This is the multi-page printable view of this section. Click here to print.
Contribution Guidelines
1 - 如何参与 HugeGraph 社区
TODO: translate this article to Chinese
Thanks for taking the time to contribute! As an open source project, HugeGraph is looking forward to be contributed from everyone, and we are also grateful to all the contributors.
The following is a contribution guide for HugeGraph:
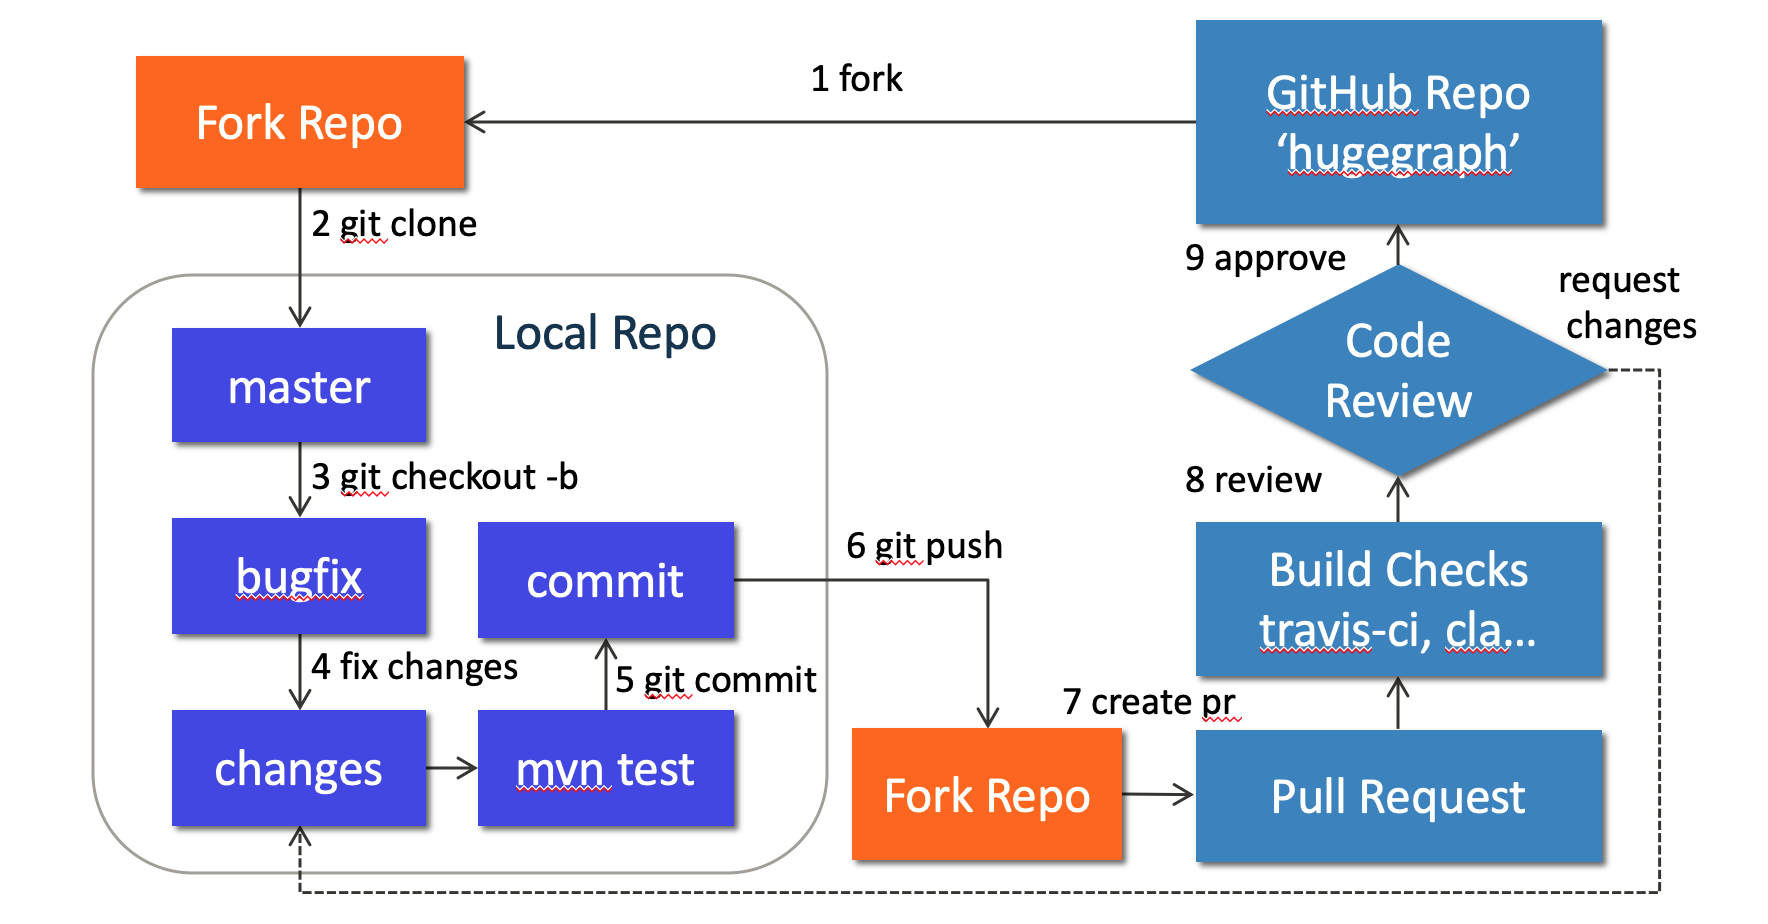
1. Preparation
建议: 使用 GitHub desktop 可以大幅简化和改善你提交 PR/Commit 的过程, 特别适合新人
We can contribute by reporting issues, submitting code patches or any other feedback.
Before submitting the code, we need to do some preparation:
Sign up or login to GitHub: https://github.com
Fork HugeGraph repo from GitHub: https://github.com/apache/hugegraph/fork
Clone code from fork repo to local: https://github.com/${GITHUB_USER_NAME}/hugegraph
# clone code from remote to local repo
git clone https://github.com/${GITHUB_USER_NAME}/hugegraph
Configure local HugeGraph repo
cd hugegraph

# add upstream to synchronize the latest code
git remote add hugegraph https://github.com/apache/hugegraph

# set name and email to push code to github
git config user.name "{full-name}" # like "Jermy Li"
git config user.email "{email-address-of-github}" # like "jermy@apache.org"
2. Create an Issue on GitHub
If you encounter bugs or have any questions, please go to GitHub Issues to report them and feel free to create an issue.
3. Make changes of code locally
3.1 Create a new branch
Please don’t use master branch for development. We should create a new branch instead:
# checkout master branch
git checkout master
# pull the latest code from official hugegraph
git pull hugegraph
# create new branch: bugfix-branch
git checkout -b bugfix-branch
3.2 Change the code
Assume that we need to modify some files like “HugeGraph.java” and “HugeFactory.java”:
# modify code to fix a bug
vim hugegraph-core/src/main/java/org/apache/hugegraph/HugeGraph.java
vim hugegraph-core/src/main/java/org/apache/hugegraph/HugeFactory.java
# run test locally (optional)
mvn test -Pcore-test,memory
Note: In order to be consistent with the code style easily, if you use IDEA as your IDE, you can import our code style configuration file.
3.2.1 添加第三方依赖
如果我们要在 HugeGraph 项目中添加新的第三方依赖, 我们需要做下面的几件事情:
- 找到第三方依赖的仓库,将依赖的
license文件放到 ./hugegraph-dist/release-docs/licenses/ 路径下。 - 在./hugegraph-dist/release-docs/LICENSE 中声明该依赖的
LICENSE信息。 - 找到仓库里的 NOTICE 文件,将其追加到 ./hugegraph-dist/release-docs/NOTICE 文件后面(如果没有NOTICE文件则跳过这一步)。
- 本地执行./hugegraph-dist/scripts/dependency/regenerate_known_dependencies.sh 脚本来更新依赖列表known-dependencies.txt (或者手动更新)。
例如:在项目中引入了第三方新依赖 -> ant-1.9.1.jar
- 项目源码位于:https://github.com/apache/ant/tree/rel/1.9.1
- LICENSE 文件:https://github.com/apache/ant/blob/rel/1.9.1/LICENSE
- NOTICE 文件:https://github.com/apache/ant/blob/rel/1.9.1/NOTICE
ant-1.9.1.jar 的 license 信息需要在 LICENSE 文件中指定,notice 信息需要在 NOTICE 文件中指定。 ant-1.9.1.jar 对应的详细 LICENSE 文件需要复制到我们的 licenses/ 目录下。最后更新 known-dependencies.txt 文件。
3.3 Commit changes to git repo
After the code has been completed, we submit them to the local git repo:
# add files to local git index
git add hugegraph-core/src/main/java/org/apache/hugegraph/HugeGraph.java
git add hugegraph-core/src/main/java/org/apache/hugegraph/HugeFactory.java
# commit to local git repo
git commit
Please edit the commit message after running git commit, we can explain what and how to fix a bug or implement a feature, the following is an example:
Fix bug: run deploy multiple times

fix #ISSUE_ID
Please remember to fill in the issue id, which was generated by GitHub after issue creation.
3.4 Push commit to GitHub fork repo
Push the local commit to GitHub fork repo:
# push the local commit to fork repo
git push origin bugfix-branch:bugfix-branch
Note that since GitHub requires submitting code through username + token (instead of using username + password directly), you need to create a GitHub token from https://github.com/settings/tokens:

4. Create a Pull Request
Go to the web page of GitHub fork repo, there would be a chance to create a Pull Request after pushing to a new branch, just click button “Compare & pull request” to do it. Then edit the description for proposed changes, which can just be copied from the commit message.
Note: please make sure the email address you used to submit the code is bound to the GitHub account. For how to bind the email address, please refer to https://github.com/settings/emails:

5. Code review
Maintainers will start the code review after all the automatic checks are passed:
- Check: Contributor License Agreement is signed
- Check: Travis CI builds is passed (automatically Test and Deploy)
The commit will be accepted and merged if there is no problem after review.
Please click on “Details” to find the problem if any check does not pass.
If there are checks not passed or changes requested, then continue to modify the code and push again.
6. More changes after review
If we have not passed the review, don’t be discouraged. Usually a commit needs to be reviewed several times before being accepted! Please follow the review comments and make further changes.
After the further changes, we submit them to the local repo:
# commit all updated files in a new commit,
# please feel free to enter any appropriate commit message, note that
# we will squash all commits in the pull request as one commit when
# merging into the master branch.
git commit -a
If there are conflicts that prevent the code from being merged, we need to rebase on master branch:
# synchronize the latest code
git checkout master
git pull hugegraph
# rebase on master
git checkout bugfix-branch
git rebase -i master
And push it to GitHub fork repo again:
# force push the local commit to fork repo
git push -f origin bugfix-branch:bugfix-branch
GitHub will automatically update the Pull Request after we push it, just wait for code review.
2 - 订阅社区邮箱
按照以下步骤订阅邮件列表:
- 通过您的电子邮件账户发送邮件至 dev-subscribe@hugegraph.apache.org,然后您将收到一封确认邮件。
- 回复确认邮件以确认您的订阅。然后,您将收到另一封确认邮件。
- 现在您已经成为该邮件列表的订阅者。如果您有更多问题,只需发送邮件到邮件列表,社区同学看到后会及时回复。
您可以随时订阅邮件列表。此外,您也可以直接浏览历史邮件/所有邮件(即使没有订阅列表)。
注意事项:
- 如果您没有收到确认邮件,请在24小时后再重试发送邮件。
- 在成功订阅邮件列表之前,请勿发送电子邮件到 dev(未订阅发送的邮件将被自动拦截)。
HugeGraph提供了一个供开发和用户讨论的电子邮件列表。
- hugegraph-dev: dev@hugegraph.apache.org 用于开发和用户讨论。
有关邮件订阅的更多信息,请参阅:
- https://lists.apache.org/list.html?dev@hugegraph.apache.org
- http://apache.org/foundation/mailinglists.html#subscribing
退订邮件列表
如果您不再需要了解 HugeGraph 的最新动态,可以退订邮件列表。
退订邮件列表的步骤如下:
使用您订阅时的电子邮件发送邮件到 dev-unsubscribe@hugegraph.apache.org(主题和内容任意)。
收到确认邮件并回复。完成第一步后,您将收到来自 dev-help@hugegraph.apache.org 的确认邮件(如果未收到,请确认邮件是否被自动归类为垃圾邮件、推广邮件、订阅邮件等)。然后直接回复邮件,或点击邮件中的链接快速回复(主题和内容任意)。
收到再见邮件。完成上述步骤后,您将收到一封主题为 “GOODBYE from dev@hugegraph.apache.org” 的再见邮件,表示您已成功退订 Apache HugeGraph 邮件列表,您将不再接收来自 dev@hugegraph.apache.org 的邮件。
3 - 验证 Apache 发版
Note: 这篇文档会持续更新。 你需要使用 Java11 验证测试 (如果希望测试功能/运行时),从 1.5.0 版本开始 (除 client 外) 不再支持 Java8
毕业说明:Apache HugeGraph 已于 2026 年 1 月毕业。正式发版投票现由 HugeGraph 社区内部完成(
dev@hugegraph.apache.org上的 PMC binding 投票),不再需要 Incubatorgeneral@incubator.apache.org审批。
验证阶段
当内部的临时发布和打包工作完成后,其他的社区开发者 (尤其是 PMC) 需要按 ASF 发版规范参与验证,可参考:
- ASF 发布策略
- Incubator 检查清单(历史参考) 确保某个人发布版本的"正确性 + 完整性", 这里需要每个人都尽量参与,然后后序邮件回复的时候说明自己 已检查了哪些项。(下面是核心项)
1. 准备工作
如果本地没有 svn 或 gpg 或 wget 环境,建议先安装一下 (windows 推荐使用 WSL2 环境,
或者至少是 git-bash), 同时确保安装 Java(推荐 11) 和 maven 软件。
# 1. 安装svn
# ubuntu/debian
sudo apt install subversion -y
# MacOS
brew install subversion
# 验证安装是否成功, 执行以下命令:
svn --version

# 2. 安装gpg
# ubuntu/debian
sudo apt-get install gnupg -y
# MacOS
brew install gnupg
# 验证安装是否成功, 执行以下命令:
gpg --version

# 3. 安装wget
# ubuntu/debian
sudo apt-get install wget -y
# MacOS
brew install wget

# 4. 下载 hugegraph-svn 目录 (版本号注意填写此次验证版本)
svn co https://dist.apache.org/repos/dist/dev/hugegraph/1.x.x/
# (注) 如果出现 svn 下载某个文件速度很慢的情况, 可以考虑 wget 单个文件下载, 如下 (或考虑使用 VPN / 代理)
wget https://dist.apache.org/repos/dist/dev/hugegraph/1.x.x/apache-hugegraph-toolchain-incubating-1.x.x.tar.gz
2. 检查 hash 值
首先需要检查 source + binary 包的文件完整性,通过 shasum 进行校验,确保和发布到 apache/github 上的
hash 值一致 (一般是 sha512)
执行命令:
for i in *.tar.gz; do echo $i; shasum -a 512 --check  $i.sha512; done
3. 检查 gpg 签名
这个就是为了确保发布的包是由可信赖的人上传的,假设 tom 签名后上传,其他人应该下载 A 的公钥 然后进行签名确认, 相关命令:
# 1. 下载项目可信赖公钥到本地 (首次需要) & 导入
curl  https://downloads.apache.org/hugegraph/KEYS > KEYS
gpg --import KEYS

# 导入后可以看到如下输出, 这代表导入了 x 个用户公钥
gpg: /home/ubuntu/.gnupg/trustdb.gpg: trustdb created
gpg: key BA7E78F8A81A885E: public key "imbajin (apache mail) <jin@apache.org>" imported
gpg: key 818108E7924549CC: public key "vaughn <vaughn@apache.org>" imported
gpg: key 28DCAED849C4180E: public key "coderzc (CODE SIGNING KEY) <zhaocong@apache.org>" imported
....
gpg: Total number processed: x
gpg:               imported: x

# 2. 信任发版用户 (你需要信任 n 个邮件里提到的 gpg 用户名, >1则依次执行相同操作)
gpg --edit-key $USER # 这里填写具体用户名或者公钥串, 回车进入交互模式
gpg> trust
...输出选项..
Your decision? 5 # 选择5
Do you really want to set this key to ultimate trust? (y/N) y # 选择y, 然后 q 退出信任下一个用户

# (可选) 你也可以直接使用非交互模式的如下命令:
echo -e "5\ny\n" | gpg --batch --command-fd 0 --edit-key $USER trust
# 或者是信任所有当前导入过的 gpg 公钥 (请小心检查)
for key in $(gpg --no-tty --list-keys --with-colons | awk -F: '/^pub/ {print $5}'); do
  echo -e "5\ny\n" | gpg --batch --command-fd 0 --edit-key "$key" trust
done

# 3. 检查签名(确保没有 Warning 输出, 每一个 source/binary 文件都提示 Good Signature)
#单个文件验证
gpg --verify xx.asc xxx-src.tar.gz
gpg --verify xx.asc xxx.tar.gz # 注:目前没有  bin/binary  后缀

# 一行脚本快速验证所有包 (推荐使用,请确保所有 gpg 公钥已经信任)
for i in *.tar.gz; do echo $i; gpg --verify $i.asc $i ; done
先确认了整体的"完整性 + 一致性", 然后接下来确认具体的内容 (关键)
4. 检查压缩包内容
这里检查准备工作下载的压缩包内容。分源码包 + 二进制包两个方面,源码包更为严格,挑核心的部分说 (完整的列表可参考官方 Wiki, 比较长)
A. 源码包
解压 *hugegraph*src.tar.gz后,进行如下检查:
- 包名/目录名应符合当前发版命名(历史版本可能仍包含
incubating),且不存在空的文件/文件夹 - 存在
LICENSE+NOTICE且内容正常;历史 incubating 制品需检查DISCLAIMER - 不存在 缺乏 License 的二进制文件
- 源码文件都包含标准
ASF License头 (这个用插件跑一下为主) - 检查每个父 / 子模块的
pom.xml版本号是否一致 (且符合期望) - 最后,确保源码可以正常 / 正确编译 (然后看看测试和规范)
PMC 同学请特别注意认真检查 LICENSE + NOTICE 文件,确保文件严格遵循了 ASF 的发版要求,
大部分的发版问题都与之相关
# 请优先使用/切换到 `java 11` 版本进行后序的编译和运行操作 (注:`Computer` 仅支持 `java >= 11`)
# java --version

# 尝试在 Unix 环境下编译测试是否正常
mvn clean package -DskipTests -Dcheckstyle.skip=true -P stage
B. 二进制包
解压 xxx-hugegraph.tar.gz后,进行如下检查:
- 包名/目录名应符合当前发版命名(历史版本可能仍包含
incubating) - 存在
LICENSE+NOTICE且内容正常(历史 incubating 制品需检查DISCLAIMER) - 服务启动
# hugegraph-server
bin/start-hugegraph.sh

# hugegraph-loader
bin/hugegraph-loader.sh -g hugegraph -f example/file/struct.json -s example/file/schema.groovy

# hugegraph-hubble
bin/start-hubble.sh

更多参考官网: https://hugegraph.apache.org/cn/docs/quickstart
注: 如果二进制包里面引入了第三方依赖, 则需要更新 LICENSE, 加入第三方依赖的 LICENSE; 若第三方依赖 LICENSE 是 Apache 2.0, 且对应的项目中包含了 NOTICE, 则还需要更新我们的 NOTICE 文件
5. 检查官网以及 github 等页面
- 确保官网至少满足 apache website check, 以及没有死链等
- 更新下载链接存在,以及版本更新说明页面更新
- …
邮件模板
检查完成后,你应该按不同角色回复邮件:(普通开发者 & PMC 成员)
[] +1 approve

[] +0 no opinion

[] -1 disapprove with the reason
+1 (non-binding)
I checked:
1. Download link/tag in mail are valid
2. Checksum and GPG signatures are OK
3. LICENSE & NOTICE & DISCLAIMER are exist
4. Build successfully on XX OS version XXX
5. No unexpected binary files
6. Date is right in the NOTICE file
7. Compile from source is fine under JavaX
8. No empty file & directory found
9. Test running xxx service OK
10. ....
特别注意 PMC 成员必须使用 binding 标记回复邮件,这对于统计有效投票很重要;
+1 (binding)
I checked:
1. Download link/tag in mail are valid
2. Checksum and GPG signatures are OK
3. LICENSE & NOTICE & DISCLAIMER are exist
4. Build successfully on XX OS Version XX
5. No unexpected binary files
6. Date is right in the NOTICE file
7. Compile from source is fine under JavaXX
8. No empty file & directory found
9. Test running XXX service OK
10. ....
4 - 在 IDEA 中配置 Server 开发环境
注意:下述配置仅供参考,基于这个版本,在 Linux 和 macOS 平台下进行了测试。
背景
在 Quick Start 部分已经介绍了使用脚本启停 HugeGraph-Server 的流程。下面以 Linux 平台为例, 介绍使用 IntelliJ IDEA 运行与调试 HugeGraph-Server 的流程。
本地启动的核心与脚本启动是一样的:
- 初始化数据库后端,执行
InitStore类初始化图 - 启动 HugeGraph-Server,执行
HugeGraphServer类加载初始化的图信息启动
在执行下述流程之前,请确保已经克隆了 HugeGraph 的源代码,并且已经配置了 Java 11 环境 & 可以参考这个 配置文档
git clone https://github.com/apache/hugegraph.git
步骤
1. 配置文件拷贝
为了避免配置文件的更改影响 Git 的追踪,建议将所需的配置文件拷贝到一个单独的文件夹中:
cp -r hugegraph-dist/src/assembly/static/scripts hugegraph-dist/src/assembly/static/conf path-to-your-directory
将 path-to-your-directory 替换为你创建的文件夹的路径。
在引入 ToplingDB 后,开发者需执行
preload-topling.sh脚本,该脚本会将相关动态库和 Web Server 所需的静态资源自动解压至与bin同级的library目录中 (静态资源会同时拷贝到/dev/shm/rocksdb_resource中)。
2. InitStore 类初始化图
首先,需要在配置文件中配置数据库后端。以 RocksDB 为例,在 path-to-your-directory/conf/graphs/hugegraph.properties 文件中进行以下配置:
backend=rocksdb
serializer=binary
rocksdb.data_path=.
rocksdb.wal_path=.
然后,打开 IntelliJ IDEA 的 Run/Debug Configurations 面板,创建一个新的 Application 配置,按照以下步骤进行配置:
- 在
Use classpath of module中选择hugegraph-dist - 将
Main class设置为org.apache.hugegraph.cmd.InitStore - 设置运行参数为
conf/rest-server.properties,这里的路径是相对于工作路径的,需要将工作路径设置为path-to-your-directory - (可选) ToplingDB 需要通过
LD_PRELOAD机制预加载动态库,开发者需设置两个环境变量:LD_LIBRARY_PATH指向preload-topling.sh解压出的library目录,LD_PRELOAD设置为libjemalloc.so:librocksdbjni-linux64.so,以确保相关库在运行时被正确加载- LD_LIBRARY_PATH=/path/to/your/library:$LD_LIBRARY_PATH
- LD_PRELOAD=libjemalloc.so:librocksdbjni-linux64.so
若在 Java 11 环境下为 HugeGraph-Server 配置了用户认证 (authenticator),需要参考二进制包的脚本配置,添加下述 VM options:
--add-exports=java.base/jdk.internal.reflect=ALL-UNNAMED否则会报错:
java.lang.reflect.InaccessibleObjectException: Unable to make public static synchronized void jdk.internal.reflect.Reflection.registerFieldsToFilter(java.lang.Class,java.lang.String[]) accessible: module java.base does not "exports jdk.internal.reflect" to unnamed module @xxx
配置完成后运行,如果运行成功,将会输出以下类似运行日志:
2023-06-05 00:43:37 [main] [INFO] o.a.h.u.ConfigUtil - Scanning option 'graphs' directory './conf/graphs'
2023-06-05 00:43:37 [main] [INFO] o.a.h.c.InitStore - Init graph with config file: ./conf/graphs/hugegraph.properties
......
2023-06-05 00:43:39 [main] [INFO] o.a.h.b.s.r.RocksDBStore - Write down the backend version: 1.11
2023-06-05 00:43:39 [main] [INFO] o.a.h.StandardHugeGraph - Graph 'hugegraph' has been initialized
2023-06-05 00:43:39 [main] [INFO] o.a.h.StandardHugeGraph - Close graph standardhugegraph[hugegraph]
2023-06-05 00:43:39 [db-open-1] [INFO] o.a.h.b.s.r.RocksDBStore - Opening RocksDB with data path: ./m
2023-06-05 00:43:39 [db-open-1] [INFO] o.a.h.b.s.r.RocksDBStore - Opening RocksDB with data path: ./s
2023-06-05 00:43:39 [db-open-1] [INFO] o.a.h.b.s.r.RocksDBStore - Opening RocksDB with data path: ./g
2023-06-05 00:43:39 [main] [INFO] o.a.h.HugeFactory - HugeFactory shutdown
2023-06-05 00:43:39 [hugegraph-shutdown] [INFO] o.a.h.HugeFactory - HugeGraph is shutting down
3. 运行 HugeGraphServer
类似地,打开 IntelliJ IDEA 的 Run/Debug Configurations 面板,创建一个新的 Application 配置,按照以下步骤进行配置:
- 在
Use classpath of module中选择hugegraph-dist - 将
Main class设置为org.apache.hugegraph.dist.HugeGraphServer - 设置运行参数为
conf/gremlin-server.yaml conf/rest-server.properties,同样地,这里的路径是相对于工作路径的,需要将工作路径设置为path-to-your-directory
类似的,若在 Java 11 环境下为 HugeGraph-Server 配置了用户认证 (authenticator),同样需要参考二进制包的脚本配置,添加下述 VM options:
--add-exports=java.base/jdk.internal.reflect=ALL-UNNAMED --add-modules=jdk.unsupported --add-exports=java.base/sun.nio.ch=ALL-UNNAMED否则会报错:
java.lang.reflect.InaccessibleObjectException: Unable to make public static synchronized void jdk.internal.reflect.Reflection.registerFieldsToFilter(java.lang.Class,java.lang.String[]) accessible: module java.base does not "exports jdk.internal.reflect" to unnamed module @xxx
配置完成后运行,如果看到以下类似日志,表示 HugeGraphServer 已经成功启动:
......
2023-06-05 00:51:56 [gremlin-server-boss-1] [INFO] o.a.t.g.s.GremlinServer - Gremlin Server configured with worker thread pool of 1, gremlin pool of 8 and boss thread pool of 1.
2023-06-05 00:51:56 [gremlin-server-boss-1] [INFO] o.a.t.g.s.GremlinServer - Channel started at port 8182.
4. 调试 HugeGraphServer (可选)
在完成上述配置后,可以尝试对 HugeGraphServer 进行调试。在调试模式下运行 HugeGraphServer,并在以下位置设置断点:
public String list(@Context GraphManager manager,
                   @PathParam("graph") String graph, @QueryParam("label") String label,
                   @QueryParam("properties") String properties, ......) {
    // ignore log
    Map<String, Object> props = parseProperties(properties);
然后,使用 RESTful API 请求 HugeGraphServer:
curl "http://localhost:8080/graphs/hugegraph/graph/vertices" | gunzip
此时,可以在调试器中查看详细的变量信息。
5. Log4j2 日志配置
默认情况下,运行 InitStore 和 HugeGraphServer 时,读取的 Log4j2 配置文件路径为 hugegraph-dist/src/main/resources/log4j2.xml,而不是 path-to-your-directory/conf/log4j2.xml,这个配置文件是使用脚本启动 HugeGraph-Server 时读取的。
为了避免同时维护两份配置文件,可以考虑在 IntelliJ IDEA 运行与调试 HugeGraph-Server 时,修改读取的 Log4j2 配置文件路径:
- 打开之前创建的
Application配置 - 点击
Modify options-Add VM options - 设置 VM options 为
-Dlog4j.configurationFile=conf/log4j2.xml
可能遇到的问题
1. java: package sun.misc does not exist
原因可能是在使用 Java 11 编译时触发了交叉编译,导致项目中使用的 sun.misc.Unsafe 找不到符号。有两种解决方案可供选择:
- 在 IntelliJ IDEA 的
Preferences/Settings中找到Java Compiler面板,然后关闭--release选项 (推荐) - 或者将项目的 SDK 版本设置为 8 (Deprecated soon)
2. java: *.store.raft.rpc.RaftRequests does not exist (RPC Generated Files)
原因是源代码没有包含 RPC-generated 文件。可以尝试两种方法来解决:
- [命令] 在根目录下运行
mvn clean compile -DskipTests(推荐) - [UI] 在 IDEA 中,右键点击
hugegraph模块,选择Manve -> Generate Sources and Update Folders
3. Log4j2 日志无法打印 %l 等位置信息
这是因为 Log4j2 中使用了 asynchronous loggers,可以参考官方文档进行配置
参考
5 - Apache HugeGraph Committer 指南
本文档概述了 Apache Committer 推选要求以及流程,对应的 ASF 官方文档可见:https://community.apache.org/newcommitter.html
候选人要求
- 候选人应遵守 Apache Code of Conduct
- PMC 成员将通过搜索邮件列表、issues、PRs、官网文档等方式,了解候选人如何与他人互动,以及他们所做的贡献
- 以下是在评估候选人是否适合成为 Committer 时需要考虑的一些要点:
- 与社区成员合作的能力
- 担任导师的能力
- 社区参与度
- 贡献程度
- 个人技能/能力
推选详细流程
讨论 (DISCUSS) → 投票 (VOTE) → 邀请 (INVITE) → 公告 (ANNOUNCE)
发起社区邮件讨论 (DISCUSS)
任何 HugeGraph 的 PMC 成员都可以发起投票讨论,在发现社区贡献者任何有价值的贡献并取得候选人本人同意后,可以在 private@hugegraph.apache.org 发起讨论。 讨论邮件里提议者要把候选人的贡献说清楚,并最好给出确认贡献的 URL 等信息,便于大家讨论分析。
下面是 HugeGraph 对应的邮件模板:(仅供参考)
Note: 后续将使用 xxx 指代候选人名,一般
xxx为一个容易读的名字 (例如Simon Jay)
ASF-INFRA建议避免使用不易读的ID直接作为邮件人名代指 (例如避免simon321或wh0isSim0n😄)另发送邮件最好选择 “纯文本” 模式,否则排版在 ASF Mail UI 中可能会乱
To: private@hugegraph.apache.org
Subject: [DISCUSS] XXX as a HugeGraph Committer Candidate

Hi all:

I am pleased to nominate xxx for the role of HugeGraph Committer based on his/her contributions over the past few months.

[ Candidate's Contribution Summary ]

Here are the relevant PRs (issues) he/she has participated in:

**Core Features:**
- Feature 1: [ Reference Links ]
- ...

**Fix/Chore/Release:**

**Doc:**

[ Candidate's Current Notable Contributions ]

His/Her contributions bring the following benefits to the community, helping us in the following ways:

[ Candidate's Contributions and Benefits to the Community ]

In view of the above contributions, I elect xxx as Committer of the HugeGraph project.

[ Reference Links ]
1. PR1
2. PR2
3. ...

Welcome everyone to share opinions~

Thanks!
对于讨论邮件中贡献链接,可以使用 GitHub Search 的统计功能,按需输入如下对应关键词查询即可,可以在此基础上添加新的 repo 如 repo:apache/hugegraph-computer,特别注意调整时间范围 (下面是一个模板参考,请自行调整参数):
- PR 提交次数
is:pr author:xxx repo:apache/hugegraph repo:apache/hugegraph-doc created:>2023-06-01 updated:<2023-12-25
- 代码提交/修改行数
- PR 提交关联 Issue 次数
linked:issue involves:xxx repo:apache/hugegraph repo:apache/hugegraph-doc created:>2023-06-01 updated:<2023-12-25
- PR Review 个数
type:pr reviewed-by:xxx repo:apache/hugegraph repo:apache/hugegraph-doc created:>2023-06-01 updated:<2023-12-25
- PR Review 行数
- 合并次数
type:pr author:xxx repo:apache/hugegraph repo:apache/hugegraph-doc created:>2023-06-01 updated:<2023-12-25
- 有效合并行数
- Issue 提交数
type:issue author:xxx repo:apache/hugegraph repo:apache/hugegraph-doc created:>2023-06-01 updated:<2023-12-25
- Issue 修复数
- 在 Issue 提交数的基础上选取状态为 closed 的 Issues
- Issue 参与数
type:issue involves:xxx repo:apache/hugegraph repo:apache/hugegraph-doc created:>2023-06-01 updated:<2023-12-25
- 评论 Issue 数
type:issue commenter:xxx repo:apache/hugegraph repo:apache/hugegraph-doc created:>2023-06-01 updated:<2023-12-25
- 评论 PR 数
type:pr commenter:xxx repo:apache/hugegraph repo:apache/hugegraph-doc created:>2023-06-01 updated:<2023-12-25
Mailing Lists 的参与则可使用 https://lists.apache.org/list?dev@hugegraph.apache.org:lte=10M:xxx 查询。
发起社区邮件投票 (VOTE)
如果讨论邮件在规定时间内没有收到分歧信息,投票发起者需要在 private@hugegraph.apache.org 发起对 Committer 的选举投票。
下面是对应的邮件模板:
To: private@hugegraph.apache.org
Subject: [VOTE] xxx as a HugeGraph Committer

Hi all:

Through the discussion of last week:
[ Discussion Mailing List Link ]

We have discussed and listed what xxx participated in the HugeGraph community.
I believe making him/her a Committer will enhance the work for HugeGraph.

So, I am happy to call VOTE to accept xxx as a HugeGraph Committer.

Voting will continue for at least 72 hours or until the required number of votes is reached.

Please vote accordingly:
[ ] +1 approve
[ ] +0 no opinion
[ ] -1 disapprove with the reason

Thanks!
然后 PMC 成员回复 +1 或 -1 的邮件回复表达意见,一般来说至少需要 ≥3 票 +1 才能结束投票。
宣布投票结果 (RESULT)
投票邮件结束后,投票发起者需要邮件里提醒投票结束。同时,投票发起者需要发起邮件宣布投票结果,发送至 private@hugegraph.apache.org,邮件模板可参考:
To: private@hugegraph.apache.org
Subject: [RESULTS][VOTE] xxx as a HugeGraph Committer

Hi all: The vote for "xxx" as a HugeGraph Committer has PASSED and closed now.

The result is as follows: X PMC +1 Votes:
- A (PMC ID)
- B
- C...

Vote thread:
put vote thread link here

Then I'm going to invite xxx to join us soon. Thanks for everyone's support!
向候选人发起邮件邀请 (INVITE)
宣布投票结果邮件发出后,投票发起人要给候选人发送邀请邮件。邀请邮件主送候选人,抄送 private@hugegraph.apache.org,被邀请的候选人必须通过指定的邮箱地址回复接受或者拒绝该邀请。
下面是对应可参考的邮件模板:
To: [ Candidate's Email ]
Cc: private@hugegraph.apache.org
Subject: Invitation to become HugeGraph committer: xxx

Hello xxx,

The HugeGraph Project Management Committee (PMC)
hereby offers you committer privileges to the project.
These privileges are offered on the understanding that you'll use them
reasonably and with common sense. We like to work on trust
rather than unnecessary constraints.

Being a committer enables you to more easily make
changes without needing to go through the patch
submission process.

Being a committer does not require you to
participate any more than you already do. It does
tend to make one even more committed.  You will
probably find that you spend more time here.

Of course, you can decline and instead remain as a
contributor, participating as you do now.

A. This personal invitation is a chance for you to
accept or decline in private.  Either way, please
let us know in reply to the private@hugegraph.apache.org
address only.

B. If you accept, the next step is to register an iCLA:
    1. Details of the iCLA and the forms are found
    through this link: https://www.apache.org/licenses/#clas

    2. Instructions for its completion and return to
    the Secretary of the ASF are found at
    https://www.apache.org/licenses/#submitting

    3. When you transmit the completed iCLA, request
    to notify the Apache HugeGraph project and choose a
    unique Apache ID. Look to see if your preferred
    ID is already taken at
    https://people.apache.org/committer-index.html
    This will allow the Secretary to notify the PMC
    when your iCLA has been recorded.

When recording of your iCLA is noted, you will
receive a follow-up message with the next steps for
establishing you as a committer.

With the expectation of your acceptance, welcome!

The Apache HugeGraph PMC
候选人接受邀请 (ACCEPT)
候选人应回复上述邮件 (选择 reply all),表明接受邀请,邮件模板可参考:
To: [ Sender's Email ]
Cc: private@hugegraph.apache.org
Subject: Re: Invitation to become HugeGraph committer: xxx

Hello Apache HugeGraph PMC,

I accept the invitation.

Thanks to the Apache HugeGraph Community for recognizing my work, I
will continue to actively participate in the work of the Apache
HugeGraph.

Next, I will follow the instructions to complete the next steps:
Signing and submitting iCLA and registering Apache ID.

xxx
当然,候选人也可以选择拒绝邀请,这里就没有模板了:)
一旦邀请被接受,候选人需要完成以下事项:
- 订阅 dev@hugegraph.apache.org,具体步骤/过滤等配置请参考文档
- 签署 ICLA,具体步骤见下↓
ICLA 签署流程
- 下载 ICLA
- 打开 PDF 并填写相关内容,均需要全英文填写,建议使用 PDF 工具编辑并署名
- Full name: 名字在前,姓氏在后
- Public name: 可以不填,默认和
Full name相同 - 勾选 check this box only if you enter names with your family name first
- Postal Address: 英文地址,从小地方到大地方的顺序来写,需详细到门牌号
- Country: 所在国家英文
- E-mail: 邮箱地址,建议与上述邮件中使用的邮箱相同
- (optional) preferred Apache id(s): 选择一个 Apache committer 页面不存在的 SVN ID
- (optional) notify project:Apache HugeGraph
- 签名:务必使用 PDF 工具手写
- Date: 格式 xxxx-xx-xx
- 签署完之后将
icla.pdf重命名为姓名拼音-icla.pdf - 发送下述邮件,并附件引用
姓名拼音-icla.pdf
To: secretary@apache.org
Subject: ICLA Information

Hello everyone:

I have accepted the Apache HugeGraph PMC invitation to
become a HugeGraph committer, the attachment is my ICLA information.

(Optional) My GitHub account is https://github.com/xxx. Thanks!

xxx
PMC 成员将等待 Apache secretary 团队确认 ICLA 备案,候选人和 PMC 成员将收到以下电子邮件:
Dear xxx,

This message acknowledges receipt of your ICLA, which has been filed in the Apache Software Foundation records.

Your account (with id xxx) has been requested for you and you should receive email with next steps
within the next few days (this process can take up to a week).

Please refer to https://www.apache.org/foundation/how-it-works.html#developers
for more information about roles at Apache.
设置 Apache 账号和开发环境 (CONFIG)
备案完成后,候选人将收到来自 root@apache.org 主题为 Welcome to the Apache Software Foundation 的邮件,此时需按照邮件中的步骤设置 Apache 账号和开发环境:
- 重置密码 https://id.apache.org/reset/enter
- 配置个人信息 https://whimsy.apache.org/roster/committer/xxx
- 关联 GitHub 账号 https://gitbox.apache.org/boxer
- 这一步需要配置 GitHub 双重身份验证 (2FA)
- 负责提名的 PMC 成员需通过 Roster 页面,将新的 Committer 添加到官方提交者列表中 (重要, 否则仓库权限不生效)
- 在这一步后,候选人即新的 Committer 才拥有对 GitHub HugeGraph 仓库的写权限
- (可选) 新的 Committer 可以使用 Apache 账号申请免费使用 Jetbrains 的全系列产品
发布公告邮件 (ANNOUNCE)
当候选人完成上述步骤后,候选人将正式成为 HugeGraph 的 Committer,此时需要向 dev@hugegraph.apache.org 发送公告邮件,邮件模板可参考:
To: dev@hugegraph.apache.org
Subject: [ANNOUNCE] New Committer: xxx

Hi everyone, The PMC for Apache HugeGraph has invited xxx to
become a Committer and we are pleased to announce that he/she has accepted.

xxx is being active in the HugeGraph community & dedicated to ... modules,
and we are glad to see his/her more interactions with the community in the future.

(Optional) His/Her GitHub account is https://github.com/xxx

Welcome xxx, and please enjoy your community journey~

Thanks!

The Apache HugeGraph PMC
更新治理信息入口
Apache HugeGraph 已于 2026 年 1 月毕业,治理信息不再通过 Incubator clutch 页面维护,而是通过 ASF committee/project 数据维护。
请优先检查:
若信息未自动同步,请按照 ASF 官方流程联系 Apache Community Development 或 ASF Infra 协助处理。
参考
- https://community.apache.org/newcommitter.html (ASF 官方文档)
- https://infra.apache.org/new-committers-guide.html
- https://www.apache.org/dev/pmc.html#newcommitter
- https://linkis.apache.org/zh-CN/community/how-to-vote-a-committer-pmc
- https://www.apache.org/licenses/contributor-agreements.html#submitting
- https://www.apache.org/licenses/cla-faq.html#printer
- https://linkis.apache.org/zh-CN/community/how-to-sign-apache-icla
- https://github.com/apache/hugegraph/issues/1732 (HugeGraph ICLA related issue)