Documentation
Apache HugeGraph 文档
Apache HugeGraph 是一套完整的图数据库生态系统,支持 OLTP 实时查询、OLAP 离线分析和 AI 智能应用。
按场景快速导航
生态系统一览
┌─────────────────────────────────────────────────────────────────┐
│                    Apache HugeGraph 生态                         │
├─────────────────────────────────────────────────────────────────┤
│  ┌─────────────┐  ┌─────────────┐  ┌─────────────────────────┐  │
│  │ HugeGraph   │  │ HugeGraph   │  │ HugeGraph-AI            │  │
│  │ Server      │  │ Computer    │  │ (GraphRAG/ML/Python)    │  │
│  │ (OLTP)      │  │ (OLAP)      │  │                         │  │
│  └─────────────┘  └─────────────┘  └─────────────────────────┘  │
│         │               │                    │                   │
│  ┌──────┴───────────────┴────────────────────┴──────────────┐   │
│  │              HugeGraph Toolchain                          │   │
│  │  Hubble (UI) | Loader | Client (Java/Go/Python) | Tools   │   │
│  └───────────────────────────────────────────────────────────┘   │
└─────────────────────────────────────────────────────────────────┘
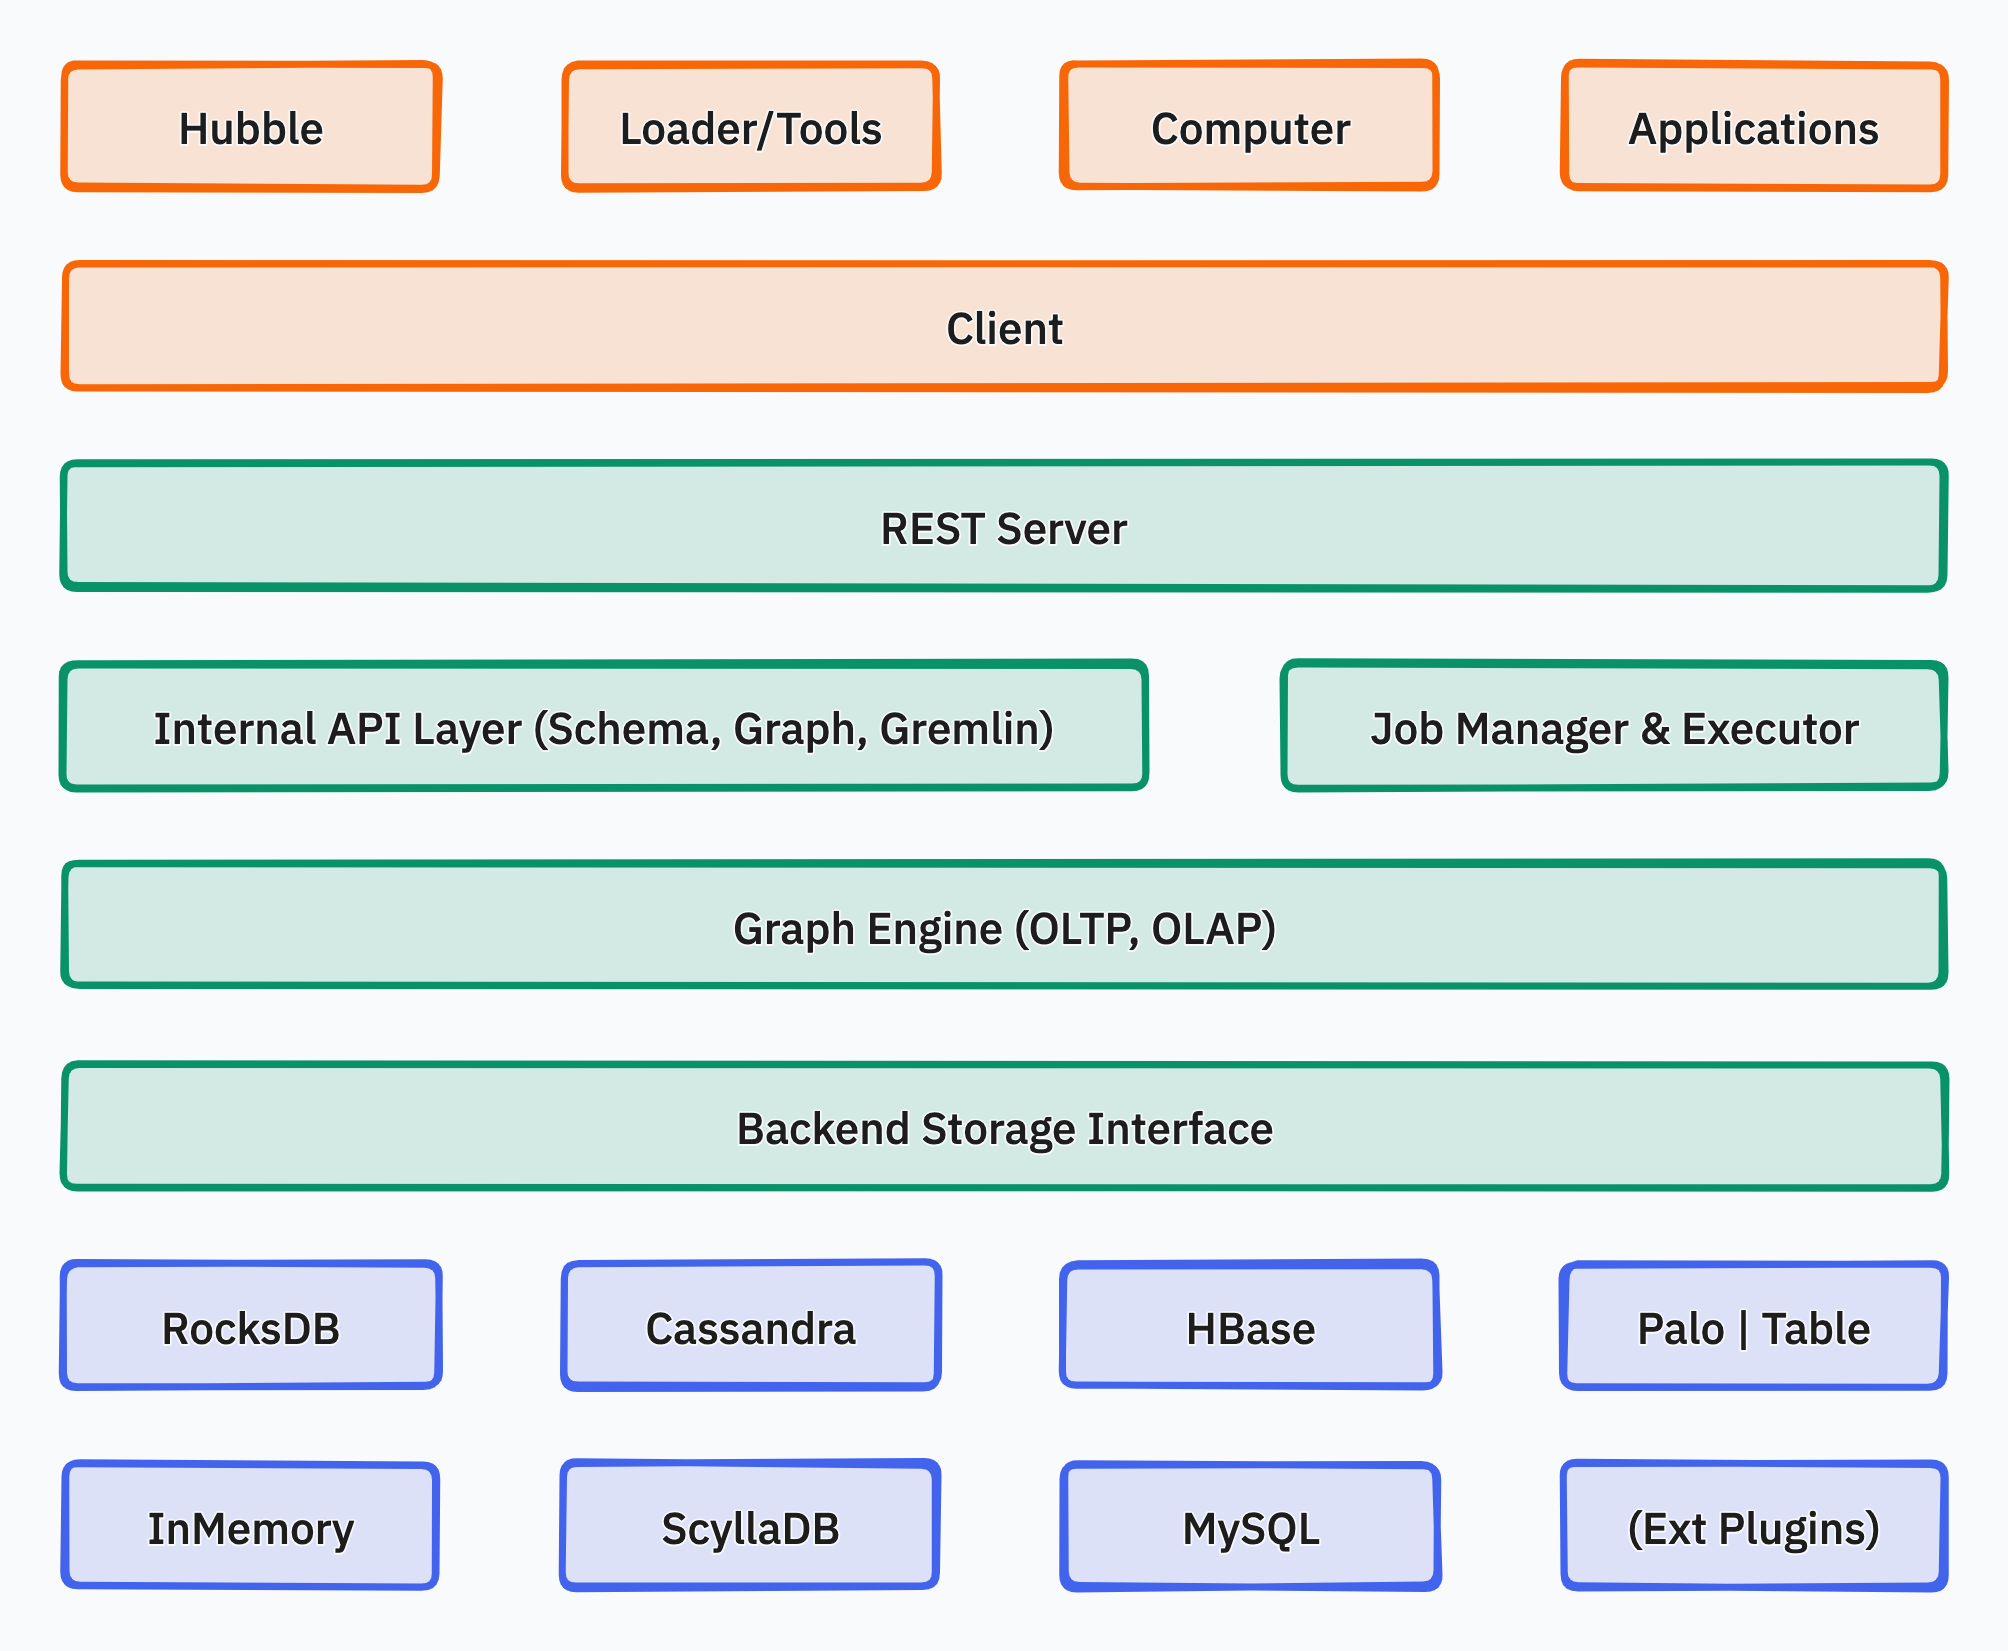
核心组件
- HugeGraph Server - 图数据库核心,REST API + Gremlin + Cypher 支持
- HugeGraph Toolchain - 客户端 SDK、数据导入、可视化、运维工具
- HugeGraph Computer - 分布式图计算 (Vermeer 高性能内存版 / Computer 海量存储外存版)
- HugeGraph-AI - GraphRAG、知识图谱构建、20+ 图机器学习算法
部署模式
| 模式 | 适用场景 | 数据规模 |
|---|
| 单机版 | 极速稳定、存算一体 | < 4TB |
| 分布式 | 海量存储、存算分离 | < 1000TB |
| Docker | 快速体验 | 任意 |
📖 详细介绍
1 - Introduction with HugeGraph
什么是 Apache HugeGraph?
Apache HugeGraph 是一套易用、高效、通用的开源全栈图系统(GitHub),
覆盖图数据库(OLTP 实时查询)、图计算(OLAP 大规模分析)与图 AI(GraphRAG / 图机器学习)三大领域。
HugeGraph 支持百亿以上的顶点和边的快速存储与查询,具备出色的 OLTP 性能。
其图引擎完全兼容 Apache TinkerPop 3 框架,同时支持
Gremlin 和 Cypher(OpenCypher 标准)双查询语言。
典型应用场景: 深度关系探索、关联分析、路径搜索、特征抽取、社区检测、知识图谱等,
适用领域: 网络安全、电信反欺诈、金融风控、广告推荐、社交网络、智能问答等。
生态系统全景
┌──────────────────────────────────────────────────────────────┐
│         Apache HugeGraph - Full-Stack Graph System           │
├──────────────────┬────────────────────┬──────────────────────┤
│  Graph DB (OLTP) │    Graph Compute   │       Graph AI       │
│  HugeGraph       │  Vermeer (Memory)  │    HugeGraph-AI      │
│  Server          │  Computer (Dist.)  │  GraphRAG/GNN/Py     │
├──────────────────┴────────────────────┴──────────────────────┤
│                    HugeGraph Toolchain                       │
│  Hubble | Loader | Client(Java/Go/Py) | Spark | Tools        │
└──────────────────────────────────────────────────────────────┘
核心组件
🗄️ HugeGraph Server — 图引擎(OLTP)
HugeGraph 项目的核心模块,提供高性能的图数据存储与实时查询能力:
- 图引擎核心:支持属性图(Property Graph)建模,包含 VertexLabel、EdgeLabel、PropertyKey、IndexLabel 完整 Schema 管理
- 双查询语言:全面兼容 Gremlin(TinkerPop 3)和 Cypher(OpenCypher)
- REST API:内置 REST Server,提供 RESTful 图操作接口
- 多类型索引:精确查询、范围查询、复合条件组合查询
- 插件式存储后端:1.7.0+ 默认支持
RocksDB(单机默认)、HStore(分布式)、HBase、Memory,1.5.x 及以前还支持 MySQL / PostgreSQL / Cassandra 等
子模块:
Core — 图引擎实现,向下连接 Backend,向上支持 APIBackend — 多后端存储适配层API — RESTful 接入层,兼容 Gremlin/Cypher 查询
📖 Server 快速开始
📊 图计算引擎(OLAP)
提供两种互补的图分析引擎:
- Vermeer(推荐):高性能纯内存图计算引擎,部署简单、响应快,适合中小规模图分析和快速上手
- HugeGraph-Computer:基于 Pregel 的分布式 OLAP 引擎,可运行在 Kubernetes / Yarn 上,适合超大规模图算法任务
📖 图计算快速开始
🤖 HugeGraph-AI — 图 AI 生态
HugeGraph 独立的 AI 组件,连接图与大语言模型(LLM):
- GraphRAG:基于图的检索增强生成,实现 LLM 智能问答
- 知识图谱构建:自动从非结构化文本中提取实体和关系,构建知识图谱
- 图神经网络:支持 GNN 模型的训练与推理
- 20+ 图机器学习算法:内置丰富的图分析算法,持续更新
- Python Client:为 AI 应用提供便捷的 Python SDK
📖 HugeGraph-AI 快速开始
围绕图系统的完整工具生态(toolchain 仓库):
| 工具 | 说明 |
|---|
| Hubble | Web 可视化平台:数据建模 → 批量导入 → 在线/离线分析 一站式操作 |
| Loader | 数据导入工具:支持本地文件、HDFS、MySQL 等多数据源,TXT/CSV/JSON 等格式 |
| Client | 多语言 SDK:Java / Python / Go |
| Spark-connector | Spark 集成:支持通过 Spark 批量读写图数据,适合大数据离线处理场景 |
| Tools | 命令行运维工具:图管理、备份恢复、Gremlin 执行等 |
部署模式
HugeGraph 支持两种主要部署模式:
| 模式 | 核心组件 | 适用场景 | 数据规模 | 高可用 |
|---|
| 单机 (Standalone) | Server + RocksDB | 开发、测试、单节点生产 | < 4TB | 基础 |
| 分布式 (Distributed) | Server + PD(3-5节点)+ Store(3+节点) | 生产环境、水平扩展 | < 1000TB | ✅ |
Docker 快速体验:
docker run -itd --name=hugegraph -p 8080:8080 hugegraph/hugegraph
快速入门导航
系统特性
- 易用:Gremlin/Cypher 双查询语言 + RESTful API,功能齐全的工具链,轻松上手
- 高效:图存储与查询深度优化,毫秒级响应,支持数千并发在线操作,百亿级数据快速导入
- 通用:支持 OLTP + OLAP 双模式,无缝对接 Apache Hadoop、Spark、Flink 大数据生态
- 可扩展:分布式存储、数据多副本、横向扩容,插件式后端可灵活扩展
- 开放:Apache 2.0 License,完全开源,欢迎社区贡献
联系我们

2 - 下载 Apache HugeGraph
指南:
- 推荐使用最新版本的 HugeGraph 软件包, 运行时环境请选择 Java11
- 验证下载版本, 请使用相应的哈希 (SHA512)、签名和 项目签名验证 KEYS
- 检查哈希 (SHA512)、签名的说明在 版本验证 页面, 也可参考 ASF 验证说明
- 注: HugeGraph 所有组件版本号已保持一致,
client/loader/hubble/common 等 maven 仓库版本号同理, 依赖引用可参考 maven 示例 - 兼容说明: HugeGraph 于 2026 年 1 月毕业后,下载路径已从
/incubator/hugegraph 迁移到 /hugegraph。历史版本的发布文件名可能仍包含 -incubating-。
最新版本 1.7.0
二进制包
源码包
Please refer to build from source.
归档版本
注:
- 请大家尽早迁移到最新 Release 版本上, 社区将不再维护
1.0.0 前的旧版本 (非 ASF 版本) 1.3.0 是最后一个兼容 Java8 的主版本, 请尽早使用/迁移运行时为 Java11 (低版本 Java 有潜在更多的 SEC 风险和性能影响)- 从版本
1.5.0 开始,需要 Java11 运行时环境
1.5.0
二进制包
源码包
Please refer to build from source.
1.3.0
二进制包
源码包
Please refer to build from source.
1.2.0
二进制包
源码包
1.0.0
二进制包
源码包
3 - Quick Start
3.1 - HugeGraph (OLTP)
DeepWiki 提供实时更新的项目文档,内容更全面准确,适合快速了解项目最新情况。
📖 https://deepwiki.com/apache/hugegraph
GitHub 访问: https://github.com/apache/hugegraph
3.1.1 - HugeGraph-Server Quick Start
1 HugeGraph-Server 概述
HugeGraph-Server 是 HugeGraph 项目的核心部分,包含 graph-core、backend、API 等子模块。
Core 模块是 Tinkerpop 接口的实现,Backend 模块用于管理数据存储,1.7.0+ 版本支持的后端包括:RocksDB(单机默认)、HStore(分布式)、HBase 和 Memory。API 模块提供 HTTP Server,将 Client 的 HTTP 请求转化为对 Core 的调用。
⚠️ 重要变更: 从 1.7.0 版本开始,MySQL、PostgreSQL、Cassandra、ScyllaDB 等遗留后端已被移除。如需使用这些后端,请使用 1.5.x 或更早版本。
文档中会出现 HugeGraph-Server 与 HugeGraphServer 两种写法,其他组件也类似。
两者在含义上并无明显差异,可简单区分为:HugeGraph-Server 表示服务端相关组件代码,HugeGraphServer 表示服务进程。
2 依赖
2.1 安装 Java 11 (JDK 11)
建议在 Java 11 环境中运行 HugeGraph-Server(1.5.0 之前的版本仍保留对 Java 8 的基本兼容)。
在继续阅读前,请先执行 java -version 命令确认 JDK 版本。
注:使用 Java 8 启动 HugeGraph-Server 会失去部分安全性保障,也会影响性能表现。请尽早升级或迁移,1.7.0 起已不再支持 Java 8。
3 部署
有四种方式可以部署 HugeGraph-Server 组件:
- 方式 1:使用 Docker 容器 (便于测试)
- 方式 2:下载 tar 包
- 方式 3:源码编译
- 方式 4:使用 tools 工具部署 (Outdated)
⚠️ SEC 提醒:由于图查询语言 (如 Gremlin/Cypher) 的高度灵活性,直接暴露原生查询接口会带来潜在的安全隐患,因此请避免直接在公网环境中暴露任何查询相关接口。生产环境中务必开启 鉴权体系 (Auth) 配合 IP 白名单 构成双重保障机制,同时建议辅以 Audit Log (审计日志) 追踪具体查询语句。推荐整体采用 容器化环境 (Docker/K8s) 进行部署以获得更好的系统级安全隔离。
3.1 使用 Docker 容器 (便于测试)
可参考 Docker 部署方式。
可以使用 docker run -itd --name=server -p 8080:8080 -e PASSWORD=xxx hugegraph/hugegraph:1.7.0 快速启动一个内置 RocksDB 后端的 HugeGraph-Server 实例。
可选项:
- 可以使用
docker exec -it server bash 进入容器执行运维或调试操作。 - 可以使用
docker run -itd --name=server -p 8080:8080 -e PRELOAD="true" hugegraph/hugegraph:1.7.0 在启动时预加载一个内置样例图。可通过 RESTful API 进行验证,具体步骤可参考 5.1.8。 - 可以使用
-e PASSWORD=xxx 开启鉴权模式并设置 admin 密码,具体步骤可参考 Config Authentication。
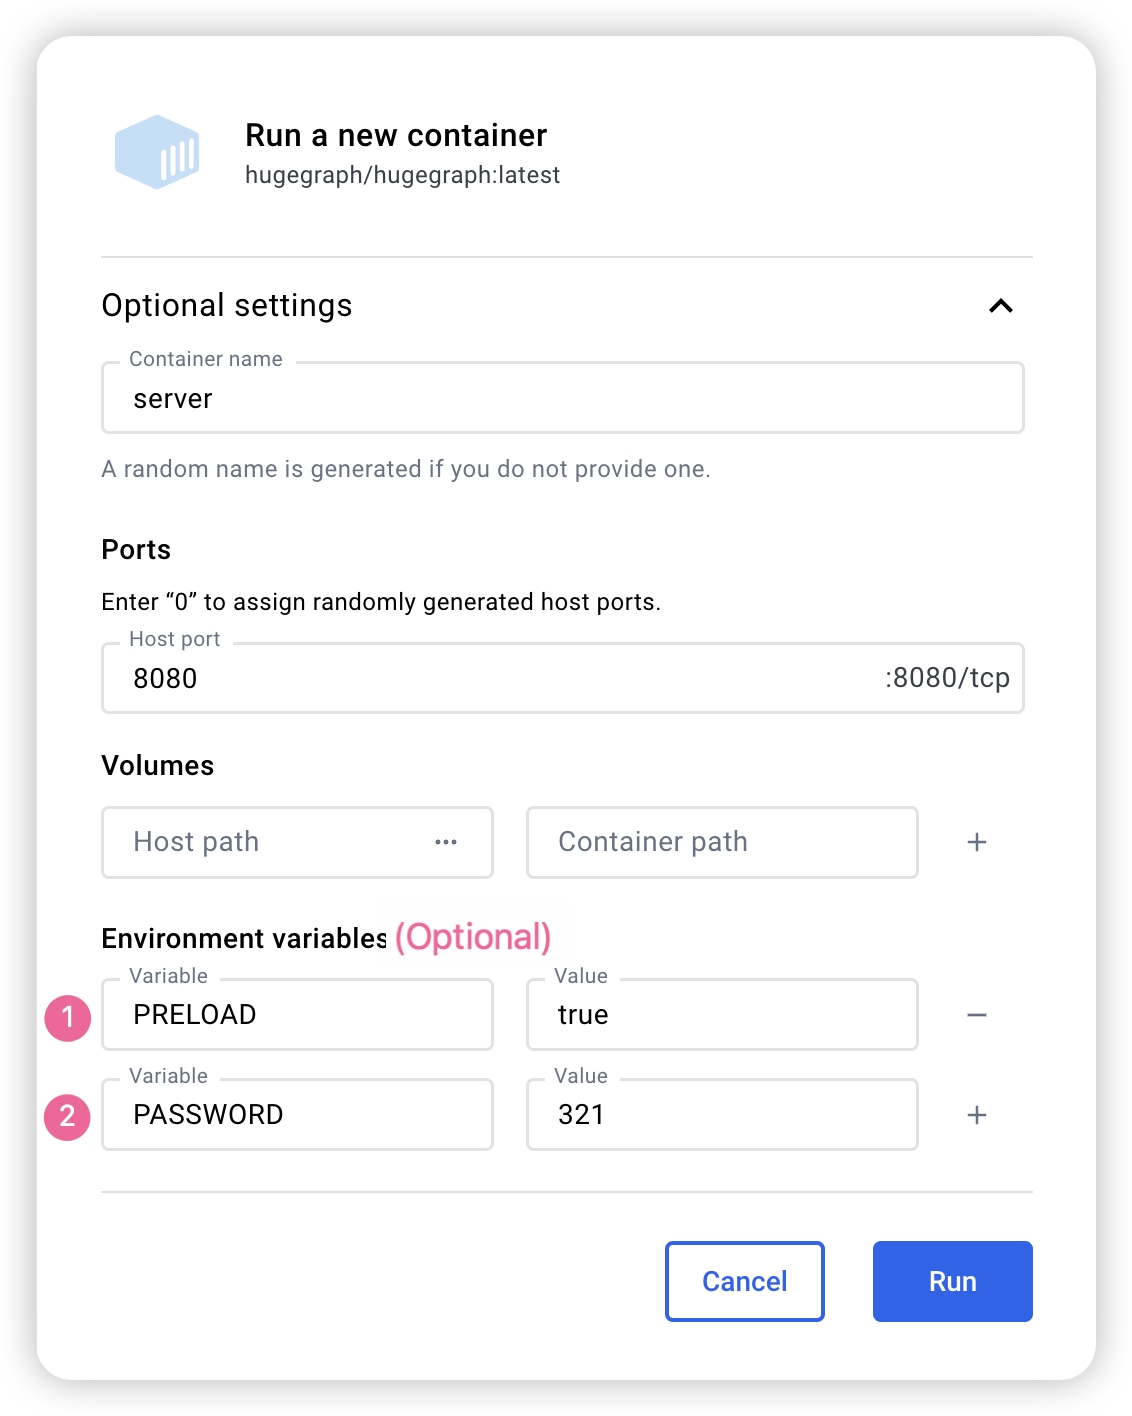
如果使用 Docker Desktop,则可以按如下方式设置相关选项:
注意:Docker Compose 文件使用桥接网络(hg-net),适用于 Linux 和 Mac(Docker Desktop)。如需运行 3 节点分布式集群,请为 Docker Desktop 分配至少 12 GB 内存(设置 → 资源 → 内存)。Linux 上 Docker 直接使用宿主机内存。
如果希望通过一个配置文件统一管理 HugeGraph 的多个服务实例,则可以使用 docker compose。
docker/ 目录下提供了两个 compose 文件:
- 单节点快速启动(预构建镜像):
docker/docker-compose.yml - 单节点开发构建(从源码构建):
docker/docker-compose.dev.yml
cd hugegraph/docker
# 注意版本号请随时保持更新 → 1.x.0
HUGEGRAPH_VERSION=1.7.0 docker compose up -d
如需开启鉴权,可在 compose 文件的环境变量中添加 PASSWORD=xxx,或在 docker run 命令中传入 -e PASSWORD=xxx。
完整的部署指南请参阅 docker/README.md。
注意:
HugeGraph 的 Docker 镜像主要用于便捷地快速启动 HugeGraph,并不是 ASF 官方发布物料包。你可以从 ASF Release Distribution Policy 中了解更多细节。
推荐使用 release tag (如 1.7.0/1.x.0) 以获取稳定版。使用 latest tag 可以使用开发中的最新功能。
3.2 下载 tar 包
# use the latest version, here is 1.7.0 for example
wget https://downloads.apache.org/hugegraph/{version}/apache-hugegraph-incubating-{version}.tar.gz
tar zxf *hugegraph*.tar.gz
3.3 源码编译
源码编译前请确保本机有安装 wget/curl 命令
下载 HugeGraph 源代码
git clone https://github.com/apache/hugegraph.git
编译打包生成 tar 包
cd hugegraph
# (Optional) use "-P stage" param if you build failed with the latest code(during pre-release period)
mvn package -DskipTests
执行日志如下:
......
[INFO] Reactor Summary for hugegraph 1.5.0:
[INFO]
[INFO] hugegraph .......................................... SUCCESS [  2.405 s]
[INFO] hugegraph-core ..................................... SUCCESS [ 13.405 s]
[INFO] hugegraph-api ...................................... SUCCESS [ 25.943 s]
[INFO] hugegraph-cassandra ................................ SUCCESS [ 54.270 s]
[INFO] hugegraph-scylladb ................................. SUCCESS [  1.032 s]
[INFO] hugegraph-rocksdb .................................. SUCCESS [ 34.752 s]
[INFO] hugegraph-mysql .................................... SUCCESS [  1.778 s]
[INFO] hugegraph-palo ..................................... SUCCESS [  1.070 s]
[INFO] hugegraph-hbase .................................... SUCCESS [ 32.124 s]
[INFO] hugegraph-postgresql ............................... SUCCESS [  1.823 s]
[INFO] hugegraph-dist ..................................... SUCCESS [ 17.426 s]
[INFO] hugegraph-example .................................. SUCCESS [  1.941 s]
[INFO] hugegraph-test ..................................... SUCCESS [01:01 min]
[INFO] ------------------------------------------------------------------------
[INFO] BUILD SUCCESS
[INFO] ------------------------------------------------------------------------
......
执行成功后,在 hugegraph 目录下生成 *hugegraph-*.tar.gz 文件,就是编译生成的 tar 包。
过时的 tools 工具安装
HugeGraph-Tools 提供了一键部署的命令行工具,用户可以使用该工具快速地一键下载、解压、配置并启动 HugeGraph-Server 和 HugeGraph-Hubble,最新的 HugeGraph-Toolchain 中已经包含所有的这些工具,直接下载它解压就有工具包集合了
# download toolchain package, it includes loader + tool + hubble, please check the latest version (here is 1.7.0)
wget https://downloads.apache.org/hugegraph/1.7.0/apache-hugegraph-toolchain-incubating-1.7.0.tar.gz
tar zxf *hugegraph-*.tar.gz
# enter the tool's package
cd *hugegraph*/*tool*
注:${version} 为版本号,最新版本号可参考 Download 页面,或直接从 Download 页面点击链接下载
HugeGraph-Tools 的总入口脚本是 bin/hugegraph,用户可以使用 help 子命令查看其用法,这里只介绍一键部署的命令。
bin/hugegraph deploy -v {hugegraph-version} -p {install-path} [-u {download-path-prefix}]
{hugegraph-version} 表示要部署的 HugeGraphServer 及 HugeGraphStudio 的版本,用户可查看 conf/version-mapping.yaml 文件获取版本信息,{install-path} 指定 HugeGraphServer 及 HugeGraphStudio 的安装目录,{download-path-prefix} 可选,指定 HugeGraphServer 及 HugeGraphStudio tar 包的下载地址,不提供时使用默认下载地址,比如要启动 0.6 版本的 HugeGraph-Server 及 HugeGraphStudio 将上述命令写为 bin/hugegraph deploy -v 0.6 -p services 即可。
4 配置
如果需要快速启动 HugeGraph 仅用于测试,那么只需要进行少数几个配置项的修改即可(见下一节)。
详细的配置介绍请参考配置文档及配置项介绍。
5 启动
5.1 使用启动脚本启动
启动流程分为“首次启动”和“非首次启动”。首次启动前需要先初始化后端数据库,然后再启动服务。
如果服务曾被手动停止,或因其他原因需要再次启动,由于后端数据库已持久化存在,通常可以直接启动服务。
HugeGraphServer 启动时会连接后端存储并检查其版本信息。如果后端尚未初始化,或者已初始化但版本不匹配(例如存在旧版本数据),HugeGraphServer 会启动失败并给出错误信息。
如果需要外部访问 HugeGraphServer,请修改 rest-server.properties 的 restserver.url 配置项(默认为 http://127.0.0.1:8080),修改成机器名或 IP 地址。
由于各种后端所需的配置(hugegraph.properties)及启动步骤略有不同,下面逐一对各后端的配置及启动做介绍。
注: 如果想要开启 HugeGraph 权限系统,在启动 Server 之前应按照 Server 鉴权配置 进行配置。(尤其是生产环境/外网环境须开启)
5.1.1 分布式存储 (HStore)
点击展开/折叠 分布式存储 配置及启动方法
分布式存储是 HugeGraph 1.5.0 之后推出的新特性,它基于 HugeGraph-PD 和 HugeGraph-Store 组件实现了分布式的数据存储和计算。
要使用分布式存储引擎,需要先部署 HugeGraph-PD 和 HugeGraph-Store,详见 HugeGraph-PD 快速入门 和 HugeGraph-Store 快速入门。
确保 PD 和 Store 服务均已启动后
- 修改 HugeGraph-Server 的
hugegraph.properties 配置:
backend=hstore
serializer=binary
task.scheduler_type=distributed

# PD 服务地址,多个 PD 地址用逗号分割,配置 PD 的 RPC 端口
pd.peers=127.0.0.1:8686,127.0.0.1:8687,127.0.0.1:8688
# 简单示例(带鉴权)
gremlin.graph=org.apache.hugegraph.auth.HugeFactoryAuthProxy

# 指定存储 hstore(必须)
backend=hstore
serializer=binary
store=hugegraph

# 指定任务调度器(1.7.0及之前,hstore 存储必须)
task.scheduler_type=distributed

# pd config
pd.peers=127.0.0.1:8686
- 修改 HugeGraph-Server 的
rest-server.properties 配置:
usePD=true
# 注意,1.7.0 必须在 rest-server.properties 配置 pd.peers
pd.peers=127.0.0.1:8686,127.0.0.1:8687,127.0.0.1:8688

# 若需要 auth
# auth.authenticator=org.apache.hugegraph.auth.StandardAuthenticator
如果配置多个 HugeGraph-Server 节点,需要为每个节点修改 rest-server.properties 配置文件,例如:
节点 1(主节点):
usePD=true
restserver.url=http://127.0.0.1:8081
gremlinserver.url=http://127.0.0.1:8181
pd.peers=127.0.0.1:8686

rpc.server_host=127.0.0.1
rpc.server_port=8091

server.id=server-1
server.role=master
节点 2(工作节点):
usePD=true
restserver.url=http://127.0.0.1:8082
gremlinserver.url=http://127.0.0.1:8182
pd.peers=127.0.0.1:8686

rpc.server_host=127.0.0.1
rpc.server_port=8092

server.id=server-2
server.role=worker
同时,还需要修改每个节点的 gremlin-server.yaml 中的端口配置:
节点 1:
host: 127.0.0.1
port: 8181
节点 2:
host: 127.0.0.1
port: 8182
初始化数据库:
cd *hugegraph-${version}
bin/init-store.sh
启动 Server:
使用分布式存储引擎的启动顺序为:
- 启动 HugeGraph-PD
- 启动 HugeGraph-Store
- 初始化数据库(仅首次)
- 启动 HugeGraph-Server
验证服务是否正常启动:
curl http://localhost:8081/graphs
# 应返回:{"graphs":["hugegraph"]}
停止服务的顺序应该与启动顺序相反:
- 停止 HugeGraph-Server
- 停止 HugeGraph-Store
- 停止 HugeGraph-PD
Docker 分布式集群
通过 Docker-Compose 运行完整的分布式集群(3 PD + 3 Store + 3 Server):
cd hugegraph/docker
HUGEGRAPH_VERSION=1.7.0 docker compose -f docker-compose-3pd-3store-3server.yml up -d
服务通过 hg-net 桥接网络上的容器主机名进行通信。配置通过环境变量注入:
# Server 配置
HG_SERVER_BACKEND: hstore
HG_SERVER_PD_PEERS: pd0:8686,pd1:8686,pd2:8686
验证集群:
curl http://localhost:8080/versions
curl http://localhost:8620/v1/stores
运行时日志可通过 docker logs <container-name>(如 docker logs hg-pd0)直接查看,无需进入容器。
完整的环境变量参考、端口表和故障排查指南请参阅 docker/README.md。
5.1.2 RocksDB / ToplingDB
点击展开/折叠 RocksDB 配置及启动方法
RocksDB 是一个嵌入式的数据库,不需要手动安装部署,要求 GCC 版本 >= 4.3.0(GLIBCXX_3.4.10),如不满足,需要提前升级 GCC
修改 hugegraph.properties
backend=rocksdb
serializer=binary
rocksdb.data_path=.
rocksdb.wal_path=.
初始化数据库(第一次启动时或在 conf/graphs/ 下手动添加了新配置时需要进行初始化)
cd *hugegraph-${version}
bin/init-store.sh
启动 server
bin/start-hugegraph.sh
Starting HugeGraphServer...
Connecting to HugeGraphServer (http://127.0.0.1:8080/graphs)....OK
提示的 url 与 rest-server.properties 中配置的 restserver.url 一致
ToplingDB (Beta): 作为 RocksDB 的高性能替代方案,配置方式请参考: ToplingDB Quick Start
5.1.3 HBase
点击展开/折叠 HBase 配置及启动方法
用户需自行安装 HBase,要求版本 2.0 以上,下载地址
修改 hugegraph.properties
backend=hbase
serializer=hbase

# hbase backend config
hbase.hosts=localhost
hbase.port=2181
# Note: recommend to modify the HBase partition number by the actual/env data amount & RS amount before init store
# it may influence the loading speed a lot
#hbase.enable_partition=true
#hbase.vertex_partitions=10
#hbase.edge_partitions=30
初始化数据库(第一次启动时或在 conf/graphs/ 下手动添加了新配置时需要进行初始化)
cd *hugegraph-${version}
bin/init-store.sh
启动 server
bin/start-hugegraph.sh
Starting HugeGraphServer...
Connecting to HugeGraphServer (http://127.0.0.1:8080/graphs)....OK
更多其它后端配置可参考配置项介绍
5.1.4 MySQL
⚠️ 已废弃: 此后端从 HugeGraph 1.7.0 版本开始已移除。如需使用,请参考 1.5.x 版本文档。
点击展开/折叠 MySQL 配置及启动方法
由于 MySQL 是在 GPL 协议下,与 Apache 协议不兼容,用户需自行安装 MySQL,下载地址
下载 MySQL 的驱动包,比如 mysql-connector-java-8.0.30.jar,并放入 HugeGraph-Server 的 lib 目录下。
修改 hugegraph.properties,配置数据库 URL,用户名和密码,store 是数据库名,如果没有会被自动创建。
backend=mysql
serializer=mysql

store=hugegraph

# mysql backend config
jdbc.driver=com.mysql.cj.jdbc.Driver
jdbc.url=jdbc:mysql://127.0.0.1:3306
jdbc.username=
jdbc.password=
jdbc.reconnect_max_times=3
jdbc.reconnect_interval=3
jdbc.ssl_mode=false
初始化数据库(第一次启动时或在 conf/graphs/ 下手动添加了新配置时需要进行初始化)
cd *hugegraph-${version}
bin/init-store.sh
启动 server
bin/start-hugegraph.sh
Starting HugeGraphServer...
Connecting to HugeGraphServer (http://127.0.0.1:8080/graphs)....OK
5.1.5 Cassandra
⚠️ 已废弃: 此后端从 HugeGraph 1.7.0 版本开始已移除。如需使用,请参考 1.5.x 版本文档。
点击展开/折叠 Cassandra 配置及启动方法
用户需自行安装 Cassandra,要求版本 3.0 以上,下载地址
修改 hugegraph.properties
backend=cassandra
serializer=cassandra

# cassandra backend config
cassandra.host=localhost
cassandra.port=9042
cassandra.username=
cassandra.password=
#cassandra.connect_timeout=5
#cassandra.read_timeout=20

#cassandra.keyspace.strategy=SimpleStrategy
#cassandra.keyspace.replication=3
初始化数据库(第一次启动时或在 conf/graphs/ 下手动添加了新配置时需要进行初始化)
cd *hugegraph-${version}
bin/init-store.sh
Initing HugeGraph Store...
2017-12-01 11:26:51 1424  [main] [INFO ] org.apache.hugegraph.HugeGraph [] - Opening backend store: 'cassandra'
2017-12-01 11:26:52 2389  [main] [INFO ] org.apache.hugegraph.backend.store.cassandra.CassandraStore [] - Failed to connect keyspace: hugegraph, try init keyspace later
2017-12-01 11:26:52 2472  [main] [INFO ] org.apache.hugegraph.backend.store.cassandra.CassandraStore [] - Failed to connect keyspace: hugegraph, try init keyspace later
2017-12-01 11:26:52 2557  [main] [INFO ] org.apache.hugegraph.backend.store.cassandra.CassandraStore [] - Failed to connect keyspace: hugegraph, try init keyspace later
2017-12-01 11:26:53 2797  [main] [INFO ] org.apache.hugegraph.backend.store.cassandra.CassandraStore [] - Store initialized: huge_graph
2017-12-01 11:26:53 2945  [main] [INFO ] org.apache.hugegraph.backend.store.cassandra.CassandraStore [] - Store initialized: huge_schema
2017-12-01 11:26:53 3044  [main] [INFO ] org.apache.hugegraph.backend.store.cassandra.CassandraStore [] - Store initialized: huge_index
2017-12-01 11:26:53 3046  [pool-3-thread-1] [INFO ] org.apache.hugegraph.backend.Transaction [] - Clear cache on event 'store.init'
2017-12-01 11:26:59 9720  [main] [INFO ] org.apache.hugegraph.HugeGraph [] - Opening backend store: 'cassandra'
2017-12-01 11:27:00 9805  [main] [INFO ] org.apache.hugegraph.backend.store.cassandra.CassandraStore [] - Failed to connect keyspace: hugegraph1, try init keyspace later
2017-12-01 11:27:00 9886  [main] [INFO ] org.apache.hugegraph.backend.store.cassandra.CassandraStore [] - Failed to connect keyspace: hugegraph1, try init keyspace later
2017-12-01 11:27:00 9955  [main] [INFO ] org.apache.hugegraph.backend.store.cassandra.CassandraStore [] - Failed to connect keyspace: hugegraph1, try init keyspace later
2017-12-01 11:27:00 10175 [main] [INFO ] org.apache.hugegraph.backend.store.cassandra.CassandraStore [] - Store initialized: huge_graph
2017-12-01 11:27:00 10321 [main] [INFO ] org.apache.hugegraph.backend.store.cassandra.CassandraStore [] - Store initialized: huge_schema
2017-12-01 11:27:00 10413 [main] [INFO ] org.apache.hugegraph.backend.store.cassandra.CassandraStore [] - Store initialized: huge_index
2017-12-01 11:27:00 10413 [pool-3-thread-1] [INFO ] org.apache.hugegraph.backend.Transaction [] - Clear cache on event 'store.init'
启动 server
bin/start-hugegraph.sh
Starting HugeGraphServer...
Connecting to HugeGraphServer (http://127.0.0.1:8080/graphs)....OK
5.1.6 Memory
点击展开/折叠 Memory 配置及启动方法
修改 hugegraph.properties
backend=memory
serializer=text
Memory 后端的数据是保存在内存中无法持久化的,不需要初始化后端,这也是唯一一个不需要初始化的后端。
启动 server
bin/start-hugegraph.sh
Starting HugeGraphServer...
Connecting to HugeGraphServer (http://127.0.0.1:8080/graphs)....OK
提示的 url 与 rest-server.properties 中配置的 restserver.url 一致
5.1.7 ScyllaDB
⚠️ 已废弃: 此后端从 HugeGraph 1.7.0 版本开始已移除。如需使用,请参考 1.5.x 版本文档。
点击展开/折叠 ScyllaDB 配置及启动方法
用户需自行安装 ScyllaDB,推荐版本 2.1 以上,下载地址
修改 hugegraph.properties
backend=scylladb
serializer=scylladb

# cassandra backend config
cassandra.host=localhost
cassandra.port=9042
cassandra.username=
cassandra.password=
#cassandra.connect_timeout=5
#cassandra.read_timeout=20

#cassandra.keyspace.strategy=SimpleStrategy
#cassandra.keyspace.replication=3
由于 scylladb 数据库本身就是基于 cassandra 的"优化版",如果用户未安装 scylladb,也可以直接使用 cassandra 作为后端存储,只需要把 backend 和 serializer 修改为 scylladb,host 和 post 指向 cassandra 集群的 seeds 和 port 即可,但是并不建议这样做,这样发挥不出 scylladb 本身的优势了。
初始化数据库(第一次启动时或在 conf/graphs/ 下手动添加了新配置时需要进行初始化)
cd *hugegraph-${version}
bin/init-store.sh
启动 server
bin/start-hugegraph.sh
Starting HugeGraphServer...
Connecting to HugeGraphServer (http://127.0.0.1:8080/graphs)....OK
5.1.8 启动 server 的时候创建示例图
在启动脚本时携带 -p true 参数,表示开启 preload,即创建示例图。
bin/start-hugegraph.sh -p true
Starting HugeGraphServer in daemon mode...
Connecting to HugeGraphServer (http://127.0.0.1:8080/graphs)......OK
并且使用 RESTful API 请求 HugeGraphServer 得到如下结果:
> curl "http://localhost:8080/graphs/hugegraph/graph/vertices" | gunzip

{"vertices":[{"id":"2:lop","label":"software","type":"vertex","properties":{"name":"lop","lang":"java","price":328}},{"id":"1:josh","label":"person","type":"vertex","properties":{"name":"josh","age":32,"city":"Beijing"}},{"id":"1:marko","label":"person","type":"vertex","properties":{"name":"marko","age":29,"city":"Beijing"}},{"id":"1:peter","label":"person","type":"vertex","properties":{"name":"peter","age":35,"city":"Shanghai"}},{"id":"1:vadas","label":"person","type":"vertex","properties":{"name":"vadas","age":27,"city":"Hongkong"}},{"id":"2:ripple","label":"software","type":"vertex","properties":{"name":"ripple","lang":"java","price":199}}]}
代表创建示例图成功。
5.2 使用 Docker
在 3.1 使用 Docker 容器 中,我们已经介绍了如何使用 docker 部署 hugegraph-server。此外,也可以通过切换后端存储或设置参数,在 Server 启动时加载样例图。
5.2.1 使用 Cassandra 作为后端
⚠️ 已废弃: Cassandra 后端从 HugeGraph 1.7.0 版本开始已移除。如需使用,请参考 1.5.x 版本文档。
点击展开/折叠 Cassandra 配置及启动方法
在使用 Docker 的时候,我们可以使用 Cassandra 作为后端存储。我们更加推荐直接使用 docker-compose 来对于 server 以及 Cassandra 进行统一管理
样例的 docker-compose.yml 可以在 github 中获取,使用 docker-compose up -d 启动。(如果使用 cassandra 4.0 版本作为后端存储,则需要大约两个分钟初始化,请耐心等待)
version: "3"

services:
  server:
    image: hugegraph/hugegraph
    container_name: cas-server
    ports:
      - 8080:8080
    environment:
      hugegraph.backend: cassandra
      hugegraph.serializer: cassandra
      hugegraph.cassandra.host: cas-cassandra
      hugegraph.cassandra.port: 9042
    networks:
      - ca-network
    depends_on:
      - cassandra
    healthcheck:
      test: ["CMD", "bin/gremlin-console.sh", "--" ,"-e", "scripts/remote-connect.groovy"]
      interval: 10s
      timeout: 30s
      retries: 3

  cassandra:
    image: cassandra:4
    container_name: cas-cassandra
    ports:
      - 7000:7000
      - 9042:9042
    security_opt:
      - seccomp:unconfined
    networks:
      - ca-network
    healthcheck:
      test: ["CMD", "cqlsh", "--execute", "describe keyspaces;"]
      interval: 10s
      timeout: 30s
      retries: 5

networks:
  ca-network:

volumes:
  hugegraph-data:
在这个 yaml 中,需要在环境变量中以 hugegraph.<parameter_name>的形式进行参数传递,配置 Cassandra 相关的参数。
具体来说,在 hugegraph.properties 配置文件中,提供了 backend=xxx、cassandra.host=xxx 等配置项。为了通过环境变量传递这些配置,需要在配置项前加上 hugegraph.,例如 hugegraph.backend 和 hugegraph.cassandra.host。
其他配置可以参照 4 配置
5.2.2 启动 server 的时候创建示例图
在 Docker 启动时设置环境变量 PRELOAD=true,即可在启动脚本执行过程中加载样例数据。
使用docker run
使用 docker run -itd --name=server -p 8080:8080 -e PRELOAD=true hugegraph/hugegraph:1.7.0
使用docker-compose
创建docker-compose.yml,具体文件如下,在环境变量中设置 PRELOAD=true。其中,example.groovy 是一个预定义的脚本,用于预加载样例数据。如果有需要,可以通过挂载新的 example.groovy 脚本改变预加载的数据。
version: '3'
services:
  server:
    image: hugegraph/hugegraph:1.7.0
    container_name: server
    environment:
      - PRELOAD=true
      - PASSWORD=xxx
    volumes:
      - /path/to/yourscript:/hugegraph/scripts/example.groovy
    ports:
      - 8080:8080
使用命令 docker-compose up -d 启动容器
使用 RESTful API 请求 HugeGraphServer 得到如下结果:
> curl "http://localhost:8080/graphs/hugegraph/graph/vertices" | gunzip

{"vertices":[{"id":"2:lop","label":"software","type":"vertex","properties":{"name":"lop","lang":"java","price":328}},{"id":"1:josh","label":"person","type":"vertex","properties":{"name":"josh","age":32,"city":"Beijing"}},{"id":"1:marko","label":"person","type":"vertex","properties":{"name":"marko","age":29,"city":"Beijing"}},{"id":"1:peter","label":"person","type":"vertex","properties":{"name":"peter","age":35,"city":"Shanghai"}},{"id":"1:vadas","label":"person","type":"vertex","properties":{"name":"vadas","age":27,"city":"Hongkong"}},{"id":"2:ripple","label":"software","type":"vertex","properties":{"name":"ripple","lang":"java","price":199}}]}
代表创建示例图成功。
6 访问 Server
6.1 服务启动状态校验
jps 查看服务进程
curl 请求 RESTful API
echo `curl -o /dev/null -s -w %{http_code} "http://localhost:8080/graphs/hugegraph/graph/vertices"`
返回结果 200,代表 server 启动正常
6.2 请求 Server
HugeGraphServer 的 RESTful API 包括多种类型的资源,典型的包括 graph、schema、gremlin、traverser 和 task
graph 包含 vertices、edgesschema 包含 vertexlabels、propertykeys、edgelabels、indexlabelsgremlin 包含各种 Gremlin 语句,如 g.v(),可以同步或者异步执行traverser 包含各种高级查询,包括最短路径、交叉点、N 步可达邻居等task 包含异步任务的查询和删除
6.2.1 获取 hugegraph 的顶点及相关属性
curl http://localhost:8080/graphs/hugegraph/graph/vertices
说明
由于图的点和边很多,对于 list 型的请求,比如获取所有顶点,获取所有边等,Server 会将数据压缩再返回,所以使用 curl 时得到一堆乱码,可以重定向至 gunzip 进行解压。推荐使用 Chrome 浏览器 + Restlet 插件发送 HTTP 请求进行测试。
curl "http://localhost:8080/graphs/hugegraph/graph/vertices" | gunzip
当前 HugeGraphServer 的默认配置只能是本机访问,可以修改配置,使其能在其他机器访问。
vim conf/rest-server.properties

restserver.url=http://0.0.0.0:8080
响应体如下:
{
    "vertices": [
        {
            "id": "2lop",
            "label": "software",
            "type": "vertex",
            "properties": {
                "price": [
                    {
                        "id": "price",
                        "value": 328
                    }
                ],
                "name": [
                    {
                        "id": "name",
                        "value": "lop"
                    }
                ],
                "lang": [
                    {
                        "id": "lang",
                        "value": "java"
                    }
                ]
            }
        },
        {
            "id": "1josh",
            "label": "person",
            "type": "vertex",
            "properties": {
                "name": [
                    {
                        "id": "name",
                        "value": "josh"
                    }
                ],
                "age": [
                    {
                        "id": "age",
                        "value": 32
                    }
                ]
            }
        },
        ...
    ]
}
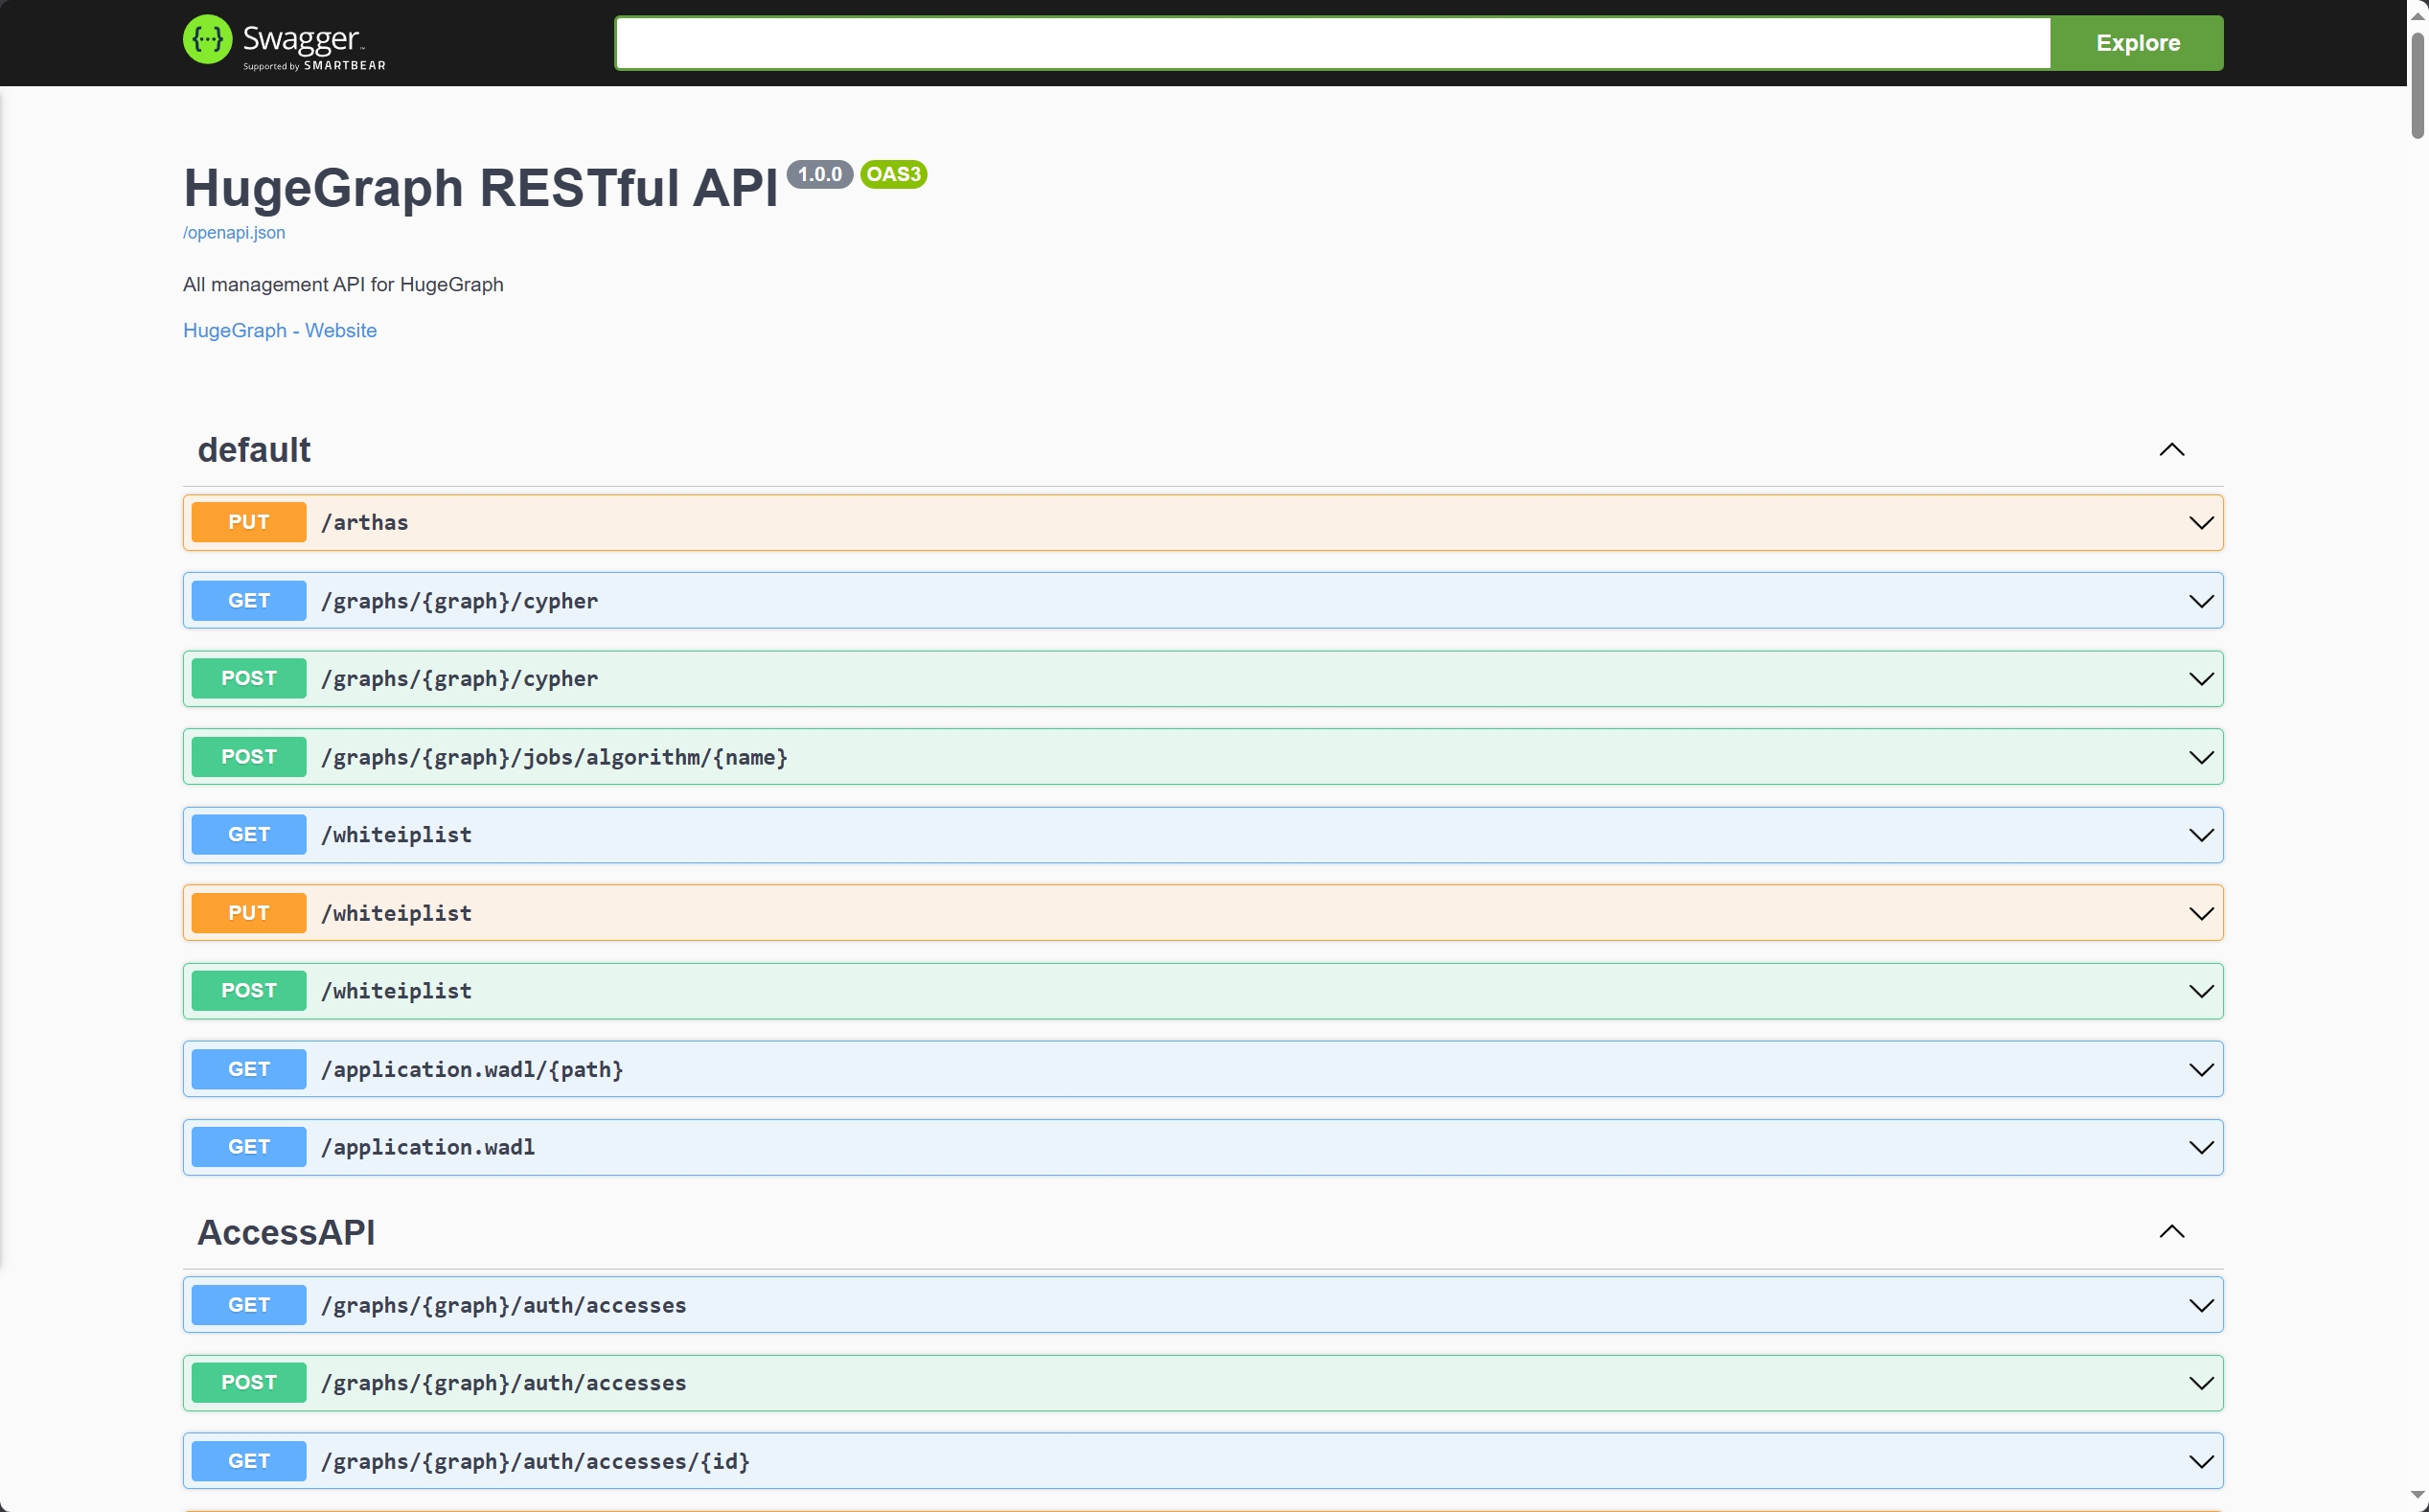
详细的 API 请参考 RESTful-API 文档。
另外也可以通过访问 localhost:8080/swagger-ui/index.html 查看 API。
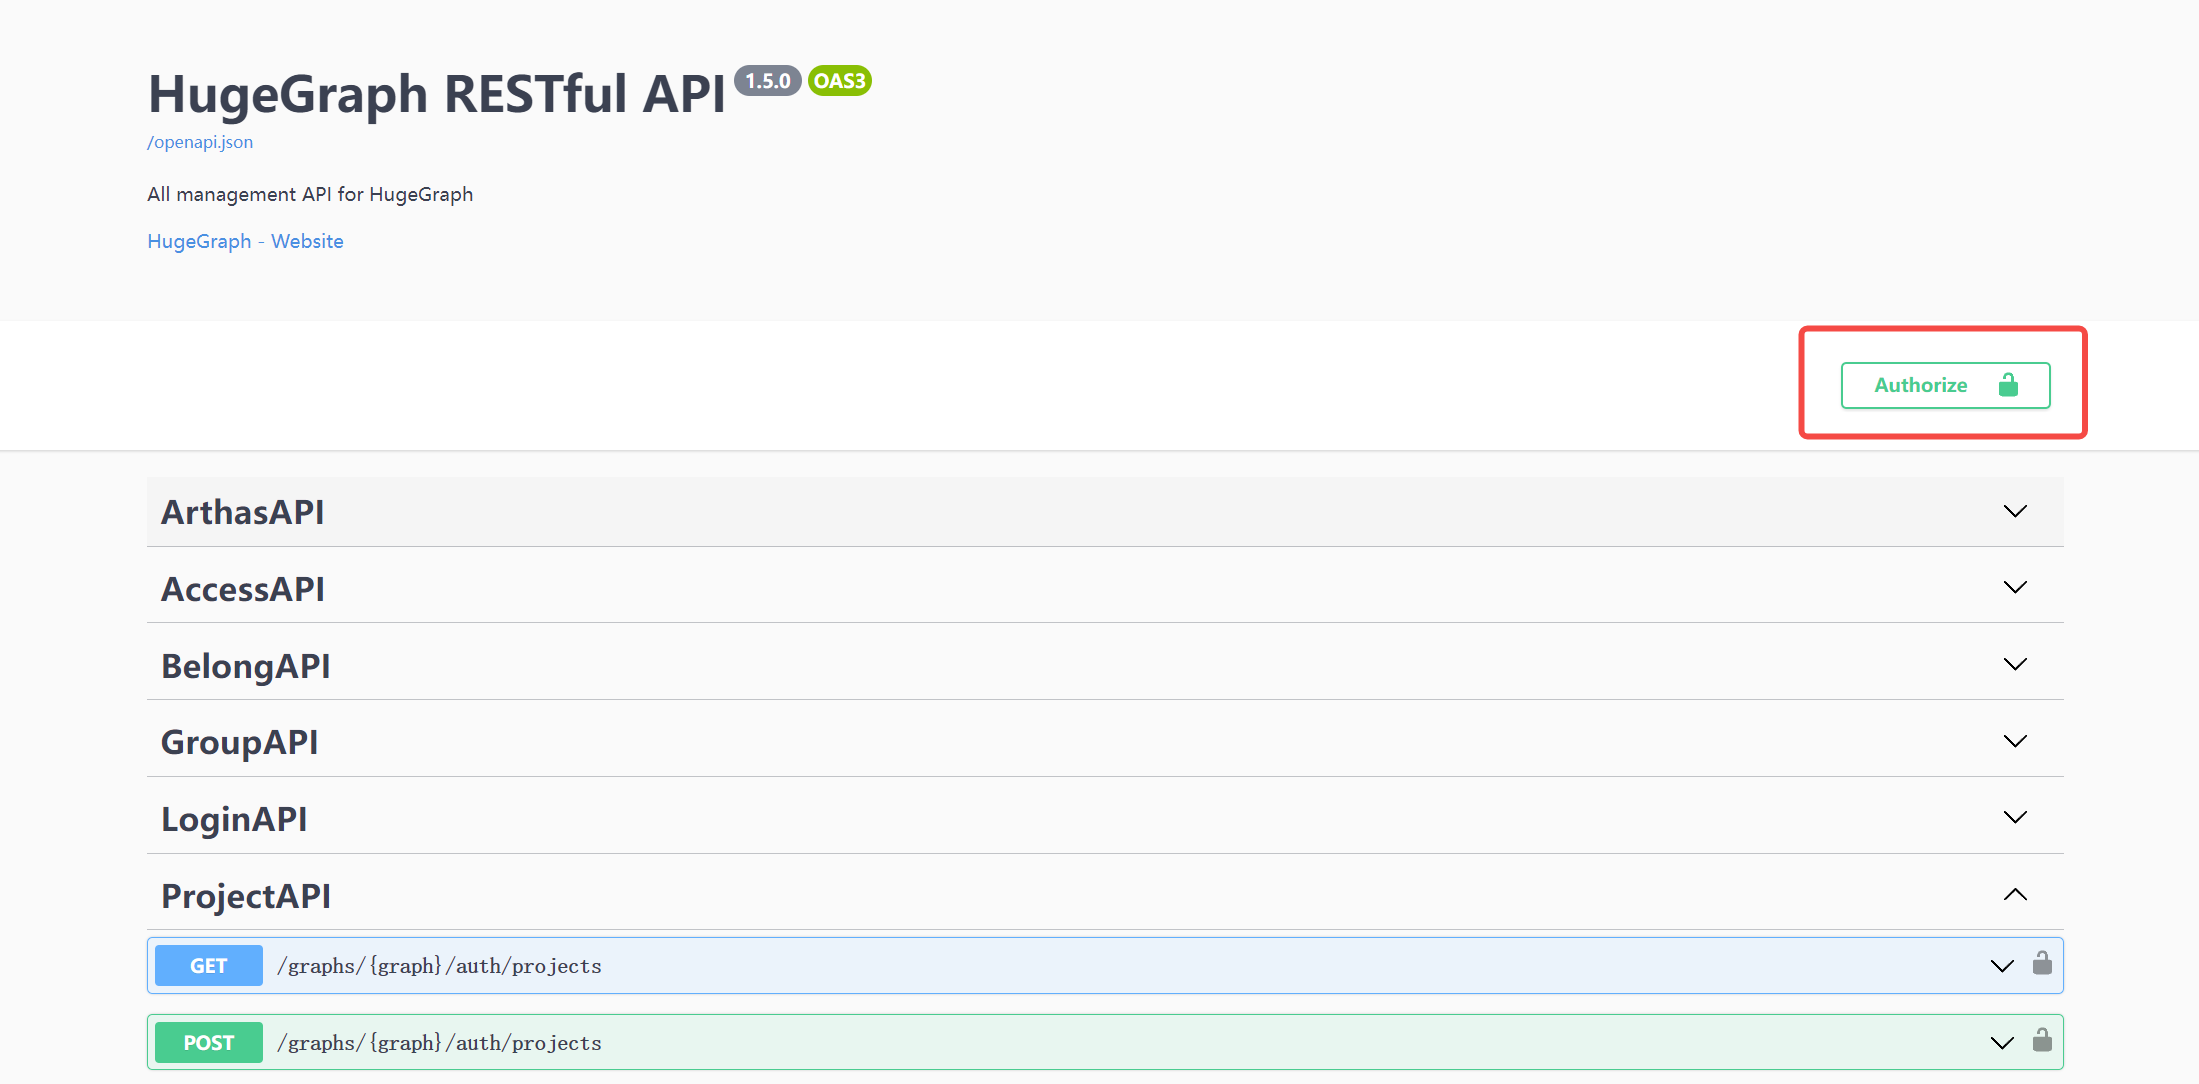
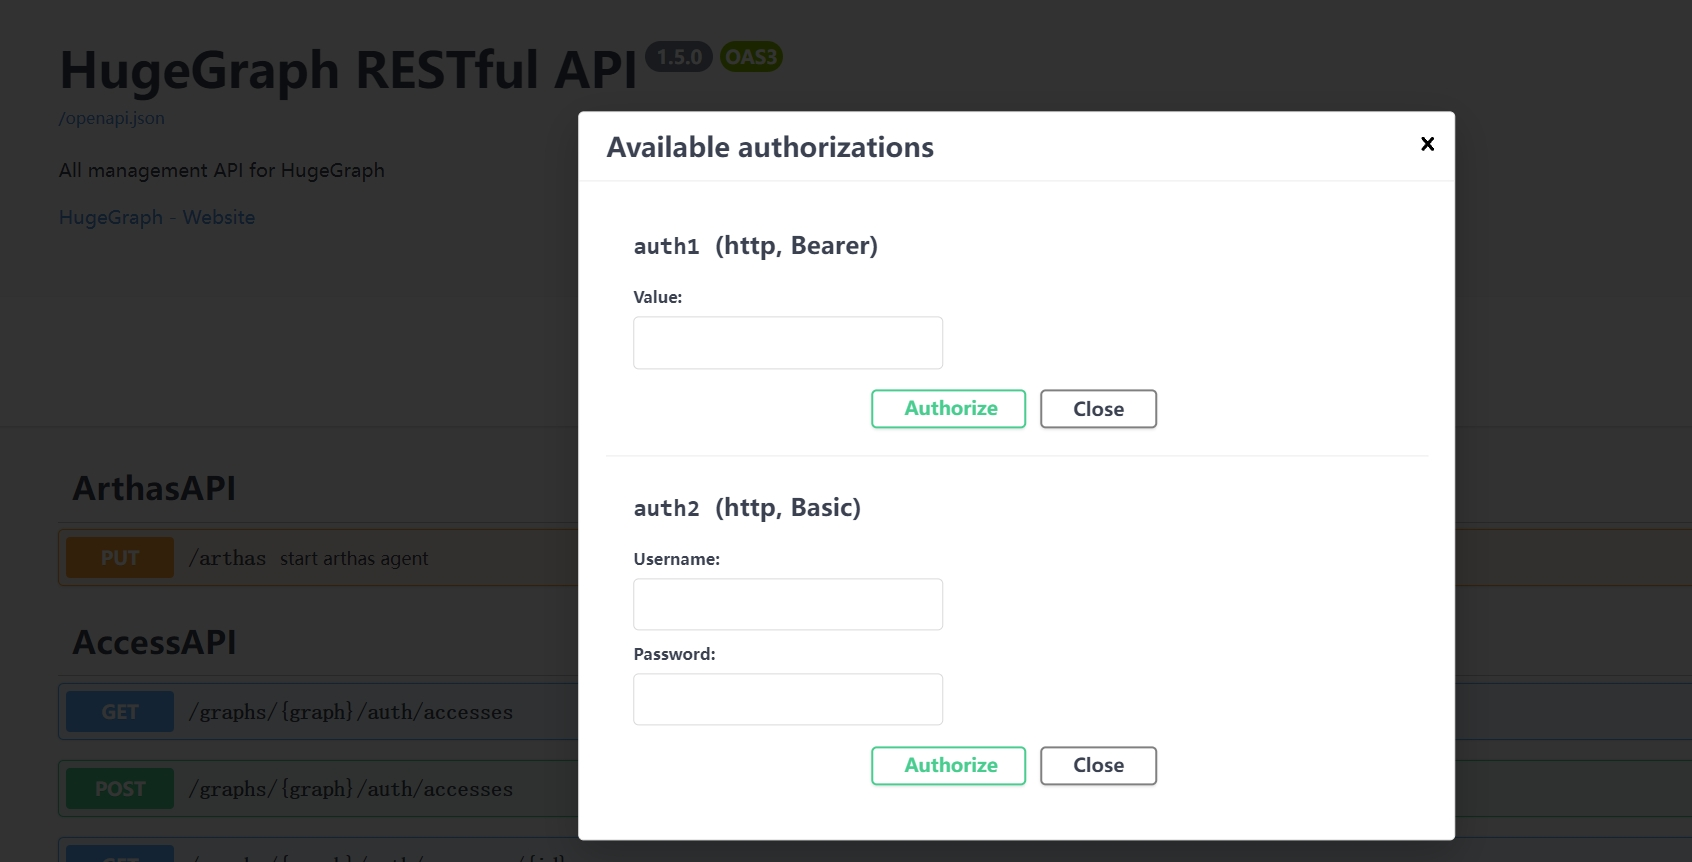
在使用 Swagger UI 调试 HugeGraph 提供的 API 时,如果 HugeGraph Server 开启了鉴权模式,可以在 Swagger 页面输入鉴权信息。
当前 HugeGraph 支持基于 Basic 和 Bearer 两种形式设置鉴权信息。
7 停止 Server
$cd *hugegraph-${version}
$bin/stop-hugegraph.sh
8 使用 IntelliJ IDEA 调试 Server
请参考在 IDEA 中配置 Server 开发环境
3.1.2 - HugeGraph-PD Quick Start
1 HugeGraph-PD 概述
HugeGraph-PD (Placement Driver) 是 HugeGraph 分布式版本的元数据管理组件,负责管理图数据的分布和存储节点的协调。它在分布式 HugeGraph 中扮演着核心角色,维护集群状态并协调 HugeGraph-Store 存储节点。
2 依赖
2.1 前置条件
- 操作系统:Linux 或 macOS(Windows 尚未经过完整测试)
- Java 版本:≥ 11
- Maven 版本:≥ 3.5.0
3 部署
有两种方式可以部署 HugeGraph-PD 组件:
3.1 下载 tar 包
从 Apache HugeGraph 官方下载页面下载最新版本的 HugeGraph-PD:
# 用最新版本号替换 {version},例如 1.5.0
wget https://downloads.apache.org/hugegraph/{version}/apache-hugegraph-incubating-{version}.tar.gz
tar zxf apache-hugegraph-incubating-{version}.tar.gz
cd apache-hugegraph-incubating-{version}/apache-hugegraph-pd-incubating-{version}
3.2 源码编译
# 1. 克隆源代码
git clone https://github.com/apache/hugegraph.git

# 2. 编译项目
cd hugegraph
mvn clean install -DskipTests=true

# 3. 编译成功后,PD 模块的构建产物将位于
#    apache-hugegraph-incubating-{version}/apache-hugegraph-pd-incubating-{version}
#    target/apache-hugegraph-incubating-{version}.tar.gz
3.3 Docker 部署
HugeGraph-PD Docker 镜像已发布在 Docker Hub,镜像名为 hugegraph/pd。
注: 后续步骤皆假设你本地已拉取 hugegraph 主仓库代码 (至少是 docker 目录)
使用 docker-compose 模式部署完整的 3 节点集群(PD + Store + Server):
cd hugegraph/docker
# 注意版本号请随时保持更新 → 1.x.0
HUGEGRAPH_VERSION=1.7.0 docker compose -f docker-compose-3pd-3store-3server.yml up -d
通过 docker run 运行单个 PD 节点时,通过环境变量提供配置:
docker run -d \
  -p 8620:8620 \
  -p 8686:8686 \
  -p 8610:8610 \
  -e HG_PD_GRPC_HOST=<your-ip> \
  -e HG_PD_RAFT_ADDRESS=<your-ip>:8610 \
  -e HG_PD_RAFT_PEERS_LIST=<your-ip>:8610 \
  -e HG_PD_INITIAL_STORE_LIST=<store-ip>:8500 \
  -v /path/to/data:/hugegraph-pd/pd_data \
  --name hugegraph-pd \
  hugegraph/pd:1.7.0
环境变量参考:
| 变量 | 必填 | 默认值 | 描述 |
|---|
HG_PD_GRPC_HOST | 是 | — | 本节点的 gRPC 主机名/IP(Docker 中使用 pd0,裸机使用 192.168.1.10) |
HG_PD_RAFT_ADDRESS | 是 | — | 本节点的 Raft 地址(如 pd0:8610) |
HG_PD_RAFT_PEERS_LIST | 是 | — | 所有 PD 节点的 Raft 地址(如 pd0:8610,pd1:8610,pd2:8610) |
HG_PD_INITIAL_STORE_LIST | 是 | — | 预期的 Store gRPC 地址(如 store0:8500,store1:8500,store2:8500) |
HG_PD_GRPC_PORT | 否 | 8686 | gRPC 服务端口 |
HG_PD_REST_PORT | 否 | 8620 | REST API 端口 |
HG_PD_DATA_PATH | 否 | /hugegraph-pd/pd_data | 元数据存储路径 |
HG_PD_INITIAL_STORE_COUNT | 否 | 1 | 集群可用所需的最小 Store 数量 |
注意:在 Docker 桥接网络中,HG_PD_GRPC_HOST 和 HG_PD_RAFT_ADDRESS 应使用容器主机名(如 pd0)而非 IP 地址。
已弃用的别名:GRPC_HOST、RAFT_ADDRESS、RAFT_PEERS、PD_INITIAL_STORE_LIST 仍可使用,但会输出弃用警告。新部署请使用 HG_PD_* 名称。
运行时日志可通过 docker logs <container-name>(如 docker logs hg-pd0)直接查看,无需进入容器。
完整的集群部署指南请参阅 docker/README.md。
4 配置
PD 的主要配置文件为 conf/application.yml,以下是关键配置项:
spring:
  application:
    name: hugegraph-pd

grpc:
  # 集群模式下的 gRPC 端口
  port: 8686
  host: 127.0.0.1

server:
  # REST 服务端口号
  port: 8620

pd:
  # 存储路径
  data-path: ./pd_data
  # 自动扩容的检查周期(秒)
  patrol-interval: 1800
  # 集群可用所需的最小 Store 数量
  initial-store-count: 1
  # store 的配置信息,格式为 IP:gRPC端口
  initial-store-list: 127.0.0.1:8500

raft:
  # 集群模式
  address: 127.0.0.1:8610
  # 集群中所有 PD 节点的 raft 地址
  peers-list: 127.0.0.1:8610

store:
  # store 下线时间(秒)。超过该时间,认为 store 永久不可用,分配副本到其他机器
  max-down-time: 172800
  # 是否开启 store 监控数据存储
  monitor_data_enabled: true
  # 监控数据的间隔
  monitor_data_interval: 1 minute
  # 监控数据的保留时间
  monitor_data_retention: 1 day
  initial-store-count: 1

partition:
  # 默认每个分区副本数
  default-shard-count: 1
  # 默认每机器最大副本数
  store-max-shard-count: 12
对于多节点部署,需要修改各节点的端口和地址配置,确保各节点之间能够正常通信。
5 启动与停止
5.1 启动 PD
在 PD 安装目录下执行:
./bin/start-hugegraph-pd.sh
启动脚本支持 -d 参数控制守护进程模式:
-d true(默认):以后台守护进程方式运行,脚本立即返回。-d false:以前台模式运行——脚本通过 exec 替换为 Java 进程,容器/进程管理器的进程即为 Java 本身。在 Docker 或进程管理器(systemd、supervisord)下运行时请使用此参数,以便在崩溃时自动检测并重启服务。
启动成功后,可以在 logs/hugegraph-pd-stdout.log 中看到类似以下的日志:
YYYY-mm-dd xx:xx:xx [main] [INFO] o.a.h.p.b.HugePDServer - Started HugePDServer in x.xxx seconds (JVM running for x.xxx)
5.2 停止 PD
在 PD 安装目录下执行:
./bin/stop-hugegraph-pd.sh
6 验证
确认 PD 服务是否正常运行:
curl http://localhost:8620/actuator/health
如果返回 {"status":"UP"},则表示 PD 服务已成功启动。
此外,也可以通过 PD API 查看 Store 节点状态:
curl http://localhost:8620/v1/stores
如果响应中 state 为 Up,说明对应的 Store 节点运行正常。在一个健康的 3 节点部署中,storeId 列表应包含 3 个 ID,且 stateCountMap.Up、numOfService 和 numOfNormalService 都应为 3。
3.1.3 - HugeGraph-Store Quick Start
1 HugeGraph-Store 概述
HugeGraph-Store 是 HugeGraph 分布式版本的存储节点组件,负责实际存储和管理图数据。它与 HugeGraph-PD 协同工作,共同构成 HugeGraph 的分布式存储引擎,提供高可用性和水平扩展能力。
2 依赖
2.1 前置条件
- 操作系统:Linux 或 macOS(Windows 尚未经过完整测试)
- Java 版本:≥ 11
- Maven 版本:≥ 3.5.0
- 如需进行多节点部署,请先部署 HugeGraph-PD
3 部署
有两种方式可以部署 HugeGraph-Store 组件:
3.1 下载 tar 包
从 Apache HugeGraph 官方下载页面下载最新版本的 HugeGraph-Store:
# 用最新版本号替换 {version},例如 1.5.0
wget https://downloads.apache.org/hugegraph/{version}/apache-hugegraph-incubating-{version}.tar.gz
tar zxf apache-hugegraph-incubating-{version}.tar.gz
cd apache-hugegraph-incubating-{version}/apache-hugegraph-hstore-incubating-{version}
3.2 源码编译
# 1. 克隆源代码
git clone https://github.com/apache/hugegraph.git

# 2. 编译项目
cd hugegraph
mvn clean install -DskipTests=true

# 3. 编译成功后,Store 模块的构建产物将位于
#    apache-hugegraph-incubating-{version}/apache-hugegraph-hstore-incubating-{version}
#    target/apache-hugegraph-incubating-{version}.tar.gz
3.3 Docker 部署
HugeGraph-Store Docker 镜像已发布在 Docker Hub,镜像名是 hugegraph/store。
注: 后续步骤皆假设你本地已拉取 hugegraph 主仓库代码 (至少是 docker 目录)
使用 docker-compose 文件部署完整的 3 节点集群(PD + Store + Server):
cd hugegraph/docker
# 注意版本号请随时保持更新 → 1.x.0
HUGEGRAPH_VERSION=1.7.0 docker compose -f docker-compose-3pd-3store-3server.yml up -d
通过 docker run 运行单个 Store 节点:
docker run -d \
  -p 8520:8520 \
  -p 8500:8500 \
  -p 8510:8510 \
  -e HG_STORE_PD_ADDRESS=<pd-ip>:8686 \
  -e HG_STORE_GRPC_HOST=<your-ip> \
  -e HG_STORE_RAFT_ADDRESS=<your-ip>:8510 \
  -v /path/to/storage:/hugegraph-store/storage \
  --name hugegraph-store \
  hugegraph/store:1.7.0
环境变量参考:
| 变量 | 必填 | 默认值 | 描述 |
|---|
HG_STORE_PD_ADDRESS | 是 | — | PD gRPC 地址(如 pd0:8686,pd1:8686,pd2:8686) |
HG_STORE_GRPC_HOST | 是 | — | 本节点的 gRPC 主机名/IP(如 store0) |
HG_STORE_RAFT_ADDRESS | 是 | — | 本节点的 Raft 地址(如 store0:8510) |
HG_STORE_GRPC_PORT | 否 | 8500 | gRPC 服务端口 |
HG_STORE_REST_PORT | 否 | 8520 | REST API 端口 |
HG_STORE_DATA_PATH | 否 | /hugegraph-store/storage | 数据存储路径 |
注意:在 Docker 桥接网络中,HG_STORE_GRPC_HOST 应使用容器主机名(如 store0)而非 IP 地址。
已弃用的别名:PD_ADDRESS、GRPC_HOST、RAFT_ADDRESS 仍可使用,但会输出弃用警告。新部署请使用 HG_STORE_* 名称。
4 配置
Store 的主要配置文件为 conf/application.yml,以下是关键配置项:
pdserver:
  # PD 服务地址,多个 PD 地址用逗号分割(配置 PD 的 gRPC 端口)
  address: 127.0.0.1:8686

grpc:
  # gRPC 的服务地址
  host: 127.0.0.1
  port: 8500
  netty-server:
    max-inbound-message-size: 1000MB

raft:
  # raft 缓存队列大小
  disruptorBufferSize: 1024
  address: 127.0.0.1:8510
  max-log-file-size: 600000000000
  # 快照生成时间间隔,单位秒
  snapshotInterval: 1800

server:
  # REST 服务地址
  port: 8520

app:
  # 存储路径,支持多个路径,逗号分割
  data-path: ./storage
  #raft-path: ./storage

spring:
  application:
    name: store-node-grpc-server
  profiles:
    active: default
    include: pd

logging:
  config: 'file:./conf/log4j2.xml'
  level:
    root: info
对于多节点部署,需要为每个 Store 节点修改以下配置:
- 每个节点的
grpc.port(RPC 端口) - 每个节点的
raft.address(Raft 协议端口) - 每个节点的
server.port(REST 端口) - 每个节点的
app.data-path(数据存储路径)
5 启动与停止
5.1 启动 Store
确保 PD 服务已经启动,然后在 Store 安装目录下执行:
./bin/start-hugegraph-store.sh
启动脚本支持 -d 参数控制守护进程模式:
-d true(默认):以后台守护进程方式运行,脚本立即返回。-d false:以前台模式运行——脚本通过 exec 替换为 Java 进程,容器/进程管理器的进程即为 Java 本身。在 Docker 或进程管理器(systemd、supervisord)下运行时请使用此参数,以便在崩溃时自动检测并重启服务。
启动成功后,可以在 logs/hugegraph-store-server.log 中看到类似以下的日志:
YYYY-mm-dd xx:xx:xx [main] [INFO] o.a.h.s.n.StoreNodeApplication - Started StoreNodeApplication in x.xxx seconds (JVM running for x.xxx)
5.2 停止 Store
在 Store 安装目录下执行:
./bin/stop-hugegraph-store.sh
6 多节点部署示例
以下是一个三节点部署的配置示例:
6.1 三节点配置参考
- 3 PD 节点
- raft 端口:8610, 8611, 8612
- rpc 端口:8686, 8687, 8688
- rest 端口:8620, 8621, 8622
- 3 Store 节点
- raft 端口:8510, 8511, 8512
- rpc 端口:8500, 8501, 8502
- rest 端口:8520, 8521, 8522
6.2 Store 节点配置
对于三个 Store 节点,每个节点的主要配置差异如下:
节点 A:
grpc:
  port: 8500
raft:
  address: 127.0.0.1:8510
server:
  port: 8520
app:
  data-path: ./storage-a
节点 B:
grpc:
  port: 8501
raft:
  address: 127.0.0.1:8511
server:
  port: 8521
app:
  data-path: ./storage-b
节点 C:
grpc:
  port: 8502
raft:
  address: 127.0.0.1:8512
server:
  port: 8522
app:
  data-path: ./storage-c
所有节点都应该指向相同的 PD 集群:
pdserver:
  address: 127.0.0.1:8686,127.0.0.1:8687,127.0.0.1:8688
6.3 Docker 分布式集群配置
3 节点 Store 集群包含在 docker/docker-compose-3pd-3store-3server.yml 中。每个 Store 节点拥有独立的主机名和环境变量:
# store0
HG_STORE_PD_ADDRESS: pd0:8686,pd1:8686,pd2:8686
HG_STORE_GRPC_HOST: store0
HG_STORE_GRPC_PORT: "8500"
HG_STORE_REST_PORT: "8520"
HG_STORE_RAFT_ADDRESS: store0:8510
HG_STORE_DATA_PATH: /hugegraph-store/storage

# store1
HG_STORE_PD_ADDRESS: pd0:8686,pd1:8686,pd2:8686
HG_STORE_GRPC_HOST: store1
HG_STORE_RAFT_ADDRESS: store1:8510

# store2
HG_STORE_PD_ADDRESS: pd0:8686,pd1:8686,pd2:8686
HG_STORE_GRPC_HOST: store2
HG_STORE_RAFT_ADDRESS: store2:8510
Store 节点仅在所有 PD 节点通过健康检查后才会启动,其中 docker-compose 中的 healthcheck 实际访问的是 PD 的 REST 接口 /v1/health(也可以通过 Actuator 暴露的 /actuator/health 进行手动检查),并通过 depends_on: condition: service_healthy 强制执行依赖关系。
运行时日志可通过 docker logs <container-name>(如 docker logs hg-store0)直接查看,无需进入容器。
完整的部署指南请参阅 docker/README.md。
7 验证 Store 服务
确认 Store 服务是否正常运行:
curl http://localhost:8520/actuator/health
如果返回 {"status":"UP"},则表示 Store 服务已成功启动。
此外,可以通过 PD 的 API 查看集群中的 Store 节点状态:
curl http://localhost:8620/v1/stores
如果 Store 配置成功,上述接口响应中应包含当前节点的状态信息,其中 state 为 Up 表示节点运行正常。
下方示例仅展示 1 个 Store 节点的返回结果。如果 3 个节点都已正确配置并正在运行,则响应中的 storeId 列表应包含 3 个 ID,且 stateCountMap.Up、numOfService 和 numOfNormalService 都应为 3。
{
  "message": "OK",
  "data": {
    "stores": [
      {
        "storeId": 8319292642220586694,
        "address": "127.0.0.1:8500",
        "raftAddress": "127.0.0.1:8510",
        "version": "",
        "state": "Up",
        "deployPath": "/Users/{your_user_name}/hugegraph/apache-hugegraph-incubating-1.5.0/apache-hugegraph-store-incubating-1.5.0/lib/hg-store-node-1.5.0.jar",
        "dataPath": "./storage",
        "startTimeStamp": 1754027127969,
        "registedTimeStamp": 1754027127969,
        "lastHeartBeat": 1754027909444,
        "capacity": 494384795648,
        "available": 346535829504,
        "partitionCount": 0,
        "graphSize": 0,
        "keyCount": 0,
        "leaderCount": 0,
        "serviceName": "127.0.0.1:8500-store",
        "serviceVersion": "",
        "serviceCreatedTimeStamp": 1754027127000,
        "partitions": []
      }
    ],
    "stateCountMap": {
      "Up": 1
    },
    "numOfService": 1,
    "numOfNormalService": 1
  },
  "status": 0
}
3.2.1 - HugeGraph-Hubble Quick Start
1 HugeGraph-Hubble 概述
特别注意: 当前版本的 Hubble 还没有添加 Auth/Login 相关界面和接口和单独防护, 在下一个 Release 版 (> 1.5) 会加入,
请留意避免把它暴露在公网环境或不受信任的网络中,以免引起相关 SEC 问题 (另外也可以使用 IP & 端口白名单 + HTTPS)
测试指南:如需在本地运行 Hubble 测试,请参考 工具链本地测试指南
HugeGraph-Hubble 是 HugeGraph 的一站式可视化分析平台,平台涵盖了从数据建模,到数据快速导入,
再到数据的在线、离线分析、以及图的统一管理的全过程,实现了图应用的全流程向导式操作,旨在提升用户的使用流畅度,
降低用户的使用门槛,提供更为高效易用的使用体验。
平台主要包括以下模块:
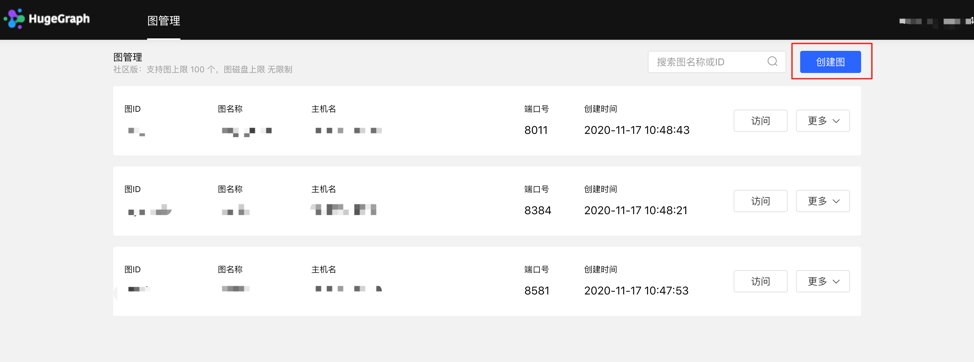
图管理
图管理模块通过图的创建,连接平台与图数据,实现多图的统一管理,并实现图的访问、编辑、删除、查询操作。
元数据建模
元数据建模模块通过创建属性库,顶点类型,边类型,索引类型,实现图模型的构建与管理,平台提供两种模式,列表模式和图模式,可实时展示元数据模型,更加直观。同时还提供了跨图的元数据复用功能,省去相同元数据繁琐的重复创建过程,极大地提升建模效率,增强易用性。
图分析
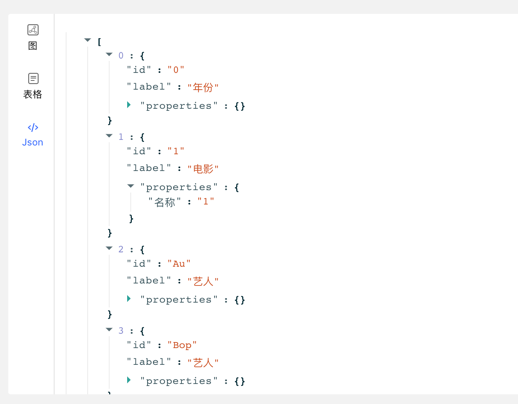
通过输入图遍历语言 Gremlin 可实现图数据的高性能通用分析,并提供顶点的定制化多维路径查询等功能,提供 3 种图结果展示方式,包括:图形式、表格形式、Json 形式,多维度展示数据形态,满足用户使用的多种场景需求。提供运行记录及常用语句收藏等功能,实现图操作的可追溯,以及查询输入的复用共享,快捷高效。支持图数据的导出,导出格式为 Json 格式。
任务管理
对于需要遍历全图的 Gremlin 任务,索引的创建与重建等耗时较长的异步任务,平台提供相应的任务管理功能,实现异步任务的统一的管理与结果查看。
数据导入 (BETA)
注: 数据导入功能目前适合初步试用,正式数据导入请使用 hugegraph-loader, 性能/稳定性/功能全面许多
数据导入是将用户的业务数据转化为图的顶点和边并插入图数据库中,平台提供了向导式的可视化导入模块,通过创建导入任务,
实现导入任务的管理及多个导入任务的并行运行,提高导入效能。进入导入任务后,只需跟随平台步骤提示,按需上传文件,填写内容,
就可轻松实现图数据的导入过程,同时支持断点续传,错误重试机制等,降低导入成本,提升效率。
2 部署
有三种方式可以部署hugegraph-hubble
- 使用 docker (便于测试)
- 下载 toolchain 二进制包
- 源码编译
2.1 使用 Docker (便于测试)
特别注意: docker 模式下,若 hubble 和 server 在同一宿主机,hubble 页面中设置 server 的 hostname 不能设置为 localhost/127.0.0.1,因这会指向 hubble 容器内部而非宿主机,导致无法连接到 server.
若 hubble 和 server 在同一 docker 网络下,推荐直接使用container_name (如下例的 server) 作为主机名。或者也可以使用 宿主机 IP 作为主机名,此时端口号为宿主机给 server 配置的端口
我们可以使用 docker run -itd --name=hubble -p 8088:8088 hugegraph/hubble:1.5.0 快速启动 hubble.
或者使用 docker-compose 启动 hubble,另外如果 hubble 和 server 在同一个 docker 网络下,可以使用 server 的 contain_name 进行访问,而不需要宿主机的 ip
使用docker-compose up -d,docker-compose.yml如下:
version: '3'
services:
  server:
    image: hugegraph/hugegraph:1.5.0
    container_name: server
    environment:
      - PASSWORD=xxx
    ports:
      - 8080:8080

  hubble:
    image: hugegraph/hubble:1.5.0
    container_name: hubble
    ports:
      - 8088:8088
注意:
hugegraph-hubble 的 docker 镜像是一个便捷发布版本,用于快速测试试用 hubble,并非ASF 官方发布物料包的方式。你可以从 ASF Release Distribution Policy 中得到更多细节。
生产环境推荐使用 release tag(如 1.5.0) 稳定版。使用 latest tag 默认对应 master 最新代码。
hubble项目在toolchain项目中,首先下载toolchain的 tar 包
wget https://downloads.apache.org/hugegraph/{version}/apache-hugegraph-toolchain-incubating-{version}.tar.gz
tar -xvf apache-hugegraph-toolchain-incubating-{version}.tar.gz
cd apache-hugegraph-toolchain-incubating-{version}.tar.gz/apache-hugegraph-hubble-incubating-{version}
运行hubble
随后我们可以看到
starting HugeGraphHubble ..............timed out with http status 502
2023-08-30 20:38:34 [main] [INFO ] o.a.h.HugeGraphHubble [] - Starting HugeGraphHubble v1.0.0 on cpu05 with PID xxx (~/apache-hugegraph-toolchain-incubating-1.0.0/apache-hugegraph-hubble-incubating-1.0.0/lib/hubble-be-1.0.0.jar started by $USER in ~/apache-hugegraph-toolchain-incubating-1.0.0/apache-hugegraph-hubble-incubating-1.0.0)
...
2023-08-30 20:38:38 [main] [INFO ] c.z.h.HikariDataSource [] - hugegraph-hubble-HikariCP - Start completed.
2023-08-30 20:38:41 [main] [INFO ] o.a.c.h.Http11NioProtocol [] - Starting ProtocolHandler ["http-nio-0.0.0.0-8088"]
2023-08-30 20:38:41 [main] [INFO ] o.a.h.HugeGraphHubble [] - Started HugeGraphHubble in 7.379 seconds (JVM running for 8.499)
然后使用浏览器访问 ip:8088 可看到hubble页面,通过bin/stop-hubble.sh则可以停止服务
2.3 源码编译
注意: 目前已在 hugegraph-hubble/hubble-be/pom.xml 中引入插件 frontend-maven-plugin,编译 hubble 时不需要用户本地环境提前安装 Nodejs V16.x 与 yarn 环境,可直接按下述步骤执行
下载 toolchain 源码包
git clone https://github.com/apache/hugegraph-toolchain.git
编译hubble, 它依赖 loader 和 client, 编译时需提前构建这些依赖 (后续可跳)
cd hugegraph-toolchain
sudo pip install -r hugegraph-hubble/hubble-dist/assembly/travis/requirements.txt
mvn install -pl hugegraph-client,hugegraph-loader -am -Dmaven.javadoc.skip=true -DskipTests -ntp

cd hugegraph-hubble
mvn -e package -Dmaven.javadoc.skip=true -Dmaven.test.skip=true -ntp
cd apache-hugegraph-hubble-incubating*
启动hubble
3 平台使用流程
平台的模块使用流程如下:
4 平台使用说明
4.1 图管理
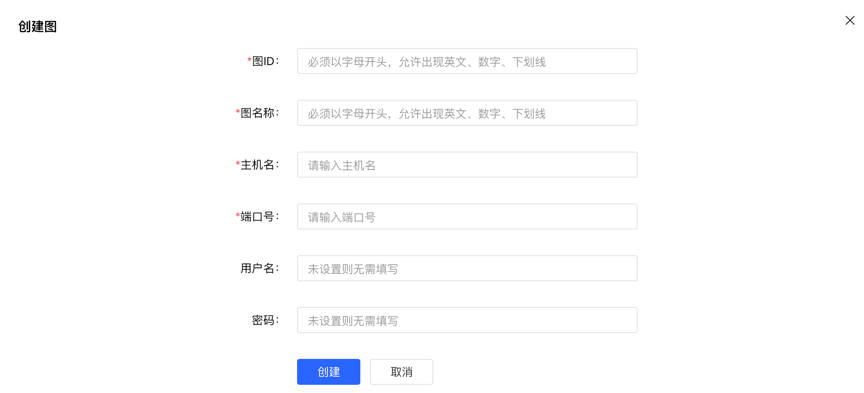
4.1.1 图创建
图管理模块下,点击【创建图】,通过填写图 ID、图名称、主机名、端口号、用户名、密码的信息,实现多图的连接。
创建图填写内容如下:
注意:如果使用 docker 启动 hubble,且 server 和 hubble 位于同一宿主机,不能直接使用 localhost/127.0.0.1 作为主机名。如果 hubble 和 server 在同一 docker 网络下,则可以直接使用 container_name 作为主机名,端口则为 8080。或者也可以使用宿主机 ip 作为主机名,此时端口为宿主机为 server 配置的端口
4.1.2 图访问
实现图空间的信息访问,进入后,可进行图的多维查询分析、元数据管理、数据导入、算法分析等操作。
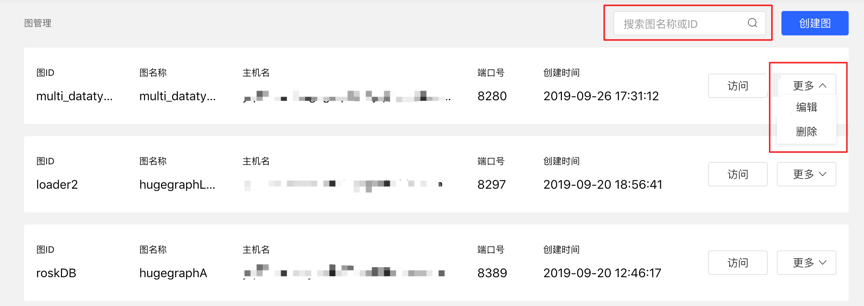
4.1.3 图管理
- 用户通过对图的概览、搜索以及单图的信息编辑与删除,实现图的统一管理。
- 搜索范围:可对图名称和 ID 进行搜索。
4.2 元数据建模(列表 + 图模式)
4.2.1 模块入口
左侧导航处:
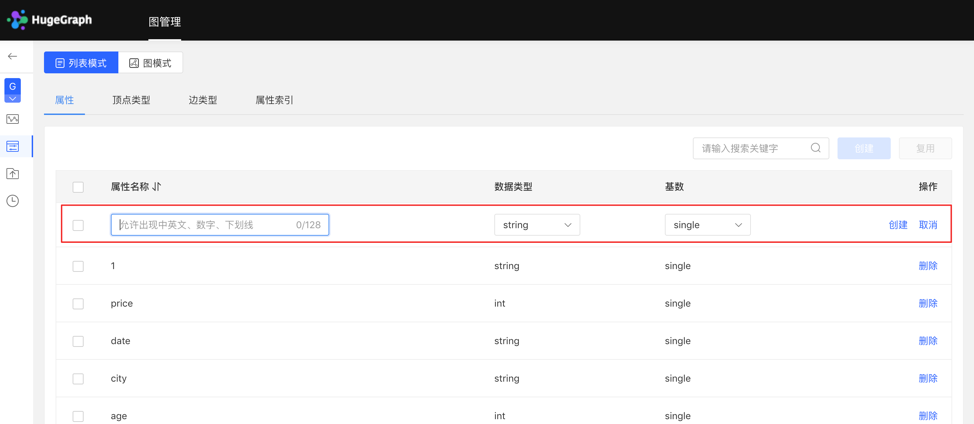
4.2.2 属性类型
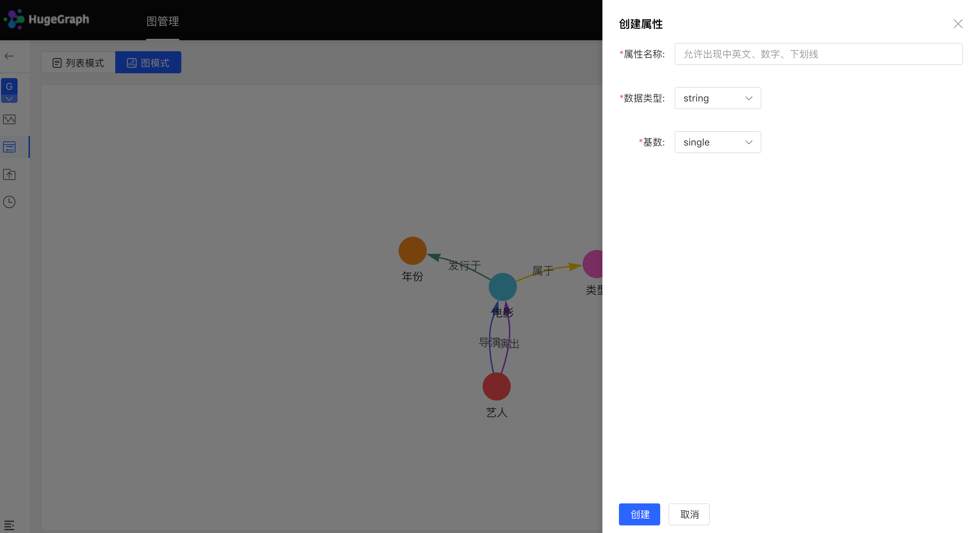
4.2.2.1 创建
- 填写或选择属性名称、数据类型、基数,完成属性的创建。
- 创建的属性可作为顶点类型和边类型的属性。
列表模式:
图模式:
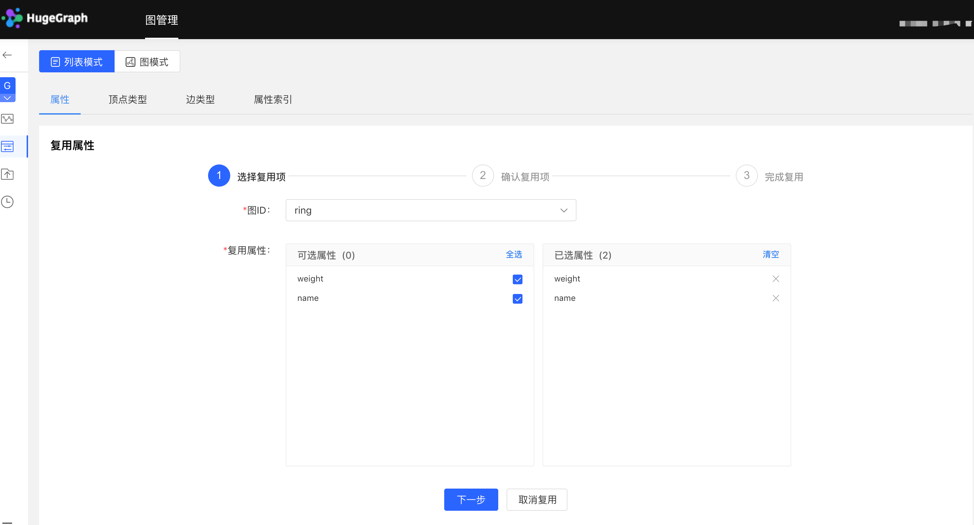
4.2.2.2 复用
- 平台提供【复用】功能,可直接复用其他图的元数据。
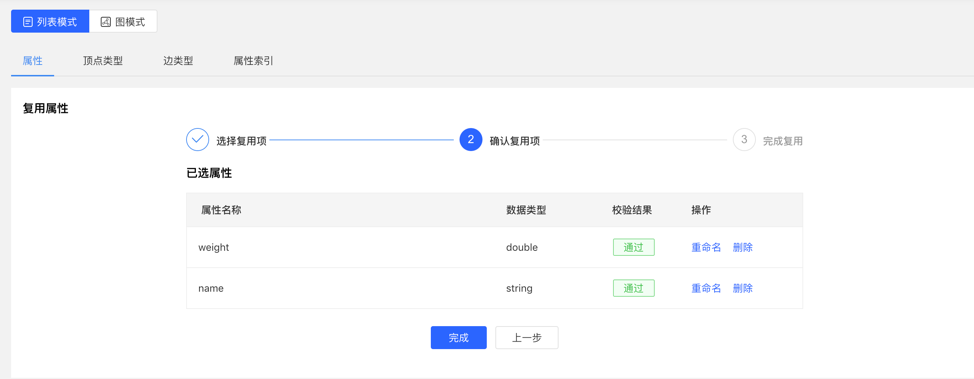
- 选择需要复用的图 ID,继续选择需要复用的属性,之后平台会进行是否冲突的校验,通过后,可实现元数据的复用。
选择复用项:
校验复用项:
4.2.2.3 管理
- 在属性列表中可进行单条删除或批量删除操作。
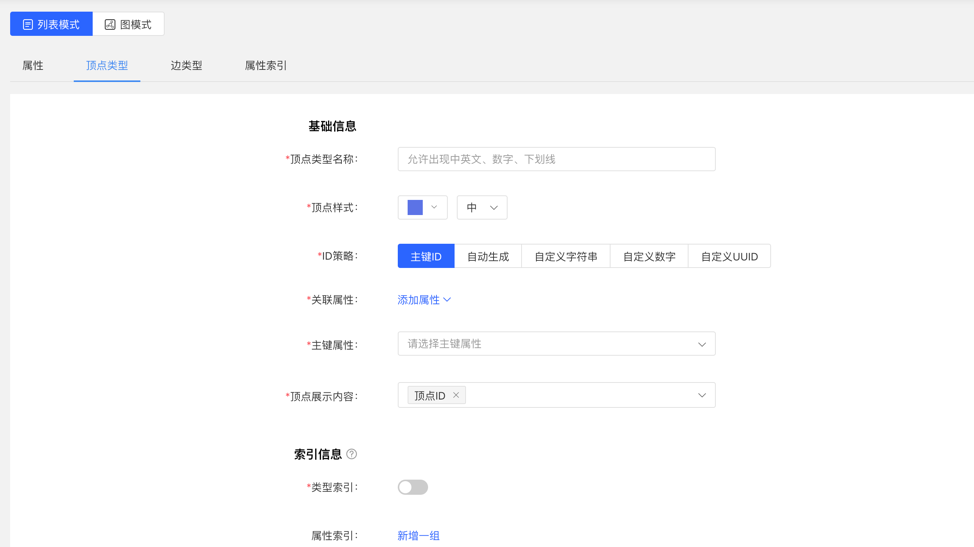
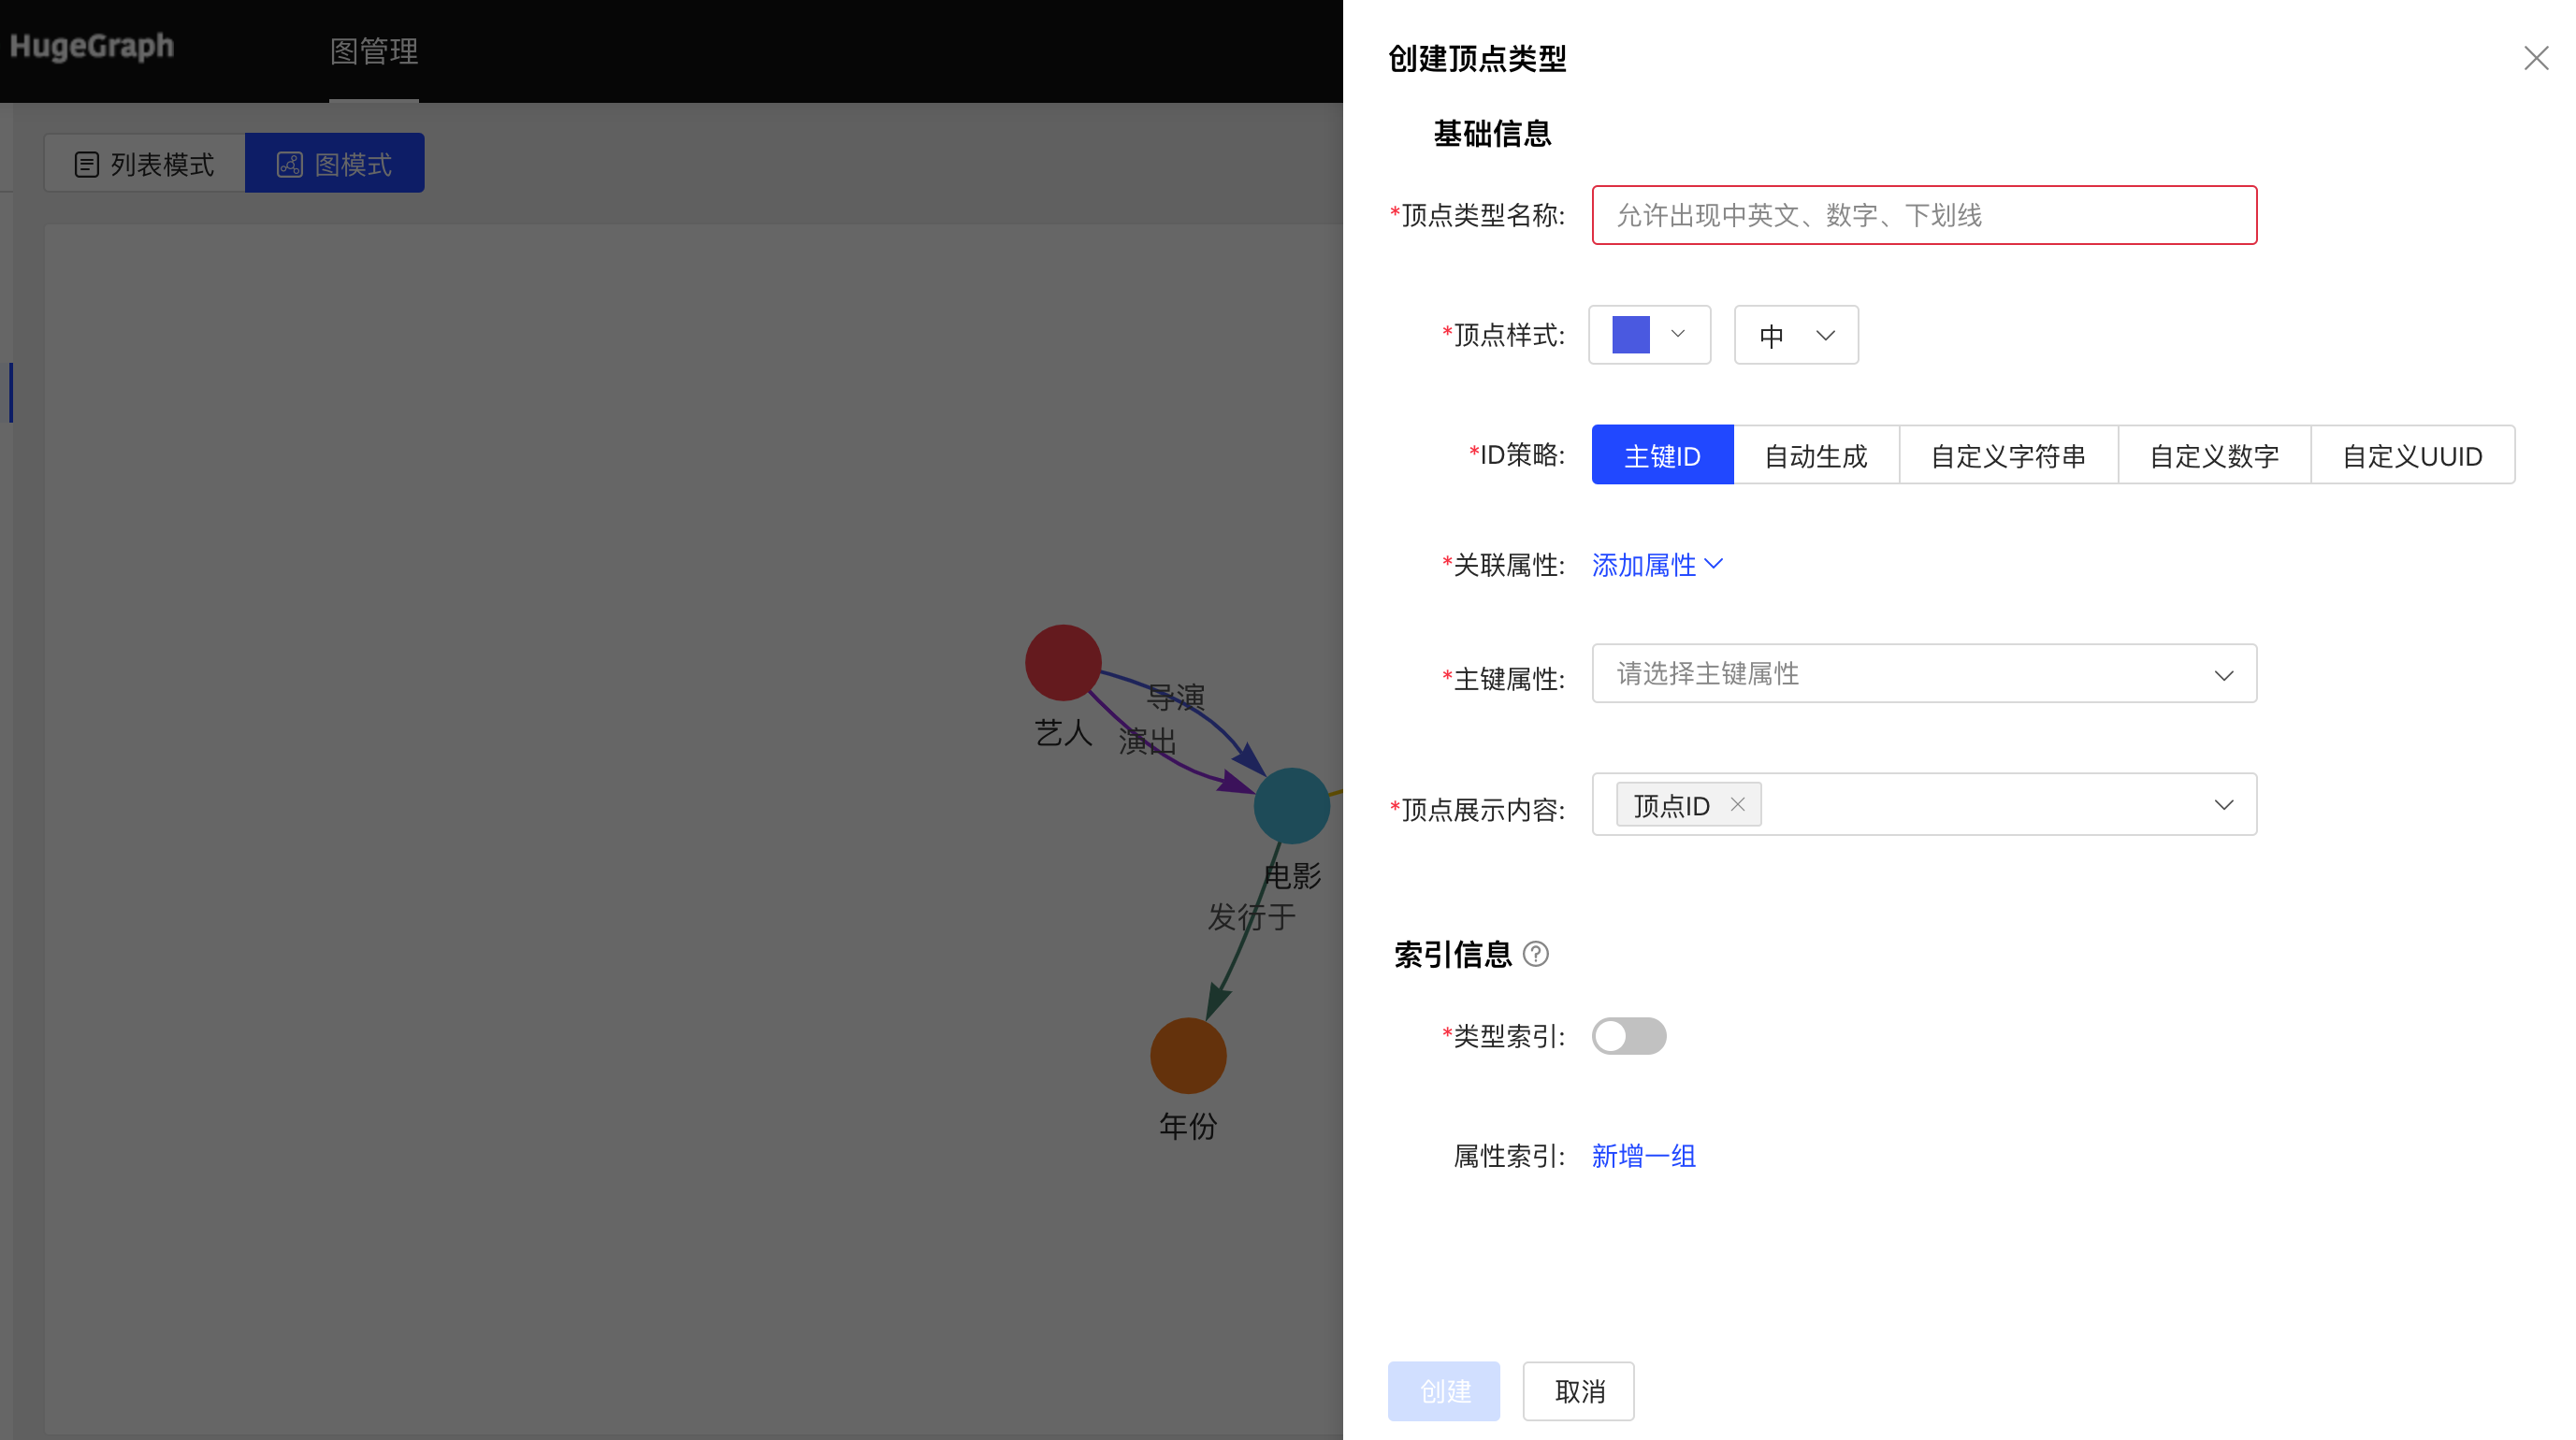
4.2.3 顶点类型
4.2.3.1 创建
- 填写或选择顶点类型名称、ID 策略、关联属性、主键属性,顶点样式、查询结果中顶点下方展示的内容,以及索引的信息:包括是否创建类型索引,及属性索引的具体内容,完成顶点类型的创建。
列表模式:
图模式:
4.2.3.2 复用
- 顶点类型的复用,会将此类型关联的属性和属性索引一并复用。
- 复用功能使用方法类似属性的复用,见 3.2.2.2。
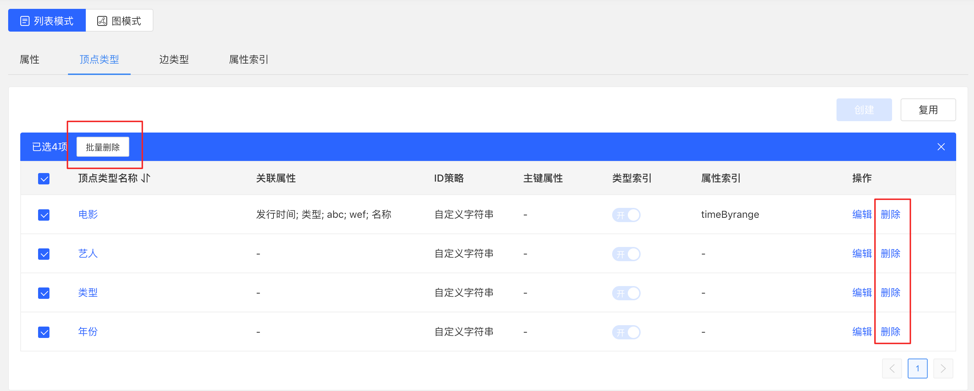
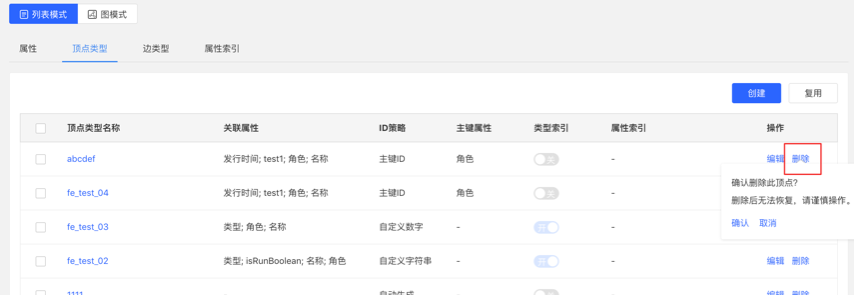
4.2.3.3 管理
可进行编辑操作,顶点样式、关联类型、顶点展示内容、属性索引可编辑,其余不可编辑。
可进行单条删除或批量删除操作。
4.2.4 边类型
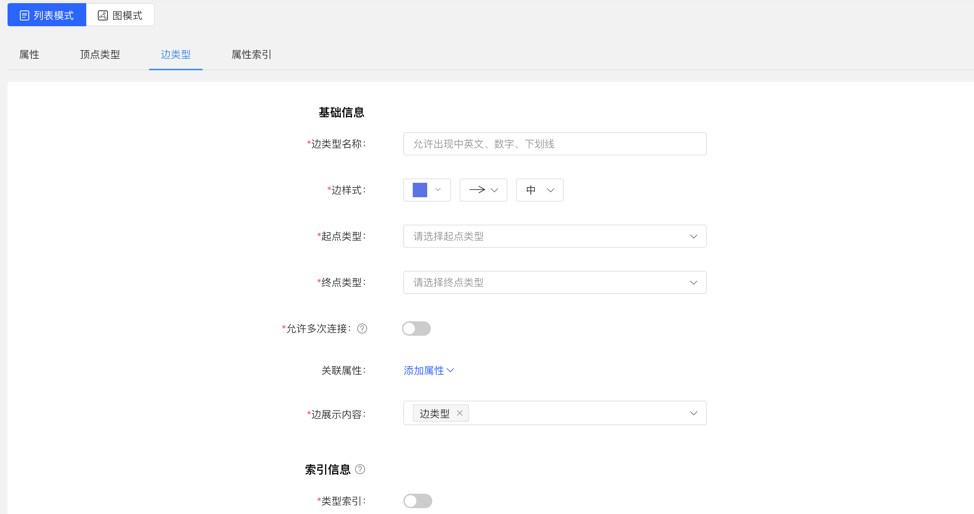
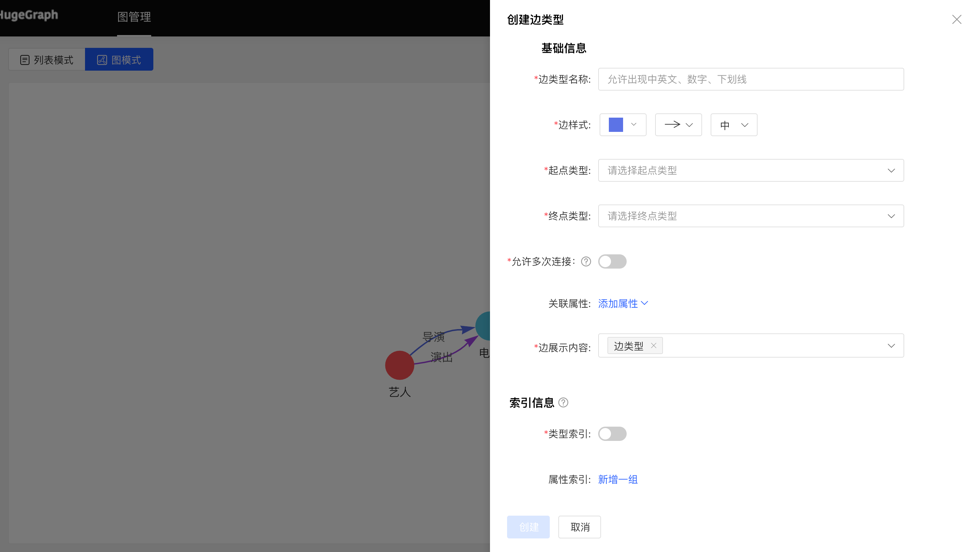
4.2.4.1 创建
- 填写或选择边类型名称、起点类型、终点类型、关联属性、是否允许多次连接、边样式、查询结果中边下方展示的内容,以及索引的信息:包括是否创建类型索引,及属性索引的具体内容,完成边类型的创建。
列表模式:
图模式:
4.2.4.2 复用
- 边类型的复用,会将此类型的起点类型、终点类型、关联的属性和属性索引一并复用。
- 复用功能使用方法类似属性的复用,见 3.2.2.2。
4.2.4.3 管理
- 可进行编辑操作,边样式、关联属性、边展示内容、属性索引可编辑,其余不可编辑,同顶点类型。
- 可进行单条删除或批量删除操作。
4.2.5 索引类型
展示顶点类型和边类型的顶点索引和边索引。
4.3 数据导入
注意:目前推荐使用 hugegraph-loader 进行正式数据导入,hubble 内置的导入用来做测试和简单上手
数据导入的使用流程如下:

4.3.1 模块入口
左侧导航处:

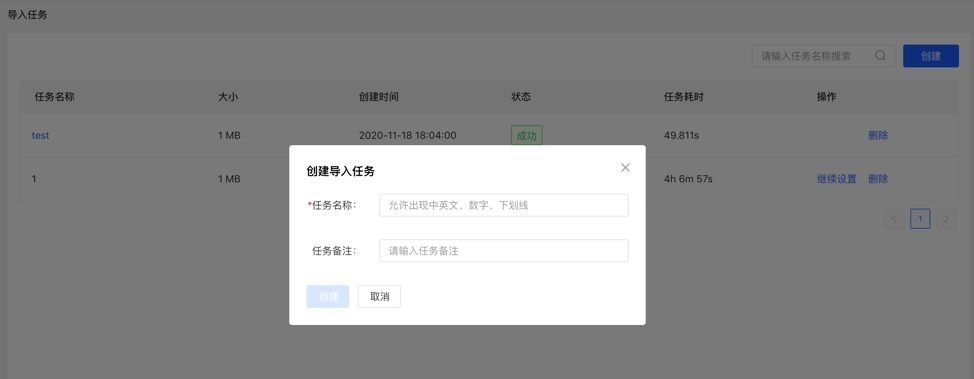
4.3.2 创建任务
- 填写任务名称和备注(非必填),可以创建导入任务。
- 可创建多个导入任务,并行导入。
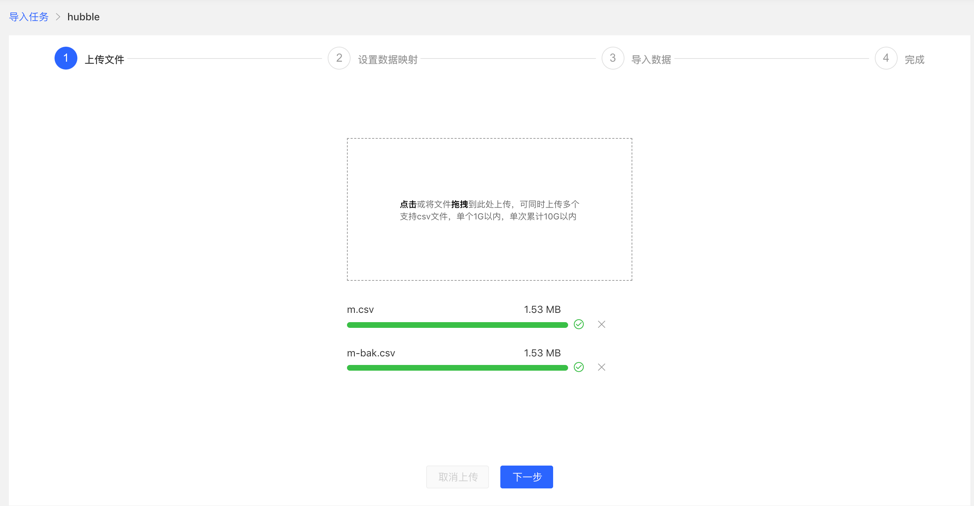
4.3.3 上传文件
- 上传需要构图的文件,目前支持的格式为 CSV,后续会不断更新。
- 可同时上传多个文件。
4.3.4 设置数据映射
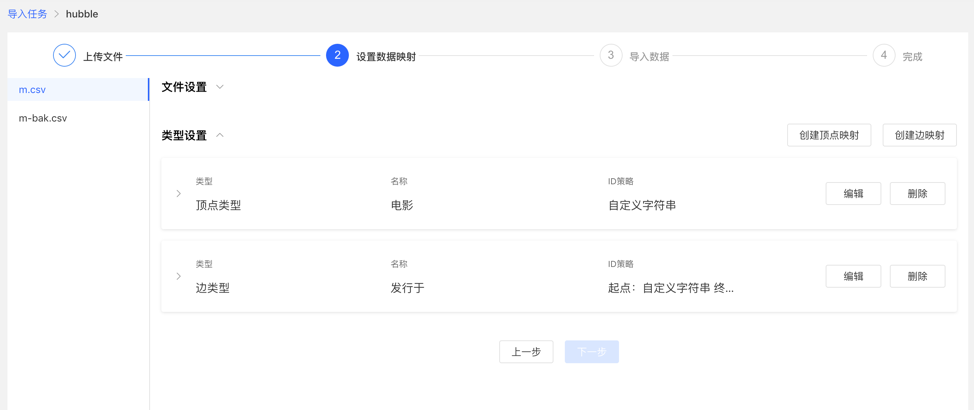
对上传的文件分别设置数据映射,包括文件设置和类型设置
文件设置:勾选或填写是否包含表头、分隔符、编码格式等文件本身的设置内容,均设置默认值,无需手动填写
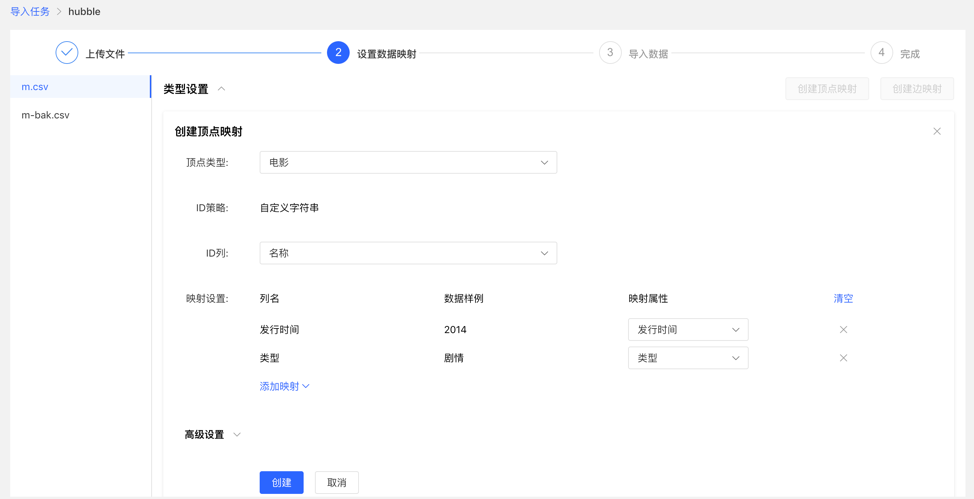
类型设置:
顶点映射和边映射:
【顶点类型】 :选择顶点类型,并为其 ID 映射上传文件中列数据;
【边类型】:选择边类型,为其起点类型和终点类型的 ID 列映射上传文件的列数据;
映射设置:为选定的顶点类型的属性映射上传文件中的列数据,此处,若属性名称与文件的表头名称一致,可自动匹配映射属性,无需手动填选
完成设置后,显示设置列表,方可进行下一步操作,支持映射的新增、编辑、删除操作
设置映射的填写内容:
映射列表:
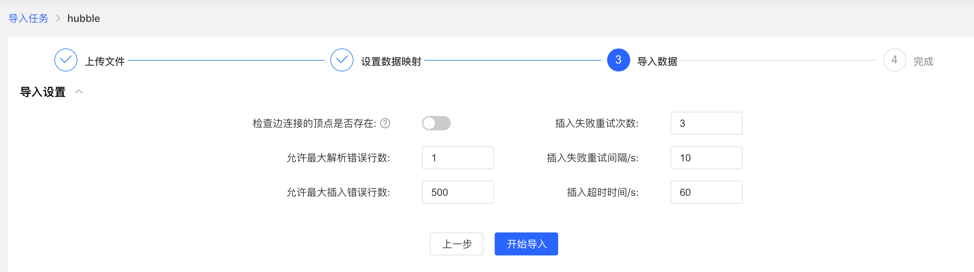
4.3.5 导入数据
导入前需要填写导入设置参数,填写完成后,可开始向图库中导入数据
- 导入设置
- 导入设置参数项如下图所示,均设置默认值,无需手动填写
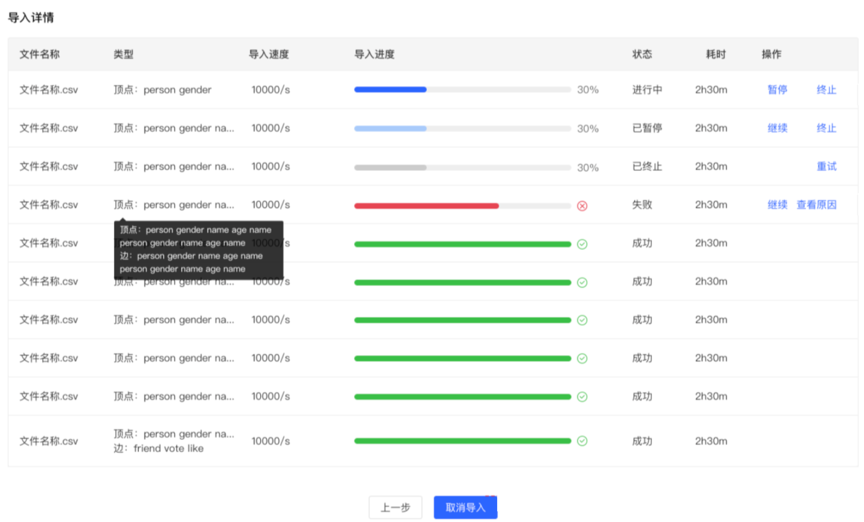
- 导入详情
- 点击开始导入,开始文件的导入任务
- 导入详情中提供每个上传文件设置的映射类型、导入速度、导入的进度、耗时以及当前任务的具体状态,并可对每个任务进行暂停、继续、停止等操作
- 若导入失败,可查看具体原因
4.4 数据分析
4.4.1 模块入口
左侧导航处:

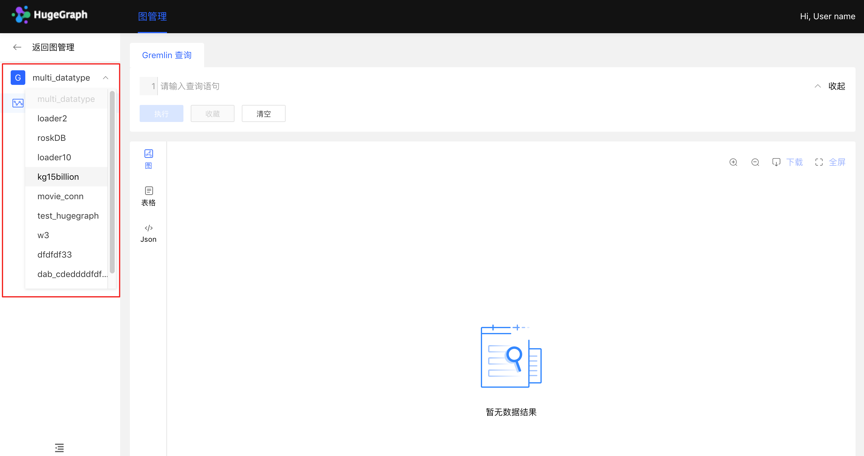
4.4.2 多图切换
通过左侧切换入口,灵活切换多图的操作空间
4.4.3 图分析与处理
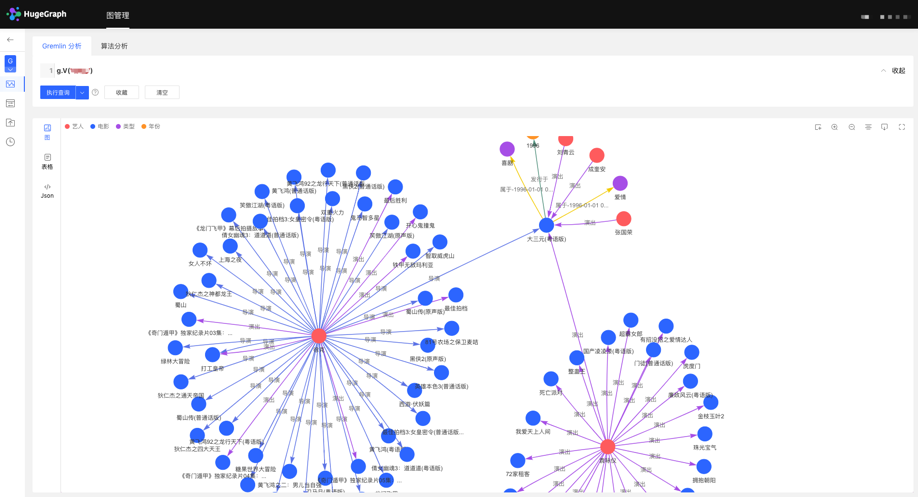
HugeGraph 支持 Apache TinkerPop3 的图遍历查询语言 Gremlin,Gremlin 是一种通用的图数据库查询语言,通过输入 Gremlin 语句,点击执行,即可执行图数据的查询分析操作,并可实现顶点/边的创建及删除、顶点/边的属性修改等。
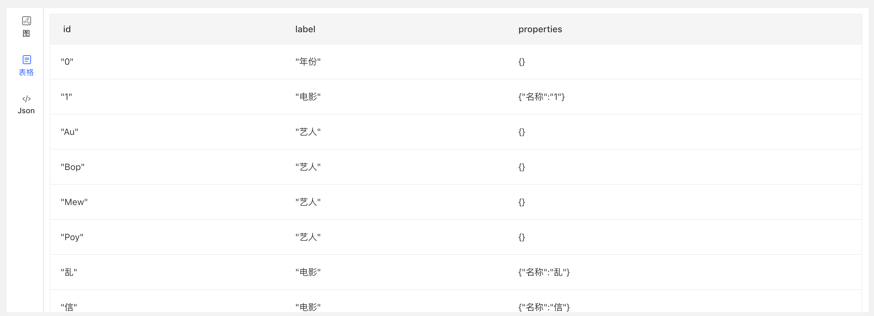
Gremlin 查询后,下方为图结果展示区域,提供 3 种图结果展示方式,分别为:【图模式】、【表格模式】、【Json 模式】。
⚠️ SEC 提醒:Hubble 允许在网页端直接输入并执行 Gremlin 原生查询语句,这赋予了使用者较高的操作权限。请避免将 Hubble 服务暴露在公网环境,建议在使用时确保图数据库服务端已开启 鉴权体系 (Auth) 并配合 IP 白名单进行严格的权限控制,防止未授权访问或恶意代码执行风险。
支持缩放、居中、全屏、导出等操作。
【图模式】
【表格模式】
【Json 模式】
4.4.4 数据详情
点击顶点/边实体,可查看顶点/边的数据详情,包括:顶点/边类型,顶点 ID,属性及对应值,拓展图的信息展示维度,提高易用性。
4.4.5 图结果的多维路径查询
除了全局的查询外,可针对查询结果中的顶点进行深度定制化查询以及隐藏操作,实现图结果的定制化挖掘。
右击顶点,出现顶点的菜单入口,可进行展示、查询、隐藏等操作。
- 展开:点击后,展示与选中点关联的顶点。
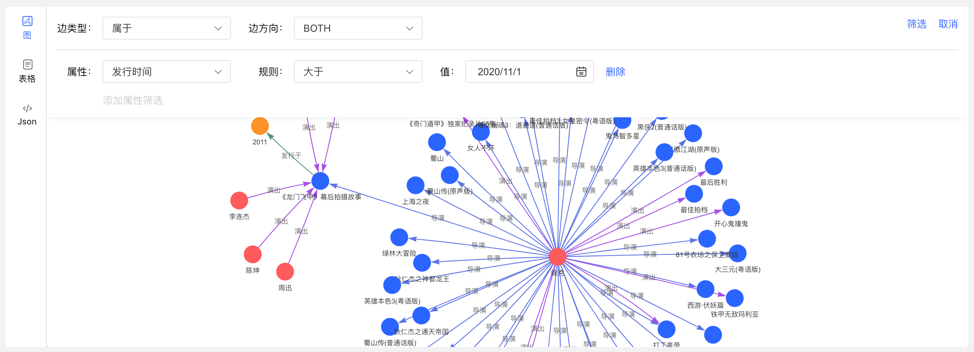
- 查询:通过选择与选中点关联的边类型及边方向,在此条件下,再选择其属性及相应筛选规则,可实现定制化的路径展示。
- 隐藏:点击后,隐藏选中点及与之关联的边。
双击顶点,也可展示与选中点关联的顶点。
4.4.6 新增顶点/边
4.4.6.1 新增顶点
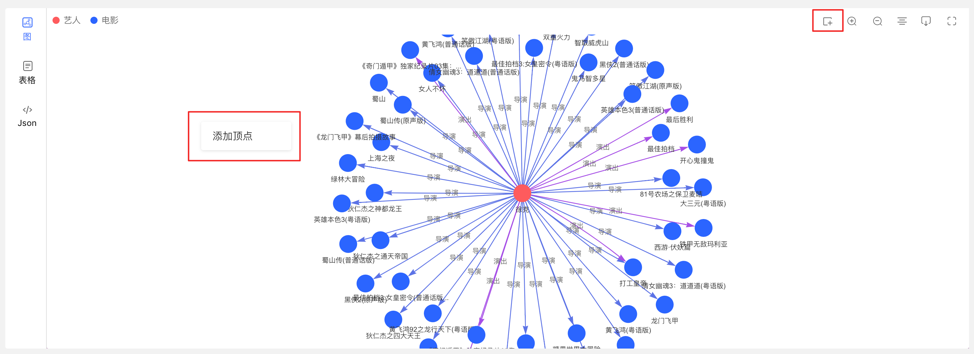
在图区可通过两个入口,动态新增顶点,如下:
- 点击图区面板,出现添加顶点入口
- 点击右上角的操作栏中的首个图标
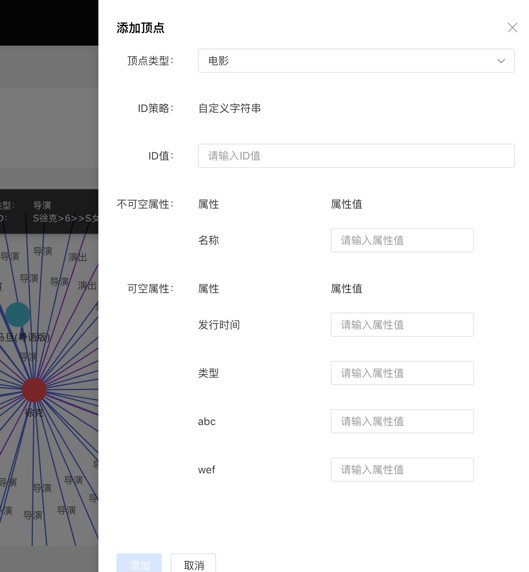
通过选择或填写顶点类型、ID 值、属性信息,完成顶点的增加。
入口如下:
添加顶点内容如下:
4.4.6.2 新增边
右击图结果中的顶点,可增加该点的出边或者入边。
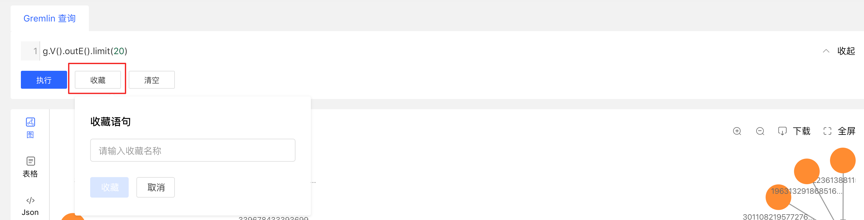
4.4.7 执行记录与收藏的查询
- 图区下方记载每次查询记录,包括:查询时间、执行类型、内容、状态、耗时、以及【收藏】和【加载】操作,实现图执行的全方位记录,有迹可循,并可对执行内容快速加载复用
- 提供语句的收藏功能,可对常用语句进行收藏操作,方便高频语句快速调用
4.5 任务管理
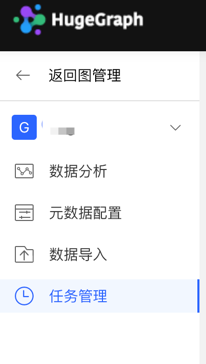
4.5.1 模块入口
左侧导航处:
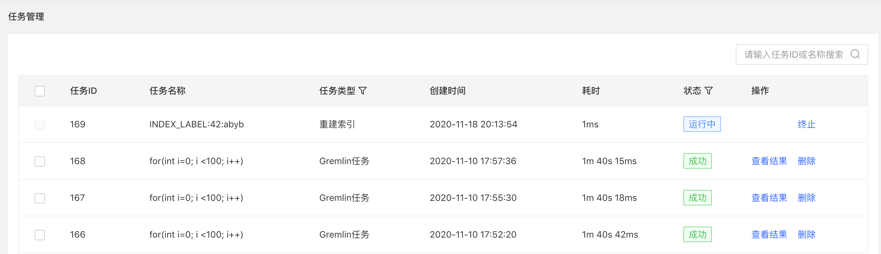
4.5.2 任务管理
- 提供异步任务的统一的管理与结果查看,异步任务包括 4 类,分别为:
- gremlin:Gremlin 任务务
- algorithm:OLAP 算法任务务
- remove_schema:删除元数据
- rebuild_index:重建索引
- 列表显示当前图的异步任务信息,包括:任务 ID,任务名称,任务类型,创建时间,耗时,状态,操作,实现对异步任务的管理。
- 支持对任务类型和状态进行筛选
- 支持搜索任务 ID 和任务名称
- 可对异步任务进行删除或批量删除操作
4.5.3 Gremlin 异步任务
1.创建任务
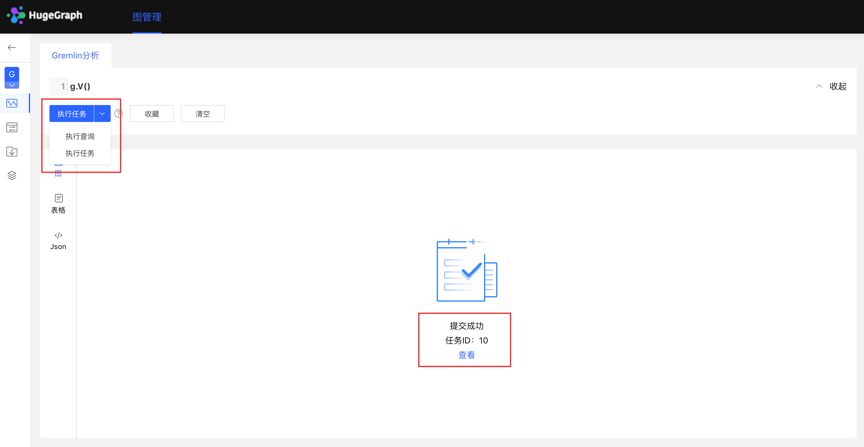
- 数据分析模块,目前支持两种 Gremlin 操作,Gremlin 查询和 Gremlin 任务;若用户切换到 Gremlin 任务,点击执行后,在异步任务中心会建立一条异步任务;
2.任务提交
- 任务提交成功后,图区部分返回提交结果和任务 ID
3.任务详情
- 提供【查看】入口,可跳转到任务详情查看当前任务具体执行情况跳转到任务中心后,直接显示当前执行的任务行
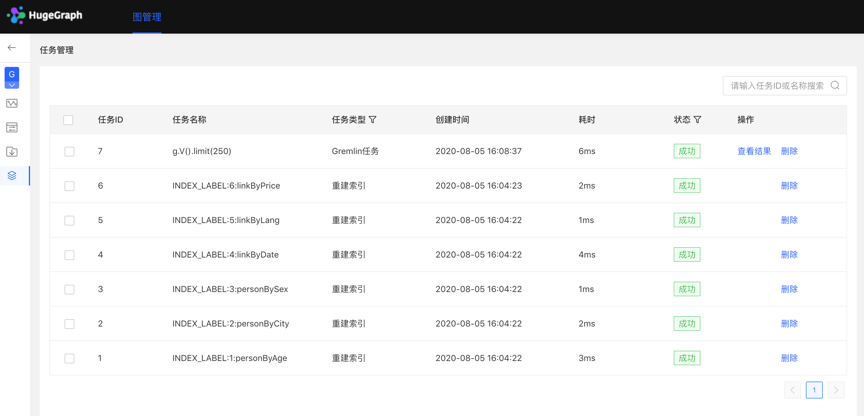
点击查看入口,跳转到任务管理列表,如下:
4.查看结果
4.5.4 OLAP 算法任务
Hubble 上暂未提供可视化的 OLAP 算法执行,可调用 RESTful API 进行 OLAP 类算法任务,在任务管理中通过 ID 找到相应任务,查看进度与结果等。
4.5.5 删除元数据、重建索引
1.创建任务
- 在元数据建模模块中,删除元数据时,可建立删除元数据的异步任务
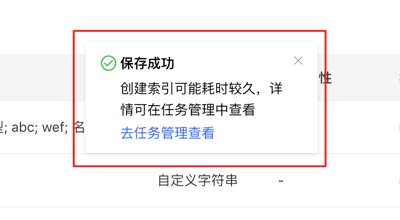
- 在编辑已有的顶点/边类型操作中,新增索引时,可建立创建索引的异步任务
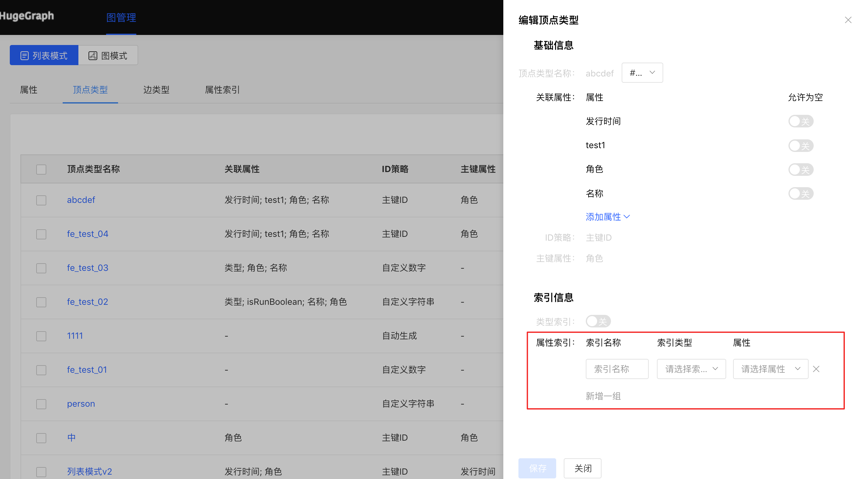
2.任务详情
5 配置说明
HugeGraph-Hubble 可以通过 conf/hugegraph-hubble.properties 文件进行配置。
5.1 服务器配置
| 配置项 | 默认值 | 说明 |
|---|
hubble.host | 0.0.0.0 | Hubble 服务绑定的地址 |
hubble.port | 8088 | Hubble 服务监听的端口 |
5.2 Gremlin 查询限制
这些设置控制查询结果限制,防止内存问题:
| 配置项 | 默认值 | 说明 |
|---|
gremlin.suffix_limit | 250 | 查询后缀最大长度 |
gremlin.vertex_degree_limit | 100 | 显示的最大顶点度数 |
gremlin.edges_total_limit | 500 | 返回的最大边数 |
gremlin.batch_query_ids | 100 | ID 批量查询大小 |
3.2.2 - HugeGraph-Loader Quick Start
1 HugeGraph-Loader 概述
HugeGraph-Loader 是 HugeGraph 的数据导入组件,能够将多种数据源的数据转化为图的顶点和边并批量导入到图数据库中。
目前支持的数据源包括:
- 本地磁盘文件或目录,支持 TEXT、CSV 和 JSON 格式的文件,支持压缩文件
- HDFS 文件或目录,支持压缩文件
- 主流关系型数据库,如 MySQL、PostgreSQL、Oracle、SQL Server
本地磁盘文件和 HDFS 文件支持断点续传。
后面会具体说明。
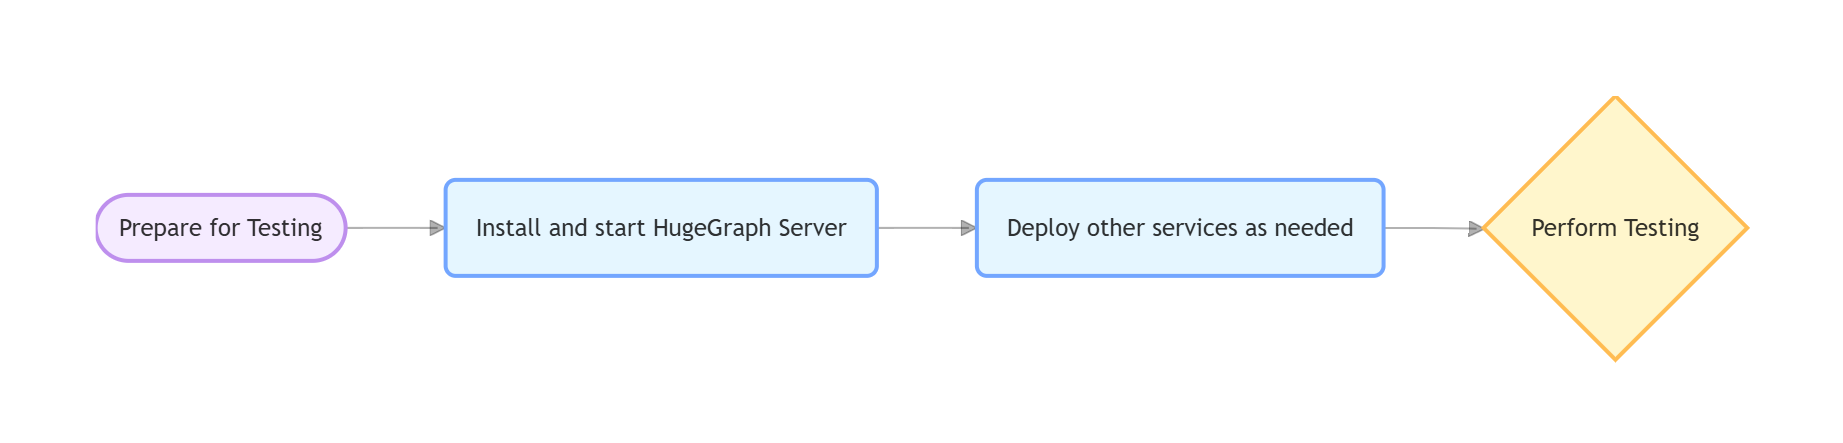
注意:使用 HugeGraph-Loader 需要依赖 HugeGraph Server 服务,下载和启动 Server 请参考 HugeGraph-Server Quick Start
测试指南:如需在本地运行 Loader 测试,请参考 工具链本地测试指南
2 获取 HugeGraph-Loader
有两种方式可以获取 HugeGraph-Loader:
- 使用 Docker 镜像 (便于测试)
- 下载已编译的压缩包
- 克隆源码编译安装
2.1 使用 Docker 镜像 (便于测试)
我们可以使用 docker run -itd --name loader hugegraph/loader:1.5.0 部署 loader 服务。对于需要加载的数据,则可以通过挂载 -v /path/to/data/file:/loader/file 或者 docker cp 的方式将文件复制到 loader 容器内部。
或者使用 docker-compose 启动 loader, 启动命令为 docker-compose up -d, 样例的 docker-compose.yml 如下所示:
version: '3'

services:
  server:
    image: hugegraph/hugegraph:1.5.0
    container_name: server
    environment:
      - PASSWORD=xxx
    ports:
      - 8080:8080

  hubble:
    image: hugegraph/hubble:1.5.0
    container_name: hubble
    ports:
      - 8088:8088

  loader:
    image: hugegraph/loader:1.5.0
    container_name: loader
    # mount your own data here
    # volumes:
      # - /path/to/data/file:/loader/file
具体的数据导入流程可以参考 4.5 使用 docker 导入
注意:
hugegraph-loader 的 docker 镜像是一个便捷版本,用于快速启动 loader,并不是官方发布物料包方式。你可以从 ASF Release Distribution Policy 中得到更多细节。
推荐使用 release tag (如 1.5.0) 以获取稳定版。使用 latest tag 可以使用开发中的最新功能。
2.2 下载已编译的压缩包
下载最新版本的 HugeGraph-Toolchain Release 包,里面包含了 loader + tool + hubble 全套工具,如果你已经下载,可跳过重复步骤
wget https://downloads.apache.org/hugegraph/{version}/apache-hugegraph-toolchain-incubating-{version}.tar.gz
tar zxf *hugegraph*.tar.gz
2.3 克隆源码编译安装
克隆最新版本的 HugeGraph-Loader 源码包:
# 1. get from github
git clone https://github.com/apache/hugegraph-toolchain.git

# 2. get from direct url (please choose the **latest release** version)
wget https://downloads.apache.org/hugegraph/{version}/apache-hugegraph-toolchain-incubating-{version}-src.tar.gz
点击展开/折叠 手动安装 ojdbc 方法
由于 Oracle ojdbc license 的限制,需要手动安装 ojdbc 到本地 maven 仓库。
访问 Oracle jdbc 下载 页面。选择 Oracle Database 12c Release 2 (12.2.0.1) drivers,如下图所示。
打开链接后,选择“ojdbc8.jar”
把 ojdbc8 安装到本地 maven 仓库,进入ojdbc8.jar所在目录,执行以下命令。
mvn install:install-file -Dfile=./ojdbc8.jar -DgroupId=com.oracle -DartifactId=ojdbc8 -Dversion=12.2.0.1 -Dpackaging=jar
编译生成 tar 包:
cd hugegraph-loader
mvn clean package -DskipTests
3 使用流程
使用 HugeGraph-Loader 的基本流程分为以下几步:
- 编写图模型
- 准备数据文件
- 编写输入源映射文件
- 执行命令导入
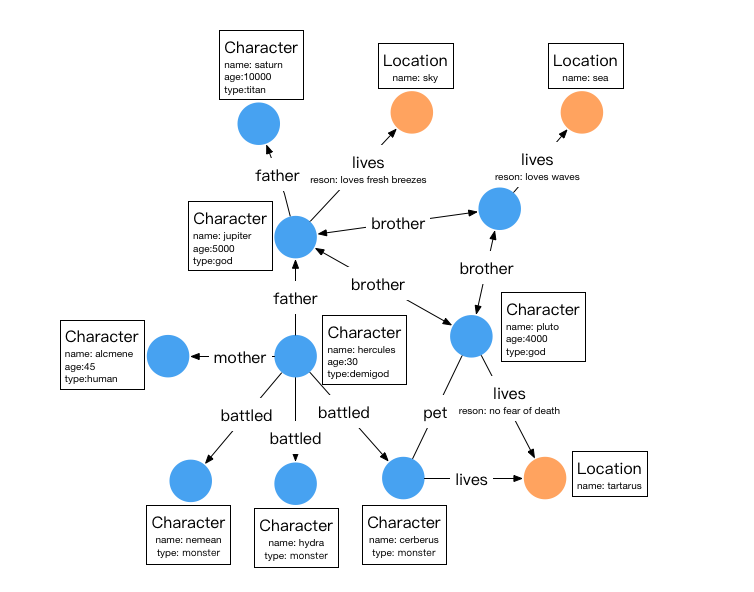
3.1 编写图模型
这一步是建模的过程,用户需要对自己已有的数据和想要创建的图模型有一个清晰的构想,然后编写 schema 建立图模型。
比如想创建一个拥有两类顶点及两类边的图,顶点是"人"和"软件",边是"人认识人"和"人创造软件",并且这些顶点和边都带有一些属性,比如顶点"人"有:“姓名”、“年龄"等属性,
“软件"有:“名字”、“售卖价格"等属性;边"认识"有:“日期"属性等。

示例图模型
在设计好了图模型之后,我们可以用groovy编写出schema的定义,并保存至文件中,这里命名为schema.groovy。
// 创建一些属性
schema.propertyKey("name").asText().ifNotExist().create();
schema.propertyKey("age").asInt().ifNotExist().create();
schema.propertyKey("city").asText().ifNotExist().create();
schema.propertyKey("date").asText().ifNotExist().create();
schema.propertyKey("price").asDouble().ifNotExist().create();

// 创建 person 顶点类型,其拥有三个属性:name, age, city,主键是 name
schema.vertexLabel("person").properties("name", "age", "city").primaryKeys("name").ifNotExist().create();
// 创建 software 顶点类型,其拥有两个属性:name, price,主键是 name
schema.vertexLabel("software").properties("name", "price").primaryKeys("name").ifNotExist().create();

// 创建 knows 边类型,这类边是从 person 指向 person 的
schema.edgeLabel("knows").sourceLabel("person").targetLabel("person").ifNotExist().create();
// 创建 created 边类型,这类边是从 person 指向 software 的
schema.edgeLabel("created").sourceLabel("person").targetLabel("software").ifNotExist().create();
关于 schema 的详细说明请参考 hugegraph-client 中对应部分。
3.2 准备数据
目前 HugeGraph-Loader 支持的数据源包括:
- 本地磁盘文件或目录
- HDFS 文件或目录
- 部分关系型数据库
- Kafka topic
3.2.1 数据源结构
3.2.1.1 本地磁盘文件或目录
用户可以指定本地磁盘文件作为数据源,如果数据分散在多个文件中,也支持以某个目录作为数据源,但暂时不支持以多个目录作为数据源。
比如:我的数据分散在多个文件中,part-0、part-1 … part-n,要想执行导入,必须保证它们是放在一个目录下的。然后在 loader 的映射文件中,将path指定为该目录即可。
支持的文件格式包括:
TEXT 是自定义分隔符的文本文件,第一行通常是标题,记录了每一列的名称,也允许没有标题行(在映射文件中指定)。其余的每行代表一条记录,会被转化为一个顶点/边;行的每一列对应一个字段,会被转化为顶点/边的 id、label 或属性;
示例如下:
id|name|lang|price|ISBN
1|lop|java|328|ISBN978-7-107-18618-5
2|ripple|java|199|ISBN978-7-100-13678-5
CSV 是分隔符为逗号,的 TEXT 文件,当列值本身包含逗号时,该列值需要用双引号包起来,如:
marko,29,Beijing
"li,nary",26,"Wu,han"
JSON 文件要求每一行都是一个 JSON 串,且每行的格式需保持一致。
{"source_name": "marko", "target_name": "vadas", "date": "20160110", "weight": 0.5}
{"source_name": "marko", "target_name": "josh", "date": "20130220", "weight": 1.0}
3.2.1.2 HDFS 文件或目录
用户也可以指定 HDFS 文件或目录作为数据源,上面关于本地磁盘文件或目录的要求全部适用于这里。除此之外,鉴于 HDFS 上通常存储的都是压缩文件,loader 也提供了对压缩文件的支持,并且本地磁盘文件或目录同样支持压缩文件。
目前支持的压缩文件类型包括:GZIP、BZ2、XZ、LZMA、SNAPPY_RAW、SNAPPY_FRAMED、Z、DEFLATE、LZ4_BLOCK、LZ4_FRAMED、ORC 和 PARQUET。
3.2.1.3 主流关系型数据库
loader 还支持以部分关系型数据库作为数据源,目前支持 MySQL、PostgreSQL、Oracle 和 SQL Server。
但目前对表结构要求较为严格,如果导入过程中需要做关联查询,这样的表结构是不允许的。关联查询的意思是:在读到表的某行后,发现某列的值不能直接使用(比如外键),需要再去做一次查询才能确定该列的真实值。
举个例子:假设有三张表,person、software 和 created
// person 表结构
id | name | age | city
// software 表结构
id | name | lang | price
// created 表结构
id | p_id | s_id | date
如果在建模(schema)时指定 person 或 software 的 id 策略是 PRIMARY_KEY,选择以 name 作为 primary keys(注意:这是 hugegraph 中 vertexlabel 的概念),在导入边数据时,由于需要拼接出源顶点和目标顶点的 id,必须拿着 p_id/s_id 去 person/software 表中查到对应的 name,这种需要做额外查询的表结构的情况,loader 暂时是不支持的。这时可以采用以下两种方式替代:
- 仍然指定 person 和 software 的 id 策略为 PRIMARY_KEY,但是以 person 表和 software 表的 id 列作为顶点的主键属性,这样导入边时直接使用 p_id 和 s_id 和顶点的 label 拼接就能生成 id 了;
- 指定 person 和 software 的 id 策略为 CUSTOMIZE,然后直接以 person 表和 software 表的 id 列作为顶点 id,这样导入边时直接使用 p_id 和 s_id 即可;
关键点就是要让边能直接使用 p_id 和 s_id,不要再去查一次。
3.2.2 准备顶点和边数据
3.2.2.1 顶点数据
顶点数据文件由一行一行的数据组成,一般每一行作为一个顶点,每一列会作为顶点属性。下面以 CSV 格式作为示例进行说明。
- person 顶点数据(数据本身不包含 header)
Tom,48,Beijing
Jerry,36,Shanghai
- software 顶点数据(数据本身包含 header)
name,price
Photoshop,999
Office,388
3.2.2.2 边数据
边数据文件由一行一行的数据组成,一般每一行作为一条边,其中有部分列会作为源顶点和目标顶点的 id,其他列作为边属性。下面以 JSON 格式作为示例进行说明。
{"source_name": "Tom", "target_name": "Jerry", "date": "2008-12-12"}
{"source_name": "Tom", "target_name": "Photoshop"}
{"source_name": "Tom", "target_name": "Office"}
{"source_name": "Jerry", "target_name": "Office"}
3.3 编写数据源映射文件
3.3.1 映射文件概述
输入源的映射文件用于描述如何将输入源数据与图的顶点类型/边类型建立映射关系,以JSON格式组织,由多个映射块组成,其中每一个映射块都负责将一个输入源映射为顶点和边。
具体而言,每个映射块包含一个输入源和多个顶点映射与边映射块,输入源块对应上面介绍的本地磁盘文件或目录、HDFS 文件或目录和关系型数据库,负责描述数据源的基本信息,比如数据在哪,是什么格式的,分隔符是什么等。顶点映射/边映射与该输入源绑定,可以选择输入源的哪些列,哪些列作为 id、哪些列作为属性,以及每一列映射成什么属性,列的值映射成属性的什么值等等。
以最通俗的话讲,每一个映射块描述了:要导入的文件在哪,文件的每一行要作为哪一类顶点/边,文件的哪些列是需要导入的,以及这些列对应顶点/边的什么属性等。
注意:0.11.0 版本以前的映射文件与 0.11.0 以后的格式变化较大,为表述方便,下面称 0.11.0 以前的映射文件(格式)为 1.0 版本,0.11.0 以后的为 2.0 版本。并且若无特殊说明,“映射文件”表示的是 2.0 版本的。
点击展开/折叠 2.0 版本的映射文件的框架
{
  "version": "2.0",
  "structs": [
    {
      "id": "1",
      "input": {
      },
      "vertices": [
        {},
        {}
      ],
      "edges": [
        {},
        {}
      ]
    }
  ]
}
这里直接给出两个版本的映射文件(描述了上面图模型和数据文件)
点击展开/折叠 2.0 版本的映射文件
{
  "version": "2.0",
  "structs": [
    {
      "id": "1",
      "skip": false,
      "input": {
        "type": "FILE",
        "path": "vertex_person.csv",
        "file_filter": {
          "extensions": [
            "*"
          ]
        },
        "format": "CSV",
        "delimiter": ",",
        "date_format": "yyyy-MM-dd HH:mm:ss",
        "time_zone": "GMT+8",
        "skipped_line": {
          "regex": "(^#|^//).*|"
        },
        "compression": "NONE",
        "header": [
          "name",
          "age",
          "city"
        ],
        "charset": "UTF-8",
        "list_format": {
          "start_symbol": "[",
          "elem_delimiter": "|",
          "end_symbol": "]"
        }
      },
      "vertices": [
        {
          "label": "person",
          "skip": false,
          "id": null,
          "unfold": false,
          "field_mapping": {},
          "value_mapping": {},
          "selected": [],
          "ignored": [],
          "null_values": [
            ""
          ],
          "update_strategies": {}
        }
      ],
      "edges": []
    },
    {
      "id": "2",
      "skip": false,
      "input": {
        "type": "FILE",
        "path": "vertex_software.csv",
        "file_filter": {
          "extensions": [
            "*"
          ]
        },
        "format": "CSV",
        "delimiter": ",",
        "date_format": "yyyy-MM-dd HH:mm:ss",
        "time_zone": "GMT+8",
        "skipped_line": {
          "regex": "(^#|^//).*|"
        },
        "compression": "NONE",
        "header": null,
        "charset": "UTF-8",
        "list_format": {
          "start_symbol": "",
          "elem_delimiter": ",",
          "end_symbol": ""
        }
      },
      "vertices": [
        {
          "label": "software",
          "skip": false,
          "id": null,
          "unfold": false,
          "field_mapping": {},
          "value_mapping": {},
          "selected": [],
          "ignored": [],
          "null_values": [
            ""
          ],
          "update_strategies": {}
        }
      ],
      "edges": []
    },
    {
      "id": "3",
      "skip": false,
      "input": {
        "type": "FILE",
        "path": "edge_knows.json",
        "file_filter": {
          "extensions": [
            "*"
          ]
        },
        "format": "JSON",
        "delimiter": null,
        "date_format": "yyyy-MM-dd HH:mm:ss",
        "time_zone": "GMT+8",
        "skipped_line": {
          "regex": "(^#|^//).*|"
        },
        "compression": "NONE",
        "header": null,
        "charset": "UTF-8",
        "list_format": null
      },
      "vertices": [],
      "edges": [
        {
          "label": "knows",
          "skip": false,
          "source": [
            "source_name"
          ],
          "unfold_source": false,
          "target": [
            "target_name"
          ],
          "unfold_target": false,
          "field_mapping": {
            "source_name": "name",
            "target_name": "name"
          },
          "value_mapping": {},
          "selected": [],
          "ignored": [],
          "null_values": [
            ""
          ],
          "update_strategies": {}
        }
      ]
    },
    {
      "id": "4",
      "skip": false,
      "input": {
        "type": "FILE",
        "path": "edge_created.json",
        "file_filter": {
          "extensions": [
            "*"
          ]
        },
        "format": "JSON",
        "delimiter": null,
        "date_format": "yyyy-MM-dd HH:mm:ss",
        "time_zone": "GMT+8",
        "skipped_line": {
          "regex": "(^#|^//).*|"
        },
        "compression": "NONE",
        "header": null,
        "charset": "UTF-8",
        "list_format": null
      },
      "vertices": [],
      "edges": [
        {
          "label": "created",
          "skip": false,
          "source": [
            "source_name"
          ],
          "unfold_source": false,
          "target": [
            "target_name"
          ],
          "unfold_target": false,
          "field_mapping": {
            "source_name": "name",
            "target_name": "name"
          },
          "value_mapping": {},
          "selected": [],
          "ignored": [],
          "null_values": [
            ""
          ],
          "update_strategies": {}
        }
      ]
    }
  ]
}
点击展开/折叠 1.0 版本的映射文件
{
  "vertices": [
    {
      "label": "person",
      "input": {
        "type": "file",
        "path": "vertex_person.csv",
        "format": "CSV",
        "header": ["name", "age", "city"],
        "charset": "UTF-8"
      }
    },
    {
      "label": "software",
      "input": {
        "type": "file",
        "path": "vertex_software.csv",
        "format": "CSV"
      }
    }
  ],
  "edges": [
    {
      "label": "knows",
      "source": ["source_name"],
      "target": ["target_name"],
      "input": {
        "type": "file",
        "path": "edge_knows.json",
        "format": "JSON"
      },
      "field_mapping": {
        "source_name": "name",
        "target_name": "name"
      }
    },
    {
      "label": "created",
      "source": ["source_name"],
      "target": ["target_name"],
      "input": {
        "type": "file",
        "path": "edge_created.json",
        "format": "JSON"
      },
      "field_mapping": {
        "source_name": "name",
        "target_name": "name"
      }
    }
  ]
}
映射文件 1.0 版本是以顶点和边为中心,设置输入源;而 2.0 版本是以输入源为中心,设置顶点和边映射。有些输入源(比如一个文件)既能生成顶点,也能生成边,如果用 1.0 版的格式写,就需要在 vertex 和 edge 映射块中各写一次 input 块,这两次的 input 块是完全一样的;而 2.0 版本只需要写一次 input。所以 2.0 版相比于 1.0 版,能省掉一些 input 的重复书写。
在 hugegraph-loader-{version} 的 bin 目录下,有一个脚本工具 mapping-convert.sh 能直接将 1.0 版本的映射文件转换为 2.0 版本的,使用方式如下:
bin/mapping-convert.sh struct.json
会在 struct.json 的同级目录下生成一个 struct-v2.json。
3.3.2 输入源
输入源目前分为五类:FILE、HDFS、JDBC、KAFKA 和 GRAPH,由type节点区分,我们称为本地文件输入源、HDFS 输入源、JDBC 输入源和 KAFKA 输入源,图数据源,下面分别介绍。
3.3.2.1 本地文件输入源
- id: 输入源的 id,该字段用于支持一些内部功能,非必填(未填时会自动生成),强烈建议写上,对于调试大有裨益;
- skip: 是否跳过该输入源,由于 JSON 文件无法添加注释,如果某次导入时不想导入某个输入源,但又不想删除该输入源的配置,则可以设置为 true 将其跳过,默认为 false,非必填;
- input: 输入源映射块,复合结构
- type: 输入源类型,必须填 file 或 FILE;
- path: 本地文件或目录的路径,绝对路径或相对于映射文件的相对路径,建议使用绝对路径,必填;
- file_filter: 从
path中筛选复合条件的文件,复合结构,目前只支持配置扩展名,用子节点extensions表示,默认为”*",表示保留所有文件; - format: 本地文件的格式,可选值为 CSV、TEXT 及 JSON,必须大写,必填;
- header: 文件各列的列名,如不指定则会以数据文件第一行作为 header;当文件本身有标题且又指定了 header,文件的第一行会被当作普通的数据行;JSON 文件不需要指定 header,选填;
- delimiter: 文件行的列分隔符,默认以逗号
","作为分隔符,JSON文件不需要指定,选填; - charset: 文件的编码字符集,默认
UTF-8,选填; - date_format: 自定义的日期格式,默认值为 yyyy-MM-dd HH:mm:ss,选填;如果日期是以时间戳的形式呈现的,此项须写为
timestamp(固定写法); - time_zone: 设置日期数据是处于哪个时区的,默认值为
GMT+8,选填; - skipped_line: 想跳过的行,复合结构,目前只能配置要跳过的行的正则表达式,用子节点
regex描述,默认不跳过任何行,选填; - compression: 文件的压缩格式,可选值为 NONE、GZIP、BZ2、XZ、LZMA、SNAPPY_RAW、SNAPPY_FRAMED、Z、DEFLATE、LZ4_BLOCK、LZ4_FRAMED、ORC 和 PARQUET,默认为 NONE,表示非压缩文件,选填;
- list_format: 当文件 (非 JSON ) 的某列是集合结构时(对应图中的 PropertyKey 的 Cardinality 为 Set 或 List),可以用此项设置该列的起始符、分隔符、结束符,复合结构:
- start_symbol: 集合结构列的起始符 (默认值是
[, JSON 格式目前不支持指定) - elem_delimiter: 集合结构列的分隔符 (默认值是
|, JSON 格式目前只支持原生,分隔) - end_symbol: 集合结构列的结束符 (默认值是
], JSON 格式目前不支持指定)
3.3.2.2 HDFS 输入源
上述本地文件输入源的节点及含义这里基本都适用,下面仅列出 HDFS 输入源不一样的和特有的节点。
- type: 输入源类型,必须填 hdfs 或 HDFS,必填;
- path: HDFS 文件或目录的路径,必须是 HDFS 的绝对路径,必填;
- core_site_path: HDFS 集群的 core-site.xml 文件路径,重点要指明 NameNode 的地址(
fs.default.name),以及文件系统的实现(fs.hdfs.impl);
3.3.2.3 JDBC 输入源
前面说到过支持多种关系型数据库,但由于它们的映射结构非常相似,故统称为 JDBC 输入源,然后用vendor节点区分不同的数据库。
- type: 输入源类型,必须填 jdbc 或 JDBC,必填;
- vendor: 数据库类型,可选项为 [MySQL、PostgreSQL、Oracle、SQLServer],不区分大小写,必填;
- driver: jdbc 使用的 driver 类型,必填;
- url: jdbc 要连接的数据库的 url,必填;
- database: 要连接的数据库名,必填;
- schema: 要连接的 schema 名,不同的数据库要求不一样,下面详细说明;
- table: 要连接的表名,
custom_sql 和 table 参数必须填其中一个; - custom_sql: 自定义 SQL 语句,
custom_sql 和 table 参数必须填其中一个; - username: 连接数据库的用户名,必填;
- password: 连接数据库的密码,必填;
- batch_size: 按页获取表数据时的一页的大小,默认为 500,选填;
MYSQL
| 节点 | 固定值或常见值 |
|---|
| vendor | MYSQL |
| driver | com.mysql.cj.jdbc.Driver |
| url | jdbc:mysql://127.0.0.1:3306 |
schema: 可空,若填写必须与 database 的值一样
POSTGRESQL
| 节点 | 固定值或常见值 |
|---|
| vendor | POSTGRESQL |
| driver | org.postgresql.Driver |
| url | jdbc:postgresql://127.0.0.1:5432 |
schema: 可空,默认值为“public”
ORACLE
| 节点 | 固定值或常见值 |
|---|
| vendor | ORACLE |
| driver | oracle.jdbc.driver.OracleDriver |
| url | jdbc:oracle:thin:@127.0.0.1:1521 |
schema: 可空,默认值与用户名相同
SQLSERVER
| 节点 | 固定值或常见值 |
|---|
| vendor | SQLSERVER |
| driver | com.microsoft.sqlserver.jdbc.SQLServerDriver |
| url | jdbc:sqlserver://127.0.0.1:1433 |
schema: 必填
3.3.2.4 Kafka 输入源
- type:输入源类型,必须填
kafka 或 KAFKA,必填; - bootstrap_server:设置 kafka bootstrap server 列表;
- topic:订阅的 topic;
- group:Kafka 消费者组;
- from_beginning:设置是否从头开始读取;
- format:本地文件的格式,可选值为 CSV、TEXT 及 JSON,必须大写,必填;
- header:文件各列的列名,如不指定则会以数据文件第一行作为 header;当文件本身有标题且又指定了 header,文件的第一行会被当作普通的数据行;JSON 文件不需要指定 header,选填;
- delimiter:文件行的列分隔符,默认以逗号”,“作为分隔符,JSON 文件不需要指定,选填;
- charset:文件的编码字符集,默认 UTF-8,选填;
- date_format:自定义的日期格式,默认值为 yyyy-MM-dd HH:mm:ss,选填;如果日期是以时间戳的形式呈现的,此项须写为 timestamp(固定写法);
- extra_date_formats:自定义的其他日期格式列表,默认为空,选填;列表中每一项都是一个 date_format 指定日期格式的备用日期格式;
- time_zone:置日期数据是处于哪个时区的,默认值为 GMT+8,选填;
- skipped_line:想跳过的行,复合结构,目前只能配置要跳过的行的正则表达式,用子节点 regex 描述,默认不跳过任何行,选填;
- early_stop:某次从 Kafka broker 拉取的记录为空,停止任务,默认为 false,仅用于调试,选填;
3.3.2.5 GRAPH 输入源
- type:输入源类型,必须填
graph 或 GRAPH,必填; - graphspace:源图空间名称,默认为
DEFAULT; - graph: 源图名称,必填;
- username:HugeGraph 用户名;
- password:HugeGraph 密码;
- selected_vertices:要同步的顶点筛选规则;
- ignored_vertices:要忽略的顶点筛选规则;
- selected_edges:要同步的边筛选规则;
- ignored_edges:要忽略的边筛选规则;
- pd-peers:HugeGraph-PD 节点地址;
- meta-endpoints:源集群 Meta服务端点;
- cluster:源集群名称;
- batch_size:批量读取源图数据的批次大小,默认为500;
3.3.3 顶点和边映射
顶点和边映射的节点(JSON 文件中的一个 key)有很多相同的部分,下面先介绍相同部分,再分别介绍顶点映射和边映射的特有节点。
相同部分的节点
- label: 待导入的顶点/边数据所属的
label,必填; - field_mapping: 将输入源列的列名映射为顶点/边的属性名,选填;
- value_mapping: 将输入源的数据值映射为顶点/边的属性值,选填;
- selected: 选择某些列插入,其他未选中的不插入,不能与
ignored同时存在,选填; - ignored: 忽略某些列,使其不参与插入,不能与
selected同时存在,选填; - null_values: 可以指定一些字符串代表空值,比如"NULL”,如果该列对应的顶点/边属性又是一个可空属性,那在构造顶点/边时不会设置该属性的值,选填;
- update_strategies: 如果数据需要按特定方式批量更新时可以对每个属性指定具体的更新策略 (具体见下),选填;
- unfold: 是否将列展开,展开的每一列都会与其他列一起组成一行,相当于是展开成了多行;比如文件的某一列(id 列)的值是
[1,2,3],其他列的值是18,Beijing,当设置了 unfold 之后,这一行就会变成 3 行,分别是:1,18,Beijing,2,18,Beijing和3,18,Beijing。需要注意的是此项只会展开被选作为 id 的列。默认 false,选填;
更新策略支持 8 种 : (需要全大写)
- 数值累加 :
SUM - 两个数字/日期取更大的:
BIGGER - 两个数字/日期取更小:
SMALLER - Set属性取并集:
UNION - Set属性取交集:
INTERSECTION - List属性追加元素:
APPEND - List/Set属性删除元素:
ELIMINATE - 覆盖已有属性:
OVERRIDE
注意: 如果新导入的属性值为空,会采用已有的旧数据而不会采用空值,效果可以参考如下示例
// JSON 文件中以如下方式指定更新策略
{
  "vertices": [
    {
      "label": "person",
      "update_strategies": {
        "age": "SMALLER",
        "set": "UNION"
      },
      "input": {
        "type": "file",
        "path": "vertex_person.txt",
        "format": "TEXT",
        "header": ["name", "age", "set"]
      }
    }
  ]
}

// 1.写入一行带 OVERRIDE 更新策略的数据 (这里 null 代表空)
'a b null null'

// 2.再写一行
'null null c d'

// 3.最后可以得到
'a b c d'

// 如果没有更新策略,则会得到
'null null c d'
注意 : 采用了批量更新的策略后, 磁盘读请求数会大幅上升, 导入速度相比纯写覆盖会慢数倍 (此时HDD磁盘IOPS会成为瓶颈, 建议采用SSD以保证速度)
顶点映射的特有节点
- id: 指定某一列作为顶点的 id 列,当顶点 id 策略为
CUSTOMIZE时,必填;当 id 策略为PRIMARY_KEY时,必须为空;
边映射的特有节点
- source: 选择输入源某几列作为源顶点的 id 列,当源顶点的 id 策略为
CUSTOMIZE时,必须指定某一列作为顶点的 id 列;当源顶点的 id 策略为 PRIMARY_KEY时,必须指定一列或多列用于拼接生成顶点的 id,也就是说,不管是哪种 id 策略,此项必填; - target: 指定某几列作为目标顶点的 id 列,与 source 类似,不再赘述;
- unfold_source: 是否展开文件的 source 列,效果与顶点映射中的类似,不再赘述;
- unfold_target: 是否展开文件的 target 列,效果与顶点映射中的类似,不再赘述;
3.4 执行命令导入
准备好图模型、数据文件以及输入源映射关系文件后,接下来就可以将数据文件导入到图数据库中。
导入过程由用户提交的命令控制,用户可以通过不同的参数控制执行的具体流程。
3.4.1 参数说明
| 参数 | 默认值 | 是否必传 | 描述信息 |
|---|
-f 或 --file | | Y | 配置脚本的路径 |
-g 或 --graph | | Y | 图名称 |
--graphspace | DEFAULT | | 图空间 |
-s 或 --schema | | Y | schema 文件路径 |
-h 或 --host 或 -i | localhost | | HugeGraphServer 的地址 |
-p 或 --port | 8080 | | HugeGraphServer 的端口号 |
--username | null | | 当 HugeGraphServer 开启了权限认证时,当前图的 username |
--password | null | | 当 HugeGraphServer 开启了权限认证时,当前图的 password |
--create-graph | false | | 是否在图不存在时自动创建 |
--token | null | | 当 HugeGraphServer 开启了权限认证时,当前图的 token |
--protocol | http | | 向服务端发请求的协议,可选 http 或 https |
--pd-peers | | | PD 服务节点地址 |
--pd-token | | | 访问 PD 服务的 token |
--meta-endpoints | | | 元信息存储服务地址 |
--direct | false | | 是否直连 HugeGraph-Store |
--route-type | NODE_PORT | | 路由选择方式(可选值:NODE_PORT / DDS / BOTH) |
--cluster | hg | | 集群名 |
--trust-store-file | | | 请求协议为 https 时,客户端的证书文件路径 |
--trust-store-password | | | 请求协议为 https 时,客户端证书密码 |
--clear-all-data | false | | 导入数据前是否清除服务端的原有数据 |
--clear-timeout | 240 | | 导入数据前清除服务端的原有数据的超时时间 |
--incremental-mode | false | | 是否使用断点续导模式,仅输入源为 FILE 和 HDFS 支持该模式,启用该模式能从上一次导入停止的地方开始导入 |
--failure-mode | false | | 失败模式为 true 时,会导入之前失败了的数据,一般来说失败数据文件需要在人工更正编辑好后,再次进行导入 |
--batch-insert-threads | CPUs | | 批量插入线程池大小 (CPUs 是当前 OS 可用逻辑核个数) |
--single-insert-threads | 8 | | 单条插入线程池的大小 |
--max-conn | 4 * CPUs | | HugeClient 与 HugeGraphServer 的最大 HTTP 连接数,调整线程的时候建议同时调整此项 |
--max-conn-per-route | 2 * CPUs | | HugeClient 与 HugeGraphServer 每个路由的最大 HTTP 连接数,调整线程的时候建议同时调整此项 |
--batch-size | 500 | | 导入数据时每个批次包含的数据条数 |
--max-parse-errors | 1 | | 最多允许多少行数据解析错误,达到该值则程序退出 |
--max-insert-errors | 500 | | 最多允许多少行数据插入错误,达到该值则程序退出 |
--timeout | 60 | | 插入结果返回的超时时间(秒) |
--shutdown-timeout | 10 | | 多线程停止的等待时间(秒) |
--retry-times | 0 | | 发生特定异常时的重试次数 |
--retry-interval | 10 | | 重试之前的间隔时间(秒) |
--check-vertex | false | | 插入边时是否检查边所连接的顶点是否存在 |
--print-progress | true | | 是否在控制台实时打印导入条数 |
--dry-run | false | | 打开该模式,只解析不导入,通常用于测试 |
--help 或 -help | false | | 打印帮助信息 |
--parser-threads 或 --parallel-count | max(2,CPUS) | | 并行读取数据文件最大线程数 |
--start-file | 0 | | 用于部分(分片)导入的起始文件索引 |
--end-file | -1 | | 用于部分导入的截止文件索引 |
--scatter-sources | false | | 分散(并行)读取多个数据源以优化 I/O 性能 |
--cdc-flush-interval | 30000 | | Flink CDC 的数据刷新间隔 |
--cdc-sink-parallelism | 1 | | Flink CDC 写入端(Sink)的并行度 |
--max-read-errors | 1 | | 程序退出前允许的最大读取错误行数 |
--max-read-lines | -1L | | 最大读取行数限制;一旦达到此行数,导入任务将停止 |
--test-mode | false | | 是否开启测试模式 |
--use-prefilter | false | | 是否预先过滤顶点 |
--short-id | [] | | 将自定义 ID 映射为更短的 ID |
--vertex-edge-limit | -1L | | 单个顶点的最大边数限制 |
--sink-type | true | | 是否输出至不同的存储 |
--vertex-partitions | 64 | | HBase 顶点表的预分区数量 |
--edge-partitions | 64 | | HBase 边表的预分区数量 |
--vertex-table-name | | | HBase 顶点表名称 |
--edge-table-name | | | HBase 边表名称 |
--hbase-zk-quorum | | | HBase Zookeeper 集群地址 |
--hbase-zk-port | | | HBase Zookeeper 端口号 |
--hbase-zk-parent | | | HBase Zookeeper 根路径 |
--restore | false | | 将图模式设置为恢复模式 (RESTORING) |
--backend | hstore | | 自动创建图(如果不存在)时的后端存储类型 |
--serializer | binary | | 自动创建图(如果不存在)时的序列化器类型 |
--scheduler-type | distributed | | 自动创建图(如果不存在)时的任务调度器类型 |
--batch-failure-fallback | true | | 批量插入失败时是否回退至单条插入模式 |
3.4.2 断点续导模式
通常情况下,Loader 任务都需要较长时间执行,如果因为某些原因导致导入中断进程退出,而下次希望能从中断的点继续导,这就是使用断点续导的场景。
用户设置命令行参数 –incremental-mode 为 true 即打开了断点续导模式。断点续导的关键在于进度文件,导入进程退出的时候,会把退出时刻的导入进度
记录到进度文件中,进度文件位于 ${struct} 目录下,文件名形如 load-progress ${date} ,${struct} 为映射文件的前缀,${date} 为导入开始
的时刻。比如:在 2019-10-10 12:30:30 开始的一次导入任务,使用的映射文件为 struct-example.json,则进度文件的路径为与 struct-example.json
同级的 struct-example/load-progress 2019-10-10 12:30:30。
注意:进度文件的生成与 –incremental-mode 是否打开无关,每次导入结束都会生成一个进度文件。
如果数据文件格式都是合法的,是用户自己停止(CTRL + C 或 kill,kill -9 不支持)的导入任务,也就是说没有错误记录的情况下,下一次导入只需要设置
为断点续导即可。
但如果是因为太多数据不合法或者网络异常,达到了 –max-parse-errors 或 –max-insert-errors 的限制,Loader 会把这些插入失败的原始行记录到
失败文件中,用户对失败文件中的数据行修改后,设置 –reload-failure 为 true 即可把这些"失败文件"也当作输入源进行导入(不影响正常的文件的导入),
当然如果修改后的数据行仍然有问题,则会被再次记录到失败文件中(不用担心会有重复行)。
每个顶点映射或边映射有数据插入失败时都会产生自己的失败文件,失败文件又分为解析失败文件(后缀 .parse-error)和插入失败文件(后缀 .insert-error),
它们被保存在 ${struct}/current 目录下。比如映射文件中有一个顶点映射 person 和边映射 knows,它们各有一些错误行,当 Loader 退出后,在
${struct}/current 目录下会看到如下文件:
- person-b4cd32ab.parse-error: 顶点映射 person 解析错误的数据
- person-b4cd32ab.insert-error: 顶点映射 person 插入错误的数据
- knows-eb6b2bac.parse-error: 边映射 knows 解析错误的数据
- knows-eb6b2bac.insert-error: 边映射 knows 插入错误的数据
.parse-error 和 .insert-error 并不总是一起存在的,只有存在解析出错的行才会有 .parse-error 文件,只有存在插入出错的行才会有 .insert-error 文件。
3.4.3 logs 目录文件说明
程序执行过程中各日志及错误数据会写入 hugegraph-loader.log 文件中。
3.4.4 执行命令
运行 bin/hugegraph-loader 并传入参数
bin/hugegraph-loader -g {GRAPH_NAME} -f ${INPUT_DESC_FILE} -s ${SCHEMA_FILE} -h {HOST} -p {PORT}
4 完整示例
下面给出的是 hugegraph-loader 包中 example 目录下的例子。(GitHub 地址)
4.1 准备数据
顶点文件:example/file/vertex_person.csv
marko,29,Beijing
vadas,27,Hongkong
josh,32,Beijing
peter,35,Shanghai
"li,nary",26,"Wu,han"
tom,null,NULL
顶点文件:example/file/vertex_software.txt
id|name|lang|price|ISBN
1|lop|java|328|ISBN978-7-107-18618-5
2|ripple|java|199|ISBN978-7-100-13678-5
边文件:example/file/edge_knows.json
{"source_name": "marko", "target_name": "vadas", "date": "20160110", "weight": 0.5}
{"source_name": "marko", "target_name": "josh", "date": "20130220", "weight": 1.0}
边文件:example/file/edge_created.json
{"aname": "marko", "bname": "lop", "date": "20171210", "weight": 0.4}
{"aname": "josh", "bname": "lop", "date": "20091111", "weight": 0.4}
{"aname": "josh", "bname": "ripple", "date": "20171210", "weight": 1.0}
{"aname": "peter", "bname": "lop", "date": "20170324", "weight": 0.2}
4.2 编写 schema
点击展开/折叠 schema 文件:example/file/schema.groovy
schema.propertyKey("name").asText().ifNotExist().create();
schema.propertyKey("age").asInt().ifNotExist().create();
schema.propertyKey("city").asText().ifNotExist().create();
schema.propertyKey("weight").asDouble().ifNotExist().create();
schema.propertyKey("lang").asText().ifNotExist().create();
schema.propertyKey("date").asText().ifNotExist().create();
schema.propertyKey("price").asDouble().ifNotExist().create();

schema.vertexLabel("person").properties("name", "age", "city").primaryKeys("name").ifNotExist().create();
schema.vertexLabel("software").properties("name", "lang", "price").primaryKeys("name").ifNotExist().create();

schema.indexLabel("personByAge").onV("person").by("age").range().ifNotExist().create();
schema.indexLabel("personByCity").onV("person").by("city").secondary().ifNotExist().create();
schema.indexLabel("personByAgeAndCity").onV("person").by("age", "city").secondary().ifNotExist().create();
schema.indexLabel("softwareByPrice").onV("software").by("price").range().ifNotExist().create();

schema.edgeLabel("knows").sourceLabel("person").targetLabel("person").properties("date", "weight").ifNotExist().create();
schema.edgeLabel("created").sourceLabel("person").targetLabel("software").properties("date", "weight").ifNotExist().create();

schema.indexLabel("createdByDate").onE("created").by("date").secondary().ifNotExist().create();
schema.indexLabel("createdByWeight").onE("created").by("weight").range().ifNotExist().create();
schema.indexLabel("knowsByWeight").onE("knows").by("weight").range().ifNotExist().create();
4.3 编写输入源映射文件example/file/struct.json
点击展开/折叠 源映射文件 example/file/struct.json
{
  "vertices": [
    {
      "label": "person",
      "input": {
        "type": "file",
        "path": "example/file/vertex_person.csv",
        "format": "CSV",
        "header": ["name", "age", "city"],
        "charset": "UTF-8",
        "skipped_line": {
          "regex": "(^#|^//).*"
        }
      },
      "null_values": ["NULL", "null", ""]
    },
    {
      "label": "software",
      "input": {
        "type": "file",
        "path": "example/file/vertex_software.txt",
        "format": "TEXT",
        "delimiter": "|",
        "charset": "GBK"
      },
      "id": "id",
      "ignored": ["ISBN"]
    }
  ],
  "edges": [
    {
      "label": "knows",
      "source": ["source_name"],
      "target": ["target_name"],
      "input": {
        "type": "file",
        "path": "example/file/edge_knows.json",
        "format": "JSON",
        "date_format": "yyyyMMdd"
      },
      "field_mapping": {
        "source_name": "name",
        "target_name": "name"
      }
    },
    {
      "label": "created",
      "source": ["source_name"],
      "target": ["target_id"],
      "input": {
        "type": "file",
        "path": "example/file/edge_created.json",
        "format": "JSON",
        "date_format": "yyyy-MM-dd"
      },
      "field_mapping": {
        "source_name": "name"
      }
    }
  ]
}
4.4 执行命令导入
sh bin/hugegraph-loader.sh -g hugegraph -f example/file/struct.json -s example/file/schema.groovy
导入结束后,会出现类似如下统计信息:
vertices/edges has been loaded this time : 8/6
--------------------------------------------------
count metrics
     input read success            : 14
     input read failure            : 0
     vertex parse success          : 8
     vertex parse failure          : 0
     vertex insert success         : 8
     vertex insert failure         : 0
     edge parse success            : 6
     edge parse failure            : 0
     edge insert success           : 6
     edge insert failure           : 0
4.5 使用 docker 导入
4.5.1 使用 docker exec 直接导入数据
4.5.1.1 数据准备
如果仅仅尝试使用 loader, 我们可以使用内置的 example 数据集进行导入,无需自己额外准备数据
如果使用自定义的数据,则在使用 loader 导入数据之前,我们需要将数据复制到容器内部。
首先我们可以根据 4.1-4.3 的步骤准备数据,将准备好的数据通过 docker cp 复制到 loader 容器内部。
假设我们已经按照上述的步骤准备好了对应的数据集,存放在 hugegraph-dataset 文件夹下,文件结构如下:
tree -f hugegraph-dataset/

hugegraph-dataset
├── hugegraph-dataset/edge_created.json
├── hugegraph-dataset/edge_knows.json
├── hugegraph-dataset/schema.groovy
├── hugegraph-dataset/struct.json
├── hugegraph-dataset/vertex_person.csv
└── hugegraph-dataset/vertex_software.txt
将文件复制到容器内部
docker cp hugegraph-dataset loader:/loader/dataset
docker exec -it loader ls /loader/dataset

edge_created.json  edge_knows.json  schema.groovy  struct.json  vertex_person.csv  vertex_software.txt
4.5.1.2 数据导入
以内置的 example 数据集为例,我们可以使用以下的命令对数据进行导入。
如果需要导入自己准备的数据集,则只需要修改 -f 配置脚本的路径 以及 -s schema 文件路径即可。
其他的参数可以参照 3.4.1 参数说明
docker exec -it loader bin/hugegraph-loader.sh -g hugegraph -f example/file/struct.json -s example/file/schema.groovy -h server -p 8080
如果导入用户自定义的数据集,按照刚才的例子,则使用:
docker exec -it loader bin/hugegraph-loader.sh -g hugegraph -f /loader/dataset/struct.json -s /loader/dataset/schema.groovy -h server -p 8080
如果 loader 和 server位于同一 docker 网络,则可以指定 -h {server_container_name}, 否则需要指定 server的宿主机的 ip (在我们的例子中, server_container_name 为 server).
然后我们可以观察到结果:
HugeGraphLoader worked in NORMAL MODE
vertices/edges loaded this time : 8/6
--------------------------------------------------
count metrics
    input read success            : 14
    input read failure            : 0
    vertex parse success          : 8
    vertex parse failure          : 0
    vertex insert success         : 8
    vertex insert failure         : 0
    edge parse success            : 6
    edge parse failure            : 0
    edge insert success           : 6
    edge insert failure           : 0
--------------------------------------------------
meter metrics
    total time                    : 0.199s
    read time                     : 0.046s
    load time                     : 0.153s
    vertex load time              : 0.077s
    vertex load rate(vertices/s)  : 103
    edge load time                : 0.112s
    edge load rate(edges/s)       : 53
也可以使用 curl 或者 hubble观察导入结果,此处以 curl 为例:
> curl "http://localhost:8080/graphs/hugegraph/graph/vertices" | gunzip
{"vertices":[{"id":1,"label":"software","type":"vertex","properties":{"name":"lop","lang":"java","price":328.0}},{"id":2,"label":"software","type":"vertex","properties":{"name":"ripple","lang":"java","price":199.0}},{"id":"1:tom","label":"person","type":"vertex","properties":{"name":"tom"}},{"id":"1:josh","label":"person","type":"vertex","properties":{"name":"josh","age":32,"city":"Beijing"}},{"id":"1:marko","label":"person","type":"vertex","properties":{"name":"marko","age":29,"city":"Beijing"}},{"id":"1:peter","label":"person","type":"vertex","properties":{"name":"peter","age":35,"city":"Shanghai"}},{"id":"1:vadas","label":"person","type":"vertex","properties":{"name":"vadas","age":27,"city":"Hongkong"}},{"id":"1:li,nary","label":"person","type":"vertex","properties":{"name":"li,nary","age":26,"city":"Wu,han"}}]}
如果想检查边的导入结果,可以使用 curl "http://localhost:8080/graphs/hugegraph/graph/edges" | gunzip
4.5.2 进入 docker 容器进行导入
除了直接使用 docker exec 导入数据,我们也可以进入容器进行数据导入,基本流程与 4.5.1 相同
使用 docker exec -it loader bash进入容器内部,并执行命令
sh bin/hugegraph-loader.sh -g hugegraph -f example/file/struct.json -s example/file/schema.groovy -h server -p 8080
执行的结果如 4.5.1 所示
4.6 使用 spark-loader 导入
Spark 版本:Spark 3+,其他版本未测试。
HugeGraph Toolchain 版本:toolchain-1.0.0
spark-loader 的参数分为两部分,注意:因二者参数名缩写存在重合部分,请使用参数全称。两种参数之间无需保证先后顺序。
示例:
sh bin/hugegraph-spark-loader.sh --master yarn \
--deploy-mode cluster --name spark-hugegraph-loader --file ./hugegraph.json \
--username admin --token admin --host xx.xx.xx.xx --port 8093 \
--graph graph-test --num-executors 6 --executor-cores 16 --executor-memory 15g
3.2.3 - HugeGraph-Tools Quick Start
HugeGraph-Tools 是 HugeGraph 的自动化部署、管理和备份/还原组件。
测试指南:如需在本地运行 Tools 测试,请参考 工具链本地测试指南
有两种方式可以获取 HugeGraph-Tools:(它被包含子 Toolchain 中)
2.1 下载二进制tar包
下载最新版本的 HugeGraph-Toolchain 包, 然后进入 tools 子目录
wget https://downloads.apache.org/hugegraph/1.0.0/apache-hugegraph-toolchain-incubating-1.0.0.tar.gz
tar zxf *hugegraph*.tar.gz
2.2 下载源码编译安装
源码编译前请确保安装了wget命令
下载最新版本的 HugeGraph-Toolchain 源码包, 然后根目录编译或者单独编译 tool 子模块:
# 1. get from github
git clone https://github.com/apache/hugegraph-toolchain.git

# 2. get from direct  (e.g. here is 1.0.0, please choose the latest version)
wget https://downloads.apache.org/hugegraph/1.0.0/apache-hugegraph-toolchain-incubating-1.0.0-src.tar.gz
编译生成 tar 包:
cd hugegraph-tools
mvn package -DskipTests
生成 tar 包 hugegraph-tools-${version}.tar.gz
3 使用
3.1 功能概览
解压后,进入 hugegraph-tools 目录,可以使用bin/hugegraph或者bin/hugegraph help来查看 usage 信息。主要分为:
- 图管理类,graph-mode-set、graph-mode-get、graph-list、graph-get、graph-clear、graph-create、graph-clone 和 graph-drop
- 异步任务管理类,task-list、task-get、task-delete、task-cancel 和 task-clear
- Gremlin类,gremlin-execute 和 gremlin-schedule
- 备份/恢复类,backup、restore、migrate、schedule-backup 和 dump
- 认证数据备份/恢复类,auth-backup 和 auth-restore
- 安装部署类,deploy、clear、start-all 和 stop-all
Usage: hugegraph [options] [command] [command options]
3.2 [options]-全局变量
options是 HugeGraph-Tools 的全局变量,可以在 hugegraph-tools/bin/hugegraph 中配置,包括:
- –graph,HugeGraph-Tools 操作的图的名字,默认值是 hugegraph
- –url,HugeGraph-Server 的服务地址,默认是 http://127.0.0.1:8080
- –user,当 HugeGraph-Server 开启认证时,传递用户名
- –password,当 HugeGraph-Server 开启认证时,传递用户的密码
- –timeout,连接 HugeGraph-Server 时的超时时间,默认是 30s
- –trust-store-file,证书文件的路径,当 –url 使用 https 时,HugeGraph-Client 使用的 truststore 文件,默认为空,代表使用 hugegraph-tools 内置的 truststore 文件 conf/hugegraph.truststore
- –trust-store-password,证书文件的密码,当 –url 使用 https 时,HugeGraph-Client 使用的 truststore 的密码,默认为空,代表使用 hugegraph-tools 内置的 truststore 文件的密码
上述全局变量,也可以通过环境变量来设置。一种方式是在命令行使用 export 设置临时环境变量,在该命令行关闭之前均有效
| 全局变量 | 环境变量 | 示例 |
|---|
| –url | HUGEGRAPH_URL | export HUGEGRAPH_URL=http://127.0.0.1:8080 |
| –graph | HUGEGRAPH_GRAPH | export HUGEGRAPH_GRAPH=hugegraph |
| –user | HUGEGRAPH_USERNAME | export HUGEGRAPH_USERNAME=admin |
| –password | HUGEGRAPH_PASSWORD | export HUGEGRAPH_PASSWORD=test |
| –timeout | HUGEGRAPH_TIMEOUT | export HUGEGRAPH_TIMEOUT=30 |
| –trust-store-file | HUGEGRAPH_TRUST_STORE_FILE | export HUGEGRAPH_TRUST_STORE_FILE=/tmp/trust-store |
| –trust-store-password | HUGEGRAPH_TRUST_STORE_PASSWORD | export HUGEGRAPH_TRUST_STORE_PASSWORD=xxxx |
另一种方式是在 bin/hugegraph 脚本中设置环境变量:
#!/bin/bash

# Set environment here if needed
#export HUGEGRAPH_URL=
#export HUGEGRAPH_GRAPH=
#export HUGEGRAPH_USERNAME=
#export HUGEGRAPH_PASSWORD=
#export HUGEGRAPH_TIMEOUT=
#export HUGEGRAPH_TRUST_STORE_FILE=
#export HUGEGRAPH_TRUST_STORE_PASSWORD=
3.3 图管理类,graph-mode-set、graph-mode-get、graph-list、graph-get、graph-clear、graph-create、graph-clone和graph-drop
- graph-mode-set,设置图的 restore mode
- –graph-mode 或者 -m,必填项,指定将要设置的模式,合法值包括 [NONE, RESTORING, MERGING, LOADING]
- graph-mode-get,获取图的 restore mode
- graph-list,列出某个 HugeGraph-Server 中全部的图
- graph-get,获取某个图及其存储后端类型
- graph-clear,清除某个图的全部 schema 和 data
- –confirm-message 或者 -c,必填项,删除确认信息,需要手动输入,二次确认防止误删,“I’m sure to delete all data”,包括双引号
- graph-create,使用配置文件创建新图
- –name 或者 -n,选填项,新图的名称,默认为 hugegraph
- –file 或者 -f,必填项,图配置文件的路径
- graph-clone,克隆已存在的图
- –name 或者 -n,选填项,新克隆图的名称,默认为 hugegraph
- –clone-graph-name,选填项,要克隆的源图名称,默认为 hugegraph
- graph-drop,删除图(不同于 graph-clear,这会完全删除图)
- –confirm-message 或者 -c,必填项,确认消息 “I’m sure to drop the graph”,包括双引号
当需要把备份的图原样恢复到一个新的图中的时候,需要先将图模式设置为 RESTORING 模式;当需要将备份的图合并到已存在的图中时,需要先将图模式设置为 MERGING 模式。
3.4 异步任务管理类,task-list、task-get和task-delete
- task-list,列出某个图中的异步任务,可以根据任务的状态过滤
- –status,选填项,指定要查看的任务的状态,即按状态过滤任务
- –limit,选填项,指定要获取的任务的数目,默认为 -1,意思为获取全部符合条件的任务
- task-get,获取某个异步任务的详细信息
- task-delete,删除某个异步任务的信息
- task-cancel,取消某个异步任务的执行
- task-clear,清理完成的异步任务
- –force,选填项,设置时,表示清理全部异步任务,未执行完成的先取消,然后清除所有异步任务。默认只清理已完成的异步任务
3.5 Gremlin类,gremlin-execute和gremlin-schedule
- gremlin-execute,发送 Gremlin 语句到 HugeGraph-Server 来执行查询或修改操作,同步执行,结束后返回结果
- –file 或者 -f,指定要执行的脚本文件,UTF-8编码,与 –script 互斥
- –script 或者 -s,指定要执行的脚本字符串,与 –file 互斥
- –aliases 或者 -a,Gremlin 别名设置,格式为:key1=value1,key2=value2,…
- –bindings 或者 -b,Gremlin 绑定设置,格式为:key1=value1,key2=value2,…
- –language 或者 -l,Gremlin 脚本的语言,默认为 gremlin-groovy
–file 和 –script 二者互斥,必须设置其中之一
- gremlin-schedule,发送 Gremlin 语句到 HugeGraph-Server 来执行查询或修改操作,异步执行,任务提交后立刻返回异步任务id
- –file 或者 -f,指定要执行的脚本文件,UTF-8编码,与 –script 互斥
- –script 或者 -s,指定要执行的脚本字符串,与 –file 互斥
- –bindings 或者 -b,Gremlin 绑定设置,格式为:key1=value1,key2=value2,…
- –language 或者 -l,Gremlin 脚本的语言,默认为 gremlin-groovy
–file 和 –script 二者互斥,必须设置其中之一
3.6 备份/恢复类
- backup,将某张图中的 schema 或者 data 备份到 HugeGraph 系统之外,以 JSON 形式存在本地磁盘或者 HDFS
- –format,备份的格式,可选值包括 [json, text],默认为 json
- –all-properties,是否备份顶点/边全部的属性,仅在 –format 为 text 是有效,默认 false
- –label,要备份的顶点/边的类型,仅在 –format 为 text 是有效,只有备份顶点或者边的时候有效
- –properties,要备份的顶点/边的属性,逗号分隔,仅在 –format 为 text 是有效,只有备份顶点或者边的时候有效
- –compress,备份时是否压缩数据,默认为 true
- –directory 或者 -d,存储 schema 或者 data 的目录,本地目录时,默认为’./{graphName}’,HDFS 时,默认为 ‘{fs.default.name}/{graphName}’
- –huge-types 或者 -t,要备份的数据类型,逗号分隔,可选值为 ‘all’ 或者 一个或多个 [vertex,edge,vertex_label,edge_label,property_key,index_label] 的组合,‘all’ 代表全部6种类型,即顶点、边和所有schema
- –log 或者 -l,指定日志目录,默认为当前目录
- –retry,指定失败重试次数,默认为 3
- –thread-num 或者 -T,使用的线程数,默认为 Math.min(10, Math.max(4, CPUs / 2))
- –split-size 或者 -s,指定在备份时对顶点或者边分块的大小,默认为 1048576
- -D,用 -Dkey=value 的模式指定动态参数,用来备份数据到 HDFS 时,指定 HDFS 的配置项,例如:-Dfs.default.name=hdfs://localhost:9000
- restore,将 JSON 格式存储的 schema 或者 data 恢复到一个新图中(RESTORING 模式)或者合并到已存在的图中(MERGING 模式)
- –directory 或者 -d,存储 schema 或者 data 的目录,本地目录时,默认为’./{graphName}’,HDFS 时,默认为 ‘{fs.default.name}/{graphName}’
- –clean,是否在恢复图完成后删除 –directory 指定的目录,默认为 false
- –huge-types 或者 -t,要恢复的数据类型,逗号分隔,可选值为 ‘all’ 或者 一个或多个 [vertex,edge,vertex_label,edge_label,property_key,index_label] 的组合,‘all’ 代表全部6种类型,即顶点、边和所有schema
- –log 或者 -l,指定日志目录,默认为当前目录
- –retry,指定失败重试次数,默认为 3
- –thread-num 或者 -T,使用的线程数,默认为 Math.min(10, Math.max(4, CPUs / 2))
- -D,用 -Dkey=value 的模式指定动态参数,用来从 HDFS 恢复图时,指定 HDFS 的配置项,例如:-Dfs.default.name=hdfs://localhost:9000
只有当 –format 为 json 执行 backup 时,才可以使用 restore 命令恢复
- migrate, 将当前连接的图迁移至另一个 HugeGraphServer 中
- –target-graph,目标图的名字,默认为 hugegraph
- –target-url,目标图所在的 HugeGraphServer,默认为 http://127.0.0.1:8081
- –target-username,访问目标图的用户名
- –target-password,访问目标图的密码
- –target-timeout,访问目标图的超时时间
- –target-trust-store-file,访问目标图使用的 truststore 文件
- –target-trust-store-password,访问目标图使用的 truststore 的密码
- –directory 或者 -d,迁移过程中,存储源图的 schema 或者 data 的目录,本地目录时,默认为’./{graphName}’,HDFS 时,默认为 ‘{fs.default.name}/{graphName}’
- –huge-types 或者 -t,要迁移的数据类型,逗号分隔,可选值为 ‘all’ 或者 一个或多个 [vertex,edge,vertex_label,edge_label,property_key,index_label] 的组合,‘all’ 代表全部6种类型,即顶点、边和所有schema
- –log 或者 -l,指定日志目录,默认为当前目录
- –retry,指定失败重试次数,默认为 3
- –split-size 或者 -s,指定迁移过程中对源图进行备份时顶点或者边分块的大小,默认为 1048576
- -D,用 -Dkey=value 的模式指定动态参数,用来在迁移图过程中需要备份数据到 HDFS 时,指定 HDFS 的配置项,例如:-Dfs.default.name=hdfs://localhost:9000
- –graph-mode 或者 -m,将源图恢复到目标图时将目标图设置的模式,合法值包括 [RESTORING, MERGING]
- –keep-local-data,是否保留在迁移图的过程中产生的源图的备份,默认为 false,即默认迁移图结束后不保留产生的源图备份
- schedule-backup,周期性对图执行备份操作,并保留一定数目的最新备份(目前仅支持本地文件系统)
- –directory 或者 -d,必填项,指定备份数据的目录
- –backup-num,选填项,指定保存的最新的备份的数目,默认为 3
- –interval,选填项,指定进行备份的周期,格式同 Linux crontab 格式
- dump,把整张图的顶点和边全部导出,默认以
vertex vertex-edge1 vertex-edge2...JSON格式存储。
用户也可以自定义存储格式,只需要在hugegraph-tools/src/main/java/com/baidu/hugegraph/formatter
目录下实现一个继承自Formatter的类,例如CustomFormatter,使用时指定该类为formatter即可,例如
bin/hugegraph dump -f CustomFormatter- –formatter 或者 -f,指定使用的 formatter,默认为 JsonFormatter
- –directory 或者 -d,存储 schema 或者 data 的目录,默认为当前目录
- –log 或者 -l,指定日志目录,默认为当前目录
- –retry,指定失败重试次数,默认为 3
- –split-size 或者 -s,指定在备份时对顶点或者边分块的大小,默认为 1048576
- -D,用 -Dkey=value 的模式指定动态参数,用来备份数据到 HDFS 时,指定 HDFS 的配置项,例如:-Dfs.default.name=hdfs://localhost:9000
3.7 认证数据备份/恢复类
- auth-backup,备份认证数据到指定目录
- –types 或者 -t,要备份的认证数据类型,逗号分隔,可选值为 ‘all’ 或者一个或多个 [user, group, target, belong, access] 的组合,‘all’ 代表全部5种类型
- –directory 或者 -d,备份数据存储目录,默认为当前目录
- –log 或者 -l,指定日志目录,默认为当前目录
- –retry,指定失败重试次数,默认为 3
- –thread-num 或者 -T,使用的线程数,默认为 Math.min(10, Math.max(4, CPUs / 2))
- -D,用 -Dkey=value 的模式指定动态参数,用来备份数据到 HDFS 时,指定 HDFS 的配置项,例如:-Dfs.default.name=hdfs://localhost:9000
- auth-restore,从指定目录恢复认证数据
- –types 或者 -t,要恢复的认证数据类型,逗号分隔,可选值为 ‘all’ 或者一个或多个 [user, group, target, belong, access] 的组合,‘all’ 代表全部5种类型
- –directory 或者 -d,备份数据存储目录,默认为当前目录
- –log 或者 -l,指定日志目录,默认为当前目录
- –retry,指定失败重试次数,默认为 3
- –thread-num 或者 -T,使用的线程数,默认为 Math.min(10, Math.max(4, CPUs / 2))
- –strategy,冲突处理策略,可选值为 [stop, ignore],默认为 stop。stop 表示遇到冲突时停止恢复,ignore 表示忽略冲突继续恢复
- –init-password,恢复用户时设置的初始密码,恢复用户数据时必填
- -D,用 -Dkey=value 的模式指定动态参数,用来从 HDFS 恢复数据时,指定 HDFS 的配置项,例如:-Dfs.default.name=hdfs://localhost:9000
3.8 安装部署类
- deploy,一键下载、安装和启动 HugeGraph-Server 和 HugeGraph-Studio
- -v,必填项,指明安装的 HugeGraph-Server 和 HugeGraph-Studio 的版本号,最新的是 0.9
- -p,必填项,指定安装的 HugeGraph-Server 和 HugeGraph-Studio 目录
- -u,选填项,指定下载 HugeGraph-Server 和 HugeGraph-Studio 压缩包的链接
- clear,清理 HugeGraph-Server 和 HugeGraph-Studio 目录和tar包
- -p,必填项,指定要清理的 HugeGraph-Server 和 HugeGraph-Studio 的目录
- start-all,一键启动 HugeGraph-Server 和 HugeGraph-Studio,并启动监控,服务死掉时自动拉起服务
- -v,必填项,指明要启动的 HugeGraph-Server 和 HugeGraph-Studio 的版本号,最新的是 0.9
- -p,必填项,指定安装了 HugeGraph-Server 和 HugeGraph-Studio 的目录
- stop-all,一键关闭 HugeGraph-Server 和 HugeGraph-Studio
deploy命令中有可选参数 -u,提供时会使用指定的下载地址替代默认下载地址下载 tar 包,并且将地址写入~/hugegraph-download-url-prefix文件中;之后如果不指定地址时,会优先从~/hugegraph-download-url-prefix指定的地址下载 tar 包;如果 -u 和~/hugegraph-download-url-prefix都没有时,会从默认下载地址进行下载
3.9 具体命令参数
各子命令的具体参数如下:
Usage: hugegraph [options] [command] [command options]
  Options:
    --graph
      Name of graph
      Default: hugegraph
    --password
      Password of user
    --timeout
      Connection timeout
      Default: 30
    --trust-store-file
      The path of client truststore file used when https protocol is enabled
    --trust-store-password
      The password of the client truststore file used when the https protocol
      is enabled
    --url
      The URL of HugeGraph-Server
      Default: http://127.0.0.1:8080
    --user
      Name of user
  Commands:
    graph-list      List all graphs
      Usage: graph-list

    graph-get      Get graph info
      Usage: graph-get

    graph-clear      Clear graph schema and data
      Usage: graph-clear [options]
        Options:
        * --confirm-message, -c
            Confirm message of graph clear is "I'm sure to delete all data".
            (Note: include "")

    graph-mode-set      Set graph mode
      Usage: graph-mode-set [options]
        Options:
        * --graph-mode, -m
            Graph mode, include: [NONE, RESTORING, MERGING]
            Possible Values: [NONE, RESTORING, MERGING, LOADING]

    graph-mode-get      Get graph mode
      Usage: graph-mode-get

    task-list      List tasks
      Usage: task-list [options]
        Options:
          --limit
            Limit number, no limit if not provided
            Default: -1
          --status
            Status of task

    task-get      Get task info
      Usage: task-get [options]
        Options:
        * --task-id
            Task id
            Default: 0

    task-delete      Delete task
      Usage: task-delete [options]
        Options:
        * --task-id
            Task id
            Default: 0

    task-cancel      Cancel task
      Usage: task-cancel [options]
        Options:
        * --task-id
            Task id
            Default: 0

    task-clear      Clear completed tasks
      Usage: task-clear [options]
        Options:
          --force
            Force to clear all tasks, cancel all uncompleted tasks firstly,
            and delete all completed tasks
            Default: false

    gremlin-execute      Execute Gremlin statements
      Usage: gremlin-execute [options]
        Options:
          --aliases, -a
            Gremlin aliases, valid format is: 'key1=value1,key2=value2...'
            Default: {}
          --bindings, -b
            Gremlin bindings, valid format is: 'key1=value1,key2=value2...'
            Default: {}
          --file, -f
            Gremlin Script file to be executed, UTF-8 encoded, exclusive to
            --script
          --language, -l
            Gremlin script language
            Default: gremlin-groovy
          --script, -s
            Gremlin script to be executed, exclusive to --file

    gremlin-schedule      Execute Gremlin statements as asynchronous job
      Usage: gremlin-schedule [options]
        Options:
          --bindings, -b
            Gremlin bindings, valid format is: 'key1=value1,key2=value2...'
            Default: {}
          --file, -f
            Gremlin Script file to be executed, UTF-8 encoded, exclusive to
            --script
          --language, -l
            Gremlin script language
            Default: gremlin-groovy
          --script, -s
            Gremlin script to be executed, exclusive to --file

    backup      Backup graph schema/data. If directory is on HDFS, use -D to
            set HDFS params. For exmaple:
            -Dfs.default.name=hdfs://localhost:9000
      Usage: backup [options]
        Options:
          --all-properties
            All properties to be backup flag
            Default: false
          --compress
            compress flag
            Default: true
          --directory, -d
            Directory of graph schema/data, default is './{graphname}' in
            local file system or '{fs.default.name}/{graphname}' in HDFS
          --format
            File format, valid is [json, text]
            Default: json
          --huge-types, -t
            Type of schema/data. Concat with ',' if more than one. 'all' means
            all vertices, edges and schema, in other words, 'all' equals with
            'vertex,edge,vertex_label,edge_label,property_key,index_label'
            Default: [PROPERTY_KEY, VERTEX_LABEL, EDGE_LABEL, INDEX_LABEL, VERTEX, EDGE]
          --label
            Vertex or edge label, only valid when type is vertex or edge
          --log, -l
            Directory of log
            Default: ./logs
          --properties
            Vertex or edge properties to backup, only valid when type is
            vertex or edge
            Default: []
          --retry
            Retry times, default is 3
            Default: 3
          --split-size, -s
            Split size of shard
            Default: 1048576
          -D
            HDFS config parameters
            Syntax: -Dkey=value
            Default: {}

    schedule-backup      Schedule backup task
      Usage: schedule-backup [options]
        Options:
          --backup-num
            The number of latest backups to keep
            Default: 3
        * --directory, -d
            The directory of backups stored
          --interval
            The interval of backup, format is: "a b c d e". 'a' means minute
            (0 - 59), 'b' means hour (0 - 23), 'c' means day of month (1 -
            31), 'd' means month (1 - 12), 'e' means day of week (0 - 6)
            (Sunday=0), "*" means all
            Default: "0 0 * * *"

    dump      Dump graph to files
      Usage: dump [options]
        Options:
          --directory, -d
            Directory of graph schema/data, default is './{graphname}' in
            local file system or '{fs.default.name}/{graphname}' in HDFS
          --formatter, -f
            Formatter to customize format of vertex/edge
            Default: JsonFormatter
          --log, -l
            Directory of log
            Default: ./logs
          --retry
            Retry times, default is 3
            Default: 3
          --split-size, -s
            Split size of shard
            Default: 1048576
          -D
            HDFS config parameters
            Syntax: -Dkey=value
            Default: {}

    restore      Restore graph schema/data. If directory is on HDFS, use -D to
            set HDFS params if needed. For
            exmaple:-Dfs.default.name=hdfs://localhost:9000
      Usage: restore [options]
        Options:
          --clean
            Whether to remove the directory of graph data after restored
            Default: false
          --directory, -d
            Directory of graph schema/data, default is './{graphname}' in
            local file system or '{fs.default.name}/{graphname}' in HDFS
          --huge-types, -t
            Type of schema/data. Concat with ',' if more than one. 'all' means
            all vertices, edges and schema, in other words, 'all' equals with
            'vertex,edge,vertex_label,edge_label,property_key,index_label'
            Default: [PROPERTY_KEY, VERTEX_LABEL, EDGE_LABEL, INDEX_LABEL, VERTEX, EDGE]
          --log, -l
            Directory of log
            Default: ./logs
          --retry
            Retry times, default is 3
            Default: 3
          -D
            HDFS config parameters
            Syntax: -Dkey=value
            Default: {}

    migrate      Migrate graph
      Usage: migrate [options]
        Options:
          --directory, -d
            Directory of graph schema/data, default is './{graphname}' in
            local file system or '{fs.default.name}/{graphname}' in HDFS
          --graph-mode, -m
            Mode used when migrating to target graph, include: [RESTORING,
            MERGING]
            Default: RESTORING
            Possible Values: [NONE, RESTORING, MERGING, LOADING]
          --huge-types, -t
            Type of schema/data. Concat with ',' if more than one. 'all' means
            all vertices, edges and schema, in other words, 'all' equals with
            'vertex,edge,vertex_label,edge_label,property_key,index_label'
            Default: [PROPERTY_KEY, VERTEX_LABEL, EDGE_LABEL, INDEX_LABEL, VERTEX, EDGE]
          --keep-local-data
            Whether to keep the local directory of graph data after restored
            Default: false
          --log, -l
            Directory of log
            Default: ./logs
          --retry
            Retry times, default is 3
            Default: 3
          --split-size, -s
            Split size of shard
            Default: 1048576
          --target-graph
            The name of target graph to migrate
            Default: hugegraph
          --target-password
            The password of target graph to migrate
          --target-timeout
            The timeout to connect target graph to migrate
            Default: 0
          --target-trust-store-file
            The trust store file of target graph to migrate
          --target-trust-store-password
            The trust store password of target graph to migrate
          --target-url
            The url of target graph to migrate
            Default: http://127.0.0.1:8081
          --target-user
            The username of target graph to migrate
          -D
            HDFS config parameters
            Syntax: -Dkey=value
            Default: {}

    deploy      Install HugeGraph-Server and HugeGraph-Studio
      Usage: deploy [options]
        Options:
        * -p
            Install path of HugeGraph-Server and HugeGraph-Studio
          -u
            Download url prefix path of HugeGraph-Server and HugeGraph-Studio
        * -v
            Version of HugeGraph-Server and HugeGraph-Studio

    start-all      Start HugeGraph-Server and HugeGraph-Studio
      Usage: start-all [options]
        Options:
        * -p
            Install path of HugeGraph-Server and HugeGraph-Studio
        * -v
            Version of HugeGraph-Server and HugeGraph-Studio

    clear      Clear HugeGraph-Server and HugeGraph-Studio
      Usage: clear [options]
        Options:
        * -p
            Install path of HugeGraph-Server and HugeGraph-Studio

    stop-all      Stop HugeGraph-Server and HugeGraph-Studio
      Usage: stop-all

    help      Print usage
      Usage: help
3.10 具体命令示例
1. gremlin语句
# 同步执行gremlin
./bin/hugegraph --url http://127.0.0.1:8080 --graph hugegraph gremlin-execute --script 'g.V().count()'

# 异步执行gremlin
./bin/hugegraph --url http://127.0.0.1:8080 --graph hugegraph gremlin-schedule --script 'g.V().count()'
2. 查看task情况
./bin/hugegraph --url http://127.0.0.1:8080 --graph hugegraph task-list

./bin/hugegraph --url http://127.0.0.1:8080 --graph hugegraph task-list --limit 5

./bin/hugegraph --url http://127.0.0.1:8080 --graph hugegraph task-list --status success
3. 图模式查看和设置
./bin/hugegraph --url http://127.0.0.1:8080 --graph hugegraph graph-mode-set -m RESTORING MERGING NONE

./bin/hugegraph --url http://127.0.0.1:8080 --graph hugegraph graph-mode-set -m RESTORING

./bin/hugegraph --url http://127.0.0.1:8080 --graph hugegraph graph-mode-get

./bin/hugegraph --url http://127.0.0.1:8080 --graph hugegraph graph-list
4. 清理图
./bin/hugegraph --url http://127.0.0.1:8080 --graph hugegraph graph-clear -c "I'm sure to delete all data"
5. 图备份
./bin/hugegraph --url http://127.0.0.1:8080 --graph hugegraph backup -t all --directory ./backup-test
6. 周期性的备份
./bin/hugegraph --url http://127.0.0.1:8080 --graph hugegraph --interval */2 * * * * schedule-backup -d ./backup-0.10.2
7. 图恢复
# 设置图模式
./bin/hugegraph --url http://127.0.0.1:8080 --graph hugegraph graph-mode-set -m RESTORING

# 恢复图
./bin/hugegraph --url http://127.0.0.1:8080 --graph hugegraph restore -t all --directory ./backup-test

# 恢复图模式
./bin/hugegraph --url http://127.0.0.1:8080 --graph hugegraph graph-mode-set -m NONE
8. 图迁移
./bin/hugegraph --url http://127.0.0.1:8080 --graph hugegraph migrate --target-url http://127.0.0.1:8090 --target-graph hugegraph
3.2.4 - HugeGraph-Spark-Connector Quick Start
1 HugeGraph-Spark-Connector 概述
HugeGraph-Spark-Connector 是一个用于在 Spark 中以标准格式读写 HugeGraph 数据的连接器应用程序。
2 环境要求
- Java 8+
- Maven 3.6+
- Spark 3.x
- Scala 2.12
3 编译
3.1 不执行测试的编译
mvn clean package -DskipTests
3.2 执行默认测试的编译
4 使用方法
首先在你的 pom.xml 中添加依赖:
<dependency>
    <groupId>org.apache.hugegraph</groupId>
    <artifactId>hugegraph-spark-connector</artifactId>
    <version>${revision}</version>
</dependency>
4.1 Schema 定义示例
假设我们有一个图,其 schema 定义如下:
schema.propertyKey("name").asText().ifNotExist().create()
schema.propertyKey("age").asInt().ifNotExist().create()
schema.propertyKey("city").asText().ifNotExist().create()
schema.propertyKey("weight").asDouble().ifNotExist().create()
schema.propertyKey("lang").asText().ifNotExist().create()
schema.propertyKey("date").asText().ifNotExist().create()
schema.propertyKey("price").asDouble().ifNotExist().create()

schema.vertexLabel("person")
        .properties("name", "age", "city")
        .useCustomizeStringId()
        .nullableKeys("age", "city")
        .ifNotExist()
        .create()

schema.vertexLabel("software")
        .properties("name", "lang", "price")
        .primaryKeys("name")
        .ifNotExist()
        .create()

schema.edgeLabel("knows")
        .sourceLabel("person")
        .targetLabel("person")
        .properties("date", "weight")
        .ifNotExist()
        .create()

schema.edgeLabel("created")
        .sourceLabel("person")
        .targetLabel("software")
        .properties("date", "weight")
        .ifNotExist()
        .create()
4.2 写入顶点数据(Scala)
val df = sparkSession.createDataFrame(Seq(
  Tuple3("marko", 29, "Beijing"),
  Tuple3("vadas", 27, "HongKong"),
  Tuple3("Josh", 32, "Beijing"),
  Tuple3("peter", 35, "ShangHai"),
  Tuple3("li,nary", 26, "Wu,han"),
  Tuple3("Bob", 18, "HangZhou"),
)) toDF("name", "age", "city")

df.show()

df.write
  .format("org.apache.hugegraph.spark.connector.DataSource")
  .option("host", "127.0.0.1")
  .option("port", "8080")
  .option("graph", "hugegraph")
  .option("data-type", "vertex")
  .option("label", "person")
  .option("id", "name")
  .option("batch-size", 2)
  .mode(SaveMode.Overwrite)
  .save()
4.3 写入边数据(Scala)
val df = sparkSession.createDataFrame(Seq(
  Tuple4("marko", "vadas", "20160110", 0.5),
  Tuple4("peter", "Josh", "20230801", 1.0),
  Tuple4("peter", "li,nary", "20130220", 2.0)
)).toDF("source", "target", "date", "weight")

df.show()

df.write
  .format("org.apache.hugegraph.spark.connector.DataSource")
  .option("host", "127.0.0.1")
  .option("port", "8080")
  .option("graph", "hugegraph")
  .option("data-type", "edge")
  .option("label", "knows")
  .option("source-name", "source")
  .option("target-name", "target")
  .option("batch-size", 2)
  .mode(SaveMode.Overwrite)
  .save()
5 配置参数
5.1 客户端配置
客户端配置用于配置 hugegraph-client。
| 参数 | 默认值 | 说明 |
|---|
host | localhost | HugeGraphServer 的地址 |
port | 8080 | HugeGraphServer 的端口 |
graph | hugegraph | 图空间名称 |
protocol | http | 向服务器发送请求的协议,可选 http 或 https |
username | null | 当 HugeGraphServer 开启权限认证时,当前图的用户名 |
token | null | 当 HugeGraphServer 开启权限认证时,当前图的 token |
timeout | 60 | 插入结果返回的超时时间(秒) |
max-conn | CPUS * 4 | HugeClient 与 HugeGraphServer 之间的最大 HTTP 连接数 |
max-conn-per-route | CPUS * 2 | HugeClient 与 HugeGraphServer 之间每个路由的最大 HTTP 连接数 |
trust-store-file | null | 当请求协议为 https 时,客户端的证书文件路径 |
trust-store-token | null | 当请求协议为 https 时,客户端的证书密码 |
5.2 图数据配置
图数据配置用于设置图空间的配置。
| 参数 | 默认值 | 说明 |
|---|
data-type | | 图数据类型,必须是 vertex 或 edge |
label | | 要导入的顶点/边数据所属的标签 |
id | | 指定某一列作为顶点的 id 列。当顶点 id 策略为 CUSTOMIZE 时,必填;当 id 策略为 PRIMARY_KEY 时,必须为空 |
source-name | | 选择输入源的某些列作为源顶点的 id 列。当源顶点的 id 策略为 CUSTOMIZE 时,必须指定某一列作为顶点的 id 列;当源顶点的 id 策略为 PRIMARY_KEY 时,必须指定一列或多列用于拼接生成顶点的 id,即无论使用哪种 id 策略,此项都是必填的 |
target-name | | 指定某些列作为目标顶点的 id 列,与 source-name 类似 |
selected-fields | | 选择某些列进行插入,其他未选择的列不插入,不能与 ignored-fields 同时存在 |
ignored-fields | | 忽略某些列使其不参与插入,不能与 selected-fields 同时存在 |
batch-size | 500 | 导入数据时每批数据的条目数 |
5.3 通用配置
通用配置包含一些常用的配置项。
| 参数 | 默认值 | 说明 |
|---|
delimiter | , | source-name、target-name、selected-fields 或 ignored-fields 的分隔符 |
6 许可证
与 HugeGraph 一样,hugegraph-spark-connector 也采用 Apache 2.0 许可证。
3.3 - HugeGraph-AI


DeepWiki 提供实时更新的项目文档,内容更全面准确,适合快速了解项目最新情况。
📖 https://deepwiki.com/apache/hugegraph-ai
hugegraph-ai 整合了 HugeGraph 与人工智能功能,为开发者构建 AI 驱动的图应用提供全面支持。
✨ 核心功能
- GraphRAG:利用图增强检索构建智能问答系统
- Text2Gremlin:自然语言到图查询的转换,支持 REST API
- 知识图谱构建:使用大语言模型从文本自动构建图谱
- 图机器学习:集成 21 种图学习算法(GCN、GAT、GraphSAGE 等)
- Python 客户端:易于使用的 HugeGraph Python 操作接口
- AI 智能体:提供智能图分析与推理能力
🎉 v1.5.0 新特性
- Text2Gremlin REST API:通过 REST 端点将自然语言查询转换为 Gremlin 命令
- 多模型向量支持:每个图实例可以使用独立的嵌入模型
- 双语提示支持:支持英文和中文提示词切换(EN/CN)
- 半自动 Schema 生成:从文本数据智能推断 Schema
- 半自动 Prompt 生成:上下文感知的提示词模板
- 增强的 Reranker 支持:集成 Cohere 和 SiliconFlow 重排序器
- LiteLLM 多供应商支持:统一接口支持 OpenAI、Anthropic、Gemini 等
🚀 快速开始
[!NOTE]
如需完整的部署指南和详细示例,请参阅 hugegraph-llm/README.md。
环境要求
- Python 3.10+(hugegraph-llm 必需)
- uv 0.7+(推荐的包管理器)
- HugeGraph Server 1.5+(必需)
- Docker(可选,用于容器化部署)
方案一:Docker 部署(推荐)
# 克隆仓库
git clone https://github.com/apache/hugegraph-ai.git
cd hugegraph-ai

# 设置环境并启动服务
cp docker/env.template docker/.env
# 编辑 docker/.env 设置你的 PROJECT_PATH
cd docker
docker-compose -f docker-compose-network.yml up -d

# 访问服务:
# - HugeGraph Server: http://localhost:8080
# - RAG 服务: http://localhost:8001
方案二:源码安装
# 1. 启动 HugeGraph Server
docker run -itd --name=server -p 8080:8080 hugegraph/hugegraph

# 2. 克隆并设置项目
git clone https://github.com/apache/hugegraph-ai.git
cd hugegraph-ai/hugegraph-llm

# 3. 安装依赖
uv venv && source .venv/bin/activate
uv pip install -e .

# 4. 启动演示
python -m hugegraph_llm.demo.rag_demo.app
# 访问 http://127.0.0.1:8001
基本用法示例
GraphRAG - 问答
from hugegraph_llm.operators.graph_rag_task import RAGPipeline

# 初始化 RAG 工作流
graph_rag = RAGPipeline()

# 对你的图进行提问
result = (graph_rag
    .extract_keywords(text="给我讲讲 Al Pacino 的故事。")
    .keywords_to_vid()
    .query_graphdb(max_deep=2, max_graph_items=30)
    .synthesize_answer()
    .run())
知识图谱构建
from hugegraph_llm.models.llms.init_llm import LLMs
from hugegraph_llm.operators.kg_construction_task import KgBuilder

# 从文本构建知识图谱
TEXT = "你的文本内容..."
builder = KgBuilder(LLMs().get_chat_llm())

(builder
    .import_schema(from_hugegraph="hugegraph")
    .chunk_split(TEXT)
    .extract_info(extract_type="property_graph")
    .commit_to_hugegraph()
    .run())
图机器学习
from pyhugegraph.client import PyHugeClient
# 连接 HugeGraph 并运行机器学习算法
# 详细示例请参阅 hugegraph-ml 文档
📦 模块
用于图应用的大语言模型集成:
- GraphRAG:基于图数据的检索增强生成
- 知识图谱构建:从文本自动构建知识图谱
- 自然语言接口:使用自然语言查询图
- AI 智能体:智能图分析与推理
包含 21 种算法的图机器学习:
- 节点分类:GCN、GAT、GraphSAGE、APPNP、AGNN、ARMA、DAGNN、DeeperGCN、GRAND、JKNet、Cluster-GCN
- 图分类:DiffPool、GIN
- 图嵌入:DGI、BGRL、GRACE
- 链接预测:SEAL、P-GNN、GATNE
- 欺诈检测:CARE-GNN、BGNN
- 后处理:C&S(Correct & Smooth)
用于 HugeGraph 操作的 Python 客户端:
- Schema 管理:定义顶点/边标签和属性
- CRUD 操作:创建、读取、更新、删除图数据
- Gremlin 查询:执行图遍历查询
- REST API:完整的 HugeGraph REST API 覆盖
📚 了解更多
🔗 相关项目
🤝 贡献
我们欢迎贡献!详情请参阅我们的贡献指南。
开发设置:
- 使用 GitHub Desktop 更轻松地管理 PR
- 提交 PR 前运行
./style/code_format_and_analysis.sh - 报告错误前检查现有问题

📄 许可证
hugegraph-ai 采用 Apache 2.0 许可证。
📞 联系我们

3.3.1 - HugeGraph-LLM
本文为中文翻译版本,内容基于英文版进行,我们欢迎您随时提出修改建议。我们推荐您阅读 AI 仓库 README 以获取最新信息,官网会定期同步更新。
连接图数据库与大语言模型的桥梁
AI 总结项目文档:
🎯 概述
HugeGraph-LLM 是一个功能强大的工具包,它融合了图数据库和大型语言模型的优势,实现了 HugeGraph 与 LLM 之间的无缝集成,助力开发者构建智能应用。
核心功能
- 🏗️ 知识图谱构建:利用 LLM 和 HugeGraph 自动构建知识图谱。
- 🗣️ 自然语言查询:通过自然语言(Gremlin/Cypher)操作图数据库。
- 🔍 图增强 RAG:借助知识图谱提升问答准确性(GraphRAG 和 Graph Agent)。
更多源码文档,请访问我们的 DeepWiki 页面(推荐)。
📋 环境要求
[!IMPORTANT]
- Python:3.10+(未在 3.12 版本测试)
- HugeGraph Server:1.3+(推荐 1.5+)
- UV 包管理器:0.7+
🚀 快速开始
请选择您偏好的部署方式:
方案一:Docker Compose(推荐)
这是同时启动 HugeGraph Server 和 RAG 服务的最快方法:
# 1. 设置环境
cp docker/env.template docker/.env
# 编辑 docker/.env,将 PROJECT_PATH 设置为您的实际项目路径

# 2. 部署服务
cd docker
docker-compose -f docker-compose-network.yml up -d

# 3. 验证部署
docker-compose -f docker-compose-network.yml ps

# 4. 访问服务
# HugeGraph Server: http://localhost:8080
# RAG 服务: http://localhost:8001
方案二:独立 Docker 容器
如果您希望对各组件进行更精细的控制:
可用镜像
hugegraph/rag:开发镜像,可访问源代码hugegraph/rag-bin:生产优化的二进制文件(使用 Nuitka 编译)
# 1. 创建网络
docker network create -d bridge hugegraph-net

# 2. 启动 HugeGraph Server
docker run -itd --name=server -p 8080:8080 --network hugegraph-net hugegraph/hugegraph

# 3. 启动 RAG 服务
docker pull hugegraph/rag:latest
docker run -itd --name rag \
  -v /path/to/your/hugegraph-llm/.env:/home/work/hugegraph-llm/.env \
  -p 8001:8001 --network hugegraph-net hugegraph/rag

# 4. 监控日志
docker logs -f rag
方案三:从源码构建
适用于开发和自定义场景:
# 1. 启动 HugeGraph Server
docker run -itd --name=server -p 8080:8080 hugegraph/hugegraph

# 2. 安装 UV 包管理器
curl -LsSf https://astral.sh/uv/install.sh | sh

# 3. 克隆并设置项目
git clone https://github.com/apache/hugegraph-ai.git
cd hugegraph-ai/hugegraph-llm

# 4. 创建虚拟环境并安装依赖
uv venv && source .venv/bin/activate
uv pip install -e .

# 5. 启动 RAG 演示
python -m hugegraph_llm.demo.rag_demo.app
# 访问: http://127.0.0.1:8001

# 6. (可选) 自定义主机/端口
python -m hugegraph_llm.demo.rag_demo.app --host 127.0.0.1 --port 18001
额外设置(可选)
# 下载 NLTK 停用词以优化文本处理
python ./hugegraph_llm/operators/common_op/nltk_helper.py

# 更新配置文件
python -m hugegraph_llm.config.generate --update
[!TIP]
查看我们的快速入门指南获取详细用法示例和查询逻辑解释。
💡 用法示例
知识图谱构建
交互式 Web 界面
使用 Gradio 界面进行可视化知识图谱构建:
输入选项:
- 文本:直接输入文本用于 RAG 索引创建
- 文件:上传 TXT 或 DOCX 文件(支持多选)
Schema 配置:
- 自定义 Schema:遵循我们模板的 JSON 格式
- HugeGraph Schema:使用现有图实例的 Schema(例如,“hugegraph”)
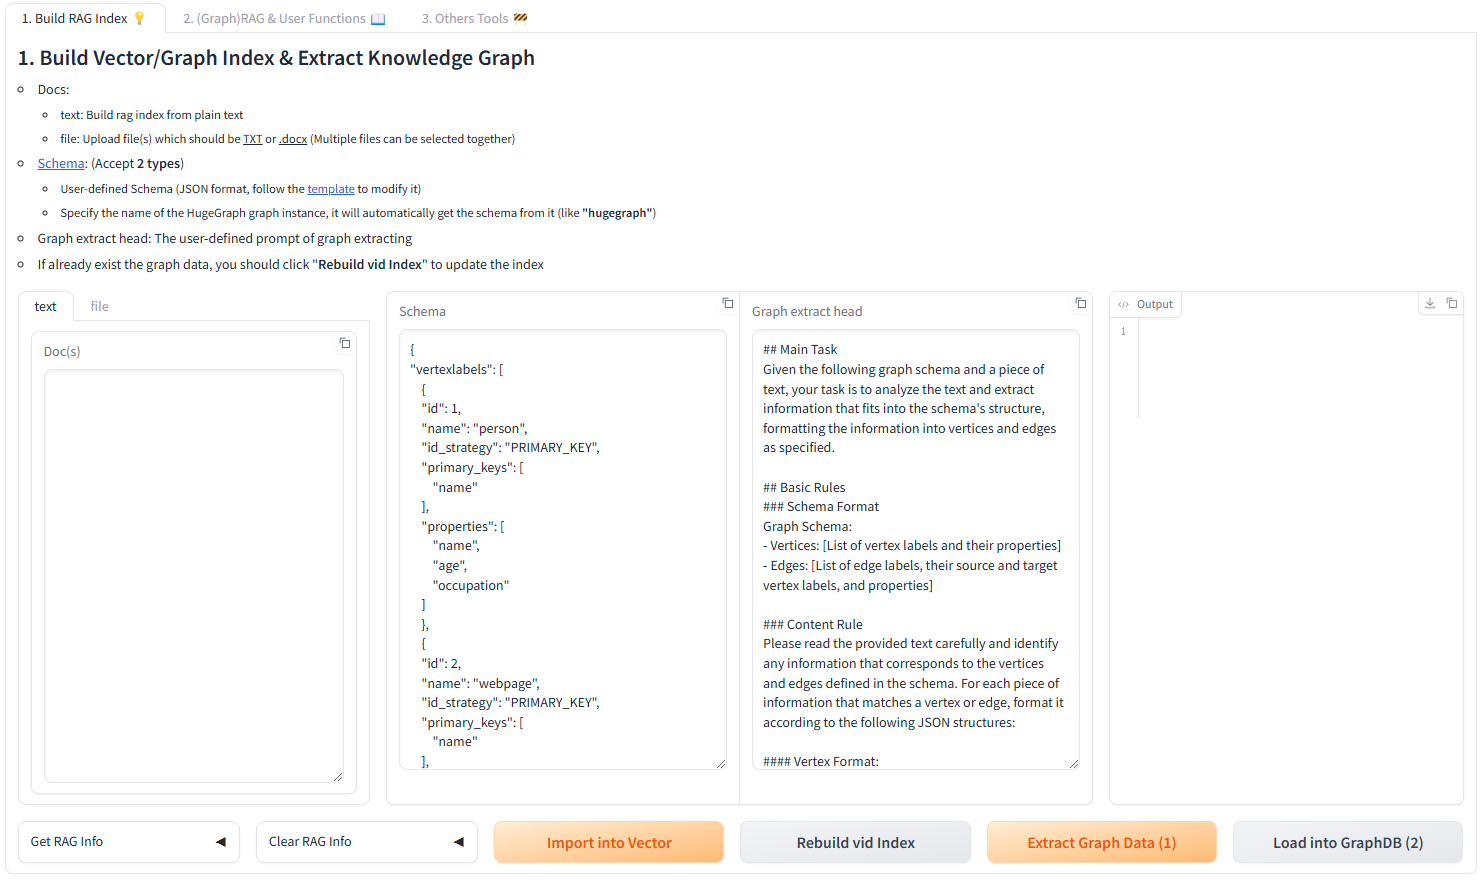
代码构建
使用 KgBuilder 类通过代码构建知识图谱:
from hugegraph_llm.models.llms.init_llm import LLMs
from hugegraph_llm.operators.kg_construction_task import KgBuilder

# 初始化并链式操作
TEXT = "在此处输入您的文本内容..."
builder = KgBuilder(LLMs().get_chat_llm())

(
    builder
    .import_schema(from_hugegraph="talent_graph").print_result()
    .chunk_split(TEXT).print_result()
    .extract_info(extract_type="property_graph").print_result()
    .commit_to_hugegraph()
    .run()
)
工作流:
graph LR
    A[导入 Schema] --> B[文本分块]
    B --> C[提取信息]
    C --> D[提交到 HugeGraph]
    D --> E[执行工作流]

    style A fill:#fff2cc
    style B fill:#d5e8d4
    style C fill:#dae8fc
    style D fill:#f8cecc
    style E fill:#e1d5e7
图增强 RAG
利用 HugeGraph 进行检索增强生成:
from hugegraph_llm.operators.graph_rag_task import RAGPipeline

# 初始化 RAG 工作流
graph_rag = RAGPipeline()

# 执行 RAG 工作流
(
    graph_rag
    .extract_keywords(text="给我讲讲 Al Pacino 的故事。")
    .keywords_to_vid()
    .query_graphdb(max_deep=2, max_graph_items=30)
    .merge_dedup_rerank()
    .synthesize_answer(vector_only_answer=False, graph_only_answer=True)
    .run(verbose=True)
)
RAG 工作流:
graph TD
    A[用户查询] --> B[提取关键词]
    B --> C[匹配图节点]
    C --> D[检索图上下文]
    D --> E[重排序结果]
    E --> F[生成答案]

    style A fill:#e3f2fd
    style B fill:#f3e5f5
    style C fill:#e8f5e8
    style D fill:#fff3e0
    style E fill:#fce4ec
    style F fill:#e0f2f1
🔧 配置
运行演示后,将自动生成配置文件:
- 环境:
hugegraph-llm/.env - 提示:
hugegraph-llm/src/hugegraph_llm/resources/demo/config_prompt.yaml
[!NOTE]
使用 Web 界面时,配置更改会自动保存。对于手动更改,刷新页面即可加载更新。
LLM 提供商配置
本项目使用 LiteLLM 实现多提供商 LLM 支持,可统一访问 OpenAI、Anthropic、Google、Cohere 以及 100 多个其他提供商。
方案一:直接 LLM 连接(OpenAI、Ollama)
# .env 配置
chat_llm_type=openai           # 或 ollama/local
openai_api_key=sk-xxx
openai_api_base=https://api.openai.com/v1
openai_language_model=gpt-4o-mini
openai_max_tokens=4096
方案二:LiteLLM 多提供商支持
LiteLLM 作为多个 LLM 提供商的统一代理:
# .env 配置
chat_llm_type=litellm
extract_llm_type=litellm
text2gql_llm_type=litellm

# LiteLLM 设置
litellm_api_base=http://localhost:4000  # LiteLLM 代理服务器
litellm_api_key=sk-1234                  # LiteLLM API 密钥

# 模型选择(提供商/模型格式)
litellm_language_model=anthropic/claude-3-5-sonnet-20241022
litellm_max_tokens=4096
支持的提供商:OpenAI、Anthropic、Google(Gemini)、Azure、Cohere、Bedrock、Vertex AI、Hugging Face 等。
完整提供商列表和配置详情,请访问 LiteLLM Providers。
Reranker 配置
Reranker 通过重新排序检索结果来提高 RAG 准确性。支持的提供商:
# Cohere Reranker
reranker_type=cohere
cohere_api_key=your-cohere-key
cohere_rerank_model=rerank-english-v3.0

# SiliconFlow Reranker
reranker_type=siliconflow
siliconflow_api_key=your-siliconflow-key
siliconflow_rerank_model=BAAI/bge-reranker-v2-m3
Text2Gremlin 配置
将自然语言转换为 Gremlin 查询:
from hugegraph_llm.operators.graph_rag_task import Text2GremlinPipeline

# 初始化工作流
text2gremlin = Text2GremlinPipeline()

# 生成 Gremlin 查询
result = (
    text2gremlin
    .query_to_gremlin(query="查找所有由 Francis Ford Coppola 执导的电影")
    .execute_gremlin_query()
    .run()
)
REST API 端点:有关 HTTP 端点详情,请参阅 REST API 文档。
📚 其他资源
- 图可视化:使用 HugeGraph Hubble 进行数据分析和 Schema 管理
- API 文档:浏览我们的 REST API 端点以进行集成
- 社区:加入我们的讨论并为项目做出贡献
许可证:Apache License 2.0 | 社区:Apache HugeGraph
3.3.2 - HugeGraph-ML
HugeGraph-ML 将 HugeGraph 与流行的图学习库集成,支持直接在图数据上进行端到端的机器学习工作流。
概述
hugegraph-ml 提供了统一接口,用于将图神经网络和机器学习算法应用于存储在 HugeGraph 中的数据。它通过无缝转换 HugeGraph 数据到主流 ML 框架兼容格式,消除了复杂的数据导出/导入流程。
核心功能
- 直接 HugeGraph 集成:无需手动导出即可直接从 HugeGraph 查询图数据
- 21 种算法实现:全面覆盖节点分类、图分类、嵌入和链接预测
- DGL 后端:利用深度图库(DGL)进行高效训练
- 端到端工作流:从数据加载到模型训练和评估
- 模块化任务:可复用的常见 ML 场景任务抽象
环境要求
- Python:3.9+(独立模块)
- HugeGraph Server:1.0+(推荐:1.5+)
- UV 包管理器:0.7+(用于依赖管理)
安装
1. 启动 HugeGraph Server
# 方案一:Docker(推荐)
docker run -itd --name=hugegraph -p 8080:8080 hugegraph/hugegraph

# 方案二:二进制包
# 参见 https://hugegraph.apache.org/docs/download/download/
2. 克隆并设置
git clone https://github.com/apache/hugegraph-ai.git
cd hugegraph-ai/hugegraph-ml
3. 安装依赖
# uv sync 自动创建 .venv 并安装所有依赖
uv sync

# 激活虚拟环境
source .venv/bin/activate
4. 导航到源代码目录
[!NOTE]
所有示例均假定您在已激活的虚拟环境中。
已实现算法
HugeGraph-ML 目前实现了跨多个类别的 21 种图机器学习算法:
节点分类(11 种算法)
基于网络结构和特征预测图节点的标签。
| 算法 | 论文 | 描述 |
|---|
| GCN | Kipf & Welling, 2017 | 图卷积网络 |
| GAT | Veličković et al., 2018 | 图注意力网络 |
| GraphSAGE | Hamilton et al., 2017 | 归纳式表示学习 |
| APPNP | Klicpera et al., 2019 | 个性化 PageRank 传播 |
| AGNN | Thekumparampil et al., 2018 | 基于注意力的 GNN |
| ARMA | Bianchi et al., 2019 | 自回归移动平均滤波器 |
| DAGNN | Liu et al., 2020 | 深度自适应图神经网络 |
| DeeperGCN | Li et al., 2020 | 非常深的 GCN 架构 |
| GRAND | Feng et al., 2020 | 图随机神经网络 |
| JKNet | Xu et al., 2018 | 跳跃知识网络 |
| Cluster-GCN | Chiang et al., 2019 | 通过聚类实现可扩展 GCN 训练 |
图分类(2 种算法)
基于结构和节点特征对整个图进行分类。
图嵌入(3 种算法)
学习用于下游任务的无监督节点表示。
链接预测(3 种算法)
预测图中缺失或未来的连接。
欺诈检测(2 种算法)
检测图中的异常节点(例如欺诈账户)。
后处理(1 种算法)
通过标签传播改进预测。
使用示例
示例 1:使用 DGI 进行节点嵌入
使用深度图信息最大化(DGI)在 Cora 数据集上进行无监督节点嵌入。
步骤 1:导入数据集(如需)
from hugegraph_ml.utils.dgl2hugegraph_utils import import_graph_from_dgl

# 从 DGL 导入 Cora 数据集到 HugeGraph
import_graph_from_dgl("cora")
步骤 2:转换图数据
from hugegraph_ml.data.hugegraph2dgl import HugeGraph2DGL

# 将 HugeGraph 数据转换为 DGL 格式
hg2d = HugeGraph2DGL()
graph = hg2d.convert_graph(vertex_label="CORA_vertex", edge_label="CORA_edge")
步骤 3:初始化模型
from hugegraph_ml.models.dgi import DGI

# 创建 DGI 模型
model = DGI(n_in_feats=graph.ndata["feat"].shape[1])
步骤 4:训练并生成嵌入
from hugegraph_ml.tasks.node_embed import NodeEmbed

# 训练模型并生成节点嵌入
node_embed_task = NodeEmbed(graph=graph, model=model)
embedded_graph = node_embed_task.train_and_embed(
    add_self_loop=True,
    n_epochs=300,
    patience=30
)
步骤 5:下游任务(节点分类)
from hugegraph_ml.models.mlp import MLPClassifier
from hugegraph_ml.tasks.node_classify import NodeClassify

# 使用嵌入进行节点分类
model = MLPClassifier(
    n_in_feat=embedded_graph.ndata["feat"].shape[1],
    n_out_feat=embedded_graph.ndata["label"].unique().shape[0]
)
node_clf_task = NodeClassify(graph=embedded_graph, model=model)
node_clf_task.train(lr=1e-3, n_epochs=400, patience=40)
print(node_clf_task.evaluate())
预期输出:
{'accuracy': 0.82, 'loss': 0.5714246034622192}
完整示例:参见 dgi_example.py
示例 2:使用 GRAND 进行节点分类
使用 GRAND 模型直接对节点进行分类(无需单独的嵌入步骤)。
from hugegraph_ml.data.hugegraph2dgl import HugeGraph2DGL
from hugegraph_ml.models.grand import GRAND
from hugegraph_ml.tasks.node_classify import NodeClassify

# 加载图
hg2d = HugeGraph2DGL()
graph = hg2d.convert_graph(vertex_label="CORA_vertex", edge_label="CORA_edge")

# 初始化 GRAND 模型
model = GRAND(
    n_in_feats=graph.ndata["feat"].shape[1],
    n_out_feats=graph.ndata["label"].unique().shape[0]
)

# 训练和评估
node_clf_task = NodeClassify(graph=graph, model=model)
node_clf_task.train(lr=1e-2, n_epochs=1500, patience=100)
print(node_clf_task.evaluate())
完整示例:参见 grand_example.py
核心组件
HugeGraph2DGL 转换器
无缝将 HugeGraph 数据转换为 DGL 图格式:
from hugegraph_ml.data.hugegraph2dgl import HugeGraph2DGL

hg2d = HugeGraph2DGL()
graph = hg2d.convert_graph(
    vertex_label="person",      # 要提取的顶点标签
    edge_label="knows",         # 要提取的边标签
    directed=False              # 图的方向性
)
任务抽象
用于常见 ML 工作流的可复用任务对象:
| 任务 | 类 | 用途 |
|---|
| 节点嵌入 | NodeEmbed | 生成无监督节点嵌入 |
| 节点分类 | NodeClassify | 预测节点标签 |
| 图分类 | GraphClassify | 预测图级标签 |
| 链接预测 | LinkPredict | 预测缺失边 |
最佳实践
- 从小数据集开始:在扩展之前先在小图(例如 Cora、Citeseer)上测试您的流程
- 使用早停:设置
patience 参数以避免过拟合 - 调整超参数:根据数据集大小调整学习率、隐藏维度和周期数
- 监控 GPU 内存:大图可能需要批量训练(例如 Cluster-GCN)
- 验证 Schema:确保顶点/边标签与您的 HugeGraph schema 匹配
故障排除
| 问题 | 解决方案 |
|---|
| 连接 HugeGraph “Connection refused” | 验证服务器是否在 8080 端口运行 |
| CUDA 内存不足 | 减少批大小或使用仅 CPU 模式 |
| 模型收敛问题 | 尝试不同的学习率(1e-2、1e-3、1e-4) |
| DGL 的 ImportError | 运行 uv sync 重新安装依赖 |
贡献
添加新算法:
- 在
src/hugegraph_ml/models/your_model.py 创建模型文件 - 继承基础模型类并实现
forward() 方法 - 在
src/hugegraph_ml/examples/ 添加示例脚本 - 更新此文档并添加算法详情
另见
3.3.3 - GraphRAG UI Details
接续主文档介绍基础 UI 功能及详情,欢迎随时更新和改进,谢谢
1. 项目核心逻辑
构建 RAG 索引职责:
- 文本分割和向量化
- 从文本中提取图(构建知识图谱)并对顶点进行向量化
(Graph)RAG 和用户功能职责:
- 根据查询从构建的知识图谱和向量数据库中检索相关内容,用于补充提示词。
2. (处理流程)构建 RAG 索引
从文本构建知识图谱、分块向量和图顶点向量。

graph TD;
    A[原始文本] --> B[文本分割]
    B --> C[向量化]
    C --> D[存储到向量数据库]

    A --> F[文本分割]
    F --> G[LLM 基于 schema 和分割后的文本提取图]
    G --> H[将图存储到图数据库,\n自动对顶点进行向量化\n并存储到向量数据库]

    I[从图数据库检索顶点] --> J[对顶点进行向量化并存储到向量数据库\n注意:增量更新]
四个输入字段:
- 文档: 输入文本
- Schema: 图的 schema,可以以 JSON 格式的 schema 提供,或提供图名称(如果数据库中已存在)。
- 图提取提示词头部: 提示词的头部
- 输出: 显示结果
按钮:
获取 RAG 信息
- 获取向量索引信息: 检索向量索引信息
- 获取图索引信息: 检索图索引信息
清除 RAG 数据
- 清除分块向量索引: 清除分块向量
- 清除图顶点向量索引: 清除图顶点向量
- 清除图数据: 清除图数据
导入到向量: 将文档中的文本转换为向量(需要先对文本进行分块,然后将分块转换为向量)
提取图数据 (1): 基于 Schema,使用图提取提示词头部和分块内容作为提示词,从文档中提取图数据
加载到图数据库 (2): 将提取的图数据存储到数据库(自动调用更新顶点嵌入以将向量存储到向量数据库)
更新顶点嵌入: 将图顶点转换为向量
执行流程:
- 在文档字段中输入文本。
- 点击导入到向量按钮,对文本进行分割和向量化,存储到向量数据库。
- 在 Schema 字段中输入图的 Schema。
- 点击提取图数据 (1) 按钮,将文本提取为图。
- 点击加载到图数据库 (2) 按钮,将提取的图存储到图数据库(这会自动调用更新顶点嵌入以将向量存储到向量数据库)。
- 点击更新顶点嵌入按钮,将图顶点向量化并存储到向量数据库。
3. (处理流程)(Graph)RAG 和用户功能
前一个模块中的导入到向量按钮将文本(分块)转换为向量,更新顶点嵌入按钮将图顶点转换为向量。这些向量分别存储,用于在本模块中补充查询(答案生成)的上下文。换句话说,前一个模块为 RAG 准备数据(向量化),而本模块执行 RAG。
本模块包含两个部分:
第一部分处理单个查询,第二部分同时处理多个查询。以下是第一部分的说明。

graph TD;
    A[问题] --> B[将问题向量化并在向量数据库中搜索最相似的分块]

    A --> F[使用 LLM 提取关键词]
    F --> G[在图数据库中使用关键词精确匹配顶点;\n在向量数据库中执行模糊匹配(图顶点)]
    G --> H[使用匹配的顶点和查询通过 LLM 生成 Gremlin 查询]
    H --> I[执行 Gremlin 查询;如果成功则完成;如果失败则回退到 BFS]

    B --> J[对结果排序]
    I --> J
    J --> K[生成答案]
输入字段:
- 问题: 输入查询
- 查询提示词: 用于向 LLM 提出最终问题的提示词模板
- 关键词提取提示词: 用于从问题中提取关键词的提示词模板
- 模板数量: < 0 表示禁用 text2gql;= 0 表示不使用模板(零样本);> 0 表示使用指定数量的模板
查询范围选择:
- 基础 LLM 答案: 不使用 RAG 功能
- 仅向量答案: 仅使用基于向量的检索(在向量数据库中查询分块向量)
- 仅图答案: 仅使用基于图的检索(在向量数据库中查询图顶点向量和图数据库)
- 图-向量答案: 同时使用基于图和基于向量的检索

执行流程:
仅图答案:

仅向量答案:
- 将查询转换为向量。
- 在向量数据库的分块向量数据集中搜索最相似的内容。
排序和答案生成:
- 执行检索后,对搜索结果进行排序以构建最终的提示词。
- 基于不同的提示词配置生成答案,并在不同的输出字段中显示:

4. (处理流程)Text2Gremlin
将自然语言查询转换为 Gremlin 查询。
本模块包含两个部分:
- 构建向量模板索引(可选): 将示例文件中的查询/gremlin 对进行向量化并存储到向量数据库中,用于生成 Gremlin 查询时参考。
- 自然语言转 Gremlin: 将自然语言查询转换为 Gremlin 查询。
第一部分较为简单,因此重点介绍第二部分。

graph TD;
    A[Gremlin 对文件] --> C[向量化查询]
    C --> D[存储到向量数据库]

    F[自然语言查询] --> G[在向量数据库中搜索最相似的查询\n(如果向量数据库中不存在 Gremlin 对,\n将自动使用默认文件进行向量化)\n并检索对应的 Gremlin]
    G --> H[将匹配的对添加到提示词中\n并使用 LLM 生成与自然语言查询\n对应的 Gremlin]
第二部分的输入字段:
- 自然语言查询: 输入要转换为 Gremlin 的自然语言文本。

执行流程:
- 在自然语言查询字段中输入查询(自然语言)。
- 在Schema字段中输入图 schema。
- 点击Text2Gremlin按钮,执行以下逻辑:
- 将查询转换为向量。
- 构建提示词:
- 检索图 schema。
- 在向量数据库中查询示例向量,检索与输入查询相似的查询-gremlin 对(如果向量数据库中缺少示例,将自动使用resources文件夹中的示例进行初始化)。

- 使用构建的提示词生成 Gremlin 查询。
5. 图工具
输入 Gremlin 查询以执行相应操作。
6. 语言切换 (v1.5.0+)
HugeGraph-LLM 支持双语提示词,以提高跨语言的准确性。
在英文和中文之间切换
系统语言影响:
- 系统提示词:LLM 使用的内部提示词
- 关键词提取:特定语言的提取逻辑
- 答案生成:响应格式和风格
配置方法一:环境变量
编辑您的 .env 文件:
# 英文提示词(默认)
LANGUAGE=EN

# 中文提示词
LANGUAGE=CN
更改语言设置后重启服务。
配置方法二:Web UI(动态)
如果您的部署中可用,使用 Web UI 中的设置面板切换语言,无需重启:
- 导航到设置或配置选项卡
- 选择语言:
EN 或 CN - 点击保存 - 更改立即生效
特定语言的行为
| 语言 | 关键词提取 | 答案风格 | 使用场景 |
|---|
EN | 英文 NLP 模型 | 专业、简洁 | 国际用户、英文文档 |
CN | 中文 NLP 模型 | 自然的中文表达 | 中文用户、中文文档 |
[!TIP]
将 LANGUAGE 设置与您的主要文档语言匹配,以获得最佳 RAG 准确性。
REST API 语言覆盖
使用 REST API 时,您可以为每个请求指定自定义提示词,以覆盖默认语言设置:
curl -X POST http://localhost:8001/rag \
  -H "Content-Type: application/json" \
  -d '{
    "query": "告诉我关于阿尔·帕西诺的信息",
    "graph_only": true,
    "keywords_extract_prompt": "请从以下文本中提取关键实体...",
    "answer_prompt": "请根据以下上下文回答问题..."
  }'
完整参数详情请参阅 REST API 参考。
3.3.4 - 配置参考
本文档提供 HugeGraph-LLM 所有配置选项的完整参考。
配置文件
- 环境文件:
.env(从模板创建或自动生成) - 提示词配置:
src/hugegraph_llm/resources/demo/config_prompt.yaml
[!TIP]
运行 python -m hugegraph_llm.config.generate --update 可自动生成或更新带有默认值的配置文件。
环境变量概览
1. 语言和模型类型选择
# 提示词语言(影响系统提示词和生成文本)
LANGUAGE=EN                     # 选项: EN | CN

# 不同任务的 LLM 类型
CHAT_LLM_TYPE=openai           # 对话/RAG: openai | litellm | ollama/local
EXTRACT_LLM_TYPE=openai        # 实体抽取: openai | litellm | ollama/local
TEXT2GQL_LLM_TYPE=openai       # 文本转 Gremlin: openai | litellm | ollama/local

# 嵌入模型类型
EMBEDDING_TYPE=openai          # 选项: openai | litellm | ollama/local

# Reranker 类型(可选)
RERANKER_TYPE=                 # 选项: cohere | siliconflow | (留空表示无)
2. OpenAI 配置
每个 LLM 任务(chat、extract、text2gql)都有独立配置:
2.1 Chat LLM(RAG 答案生成)
OPENAI_CHAT_API_BASE=https://api.openai.com/v1
OPENAI_CHAT_API_KEY=sk-your-api-key-here
OPENAI_CHAT_LANGUAGE_MODEL=gpt-4o-mini
OPENAI_CHAT_TOKENS=8192        # 对话响应的最大 tokens
OPENAI_EXTRACT_API_BASE=https://api.openai.com/v1
OPENAI_EXTRACT_API_KEY=sk-your-api-key-here
OPENAI_EXTRACT_LANGUAGE_MODEL=gpt-4o-mini
OPENAI_EXTRACT_TOKENS=1024     # 抽取任务的最大 tokens
2.3 Text2GQL LLM(自然语言转 Gremlin)
OPENAI_TEXT2GQL_API_BASE=https://api.openai.com/v1
OPENAI_TEXT2GQL_API_KEY=sk-your-api-key-here
OPENAI_TEXT2GQL_LANGUAGE_MODEL=gpt-4o-mini
OPENAI_TEXT2GQL_TOKENS=4096    # 查询生成的最大 tokens
2.4 嵌入模型
OPENAI_EMBEDDING_API_BASE=https://api.openai.com/v1
OPENAI_EMBEDDING_API_KEY=sk-your-api-key-here
OPENAI_EMBEDDING_MODEL=text-embedding-3-small
[!NOTE]
您可以为每个任务使用不同的 API 密钥/端点,以优化成本或使用专用模型。
3. LiteLLM 配置(多供应商支持)
LiteLLM 支持统一访问 100 多个 LLM 供应商(OpenAI、Anthropic、Google、Azure 等)。
3.1 Chat LLM
LITELLM_CHAT_API_BASE=http://localhost:4000       # LiteLLM 代理 URL
LITELLM_CHAT_API_KEY=sk-litellm-key              # LiteLLM API 密钥
LITELLM_CHAT_LANGUAGE_MODEL=anthropic/claude-3-5-sonnet-20241022
LITELLM_CHAT_TOKENS=8192
LITELLM_EXTRACT_API_BASE=http://localhost:4000
LITELLM_EXTRACT_API_KEY=sk-litellm-key
LITELLM_EXTRACT_LANGUAGE_MODEL=openai/gpt-4o-mini
LITELLM_EXTRACT_TOKENS=256
3.3 Text2GQL LLM
LITELLM_TEXT2GQL_API_BASE=http://localhost:4000
LITELLM_TEXT2GQL_API_KEY=sk-litellm-key
LITELLM_TEXT2GQL_LANGUAGE_MODEL=openai/gpt-4o-mini
LITELLM_TEXT2GQL_TOKENS=4096
3.4 嵌入模型
LITELLM_EMBEDDING_API_BASE=http://localhost:4000
LITELLM_EMBEDDING_API_KEY=sk-litellm-key
LITELLM_EMBEDDING_MODEL=openai/text-embedding-3-small
模型格式: 供应商/模型名称
示例:
openai/gpt-4o-minianthropic/claude-3-5-sonnet-20241022google/gemini-2.0-flash-expazure/gpt-4
完整列表请参阅 LiteLLM Providers。
4. Ollama 配置(本地部署)
使用 Ollama 运行本地 LLM,确保隐私和成本控制。
4.1 Chat LLM
OLLAMA_CHAT_HOST=127.0.0.1
OLLAMA_CHAT_PORT=11434
OLLAMA_CHAT_LANGUAGE_MODEL=llama3.1:8b
OLLAMA_EXTRACT_HOST=127.0.0.1
OLLAMA_EXTRACT_PORT=11434
OLLAMA_EXTRACT_LANGUAGE_MODEL=llama3.1:8b
4.3 Text2GQL LLM
OLLAMA_TEXT2GQL_HOST=127.0.0.1
OLLAMA_TEXT2GQL_PORT=11434
OLLAMA_TEXT2GQL_LANGUAGE_MODEL=qwen2.5-coder:7b
4.4 嵌入模型
OLLAMA_EMBEDDING_HOST=127.0.0.1
OLLAMA_EMBEDDING_PORT=11434
OLLAMA_EMBEDDING_MODEL=nomic-embed-text
[!TIP]
下载模型:ollama pull llama3.1:8b 或 ollama pull qwen2.5-coder:7b
5. Reranker 配置
Reranker 通过根据相关性重新排序检索结果来提高 RAG 准确性。
5.1 Cohere Reranker
RERANKER_TYPE=cohere
COHERE_BASE_URL=https://api.cohere.com/v1/rerank
RERANKER_API_KEY=your-cohere-api-key
RERANKER_MODEL=rerank-english-v3.0
可用模型:
rerank-english-v3.0(英文)rerank-multilingual-v3.0(100+ 种语言)
5.2 SiliconFlow Reranker
RERANKER_TYPE=siliconflow
RERANKER_API_KEY=your-siliconflow-api-key
RERANKER_MODEL=BAAI/bge-reranker-v2-m3
6. HugeGraph 连接
配置与 HugeGraph 服务器实例的连接。
# 服务器连接
GRAPH_IP=127.0.0.1
GRAPH_PORT=8080
GRAPH_NAME=hugegraph            # 图实例名称
GRAPH_USER=admin                # 用户名
GRAPH_PWD=admin-password        # 密码
GRAPH_SPACE=                    # 图空间(可选,用于多租户)
7. 查询参数
控制图遍历行为和结果限制。
# 图遍历限制
MAX_GRAPH_PATH=10               # 图查询的最大路径深度
MAX_GRAPH_ITEMS=30              # 从图中检索的最大项数
EDGE_LIMIT_PRE_LABEL=8          # 每个标签类型的最大边数

# 属性过滤
LIMIT_PROPERTY=False            # 限制结果中的属性(True/False)
8. 向量搜索配置
配置向量相似性搜索参数。
# 向量搜索阈值
VECTOR_DIS_THRESHOLD=0.9        # 最小余弦相似度(0-1,越高越严格)
TOPK_PER_KEYWORD=1              # 每个提取关键词的 Top-K 结果
9. Rerank 配置
# Rerank 结果限制
TOPK_RETURN_RESULTS=20          # 重排序后的 top 结果数
配置优先级
系统按以下顺序加载配置(后面的来源覆盖前面的):
- 默认值(在
*_config.py 文件中) - 环境变量(来自
.env 文件) - 运行时更新(通过 Web UI 或 API 调用)
配置示例
最小配置(OpenAI)
# 语言
LANGUAGE=EN

# LLM 类型
CHAT_LLM_TYPE=openai
EXTRACT_LLM_TYPE=openai
TEXT2GQL_LLM_TYPE=openai
EMBEDDING_TYPE=openai

# OpenAI 凭据(所有任务共用一个密钥)
OPENAI_API_BASE=https://api.openai.com/v1
OPENAI_API_KEY=sk-your-api-key-here
OPENAI_LANGUAGE_MODEL=gpt-4o-mini
OPENAI_EMBEDDING_MODEL=text-embedding-3-small

# HugeGraph 连接
GRAPH_IP=127.0.0.1
GRAPH_PORT=8080
GRAPH_NAME=hugegraph
GRAPH_USER=admin
GRAPH_PWD=admin
生产环境配置(LiteLLM + Reranker)
# 双语支持
LANGUAGE=EN

# 灵活使用 LiteLLM
CHAT_LLM_TYPE=litellm
EXTRACT_LLM_TYPE=litellm
TEXT2GQL_LLM_TYPE=litellm
EMBEDDING_TYPE=litellm

# LiteLLM 代理
LITELLM_CHAT_API_BASE=http://localhost:4000
LITELLM_CHAT_API_KEY=sk-litellm-master-key
LITELLM_CHAT_LANGUAGE_MODEL=anthropic/claude-3-5-sonnet-20241022
LITELLM_CHAT_TOKENS=8192

LITELLM_EXTRACT_API_BASE=http://localhost:4000
LITELLM_EXTRACT_API_KEY=sk-litellm-master-key
LITELLM_EXTRACT_LANGUAGE_MODEL=openai/gpt-4o-mini
LITELLM_EXTRACT_TOKENS=256

LITELLM_TEXT2GQL_API_BASE=http://localhost:4000
LITELLM_TEXT2GQL_API_KEY=sk-litellm-master-key
LITELLM_TEXT2GQL_LANGUAGE_MODEL=openai/gpt-4o-mini
LITELLM_TEXT2GQL_TOKENS=4096

LITELLM_EMBEDDING_API_BASE=http://localhost:4000
LITELLM_EMBEDDING_API_KEY=sk-litellm-master-key
LITELLM_EMBEDDING_MODEL=openai/text-embedding-3-small

# Cohere Reranker 提高准确性
RERANKER_TYPE=cohere
COHERE_BASE_URL=https://api.cohere.com/v1/rerank
RERANKER_API_KEY=your-cohere-key
RERANKER_MODEL=rerank-multilingual-v3.0

# 带认证的 HugeGraph
GRAPH_IP=prod-hugegraph.example.com
GRAPH_PORT=8080
GRAPH_NAME=production_graph
GRAPH_USER=rag_user
GRAPH_PWD=secure-password
GRAPH_SPACE=prod_space

# 优化的查询参数
MAX_GRAPH_PATH=15
MAX_GRAPH_ITEMS=50
VECTOR_DIS_THRESHOLD=0.85
TOPK_RETURN_RESULTS=30
本地/离线配置(Ollama)
# 语言
LANGUAGE=EN

# 全部通过 Ollama 使用本地模型
CHAT_LLM_TYPE=ollama/local
EXTRACT_LLM_TYPE=ollama/local
TEXT2GQL_LLM_TYPE=ollama/local
EMBEDDING_TYPE=ollama/local

# Ollama 端点
OLLAMA_CHAT_HOST=127.0.0.1
OLLAMA_CHAT_PORT=11434
OLLAMA_CHAT_LANGUAGE_MODEL=llama3.1:8b

OLLAMA_EXTRACT_HOST=127.0.0.1
OLLAMA_EXTRACT_PORT=11434
OLLAMA_EXTRACT_LANGUAGE_MODEL=llama3.1:8b

OLLAMA_TEXT2GQL_HOST=127.0.0.1
OLLAMA_TEXT2GQL_PORT=11434
OLLAMA_TEXT2GQL_LANGUAGE_MODEL=qwen2.5-coder:7b

OLLAMA_EMBEDDING_HOST=127.0.0.1
OLLAMA_EMBEDDING_PORT=11434
OLLAMA_EMBEDDING_MODEL=nomic-embed-text

# 离线环境不使用 reranker
RERANKER_TYPE=

# 本地 HugeGraph
GRAPH_IP=127.0.0.1
GRAPH_PORT=8080
GRAPH_NAME=hugegraph
GRAPH_USER=admin
GRAPH_PWD=admin
配置验证
修改 .env 后,验证配置:
- 通过 Web UI:访问
http://localhost:8001 并检查设置面板 - 通过 Python:
from hugegraph_llm.config import settings
print(settings.llm_config)
print(settings.hugegraph_config)
- 通过 REST API:
curl http://localhost:8001/config
故障排除
| 问题 | 解决方案 |
|---|
| “API key not found” | 检查 .env 中的 *_API_KEY 是否正确设置 |
| “Connection refused” | 验证 GRAPH_IP 和 GRAPH_PORT 是否正确 |
| “Model not found” | 对于 Ollama:运行 ollama pull <模型名称> |
| “Rate limit exceeded” | 减少 MAX_GRAPH_ITEMS 或使用不同的 API 密钥 |
| “Embedding dimension mismatch” | 删除现有向量并使用正确模型重建 |
另见
3.3.5 - REST API 参考
HugeGraph-LLM 提供 REST API 端点,用于将 RAG 和 Text2Gremlin 功能集成到您的应用程序中。
基础 URL
启动服务时更改主机/端口:
python -m hugegraph_llm.demo.rag_demo.app --host 127.0.0.1 --port 8001
认证
目前 API 支持可选的基于令牌的认证:
# 在 .env 中启用认证
ENABLE_LOGIN=true
USER_TOKEN=your-user-token
ADMIN_TOKEN=your-admin-token
在请求头中传递令牌:
Authorization: Bearer <token>
RAG 端点
1. 完整 RAG 查询
POST /rag
执行完整的 RAG 工作流,包括关键词提取、图检索、向量搜索、重排序和答案生成。
请求体
{
  "query": "给我讲讲阿尔·帕西诺的电影",
  "raw_answer": false,
  "vector_only": false,
  "graph_only": true,
  "graph_vector_answer": false,
  "graph_ratio": 0.5,
  "rerank_method": "cohere",
  "near_neighbor_first": false,
  "gremlin_tmpl_num": 5,
  "max_graph_items": 30,
  "topk_return_results": 20,
  "vector_dis_threshold": 0.9,
  "topk_per_keyword": 1,
  "custom_priority_info": "",
  "answer_prompt": "",
  "keywords_extract_prompt": "",
  "gremlin_prompt": "",
  "client_config": {
    "url": "127.0.0.1:8080",
    "graph": "hugegraph",
    "user": "admin",
    "pwd": "admin",
    "gs": ""
  }
}
参数说明:
| 字段 | 类型 | 必需 | 默认值 | 描述 |
|---|
query | string | 是 | - | 用户的自然语言问题 |
raw_answer | boolean | 否 | false | 返回 LLM 答案而不检索 |
vector_only | boolean | 否 | false | 仅使用向量搜索(无图) |
graph_only | boolean | 否 | false | 仅使用图检索(无向量) |
graph_vector_answer | boolean | 否 | false | 结合图和向量结果 |
graph_ratio | float | 否 | 0.5 | 图与向量结果的比例(0-1) |
rerank_method | string | 否 | "" | 重排序器:“cohere”、“siliconflow”、"" |
near_neighbor_first | boolean | 否 | false | 优先选择直接邻居 |
gremlin_tmpl_num | integer | 否 | 5 | 尝试的 Gremlin 模板数量 |
max_graph_items | integer | 否 | 30 | 图检索的最大项数 |
topk_return_results | integer | 否 | 20 | 重排序后的 Top-K |
vector_dis_threshold | float | 否 | 0.9 | 向量相似度阈值(0-1) |
topk_per_keyword | integer | 否 | 1 | 每个关键词的 Top-K 向量 |
custom_priority_info | string | 否 | "" | 要优先考虑的自定义上下文 |
answer_prompt | string | 否 | "" | 自定义答案生成提示词 |
keywords_extract_prompt | string | 否 | "" | 自定义关键词提取提示词 |
gremlin_prompt | string | 否 | "" | 自定义 Gremlin 生成提示词 |
client_config | object | 否 | null | 覆盖图连接设置 |
响应
{
  "query": "给我讲讲阿尔·帕西诺的电影",
  "graph_only": {
    "answer": "阿尔·帕西诺主演了《教父》(1972 年),由弗朗西斯·福特·科波拉执导...",
    "context": ["《教父》是 1972 年的犯罪电影...", "..."],
    "graph_paths": ["..."],
    "keywords": ["阿尔·帕西诺", "电影"]
  }
}
示例(curl)
curl -X POST http://localhost:8001/rag \
  -H "Content-Type: application/json" \
  -d '{
    "query": "给我讲讲阿尔·帕西诺",
    "graph_only": true,
    "max_graph_items": 30
  }'
2. 仅图检索
POST /rag/graph
检索图上下文而不生成答案。用于调试或自定义处理。
请求体
{
  "query": "阿尔·帕西诺的电影",
  "max_graph_items": 30,
  "topk_return_results": 20,
  "vector_dis_threshold": 0.9,
  "topk_per_keyword": 1,
  "gremlin_tmpl_num": 5,
  "rerank_method": "cohere",
  "near_neighbor_first": false,
  "custom_priority_info": "",
  "gremlin_prompt": "",
  "get_vertex_only": false,
  "client_config": {
    "url": "127.0.0.1:8080",
    "graph": "hugegraph",
    "user": "admin",
    "pwd": "admin",
    "gs": ""
  }
}
额外参数:
| 字段 | 类型 | 默认值 | 描述 |
|---|
get_vertex_only | boolean | false | 仅返回顶点 ID,不返回完整详情 |
响应
{
  "graph_recall": {
    "query": "阿尔·帕西诺的电影",
    "keywords": ["阿尔·帕西诺", "电影"],
    "match_vids": ["1:阿尔·帕西诺", "2:教父"],
    "graph_result_flag": true,
    "gremlin": "g.V('1:阿尔·帕西诺').outE().inV().limit(30)",
    "graph_result": [
      {"id": "1:阿尔·帕西诺", "label": "person", "properties": {"name": "阿尔·帕西诺"}},
      {"id": "2:教父", "label": "movie", "properties": {"title": "教父"}}
    ],
    "vertex_degree_list": [5, 12]
  }
}
示例(curl)
curl -X POST http://localhost:8001/rag/graph \
  -H "Content-Type: application/json" \
  -d '{
    "query": "阿尔·帕西诺",
    "max_graph_items": 30,
    "get_vertex_only": false
  }'
Text2Gremlin 端点
3. 自然语言转 Gremlin
POST /text2gremlin
将自然语言查询转换为可执行的 Gremlin 命令。
请求体
{
  "query": "查找所有由弗朗西斯·福特·科波拉执导的电影",
  "example_num": 5,
  "gremlin_prompt": "",
  "output_types": ["GREMLIN", "RESULT"],
  "client_config": {
    "url": "127.0.0.1:8080",
    "graph": "hugegraph",
    "user": "admin",
    "pwd": "admin",
    "gs": ""
  }
}
参数说明:
| 字段 | 类型 | 必需 | 默认值 | 描述 |
|---|
query | string | 是 | - | 自然语言查询 |
example_num | integer | 否 | 5 | 使用的示例模板数量 |
gremlin_prompt | string | 否 | "" | Gremlin 生成的自定义提示词 |
output_types | array | 否 | null | 输出类型:[“GREMLIN”, “RESULT”, “CYPHER”] |
client_config | object | 否 | null | 图连接覆盖 |
输出类型:
GREMLIN:生成的 Gremlin 查询RESULT:图的执行结果CYPHER:Cypher 查询(如果请求)
响应
{
  "gremlin": "g.V().has('person','name','弗朗西斯·福特·科波拉').out('directed').hasLabel('movie').values('title')",
  "result": [
    "教父",
    "教父 2",
    "现代启示录"
  ]
}
示例(curl)
curl -X POST http://localhost:8001/text2gremlin \
  -H "Content-Type: application/json" \
  -d '{
    "query": "查找所有由弗朗西斯·福特·科波拉执导的电影",
    "output_types": ["GREMLIN", "RESULT"]
  }'
配置端点
4. 更新图连接
POST /config/graph
动态更新 HugeGraph 连接设置。
请求体
{
  "url": "127.0.0.1:8080",
  "name": "hugegraph",
  "user": "admin",
  "pwd": "admin",
  "gs": ""
}
响应
{
  "status_code": 201,
  "message": "图配置更新成功"
}
5. 更新 LLM 配置
POST /config/llm
运行时更新聊天/提取 LLM 设置。
请求体(OpenAI)
{
  "llm_type": "openai",
  "api_key": "sk-your-api-key",
  "api_base": "https://api.openai.com/v1",
  "language_model": "gpt-4o-mini",
  "max_tokens": 4096
}
请求体(Ollama)
{
  "llm_type": "ollama/local",
  "host": "127.0.0.1",
  "port": 11434,
  "language_model": "llama3.1:8b"
}
6. 更新嵌入配置
POST /config/embedding
更新嵌入模型设置。
请求体
{
  "llm_type": "openai",
  "api_key": "sk-your-api-key",
  "api_base": "https://api.openai.com/v1",
  "language_model": "text-embedding-3-small"
}
7. 更新 Reranker 配置
POST /config/rerank
配置重排序器设置。
请求体(Cohere)
{
  "reranker_type": "cohere",
  "api_key": "your-cohere-key",
  "reranker_model": "rerank-multilingual-v3.0",
  "cohere_base_url": "https://api.cohere.com/v1/rerank"
}
请求体(SiliconFlow)
{
  "reranker_type": "siliconflow",
  "api_key": "your-siliconflow-key",
  "reranker_model": "BAAI/bge-reranker-v2-m3"
}
错误响应
所有端点返回标准 HTTP 状态码:
| 代码 | 含义 |
|---|
| 200 | 成功 |
| 201 | 已创建(配置已更新) |
| 400 | 错误请求(无效参数) |
| 500 | 内部服务器错误 |
| 501 | 未实现 |
错误响应格式:
Python 客户端示例
import requests

BASE_URL = "http://localhost:8001"

# 1. 配置图连接
graph_config = {
    "url": "127.0.0.1:8080",
    "name": "hugegraph",
    "user": "admin",
    "pwd": "admin"
}
requests.post(f"{BASE_URL}/config/graph", json=graph_config)

# 2. 执行 RAG 查询
rag_request = {
    "query": "给我讲讲阿尔·帕西诺",
    "graph_only": True,
    "max_graph_items": 30
}
response = requests.post(f"{BASE_URL}/rag", json=rag_request)
print(response.json())

# 3. 从自然语言生成 Gremlin
text2gql_request = {
    "query": "查找所有与阿尔·帕西诺合作的导演",
    "output_types": ["GREMLIN", "RESULT"]
}
response = requests.post(f"{BASE_URL}/text2gremlin", json=text2gql_request)
print(response.json())
另见
3.4.1 - HugeGraph-Vermeer Quick Start
一、Vermeer 概述
1.1 运行架构
Vermeer 是一个 Go编写的高性能内存优先的图计算框架 (一次启动,任意执行),支持 15+ OLAP 图算法的极速计算 (大部分秒~分钟级别完成执行),包含 master 和 worker 两种角色。master 目前只有一个 (可增加 HA),worker 可以有多个。
master 是负责通信、转发、汇总的节点,计算量和占用资源量较少。worker 是计算节点,用于存储图数据和运行计算任务,占用大量内存和 cpu。grpc 和 rest 模块分别负责内部通信和外部调用。
该框架的运行配置可以通过命令行参数传入,也可以通过位于 config/ 目录下的配置文件指定,--env 参数可以指定使用哪个配置文件,例如 --env=master 指定使用 master.ini。需要注意 master 需要指定监听的端口号,worker 需要指定监听端口号和 master 的 ip:port。
1.2 运行方法
- 方案一:Docker Compose(推荐)
确保docker-compose.yaml存在于您的项目根目录中。如果没有,以下是一个示例:
services:
  vermeer-master:
    image: hugegraph/vermeer
    container_name: vermeer-master
    volumes:
      - ~/.config:/go/bin/config # Change here to your actual config path
    command: --env=master
    networks:
      vermeer_network:
        ipv4_address: 172.20.0.10 # Assign a static IP for the master

  vermeer-worker:
    image: hugegraph/vermeer
    container_name: vermeer-worker
    volumes:
      - ~/:/go/bin/config # Change here to your actual config path
    command: --env=worker
    networks:
      vermeer_network:
        ipv4_address: 172.20.0.11 # Assign a static IP for the worker

networks:
  vermeer_network:
    driver: bridge
    ipam:
      config:
        - subnet: 172.20.0.0/24 # Define the subnet for your network
修改 docker-compose.yaml
- Volume:例如将两处 ~/:/go/bin/config 改为 /home/user/config:/go/bin/config(或您自己的配置目录)。
- Subnet:根据实际情况修改子网IP。请注意,每个容器需要访问的端口在config文件中指定,具体请参照项目
config文件夹下内容。
在项目目录构建镜像并启动(或者先用 docker build 再 docker-compose up)
# 构建镜像(在项目根 vermeer 目录)
docker build -t hugegraph/vermeer .

# 启动(在 vermeer 根目录)
docker-compose up -d
# 或使用新版 CLI:
# docker compose up -d
查看日志 / 停止 / 删除:
docker-compose logs -f
docker-compose down
- 方案二:通过 docker run 单独启动(手动创建网络并分配静态 IP)
确保CONFIG_DIR对Docker进程具有适当的读取/执行权限。
构建镜像:
docker build -t hugegraph/vermeer .
创建自定义 bridge 网络(一次性操作):
docker network create --driver bridge \
  --subnet 172.20.0.0/24 \
  vermeer_network
运行 master(调整 CONFIG_DIR 为您的绝对配置路径,可以根据实际情况调整IP):
CONFIG_DIR=/home/user/config

docker run -d \
  --name vermeer-master \
  --network vermeer_network --ip 172.20.0.10 \
  -v ${CONFIG_DIR}:/go/bin/config \
  hugegraph/vermeer \
  --env=master
运行 worker:
docker run -d \
  --name vermeer-worker \
  --network vermeer_network --ip 172.20.0.11 \
  -v ${CONFIG_DIR}:/go/bin/config \
  hugegraph/vermeer \
  --env=worker
查看日志 / 停止 / 删除:
docker logs -f vermeer-master
docker logs -f vermeer-worker

docker stop vermeer-master vermeer-worker
docker rm vermeer-master vermeer-worker

# 删除自定义网络(如果需要)
docker network rm vermeer_network
- 方案三:从源码构建
构建。具体请参照 Vermeer Readme。
在进入文件夹目录后输入 ./vermeer --env=master 或 ./vermeer --env=worker01
二、任务创建类 rest api
2.1 简介
此类 rest api 提供所有创建任务的功能,包括读取图数据和多种计算功能,提供异步返回和同步返回两种接口。返回的内容均包含所创建任务的信息。使用 vermeer 的整体流程是先创建读取图的任务,待图读取完毕后创建计算任务执行计算。图不会自动被删除,在一个图上运行多个计算任务无需多次重复读取,如需删除可用删除图接口。任务状态可分为读取任务状态和计算任务状态。通常情况下客户端仅需了解创建、任务中、任务结束和任务错误四种状态。图状态是图是否可用的判断依据,若图正在读取中或图状态错误,无法使用该图创建计算任务。图删除接口仅在 loaded 和 error 状态且该图无计算任务时可用。
可以使用的 url 如下:
- 异步返回接口 POST http://master_ip:port/tasks/create 仅返回任务创建是否成功,需通过主动查询任务状态判断是否完成。
- 同步返回接口 POST http://master_ip:port/tasks/create/sync 在任务结束后返回。
2.2 加载图数据
具体参数参考 Vermeer 参数列表文档。
vermeer提供三种加载方式:
- 从本地加载
可以预先获取数据集,例如 twitter-2010 数据集。获取方式:https://snap.stanford.edu/data/twitter-2010.html,第一个 twitter-2010.txt.gz 即可。
request 示例:
POST http://localhost:8688/tasks/create
{
 "task_type": "load",
 "graph": "testdb",
 "params": {
  "load.parallel": "50",
  "load.type": "local",
  "load.vertex_files": "{\"localhost\":\"data/twitter-2010.v_[0,99]\"}",
  "load.edge_files": "{\"localhost\":\"data/twitter-2010.e_[0,99]\"}",
  "load.use_out_degree": "1",
  "load.use_outedge": "1"
 }
}
- 从hugegraph加载
request 示例:
⚠️ 安全警告:切勿在配置文件或代码中存储真实密码。请改用环境变量或安全的凭据管理系统。
POST http://localhost:8688/tasks/create
{
  "task_type": "load",
  "graph": "testdb",
  "params": {
    "load.parallel": "50",
    "load.type": "hugegraph",
    "load.hg_pd_peers": "[\"<your-hugegraph-ip>:8686\"]",
    "load.hugegraph_name": "DEFAULT/hugegraph2/g",
    "load.hugegraph_username": "admin",
    "load.hugegraph_password": "<your-password-here>",
    "load.use_out_degree": "1",
    "load.use_outedge": "1"
  }
}
- 从hdfs加载
request 示例:
POST http://localhost:8688/tasks/create
{
  "task_type": "load",
  "graph": "testdb",
  "params": {
    "load.parallel": "50",
    "load.type": "hdfs",
    "load.hdfs_namenode": "name_node1:9000",
    "load.hdfs_conf_path": "/path/to/conf",
    "load.krb_realm": "EXAMPLE.COM",
    "load.krb_name": "user@EXAMPLE.COM",
    "load.krb_keytab_path": "/path/to/keytab",
    "load.krb_conf_path": "/path/to/krb5.conf",
    "load.hdfs_use_krb": "1",
    "load.vertex_files": "/data/graph/vertices",
    "load.edge_files": "/data/graph/edges",
    "load.use_out_degree": "1",
    "load.use_outedge": "1"
  }
}
2.3 输出计算结果
所有的 vermeer 计算任务均支持多种结果输出方式,可自定义输出方式:local、hdfs、afs 或 hugegraph,在发送请求时的 params 参数下加入对应参数,即可生效。指定 output.need_statistics 为 1 时,支持计算结果统计信息输出,结果会写在接口任务信息内。统计模式算子目前支持 “count” 和 “modularity” 。但仅针对社区发现算法适用。
具体参数参考 Vermeer 参数列表文档。
request 示例:
POST http://localhost:8688/tasks/create
{
 "task_type": "compute",
 "graph": "testdb",
 "params": {
 "compute.algorithm": "pagerank",
 "compute.parallel": "10",
 "compute.max_step": "10",
 "output.type": "local",
 "output.parallel": "1",
 "output.file_path": "result/pagerank"
  }
}
三、支持的算法
PageRank 算法又称网页排名算法,是一种由搜索引擎根据网页(节点)之间相互的超链接进行计算的技
术,用来体现网页(节点)的相关性和重要性。
- 如果一个网页被很多其他网页链接到,说明这个网页比较重要,也就是其 PageRank 值会相对较高。
- 如果一个 PageRank 值很高的网页链接到其他网页,那么被链接到的网页的 PageRank 值会相应地提高。
PageRank 算法适用于网页排序、社交网络重点人物发掘等场景。
request 示例:
POST http://localhost:8688/tasks/create
{
 "task_type": "compute",
 "graph": "testdb",
 "params": {
 "compute.algorithm": "pagerank",
 "compute.parallel":"10",
 "output.type":"local",
 "output.parallel":"1",
 "output.file_path":"result/pagerank",
 "compute.max_step":"10"
 }
}
3.2 WCC(弱连通分量)
弱连通分量,计算无向图中所有联通的子图,输出各顶点所属的弱联通子图 id,表明各个点之间的连通性,区分不同的连通社区。
request 示例:
POST http://localhost:8688/tasks/create
{
 "task_type": "compute",
 "graph": "testdb",
 "params": {
 "compute.algorithm": "wcc",
 "compute.parallel":"10",
 "output.type":"local",
 "output.parallel":"1",
 "output.file_path":"result/wcc",
 "compute.max_step":"10"
 }
}
3.3 LPA(标签传播)
标签传递算法,是一种图聚类算法,常用在社交网络中,用于发现潜在的社区。
request 示例:
POST http://localhost:8688/tasks/create
{
 "task_type": "compute",
 "graph": "testdb",
 "params": {
 "compute.algorithm": "lpa",
 "compute.parallel":"10",
 "output.type":"local",
 "output.parallel":"1",
 "output.file_path":"result/lpa",
 "compute.max_step":"10"
 }
}
3.4 Degree Centrality(度中心性)
度中心性算法,算法用于计算图中每个节点的度中心性值,支持无向图和有向图。度中心性是衡量节点重要性的重要指标,节点与其它节点的边越多,则节点的度中心性值越大,节点在图中的重要性也就越高。在无向图中,度中心性的计算是基于边信息统计节点出现次数,得出节点的度中心性的值,在有向图中则基于边的方向进行筛选,基于输入边或输出边信息统计节点出现次数,得到节点的入度值或出度值。它表明各个点的重要性,一般越重要的点度数越高。
request 示例:
POST http://localhost:8688/tasks/create
{
 "task_type": "compute",
 "graph": "testdb",
 "params": {
 "compute.algorithm": "degree",
 "compute.parallel":"10",
 "output.type":"local",
 "output.parallel":"1",
 "output.file_path":"result/degree",
 "degree.direction":"both"
 }
}
3.5 Closeness Centrality(紧密中心性)
紧密中心性(Closeness Centrality)用于计算一个节点到所有其他可达节点的最短距离的倒数,进行累积后归一化的值。紧密中心度可以用来衡量信息从该节点传输到其他节点的时间长短。节点的“Closeness Centrality”越大,其在所在图中的位置越靠近中心,适用于社交网络中关键节点发掘等场景。
request 示例:
POST http://localhost:8688/tasks/create
{
 "task_type": "compute",
 "graph": "testdb",
 "params": {
 "compute.algorithm": "closeness_centrality",
 "compute.parallel":"10",
 "output.type":"local",
 "output.parallel":"1",
 "output.file_path":"result/closeness_centrality",
 "closeness_centrality.sample_rate":"0.01"
 }
}
3.6 Betweenness Centrality(中介中心性算法)
中介中心性算法(Betweeness Centrality)判断一个节点具有"桥梁"节点的值,值越大说明它作为图中两点间必经路径的可能性越大,典型的例子包括社交网络中的共同关注的人。适用于衡量社群围绕某个节点的聚集程度。
request 示例:
POST http://localhost:8688/tasks/create
{
 "task_type": "compute",
 "graph": "testdb",
 "params": {
 "compute.algorithm": "betweenness_centrality",
 "compute.parallel":"10",
 "output.type":"local",
 "output.parallel":"1",
 "output.file_path":"result/betweenness_centrality",
 "betweenness_centrality.sample_rate":"0.01"
 }
}
3.7 Triangle Count(三角形计数)
三角形计数算法,用于计算通过每个顶点的三角形个数,适用于计算用户之间的关系,关联性是不是成三角形。三角形越多,代表图中节点关联程度越高,组织关系越严密。社交网络中的三角形表示存在有凝聚力的社区,识别三角形有助于理解网络中个人或群体的聚类和相互联系。在金融网络或交易网络中,三角形的存在可能表示存在可疑或欺诈活动,三角形计数可以帮助识别可能需要进一步调查的交易模式。
输出的结果为 每个顶点对应一个 Triangle Count,即为每个顶点所在三角形的个数。
注:该算法为无向图算法,忽略边的方向。
request 示例:
POST http://localhost:8688/tasks/create
{
 "task_type": "compute",
 "graph": "testdb",
 "params": {
 "compute.algorithm": "triangle_count",
 "compute.parallel":"10",
 "output.type":"local",
 "output.parallel":"1",
 "output.file_path":"result/triangle_count"
 }
}
3.8 K-Core
K-Core 算法,标记所有度数为 K 的顶点,适用于图的剪枝,查找图的核心部分。
request 示例:
POST http://localhost:8688/tasks/create
{
"task_type": "compute",
"graph": "testdb",
"params": {
"compute.algorithm": "kcore",
"compute.parallel":"10",
"output.type":"local",
"output.parallel":"1",
"output.file_path":"result/kcore",
"kcore.degree_k":"5"
}
}
3.9 SSSP(单元最短路径)
单源最短路径算法,求一个点到其他所有点的最短距离。
request 示例:
POST http://localhost:8688/tasks/create
{
"task_type": "compute",
"graph": "testdb",
"params": {
"compute.algorithm": "sssp",
"compute.parallel":"10",
"output.type":"local",
"output.parallel":"1",
"output.file_path":"result/degree",
"sssp.source":"tom"
}
}
3.10 KOUT
以一个点为起点,获取这个点的 k 层的节点。
request 示例:
POST http://localhost:8688/tasks/create
{
"task_type": "compute",
"graph": "testdb",
"params": {
"compute.algorithm": "kout",
"compute.parallel":"10",
"output.type":"local",
"output.parallel":"1",
"output.file_path":"result/kout",
"kout.source":"tom",
"compute.max_step":"6"
}
}
3.11 Louvain
Louvain 算法是一种基于模块度的社区发现算法。其基本思想是网络中节点尝试遍历所有邻居的社区标签,并选择最大化模块度增量的社区标签。在最大化模块度之后,每个社区看成一个新的节点,重复直到模块度不再增大。
Vermeer 上实现的分布式 Louvain 算法受节点顺序、并行计算等因素影响,并且由于 Louvain 算法由于其遍历顺序的随机导致社区压缩也具有一定的随机性,导致重复多次执行可能存在不同的结果。但整体趋势不会有大的变化。
request 示例:
POST http://localhost:8688/tasks/create
{
"task_type": "compute",
"graph": "testdb",
"params": {
"compute.algorithm": "louvain",
"compute.parallel":"10",
"compute.max_step":"1000",
"louvain.threshold":"0.0000001",
"louvain.resolution":"1.0",
"louvain.step":"10",
"output.type":"local",
"output.parallel":"1",
"output.file_path":"result/louvain"
}
}
3.12 Jaccard 相似度系数
Jaccard index , 又称为 Jaccard 相似系数(Jaccard similarity coefficient)用于比较有限样本集之间的相似性与差异性。Jaccard 系数值越大,样本相似度越高。用于计算一个给定的源点,与图中其他所有点的 Jaccard 相似系数。
request 示例:
POST http://localhost:8688/tasks/create
{
"task_type": "compute",
"graph": "testdb",
"params": {
"compute.algorithm": "jaccard",
"compute.parallel":"10",
"compute.max_step":"2",
"jaccard.source":"123",
"output.type":"local",
"output.parallel":"1",
"output.file_path":"result/jaccard"
}
}
个性化的 pagerank 的目标是要计算所有节点相对于用户 u 的相关度。从用户 u 对应的节点开始游走,每到一个节点都以 1-d 的概率停止游走并从 u 重新开始,或者以 d 的概率继续游走,从当前节点指向的节点中按照均匀分布随机选择一个节点往下游走。用于给定一个起点,计算此起点开始游走的个性化 pagerank 得分。适用于社交推荐等场景。
由于计算需要使用出度,需要在读取图时需要设置 load.use_out_degree 为 1。
request 示例:
POST http://localhost:8688/tasks/create
{
"task_type": "compute",
"graph": "testdb",
"params": {
"compute.algorithm": "ppr",
"compute.parallel":"100",
"compute.max_step":"10",
"ppr.source":"123",
"ppr.damping":"0.85",
"ppr.diff_threshold":"0.00001",
"output.type":"local",
"output.parallel":"1",
"output.file_path":"result/ppr"
}
}
3.14 全图 Kout
计算图的所有节点的k度邻居(不包含自己以及1~k-1度的邻居),由于全图kout算法内存膨胀比较厉害,目前k限制在1和2,另外,全局kout算法支持过滤功能( 参数如:“compute.filter”:“risk_level==1”),在计算第k度的是时候进行过滤条件的判断,符合过滤条件的进入最终结果集,算法最终输出是符合条件的邻居个数。
request 示例:
POST http://localhost:8688/tasks/create
{
"task_type": "compute",
"graph": "testdb",
"params": {
"compute.algorithm": "kout_all",
"compute.parallel":"10",
"output.type":"local",
"output.parallel":"10",
"output.file_path":"result/kout",
"compute.max_step":"2",
"compute.filter":"risk_level==1"
}
}
3.15 集聚系数 clustering coefficient
集聚系数表示一个图中节点聚集程度的系数。在现实的网络中,尤其是在特定的网络中,由于相对高密度连接点的关系,节点总是趋向于建立一组严密的组织关系。集聚系数算法(Cluster Coefficient)用于计算图中节点的聚集程度。本算法为局部集聚系数。局部集聚系数可以测量图中每一个结点附近的集聚程度。
request 示例:
POST http://localhost:8688/tasks/create
{
"task_type": "compute",
"graph": "testdb",
"params": {
"compute.algorithm": "clustering_coefficient",
"compute.parallel":"100",
"compute.max_step":"10",
"output.type":"local",
"output.parallel":"1",
"output.file_path":"result/cc"
}
}
3.16 SCC(强连通分量)
在有向图的数学理论中,如果一个图的每一个顶点都可从该图其他任意一点到达,则称该图是强连通的。在任意有向图中能够实现强连通的部分我们称其为强连通分量。它表明各个点之间的连通性,区分不同的连通社区。
POST http://localhost:8688/tasks/create
{
"task_type": "compute",
"graph": "testdb",
"params": {
"compute.algorithm": "scc",
"compute.parallel":"10",
"output.type":"local",
"output.parallel":"1",
"output.file_path":"result/scc",
"compute.max_step":"200"
}
}
🚧, 后续随时更新完善,欢迎随时提出建议和意见。
3.4.2 - HugeGraph-Computer Quick Start
1 HugeGraph-Computer 概述
HugeGraph-Computer 是分布式图处理系统 (OLAP). 它是 Pregel的一个实现。它可以运行在 Kubernetes(K8s)/Yarn 上。(它侧重可支持百亿~千亿的图数据量下进行图计算, 会使用磁盘进行排序和加速, 这是它和 Vermeer 相对最大的区别之一)
特性
- 支持分布式 MPP 图计算,集成 HugeGraph 作为图输入输出存储。
- 算法基于 BSP(Bulk Synchronous Parallel) 模型,通过多次并行迭代进行计算,每一次迭代都是一次超步。
- 自动内存管理。该框架永远不会出现 OOM(内存不足),因为如果它没有足够的内存来容纳所有数据,它会将一些数据拆分到磁盘。
- 边的部分或超级节点的消息可以在内存中,所以你永远不会丢失它。
- 您可以从 HDFS 或 HugeGraph 或任何其他系统加载数据。
- 您可以将结果输出到 HDFS 或 HugeGraph,或任何其他系统。
- 易于开发新算法。您只需要像在单个服务器中一样专注于仅顶点处理,而不必担心消息传输和内存存储管理。
2 依赖
2.1 安装 Java 11 (JDK 11)
必须在 ≥ Java 11 的环境上启动 Computer,然后自行配置。
在往下阅读之前务必执行 java -version 命令查看 jdk 版本
3 开始
要使用 HugeGraph-Computer 运行算法,必须装有 Java 11 或更高版本。
还需要首先部署 HugeGraph-Server 和 Etcd.
有两种方式可以获取 HugeGraph-Computer:
3.1.1 下载已编译的压缩包
下载最新版本的 HugeGraph-Computer release 包:
wget https://downloads.apache.org/hugegraph/${version}/apache-hugegraph-computer-incubating-${version}.tar.gz
tar zxvf apache-hugegraph-computer-incubating-${version}.tar.gz -C hugegraph-computer
3.1.2 克隆源码编译打包
克隆最新版本的 HugeGraph-Computer 源码包:
$ git clone https://github.com/apache/hugegraph-computer.git
编译生成 tar 包:
cd hugegraph-computer
mvn clean package -DskipTests
3.1.3 启动 master 节点
您可以使用 -c 参数指定配置文件,更多 computer 配置请看:Computer Config Options
cd hugegraph-computer
bin/start-computer.sh -d local -r master
3.1.4 启动 worker 节点
bin/start-computer.sh -d local -r worker
3.1.5 查询算法结果
2.5.1 为 server 启用 OLAP 索引查询
如果没有启用 OLAP 索引,则需要启用,更多参考:modify-graphs-read-mode
PUT http://localhost:8080/graphs/hugegraph/graph_read_mode
"ALL"
3.1.5.2 查询 page_rank 属性值:
curl "http://localhost:8080/graphs/hugegraph/graph/vertices?page&limit=3" | gunzip
要使用 HugeGraph-Computer 运行算法,您需要先部署 HugeGraph-Server
3.2.1 安装 HugeGraph-Computer CRD
# Kubernetes version >= v1.16
kubectl apply -f https://raw.githubusercontent.com/apache/hugegraph-computer/master/computer-k8s-operator/manifest/hugegraph-computer-crd.v1.yaml
# Kubernetes version < v1.16
kubectl apply -f https://raw.githubusercontent.com/apache/hugegraph-computer/master/computer-k8s-operator/manifest/hugegraph-computer-crd.v1beta1.yaml
3.2.2 显示 CRD
kubectl get crd
NAME CREATED AT
hugegraphcomputerjobs.hugegraph.apache.org 2021-09-16T08:01:08Z
3.2.3 安装 hugegraph-computer-operator&etcd-server
kubectl apply -f https://raw.githubusercontent.com/apache/hugegraph-computer/master/computer-k8s-operator/manifest/hugegraph-computer-operator.yaml
3.2.4 等待 hugegraph-computer-operator&etcd-server 部署完成
kubectl get pod -n hugegraph-computer-operator-system
NAME READY STATUS RESTARTS AGE
hugegraph-computer-operator-controller-manager-58c5545949-jqvzl 1/1 Running 0 15h
hugegraph-computer-operator-etcd-28lm67jxk5 1/1 Running 0 15h
3.2.5 提交作业
更多 computer crd spec 请看:Computer CRD
更多 Computer 配置请看:Computer Config Options
cat <<EOF | kubectl apply --filename -
apiVersion: hugegraph.apache.org/v1
kind: HugeGraphComputerJob
metadata:
namespace: hugegraph-computer-operator-system
name: &jobName pagerank-sample
spec:
jobId: *jobName
algorithmName: page_rank
image: hugegraph/hugegraph-computer:latest # algorithm image url
jarFile: /hugegraph/hugegraph-computer/algorithm/builtin-algorithm.jar # algorithm jar path
pullPolicy: Always
workerCpu: "4"
workerMemory: "4Gi"
workerInstances: 5
computerConf:
job.partitions_count: "20"
algorithm.params_class: org.apache.hugegraph.computer.algorithm.centrality.pagerank.PageRankParams
hugegraph.url: http://${hugegraph-server-host}:${hugegraph-server-port} # hugegraph server url
hugegraph.name: hugegraph # hugegraph graph name
EOF
3.2.6 显示作业
kubectl get hcjob/pagerank-sample -n hugegraph-computer-operator-system
NAME JOBID JOBSTATUS
pagerank-sample pagerank-sample RUNNING
3.2.7 显示节点日志
# Show the master log
kubectl logs -l component=pagerank-sample-master -n hugegraph-computer-operator-system
# Show the worker log
kubectl logs -l component=pagerank-sample-worker -n hugegraph-computer-operator-system
# Show diagnostic log of a job
# 注意: 诊断日志仅在作业失败时存在,并且只会保存一小时。
kubectl get event --field-selector reason=ComputerJobFailed --field-selector involvedObject.name=pagerank-sample -n hugegraph-computer-operator-system
3.2.8 显示作业的成功事件
NOTE: it will only be saved for one hour
kubectl get event --field-selector reason=ComputerJobSucceed --field-selector involvedObject.name=pagerank-sample -n hugegraph-computer-operator-system
3.2.9 查询算法结果
如果输出到 Hugegraph-Server 则与 Locally 模式一致,如果输出到 HDFS ,请检查 hugegraph-computerresults{jobId}目录下的结果文件。
4 内置算法文档
4.1 支持的算法列表:
中心性算法:
- PageRank
- BetweennessCentrality
- ClosenessCentrality
- DegreeCentrality
社区算法:
- ClusteringCoefficient
- Kcore
- Lpa
- TriangleCount
- Wcc
路径算法:
- RingsDetection
- RingsDetectionWithFilter
更多算法请看:Built-In algorithms
4.2 算法描述
TODO
5 算法开发指南
TODO
6 注意事项
- 如果 computer-k8s 模块下面的某些类不存在,你需要运行
mvn compile来提前生成对应的类。
3.4.3 - HugeGraph-Computer 配置参考
Computer 配置选项
默认值说明:
- 以下配置项显示的是代码默认值(定义在
ComputerOptions.java 中) - 当打包配置文件(
conf/computer.properties 分发包中)指定了不同的值时,会以 值 (打包: 值) 的形式标注 - 示例:
300000 (打包: 100000) 表示代码默认值为 300000,但分发包默认值为 100000 - 对于生产环境部署,除非明确覆盖,否则打包默认值优先生效
1. 基础配置
HugeGraph-Computer 核心作业设置。
| 配置项 | 默认值 | 说明 |
|---|
| hugegraph.url | http://127.0.0.1:8080 | HugeGraph 服务器 URL,用于加载数据和写回结果。 |
| hugegraph.name | hugegraph | 图名称,用于加载数据和写回结果。 |
| hugegraph.username | "" (空) | HugeGraph 认证用户名(如果未启用认证则留空)。 |
| hugegraph.password | "" (空) | HugeGraph 认证密码(如果未启用认证则留空)。 |
| job.id | local_0001 (打包: local_001) | YARN 集群或 K8s 集群上的作业标识符。 |
| job.namespace | "" (空) | 作业命名空间,可以分隔不同的数据源。🔒 由系统管理 - 不要手动修改。 |
| job.workers_count | 1 | 执行一个图算法作业的 Worker 数量。🔒 在 K8s 中由系统管理 - 不要手动修改。 |
| job.partitions_count | 1 | 执行一个图算法作业的分区数量。 |
| job.partitions_thread_nums | 4 | 分区并行计算的线程数量。 |
2. 算法配置
计算逻辑的算法特定配置。
| 配置项 | 默认值 | 说明 |
|---|
| algorithm.params_class | org.apache.hugegraph.computer.core.config.Null | ⚠️ 必填 在算法运行前用于传递算法参数的类。 |
| algorithm.result_class | org.apache.hugegraph.computer.core.config.Null | 顶点值的类,用于存储顶点的计算结果。 |
| algorithm.message_class | org.apache.hugegraph.computer.core.config.Null | 计算顶点时传递的消息类。 |
3. 输入配置
从 HugeGraph 或其他数据源加载输入数据的配置。
3.1 输入源
| 配置项 | 默认值 | 说明 |
|---|
| input.source_type | hugegraph-server | 加载输入数据的源类型,允许值:[‘hugegraph-server’, ‘hugegraph-loader’]。‘hugegraph-loader’ 表示使用 hugegraph-loader 从 HDFS 或文件加载数据。如果使用 ‘hugegraph-loader’,请配置 ‘input.loader_struct_path’ 和 ‘input.loader_schema_path’。 |
| input.loader_struct_path | "" (空) | Loader 输入的结构路径,仅在 input.source_type=loader 启用时生效。 |
| input.loader_schema_path | "" (空) | Loader 输入的 schema 路径,仅在 input.source_type=loader 启用时生效。 |
3.2 输入分片
| 配置项 | 默认值 | 说明 |
|---|
| input.split_size | 1048576 (1 MB) | 输入分片大小(字节)。 |
| input.split_max_splits | 10000000 | 最大输入分片数量。 |
| input.split_page_size | 500 | 流式加载输入分片数据的页面大小。 |
| input.split_fetch_timeout | 300 | 获取输入分片的超时时间(秒)。 |
3.3 输入处理
| 配置项 | 默认值 | 说明 |
|---|
| input.filter_class | org.apache.hugegraph.computer.core.input.filter.DefaultInputFilter | 创建输入过滤器对象的类。输入过滤器用于根据用户需求过滤顶点边。 |
| input.edge_direction | OUT | 要加载的边的方向,允许值:[OUT, IN, BOTH]。当值为 BOTH 时,将加载 OUT 和 IN 两个方向的边。 |
| input.edge_freq | MULTIPLE | 一对顶点之间可以存在的边的频率,允许值:[SINGLE, SINGLE_PER_LABEL, MULTIPLE]。SINGLE 表示一对顶点之间只能存在一条边(通过 sourceId + targetId 标识);SINGLE_PER_LABEL 表示每个边标签在一对顶点之间可以有一条边(通过 sourceId + edgeLabel + targetId 标识);MULTIPLE 表示一对顶点之间可以存在多条边(通过 sourceId + edgeLabel + sortValues + targetId 标识)。 |
| input.max_edges_in_one_vertex | 200 | 允许附加到一个顶点的最大邻接边数量。邻接边将作为一个批处理单元一起存储和传输。 |
3.4 输入性能
| 配置项 | 默认值 | 说明 |
|---|
| input.send_thread_nums | 4 | 并行发送顶点或边的线程数量。 |
4. 快照与存储配置
HugeGraph-Computer 支持快照功能,可将顶点/边分区保存到本地存储或 MinIO 对象存储,用于断点恢复或加速重复计算。
4.1 基础快照配置
| 配置项 | 默认值 | 说明 |
|---|
| snapshot.write | false | 是否写入输入顶点/边分区的快照。 |
| snapshot.load | false | 是否从顶点/边分区的快照加载。 |
| snapshot.name | "" (空) | 用户自定义的快照名称,用于区分不同的快照。 |
4.2 MinIO 集成(可选)
MinIO 可用作 K8s 部署中快照的分布式对象存储后端。
| 配置项 | 默认值 | 说明 |
|---|
| snapshot.minio_endpoint | "" (空) | MinIO 服务端点(例如 http://minio:9000)。使用 MinIO 时必填。 |
| snapshot.minio_access_key | minioadmin | MinIO 认证访问密钥。 |
| snapshot.minio_secret_key | minioadmin | MinIO 认证密钥。 |
| snapshot.minio_bucket_name | "" (空) | 用于存储快照数据的 MinIO 存储桶名称。 |
使用场景:
- 断点恢复:作业失败后从快照恢复,避免重新加载数据
- 重复计算:多次运行同一算法时从快照加载数据以加速启动
- A/B 测试:保存同一数据集的多个快照版本,测试不同的算法参数
示例:本地快照(在 computer.properties 中):
snapshot.write=true
snapshot.name=pagerank-snapshot-20260201
示例:MinIO 快照(在 K8s CRD computerConf 中):
computerConf:
snapshot.write: "true"
snapshot.name: "pagerank-snapshot-v1"
snapshot.minio_endpoint: "http://minio:9000"
snapshot.minio_access_key: "my-access-key"
snapshot.minio_secret_key: "my-secret-key"
snapshot.minio_bucket_name: "hugegraph-snapshots"
5. Worker 与 Master 配置
Worker 和 Master 计算逻辑的配置。
5.1 Master 配置
| 配置项 | 默认值 | 说明 |
|---|
| master.computation_class | org.apache.hugegraph.computer.core.master.DefaultMasterComputation | Master 计算是可以决定是否继续下一个超步的计算。它在每个超步结束时在 master 上运行。 |
5.2 Worker 计算
| 配置项 | 默认值 | 说明 |
|---|
| worker.computation_class | org.apache.hugegraph.computer.core.config.Null | 创建 worker 计算对象的类。Worker 计算用于在每个超步中计算每个顶点。 |
| worker.combiner_class | org.apache.hugegraph.computer.core.config.Null | Combiner 可以将消息组合为一个顶点的一个值。例如,PageRank 算法可以将一个顶点的消息组合为一个求和值。 |
| worker.partitioner | org.apache.hugegraph.computer.core.graph.partition.HashPartitioner | 分区器,决定顶点应该在哪个分区中,以及分区应该在哪个 worker 中。 |
5.3 Worker 组合器
| 配置项 | 默认值 | 说明 |
|---|
| worker.vertex_properties_combiner_class | org.apache.hugegraph.computer.core.combiner.OverwritePropertiesCombiner | 组合器可以在输入步骤将同一顶点的多个属性组合为一个属性。 |
| worker.edge_properties_combiner_class | org.apache.hugegraph.computer.core.combiner.OverwritePropertiesCombiner | 组合器可以在输入步骤将同一边的多个属性组合为一个属性。 |
5.4 Worker 缓冲区
| 配置项 | 默认值 | 说明 |
|---|
| worker.received_buffers_bytes_limit | 104857600 (100 MB) | 接收数据缓冲区的限制字节数。所有缓冲区的总大小不能超过此限制。如果接收缓冲区达到此限制,它们将被合并到文件中(溢出到磁盘)。 |
| worker.write_buffer_capacity | 52428800 (50 MB) | 用于存储顶点或消息的写缓冲区的初始大小。 |
| worker.write_buffer_threshold | 52428800 (50 MB) | 写缓冲区的阈值。超过它将触发排序。写缓冲区用于存储顶点或消息。 |
5.5 Worker 数据与超时
| 配置项 | 默认值 | 说明 |
|---|
| worker.data_dirs | [jobs] | 用逗号分隔的目录,接收的顶点和消息可以持久化到其中。 |
| worker.wait_sort_timeout | 600000 (10 分钟) | 消息处理程序等待排序线程对一批缓冲区进行排序的最大超时时间(毫秒)。 |
| worker.wait_finish_messages_timeout | 86400000 (24 小时) | 消息处理程序等待所有 worker 完成消息的最大超时时间(毫秒)。 |
6. I/O 与输出配置
输出计算结果的配置。
6.1 输出类与结果
| 配置项 | 默认值 | 说明 |
|---|
| output.output_class | org.apache.hugegraph.computer.core.output.LogOutput | 输出每个顶点计算结果的类。在迭代计算后调用。 |
| output.result_name | value | 该值由 WORKER_COMPUTATION_CLASS 创建的实例的 #name() 动态分配。 |
| output.result_write_type | OLAP_COMMON | 输出到 HugeGraph 的结果写入类型,允许值:[OLAP_COMMON, OLAP_SECONDARY, OLAP_RANGE]。 |
6.2 输出行为
| 配置项 | 默认值 | 说明 |
|---|
| output.with_adjacent_edges | false | 是否输出顶点的邻接边。 |
| output.with_vertex_properties | false | 是否输出顶点的属性。 |
| output.with_edge_properties | false | 是否输出边的属性。 |
6.3 批量输出
| 配置项 | 默认值 | 说明 |
|---|
| output.batch_size | 500 | 输出的批处理大小。 |
| output.batch_threads | 1 | 用于批量输出的线程数量。 |
| output.single_threads | 1 | 用于单个输出的线程数量。 |
6.4 HDFS 输出
| 配置项 | 默认值 | 说明 |
|---|
| output.hdfs_url | hdfs://127.0.0.1:9000 | 输出的 HDFS URL。 |
| output.hdfs_user | hadoop | 输出的 HDFS 用户。 |
| output.hdfs_path_prefix | /hugegraph-computer/results | HDFS 输出结果的目录。 |
| output.hdfs_delimiter | , (逗号) | HDFS 输出的分隔符。 |
| output.hdfs_merge_partitions | true | 是否合并多个分区的输出文件。 |
| output.hdfs_replication | 3 | HDFS 的副本数。 |
| output.hdfs_core_site_path | "" (空) | HDFS core site 路径。 |
| output.hdfs_site_path | "" (空) | HDFS site 路径。 |
| output.hdfs_kerberos_enable | false | 是否为 HDFS 启用 Kerberos 认证。 |
| output.hdfs_kerberos_principal | "" (空) | HDFS 的 Kerberos 认证 principal。 |
| output.hdfs_kerberos_keytab | "" (空) | HDFS 的 Kerberos 认证 keytab 文件。 |
| output.hdfs_krb5_conf | /etc/krb5.conf | Kerberos 配置文件路径。 |
6.5 重试与超时
| 配置项 | 默认值 | 说明 |
|---|
| output.retry_times | 3 | 输出失败时的重试次数。 |
| output.retry_interval | 10 | 输出失败时的重试间隔(秒)。 |
| output.thread_pool_shutdown_timeout | 60 | 输出线程池关闭的超时时间(秒)。 |
7. 网络与传输配置
Worker 和 Master 之间网络通信的配置。
7.1 服务器配置
| 配置项 | 默认值 | 说明 |
|---|
| transport.server_host | 127.0.0.1 | 🔒 由系统管理 监听传输数据的服务器主机名或 IP。不要手动修改。 |
| transport.server_port | 0 | 🔒 由系统管理 监听传输数据的服务器端口。如果设置为 0,系统将分配一个随机端口。不要手动修改。 |
| transport.server_threads | 4 | 服务器传输线程的数量。 |
7.2 客户端配置
| 配置项 | 默认值 | 说明 |
|---|
| transport.client_threads | 4 | 客户端传输线程的数量。 |
| transport.client_connect_timeout | 3000 | 客户端连接到服务器的超时时间(毫秒)。 |
7.3 协议配置
| 配置项 | 默认值 | 说明 |
|---|
| transport.provider_class | org.apache.hugegraph.computer.core.network.netty.NettyTransportProvider | 传输提供程序,目前仅支持 Netty。 |
| transport.io_mode | AUTO | 网络 IO 模式,允许值:[NIO, EPOLL, AUTO]。AUTO 表示自动选择适当的模式。 |
| transport.tcp_keep_alive | true | 是否启用 TCP keep-alive。 |
| transport.transport_epoll_lt | false | 是否启用 EPOLL 水平触发(仅在 io_mode=EPOLL 时有效)。 |
7.4 缓冲区配置
| 配置项 | 默认值 | 说明 |
|---|
| transport.send_buffer_size | 0 | Socket 发送缓冲区大小(字节)。0 表示使用系统默认值。 |
| transport.receive_buffer_size | 0 | Socket 接收缓冲区大小(字节)。0 表示使用系统默认值。 |
| transport.write_buffer_high_mark | 67108864 (64 MB) | 写缓冲区的高水位标记(字节)。如果排队字节数 > write_buffer_high_mark,将触发发送不可用。 |
| transport.write_buffer_low_mark | 33554432 (32 MB) | 写缓冲区的低水位标记(字节)。如果排队字节数 < write_buffer_low_mark,将触发发送可用。 |
7.5 流量控制
| 配置项 | 默认值 | 说明 |
|---|
| transport.max_pending_requests | 8 | 客户端未接收 ACK 的最大数量。如果未接收 ACK 的数量 >= max_pending_requests,将触发发送不可用。 |
| transport.min_pending_requests | 6 | 客户端未接收 ACK 的最小数量。如果未接收 ACK 的数量 < min_pending_requests,将触发发送可用。 |
| transport.min_ack_interval | 200 | 服务器回复 ACK 的最小间隔(毫秒)。 |
7.6 超时配置
| 配置项 | 默认值 | 说明 |
|---|
| transport.close_timeout | 10000 | 关闭服务器或关闭客户端的超时时间(毫秒)。 |
| transport.sync_request_timeout | 10000 | 发送同步请求后等待响应的超时时间(毫秒)。 |
| transport.finish_session_timeout | 0 | 完成会话的超时时间(毫秒)。0 表示使用 (transport.sync_request_timeout × transport.max_pending_requests)。 |
| transport.write_socket_timeout | 3000 | 将数据写入 socket 缓冲区的超时时间(毫秒)。 |
| transport.server_idle_timeout | 360000 (6 分钟) | 服务器空闲的最大超时时间(毫秒)。 |
7.7 心跳配置
| 配置项 | 默认值 | 说明 |
|---|
| transport.heartbeat_interval | 20000 (20 秒) | 客户端心跳之间的最小间隔(毫秒)。 |
| transport.max_timeout_heartbeat_count | 120 | 客户端超时心跳的最大次数。如果连续等待心跳响应超时的次数 > max_timeout_heartbeat_count,通道将从客户端关闭。 |
7.8 高级网络设置
| 配置项 | 默认值 | 说明 |
|---|
| transport.max_syn_backlog | 511 | 服务器端 SYN 队列的容量。0 表示使用系统默认值。 |
| transport.recv_file_mode | true | 是否启用接收缓冲文件模式。如果启用,将使用零拷贝从 socket 接收缓冲区并写入文件。注意:需要操作系统支持零拷贝(例如 Linux sendfile/splice)。 |
| transport.network_retries | 3 | 网络通信不稳定时的重试次数。 |
8. 存储与持久化配置
HGKV(HugeGraph Key-Value)存储引擎和值文件的配置。
8.1 HGKV 配置
| 配置项 | 默认值 | 说明 |
|---|
| hgkv.max_file_size | 2147483648 (2 GB) | 每个 HGKV 文件的最大字节数。 |
| hgkv.max_data_block_size | 65536 (64 KB) | HGKV 文件数据块的最大字节大小。 |
| hgkv.max_merge_files | 10 | 一次合并的最大文件数。 |
| hgkv.temp_file_dir | /tmp/hgkv | 此文件夹用于在文件合并过程中存储临时文件。 |
8.2 值文件配置
| 配置项 | 默认值 | 说明 |
|---|
| valuefile.max_segment_size | 1073741824 (1 GB) | 值文件每个段的最大字节数。 |
9. BSP 与协调配置
批量同步并行(BSP)协议和 etcd 协调的配置。
| 配置项 | 默认值 | 说明 |
|---|
| bsp.etcd_endpoints | http://localhost:2379 | 🔒 在 K8s 中由系统管理 访问 etcd 的端点。对于多个端点,使用逗号分隔列表:http://host1:port1,http://host2:port2。不要在 K8s 部署中手动修改。 |
| bsp.max_super_step | 10 (打包: 2) | 算法的最大超步数。 |
| bsp.register_timeout | 300000 (打包: 100000) | 等待 master 和 worker 注册的最大超时时间(毫秒)。 |
| bsp.wait_workers_timeout | 86400000 (24 小时) | 等待 worker BSP 事件的最大超时时间(毫秒)。 |
| bsp.wait_master_timeout | 86400000 (24 小时) | 等待 master BSP 事件的最大超时时间(毫秒)。 |
| bsp.log_interval | 30000 (30 秒) | 等待 BSP 事件时打印日志的日志间隔(毫秒)。 |
10. 性能调优配置
性能优化的配置。
| 配置项 | 默认值 | 说明 |
|---|
| allocator.max_vertices_per_thread | 10000 | 每个内存分配器中每个线程处理的最大顶点数。 |
| sort.thread_nums | 4 | 执行内部排序的线程数量。 |
11. 系统管理配置
⚠️ 由系统管理的配置项 - 禁止用户手动修改。
以下配置项由 K8s Operator、Driver 或运行时系统自动管理。手动修改将导致集群通信失败或作业调度错误。
| 配置项 | 管理者 | 说明 |
|---|
| bsp.etcd_endpoints | K8s Operator | 自动设置为 operator 的 etcd 服务地址 |
| transport.server_host | 运行时 | 自动设置为 pod/容器主机名 |
| transport.server_port | 运行时 | 自动分配随机端口 |
| job.namespace | K8s Operator | 自动设置为作业命名空间 |
| job.id | K8s Operator | 自动从 CRD 设置为作业 ID |
| job.workers_count | K8s Operator | 自动从 CRD workerInstances 设置 |
| rpc.server_host | 运行时 | RPC 服务器主机名(系统管理) |
| rpc.server_port | 运行时 | RPC 服务器端口(系统管理) |
| rpc.remote_url | 运行时 | RPC 远程 URL(系统管理) |
为什么禁止修改:
- BSP/RPC 配置:必须与实际部署的 etcd/RPC 服务匹配。手动覆盖会破坏协调。
- 作业配置:必须与 K8s CRD 规范匹配。不匹配会导致 worker 数量错误。
- 传输配置:必须使用实际的 pod 主机名/端口。手动值会阻止 worker 间通信。
K8s Operator 配置选项
注意:选项需要通过环境变量设置进行转换,例如 k8s.internal_etcd_url => INTERNAL_ETCD_URL
| 配置项 | 默认值 | 说明 |
|---|
| k8s.auto_destroy_pod | true | 作业完成或失败时是否自动销毁所有 pod。 |
| k8s.close_reconciler_timeout | 120 | 关闭 reconciler 的最大超时时间(毫秒)。 |
| k8s.internal_etcd_url | http://127.0.0.1:2379 | operator 系统的内部 etcd URL。 |
| k8s.max_reconcile_retry | 3 | reconcile 的最大重试次数。 |
| k8s.probe_backlog | 50 | 服务健康探针的最大积压。 |
| k8s.probe_port | 9892 | controller 绑定的用于服务健康探针的端口。 |
| k8s.ready_check_internal | 1000 | 检查就绪的时间间隔(毫秒)。 |
| k8s.ready_timeout | 30000 | 检查就绪的最大超时时间(毫秒)。 |
| k8s.reconciler_count | 10 | reconciler 线程的最大数量。 |
| k8s.resync_period | 600000 | 被监视资源进行 reconcile 的最小频率。 |
| k8s.timezone | Asia/Shanghai | computer 作业和 operator 的时区。 |
| k8s.watch_namespace | hugegraph-computer-system | 监视自定义资源的命名空间。使用 ‘*’ 监视所有命名空间。 |
HugeGraph-Computer CRD
CRD: https://github.com/apache/hugegraph-computer/blob/master/computer-k8s-operator/manifest/hugegraph-computer-crd.v1.yaml
| 字段 | 默认值 | 说明 | 必填 |
|---|
| algorithmName | | 算法名称。 | true |
| jobId | | 作业 ID。 | true |
| image | | 算法镜像。 | true |
| computerConf | | computer 配置选项的映射。 | true |
| workerInstances | | worker 实例数量,将覆盖 ‘job.workers_count’ 选项。 | true |
| pullPolicy | Always | 镜像拉取策略,详情请参考:https://kubernetes.io/docs/concepts/containers/images/#image-pull-policy | false |
| pullSecrets | | 镜像拉取密钥,详情请参考:https://kubernetes.io/docs/concepts/containers/images/#specifying-imagepullsecrets-on-a-pod | false |
| masterCpu | | master 的 CPU 限制,单位可以是 ’m’ 或无单位,详情请参考:https://kubernetes.io/docs/concepts/configuration/manage-resources-containers/#meaning-of-cpu | false |
| workerCpu | | worker 的 CPU 限制,单位可以是 ’m’ 或无单位,详情请参考:https://kubernetes.io/docs/concepts/configuration/manage-resources-containers/#meaning-of-cpu | false |
| masterMemory | | master 的内存限制,单位可以是 Ei、Pi、Ti、Gi、Mi、Ki 之一,详情请参考:https://kubernetes.io/docs/concepts/configuration/manage-resources-containers/#meaning-of-memory | false |
| workerMemory | | worker 的内存限制,单位可以是 Ei、Pi、Ti、Gi、Mi、Ki 之一,详情请参考:https://kubernetes.io/docs/concepts/configuration/manage-resources-containers/#meaning-of-memory | false |
| log4jXml | | computer 作业的 log4j.xml 内容。 | false |
| jarFile | | computer 算法的 jar 路径。 | false |
| remoteJarUri | | computer 算法的远程 jar URI,将覆盖算法镜像。 | false |
| jvmOptions | | computer 作业的 Java 启动参数。 | false |
| envVars | | 请参考:https://kubernetes.io/docs/tasks/inject-data-application/define-interdependent-environment-variables/ | false |
| envFrom | | 请参考:https://kubernetes.io/docs/tasks/inject-data-application/define-environment-variable-container/ | false |
| masterCommand | bin/start-computer.sh | master 的运行命令,等同于 Docker 的 ‘Entrypoint’ 字段。 | false |
| masterArgs | ["-r master", “-d k8s”] | master 的运行参数,等同于 Docker 的 ‘Cmd’ 字段。 | false |
| workerCommand | bin/start-computer.sh | worker 的运行命令,等同于 Docker 的 ‘Entrypoint’ 字段。 | false |
| workerArgs | ["-r worker", “-d k8s”] | worker 的运行参数,等同于 Docker 的 ‘Cmd’ 字段。 | false |
| volumes | | 请参考:https://kubernetes.io/docs/concepts/storage/volumes/ | false |
| volumeMounts | | 请参考:https://kubernetes.io/docs/concepts/storage/volumes/ | false |
| secretPaths | | k8s-secret 名称和挂载路径的映射。 | false |
| configMapPaths | | k8s-configmap 名称和挂载路径的映射。 | false |
| podTemplateSpec | | 请参考:https://kubernetes.io/docs/reference/kubernetes-api/workload-resources/pod-template-v1/#PodTemplateSpec | false |
| securityContext | | 请参考:https://kubernetes.io/docs/tasks/configure-pod-container/security-context/ | false |
KubeDriver 配置选项
| 配置项 | 默认值 | 说明 |
|---|
| k8s.build_image_bash_path | | 用于构建镜像的命令路径。 |
| k8s.enable_internal_algorithm | true | 是否启用内部算法。 |
| k8s.framework_image_url | hugegraph/hugegraph-computer:latest | computer 框架的镜像 URL。 |
| k8s.image_repository_password | | 登录镜像仓库的密码。 |
| k8s.image_repository_registry | | 登录镜像仓库的地址。 |
| k8s.image_repository_url | hugegraph/hugegraph-computer | 镜像仓库的 URL。 |
| k8s.image_repository_username | | 登录镜像仓库的用户名。 |
| k8s.internal_algorithm | [pageRank] | 所有内部算法的名称列表。注意:算法名称在这里使用驼峰命名法(例如 pageRank),但算法实现返回下划线命名法(例如 page_rank)。 |
| k8s.internal_algorithm_image_url | hugegraph/hugegraph-computer:latest | 内部算法的镜像 URL。 |
| k8s.jar_file_dir | /cache/jars/ | 算法 jar 将上传到的目录。 |
| k8s.kube_config | ~/.kube/config | k8s 配置文件的路径。 |
| k8s.log4j_xml_path | | computer 作业的 log4j.xml 路径。 |
| k8s.namespace | hugegraph-computer-system | hugegraph-computer 系统的命名空间。 |
| k8s.pull_secret_names | [] | 拉取镜像的 pull-secret 名称。 |
3.5 - HugeGraph Client
3.5.1 - HugeGraph-Java-Client
1 HugeGraph-Client 概述
HugeGraph-Client 向 HugeGraph-Server 发出 HTTP 请求,获取并解析 Server 的执行结果。
提供了 Java/Go/Python 版,
用户可以使用 Client-API 编写代码操作 HugeGraph,比如元数据和图数据的增删改查,或者执行 gremlin 语句等。
后文主要是 Java 使用示例 (其他语言 SDK 可参考对应 READEME 页面)
现在已经支持基于 Go/Python 语言的 HugeGraph Client SDK (version >=1.2.0)
2 环境要求
- java 11 (兼容 java 8)
- maven 3.5+
3 使用流程
使用 HugeGraph-Client 的基本步骤如下:
- 新建Eclipse/ IDEA Maven 项目;
- 在 pom 文件中添加 HugeGraph-Client 依赖;
- 创建类,调用 HugeGraph-Client 接口;
详细使用过程见下节完整示例。
4 完整示例
4.1 新建 Maven 工程
可以选择 Eclipse 或者 Intellij Idea 创建工程:
4.2 添加 hugegraph-client 依赖
添加 hugegraph-client 依赖
<dependencies>
<dependency>
<groupId>org.apache.hugegraph</groupId>
<artifactId>hugegraph-client</artifactId>
<!-- Update to the latest release version -->
<version>1.7.0</version>
</dependency>
</dependencies>
注:Graph 所有组件版本号均保持一致
4.3 Example
4.3.1 SingleExample
import java.io.IOException;
import java.util.Iterator;
import java.util.List;
import org.apache.hugegraph.driver.GraphManager;
import org.apache.hugegraph.driver.GremlinManager;
import org.apache.hugegraph.driver.HugeClient;
import org.apache.hugegraph.driver.SchemaManager;
import org.apache.hugegraph.structure.constant.T;
import org.apache.hugegraph.structure.graph.Edge;
import org.apache.hugegraph.structure.graph.Path;
import org.apache.hugegraph.structure.graph.Vertex;
import org.apache.hugegraph.structure.gremlin.Result;
import org.apache.hugegraph.structure.gremlin.ResultSet;
public class SingleExample {
public static void main(String[] args) throws IOException {
// If connect failed will throw a exception.
HugeClient hugeClient = HugeClient.builder("http://localhost:8080",
"DEFAULT",
"hugegraph")
.configUser("username", "password")
// 这是示例,生产环境需要使用安全的凭证
.build();
SchemaManager schema = hugeClient.schema();
schema.propertyKey("name").asText().ifNotExist().create();
schema.propertyKey("age").asInt().ifNotExist().create();
schema.propertyKey("city").asText().ifNotExist().create();
schema.propertyKey("weight").asDouble().ifNotExist().create();
schema.propertyKey("lang").asText().ifNotExist().create();
schema.propertyKey("date").asDate().ifNotExist().create();
schema.propertyKey("price").asInt().ifNotExist().create();
schema.vertexLabel("person")
.properties("name", "age", "city")
.primaryKeys("name")
.ifNotExist()
.create();
schema.vertexLabel("software")
.properties("name", "lang", "price")
.primaryKeys("name")
.ifNotExist()
.create();
schema.indexLabel("personByCity")
.onV("person")
.by("city")
.secondary()
.ifNotExist()
.create();
schema.indexLabel("personByAgeAndCity")
.onV("person")
.by("age", "city")
.secondary()
.ifNotExist()
.create();
schema.indexLabel("softwareByPrice")
.onV("software")
.by("price")
.range()
.ifNotExist()
.create();
schema.edgeLabel("knows")
.sourceLabel("person")
.targetLabel("person")
.properties("date", "weight")
.ifNotExist()
.create();
schema.edgeLabel("created")
.sourceLabel("person").targetLabel("software")
.properties("date", "weight")
.ifNotExist()
.create();
schema.indexLabel("createdByDate")
.onE("created")
.by("date")
.secondary()
.ifNotExist()
.create();
schema.indexLabel("createdByWeight")
.onE("created")
.by("weight")
.range()
.ifNotExist()
.create();
schema.indexLabel("knowsByWeight")
.onE("knows")
.by("weight")
.range()
.ifNotExist()
.create();
GraphManager graph = hugeClient.graph();
Vertex marko = graph.addVertex(T.LABEL, "person", "name", "marko",
"age", 29, "city", "Beijing");
Vertex vadas = graph.addVertex(T.LABEL, "person", "name", "vadas",
"age", 27, "city", "Hongkong");
Vertex lop = graph.addVertex(T.LABEL, "software", "name", "lop",
"lang", "java", "price", 328);
Vertex josh = graph.addVertex(T.LABEL, "person", "name", "josh",
"age", 32, "city", "Beijing");
Vertex ripple = graph.addVertex(T.LABEL, "software", "name", "ripple",
"lang", "java", "price", 199);
Vertex peter = graph.addVertex(T.LABEL, "person", "name", "peter",
"age", 35, "city", "Shanghai");
marko.addEdge("knows", vadas, "date", "2016-01-10", "weight", 0.5);
marko.addEdge("knows", josh, "date", "2013-02-20", "weight", 1.0);
marko.addEdge("created", lop, "date", "2017-12-10", "weight", 0.4);
josh.addEdge("created", lop, "date", "2009-11-11", "weight", 0.4);
josh.addEdge("created", ripple, "date", "2017-12-10", "weight", 1.0);
peter.addEdge("created", lop, "date", "2017-03-24", "weight", 0.2);
GremlinManager gremlin = hugeClient.gremlin();
System.out.println("==== Path ====");
ResultSet resultSet = gremlin.gremlin("g.V().outE().path()").execute();
Iterator<Result> results = resultSet.iterator();
results.forEachRemaining(result -> {
System.out.println(result.getObject().getClass());
Object object = result.getObject();
if (object instanceof Vertex) {
System.out.println(((Vertex) object).id());
} else if (object instanceof Edge) {
System.out.println(((Edge) object).id());
} else if (object instanceof Path) {
List<Object> elements = ((Path) object).objects();
elements.forEach(element -> {
System.out.println(element.getClass());
System.out.println(element);
});
} else {
System.out.println(object);
}
});
hugeClient.close();
}
}
4.3.2 BatchExample
import java.util.ArrayList;
import java.util.List;
import org.apache.hugegraph.driver.GraphManager;
import org.apache.hugegraph.driver.HugeClient;
import org.apache.hugegraph.driver.SchemaManager;
import org.apache.hugegraph.structure.graph.Edge;
import org.apache.hugegraph.structure.graph.Vertex;
public class BatchExample {
public static void main(String[] args) {
// If connect failed will throw a exception.
HugeClient hugeClient = HugeClient.builder("http://localhost:8080",
"DEFAULT",
"hugegraph")
.configUser("username", "password")
// 这是示例,生产环境需要使用安全的凭证
.build();
SchemaManager schema = hugeClient.schema();
schema.propertyKey("name").asText().ifNotExist().create();
schema.propertyKey("age").asInt().ifNotExist().create();
schema.propertyKey("lang").asText().ifNotExist().create();
schema.propertyKey("date").asDate().ifNotExist().create();
schema.propertyKey("price").asInt().ifNotExist().create();
schema.vertexLabel("person")
.properties("name", "age")
.primaryKeys("name")
.ifNotExist()
.create();
schema.vertexLabel("person")
.properties("price")
.nullableKeys("price")
.append();
schema.vertexLabel("software")
.properties("name", "lang", "price")
.primaryKeys("name")
.ifNotExist()
.create();
schema.indexLabel("softwareByPrice")
.onV("software").by("price")
.range()
.ifNotExist()
.create();
schema.edgeLabel("knows")
.link("person", "person")
.properties("date")
.ifNotExist()
.create();
schema.edgeLabel("created")
.link("person", "software")
.properties("date")
.ifNotExist()
.create();
schema.indexLabel("createdByDate")
.onE("created").by("date")
.secondary()
.ifNotExist()
.create();
// get schema object by name
System.out.println(schema.getPropertyKey("name"));
System.out.println(schema.getVertexLabel("person"));
System.out.println(schema.getEdgeLabel("knows"));
System.out.println(schema.getIndexLabel("createdByDate"));
// list all schema objects
System.out.println(schema.getPropertyKeys());
System.out.println(schema.getVertexLabels());
System.out.println(schema.getEdgeLabels());
System.out.println(schema.getIndexLabels());
GraphManager graph = hugeClient.graph();
Vertex marko = new Vertex("person").property("name", "marko")
.property("age", 29);
Vertex vadas = new Vertex("person").property("name", "vadas")
.property("age", 27);
Vertex lop = new Vertex("software").property("name", "lop")
.property("lang", "java")
.property("price", 328);
Vertex josh = new Vertex("person").property("name", "josh")
.property("age", 32);
Vertex ripple = new Vertex("software").property("name", "ripple")
.property("lang", "java")
.property("price", 199);
Vertex peter = new Vertex("person").property("name", "peter")
.property("age", 35);
Edge markoKnowsVadas = new Edge("knows").source(marko).target(vadas)
.property("date", "2016-01-10");
Edge markoKnowsJosh = new Edge("knows").source(marko).target(josh)
.property("date", "2013-02-20");
Edge markoCreateLop = new Edge("created").source(marko).target(lop)
.property("date",
"2017-12-10");
Edge joshCreateRipple = new Edge("created").source(josh).target(ripple)
.property("date",
"2017-12-10");
Edge joshCreateLop = new Edge("created").source(josh).target(lop)
.property("date", "2009-11-11");
Edge peterCreateLop = new Edge("created").source(peter).target(lop)
.property("date",
"2017-03-24");
List<Vertex> vertices = new ArrayList<>();
vertices.add(marko);
vertices.add(vadas);
vertices.add(lop);
vertices.add(josh);
vertices.add(ripple);
vertices.add(peter);
List<Edge> edges = new ArrayList<>();
edges.add(markoKnowsVadas);
edges.add(markoKnowsJosh);
edges.add(markoCreateLop);
edges.add(joshCreateRipple);
edges.add(joshCreateLop);
edges.add(peterCreateLop);
vertices = graph.addVertices(vertices);
vertices.forEach(vertex -> System.out.println(vertex));
edges = graph.addEdges(edges, false);
edges.forEach(edge -> System.out.println(edge));
hugeClient.close();
}
}
4.4 运行 Example
运行 Example 之前需要启动 Server,
启动过程见HugeGraph-Server Quick Start
4.5 详细 API 说明
示例说明见HugeGraph-Client 基本 API 介绍
3.5.2 - HugeGraph Python 客户端快速入门
hugegraph-python-client 是 HugeGraph 图数据库的 Python 客户端/SDK。
它用于定义图结构、对图数据执行 CRUD 操作、管理 Schema 以及执行 Gremlin 查询。hugegraph-llm 和 hugegraph-ml 模块都依赖于这个基础库。
安装
安装已发布的包(稳定版)
要安装 hugegraph-python-client,您可以使用 uv/pip 或从源码构建:
# uv 是可选的,您可以直接使用 pip
uv pip install hugegraph-python # 注意:可能不是最新版本,建议从源码安装
# WIP:我们很快会将 'hugegraph-python-client' 作为包名
从源码安装(最新代码)
要从源码安装,请克隆仓库并安装所需的依赖项:
git clone https://github.com/apache/hugegraph-ai.git
cd hugegraph-ai/hugegraph-python-client
# 普通安装
uv pip install .
# (可选) 安装开发版本
uv pip install -e .
使用示例
定义图结构
您可以使用 hugegraph-python-client 来定义图结构。以下是如何定义图的示例:
from pyhugegraph.client import PyHugeClient
# 初始化客户端
# 对于 HugeGraph API 版本 ≥ v3:(或启用 graphspace 功能)
# - 如果启用了 graphspace,则 'graphspace' 参数变得相关(默认名称为 'DEFAULT')
# - 否则,graphspace 参数是可选的,可以忽略。
client = PyHugeClient("127.0.0.1", "8080", user="admin", pwd="admin", graph="hugegraph", graphspace="DEFAULT")
""""
注意:
可以参考您 HugeGraph 版本的官方 REST-API 文档以获取准确的详细信息。
如果某些 API 与预期不符,请提交 issue 或联系我们。
"""
schema = client.schema()
schema.propertyKey("name").asText().ifNotExist().create()
schema.propertyKey("birthDate").asText().ifNotExist().create()
schema.vertexLabel("Person").properties("name", "birthDate").usePrimaryKeyId().primaryKeys("name").ifNotExist().create()
schema.vertexLabel("Movie").properties("name").usePrimaryKeyId().primaryKeys("name").ifNotExist().create()
schema.edgeLabel("ActedIn").sourceLabel("Person").targetLabel("Movie").ifNotExist().create()
print(schema.getVertexLabels())
print(schema.getEdgeLabels())
print(schema.getRelations())
# 初始化图
g = client.graph()
v_al_pacino = g.addVertex("Person", {"name": "Al Pacino", "birthDate": "1940-04-25"})
v_robert = g.addVertex("Person", {"name": "Robert De Niro", "birthDate": "1943-08-17"})
v_godfather = g.addVertex("Movie", {"name": "The Godfather"})
v_godfather2 = g.addVertex("Movie", {"name": "The Godfather Part II"})
v_godfather3 = g.addVertex("Movie", {"name": "The Godfather Coda The Death of Michael Corleone"})
g.addEdge("ActedIn", v_al_pacino.id, v_godfather.id, {})
g.addEdge("ActedIn", v_al_pacino.id, v_godfather2.id, {})
g.addEdge("ActedIn", v_al_pacino.id, v_godfather3.id, {})
g.addEdge("ActedIn", v_robert.id, v_godfather2.id, {})
res = g.getVertexById(v_al_pacino.id).label
print(res)
g.close()
Schema 管理
hugegraph-python-client 提供了全面的 Schema 管理功能。
定义属性键 (Property Key)
# 定义属性键
client.schema().propertyKey('name').dataType('STRING').cardinality('SINGLE').create()
定义顶点标签 (Vertex Label)
# 定义顶点标签
client.schema().vertexLabel('person').properties('name', 'age').primaryKeys('name').create()
定义边标签 (Edge Label)
# 定义边标签
client.schema().edgeLabel('knows').sourceLabel('person').targetLabel('person').properties('since').create()
定义索引标签 (Index Label)
# 定义索引标签
client.schema().indexLabel('personByName').onV('person').by('name').secondary().create()
CRUD 操作
客户端允许您对图数据执行 CRUD 操作。以下是如何创建、读取、更新和删除顶点和边的示例:
创建顶点和边
# 创建顶点
v1 = client.graph().addVertex('person').property('name', 'John').property('age', 29).create()
v2 = client.graph().addVertex('person').property('name', 'Jane').property('age', 25).create()
# 创建边
client.graph().addEdge(v1, 'knows', v2).property('since', '2020').create()
读取顶点和边
# 通过 ID 获取顶点
vertex = client.graph().getVertexById(v1.id)
print(vertex)
# 通过 ID 获取边
edge = client.graph().getEdgeById(edge.id) # 假设 edge 对象已定义并有 id 属性
print(edge)
更新顶点和边
# 更新顶点
client.graph().updateVertex(v1.id).property('age', 30).update()
# 更新边
client.graph().updateEdge(edge.id).property('since', '2021').update() # 假设 edge 对象已定义并有 id 属性
删除顶点和边
# 删除顶点
client.graph().deleteVertex(v1.id)
# 删除边
client.graph().deleteEdge(edge.id) # 假设 edge 对象已定义并有 id 属性
执行 Gremlin 查询
客户端还支持执行 Gremlin 查询:
# 执行 Gremlin 查询
g = client.gremlin()
res = g.exec("g.V().limit(5)")
print(res)
其他信息正在建设中 🚧 (欢迎为此添加更多文档,用户可以参考 java-client-doc 获取类似用法)
API 文档参考
贡献
- 欢迎为
hugegraph-python-client 做出贡献。请参阅 贡献指南 获取更多信息。 - 代码格式:请在提交 PR 前运行
./style/code_format_and_analysis.sh 来格式化您的代码。
感谢所有已经为 hugegraph-python-client 做出贡献的人!
3.5.3 - HugeGraph Go 客户端快速入门
基于 Go 语言的 HugeGraph Client SDK 工具。
软件架构
(软件架构说明)
安装教程
go get github.com/apache/hugegraph-toolchain/hugegraph-client-go
已实现 API
| API | 说明 |
|---|
| schema | 获取模型 schema |
| version | 获取版本信息 |
使用说明
1. 初始化客户端
package main
import (
"log"
"os"
"github.com/apache/hugegraph-toolchain/hugegraph-client-go"
"github.com/apache/hugegraph-toolchain/hugegraph-client-go/hgtransport"
)
func main() {
client, err := hugegraph.NewCommonClient(hugegraph.Config{
Host: "127.0.0.1",
Port: 8080,
Graph: "hugegraph",
Username: "", // 根据实际情况填写用户名
Password: "", // 根据实际情况填写密码
Logger: &hgtransport.ColorLogger{
Output: os.Stdout,
EnableRequestBody: true,
EnableResponseBody: true,
},
})
if err != nil {
log.Fatalf("Error creating the client: %s\n", err)
}
// 使用 client 进行操作...
_ = client // 避免 "imported and not used" 错误
}
2. 获取 HugeGraph 版本
使用 SDK 获取版本信息
package main
import (
"fmt"
"log"
"os"
"github.com/apache/hugegraph-toolchain/hugegraph-client-go"
"github.com/apache/hugegraph-toolchain/hugegraph-client-go/hgtransport"
)
// initClient 初始化并返回一个 HugeGraph 客户端实例
func initClient() *hugegraph.CommonClient {
client, err := hugegraph.NewCommonClient(hugegraph.Config{
Host: "127.0.0.1",
Port: 8080,
Graph: "hugegraph",
Username: "",
Password: "",
Logger: &hgtransport.ColorLogger{
Output: os.Stdout,
EnableRequestBody: true,
EnableResponseBody: true,
},
})
if err != nil {
log.Fatalf("Error creating the client: %s\n", err)
}
return client
}
func getVersion() {
client := initClient()
// 假设 client 有一个 Version 方法返回版本信息和一个错误
// res, err := client.Version() // 实际调用
// 模拟返回,因为原始 README 中的 client.Version() 返回类型与此处使用不完全匹配
type VersionInfo struct {
Versions struct {
Version string `json:"version"`
Core string `json:"core"`
Gremlin string `json:"gremlin"`
API string `json:"api"`
} `json:"versions"`
// Body io.ReadCloser // 假设有 Body 用于关闭,根据实际 SDK 调整
}
// 模拟 API 调用和返回
res := &VersionInfo{
Versions: struct {
Version string `json:"version"`
Core string `json:"core"`
Gremlin string `json:"gremlin"`
API string `json:"api"`
}{
Version: "1.0.0", // 示例版本
Core: "1.0.0",
Gremlin: "3.x.x",
API: "v1",
},
}
// err := error(nil) // 假设没有错误
// if err != nil {
// log.Fatalf("Error getting the response: %s\n", err)
// }
// defer res.Body.Close() // 如果有 Body,需要关闭
fmt.Println(res.Versions)
fmt.Println(res.Versions.Version)
}
func main() {
getVersion()
}
返回值的结构
package main
// VersionResponse 定义了版本 API 返回的结构体
type VersionResponse struct {
Versions struct {
Version string `json:"version"` // hugegraph version
Core string `json:"core"` // hugegraph core version
Gremlin string `json:"gremlin"` // hugegraph gremlin version
API string `json:"api"` // hugegraph api version
} `json:"versions"`
}
API 文档参考
4 - HugeGraph-Server 配置
本节介绍 HugeGraph-Server 的配置方法,包括:
4.1 - Server 启动指南
1 概述
配置文件的目录为 hugegraph-release/conf,所有关于服务和图本身的配置都在此目录下。
主要的配置文件包括:gremlin-server.yaml、rest-server.properties 和 hugegraph.properties
HugeGraphServer 内部集成了 GremlinServer 和 RestServer,而 gremlin-server.yaml 和 rest-server.properties 就是用来配置这两个 Server 的。
- GremlinServer:GremlinServer 接受用户的 gremlin 语句,解析后转而调用 Core 的代码。
- RestServer:提供 RESTful API,根据不同的 HTTP 请求,调用对应的 Core API,如果用户请求体是 gremlin 语句,则会转发给 GremlinServer,实现对图数据的操作。
下面对这三个配置文件逐一介绍。
2 gremlin-server.yaml
gremlin-server.yaml 文件默认的内容如下:
# host and port of gremlin server, need to be consistent with host and port in rest-server.properties
#host: 127.0.0.1
#port: 8182
# Gremlin 查询中的超时时间(以毫秒为单位)
evaluationTimeout: 30000
channelizer: org.apache.tinkerpop.gremlin.server.channel.WsAndHttpChannelizer
# 不要在此处设置图形,此功能将在支持动态添加图形后再进行处理
graphs: {
}
scriptEngines: {
gremlin-groovy: {
staticImports: [
org.opencypher.gremlin.process.traversal.CustomPredicates.*',
org.opencypher.gremlin.traversal.CustomFunctions.*
],
plugins: {
org.apache.hugegraph.plugin.HugeGraphGremlinPlugin: {},
org.apache.tinkerpop.gremlin.server.jsr223.GremlinServerGremlinPlugin: {},
org.apache.tinkerpop.gremlin.jsr223.ImportGremlinPlugin: {
classImports: [
java.lang.Math,
org.apache.hugegraph.backend.id.IdGenerator,
org.apache.hugegraph.type.define.Directions,
org.apache.hugegraph.type.define.NodeRole,
org.apache.hugegraph.traversal.algorithm.CollectionPathsTraverser,
org.apache.hugegraph.traversal.algorithm.CountTraverser,
org.apache.hugegraph.traversal.algorithm.CustomizedCrosspointsTraverser,
org.apache.hugegraph.traversal.algorithm.CustomizePathsTraverser,
org.apache.hugegraph.traversal.algorithm.FusiformSimilarityTraverser,
org.apache.hugegraph.traversal.algorithm.HugeTraverser,
org.apache.hugegraph.traversal.algorithm.JaccardSimilarTraverser,
org.apache.hugegraph.traversal.algorithm.KneighborTraverser,
org.apache.hugegraph.traversal.algorithm.KoutTraverser,
org.apache.hugegraph.traversal.algorithm.MultiNodeShortestPathTraverser,
org.apache.hugegraph.traversal.algorithm.NeighborRankTraverser,
org.apache.hugegraph.traversal.algorithm.PathsTraverser,
org.apache.hugegraph.traversal.algorithm.PersonalRankTraverser,
org.apache.hugegraph.traversal.algorithm.SameNeighborTraverser,
org.apache.hugegraph.traversal.algorithm.ShortestPathTraverser,
org.apache.hugegraph.traversal.algorithm.SingleSourceShortestPathTraverser,
org.apache.hugegraph.traversal.algorithm.SubGraphTraverser,
org.apache.hugegraph.traversal.algorithm.TemplatePathsTraverser,
org.apache.hugegraph.traversal.algorithm.steps.EdgeStep,
org.apache.hugegraph.traversal.algorithm.steps.RepeatEdgeStep,
org.apache.hugegraph.traversal.algorithm.steps.WeightedEdgeStep,
org.apache.hugegraph.traversal.optimize.ConditionP,
org.apache.hugegraph.traversal.optimize.Text,
org.apache.hugegraph.traversal.optimize.TraversalUtil,
org.apache.hugegraph.util.DateUtil,
org.opencypher.gremlin.traversal.CustomFunctions,
org.opencypher.gremlin.traversal.CustomPredicate
],
methodImports: [
java.lang.Math#*,
org.opencypher.gremlin.traversal.CustomPredicate#*,
org.opencypher.gremlin.traversal.CustomFunctions#*
]
},
org.apache.tinkerpop.gremlin.jsr223.ScriptFileGremlinPlugin: {
files: [scripts/empty-sample.groovy]
}
}
}
}
serializers:
- { className: org.apache.tinkerpop.gremlin.driver.ser.GraphBinaryMessageSerializerV1,
config: {
serializeResultToString: false,
ioRegistries: [org.apache.hugegraph.io.HugeGraphIoRegistry]
}
}
- { className: org.apache.tinkerpop.gremlin.driver.ser.GraphSONMessageSerializerV1d0,
config: {
serializeResultToString: false,
ioRegistries: [org.apache.hugegraph.io.HugeGraphIoRegistry]
}
}
- { className: org.apache.tinkerpop.gremlin.driver.ser.GraphSONMessageSerializerV2d0,
config: {
serializeResultToString: false,
ioRegistries: [org.apache.hugegraph.io.HugeGraphIoRegistry]
}
}
- { className: org.apache.tinkerpop.gremlin.driver.ser.GraphSONMessageSerializerV3d0,
config: {
serializeResultToString: false,
ioRegistries: [org.apache.hugegraph.io.HugeGraphIoRegistry]
}
}
metrics: {
consoleReporter: {enabled: false, interval: 180000},
csvReporter: {enabled: false, interval: 180000, fileName: ./metrics/gremlin-server-metrics.csv},
jmxReporter: {enabled: false},
slf4jReporter: {enabled: false, interval: 180000},
gangliaReporter: {enabled: false, interval: 180000, addressingMode: MULTICAST},
graphiteReporter: {enabled: false, interval: 180000}
}
maxInitialLineLength: 4096
maxHeaderSize: 8192
maxChunkSize: 8192
maxContentLength: 65536
maxAccumulationBufferComponents: 1024
resultIterationBatchSize: 64
writeBufferLowWaterMark: 32768
writeBufferHighWaterMark: 65536
ssl: {
enabled: false
}
上面的配置项很多,但目前只需要关注如下几个配置项:channelizer 和 graphs。
- graphs:GremlinServer 启动时需要打开的图,该项是一个 map 结构,key 是图的名字,value 是该图的配置文件路径;
- channelizer:GremlinServer 与客户端有两种通信方式,分别是 WebSocket 和 HTTP(默认)。如果选择 WebSocket,
用户可以通过 Gremlin-Console 快速体验 HugeGraph 的特性,但是不支持大规模数据导入,
推荐使用 HTTP 的通信方式,HugeGraph 的外围组件都是基于 HTTP 实现的;
默认 GremlinServer 是服务在 localhost:8182,如果需要修改,配置 host、port 即可
- host:部署 GremlinServer 机器的机器名或 IP,目前 HugeGraphServer 不支持分布式部署,且 GremlinServer 不直接暴露给用户;
- port:部署 GremlinServer 机器的端口;
同时需要在 rest-server.properties 中增加对应的配置项 gremlinserver.url=http://host:port
3 rest-server.properties
rest-server.properties 文件的默认内容如下:
# bind url
# could use '0.0.0.0' or specified (real)IP to expose external network access
restserver.url=http://127.0.0.1:8080
#restserver.enable_graphspaces_filter=false
# gremlin server url, need to be consistent with host and port in gremlin-server.yaml
#gremlinserver.url=http://127.0.0.1:8182
graphs=./conf/graphs
# The maximum thread ratio for batch writing, only take effect if the batch.max_write_threads is 0
batch.max_write_ratio=80
batch.max_write_threads=0
# configuration of arthas
arthas.telnet_port=8562
arthas.http_port=8561
arthas.ip=127.0.0.1
arthas.disabled_commands=jad
# authentication configs
# choose 'org.apache.hugegraph.auth.StandardAuthenticator' or a custom implementation
#auth.authenticator=
# for StandardAuthenticator mode
#auth.graph_store=hugegraph
# auth client config
#auth.remote_url=127.0.0.1:8899,127.0.0.1:8898,127.0.0.1:8897
# TODO: Deprecated & removed later (useless from version 1.5.0)
# rpc server configs for multi graph-servers or raft-servers
#rpc.server_host=127.0.0.1
#rpc.server_port=8091
#rpc.server_timeout=30
# rpc client configs (like enable to keep cache consistency)
#rpc.remote_url=127.0.0.1:8091,127.0.0.1:8092,127.0.0.1:8093
#rpc.client_connect_timeout=20
#rpc.client_reconnect_period=10
#rpc.client_read_timeout=40
#rpc.client_retries=3
#rpc.client_load_balancer=consistentHash
# raft group initial peers
#raft.group_peers=127.0.0.1:8091,127.0.0.1:8092,127.0.0.1:8093
# lightweight load balancing (beta)
server.id=server-1
server.role=master
# slow query log
log.slow_query_threshold=1000
# jvm(in-heap) memory usage monitor, set 1 to disable it
memory_monitor.threshold=0.85
memory_monitor.period=2000
- restserver.url:RestServer 提供服务的 url,根据实际环境修改。如果其他 IP 地址无法访问,可以尝试修改为特定的地址;或修改为
http://0.0.0.0 来监听来自任何 IP 地址的请求,这种方案较为便捷,但需要留意服务可被访问的网络范围; - graphs:RestServer 启动时也需要打开图,该项为 map 结构,key 是图的名字,value 是该图的配置文件路径;
注意:gremlin-server.yaml 和 rest-server.properties 都包含 graphs 配置项,而 init-store 命令是根据 gremlin-server.yaml 的 graphs 下的图进行初始化的。
配置项 gremlinserver.url 是 GremlinServer 为 RestServer 提供服务的 url,该配置项默认为 http://localhost:8182,如需修改,需要和 gremlin-server.yaml 中的 host 和 port 相匹配;
4 hugegraph.properties
hugegraph.properties 是一类文件,因为如果系统存在多个图,则会有多个相似的文件。该文件用来配置与图存储和查询相关的参数,文件的默认内容如下:
# gremlin entrence to create graph
gremlin.graph=org.apache.hugegraph.HugeFactory
# cache config
#schema.cache_capacity=100000
# vertex-cache default is 1000w, 10min expired
#vertex.cache_capacity=10000000
#vertex.cache_expire=600
# edge-cache default is 100w, 10min expired
#edge.cache_capacity=1000000
#edge.cache_expire=600
# schema illegal name template
#schema.illegal_name_regex=\s+|~.*
#vertex.default_label=vertex
backend=rocksdb
serializer=binary
store=hugegraph
raft.mode=false
raft.safe_read=false
raft.use_snapshot=false
raft.endpoint=127.0.0.1:8281
raft.group_peers=127.0.0.1:8281,127.0.0.1:8282,127.0.0.1:8283
raft.path=./raft-log
raft.use_replicator_pipeline=true
raft.election_timeout=10000
raft.snapshot_interval=3600
raft.backend_threads=48
raft.read_index_threads=8
raft.queue_size=16384
raft.queue_publish_timeout=60
raft.apply_batch=1
raft.rpc_threads=80
raft.rpc_connect_timeout=5000
raft.rpc_timeout=60000
# if use 'ikanalyzer', need download jar from 'https://github.com/apache/hugegraph-doc/raw/ik_binary/dist/server/ikanalyzer-2012_u6.jar' to lib directory
search.text_analyzer=jieba
search.text_analyzer_mode=INDEX
# rocksdb backend config
#rocksdb.data_path=/path/to/disk
#rocksdb.wal_path=/path/to/disk
# cassandra backend config
cassandra.host=localhost
cassandra.port=9042
cassandra.username=
cassandra.password=
#cassandra.connect_timeout=5
#cassandra.read_timeout=20
#cassandra.keyspace.strategy=SimpleStrategy
#cassandra.keyspace.replication=3
# hbase backend config
#hbase.hosts=localhost
#hbase.port=2181
#hbase.znode_parent=/hbase
#hbase.threads_max=64
# mysql backend config
#jdbc.driver=com.mysql.jdbc.Driver
#jdbc.url=jdbc:mysql://127.0.0.1:3306
#jdbc.username=root
#jdbc.password=
#jdbc.reconnect_max_times=3
#jdbc.reconnect_interval=3
#jdbc.ssl_mode=false
# postgresql & cockroachdb backend config
#jdbc.driver=org.postgresql.Driver
#jdbc.url=jdbc:postgresql://localhost:5432/
#jdbc.username=postgres
#jdbc.password=
# palo backend config
#palo.host=127.0.0.1
#palo.poll_interval=10
#palo.temp_dir=./palo-data
#palo.file_limit_size=32
重点关注未注释的几项:
- gremlin.graph:GremlinServer 的启动入口,用户不要修改此项;
- backend:使用的后端存储,可选值有 memory、cassandra、scylladb、mysql、hbase、postgresql 和 rocksdb;
- serializer:主要为内部使用,用于将 schema、vertex 和 edge 序列化到后端,对应的可选值为 text、cassandra、scylladb 和 binary;(注:rocksdb 后端值需是 binary,其他后端 backend 与 serializer 值需保持一致,如 hbase 后端该值为 hbase)
- store:图存储到后端使用的数据库名,在 cassandra 和 scylladb 中就是 keyspace 名,此项的值与 GremlinServer 和 RestServer 中的图名并无关系,但是出于直观考虑,建议仍然使用相同的名字;
- cassandra.host:backend 为 cassandra 或 scylladb 时此项才有意义,cassandra/scylladb 集群的 seeds;
- cassandra.port:backend 为 cassandra 或 scylladb 时此项才有意义,cassandra/scylladb 集群的 native port;
- rocksdb.data_path:backend 为 rocksdb 时此项才有意义,rocksdb 的数据目录
- rocksdb.wal_path:backend 为 rocksdb 时此项才有意义,rocksdb 的日志目录
- admin.token: 通过一个 token 来获取服务器的配置信息,例如:http://localhost:8080/graphs/hugegraph/conf?token=162f7848-0b6d-4faf-b557-3a0797869c55
5 多图配置
我们的系统是可以存在多个图的,并且各个图的后端可以不一样,比如图 hugegraph_rocksdb 和 hugegraph_mysql,其中 hugegraph_rocksdb 以 RocksDB 作为后端,hugegraph_mysql 以 MySQL 作为后端。
配置方法也很简单:
[可选]:修改 rest-server.properties
通过修改 rest-server.properties 中的 graphs 配置项来设置图的配置文件目录。默认配置为 graphs=./conf/graphs,如果想要修改为其它目录则调整 graphs 配置项,比如调整为 graphs=/etc/hugegraph/graphs,示例如下:
在 conf/graphs 路径下基于 hugegraph.properties 修改得到 hugegraph_mysql_backend.properties 和 hugegraph_rocksdb_backend.properties
hugegraph_mysql_backend.properties 修改的部分如下:
backend=mysql
serializer=mysql
store=hugegraph_mysql
# mysql backend config
jdbc.driver=com.mysql.cj.jdbc.Driver
jdbc.url=jdbc:mysql://127.0.0.1:3306
jdbc.username=root
jdbc.password=xxx
jdbc.reconnect_max_times=3
jdbc.reconnect_interval=3
jdbc.ssl_mode=false
hugegraph_rocksdb_backend.properties 修改的部分如下:
backend=rocksdb
serializer=binary
store=hugegraph_rocksdb
停止 Server,初始化执行 init-store.sh(为新的图创建数据库),重新启动 Server
$ ./bin/stop-hugegraph.sh
$ ./bin/init-store.sh
Initializing HugeGraph Store...
2023-06-11 14:16:14 [main] [INFO] o.a.h.u.ConfigUtil - Scanning option 'graphs' directory './conf/graphs'
2023-06-11 14:16:14 [main] [INFO] o.a.h.c.InitStore - Init graph with config file: ./conf/graphs/hugegraph_rocksdb_backend.properties
...
2023-06-11 14:16:15 [main] [INFO] o.a.h.StandardHugeGraph - Graph 'hugegraph_rocksdb' has been initialized
2023-06-11 14:16:15 [main] [INFO] o.a.h.c.InitStore - Init graph with config file: ./conf/graphs/hugegraph_mysql_backend.properties
...
2023-06-11 14:16:16 [main] [INFO] o.a.h.StandardHugeGraph - Graph 'hugegraph_mysql' has been initialized
2023-06-11 14:16:16 [main] [INFO] o.a.h.StandardHugeGraph - Close graph standardhugegraph[hugegraph_rocksdb]
...
2023-06-11 14:16:16 [main] [INFO] o.a.h.HugeFactory - HugeFactory shutdown
2023-06-11 14:16:16 [hugegraph-shutdown] [INFO] o.a.h.HugeFactory - HugeGraph is shutting down
Initialization finished.
$ ./bin/start-hugegraph.sh
Starting HugeGraphServer...
Connecting to HugeGraphServer (http://127.0.0.1:8080/graphs)...OK
Started [pid 21614]
查看创建的图:
curl http://127.0.0.1:8080/graphs/
{"graphs":["hugegraph_rocksdb","hugegraph_mysql"]}
查看某个图的信息:
curl http://127.0.0.1:8080/graphs/hugegraph_mysql_backend
{"name":"hugegraph_mysql","backend":"mysql"}
curl http://127.0.0.1:8080/graphs/hugegraph_rocksdb_backend
{"name":"hugegraph_rocksdb","backend":"rocksdb"}
4.2 - Server 完整配置手册
Gremlin Server 配置项
对应配置文件gremlin-server.yaml
| config option | default value | description |
|---|
| host | 127.0.0.1 | The host or ip of Gremlin Server. |
| port | 8182 | The listening port of Gremlin Server. |
| graphs | hugegraph: conf/hugegraph.properties | The map of graphs with name and config file path. |
| scriptEvaluationTimeout | 30000 | The timeout for gremlin script execution(millisecond). |
| channelizer | org.apache.tinkerpop.gremlin.server.channel.HttpChannelizer | Indicates the protocol which the Gremlin Server provides service. |
| authentication | authenticator: org.apache.hugegraph.auth.StandardAuthenticator, config: {tokens: conf/rest-server.properties} | The authenticator and config(contains tokens path) of authentication mechanism. |
Rest Server & API 配置项
对应配置文件rest-server.properties
| config option | default value | description |
|---|
| graphs | [hugegraph:conf/hugegraph.properties] | The map of graphs’ name and config file. |
| server.id | server-1 | The id of rest server, used for license verification. |
| server.role | master | The role of nodes in the cluster, available types are [master, worker, computer] |
| restserver.url | http://127.0.0.1:8080 | The url for listening of rest server. |
| ssl.keystore_file | server.keystore | The path of server keystore file used when https protocol is enabled. |
| ssl.keystore_password | | The password of the path of the server keystore file used when the https protocol is enabled. |
| restserver.max_worker_threads | 2 * CPUs | The maximum worker threads of rest server. |
| restserver.min_free_memory | 64 | The minimum free memory(MB) of rest server, requests will be rejected when the available memory of system is lower than this value. |
| restserver.request_timeout | 30 | The time in seconds within which a request must complete, -1 means no timeout. |
| restserver.connection_idle_timeout | 30 | The time in seconds to keep an inactive connection alive, -1 means no timeout. |
| restserver.connection_max_requests | 256 | The max number of HTTP requests allowed to be processed on one keep-alive connection, -1 means unlimited. |
| gremlinserver.url | http://127.0.0.1:8182 | The url of gremlin server. |
| gremlinserver.max_route | 8 | The max route number for gremlin server. |
| gremlinserver.timeout | 30 | The timeout in seconds of waiting for gremlin server. |
| batch.max_edges_per_batch | 2500 | The maximum number of edges submitted per batch. |
| batch.max_vertices_per_batch | 2500 | The maximum number of vertices submitted per batch. |
| batch.max_write_ratio | 70 | The maximum thread ratio for batch writing, only take effect if the batch.max_write_threads is 0. |
| batch.max_write_threads | 0 | The maximum threads for batch writing, if the value is 0, the actual value will be set to batch.max_write_ratio * restserver.max_worker_threads. |
| auth.authenticator | | The class path of authenticator implementation. e.g., org.apache.hugegraph.auth.StandardAuthenticator, or a custom implementation. |
| auth.graph_store | hugegraph | The name of graph used to store authentication information, like users, only for org.apache.hugegraph.auth.StandardAuthenticator. |
| auth.audit_log_rate | 1000.0 | The max rate of audit log output per user, default value is 1000 records per second. |
| auth.cache_capacity | 10240 | The max cache capacity of each auth cache item. |
| auth.cache_expire | 600 | The expiration time in seconds of vertex cache. |
| auth.remote_url | | If the address is empty, it provide auth service, otherwise it is auth client and also provide auth service through rpc forwarding. The remote url can be set to multiple addresses, which are concat by ‘,’. |
| auth.token_expire | 86400 | The expiration time in seconds after token created |
| auth.token_secret | FXQXbJtbCLxODc6tGci732pkH1cyf8Qg | Secret key of HS256 algorithm. |
| exception.allow_trace | true | Whether to allow exception trace stack. |
| memory_monitor.threshold | 0.85 | The threshold of JVM(in-heap) memory usage monitoring , 1 means disabling this function. |
| memory_monitor.period | 2000 | The period in ms of JVM(in-heap) memory usage monitoring. |
| log.slow_query_threshold | 1000 | Slow query log threshold in milliseconds, 0 means disabled. |
对应配置文件rest-server.properties
| config option | default value | description |
|---|
| pd.peers | 127.0.0.1:8686 | PD server addresses (comma separated). |
| meta.endpoints | http://127.0.0.1:2379 | Meta service endpoints. |
基本配置项
基本配置项及后端配置项对应配置文件:{graph-name}.properties,如hugegraph.properties
| config option | default value | description |
|---|
| gremlin.graph | org.apache.hugegraph.HugeFactory | Gremlin entrance to create graph. |
| backend | rocksdb | The data store type. For version 1.7.0+: [memory, rocksdb, hstore, hbase]. Note: cassandra, scylladb, mysql, postgresql were removed in 1.7.0 (use <= 1.5.x for legacy backends). |
| serializer | binary | The serializer for backend store, available values are [text, binary, cassandra, hbase, mysql]. |
| store | hugegraph | The database name like Cassandra Keyspace. |
| store.connection_detect_interval | 600 | The interval in seconds for detecting connections, if the idle time of a connection exceeds this value, detect it and reconnect if needed before using, value 0 means detecting every time. |
| store.graph | g | The graph table name, which store vertex, edge and property. |
| store.schema | m | The schema table name, which store meta data. |
| store.system | s | The system table name, which store system data. |
| schema.illegal_name_regex | .\s+$|~. | The regex specified the illegal format for schema name. |
| schema.cache_capacity | 10000 | The max cache size(items) of schema cache. |
| vertex.cache_type | l2 | The type of vertex cache, allowed values are [l1, l2]. |
| vertex.cache_capacity | 10000000 | The max cache size(items) of vertex cache. |
| vertex.cache_expire | 600 | The expire time in seconds of vertex cache. |
| vertex.check_customized_id_exist | false | Whether to check the vertices exist for those using customized id strategy. |
| vertex.default_label | vertex | The default vertex label. |
| vertex.tx_capacity | 10000 | The max size(items) of vertices(uncommitted) in transaction. |
| vertex.check_adjacent_vertex_exist | false | Whether to check the adjacent vertices of edges exist. |
| vertex.lazy_load_adjacent_vertex | true | Whether to lazy load adjacent vertices of edges. |
| vertex.part_edge_commit_size | 5000 | Whether to enable the mode to commit part of edges of vertex, enabled if commit size > 0, 0 means disabled. |
| vertex.encode_primary_key_number | true | Whether to encode number value of primary key in vertex id. |
| vertex.remove_left_index_at_overwrite | false | Whether remove left index at overwrite. |
| edge.cache_type | l2 | The type of edge cache, allowed values are [l1, l2]. |
| edge.cache_capacity | 1000000 | The max cache size(items) of edge cache. |
| edge.cache_expire | 600 | The expiration time in seconds of edge cache. |
| edge.tx_capacity | 10000 | The max size(items) of edges(uncommitted) in transaction. |
| query.page_size | 500 | The size of each page when querying by paging. |
| query.batch_size | 1000 | The size of each batch when querying by batch. |
| query.ignore_invalid_data | true | Whether to ignore invalid data of vertex or edge. |
| query.index_intersect_threshold | 1000 | The maximum number of intermediate results to intersect indexes when querying by multiple single index properties. |
| query.ramtable_edges_capacity | 20000000 | The maximum number of edges in ramtable, include OUT and IN edges. |
| query.ramtable_enable | false | Whether to enable ramtable for query of adjacent edges. |
| query.ramtable_vertices_capacity | 10000000 | The maximum number of vertices in ramtable, generally the largest vertex id is used as capacity. |
| query.optimize_aggregate_by_index | false | Whether to optimize aggregate query(like count) by index. |
| oltp.concurrent_depth | 10 | The min depth to enable concurrent oltp algorithm. |
| oltp.concurrent_threads | 10 | Thread number to concurrently execute oltp algorithm. |
| oltp.collection_type | EC | The implementation type of collections used in oltp algorithm. |
| rate_limit.read | 0 | The max rate(times/s) to execute query of vertices/edges. |
| rate_limit.write | 0 | The max rate(items/s) to add/update/delete vertices/edges. |
| task.wait_timeout | 10 | Timeout in seconds for waiting for the task to complete,such as when truncating or clearing the backend. |
| task.input_size_limit | 16777216 | The job input size limit in bytes. |
| task.result_size_limit | 16777216 | The job result size limit in bytes. |
| task.sync_deletion | false | Whether to delete schema or expired data synchronously. |
| task.ttl_delete_batch | 1 | The batch size used to delete expired data. |
| computer.config | /conf/computer.yaml | The config file path of computer job. |
| search.text_analyzer | ikanalyzer | Choose a text analyzer for searching the vertex/edge properties, available type are [word, ansj, hanlp, smartcn, jieba, jcseg, mmseg4j, ikanalyzer]. # if use ‘ikanalyzer’, need download jar from ‘https://github.com/apache/hugegraph-doc/raw/ik_binary/dist/server/ikanalyzer-2012_u6.jar' to lib directory |
| search.text_analyzer_mode | smart | Specify the mode for the text analyzer, the available mode of analyzer are {word: [MaximumMatching, ReverseMaximumMatching, MinimumMatching, ReverseMinimumMatching, BidirectionalMaximumMatching, BidirectionalMinimumMatching, BidirectionalMaximumMinimumMatching, FullSegmentation, MinimalWordCount, MaxNgramScore, PureEnglish], ansj: [BaseAnalysis, IndexAnalysis, ToAnalysis, NlpAnalysis], hanlp: [standard, nlp, index, nShort, shortest, speed], smartcn: [], jieba: [SEARCH, INDEX], jcseg: [Simple, Complex], mmseg4j: [Simple, Complex, MaxWord], ikanalyzer: [smart, max_word]}. |
| snowflake.datecenter_id | 0 | The datacenter id of snowflake id generator. |
| snowflake.force_string | false | Whether to force the snowflake long id to be a string. |
| snowflake.worker_id | 0 | The worker id of snowflake id generator. |
| raft.mode | false | Whether the backend storage works in raft mode. |
| raft.safe_read | false | Whether to use linearly consistent read. |
| raft.use_snapshot | false | Whether to use snapshot. |
| raft.endpoint | 127.0.0.1:8281 | The peerid of current raft node. |
| raft.group_peers | 127.0.0.1:8281,127.0.0.1:8282,127.0.0.1:8283 | The peers of current raft group. |
| raft.path | ./raft-log | The log path of current raft node. |
| raft.use_replicator_pipeline | true | Whether to use replicator line, when turned on it multiple logs can be sent in parallel, and the next log doesn’t have to wait for the ack message of the current log to be sent. |
| raft.election_timeout | 10000 | Timeout in milliseconds to launch a round of election. |
| raft.snapshot_interval | 3600 | The interval in seconds to trigger snapshot save. |
| raft.backend_threads | current CPU v-cores | The thread number used to apply task to backend. |
| raft.read_index_threads | 8 | The thread number used to execute reading index. |
| raft.apply_batch | 1 | The apply batch size to trigger disruptor event handler. |
| raft.queue_size | 16384 | The disruptor buffers size for jraft RaftNode, StateMachine and LogManager. |
| raft.queue_publish_timeout | 60 | The timeout in second when publish event into disruptor. |
| raft.rpc_threads | 80 | The rpc threads for jraft RPC layer. |
| raft.rpc_connect_timeout | 5000 | The rpc connect timeout for jraft rpc. |
| raft.rpc_timeout | 60000 | The rpc timeout for jraft rpc. |
| raft.rpc_buf_low_water_mark | 10485760 | The ChannelOutboundBuffer’s low water mark of netty, when buffer size less than this size, the method ChannelOutboundBuffer.isWritable() will return true, it means that low downstream pressure or good network. |
| raft.rpc_buf_high_water_mark | 20971520 | The ChannelOutboundBuffer’s high water mark of netty, only when buffer size exceed this size, the method ChannelOutboundBuffer.isWritable() will return false, it means that the downstream pressure is too great to process the request or network is very congestion, upstream needs to limit rate at this time. |
| raft.read_strategy | ReadOnlyLeaseBased | The linearizability of read strategy. |
RocksDB 后端配置项
| config option | default value | description |
|---|
| backend | | Must be set to rocksdb. |
| serializer | | Must be set to binary. |
| rocksdb.data_disks | [] | The optimized disks for storing data of RocksDB. The format of each element: STORE/TABLE: /path/disk.Allowed keys are [g/vertex, g/edge_out, g/edge_in, g/vertex_label_index, g/edge_label_index, g/range_int_index, g/range_float_index, g/range_long_index, g/range_double_index, g/secondary_index, g/search_index, g/shard_index, g/unique_index, g/olap] |
| rocksdb.data_path | rocksdb-data/data | The path for storing data of RocksDB. |
| rocksdb.wal_path | rocksdb-data/wal | The path for storing WAL of RocksDB. |
| rocksdb.option_path | | The YAML file for configuring ToplingDB/RocksDB parameters. |
| rocksdb.open_http | false | Whether to start ToplingDB HTTP service. Security: enable only in trusted networks and restrict access (firewall/ACL); the port and document_root are configured in the YAML (http.listening_ports/document_root). |
| rocksdb.allow_mmap_reads | false | Allow the OS to mmap file for reading sst tables. |
| rocksdb.allow_mmap_writes | false | Allow the OS to mmap file for writing. |
| rocksdb.block_cache_capacity | 8388608 | The amount of block cache in bytes that will be used by RocksDB, 0 means no block cache. |
| rocksdb.bloom_filter_bits_per_key | -1 | The bits per key in bloom filter, a good value is 10, which yields a filter with ~ 1% false positive rate, -1 means no bloom filter. |
| rocksdb.bloom_filter_block_based_mode | false | Use block based filter rather than full filter. |
| rocksdb.bloom_filter_whole_key_filtering | true | True if place whole keys in the bloom filter, else place the prefix of keys. |
| rocksdb.bottommost_compression | NO_COMPRESSION | The compression algorithm for the bottommost level of RocksDB, allowed values are none/snappy/z/bzip2/lz4/lz4hc/xpress/zstd. |
| rocksdb.bulkload_mode | false | Switch to the mode to bulk load data into RocksDB. |
| rocksdb.cache_index_and_filter_blocks | false | Indicating if we’d put index/filter blocks to the block cache. |
| rocksdb.compaction_style | LEVEL | Set compaction style for RocksDB: LEVEL/UNIVERSAL/FIFO. |
| rocksdb.compression | SNAPPY_COMPRESSION | The compression algorithm for compressing blocks of RocksDB, allowed values are none/snappy/z/bzip2/lz4/lz4hc/xpress/zstd. |
| rocksdb.compression_per_level | [NO_COMPRESSION, NO_COMPRESSION, SNAPPY_COMPRESSION, SNAPPY_COMPRESSION, SNAPPY_COMPRESSION, SNAPPY_COMPRESSION, SNAPPY_COMPRESSION] | The compression algorithms for different levels of RocksDB, allowed values are none/snappy/z/bzip2/lz4/lz4hc/xpress/zstd. |
| rocksdb.delayed_write_rate | 16777216 | The rate limit in bytes/s of user write requests when need to slow down if the compaction gets behind. |
| rocksdb.log_level | INFO | The info log level of RocksDB. |
| rocksdb.max_background_jobs | 8 | Maximum number of concurrent background jobs, including flushes and compactions. |
| rocksdb.level_compaction_dynamic_level_bytes | false | Whether to enable level_compaction_dynamic_level_bytes, if it’s enabled we give max_bytes_for_level_multiplier a priority against max_bytes_for_level_base, the bytes of base level is dynamic for a more predictable LSM tree, it is useful to limit worse case space amplification. Turning this feature on/off for an existing DB can cause unexpected LSM tree structure so it’s not recommended. |
| rocksdb.max_bytes_for_level_base | 536870912 | The upper-bound of the total size of level-1 files in bytes. |
| rocksdb.max_bytes_for_level_multiplier | 10.0 | The ratio between the total size of level (L+1) files and the total size of level L files for all L. |
| rocksdb.max_open_files | -1 | The maximum number of open files that can be cached by RocksDB, -1 means no limit. |
| rocksdb.max_subcompactions | 4 | The value represents the maximum number of threads per compaction job. |
| rocksdb.max_write_buffer_number | 6 | The maximum number of write buffers that are built up in memory. |
| rocksdb.max_write_buffer_number_to_maintain | 0 | The total maximum number of write buffers to maintain in memory. |
| rocksdb.min_write_buffer_number_to_merge | 2 | The minimum number of write buffers that will be merged together. |
| rocksdb.num_levels | 7 | Set the number of levels for this database. |
| rocksdb.optimize_filters_for_hits | false | This flag allows us to not store filters for the last level. |
| rocksdb.optimize_mode | true | Optimize for heavy workloads and big datasets. |
| rocksdb.pin_l0_filter_and_index_blocks_in_cache | false | Indicating if we’d put index/filter blocks to the block cache. |
| rocksdb.sst_path | | The path for ingesting SST file into RocksDB. |
| rocksdb.target_file_size_base | 67108864 | The target file size for compaction in bytes. |
| rocksdb.target_file_size_multiplier | 1 | The size ratio between a level L file and a level (L+1) file. |
| rocksdb.use_direct_io_for_flush_and_compaction | false | Enable the OS to use direct read/writes in flush and compaction. |
| rocksdb.use_direct_reads | false | Enable the OS to use direct I/O for reading sst tables. |
| rocksdb.write_buffer_size | 134217728 | Amount of data in bytes to build up in memory. |
| rocksdb.max_manifest_file_size | 104857600 | The max size of manifest file in bytes. |
| rocksdb.skip_stats_update_on_db_open | false | Whether to skip statistics update when opening the database, setting this flag true allows us to not update statistics. |
| rocksdb.max_file_opening_threads | 16 | The max number of threads used to open files. |
| rocksdb.max_total_wal_size | 0 | Total size of WAL files in bytes. Once WALs exceed this size, we will start forcing the flush of column families related, 0 means no limit. |
| rocksdb.db_write_buffer_size | 0 | Total size of write buffers in bytes across all column families, 0 means no limit. |
| rocksdb.delete_obsolete_files_period | 21600 | The periodicity in seconds when obsolete files get deleted, 0 means always do full purge. |
| rocksdb.hard_pending_compaction_bytes_limit | 274877906944 | The hard limit to impose on pending compaction in bytes. |
| rocksdb.level0_file_num_compaction_trigger | 2 | Number of files to trigger level-0 compaction. |
| rocksdb.level0_slowdown_writes_trigger | 20 | Soft limit on number of level-0 files for slowing down writes. |
| rocksdb.level0_stop_writes_trigger | 36 | Hard limit on number of level-0 files for stopping writes. |
| rocksdb.soft_pending_compaction_bytes_limit | 68719476736 | The soft limit to impose on pending compaction in bytes. |
K8s 配置项 (可选)
对应配置文件rest-server.properties
| config option | default value | description |
|---|
| server.use_k8s | false | Whether to enable K8s multi-tenancy mode. |
| k8s.namespace | hugegraph-computer-system | K8s namespace for compute jobs. |
| k8s.kubeconfig | | Path to kubeconfig file. |
Arthas 诊断配置项 (可选)
对应配置文件rest-server.properties
| config option | default value | description |
|---|
| arthas.telnetPort | 8562 | Arthas telnet port. |
| arthas.httpPort | 8561 | Arthas HTTP port. |
| arthas.ip | 0.0.0.0 | Arthas bind IP. |
RPC Server 配置
| config option | default value | description |
|---|
| rpc.client_connect_timeout | 20 | The timeout(in seconds) of rpc client connect to rpc server. |
| rpc.client_load_balancer | consistentHash | The rpc client uses a load-balancing algorithm to access multiple rpc servers in one cluster. Default value is ‘consistentHash’, means forwarding by request parameters. |
| rpc.client_read_timeout | 40 | The timeout(in seconds) of rpc client read from rpc server. |
| rpc.client_reconnect_period | 10 | The period(in seconds) of rpc client reconnect to rpc server. |
| rpc.client_retries | 3 | Failed retry number of rpc client calls to rpc server. |
| rpc.config_order | 999 | Sofa rpc configuration file loading order, the larger the more later loading. |
| rpc.logger_impl | com.alipay.sofa.rpc.log.SLF4JLoggerImpl | Sofa rpc log implementation class. |
| rpc.protocol | bolt | Rpc communication protocol, client and server need to be specified the same value. |
| rpc.remote_url | | The remote urls of rpc peers, it can be set to multiple addresses, which are concat by ‘,’, empty value means not enabled. |
| rpc.server_adaptive_port | false | Whether the bound port is adaptive, if it’s enabled, when the port is in use, automatically +1 to detect the next available port. Note that this process is not atomic, so there may still be port conflicts. |
| rpc.server_host | | The hosts/ips bound by rpc server to provide services, empty value means not enabled. |
| rpc.server_port | 8090 | The port bound by rpc server to provide services. |
| rpc.server_timeout | 30 | The timeout(in seconds) of rpc server execution. |
HBase 后端配置项
| config option | default value | description |
|---|
| backend | | Must be set to hbase. |
| serializer | | Must be set to hbase. |
| hbase.hosts | localhost | The hostnames or ip addresses of HBase zookeeper, separated with commas. |
| hbase.port | 2181 | The port address of HBase zookeeper. |
| hbase.threads_max | 64 | The max threads num of hbase connections. |
| hbase.znode_parent | /hbase | The znode parent path of HBase zookeeper. |
| hbase.zk_retry | 3 | The recovery retry times of HBase zookeeper. |
| hbase.aggregation_timeout | 43200 | The timeout in seconds of waiting for aggregation. |
| hbase.kerberos_enable | false | Is Kerberos authentication enabled for HBase. |
| hbase.kerberos_keytab | | The HBase’s key tab file for kerberos authentication. |
| hbase.kerberos_principal | | The HBase’s principal for kerberos authentication. |
| hbase.krb5_conf | etc/krb5.conf | Kerberos configuration file, including KDC IP, default realm, etc. |
| hbase.hbase_site | /etc/hbase/conf/hbase-site.xml | The HBase’s configuration file |
| hbase.enable_partition | true | Is pre-split partitions enabled for HBase. |
| hbase.vertex_partitions | 10 | The number of partitions of the HBase vertex table. |
| hbase.edge_partitions | 30 | The number of partitions of the HBase edge table. |
≤ 1.5 版本配置 (Legacy)
以下后端存储在 1.7.0+ 版本中不再支持,仅在 1.5.x 及更早版本中可用:
Cassandra 后端配置项
| config option | default value | description |
|---|
| backend | | Must be set to cassandra. |
| serializer | | Must be set to cassandra. |
| cassandra.host | localhost | The seeds hostname or ip address of cassandra cluster. |
| cassandra.port | 9042 | The seeds port address of cassandra cluster. |
| cassandra.connect_timeout | 5 | The cassandra driver connect server timeout(seconds). |
| cassandra.read_timeout | 20 | The cassandra driver read from server timeout(seconds). |
| cassandra.keyspace.strategy | SimpleStrategy | The replication strategy of keyspace, valid value is SimpleStrategy or NetworkTopologyStrategy. |
| cassandra.keyspace.replication | [3] | The keyspace replication factor of SimpleStrategy, like ‘[3]’.Or replicas in each datacenter of NetworkTopologyStrategy, like ‘[dc1:2,dc2:1]’. |
| cassandra.username | | The username to use to login to cassandra cluster. |
| cassandra.password | | The password corresponding to cassandra.username. |
| cassandra.compression_type | none | The compression algorithm of cassandra transport: none/snappy/lz4. |
| cassandra.jmx_port=7199 | 7199 | The port of JMX API service for cassandra. |
| cassandra.aggregation_timeout | 43200 | The timeout in seconds of waiting for aggregation. |
ScyllaDB 后端配置项
| config option | default value | description |
|---|
| backend | | Must be set to scylladb. |
| serializer | | Must be set to scylladb. |
其它与 Cassandra 后端一致。
MySQL & PostgreSQL 后端配置项
| config option | default value | description |
|---|
| backend | | Must be set to mysql. |
| serializer | | Must be set to mysql. |
| jdbc.driver | com.mysql.jdbc.Driver | The JDBC driver class to connect database. |
| jdbc.url | jdbc:mysql://127.0.0.1:3306 | The url of database in JDBC format. |
| jdbc.username | root | The username to login database. |
| jdbc.password | ****** | The password corresponding to jdbc.username. |
| jdbc.ssl_mode | false | The SSL mode of connections with database. |
| jdbc.reconnect_interval | 3 | The interval(seconds) between reconnections when the database connection fails. |
| jdbc.reconnect_max_times | 3 | The reconnect times when the database connection fails. |
| jdbc.storage_engine | InnoDB | The storage engine of backend store database, like InnoDB/MyISAM/RocksDB for MySQL. |
| jdbc.postgresql.connect_database | template1 | The database used to connect when init store, drop store or check store exist. |
PostgreSQL 后端配置项
| config option | default value | description |
|---|
| backend | | Must be set to postgresql. |
| serializer | | Must be set to postgresql. |
其它与 MySQL 后端一致。
PostgreSQL 后端的 driver 和 url 应该设置为:
jdbc.driver=org.postgresql.Driverjdbc.url=jdbc:postgresql://localhost:5432/
4.3 - HugeGraph 内置用户权限与扩展权限配置及使用
概述
HugeGraph 为了方便不同用户场景下的鉴权使用,目前内置了完备的StandardAuthenticator权限模式,支持多用户认证、
以及细粒度的权限访问控制,采用基于“用户 - 用户组 - 操作 - 资源”的 4 层设计,灵活控制用户角色与权限 (支持多 GraphServer)
StandardAuthenticator 模式的几个核心设计:
- 初始化时创建超级管理员 (
admin) 用户,后续通过超级管理员创建其它用户,新创建的用户被分配足够权限后,可以创建或管理更多的用户 - 支持动态创建用户、用户组、资源,支持动态分配或取消权限
- 用户可以属于一个或多个用户组,每个用户组可以拥有对任意个资源的操作权限,操作类型包括:读、写、删除、执行等种类
- “资源” 描述了图数据库中的数据,比如符合某一类条件的顶点,每一个资源包括
type、label、properties三个要素,共有 18 种类型、任意 label、任意 properties 可组合形成的资源,一个资源的内部条件是且关系,多个资源之间的条件是或关系
举例说明:
// 场景:某用户只有北京地区的数据读取权限
user(name=xx) -belong-> group(name=xx) -access(read)-> target(graph=graph1, resource={label: person, city: Beijing})
配置用户认证
HugeGraph 目前默认未启用用户认证功能,需通过修改配置文件来启用该功能。
⚠️ SEC 提醒:图查询语言 (Gremlin/Cypher) 的安全性
出于图查询语言的灵活性可能带来的潜在系统安全隐患,请避免直接在公网/外网环境暴露任何查询相关接口。在实际生产部署时,请以此处的 鉴权认证体系 结合 IP 白名单 为安全双重保障机制,同时建议开启 Audit Log (审计日志) 以精准定位用户执行的具体查询语句。鉴于 Server 的无状态特性,整体架构上强烈推荐采用 容器化环境 (Docker/K8s) 部署,以极低成本有效隔离底层系统的安全风险。
目前已内置实现了StandardAuthenticator模式,该模式支持多用户认证与细粒度权限控制。此外,开发者可以自定义实现HugeAuthenticator接口来对接自身的权限系统。
用户认证方式均采用 HTTP Basic Authentication ,简单说就是在发送 HTTP 请求时在 Authentication 设置选择 Basic 然后输入对应的用户名和密码,对应 HTTP 明文如下所示 :
GET http://localhost:8080/graphs/hugegraph/schema/vertexlabels
Authorization: Basic admin xxxx
警告:在 1.5.0 之前版本的 HugeGraph-Server 在鉴权模式下存在 JWT 相关的安全隐患,请务必使用新版本或自行修改 JWT token 的 secretKey。
修改方式为在配置文件rest-server.properties中重写auth.token_secret信息:(1.5.0 后会默认生成随机值则无需配置)
auth.token_secret=XXXX #这里为 32 位 String,由 a-z,A-Z 和 0-9 组成
也可以通过下面的命令实现:
RANDOM_STRING=$(head /dev/urandom | tr -dc A-Za-z0-9 | head -c 32)
echo "auth.token_secret=${RANDOM_STRING}" >> rest-server.properties
StandardAuthenticator 模式
StandardAuthenticator模式是通过在数据库后端存储用户信息来支持用户认证和权限控制,该实现基于数据库存储的用户的名称与密码进行认证(密码已被加密),基于用户的角色来细粒度控制用户权限。下面是具体的配置流程(重启服务生效):
在配置文件gremlin-server.yaml中配置authenticator及其rest-server文件路径:
authentication: {
authenticator: org.apache.hugegraph.auth.StandardAuthenticator,
authenticationHandler: org.apache.hugegraph.auth.WsAndHttpBasicAuthHandler,
config: {tokens: conf/rest-server.properties}
}
在配置文件rest-server.properties中配置authenticator及其graph_store信息:
auth.authenticator=org.apache.hugegraph.auth.StandardAuthenticator
auth.graph_store=hugegraph
# auth client config
# 如果是分开部署 GraphServer 和 AuthServer,还需要指定下面的配置,地址填写 AuthServer 的 IP:RPC 端口
#auth.remote_url=127.0.0.1:8899,127.0.0.1:8898,127.0.0.1:8897
其中,graph_store配置项是指使用哪一个图来存储用户信息,如果存在多个图的话,选取任意一个均可。
在配置文件hugegraph{n}.properties中配置gremlin.graph信息:
gremlin.graph=org.apache.hugegraph.auth.HugeFactoryAuthProxy
然后详细的权限 API 调用和说明请参考 Authentication-API 文档。
自定义用户认证系统
如果需要支持更加灵活的用户系统,可自定义 authenticator 进行扩展,自定义 authenticator 实现接口org.apache.hugegraph.auth.HugeAuthenticator即可,然后修改配置文件中authenticator配置项指向该实现。
基于鉴权模式启动
在鉴权配置完成后,需在首次执行 init-store.sh 时命令行中输入 admin 密码 (非 docker 部署模式下)
如果基于 docker 镜像部署或者已经初始化 HugeGraph 并需要转换为鉴权模式,需要删除相关图数据并重新启动 HugeGraph, 若图已有业务数据,暂时无法直接转换鉴权模式 (hugegraph 版本 <= 1.2.0)
对于该功能的改进已经在最新版本发布 (Docker latest 可用),可参考 PR 2411, 此时可无缝切换。
# stop the hugeGraph firstly
bin/stop-hugegraph.sh
# delete the store data (here we use the default path for rocksdb)
# Note: no need to delete data in the latest code (fixed in https://github.com/apache/hugegraph/pull/2411)
rm -rf rocksdb-data/
# init store again
bin/init-store.sh
# start hugeGraph again
bin/start-hugegraph.sh
使用 Docker 时开启鉴权模式
对于镜像 hugegraph/hugegraph 大于等于 1.2.0 的版本,我们可以在启动 docker 镜像的同时开启鉴权模式
具体做法如下:
1. 采用 docker run
在 docker run 中添加环境变量 PASSWORD=xxx(密码可以自由设置)即可开启鉴权模式::
docker run -itd -e PASSWORD=xxx --name=server -p 8080:8080 hugegraph/hugegraph:1.5.0
2. 采用 docker-compose
使用 docker-compose 在环境变量中设置 PASSWORD=xxx即可
version: '3'
services:
server:
image: hugegraph/hugegraph:1.5.0
container_name: server
ports:
- 8080:8080
environment:
- PASSWORD=xxx
3. 进入容器后重新开启鉴权模式
首先进入容器:
docker exec -it server bash
# 用于快速修改配置, 修改前的文件被保存在conf-bak文件夹下
bin/enable-auth.sh
之后参照 基于鉴权模式启动 即可
4.4 - 配置 HugeGraphServer 使用 https 协议
概述
HugeGraphServer 默认使用的是 http 协议,如果用户对请求的安全性有要求,可以配置成 https。
服务端配置
修改 conf/rest-server.properties 配置文件,将 restserver.url 的 schema 部分改为 https。
# 将协议设置为 https
restserver.url=https://127.0.0.1:8080
# 服务端 keystore 文件路径,当协议为 https 时该默认值自动生效,可按需修改此项
ssl.keystore_file=conf/hugegraph-server.keystore
# 服务端 keystore 文件密码,当协议为 https 时该默认值自动生效,可按需修改此项
ssl.keystore_password=******
服务端的 conf 目录下已经给出了一个 keystore 文件hugegraph-server.keystore,该文件的密码为hugegraph,
这两项都是在开启了 https 协议时的默认值,用户可以生成自己的 keystore 文件及密码,然后修改ssl.keystore_file和ssl.keystore_password的值。
客户端配置
在 HugeGraph-Client 中使用 https
在构造 HugeClient 时传入 https 相关的配置,代码示例:
String url = "https://localhost:8080";
String graphName = "hugegraph";
HugeClientBuilder builder = HugeClient.builder(url, graphName);
// 客户端 keystore 文件路径
String trustStoreFilePath = "hugegraph.truststore";
// 客户端 keystore 密码
String trustStorePassword = "******";
builder.configSSL(trustStoreFilePath, trustStorePassword);
HugeClient hugeClient = builder.build();
注意:HugeGraph-Client 在 1.9.0 版本以前是直接以 new 的方式创建,并且不支持 https 协议,在 1.9.0 版本以后改成以 builder 的方式创建,并支持配置 https 协议。
在 HugeGraph-Loader 中使用 https
启动导入任务时,在命令行中添加如下选项:
# https
--protocol https
# 客户端证书文件路径,当指定 --protocol 为 https 时,默认值 conf/hugegraph.truststore 自动生效,可按需修改
--trust-store-file {file}
# 客户端证书文件密码,当指定 --protocol 为 https 时,默认值 hugegraph 自动生效,可按需修改
--trust-store-password {password}
hugegraph-loader 的 conf 目录下已经放了一个默认的客户端证书文件 hugegraph.truststore,其密码是 hugegraph。
执行命令时,在命令行中添加如下选项:
# 客户端证书文件路径,当 url 中使用 https 协议时,默认值 conf/hugegraph.truststore 自动生效,可按需修改
--trust-store-file {file}
# 客户端证书文件密码,当 url 中使用 https 协议时,默认值 hugegraph 自动生效,可按需修改
--trust-store-password {password}
# 执行迁移命令时,当 --target-url 中使用 https 协议时,默认值 conf/hugegraph.truststore 自动生效,可按需修改
--target-trust-store-file {target-file}
# 执行迁移命令时,当 --target-url 中使用 https 协议时,默认值 hugegraph 自动生效,可按需修改
--target-trust-store-password {target-password}
hugegraph-tools 的 conf 目录下已经放了一个默认的客户端证书文件 hugegraph.truststore,其密码是 hugegraph。
如何生成证书文件
本部分给出生成证书的示例,如果默认的证书已经够用,或者已经知晓如何生成,可跳过。
服务端
- ⽣成服务端私钥,并且导⼊到服务端 keystore ⽂件中,server.keystore 是给服务端⽤的,其中保存着⾃⼰的私钥
keytool -genkey -alias serverkey -keyalg RSA -keystore server.keystore
过程中根据需求填写描述信息,默认证书的描述信息如下:
名字和姓⽒:hugegraph
组织单位名称:hugegraph
组织名称:hugegraph
城市或区域名称:BJ
州或省份名称:BJ
国家代码:CN
- 根据服务端私钥,导出服务端证书
keytool -export -alias serverkey -keystore server.keystore -file server.crt
server.crt 就是服务端的证书
客户端
keytool -import -alias serverkey -file server.crt -keystore client.truststore
client.truststore 是给客户端⽤的,其中保存着受信任的证书
5 - API
5.1 - HugeGraph RESTful API
⚠️ 版本兼容性说明
- HugeGraph 1.7.0+ 引入了图空间功能,API 路径格式为:
/graphspaces/{graphspace}/graphs/{graph} - HugeGraph 1.5.x 及之前版本使用旧路径:
/graphs/{graph}, 以及创建/克隆图的 api 使用 text/plain 作为 Content-Type, 1.7.0 及之后使用 json - 默认图空间名称为
DEFAULT,可直接使用 - 旧版本 doc 参考:HugeGraph 1.5.x RESTful API
除了下方的文档,你还可以通过 localhost:8080/swagger-ui/index.html 访问 swagger-ui 以查看 RESTful API。示例可以参考此处
5.1.1 - Graphspace API
Graphspace(图空间)REST 接口:多租户与资源隔离的创建、查看、更新与删除,以及使用前置条件与限制。
2.0 Graphspace
在 HugeGraph 中,多租户是通过图空间(graph space)来实现的,资源的分配和隔离可以通过图空间进行。
重要前置条件:
- 目前图空间功能只支持在 hstore 模式下使用。
- 如果非 hstore 模式,则只能使用默认的图空间
DEFAULT,且不支持创建、删除和更新图空间的操作。 - 注意在 rest-server.properties 中,设置
usePD=true,并且 hugegraph.properties 中,设置 backend=hstore - 图空间功能必须开启鉴权模式,默认账密为 admin:pa,请务必修改默认密码,防止未授权访问。
2.0.1 创建一个图空间
Method & Url
POST http://localhost:8080/graphspaces
Request Body
注意:目前 cpu,内存,以及 k8s 相关功能暂未开放
| 名称 | 是否必填 | 类型 | 默认值 | 取值范围 | 说明 |
|---|
| name | 是 | String | | 小写字母、数字和下划线组成,首字符必须是小写字母,长度不超过 48 | 图空间的名字 |
| description | 是 | String | | | 图空间的描述信息 |
| cpu_limit | 是 | Int | | > 0 | CPU 核数 |
| memory_limit | 是 | Int | | > 0 | 内存大小,单位 GB |
| storage_limit | 是 | Int | | > 0 | 图空间的数据占据的磁盘空间上限 |
| compute_cpu_limit | 否 | Int | 0 | >= 0 | 针对图计算的额外资源配置,单位 cores。当该字段不配置或者配置为 0 时,会由 cpu_limit 字段的值进行覆盖 |
| compute_memory_limit | 否 | Int | 0 | >= 0 | 针对图计算的额外内存配置,单位 GB。当该字段不配置或者配置为 0 时,会由 memory_limit 字段的值进行覆盖 |
| oltp_namespace | 是 | String | | | OLTP 的 k8s 命名空间 |
| olap_namespace | 是 | String | | | OLAP 的 k8s 命名空间。当 olap_namespace 和 oltp_namespace 的值相同时,其配置的资源限额会进行合并 |
| storage_namespace | 是 | String | | | 存储的 k8s 命名空间 |
| operator_image_path | 否 | String | | | 图计算 operator 的镜像地址:在创建图空间时,允许指定对应的图计算镜像并交由 K8S 进行统一管理 |
| internal_algorithm_image_url | 否 | String | | | 图计算的算法镜像地址:在创建图空间时,允许指定图计算的算法镜像并交由 K8S 进行统一管理 |
| max_graph_number | 是 | Int | | > 0 | 图空间的图数目的上限 |
| max_role_number | 是 | Int | | > 0 | 图空间的角色数目的上限 |
| auth | 否 | Boolean | false | true, false | 图空间是否支持权限认证 |
| configs | 否 | Map | | | 其他配置信息 |
{
"name": "gs1",
"description": "1st graph space",
"max_graph_number": 100,
"cpu_limit": 1000,
"memory_limit": 8192,
"storage_limit": 1000000,
"max_role_number": 10,
"auth": true,
"configs": {}
}
Response Status
Response Body
{
"name": "gs1",
"description": "1st graph space",
"cpu_limit": 1000,
"memory_limit": 8192,
"storage_limit": 1000000,
"compute_cpu_limit": 0,
"compute_memory_limit": 0,
"oltp_namespace": "hugegraph-server",
"olap_namespace": "hugegraph-server",
"storage_namespace": "hugegraph-server",
"operator_image_path": "127.0.0.1/hugegraph-registry/hugegraph-computer-operator:3.1.1",
"internal_algorithm_image_url": "127.0.0.1/hugegraph-registry/hugegraph-computer-algorithm:3.1.1",
"max_graph_number": 100,
"max_role_number": 10,
"cpu_used": 0,
"memory_used": 0,
"storage_used": 0,
"graph_number_used": 0,
"role_number_used": 0,
"auth": true
}
2.0.2 列出系统所有图空间
Method & Url
GET http://localhost:8080/graphspaces
Response Status
Response Body
{
"graphSpaces": [
"gs1",
"DEFAULT"
]
}
2.0.3 查看某个图空间
Params
路径参数说明:
Method & Url
GET http://localhost:8080/graphspaces/gs1
Response Status
Response Body
{
"name": "gs1",
"description": "1st graph space",
"cpu_limit": 1000,
"memory_limit": 8192,
"storage_limit": 1000000,
"oltp_namespace": "hugegraph-server",
"olap_namespace": "hugegraph-server",
"storage_namespace": "hugegraph-server",
"operator_image_path": "127.0.0.1/hugegraph-registry/hugegraph-computer-operator:3.1.1",
"internal_algorithm_image_url": "127.0.0.1/hugegraph-registry/hugegraph-computer-algorithm:3.1.1",
"compute_cpu_limit": 0,
"compute_memory_limit": 0,
"max_graph_number": 100,
"max_role_number": 10,
"cpu_used": 0,
"memory_used": 0,
"storage_used": 0,
"graph_number_used": 0,
"role_number_used": 0,
"auth": true
}
2.0.4 更新某个图空间
注意:auth 鉴权配置,在创建图空间的过程一旦确定下来,不允许更新
Params
路径参数说明:
请求体说明:
- action: 标记本次操作为 Update 动作,取值固定为 “update”
- update: 即将更新的值,下述参数都应置于 update 中
| 名称 | 是否必填 | 类型 | 默认值 | 取值范围 | 说明 |
|---|
| name | 是 | String | | | 图空间名称 |
| description | 是 | String | | | 图空间的描述信息 |
| cpu_limit | 是 | Int | | > 0 | OLTP HugeGraphServer 的 CPU 核数 |
| memory_limit | 是 | Int | | > 0 | OLTP HugeGraphServer 的内存大小,单位 GB |
| storage_limit | 是 | Int | | > 0 | 图空间的数据占据的磁盘空间上限 |
| compute_cpu_limit | 否 | Int | 0 | >= 0 | 针对图计算的额外资源配置,单位 cores。当该字段不配置或者配置为 0 时,会由 cpu_limit 字段的值进行覆盖 |
| compute_memory_limit | 否 | Int | 0 | >= 0 | 针对图计算的额外内存配置,单位 GB。当该字段不配置或者配置为 0 时,会由 memory_limit 字段的值进行覆盖 |
| oltp_namespace | 是 | String | | | OLTP 的 k8s 命名空间 |
| olap_namespace | 是 | String | | | OLAP 的 k8s 命名空间。当 olap_namespace 和 oltp_namespace 的值相同时,其配置的资源限额会进行合并 |
| storage_namespace | 是 | String | | | 存储的 k8s 命名空间 |
| operator_image_path | 否 | String | | | 图计算 operator 的镜像地址:在更新图空间时,允许指定对应的图计算镜像并交由 K8S 进行统一管理 |
| internal_algorithm_image_url | 否 | String | | | 图计算的算法镜像地址:在更新图空间时,允许指定图计算的算法镜像并交由 K8S 进行统一管理 |
| max_graph_number | 是 | Int | | > 0 | 图空间的图数目的上限 |
| max_role_number | 是 | Int | | > 0 | 图空间的角色数目的上限 |
Method & Url
PUT http://localhost:8080/graphspaces/gs1
Request Body
{
"action": "update",
"update": {
"name": "gs1",
"description": "1st graph space",
"cpu_limit": 2000,
"memory_limit": 40960,
"storage_limit": 2048,
"oltp_namespace": "hugegraph-server",
"olap_namespace": "hugegraph-server",
"operator_image_path": "127.0.0.1/hugegraph-registry/hugegraph-computer-operator:3.1.1",
"internal_algorithm_image_url": "127.0.0.1/hugegraph-registry/hugegraph-computer-algorithm:3.1.1",
"max_graph_number": 1000,
"max_role_number": 100
}
}
Response Status
Response Body
{
"name": "gs1",
"description": "1st graph space",
"cpu_limit": 2000,
"memory_limit": 40960,
"storage_limit": 2048,
"oltp_namespace": "hugegraph-server",
"olap_namespace": "hugegraph-server",
"storage_namespace": "hugegraph-server",
"operator_image_path": "127.0.0.1/hugegraph-registry/hugegraph-computer-operator:3.1.1",
"internal_algorithm_image_url": "127.0.0.1/hugegraph-registry/hugegraph-computer-algorithm:3.1.1",
"compute_cpu_limit": 0,
"compute_memory_limit": 0,
"max_graph_number": 1000,
"max_role_number": 100,
"cpu_used": 0,
"memory_used": 0,
"storage_used": 0,
"graph_number_used": 0,
"role_number_used": 0,
"auth": true
}
2.0.5 删除某个图空间
Params
路径参数说明:
Method & Url
DELETE http://localhost:8080/graphspaces/gs1
Response Status
注意:删除图空间,会导致图空间的全部资源被释放。
5.1.2 - Schema API
Schema(图模式)REST 接口:查询图的完整模式定义,包括属性键、顶点标签、边标签和索引标签的统一视图。
1.1 Schema
HugeGraph 提供单一接口获取某个图的全部 Schema 信息,包括:PropertyKey、VertexLabel、EdgeLabel 和 IndexLabel。
Method & Url
GET http://localhost:8080/graphspaces/DEFAULT/graphs/{graph_name}/schema
e.g: GET http://localhost:8080/graphspaces/DEFAULT/graphs/hugegraph/schema
Response Status
Response Body
{
"propertykeys": [
{
"id": 7,
"name": "price",
"data_type": "DOUBLE",
"cardinality": "SINGLE",
"aggregate_type": "NONE",
"write_type": "OLTP",
"properties": [],
"status": "CREATED",
"user_data": {
"~create_time": "2023-05-08 17:49:05.316"
}
},
{
"id": 6,
"name": "date",
"data_type": "TEXT",
"cardinality": "SINGLE",
"aggregate_type": "NONE",
"write_type": "OLTP",
"properties": [],
"status": "CREATED",
"user_data": {
"~create_time": "2023-05-08 17:49:05.309"
}
},
{
"id": 3,
"name": "city",
"data_type": "TEXT",
"cardinality": "SINGLE",
"aggregate_type": "NONE",
"write_type": "OLTP",
"properties": [],
"status": "CREATED",
"user_data": {
"~create_time": "2023-05-08 17:49:05.287"
}
},
{
"id": 2,
"name": "age",
"data_type": "INT",
"cardinality": "SINGLE",
"aggregate_type": "NONE",
"write_type": "OLTP",
"properties": [],
"status": "CREATED",
"user_data": {
"~create_time": "2023-05-08 17:49:05.280"
}
},
{
"id": 5,
"name": "lang",
"data_type": "TEXT",
"cardinality": "SINGLE",
"aggregate_type": "NONE",
"write_type": "OLTP",
"properties": [],
"status": "CREATED",
"user_data": {
"~create_time": "2023-05-08 17:49:05.301"
}
},
{
"id": 4,
"name": "weight",
"data_type": "DOUBLE",
"cardinality": "SINGLE",
"aggregate_type": "NONE",
"write_type": "OLTP",
"properties": [],
"status": "CREATED",
"user_data": {
"~create_time": "2023-05-08 17:49:05.294"
}
},
{
"id": 1,
"name": "name",
"data_type": "TEXT",
"cardinality": "SINGLE",
"aggregate_type": "NONE",
"write_type": "OLTP",
"properties": [],
"status": "CREATED",
"user_data": {
"~create_time": "2023-05-08 17:49:05.250"
}
}
],
"vertexlabels": [
{
"id": 1,
"name": "person",
"id_strategy": "PRIMARY_KEY",
"primary_keys": [
"name"
],
"nullable_keys": [
"age",
"city"
],
"index_labels": [
"personByAge",
"personByCity",
"personByAgeAndCity"
],
"properties": [
"name",
"age",
"city"
],
"status": "CREATED",
"ttl": 0,
"enable_label_index": true,
"user_data": {
"~create_time": "2023-05-08 17:49:05.336"
}
},
{
"id": 2,
"name": "software",
"id_strategy": "CUSTOMIZE_NUMBER",
"primary_keys": [],
"nullable_keys": [],
"index_labels": [
"softwareByPrice"
],
"properties": [
"name",
"lang",
"price"
],
"status": "CREATED",
"ttl": 0,
"enable_label_index": true,
"user_data": {
"~create_time": "2023-05-08 17:49:05.347"
}
}
],
"edgelabels": [
{
"id": 1,
"name": "knows",
"source_label": "person",
"target_label": "person",
"frequency": "SINGLE",
"sort_keys": [],
"nullable_keys": [],
"index_labels": [
"knowsByWeight"
],
"properties": [
"weight",
"date"
],
"status": "CREATED",
"ttl": 0,
"enable_label_index": true,
"user_data": {
"~create_time": "2023-05-08 17:49:08.437"
}
},
{
"id": 2,
"name": "created",
"source_label": "person",
"target_label": "software",
"frequency": "SINGLE",
"sort_keys": [],
"nullable_keys": [],
"index_labels": [
"createdByDate",
"createdByWeight"
],
"properties": [
"weight",
"date"
],
"status": "CREATED",
"ttl": 0,
"enable_label_index": true,
"user_data": {
"~create_time": "2023-05-08 17:49:08.446"
}
}
],
"indexlabels": [
{
"id": 1,
"name": "personByAge",
"base_type": "VERTEX_LABEL",
"base_value": "person",
"index_type": "RANGE_INT",
"fields": [
"age"
],
"status": "CREATED",
"user_data": {
"~create_time": "2023-05-08 17:49:05.375"
}
},
{
"id": 2,
"name": "personByCity",
"base_type": "VERTEX_LABEL",
"base_value": "person",
"index_type": "SECONDARY",
"fields": [
"city"
],
"status": "CREATED",
"user_data": {
"~create_time": "2023-05-08 17:49:06.898"
}
},
{
"id": 3,
"name": "personByAgeAndCity",
"base_type": "VERTEX_LABEL",
"base_value": "person",
"index_type": "SECONDARY",
"fields": [
"age",
"city"
],
"status": "CREATED",
"user_data": {
"~create_time": "2023-05-08 17:49:07.407"
}
},
{
"id": 4,
"name": "softwareByPrice",
"base_type": "VERTEX_LABEL",
"base_value": "software",
"index_type": "RANGE_DOUBLE",
"fields": [
"price"
],
"status": "CREATED",
"user_data": {
"~create_time": "2023-05-08 17:49:07.916"
}
},
{
"id": 5,
"name": "createdByDate",
"base_type": "EDGE_LABEL",
"base_value": "created",
"index_type": "SECONDARY",
"fields": [
"date"
],
"status": "CREATED",
"user_data": {
"~create_time": "2023-05-08 17:49:08.454"
}
},
{
"id": 6,
"name": "createdByWeight",
"base_type": "EDGE_LABEL",
"base_value": "created",
"index_type": "RANGE_DOUBLE",
"fields": [
"weight"
],
"status": "CREATED",
"user_data": {
"~create_time": "2023-05-08 17:49:08.963"
}
},
{
"id": 7,
"name": "knowsByWeight",
"base_type": "EDGE_LABEL",
"base_value": "knows",
"index_type": "RANGE_DOUBLE",
"fields": [
"weight"
],
"status": "CREATED",
"user_data": {
"~create_time": "2023-05-08 17:49:09.473"
}
}
]
}
5.1.3 - PropertyKey API
PropertyKey(属性键)REST 接口:定义图中所有属性的数据类型和基数约束,是构建图模式的基础元素。
1.2 PropertyKey
Params 说明:
- name:属性类型名称,必填
- data_type:属性类型数据类型,包括:bool、byte、int、long、float、double、text、date、uuid、blob,默认
text 类型 (代表 string 字符串类型) - cardinality:属性类型基数,包括:single、list、set,默认
single (代表单属性值)
请求体字段说明:
- id:属性类型 id 值
- properties:属性的属性,对于属性而言,此项为空
- user_data:设置属性类型的通用信息,比如可设置 age 属性的取值范围,最小为 0,最大为 100;目前此项不做任何校验,只为后期拓展提供预留入口
1.2.1 创建一个 PropertyKey
Method & Url
POST http://localhost:8080/graphspaces/DEFAULT/graphs/hugegraph/schema/propertykeys
Request Body
{
"name": "age",
"data_type": "INT",
"cardinality": "SINGLE"
}
Response Status
Response Body
{
"property_key": {
"id": 1,
"name": "age",
"data_type": "INT",
"cardinality": "SINGLE",
"aggregate_type": "NONE",
"write_type": "OLTP",
"properties": [],
"status": "CREATED",
"user_data": {
"~create_time": "2022-05-13 13:47:23.745"
}
},
"task_id": 0
}
1.2.2 为已存在的 PropertyKey 添加或移除 userdata
Params
- action: 表示当前行为是添加还是移除,取值为
append(添加)和eliminate(移除)
Method & Url
PUT http://localhost:8080/graphspaces/DEFAULT/graphs/hugegraph/schema/propertykeys/age?action=append
Request Body
{
"name": "age",
"user_data": {
"min": 0,
"max": 100
}
}
Response Status
Response Body
{
"property_key": {
"id": 1,
"name": "age",
"data_type": "INT",
"cardinality": "SINGLE",
"aggregate_type": "NONE",
"write_type": "OLTP",
"properties": [],
"status": "CREATED",
"user_data": {
"min": 0,
"max": 100,
"~create_time": "2022-05-13 13:47:23.745"
}
},
"task_id": 0
}
1.2.3 获取所有的 PropertyKey
Method & Url
GET http://localhost:8080/graphspaces/DEFAULT/graphs/hugegraph/schema/propertykeys
Response Status
Response Body
{
"propertykeys": [
{
"id": 3,
"name": "city",
"data_type": "TEXT",
"cardinality": "SINGLE",
"properties": [],
"user_data": {}
},
{
"id": 2,
"name": "age",
"data_type": "INT",
"cardinality": "SINGLE",
"properties": [],
"user_data": {}
},
{
"id": 5,
"name": "lang",
"data_type": "TEXT",
"cardinality": "SINGLE",
"properties": [],
"user_data": {}
},
{
"id": 4,
"name": "weight",
"data_type": "DOUBLE",
"cardinality": "SINGLE",
"properties": [],
"user_data": {}
},
{
"id": 6,
"name": "date",
"data_type": "TEXT",
"cardinality": "SINGLE",
"properties": [],
"user_data": {}
},
{
"id": 1,
"name": "name",
"data_type": "TEXT",
"cardinality": "SINGLE",
"properties": [],
"user_data": {}
},
{
"id": 7,
"name": "price",
"data_type": "INT",
"cardinality": "SINGLE",
"properties": [],
"user_data": {}
}
]
}
1.2.4 根据 name 获取 PropertyKey
Method & Url
GET http://localhost:8080/graphspaces/DEFAULT/graphs/hugegraph/schema/propertykeys/age
其中,age为要获取的 PropertyKey 的名称
Response Status
Response Body
{
"id": 1,
"name": "age",
"data_type": "INT",
"cardinality": "SINGLE",
"aggregate_type": "NONE",
"write_type": "OLTP",
"properties": [],
"status": "CREATED",
"user_data": {
"min": 0,
"max": 100,
"~create_time": "2022-05-13 13:47:23.745"
}
}
1.2.5 根据 name 删除 PropertyKey
Method & Url
DELETE http://localhost:8080/graphspaces/DEFAULT/graphs/hugegraph/schema/propertykeys/age
其中,age为要删除的 PropertyKey 的名称
Response Status
Response Body
5.1.4 - VertexLabel API
VertexLabel(顶点标签)REST 接口:定义顶点类型、ID策略及关联的属性,决定顶点的结构和约束规则。
1.3 VertexLabel
假设已经创建好了 1.1.3 中列出来的 PropertyKeys
Params 说明
- id:顶点类型 id 值
- name:顶点类型名称,必填
- id_strategy: 顶点类型的 ID 策略,主键 ID、自动生成、自定义字符串、自定义数字、自定义 UUID,默认主键 ID
- properties: 顶点类型关联的属性类型
- primary_keys: 主键属性,当 ID 策略为 PRIMARY_KEY 时必须有值,其他 ID 策略时必须为空;
- enable_label_index:是否开启类型索引,默认关闭
- index_names:顶点类型创建的索引,详情见 3.4
- nullable_keys:可为空的属性
- user_data:设置顶点类型的通用信息,作用同属性类型
1.3.1 创建一个 VertexLabel
Method & Url
POST http://localhost:8080/graphspaces/DEFAULT/graphs/hugegraph/schema/vertexlabels
Request Body
{
"name": "person",
"id_strategy": "DEFAULT",
"properties": [
"name",
"age"
],
"primary_keys": [
"name"
],
"nullable_keys": [],
"enable_label_index": true
}
Response Status
Response Body
{
"id": 1,
"primary_keys": [
"name"
],
"id_strategy": "PRIMARY_KEY",
"name": "person2",
"index_names": [
],
"properties": [
"name",
"age"
],
"nullable_keys": [
],
"enable_label_index": true,
"user_data": {}
}
从 hugegraph-server v0.11.2 版本开始支持顶点的 TTL 功能。顶点的 TTL 是通过 VertexLabel 来设置的。比如希望 person 类型的顶点存活时间为一天,需要在创建 person VertexLabel 的时候将 TTL 字段设置为 86400000,即单位为毫秒。
{
"name": "person",
"id_strategy": "DEFAULT",
"properties": [
"name",
"age"
],
"primary_keys": [
"name"
],
"nullable_keys": [],
"ttl": 86400000,
"enable_label_index": true
}
另外,当顶点中带有"创建时间"的属性且希望以"创建时间"属性作为计算顶点存活时间的起点时,可以设置 VertexLabel 中的 ttl_start_time 字段。比如 person VertexLabel 有 createdTime 属性,且 createdTime 是 Date 类型的参数,希望 person 类型的顶点从创建开始存活一天的时间,那么创建 person VertexLabel 的 Request Body 如下:
{
"name": "person",
"id_strategy": "DEFAULT",
"properties": [
"name",
"age",
"createdTime"
],
"primary_keys": [
"name"
],
"nullable_keys": [],
"ttl": 86400000,
"ttl_start_time": "createdTime",
"enable_label_index": true
}
1.3.2 为已存在的 VertexLabel 添加 properties 或 userdata,或者移除 userdata(目前不支持移除 properties)
Params
- action: 表示当前行为是添加还是移除,取值为
append(添加)和eliminate(移除)
Method & Url
PUT http://localhost:8080/graphspaces/DEFAULT/graphs/hugegraph/schema/vertexlabels/person?action=append
Request Body
{
"name": "person",
"properties": [
"city"
],
"nullable_keys": ["city"],
"user_data": {
"super": "animal"
}
}
Response Status
Response Body
{
"id": 1,
"primary_keys": [
"name"
],
"id_strategy": "PRIMARY_KEY",
"name": "person",
"index_names": [
],
"properties": [
"city",
"name",
"age"
],
"nullable_keys": [
"city"
],
"enable_label_index": true,
"user_data": {
"super": "animal"
}
}
1.3.3 获取所有的 VertexLabel
Method & Url
GET http://localhost:8080/graphspaces/DEFAULT/graphs/hugegraph/schema/vertexlabels
Response Status
Response Body
{
"vertexlabels": [
{
"id": 1,
"primary_keys": [
"name"
],
"id_strategy": "PRIMARY_KEY",
"name": "person",
"index_names": [
],
"properties": [
"city",
"name",
"age"
],
"nullable_keys": [
"city"
],
"enable_label_index": true,
"user_data": {
"super": "animal"
}
},
{
"id": 2,
"primary_keys": [
"name"
],
"id_strategy": "PRIMARY_KEY",
"name": "software",
"index_names": [
],
"properties": [
"price",
"name",
"lang"
],
"nullable_keys": [
"price"
],
"enable_label_index": false,
"user_data": {}
}
]
}
1.3.4 根据 name 获取 VertexLabel
Method & Url
GET http://localhost:8080/graphspaces/DEFAULT/graphs/hugegraph/schema/vertexlabels/person
Response Status
Response Body
{
"id": 1,
"primary_keys": [
"name"
],
"id_strategy": "PRIMARY_KEY",
"name": "person",
"index_names": [
],
"properties": [
"city",
"name",
"age"
],
"nullable_keys": [
"city"
],
"enable_label_index": true,
"user_data": {
"super": "animal"
}
}
1.3.5 根据 name 删除 VertexLabel
删除 VertexLabel 会导致删除对应的顶点以及相关的索引数据,会产生一个异步任务
Method & Url
DELETE http://localhost:8080/graphspaces/DEFAULT/graphs/hugegraph/schema/vertexlabels/person
Response Status
Response Body
注:
可以通过GET http://localhost:8080/graphspaces/DEFAULT/graphs/hugegraph/tasks/1(其中"1"是 task_id)来查询异步任务的执行状态,更多异步任务 RESTful API
5.1.5 - EdgeLabel API
EdgeLabel(边标签)REST 接口:定义边类型、源顶点和目标顶点的关系约束,构建图的连接规则。
1.4 EdgeLabel
假设已经创建好了 1.2.3 中的 PropertyKeys 和 1.3.3 中的 VertexLabels
Params 说明
- name:顶点类型名称,必填
- source_label: 源顶点类型的名称,必填
- target_label: 目标顶点类型的名称,必填
- frequency:两个点之间是否可以有多条边,可以取值 SINGLE 和 MULTIPLE,非必填,默认值 SINGLE
- properties: 边类型关联的属性类型,选填
- sort_keys: 当允许关联多次时,指定区分键属性列表
- nullable_keys:可为空的属性,选填,默认可为空
- enable_label_index:是否开启类型索引,默认关闭
1.4.1 创建一个 EdgeLabel
Method & Url
POST http://localhost:8080/graphspaces/DEFAULT/graphs/hugegraph/schema/edgelabels
Request Body
{
"name": "created",
"source_label": "person",
"target_label": "software",
"frequency": "SINGLE",
"properties": [
"date"
],
"sort_keys": [],
"nullable_keys": [],
"enable_label_index": true
}
Response Status
Response Body
{
"id": 1,
"sort_keys": [
],
"source_label": "person",
"name": "created",
"index_names": [
],
"properties": [
"date"
],
"target_label": "software",
"frequency": "SINGLE",
"nullable_keys": [
],
"enable_label_index": true,
"user_data": {}
}
从 hugegraph-server v0.11.2 版本开始支持边的 TTL 功能。边的 TTL 是通过 EdgeLabel 来设置的。比如希望 knows 类型的边存活时间为一天,需要在创建 knows EdgeLabel 的时候将 TTL 字段设置为 86400000,即单位为毫秒。
{
"id": 1,
"sort_keys": [
],
"source_label": "person",
"name": "knows",
"index_names": [
],
"properties": [
"date",
"createdTime"
],
"target_label": "person",
"frequency": "SINGLE",
"nullable_keys": [
],
"enable_label_index": true,
"ttl": 86400000,
"user_data": {}
}
另外,当边中带有"创建时间"的属性且希望以"创建时间"属性作为计算边存活时间的起点时,可以设置 EdgeLabel 中的 ttl_start_time 字段。比如 knows EdgeLabel 有 createdTime 属性,且 createdTime 是 Date 类型的参数,希望 knows 类型的边从创建开始存活一天的时间,那么创建 knows EdgeLabel 的 Request Body 如下:
{
"id": 1,
"sort_keys": [
],
"source_label": "person",
"name": "knows",
"index_names": [
],
"properties": [
"date",
"createdTime"
],
"target_label": "person",
"frequency": "SINGLE",
"nullable_keys": [
],
"enable_label_index": true,
"ttl": 86400000,
"ttl_start_time": "createdTime",
"user_data": {}
}
1.4.2 为已存在的 EdgeLabel 添加 properties 或 userdata,或者移除 userdata(目前不支持移除 properties)
Params
- action: 表示当前行为是添加还是移除,取值为
append(添加)和eliminate(移除)
Method & Url
PUT http://localhost:8080/graphspaces/DEFAULT/graphs/hugegraph/schema/edgelabels/created?action=append
Request Body
{
"name": "created",
"properties": [
"weight"
],
"nullable_keys": [
"weight"
]
}
Response Status
Response Body
{
"id": 2,
"sort_keys": [
],
"source_label": "person",
"name": "created",
"index_names": [
],
"properties": [
"date",
"weight"
],
"target_label": "software",
"frequency": "SINGLE",
"nullable_keys": [
"weight"
],
"enable_label_index": true,
"user_data": {}
}
1.4.3 获取所有的 EdgeLabel
Method & Url
GET http://localhost:8080/graphspaces/DEFAULT/graphs/hugegraph/schema/edgelabels
Response Status
Response Body
{
"edgelabels": [
{
"id": 1,
"sort_keys": [
],
"source_label": "person",
"name": "created",
"index_names": [
],
"properties": [
"date",
"weight"
],
"target_label": "software",
"frequency": "SINGLE",
"nullable_keys": [
"weight"
],
"enable_label_index": true,
"user_data": {}
},
{
"id": 2,
"sort_keys": [
],
"source_label": "person",
"name": "knows",
"index_names": [
],
"properties": [
"date",
"weight"
],
"target_label": "person",
"frequency": "SINGLE",
"nullable_keys": [
],
"enable_label_index": false,
"user_data": {}
}
]
}
1.4.4 根据 name 获取 EdgeLabel
Method & Url
GET http://localhost:8080/graphspaces/DEFAULT/graphs/hugegraph/schema/edgelabels/created
Response Status
Response Body
{
"id": 1,
"sort_keys": [
],
"source_label": "person",
"name": "created",
"index_names": [
],
"properties": [
"date",
"city",
"weight"
],
"target_label": "software",
"frequency": "SINGLE",
"nullable_keys": [
"city",
"weight"
],
"enable_label_index": true,
"user_data": {}
}
1.4.5 根据 name 删除 EdgeLabel
删除 EdgeLabel 会导致删除对应的边以及相关的索引数据,会产生一个异步任务
Method & Url
DELETE http://localhost:8080/graphspaces/DEFAULT/graphs/hugegraph/schema/edgelabels/created
Response Status
Response Body
注:
可以通过GET http://localhost:8080/graphspaces/DEFAULT/graphs/hugegraph/tasks/1(其中"1"是 task_id)来查询异步任务的执行状态,更多异步任务 RESTful API
5.1.6 - IndexLabel API
IndexLabel(索引标签)REST 接口:为顶点和边的属性创建索引,加速基于属性的查询和过滤操作。
1.5 IndexLabel
假设已经创建好了 1.1.3 中的 PropertyKeys、1.2.3 中的 VertexLabels 以及 1.3.3 中的 EdgeLabels
1.5.1 创建一个 IndexLabel
Method & Url
POST http://localhost:8080/graphspaces/DEFAULT/graphs/hugegraph/schema/indexlabels
Request Body
{
"name": "personByCity",
"base_type": "VERTEX_LABEL",
"base_value": "person",
"index_type": "SECONDARY",
"fields": [
"city"
]
}
Response Status
Response Body
{
"index_label": {
"id": 1,
"base_type": "VERTEX_LABEL",
"base_value": "person",
"name": "personByCity",
"fields": [
"city"
],
"index_type": "SECONDARY"
},
"task_id": 2
}
1.5.2 获取所有的 IndexLabel
Method & Url
GET http://localhost:8080/graphspaces/DEFAULT/graphs/hugegraph/schema/indexlabels
Response Status
Response Body
{
"indexlabels": [
{
"id": 3,
"base_type": "VERTEX_LABEL",
"base_value": "software",
"name": "softwareByPrice",
"fields": [
"price"
],
"index_type": "RANGE"
},
{
"id": 4,
"base_type": "EDGE_LABEL",
"base_value": "created",
"name": "createdByDate",
"fields": [
"date"
],
"index_type": "SECONDARY"
},
{
"id": 1,
"base_type": "VERTEX_LABEL",
"base_value": "person",
"name": "personByCity",
"fields": [
"city"
],
"index_type": "SECONDARY"
},
{
"id": 3,
"base_type": "VERTEX_LABEL",
"base_value": "person",
"name": "personByAgeAndCity",
"fields": [
"age",
"city"
],
"index_type": "SECONDARY"
}
]
}
1.5.3 根据 name 获取 IndexLabel
Method & Url
GET http://localhost:8080/graphspaces/DEFAULT/graphs/hugegraph/schema/indexlabels/personByCity
Response Status
Response Body
{
"id": 1,
"base_type": "VERTEX_LABEL",
"base_value": "person",
"name": "personByCity",
"fields": [
"city"
],
"index_type": "SECONDARY"
}
1.5.4 根据 name 删除 IndexLabel
删除 IndexLabel 会导致删除相关的索引数据,会产生一个异步任务
Method & Url
DELETE http://localhost:8080/graphspaces/DEFAULT/graphs/hugegraph/schema/indexlabels/personByCity
Response Status
Response Body
注:
可以通过GET http://localhost:8080/graphspaces/DEFAULT/graphs/hugegraph/tasks/1(其中"1"是 task_id)来查询异步任务的执行状态,更多异步任务 RESTful API
5.1.7 - Rebuild API
Rebuild(重建索引)REST 接口:重建图模式的索引,确保索引数据与图数据保持一致性。
1.6 Rebuild
1.6.1 重建 IndexLabel
Method & Url
PUT http://localhost:8080/graphspaces/DEFAULT/graphs/hugegraph/jobs/rebuild/indexlabels/personByCity
Response Status
Response Body
注:
可以通过GET http://localhost:8080/graphspaces/DEFAULT/graphs/hugegraph/tasks/1(其中"1"是 task_id)来查询异步任务的执行状态,更多异步任务 RESTful API
1.6.2 VertexLabel 对应的全部索引重建
Method & Url
PUT http://localhost:8080/graphspaces/DEFAULT/graphs/hugegraph/jobs/rebuild/vertexlabels/person
Response Status
Response Body
注:
可以通过GET http://localhost:8080/graphspaces/DEFAULT/graphs/hugegraph/tasks/2(其中"2"是 task_id)来查询异步任务的执行状态,更多异步任务 RESTful API
1.6.3 EdgeLabel 对应的全部索引重建
Method & Url
PUT http://localhost:8080/graphspaces/DEFAULT/graphs/hugegraph/jobs/rebuild/edgelabels/created
Response Status
Response Body
注:
可以通过GET http://localhost:8080/graphspaces/DEFAULT/graphs/hugegraph/tasks/3(其中"3"是 task_id)来查询异步任务的执行状态,更多异步任务 RESTful API
5.1.8 - Vertex API
Vertex(顶点)REST 接口:创建、查询、更新和删除图中的顶点数据,支持批量操作和条件过滤。
2.1 Vertex
顶点类型中的 Id 策略决定了顶点的 Id 类型,其对应的 id 类型如下:
| Id_Strategy | id type |
|---|
| AUTOMATIC | number |
| PRIMARY_KEY | string |
| CUSTOMIZE_STRING | string |
| CUSTOMIZE_NUMBER | number |
| CUSTOMIZE_UUID | uuid |
顶点的 GET/PUT/DELETE API 中 url 的 id 部分应该传入带有类型信息的 id 值,这个类型信息通过 json 串是否带引号来表示,也就是说:
- 当 id 类型为
number 时,url 中的 id 不带引号,例如 xxx/vertices/123456 - 当 id 类型为
string 时,url 中的 id 带引号,例如 xxx/vertices/"123456"
接下来的示例需要先根据以下 groovy 脚本创建图 schema
schema.propertyKey("name").asText().ifNotExist().create();
schema.propertyKey("age").asInt().ifNotExist().create();
schema.propertyKey("city").asText().ifNotExist().create();
schema.propertyKey("weight").asDouble().ifNotExist().create();
schema.propertyKey("lang").asText().ifNotExist().create();
schema.propertyKey("price").asDouble().ifNotExist().create();
schema.propertyKey("hobby").asText().valueList().ifNotExist().create();
schema.vertexLabel("person").properties("name", "age", "city", "weight", "hobby").primaryKeys("name").nullableKeys("age", "city", "weight", "hobby").ifNotExist().create();
schema.vertexLabel("software").properties("name", "lang", "price").primaryKeys("name").nullableKeys("lang", "price").ifNotExist().create();
schema.indexLabel("personByAge").onV("person").by("age").range().ifNotExist().create();
2.1.1 创建一个顶点
Params
路径参数说明:
- graphspace: 图空间名称
- graph: 图名称
Method & Url
POST http://localhost:8080/graphspaces/DEFAULT/graphs/hugegraph/graph/vertices
Request Body
{
"label": "person",
"properties": {
"name": "marko",
"age": 29
}
}
Response Status
Response Body
{
"id": "1:marko",
"label": "person",
"type": "vertex",
"properties": {
"name": "marko",
"age": 29
}
}
2.1.2 创建多个顶点
Params
路径参数说明:
- graphspace: 图空间名称
- graph: 图名称
Method & Url
POST http://localhost:8080/graphspaces/DEFAULT/graphs/hugegraph/graph/vertices/batch
Request Body
[
{
"label": "person",
"properties": {
"name": "marko",
"age": 29
}
},
{
"label": "software",
"properties": {
"name": "ripple",
"lang": "java",
"price": 199
}
}
]
Response Status
Response Body
[
"1:marko",
"2:ripple"
]
2.1.3 更新顶点属性
Params
路径参数说明:
- graphspace: 图空间名称
- graph: 图名称
- id: 顶点 id,需要包含引号,例如"1:marko"
Method & Url
PUT http://127.0.0.1:8080/graphspaces/DEFAULT/graphs/hugegraph/graph/vertices/"1:marko"?action=append
Request Body
{
"label": "person",
"properties": {
"age": 30,
"city": "Beijing"
}
}
注意:属性的取值有三种类别,分别为 single、set 和 list。single 表示增加或更新属性值,set 或 list 表示追加属性值。
Response Status
Response Body
{
"id": "1:marko",
"label": "person",
"type": "vertex",
"properties": {
"name": "marko",
"age": 30,
"city": "Beijing"
}
}
2.1.4 批量更新顶点属性
功能说明
批量更新顶点的属性时,可以选择多种更新策略,如下:
- SUM: 数值累加
- BIGGER: 原值和新值 (数字、日期) 取更大的
- SMALLER: 原值和新值 (数字、日期) 取更小的
- UNION: Set 属性取并集
- INTERSECTION: Set 属性取交集
- APPEND: List 属性追加元素
- ELIMINATE: List/Set属性删除元素
- OVERRIDE: 覆盖已有属性,如果新属性为 null,则仍然使用旧属性
假设原顶点的属性如下:
{
"vertices": [
{
"id": "2:lop",
"label": "software",
"type": "vertex",
"properties": {
"name": "lop",
"lang": "java",
"price": 328
}
},
{
"id": "1:josh",
"label": "person",
"type": "vertex",
"properties": {
"name": "josh",
"age": 32,
"city": "Beijing",
"weight": 0.1,
"hobby": [
"reading",
"football"
]
}
}
]
}
通过以下命令新增顶点:
curl -H "Content-Type: application/json" -d '[{"label":"person","properties":{"name":"josh","age":32,"city":"Beijing","weight":0.1,"hobby":["reading","football"]}},{"label":"software","properties":{"name":"lop","lang":"java","price":328}}]' http://127.0.0.1:8080/graphspaces/DEFAULT/graphs/hugegraph/graph/vertices/batch
Params
路径参数说明:
- graphspace: 图空间名称
- graph: 图名称
Method & Url
PUT http://127.0.0.1:8080/graphspaces/DEFAULT/graphs/hugegraph/graph/vertices/batch
Request Body
{
"vertices": [
{
"label": "software",
"type": "vertex",
"properties": {
"name": "lop",
"lang": "c++",
"price": 299
}
},
{
"label": "person",
"type": "vertex",
"properties": {
"name": "josh",
"city": "Shanghai",
"weight": 0.2,
"hobby": [
"swimming"
]
}
}
],
"update_strategies": {
"price": "BIGGER",
"age": "OVERRIDE",
"city": "OVERRIDE",
"weight": "SUM",
"hobby": "UNION"
},
"create_if_not_exist": true
}
Response Status
Response Body
{
"vertices": [
{
"id": "2:lop",
"label": "software",
"type": "vertex",
"properties": {
"name": "lop",
"lang": "c++",
"price": 328
}
},
{
"id": "1:josh",
"label": "person",
"type": "vertex",
"properties": {
"name": "josh",
"age": 32,
"city": "Shanghai",
"weight": 0.3,
"hobby": [
"reading",
"football",
"swimming"
]
}
}
]
}
结果分析如下:
- lang 属性未指定更新策略,直接用新值覆盖旧值,无论新值是否为 null;
- price 属性指定 BIGGER 的更新策略,旧属性值为 328,新属性值为 299,所以仍然保留了旧属性值 328;
- age 属性指定 OVERRIDE 更新策略,而新属性值中未传入 age,相当于 age 为 null,所以仍然保留了原属性值 32;
- city 属性也指定了 OVERRIDE 更新策略,且新属性值不为 null,所以覆盖了旧值;
- weight 属性指定了 SUM 更新策略,旧属性值为 0.1,新属性值为 0.2,最后的值为 0.3;
- hobby 属性(基数为 Set)指定了 UNION 更新策略,所以新值与旧值取了并集;
其他更新策略的使用方式与此类似,此处不再详述。
2.1.5 删除顶点属性
Params
路径参数说明:
- graphspace: 图空间名称
- graph: 图名称
- id: 顶点 id,需要包含引号,例如"1:marko"
Method & Url
PUT http://127.0.0.1:8080/graphspaces/DEFAULT/graphs/hugegraph/graph/vertices/"1:marko"?action=eliminate
Request Body
{
"label": "person",
"properties": {
"city": "Beijing"
}
}
注意:这里会直接删除属性(删除 key 和所有 value),无论其属性的取值是 single、set 或 list。
Response Status
Response Body
{
"id": "1:marko",
"label": "person",
"type": "vertex",
"properties": {
"name": "marko",
"age": 30
}
}
2.1.6 获取符合条件的顶点
Params
路径参数说明:
- graphspace: 图空间名称
- graph: 图名称
请求参数说明:
- label: 顶点的类型
- properties: 属性键值对(查询属性的前提是该属性已经建立了索引)
- limit: 查询结果的最大数目
- page: 分页的页号
以上参数都是可选的,但如果提供了 page 参数,就必须同时提供 limit 参数,并且不能再提供其他参数。label, properties和limit之间可以任意组合。
属性键值对由属性名称和属性值组成 JSON 格式的对象,可以使用多个属性键值对作为查询条件,属性值支持精确匹配和范围匹配,精确匹配的形式如properties={"age":29},范围匹配的形式如properties={"age":"P.gt(29)"},范围匹配支持以下表达式:
| 表达式 | 说明 |
|---|
| P.eq(number) | 属性值等于 number 的顶点 |
| P.neq(number) | 属性值不等于 number 的顶点 |
| P.lt(number) | 属性值小于 number 的顶点 |
| P.lte(number) | 属性值小于等于 number 的顶点 |
| P.gt(number) | 属性值大于 number 的顶点 |
| P.gte(number) | 属性值大于等于 number 的顶点 |
| P.between(number1,number2) | 属性值大于等于 number1 且小于 number2 的顶点 |
| P.inside(number1,number2) | 属性值大于 number1 且小于 number2 的顶点 |
| P.outside(number1,number2) | 属性值小于 number1 且大于 number2 的顶点 |
| P.within(value1,value2,value3,…) | 属性值等于任何一个给定 value 的顶点 |
查询所有 age 为 29 且 label 为 person 的顶点
Method & Url
GET http://localhost:8080/graphspaces/DEFAULT/graphs/hugegraph/graph/vertices?label=person&properties={"age":29}&limit=1
Response Status
Response Body
{
"vertices": [
{
"id": "1:marko",
"label": "person",
"type": "vertex",
"properties": {
"name": "marko",
"age": 30
}
}
]
}
分页查询所有顶点,获取第一页(page 不带参数值),限定 3 条
通过以下命令新增顶点:
curl -H "Content-Type: application/json" -d '[{"label":"person","properties":{"name":"peter","age":29,"city":"Shanghai"}},{"label":"person","properties":{"name":"vadas","age":27,"city":"Hongkong"}}]' http://localhost:8080/graphspaces/DEFAULT/graphs/hugegraph/graph/vertices/batch
Method & Url
GET http://localhost:8080/graphspaces/DEFAULT/graphs/hugegraph/graph/vertices?page&limit=3
Response Status
Response Body
{
"vertices": [
{
"id": "2:lop",
"label": "software",
"type": "vertex",
"properties": {
"name": "lop",
"lang": "c++",
"price": 328
}
},
{
"id": "1:josh",
"label": "person",
"type": "vertex",
"properties": {
"name": "josh",
"age": 32,
"city": "Shanghai",
"weight": 0.3,
"hobby": [
"reading",
"football",
"swimming"
]
}
},
{
"id": "1:marko",
"label": "person",
"type": "vertex",
"properties": {
"name": "marko",
"age": 30
}
}
],
"page": "CIYxOnBldGVyAAAAAAAAAAM="
}
返回的 body 里面是带有下一页的页号信息的,"page": "CIYxOnBldGVyAAAAAAAAAAM=",在查询下一页的时候将该值赋给 page 参数。
分页查询所有顶点,获取下一页(page 带上上一页返回的 page 值),限定 3 条
Method & Url
GET http://localhost:8080/graphspaces/DEFAULT/graphs/hugegraph/graph/vertices?page=CIYxOnBldGVyAAAAAAAAAAM=&limit=3
Response Status
Response Body
{
"vertices": [
{
"id": "1:peter",
"label": "person",
"type": "vertex",
"properties": {
"name": "peter",
"age": 29,
"city": "Shanghai"
}
},
{
"id": "1:vadas",
"label": "person",
"type": "vertex",
"properties": {
"name": "vadas",
"age": 27,
"city": "Hongkong"
}
},
{
"id": "2:ripple",
"label": "software",
"type": "vertex",
"properties": {
"name": "ripple",
"lang": "java",
"price": 199
}
}
],
"page": null
}
当"page": null时,表示已经没有下一页了(注:如果后端使用的是 Cassandra,为了提高性能,当返回的页数刚好是最后一页时,返回的 page 值可能不为空,但是如果用这个 page 值再请求下一页数据时,就会返回 空数据 和 page = null,其他情况也类似)
2.1.7 根据 Id 获取顶点
Params
路径参数说明:
- graphspace: 图空间名称
- graph: 图名称
- id: 顶点 id,需要包含引号,例如"1:marko"
Method & Url
GET http://localhost:8080/graphspaces/DEFAULT/graphs/hugegraph/graph/vertices/"1:marko"
Response Status
Response Body
{
"id": "1:marko",
"label": "person",
"type": "vertex",
"properties": {
"name": "marko",
"age": 30
}
}
2.1.8 根据 Id 删除顶点
Params
路径参数说明:
- graphspace: 图空间名称
- graph: 图名称
- id: 顶点 id,需要包含引号,例如"1:marko"
请求参数说明:
仅根据 Id 删除顶点
Method & Url
DELETE http://localhost:8080/graphspaces/DEFAULT/graphs/hugegraph/graph/vertices/"1:marko"
Response Status
根据 Label+Id 删除顶点
通过指定 Label 参数和 Id 来删除顶点时,一般来说其性能比仅根据 Id 删除会更好。
Method & Url
DELETE http://localhost:8080/graphspaces/DEFAULT/graphs/hugegraph/graph/vertices/"1:marko"?label=person
Response Status
5.1.9 - Edge API
Edge(边)REST 接口:创建、查询、更新和删除顶点之间的关系数据,支持批量操作和方向查询。
2.2 Edge
顶点 id 格式的修改也影响到了边的 id 以及源顶点和目标顶点 id 的格式
EdgeId 是由 src-vertex-id + direction + label + sort-values + tgt-vertex-id 拼接而成,但是这里的顶点 id 类型不是通过引号区分的,而是根据前缀区分:
- 当 id 类型为 number 时,EdgeId 的顶点 id 前有一个前缀
L ,形如 “L123456>1»L987654” - 当 id 类型为 string 时,EdgeId 的顶点 id 前有一个前缀
S ,形如 “S1:peter>1»S2:lop”
接下来的示例需要先根据以下 groovy 脚本创建图 schema
import org.apache.hugegraph.HugeFactory
import org.apache.tinkerpop.gremlin.structure.T
conf = "conf/graphs/hugegraph.properties"
graph = HugeFactory.open(conf)
schema = graph.schema()
schema.propertyKey("name").asText().ifNotExist().create()
schema.propertyKey("age").asInt().ifNotExist().create()
schema.propertyKey("city").asText().ifNotExist().create()
schema.propertyKey("weight").asDouble().ifNotExist().create()
schema.propertyKey("lang").asText().ifNotExist().create()
schema.propertyKey("date").asText().ifNotExist().create()
schema.propertyKey("price").asInt().ifNotExist().create()
schema.vertexLabel("person").properties("name", "age", "city").primaryKeys("name").ifNotExist().create()
schema.vertexLabel("software").properties("name", "lang", "price").primaryKeys("name").ifNotExist().create()
schema.indexLabel("personByCity").onV("person").by("city").secondary().ifNotExist().create()
schema.indexLabel("personByAgeAndCity").onV("person").by("age", "city").secondary().ifNotExist().create()
schema.indexLabel("softwareByPrice").onV("software").by("price").range().ifNotExist().create()
schema.edgeLabel("knows").sourceLabel("person").targetLabel("person").properties("date", "weight").ifNotExist().create()
schema.edgeLabel("created").sourceLabel("person").targetLabel("software").properties("date", "weight").ifNotExist().create()
schema.indexLabel("createdByDate").onE("created").by("date").secondary().ifNotExist().create()
schema.indexLabel("createdByWeight").onE("created").by("weight").range().ifNotExist().create()
schema.indexLabel("knowsByWeight").onE("knows").by("weight").range().ifNotExist().create()
marko = graph.addVertex(T.label, "person", "name", "marko", "age", 29, "city", "Beijing")
vadas = graph.addVertex(T.label, "person", "name", "vadas", "age", 27, "city", "Hongkong")
lop = graph.addVertex(T.label, "software", "name", "lop", "lang", "java", "price", 328)
josh = graph.addVertex(T.label, "person", "name", "josh", "age", 32, "city", "Beijing")
ripple = graph.addVertex(T.label, "software", "name", "ripple", "lang", "java", "price", 199)
peter = graph.addVertex(T.label, "person", "name", "peter", "age", 35, "city", "Shanghai")
graph.tx().commit()
g = graph.traversal()
2.2.1 创建一条边
Params
路径参数说明:
- graphspace: 图空间名称
- graph:待操作的图
请求体说明:
- label:边类型名称,必填
- outV:源顶点 id,必填
- inV:目标顶点 id,必填
- outVLabel:源顶点类型,必填
- inVLabel:目标顶点类型,必填
- properties: 边关联的属性,对象内部结构为:
- name:属性名称
- value:属性值
Method & Url
POST http://localhost:8080/graphspaces/DEFAULT/graphs/hugegraph/graph/edges
Request Body
{
"label": "created",
"outV": "1:marko",
"inV": "2:lop",
"outVLabel": "person",
"inVLabel": "software",
"properties": {
"date": "20171210",
"weight": 0.4
}
}
Response Status
Response Body
{
"id": "S1:marko>2>>S2:lop",
"label": "created",
"type": "edge",
"outV": "1:marko",
"outVLabel": "person",
"inV": "2:lop",
"inVLabel": "software",
"properties": {
"weight": 0.4,
"date": "20171210"
}
}
2.2.2 创建多条边
Params
路径参数说明:
- graphspace: 图空间名称
- graph:待操作的图
请求参数说明:
- check_vertex:是否检查顶点存在 (true | false),当设置为 true 而待插入边的源顶点或目标顶点不存在时会报错,默认为 true
请求体说明:
Method & Url
POST http://localhost:8080/graphspaces/DEFAULT/graphs/hugegraph/graph/edges/batch
Request Body
[
{
"label": "knows",
"outV": "1:marko",
"inV": "1:vadas",
"outVLabel": "person",
"inVLabel": "person",
"properties": {
"date": "20160110",
"weight": 0.5
}
},
{
"label": "knows",
"outV": "1:marko",
"inV": "1:josh",
"outVLabel": "person",
"inVLabel": "person",
"properties": {
"date": "20130220",
"weight": 1.0
}
}
]
Response Status
Response Body
[
"S1:marko>1>>S1:vadas",
"S1:marko>1>>S1:josh"
]
2.2.3 更新边属性
Params
路径参数说明:
- graphspace: 图空间名称
- graph:待操作的图
- id:待操作的边 id
请求参数说明:
请求体说明:
Method & Url
PUT http://localhost:8080/graphspaces/DEFAULT/graphs/hugegraph/graph/edges/S1:marko>2>>S2:lop?action=append
Request Body
{
"properties": {
"weight": 1.0
}
}
注意:属性的取值是有三种类别的,分别是 single、set 和 list。如果是 single,表示增加或更新属性值;如果是 set 或 list,则表示追加属性值
Response Status
Response Body
{
"id": "S1:marko>2>>S2:lop",
"label": "created",
"type": "edge",
"outV": "1:marko",
"outVLabel": "person",
"inV": "2:lop",
"inVLabel": "software",
"properties": {
"weight": 1.0,
"date": "20171210"
}
}
2.2.4 批量更新边属性
Params
路径参数说明:
- graphspace: 图空间名称
- graph:待操作的图
请求体说明:
- edges:边信息的列表
- update_strategies:对于每个属性,可以单独设置其更新策略,包括:
- SUM:仅支持 number 类型
- BIGGER/SMALLER:仅支持 date/number 类型
- UNION/INTERSECTION:仅支持 set 类型
- APPEND/ELIMINATE:仅支持 collection 类型
- OVERRIDE
- check_vertex:是否检查顶点存在 (true | false),当设置为 true 而待插入边的源顶点或目标顶点不存在时会报错,默认为 true
- create_if_not_exist:目前只支持设定为 true
Method & Url
PUT http://127.0.0.1:8080/graphspaces/DEFAULT/graphs/hugegraph/graph/edges/batch
Request Body
{
"edges": [
{
"label": "knows",
"outV": "1:marko",
"inV": "1:vadas",
"outVLabel": "person",
"inVLabel": "person",
"properties": {
"date": "20160111",
"weight": 1.0
}
},
{
"label": "knows",
"outV": "1:marko",
"inV": "1:josh",
"outVLabel": "person",
"inVLabel": "person",
"properties": {
"date": "20130221",
"weight": 0.5
}
}
],
"update_strategies": {
"weight": "SUM",
"date": "OVERRIDE"
},
"check_vertex": false,
"create_if_not_exist": true
}
Response Status
Response Body
{
"edges": [
{
"id": "S1:marko>1>>S1:vadas",
"label": "knows",
"type": "edge",
"outV": "1:marko",
"outVLabel": "person",
"inV": "1:vadas",
"inVLabel": "person",
"properties": {
"weight": 1.5,
"date": "20160111"
}
},
{
"id": "S1:marko>1>>S1:josh",
"label": "knows",
"type": "edge",
"outV": "1:marko",
"outVLabel": "person",
"inV": "1:josh",
"inVLabel": "person",
"properties": {
"weight": 1.5,
"date": "20130221"
}
}
]
}
2.2.5 删除边属性
Params
路径参数说明:
- graphspace: 图空间名称
- graph:待操作的图
- id:待操作的边 id
请求参数说明:
请求体说明:
Method & Url
PUT http://localhost:8080/graphspaces/DEFAULT/graphs/hugegraph/graph/edges/S1:marko>2>>S2:lop?action=eliminate
Request Body
{
"properties": {
"weight": 1.0
}
}
注意:这里会直接删除属性(删除 key 和所有 value),无论其属性的取值是 single、set 或 list
Response Status
Response Body
无法删除未设置为 nullable 的属性
{
"exception": "class java.lang.IllegalArgumentException",
"message": "Can't remove non-null edge property 'p[weight->1.0]'",
"cause": ""
}
2.2.6 获取符合条件的边
Params
路径参数说明:
- graphspace: 图空间名称
- graph:待操作的图
请求参数说明:
- vertex_id: 顶点 id
- direction: 边的方向 (OUT | IN | BOTH),默认为 BOTH
- label: 边的标签
- properties: 属性键值对 (根据属性查询的前提是预先建立了索引)
- keep_start_p: 默认为 false,当设置为 true 后,不会自动转义范围匹配输入的表达式,例如此时
properties={"age":"P.gt(0.8)"} 会被理解为精确匹配,即 age 属性等于 “P.gt(0.8)” - offset:偏移,默认为 0
- limit: 查询数目,默认为 100
- page: 页号
属性键值对由 JSON 格式的属性名称和属性值组成,允许多个属性键值对作为查询条件,属性值支持精确匹配和范围匹配,精确匹配时形如 properties={"weight":0.8},范围匹配时形如 properties={"age":"P.gt(0.8)"},范围匹配支持的表达式如下:
| 表达式 | 说明 |
|---|
| P.eq(number) | 属性值等于 number 的边 |
| P.neq(number) | 属性值不等于 number 的边 |
| P.lt(number) | 属性值小于 number 的边 |
| P.lte(number) | 属性值小于等于 number 的边 |
| P.gt(number) | 属性值大于 number 的边 |
| P.gte(number) | 属性值大于等于 number 的边 |
| P.between(number1,number2) | 属性值大于等于 number1 且小于 number2 的边 |
| P.inside(number1,number2) | 属性值大于 number1 且小于 number2 的边 |
| P.outside(number1,number2) | 属性值小于 number1 且大于 number2 的边 |
| P.within(value1,value2,value3,…) | 属性值等于任何一个给定 value 的边 |
| P.textcontains(value) | 属性值包含给定 value 的边 (string 类型) |
| P.contains(value) | 属性值包含给定 value 的边 (collection 类型) |
查询与顶点 person:marko(vertex_id=“1:marko”) 相连且 label 为 knows 的且 date 属性等于 “20160111” 的边
Method & Url
GET http://127.0.0.1:8080/graphspaces/DEFAULT/graphs/hugegraph/graph/edges?vertex_id="1:marko"&label=knows&properties={"date":"P.within(\"20160111\")"}
Response Status
Response Body
{
"edges": [
{
"id": "S1:marko>1>>S1:vadas",
"label": "knows",
"type": "edge",
"outV": "1:marko",
"outVLabel": "person",
"inV": "1:vadas",
"inVLabel": "person",
"properties": {
"weight": 1.5,
"date": "20160111"
}
}
]
}
分页查询所有边,获取第一页(page 不带参数值),限定 2 条
Method & Url
GET http://127.0.0.1:8080/graphspaces/DEFAULT/graphs/hugegraph/graph/edges?page&limit=2
Response Status
Response Body
{
"edges": [
{
"id": "S1:marko>1>>S1:josh",
"label": "knows",
"type": "edge",
"outV": "1:marko",
"outVLabel": "person",
"inV": "1:josh",
"inVLabel": "person",
"properties": {
"weight": 1.5,
"date": "20130221"
}
},
{
"id": "S1:marko>1>>S1:vadas",
"label": "knows",
"type": "edge",
"outV": "1:marko",
"outVLabel": "person",
"inV": "1:vadas",
"inVLabel": "person",
"properties": {
"weight": 1.5,
"date": "20160111"
}
}
],
"page": "EoYxOm1hcmtvgggCAIQyOmxvcAAAAAAAAAAC"
}
返回的 body 里面是带有下一页的页号信息的,"page": "EoYxOm1hcmtvgggCAIQyOmxvcAAAAAAAAAAC",在查询下一页的时候将该值赋给 page 参数
分页查询所有边,获取下一页(page 带上上一页返回的 page 值),限定 2 条
Method & Url
GET http://127.0.0.1:8080/graphspaces/DEFAULT/graphs/hugegraph/graph/edges?page=EoYxOm1hcmtvgggCAIQyOmxvcAAAAAAAAAAC&limit=2
Response Status
Response Body
{
"edges": [
{
"id": "S1:marko>2>>S2:lop",
"label": "created",
"type": "edge",
"outV": "1:marko",
"outVLabel": "person",
"inV": "2:lop",
"inVLabel": "software",
"properties": {
"weight": 1.0,
"date": "20171210"
}
}
],
"page": null
}
此时 "page": null 表示已经没有下一页了
注:后端为 Cassandra 时,为了性能考虑,返回页恰好为最后一页时,返回 page 值可能非空,通过该 page 再请求下一页数据时则返回 空数据 及 page = null,其他情况类似
2.2.7 根据 id 获取边
Params
路径参数说明:
- graphspace: 图空间名称
- graph:待操作的图
- id:待操作的边 id
Method & Url
GET http://localhost:8080/graphspaces/DEFAULT/graphs/hugegraph/graph/edges/S1:marko>2>>S2:lop
Response Status
Response Body
{
"id": "S1:marko>2>>S2:lop",
"label": "created",
"type": "edge",
"outV": "1:marko",
"outVLabel": "person",
"inV": "2:lop",
"inVLabel": "software",
"properties": {
"weight": 1.0,
"date": "20171210"
}
}
2.2.8 根据 id 删除边
Params
路径参数说明:
- graphspace: 图空间名称
- graph:待操作的图
- id:待操作的边 id
请求参数说明:
仅根据 id 删除边
Method & Url
DELETE http://localhost:8080/graphspaces/DEFAULT/graphs/hugegraph/graph/edges/S1:marko>2>>S2:lop
Response Status
根据 label + id 删除边
通过指定 label 参数和 id 来删除边时,一般来说其性能比仅根据 id 删除会更好
Method & Url
DELETE http://localhost:8080/graphspaces/DEFAULT/graphs/hugegraph/graph/edges/S1:marko>1>>S1:vadas?label=knows
Response Status
5.1.10 - Traverser API
Traverser(图遍历)REST 接口:执行复杂的图算法和路径查询,包括最短路径、K近邻、相似度计算等高级分析功能。
3.1 traverser API 概述
HugeGraphServer 为 HugeGraph 图数据库提供了 RESTful API 接口。除了顶点和边的 CRUD 基本操作以外,还提供了一些遍历(traverser)方法,我们称为traverser API。这些遍历方法实现了一些复杂的图算法,方便用户对图进行分析和挖掘。
HugeGraph 支持的 Traverser API 包括:
- K-out API,根据起始顶点,查找恰好 N 步可达的邻居,分为基础版和高级版:
- 基础版使用 GET 方法,根据起始顶点,查找恰好 N 步可达的邻居
- 高级版使用 POST 方法,根据起始顶点,查找恰好 N 步可达的邻居,与基础版的不同在于:
- 支持只统计邻居数量
- 支持顶点和边属性过滤
- 支持返回到达邻居的最短路径
- K-neighbor API,根据起始顶点,查找 N 步以内可达的所有邻居,分为基础版和高级版:
- 基础版使用 GET 方法,根据起始顶点,查找 N 步以内可达的所有邻居
- 高级版使用 POST 方法,根据起始顶点,查找 N 步以内可达的所有邻居,与基础版的不同在于:
- 支持只统计邻居数量
- 支持顶点和边属性过滤
- 支持返回到达邻居的最短路径
- Same Neighbors, 查询两个顶点的共同邻居
- Jaccard Similarity API,计算 jaccard 相似度,包括两种:
- 一种是使用 GET 方法,计算两个顶点的邻居的相似度(交并比)
- 一种是使用 POST 方法,在全图中查找与起点的 jaccard similarity 最高的 N 个点
- Shortest Path API,查找两个顶点之间的最短路径
- All Shortest Paths,查找两个顶点间的全部最短路径
- Weighted Shortest Path,查找起点到目标点的带权最短路径
- Single Source Shortest Path,查找一个点到其他各个点的加权最短路径
- Multi Node Shortest Path,查找指定顶点集之间两两最短路径
- Paths API,查找两个顶点间的全部路径,分为基础版和高级版:
- 基础版使用 GET 方法,根据起点和终点,查找两个顶点间的全部路径
- 高级版使用 POST 方法,根据一组起点和一组终点,查找两个集合间符合条件的全部路径
- Customized Paths API,从一批顶点出发,按(一种)模式遍历经过的全部路径
- Template Path API,指定起点和终点以及起点和终点间路径信息,查找符合的路径
- Crosspoints API,查找两个顶点的交点(共同祖先或者共同子孙)
- Customized Crosspoints API,从一批顶点出发,按多种模式遍历,最后一步到达的顶点的交点
- Rings API,从起始顶点出发,可到达的环路路径
- Rays API,从起始顶点出发,可到达边界的路径(即无环路径)
- Fusiform Similarity API,查找一个顶点的梭形相似点
- Vertices API
- 按 ID 批量查询顶点;
- 获取顶点的分区;
- 按分区查询顶点;
- Edges API
- 按 ID 批量查询边;
- 获取边的分区;
- 按分区查询边;
3.2. traverser API 详解
使用方法中的例子,都是基于 TinkerPop 官网给出的图:
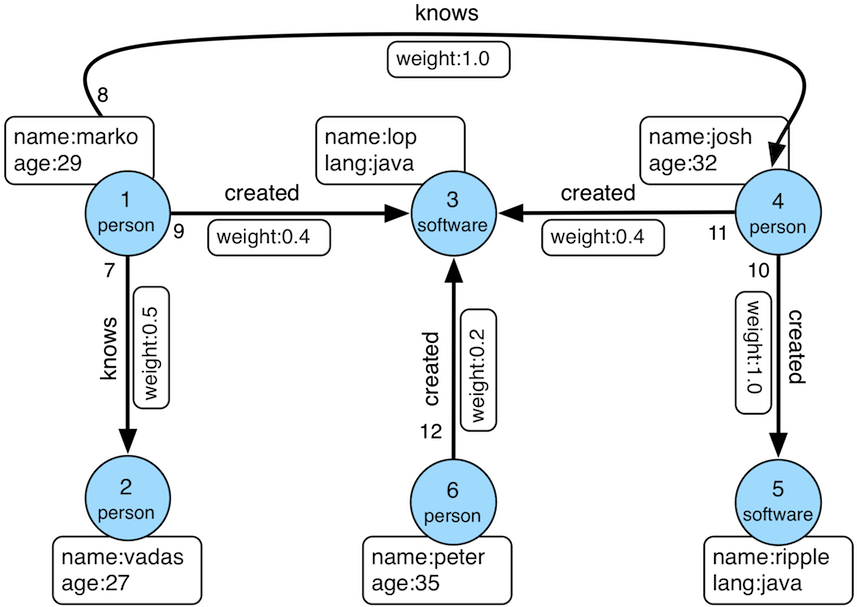
数据导入程序如下:
public class Loader {
public static void main(String[] args) {
HugeClient client = new HugeClient("http://127.0.0.1:8080", "hugegraph");
SchemaManager schema = client.schema();
schema.propertyKey("name").asText().ifNotExist().create();
schema.propertyKey("age").asInt().ifNotExist().create();
schema.propertyKey("city").asText().ifNotExist().create();
schema.propertyKey("weight").asDouble().ifNotExist().create();
schema.propertyKey("lang").asText().ifNotExist().create();
schema.propertyKey("date").asText().ifNotExist().create();
schema.propertyKey("price").asInt().ifNotExist().create();
schema.vertexLabel("person")
.properties("name", "age", "city")
.primaryKeys("name")
.nullableKeys("age")
.ifNotExist()
.create();
schema.vertexLabel("software")
.properties("name", "lang", "price")
.primaryKeys("name")
.nullableKeys("price")
.ifNotExist()
.create();
schema.indexLabel("personByCity")
.onV("person")
.by("city")
.secondary()
.ifNotExist()
.create();
schema.indexLabel("personByAgeAndCity")
.onV("person")
.by("age", "city")
.secondary()
.ifNotExist()
.create();
schema.indexLabel("softwareByPrice")
.onV("software")
.by("price")
.range()
.ifNotExist()
.create();
schema.edgeLabel("knows")
.multiTimes()
.sourceLabel("person")
.targetLabel("person")
.properties("date", "weight")
.sortKeys("date")
.nullableKeys("weight")
.ifNotExist()
.create();
schema.edgeLabel("created")
.sourceLabel("person").targetLabel("software")
.properties("date", "weight")
.nullableKeys("weight")
.ifNotExist()
.create();
schema.indexLabel("createdByDate")
.onE("created")
.by("date")
.secondary()
.ifNotExist()
.create();
schema.indexLabel("createdByWeight")
.onE("created")
.by("weight")
.range()
.ifNotExist()
.create();
schema.indexLabel("knowsByWeight")
.onE("knows")
.by("weight")
.range()
.ifNotExist()
.create();
GraphManager graph = client.graph();
Vertex marko = graph.addVertex(T.label, "person", "name", "marko",
"age", 29, "city", "Beijing");
Vertex vadas = graph.addVertex(T.label, "person", "name", "vadas",
"age", 27, "city", "Hongkong");
Vertex lop = graph.addVertex(T.label, "software", "name", "lop",
"lang", "java", "price", 328);
Vertex josh = graph.addVertex(T.label, "person", "name", "josh",
"age", 32, "city", "Beijing");
Vertex ripple = graph.addVertex(T.label, "software", "name", "ripple",
"lang", "java", "price", 199);
Vertex peter = graph.addVertex(T.label, "person", "name", "peter",
"age", 35, "city", "Shanghai");
marko.addEdge("knows", vadas, "date", "20160110", "weight", 0.5);
marko.addEdge("knows", josh, "date", "20130220", "weight", 1.0);
marko.addEdge("created", lop, "date", "20171210", "weight", 0.4);
josh.addEdge("created", lop, "date", "20091111", "weight", 0.4);
josh.addEdge("created", ripple, "date", "20171210", "weight", 1.0);
peter.addEdge("created", lop, "date", "20170324", "weight", 0.2);
}
}
顶点 ID 为:
"2:ripple",
"1:vadas",
"1:peter",
"1:josh",
"1:marko",
"2:lop"
边 ID 为:
"S1:peter>2>>S2:lop",
"S1:josh>2>>S2:lop",
"S1:josh>2>>S2:ripple",
"S1:marko>1>20130220>S1:josh",
"S1:marko>1>20160110>S1:vadas",
"S1:marko>2>>S2:lop"
3.2.1 K-out API(GET,基础版)
3.2.1.1 功能介绍
根据起始顶点、方向、边的类型(可选)和深度 depth,查找从起始顶点出发恰好 depth 步可达的顶点
Params
- source:起始顶点 id,必填项
- direction:起始顶点向外发散的方向(OUT,IN,BOTH),选填项,默认是 BOTH
- max_depth:步数,必填项
- label:边的类型,选填项,默认代表所有 edge label
- nearest:nearest 为 true 时,代表起始顶点到达结果顶点的最短路径长度为 depth,不存在更短的路径;nearest 为 false 时,代表起始顶点到结果顶点有一条长度为 depth 的路径(未必最短且可以有环),选填项,默认为 true
- max_degree:查询过程中,单个顶点遍历的最大邻接边数目,选填项,默认为 10000
- capacity:遍历过程中最大的访问的顶点数目,选填项,默认为 10000000
- limit:返回的顶点的最大数目,选填项,默认为 10000000
3.2.1.2 使用方法
Method & Url
GET http://localhost:8080/graphspaces/DEFAULT/graphs/{graph}/traversers/kout?source="1:marko"&max_depth=2
Response Status
Response Body
{
"vertices":[
"2:ripple",
"1:peter"
]
}
3.2.1.3 适用场景
查找恰好 N 步关系可达的顶点。两个例子:
- 家族关系中,查找一个人的所有孙子,person A 通过连续的两条“儿子”边到达的顶点集合。
- 社交关系中发现潜在好友,例如:与目标用户相隔两层朋友关系的用户,可以通过连续两条“朋友”边到达的顶点。
3.2.2 K-out API(POST,高级版)
3.2.2.1 功能介绍
根据起始顶点、步骤(包括方向、边类型和过滤属性)和深度 depth,查找从起始顶点出发恰好 depth 步可达的顶点。
与 K-out 基础版的不同在于:
- 支持只统计邻居数量
- 支持边属性过滤
- 支持返回到达邻居的最短路径
Params
- source:起始顶点 id,必填项
- steps: 从起始点出发的 Steps,必填项,结构如下:
- direction:表示边的方向(OUT,IN,BOTH),默认是 BOTH
- edge_steps:边 Step 集合,支持对单边的类型和属性过滤,如果为空,则不过滤
- vertex_steps:顶点 Step 集合,支持对单点的类型和属性过滤,如果为空,则不过滤
- label:顶点类型
- properties:顶点属性
- max_degree:查询过程中,单个顶点遍历的最大邻接边数目,默认为 10000 (注:0.12 版之前 step 内仅支持 degree 作为参数名,0.12 开始统一使用 max_degree, 并向下兼容 degree 写法)
- skip_degree:用于设置查询过程中舍弃超级顶点的最小边数,即当某个顶点的邻接边数目大于 skip_degree 时,完全舍弃该顶点。选填项,如果开启时,需满足
skip_degree >= max_degree 约束,默认为 0 (不启用),表示不跳过任何点 (注意:开启此配置后,遍历时会尝试访问一个顶点的 skip_degree 条边,而不仅仅是 max_degree 条边,这样有额外的遍历开销,对查询性能影响可能有较大影响,请确认理解后再开启)
- max_depth:步数,必填项
- nearest:nearest 为 true 时,代表起始顶点到达结果顶点的最短路径长度为 depth,不存在更短的路径;nearest 为 false 时,代表起始顶点到结果顶点有一条长度为 depth 的路径(未必最短且可以有环),选填项,默认为 true
- count_only:Boolean 值,true 表示只统计结果的数目,不返回具体结果;false 表示返回具体的结果,默认为 false
- with_path:true 表示返回起始点到每个邻居的最短路径,false 表示不返回起始点到每个邻居的最短路径,选填项,默认为 false
- with_edge,选填项,默认为 false:
- 如果设置为 true,则结果将包含所有边的完整信息,即路径中的所有边
- 当 with_path 为 true 时,将返回所有路径中的边的完整信息
- 当 with_path 为 false 时,不返回任何信息
- 如果设置为 false,则仅返回边的 id
- with_vertex,选填项,默认为 false:
- 如果设置为 true,则结果将包含所有顶点的完整信息,即路径中的所有顶点
- 当 with_path 为 true 时,将返回所有路径中的顶点的完整信息
- 当 with_path 为 false 时,返回所有邻居顶点的完整信息
- 如果设置为 false,则仅返回顶点的 id
- capacity:遍历过程中最大的访问的顶点数目,选填项,默认为 10000000
- limit:返回的顶点的最大数目,选填项,默认为 10000000
- traverse_mode: 遍历方式,可选择“breadth_first_search”或“depth_first_search”作为参数,默认为“breadth_first_search”
3.2.2.2 使用方法
Method & Url
POST http://localhost:8080/graphspaces/DEFAULT/graphs/{graph}/traversers/kout
Request Body
{
"source": "1:marko",
"steps": {
"direction": "BOTH",
"edge_steps": [
{
"label": "knows",
"properties": {
"weight": "P.gt(0.1)"
}
},
{
"label": "created",
"properties": {
"weight": "P.gt(0.1)"
}
}
],
"vertex_steps": [
{
"label": "person",
"properties": {
"age": "P.lt(32)"
}
},
{
"label": "software",
"properties": {}
}
],
"max_degree": 10000,
"skip_degree": 100000
},
"max_depth": 1,
"nearest": true,
"limit": 10000,
"with_vertex": true,
"with_path": true,
"with_edge": true
}
Response Status
Response Body
{
"size": 2,
"kout": [
"1:vadas",
"2:lop"
],
"paths": [
{
"objects": [
"1:marko",
"2:lop"
]
},
{
"objects": [
"1:marko",
"1:vadas"
]
}
],
"vertices": [
{
"id": "1:marko",
"label": "person",
"type": "vertex",
"properties": {
"name": "marko",
"age": 29,
"city": "Beijing"
}
},
{
"id": "1:vadas",
"label": "person",
"type": "vertex",
"properties": {
"name": "vadas",
"age": 27,
"city": "Hongkong"
}
},
{
"id": "2:lop",
"label": "software",
"type": "vertex",
"properties": {
"name": "lop",
"lang": "java",
"price": 328
}
}
],
"edges": [
{
"id": "S1:marko>1>20160110>S1:vadas",
"label": "knows",
"type": "edge",
"outV": "1:marko",
"outVLabel": "person",
"inV": "1:vadas",
"inVLabel": "person",
"properties": {
"weight": 0.5,
"date": "20160110"
}
},
{
"id": "S1:marko>2>>S2:lop",
"label": "created",
"type": "edge",
"outV": "1:marko",
"outVLabel": "person",
"inV": "2:lop",
"inVLabel": "software",
"properties": {
"weight": 0.4,
"date": "20171210"
}
}
]
}
3.2.2.3 适用场景
参见 3.2.1.3
3.2.3 K-neighbor(GET,基础版)
3.2.3.1 功能介绍
根据起始顶点、方向、边的类型(可选)和深度 depth,查找包括起始顶点在内、depth 步之内可达的所有顶点
相当于:起始顶点、K-out(1)、K-out(2)、… 、K-out(max_depth) 的并集
Params
- source: 起始顶点 id,必填项
- direction:起始顶点向外发散的方向(OUT,IN,BOTH),选填项,默认是 BOTH
- max_depth:步数,必填项
- label:边的类型,选填项,默认代表所有 edge label
- max_degree:查询过程中,单个顶点遍历的最大邻接边数目,选填项,默认为 10000
- limit:返回的顶点的最大数目,也即遍历过程中最大的访问的顶点数目,选填项,默认为 10000000
3.2.3.2 使用方法
Method & Url
GET http://localhost:8080/graphspaces/DEFAULT/graphs/{graph}/traversers/kneighbor?source=“1:marko”&max_depth=2
Response Status
Response Body
{
"vertices":[
"2:ripple",
"1:marko",
"1:josh",
"1:vadas",
"1:peter",
"2:lop"
]
}
3.2.3.3 适用场景
查找 N 步以内可达的所有顶点,例如:
- 家族关系中,查找一个人五服以内所有子孙,person A 通过连续的 5 条“亲子”边到达的顶点集合。
- 社交关系中发现好友圈子,例如目标用户通过 1 条、2 条、3 条“朋友”边可到达的用户可以组成目标用户的朋友圈子
3.2.4 K-neighbor API(POST,高级版)
3.2.4.1 功能介绍
根据起始顶点、步骤(包括方向、边类型和过滤属性)和深度 depth,查找从起始顶点出发 depth 步内可达的所有顶点。
与 K-neighbor 基础版的不同在于:
- 支持只统计邻居数量
- 支持边属性过滤
- 支持返回到达邻居的最短路径
Params
- source:起始顶点 id,必填项
- steps: 从起始点出发的 Steps,必填项,结构如下:
- direction:表示边的方向(OUT,IN,BOTH),默认是 BOTH
- 从起始点出发的 Steps,必填项,结构如下:
- direction:表示边的方向(OUT,IN,BOTH),默认是 BOTH
- edge_steps:边 Step 集合,支持对单边的类型和属性过滤,如果为空,则不过滤
- vertex_steps:顶点 Step 集合,支持对单点的类型和属性过滤,如果为空,则不过滤
- label:顶点类型
- properties:顶点属性
- max_degree:查询过程中,单个顶点遍历的最大邻接边数目,默认为 10000 (注:0.12 版之前 step 内仅支持 degree 作为参数名,0.12 开始统一使用 max_degree, 并向下兼容 degree 写法)
- skip_degree:用于设置查询过程中舍弃超级顶点的最小边数,即当某个顶点的邻接边数目大于 skip_degree 时,完全舍弃该顶点。选填项,如果开启时,需满足
skip_degree >= max_degree 约束,默认为 0 (不启用),表示不跳过任何点 (注意:开启此配置后,遍历时会尝试访问一个顶点的 skip_degree 条边,而不仅仅是 max_degree 条边,这样有额外的遍历开销,对查询性能影响可能有较大影响,请确认理解后再开启)
- max_depth:步数,必填项
- count_only:Boolean 值,true 表示只统计结果的数目,不返回具体结果;false 表示返回具体的结果,默认为 false
- with_path:true 表示返回起始点到每个邻居的最短路径,false 表示不返回起始点到每个邻居的最短路径,选填项,默认为 false
- with_edge,选填项,默认为 false:
- 如果设置为 true,则结果将包含所有边的完整信息,即路径中的所有边
- 当 with_path 为 true 时,将返回所有路径中的边的完整信息
- 当 with_path 为 false 时,不返回任何信息
- 如果设置为 false,则仅返回边的 id
- with_vertex,选填项,默认为 false:
- 如果设置为 true,则结果将包含所有顶点的完整信息,即路径中的所有顶点
- 当 with_path 为 true 时,将返回所有路径中的顶点的完整信息
- 当 with_path 为 false 时,返回所有邻居顶点的完整信息
- 如果设置为 false,则仅返回顶点的 id
- limit:返回的顶点的最大数目,选填项,默认为 10000000
3.2.4.2 使用方法
Method & Url
POST http://localhost:8080/graphspaces/DEFAULT/graphs/{graph}/traversers/kneighbor
Request Body
{
"source": "1:marko",
"steps": {
"direction": "BOTH",
"edge_steps": [
{
"label": "knows",
"properties": {}
},
{
"label": "created",
"properties": {}
}
],
"vertex_steps": [
{
"label": "person",
"properties": {
"age": "P.gt(28)"
}
},
{
"label": "software",
"properties": {}
}
],
"max_degree": 10000,
"skip_degree": 100000
},
"max_depth": 3,
"limit": 10000,
"with_vertex": true,
"with_path": true,
"with_edge": true
}
Response Status
Response Body
{
"size": 4,
"kneighbor": [
"1:josh",
"2:lop",
"1:peter",
"2:ripple"
],
"paths": [
{
"objects": [
"1:marko",
"2:lop"
]
},
{
"objects": [
"1:marko",
"2:lop",
"1:peter"
]
},
{
"objects": [
"1:marko",
"1:josh"
]
},
{
"objects": [
"1:marko",
"1:josh",
"2:ripple"
]
}
],
"vertices": [
{
"id": "2:ripple",
"label": "software",
"type": "vertex",
"properties": {
"name": "ripple",
"lang": "java",
"price": 199
}
},
{
"id": "1:marko",
"label": "person",
"type": "vertex",
"properties": {
"name": "marko",
"age": 29,
"city": "Beijing"
}
},
{
"id": "1:josh",
"label": "person",
"type": "vertex",
"properties": {
"name": "josh",
"age": 32,
"city": "Beijing"
}
},
{
"id": "1:peter",
"label": "person",
"type": "vertex",
"properties": {
"name": "peter",
"age": 35,
"city": "Shanghai"
}
},
{
"id": "2:lop",
"label": "software",
"type": "vertex",
"properties": {
"name": "lop",
"lang": "java",
"price": 328
}
}
],
"edges": [
{
"id": "S1:josh>2>>S2:ripple",
"label": "created",
"type": "edge",
"outV": "1:josh",
"outVLabel": "person",
"inV": "2:ripple",
"inVLabel": "software",
"properties": {
"weight": 1.0,
"date": "20171210"
}
},
{
"id": "S1:marko>2>>S2:lop",
"label": "created",
"type": "edge",
"outV": "1:marko",
"outVLabel": "person",
"inV": "2:lop",
"inVLabel": "software",
"properties": {
"weight": 0.4,
"date": "20171210"
}
},
{
"id": "S1:marko>1>20130220>S1:josh",
"label": "knows",
"type": "edge",
"outV": "1:marko",
"outVLabel": "person",
"inV": "1:josh",
"inVLabel": "person",
"properties": {
"weight": 1.0,
"date": "20130220"
}
},
{
"id": "S1:peter>2>>S2:lop",
"label": "created",
"type": "edge",
"outV": "1:peter",
"outVLabel": "person",
"inV": "2:lop",
"inVLabel": "software",
"properties": {
"weight": 0.2,
"date": "20170324"
}
}
]
}
3.2.4.3 适用场景
参见 3.2.3.3
3.2.5 Same Neighbors
3.2.5.1 功能介绍
查询两个点的共同邻居
Params
- vertex:一个顶点 id,必填项
- other:另一个顶点 id,必填项
- direction:顶点向外发散的方向(OUT,IN,BOTH),选填项,默认是 BOTH
- label:边的类型,选填项,默认代表所有 edge label
- max_degree:查询过程中,单个顶点遍历的最大邻接边数目,选填项,默认为 10000
- limit:返回的共同邻居的最大数目,选填项,默认为 10000000
3.2.5.2 使用方法
Method & Url
GET http://localhost:8080/graphspaces/DEFAULT/graphs/{graph}/traversers/sameneighbors?vertex=“1:marko”&other="1:josh"
Response Status
Response Body
{
"same_neighbors":[
"2:lop"
]
}
3.2.5.3 适用场景
查找两个顶点的共同邻居:
3.2.6 Jaccard Similarity (GET)
3.2.6.1 功能介绍
计算两个顶点的 jaccard similarity(两个顶点邻居的交集比上两个顶点邻居的并集)
Params
- vertex:一个顶点 id,必填项
- other:另一个顶点 id,必填项
- direction:顶点向外发散的方向(OUT,IN,BOTH),选填项,默认是 BOTH
- label:边的类型,选填项,默认代表所有 edge label
- max_degree:查询过程中,单个顶点遍历的最大邻接边数目,选填项,默认为 10000
3.2.6.2 使用方法
Method & Url
GET http://localhost:8080/graphspaces/DEFAULT/graphs/{graph}/traversers/jaccardsimilarity?vertex="1:marko"&other="1:josh"
Response Status
Response Body
{
"jaccard_similarity": 0.2
}
3.2.6.3 适用场景
用于评估两个点的相似性或者紧密度
3.2.7 Jaccard Similarity (POST)
3.2.7.1 功能介绍
计算与指定顶点的 jaccard similarity 最大的 N 个点
jaccard similarity 的计算方式为:两个顶点邻居的交集比上两个顶点邻居的并集
Params
- vertex:一个顶点 id,必填项
- 从起始点出发的 Step,必填项,结构如下:
- direction:表示边的方向(OUT,IN,BOTH),默认是 BOTH
- labels:边的类型列表
- properties:通过属性的值过滤边
- max_degree:查询过程中,单个顶点遍历的最大邻接边数目,默认为 10000 (注:0.12 版之前 step 内仅支持 degree 作为参数名,0.12 开始统一使用 max_degree, 并向下兼容 degree 写法)
- skip_degree:用于设置查询过程中舍弃超级顶点的最小边数,即当某个顶点的邻接边数目大于 skip_degree 时,完全舍弃该顶点。选填项,如果开启时,需满足
skip_degree >= max_degree 约束,默认为 0 (不启用),表示不跳过任何点 (注意:开启此配置后,遍历时会尝试访问一个顶点的 skip_degree 条边,而不仅仅是 max_degree 条边,这样有额外的遍历开销,对查询性能影响可能有较大影响,请确认理解后再开启)
- top:返回一个起点的 jaccard similarity 中最大的 top 个,选填项,默认为 100
- capacity:遍历过程中最大的访问的顶点数目,选填项,默认为 10000000
3.2.7.2 使用方法
Method & Url
POST http://localhost:8080/graphspaces/DEFAULT/graphs/{graph}/traversers/jaccardsimilarity
Request Body
{
"vertex": "1:marko",
"step": {
"direction": "BOTH",
"labels": [],
"max_degree": 10000,
"skip_degree": 100000
},
"top": 3
}
Response Status
Response Body
{
"2:ripple": 0.3333333333333333,
"1:peter": 0.3333333333333333,
"1:josh": 0.2
}
3.2.7.3 适用场景
用于在图中找出与指定顶点相似性最高的顶点
3.2.8 Shortest Path
3.2.8.1 功能介绍
根据起始顶点、目的顶点、方向、边的类型(可选)和最大深度,查找一条最短路径
Params
- source:起始顶点 id,必填项
- target:目的顶点 id,必填项
- direction:起始顶点向外发散的方向(OUT,IN,BOTH),选填项,默认是 BOTH
- max_depth:最大步数,必填项
- label:边的类型,选填项,默认代表所有 edge label
- max_degree:查询过程中,单个顶点遍历的最大邻接边数目,选填项,默认为 10000
- skip_degree:用于设置查询过程中舍弃超级顶点的最小边数,即当某个顶点的邻接边数目大于 skip_degree 时,完全舍弃该顶点。选填项,如果开启时,需满足
skip_degree >= max_degree 约束,默认为 0 (不启用),表示不跳过任何点 (注意:开启此配置后,遍历时会尝试访问一个顶点的 skip_degree 条边,而不仅仅是 max_degree 条边,这样有额外的遍历开销,对查询性能影响可能有较大影响,请确认理解后再开启) - capacity:遍历过程中最大的访问的顶点数目,选填项,默认为 10000000
3.2.8.2 使用方法
Method & Url
GET http://localhost:8080/graphspaces/DEFAULT/graphs/{graph}/traversers/shortestpath?source="1:marko"&target="2:ripple"&max_depth=3
Response Status
Response Body
{
"path":[
"1:marko",
"1:josh",
"2:ripple"
]
}
3.2.8.3 适用场景
查找两个顶点间的最短路径,例如:
- 社交关系网中,查找两个用户有关系的最短路径,即最近的朋友关系链
- 设备关联网络中,查找两个设备最短的关联关系
3.2.9 All Shortest Paths
3.2.9.1 功能介绍
根据起始顶点、目的顶点、方向、边的类型(可选)和最大深度,查找两点间所有的最短路径
Params
- source:起始顶点 id,必填项
- target:目的顶点 id,必填项
- direction:起始顶点向外发散的方向(OUT,IN,BOTH),选填项,默认是 BOTH
- max_depth:最大步数,必填项
- label:边的类型,选填项,默认代表所有 edge label
- max_degree:查询过程中,单个顶点遍历的最大邻接边数目,选填项,默认为 10000
- skip_degree:用于设置查询过程中舍弃超级顶点的最小边数,即当某个顶点的邻接边数目大于 skip_degree 时,完全舍弃该顶点。选填项,如果开启时,需满足
skip_degree >= max_degree 约束,默认为 0 (不启用),表示不跳过任何点 (注意:开启此配置后,遍历时会尝试访问一个顶点的 skip_degree 条边,而不仅仅是 max_degree 条边,这样有额外的遍历开销,对查询性能影响可能有较大影响,请确认理解后再开启) - capacity:遍历过程中最大的访问的顶点数目,选填项,默认为 10000000
3.2.9.2 使用方法
Method & Url
GET http://localhost:8080/graphspaces/DEFAULT/graphs/{graph}/traversers/allshortestpaths?source="A"&target="Z"&max_depth=10
Response Status
Response Body
{
"paths":[
{
"objects": [
"A",
"B",
"C",
"Z"
]
},
{
"objects": [
"A",
"M",
"N",
"Z"
]
}
]
}
3.2.9.3 适用场景
查找两个顶点间的所有最短路径,例如:
- 社交关系网中,查找两个用户有关系的全部最短路径,即最近的朋友关系链
- 设备关联网络中,查找两个设备全部的最短关联关系
3.2.10 Weighted Shortest Path
3.2.10.1 功能介绍
根据起始顶点、目的顶点、方向、边的类型(可选)和最大深度,查找一条带权最短路径
Params
- source:起始顶点 id,必填项
- target:目的顶点 id,必填项
- direction:起始顶点向外发散的方向(OUT,IN,BOTH),选填项,默认是 BOTH
- label:边的类型,选填项,默认代表所有 edge label
- weight:边的权重属性,必填项,必须是数字类型的属性
- max_degree:查询过程中,单个顶点遍历的最大邻接边数目,选填项,默认为 10000
- skip_degree:用于设置查询过程中舍弃超级顶点的最小边数,即当某个顶点的邻接边数目大于 skip_degree 时,完全舍弃该顶点。选填项,如果开启时,需满足
skip_degree >= max_degree 约束,默认为 0 (不启用),表示不跳过任何点 (注意:开启此配置后,遍历时会尝试访问一个顶点的 skip_degree 条边,而不仅仅是 max_degree 条边,这样有额外的遍历开销,对查询性能影响可能有较大影响,请确认理解后再开启) - capacity:遍历过程中最大的访问的顶点数目,选填项,默认为 10000000
- with_vertex:true 表示返回结果包含完整的顶点信息(路径中的全部顶点),false 时表示只返回顶点 id,选填项,默认为 false
3.2.10.2 使用方法
Method & Url
GET http://localhost:8080/graphspaces/DEFAULT/graphs/{graph}/traversers/weightedshortestpath?source="1:marko"&target="2:ripple"&weight="weight"&with_vertex=true
Response Status
Response Body
{
"path": {
"weight": 2.0,
"vertices": [
"1:marko",
"1:josh",
"2:ripple"
]
},
"vertices": [
{
"id": "1:marko",
"label": "person",
"type": "vertex",
"properties": {
"name": "marko",
"age": 29,
"city": "Beijing"
}
},
{
"id": "1:josh",
"label": "person",
"type": "vertex",
"properties": {
"name": "josh",
"age": 32,
"city": "Beijing"
}
},
{
"id": "2:ripple",
"label": "software",
"type": "vertex",
"properties": {
"name": "ripple",
"lang": "java",
"price": 199
}
}
]
}
3.2.10.3 适用场景
查找两个顶点间的带权最短路径,例如:
- 交通线路中查找从 A 城市到 B 城市花钱最少的交通方式
3.2.11 Single Source Shortest Path
3.2.11.1 功能介绍
从一个顶点出发,查找该点到图中其他顶点的最短路径(可选是否带权重)
Params
- source:起始顶点 id,必填项
- direction:起始顶点向外发散的方向(OUT,IN,BOTH),选填项,默认是 BOTH
- label:边的类型,选填项,默认代表所有 edge label
- weight:边的权重属性,选填项,必须是数字类型的属性,如果不填或者虽然填了但是边没有该属性,则权重为 1.0
- max_degree:查询过程中,单个顶点遍历的最大邻接边数目,选填项,默认为 10000
- skip_degree:用于设置查询过程中舍弃超级顶点的最小边数,即当某个顶点的邻接边数目大于 skip_degree 时,完全舍弃该顶点。选填项,如果开启时,需满足
skip_degree >= max_degree 约束,默认为 0 (不启用),表示不跳过任何点 (注意:开启此配置后,遍历时会尝试访问一个顶点的 skip_degree 条边,而不仅仅是 max_degree 条边,这样有额外的遍历开销,对查询性能影响可能有较大影响,请确认理解后再开启) - capacity:遍历过程中最大的访问的顶点数目,选填项,默认为 10000000
- limit:查询到的目标顶点个数,也是返回的最短路径的条数,选填项,默认为 10
- with_vertex:true 表示返回结果包含完整的顶点信息(路径中的全部顶点),false 时表示只返回顶点 id,选填项,默认为 false
3.2.11.2 使用方法
Method & Url
GET http://localhost:8080/graphspaces/DEFAULT/graphs/{graph}/traversers/singlesourceshortestpath?source="1:marko"&with_vertex=true
Response Status
Response Body
{
"paths": {
"2:ripple": {
"weight": 2.0,
"vertices": [
"1:marko",
"1:josh",
"2:ripple"
]
},
"1:josh": {
"weight": 1.0,
"vertices": [
"1:marko",
"1:josh"
]
},
"1:vadas": {
"weight": 1.0,
"vertices": [
"1:marko",
"1:vadas"
]
},
"1:peter": {
"weight": 2.0,
"vertices": [
"1:marko",
"2:lop",
"1:peter"
]
},
"2:lop": {
"weight": 1.0,
"vertices": [
"1:marko",
"2:lop"
]
}
},
"vertices": [
{
"id": "2:ripple",
"label": "software",
"type": "vertex",
"properties": {
"name": "ripple",
"lang": "java",
"price": 199
}
},
{
"id": "1:marko",
"label": "person",
"type": "vertex",
"properties": {
"name": "marko",
"age": 29,
"city": "Beijing"
}
},
{
"id": "1:josh",
"label": "person",
"type": "vertex",
"properties": {
"name": "josh",
"age": 32,
"city": "Beijing"
}
},
{
"id": "1:vadas",
"label": "person",
"type": "vertex",
"properties": {
"name": "vadas",
"age": 27,
"city": "Hongkong"
}
},
{
"id": "1:peter",
"label": "person",
"type": "vertex",
"properties": {
"name": "peter",
"age": 35,
"city": "Shanghai"
}
},
{
"id": "2:lop",
"label": "software",
"type": "vertex",
"properties": {
"name": "lop",
"lang": "java",
"price": 328
}
}
]
}
3.2.11.3 适用场景
查找从一个点出发到其他顶点的带权最短路径,比如:
- 查找从北京出发到全国其他所有城市的耗时最短的乘车方案
3.2.12 Multi Node Shortest Path
3.2.12.1 功能介绍
查找指定顶点集两两之间的最短路径
Params
- vertices:定义起始顶点,必填项,指定方式包括:
- ids:通过顶点 id 列表提供起始顶点
- label 和 properties:如果没有指定 ids,则使用 label 和 properties 的联合条件查询起始顶点
- label:顶点的类型
- properties:通过属性的值查询起始顶点
注意:properties 中的属性值可以是列表,表示只要 key 对应的 value 在列表中就可以
- step:表示从起始顶点到终止顶点走过的路径,必填项,Step 的结构如下:
- direction:表示边的方向(OUT,IN,BOTH),默认是 BOTH
- labels:边的类型列表
- properties:通过属性的值过滤边
- max_degree:查询过程中,单个顶点遍历的最大邻接边数目,默认为 10000 (注:0.12 版之前 step 内仅支持 degree 作为参数名,0.12 开始统一使用 max_degree, 并向下兼容 degree 写法)
- skip_degree:用于设置查询过程中舍弃超级顶点的最小边数,即当某个顶点的邻接边数目大于 skip_degree 时,完全舍弃该顶点。选填项,如果开启时,需满足
skip_degree >= max_degree 约束,默认为 0 (不启用),表示不跳过任何点 (注意:开启此配置后,遍历时会尝试访问一个顶点的 skip_degree 条边,而不仅仅是 max_degree 条边,这样有额外的遍历开销,对查询性能影响可能有较大影响,请确认理解后再开启)
- max_depth:步数,必填项
- capacity:遍历过程中最大的访问的顶点数目,选填项,默认为 10000000
- with_vertex:true 表示返回结果包含完整的顶点信息(路径中的全部顶点),false 时表示只返回顶点 id,选填项,默认为 false
3.2.12.2 使用方法
Method & Url
POST http://localhost:8080/graphspaces/DEFAULT/graphs/{graph}/traversers/multinodeshortestpath
Request Body
{
"vertices": {
"ids": ["382:marko", "382:josh", "382:vadas", "382:peter", "383:lop", "383:ripple"]
},
"step": {
"direction": "BOTH",
"properties": {
}
},
"max_depth": 10,
"capacity": 100000000,
"with_vertex": true
}
Response Status
Response Body
{
"paths": [
{
"objects": [
"382:peter",
"383:lop"
]
},
{
"objects": [
"382:peter",
"383:lop",
"382:marko"
]
},
{
"objects": [
"382:peter",
"383:lop",
"382:josh"
]
},
{
"objects": [
"382:peter",
"383:lop",
"382:marko",
"382:vadas"
]
},
{
"objects": [
"383:lop",
"382:marko"
]
},
{
"objects": [
"383:lop",
"382:josh"
]
},
{
"objects": [
"383:lop",
"382:marko",
"382:vadas"
]
},
{
"objects": [
"382:peter",
"383:lop",
"382:josh",
"383:ripple"
]
},
{
"objects": [
"382:marko",
"382:josh"
]
},
{
"objects": [
"383:lop",
"382:josh",
"383:ripple"
]
},
{
"objects": [
"382:marko",
"382:vadas"
]
},
{
"objects": [
"382:marko",
"382:josh",
"383:ripple"
]
},
{
"objects": [
"382:josh",
"383:ripple"
]
},
{
"objects": [
"382:josh",
"382:marko",
"382:vadas"
]
},
{
"objects": [
"382:vadas",
"382:marko",
"382:josh",
"383:ripple"
]
}
],
"vertices": [
{
"id": "382:peter",
"label": "person",
"type": "vertex",
"properties": {
"name": "peter",
"age": 29,
"city": "Shanghai"
}
},
{
"id": "383:lop",
"label": "software",
"type": "vertex",
"properties": {
"name": "lop",
"lang": "java",
"price": 328
}
},
{
"id": "382:marko",
"label": "person",
"type": "vertex",
"properties": {
"name": "marko",
"age": 29,
"city": "Beijing"
}
},
{
"id": "382:josh",
"label": "person",
"type": "vertex",
"properties": {
"name": "josh",
"age": 32,
"city": "Beijing"
}
},
{
"id": "382:vadas",
"label": "person",
"type": "vertex",
"properties": {
"name": "vadas",
"age": 27,
"city": "Hongkong"
}
},
{
"id": "383:ripple",
"label": "software",
"type": "vertex",
"properties": {
"name": "ripple",
"lang": "java",
"price": 199
}
}
]
}
3.2.12.3 适用场景
查找多个点之间的最短路径,比如:
3.2.13 Paths(GET,基础版)
3.2.13.1 功能介绍
根据起始顶点、目的顶点、方向、边的类型(可选)和最大深度等条件查找所有路径
Params
- source:起始顶点 id,必填项
- target:目的顶点 id,必填项
- direction:起始顶点向外发散的方向(OUT,IN,BOTH),选填项,默认是 BOTH
- label:边的类型,选填项,默认代表所有 edge label
- max_depth:步数,必填项
- max_degree:查询过程中,单个顶点遍历的最大邻接边数目,选填项,默认为 10000
- capacity:遍历过程中最大的访问的顶点数目,选填项,默认为 10000000
- limit:返回的路径的最大数目,选填项,默认为 10
3.2.13.2 使用方法
Method & Url
GET http://localhost:8080/graphspaces/DEFAULT/graphs/{graph}/traversers/paths?source="1:marko"&target="1:josh"&max_depth=5
Response Status
Response Body
{
"paths":[
{
"objects":[
"1:marko",
"1:josh"
]
},
{
"objects":[
"1:marko",
"2:lop",
"1:josh"
]
}
]
}
3.2.13.3 适用场景
查找两个顶点间的所有路径,例如:
- 社交网络中,查找两个用户所有可能的关系路径
- 设备关联网络中,查找两个设备之间所有的关联路径
3.2.14 Paths(POST,高级版)
3.2.14.1 功能介绍
根据起始顶点、目的顶点、步骤(step)和最大深度等条件查找所有路径
Params
- sources:定义起始顶点,必填项,指定方式包括:
- ids:通过顶点 id 列表提供起始顶点
- label 和 properties:如果没有指定 ids,则使用 label 和 properties 的联合条件查询起始顶点
- label:顶点的类型
- properties:通过属性的值查询起始顶点
注意:properties 中的属性值可以是列表,表示只要 key 对应的 value 在列表中就可以
- targets:定义终止顶点,必填项,指定方式包括:
- ids:通过顶点 id 列表提供终止顶点
- label 和 properties:如果没有指定 ids,则使用 label 和 properties 的联合条件查询终止顶点
- label:顶点的类型
- properties:通过属性的值查询终止顶点
注意:properties 中的属性值可以是列表,表示只要 key 对应的 value 在列表中就可以
- step:表示从起始顶点到终止顶点走过的路径,必填项,Step 的结构如下:
- direction:表示边的方向(OUT,IN,BOTH),默认是 BOTH
- labels:边的类型列表
- properties:通过属性的值过滤边
- max_degree:查询过程中,单个顶点遍历的最大邻接边数目,默认为 10000 (注:0.12 版之前 step 内仅支持 degree 作为参数名,0.12 开始统一使用 max_degree, 并向下兼容 degree 写法)
- skip_degree:用于设置查询过程中舍弃超级顶点的最小边数,即当某个顶点的邻接边数目大于 skip_degree 时,完全舍弃该顶点。选填项,如果开启时,需满足
skip_degree >= max_degree 约束,默认为 0 (不启用),表示不跳过任何点 (注意:开启此配置后,遍历时会尝试访问一个顶点的 skip_degree 条边,而不仅仅是 max_degree 条边,这样有额外的遍历开销,对查询性能影响可能有较大影响,请确认理解后再开启)
- max_depth:步数,必填项
- nearest:nearest 为 true 时,代表起始顶点到达结果顶点的最短路径长度为 depth,不存在更短的路径;nearest 为 false 时,代表起始顶点到结果顶点有一条长度为 depth 的路径(未必最短且可以有环),选填项,默认为 true
- capacity:遍历过程中最大的访问的顶点数目,选填项,默认为 10000000
- limit:返回的路径的最大数目,选填项,默认为 10
- with_vertex:true 表示返回结果包含完整的顶点信息(路径中的全部顶点),false 时表示只返回顶点 id,选填项,默认为 false
3.2.14.2 使用方法
Method & Url
POST http://localhost:8080/graphspaces/DEFAULT/graphs/{graph}/traversers/paths
Request Body
{
"sources": {
"ids": ["1:marko"]
},
"targets": {
"ids": ["1:peter"]
},
"step": {
"direction": "BOTH",
"properties": {
"weight": "P.gt(0.01)"
}
},
"max_depth": 10,
"capacity": 100000000,
"limit": 10000000,
"with_vertex": false
}
Response Status
Response Body
{
"paths": [
{
"objects": [
"1:marko",
"1:josh",
"2:lop",
"1:peter"
]
},
{
"objects": [
"1:marko",
"2:lop",
"1:peter"
]
}
]
}
3.2.14.3 适用场景
查找两个顶点间的所有路径,例如:
- 社交网络中,查找两个用户所有可能的关系路径
- 设备关联网络中,查找两个设备之间所有的关联路径
3.2.15 Customized Paths
3.2.15.1 功能介绍
根据一批起始顶点、边规则(包括方向、边的类型和属性过滤)和最大深度等条件查找符合条件的所有的路径
Params
- sources:定义起始顶点,必填项,指定方式包括:
- ids:通过顶点 id 列表提供起始顶点
- label 和 properties:如果没有指定 ids,则使用 label 和 properties 的联合条件查询起始顶点
- label:顶点的类型
- properties:通过属性的值查询起始顶点
注意:properties 中的属性值可以是列表,表示只要 key 对应的 value 在列表中就可以
- steps:表示从起始顶点走过的路径规则,是一组 Step 的列表。必填项。每个 Step 的结构如下:
- direction:表示边的方向(OUT,IN,BOTH),默认是 BOTH
- labels:边的类型列表
- properties:通过属性的值过滤边
- weight_by:根据指定的属性计算边的权重,sort_by 不为 NONE 时有效,与 default_weight 互斥
- default_weight:当边没有属性作为权重计算值时,采取的默认权重,sort_by 不为 NONE 时有效,与 weight_by 互斥
- max_degree:查询过程中,单个顶点遍历的最大邻接边数目,默认为 10000 (注:0.12 版之前 step 内仅支持 degree 作为参数名,0.12 开始统一使用 max_degree, 并向下兼容 degree 写法)
- sample:当需要对某个 step 的符合条件的边进行采样时设置,-1 表示不采样,默认为采样 100
- sort_by:根据路径的权重排序,选填项,默认为 NONE:
- NONE 表示不排序,默认值
- INCR 表示按照路径权重的升序排序
- DECR 表示按照路径权重的降序排序
- capacity:遍历过程中最大的访问的顶点数目,选填项,默认为 10000000
- limit:返回的路径的最大数目,选填项,默认为 10
- with_vertex:true 表示返回结果包含完整的顶点信息(路径中的全部顶点),false 时表示只返回顶点 id,选填项,默认为 false
3.2.15.2 使用方法
Method & Url
POST http://localhost:8080/graphspaces/DEFAULT/graphs/{graph}/traversers/customizedpaths
Request Body
{
"sources":{
"ids":[
],
"label":"person",
"properties":{
"name":"marko"
}
},
"steps":[
{
"direction":"OUT",
"labels":[
"knows"
],
"weight_by":"weight",
"max_degree":-1
},
{
"direction":"OUT",
"labels":[
"created"
],
"default_weight":8,
"max_degree":-1,
"sample":1
}
],
"sort_by":"INCR",
"with_vertex":true,
"capacity":-1,
"limit":-1
}
Response Status
Response Body
{
"paths":[
{
"objects":[
"1:marko",
"1:josh",
"2:lop"
],
"weights":[
1,
8
]
}
],
"vertices":[
{
"id":"1:marko",
"label":"person",
"type":"vertex",
"properties":{
"city":[
{
"id":"1:marko>city",
"value":"Beijing"
}
],
"name":[
{
"id":"1:marko>name",
"value":"marko"
}
],
"age":[
{
"id":"1:marko>age",
"value":29
}
]
}
},
{
"id":"1:josh",
"label":"person",
"type":"vertex",
"properties":{
"city":[
{
"id":"1:josh>city",
"value":"Beijing"
}
],
"name":[
{
"id":"1:josh>name",
"value":"josh"
}
],
"age":[
{
"id":"1:josh>age",
"value":32
}
]
}
},
{
"id":"2:lop",
"label":"software",
"type":"vertex",
"properties":{
"price":[
{
"id":"2:lop>price",
"value":328
}
],
"name":[
{
"id":"2:lop>name",
"value":"lop"
}
],
"lang":[
{
"id":"2:lop>lang",
"value":"java"
}
]
}
}
]
}
3.2.15.3 适用场景
适合查找各种复杂的路径集合,例如:
- 社交网络中,查找看过张艺谋所导演的电影的用户关注的大 V 的路径(张艺谋—>电影—->用户—>大 V)
- 风控网络中,查找多个高风险用户的直系亲属的朋友的路径(高风险用户—>直系亲属—>朋友)
3.2.16 Template Paths
3.2.16.1 功能介绍
根据一批起始顶点、边规则(包括方向、边的类型和属性过滤)和最大深度等条件查找符合条件的所有的路径
Params
- sources:定义起始顶点,必填项,指定方式包括:
- ids:通过顶点 id 列表提供起始顶点
- label 和 properties:如果没有指定 ids,则使用 label 和 properties 的联合条件查询起始顶点
- label:顶点的类型
- properties:通过属性的值查询起始顶点
注意:properties 中的属性值可以是列表,表示只要 key 对应的 value 在列表中就可以
- targets:定义终止顶点,必填项,指定方式包括:
- ids:通过顶点 id 列表提供终止顶点
- label 和 properties:如果没有指定 ids,则使用 label 和 properties 的联合条件查询终止顶点
- label:顶点的类型
- properties:通过属性的值查询终止顶点
注意:properties 中的属性值可以是列表,表示只要 key 对应的 value 在列表中就可以
- steps:表示从起始顶点走过的路径规则,是一组 Step 的列表。必填项。每个 Step 的结构如下:
- direction:表示边的方向(OUT,IN,BOTH),默认是 BOTH
- labels:边的类型列表
- properties:通过属性的值过滤边
- max_times:当前 step 可以重复的次数,当为 N 时,表示从起始顶点可以经过当前 step 1-N 次
- max_degree:查询过程中,单个顶点遍历的最大邻接边数目,默认为 10000 (注:0.12 版之前 step 内仅支持 degree 作为参数名,0.12 开始统一使用 max_degree, 并向下兼容 degree 写法)
- skip_degree:用于设置查询过程中舍弃超级顶点的最小边数,即当某个顶点的邻接边数目大于 skip_degree 时,完全舍弃该顶点。选填项,如果开启时,需满足
skip_degree >= max_degree 约束,默认为 0 (不启用),表示不跳过任何点 (注意:开启此配置后,遍历时会尝试访问一个顶点的 skip_degree 条边,而不仅仅是 max_degree 条边,这样有额外的遍历开销,对查询性能影响可能有较大影响,请确认理解后再开启)
- with_ring:Boolean 值,true 表示包含环路;false 表示不包含环路,默认为 false
- capacity:遍历过程中最大的访问的顶点数目,选填项,默认为 10000000
- limit:返回的路径的最大数目,选填项,默认为 10
- with_vertex:true 表示返回结果包含完整的顶点信息(路径中的全部顶点),false 时表示只返回顶点 id,选填项,默认为 false
3.2.16.2 使用方法
Method & Url
POST http://localhost:8080/graphspaces/DEFAULT/graphs/{graph}/traversers/templatepaths
Request Body
{
"sources": {
"ids": [],
"label": "person",
"properties": {
"name": "vadas"
}
},
"targets": {
"ids": [],
"label": "software",
"properties": {
"name": "ripple"
}
},
"steps": [
{
"direction": "IN",
"labels": ["knows"],
"properties": {
},
"max_degree": 10000,
"skip_degree": 100000
},
{
"direction": "OUT",
"labels": ["created"],
"properties": {
},
"max_degree": 10000,
"skip_degree": 100000
},
{
"direction": "IN",
"labels": ["created"],
"properties": {
},
"max_degree": 10000,
"skip_degree": 100000
},
{
"direction": "OUT",
"labels": ["created"],
"properties": {
},
"max_degree": 10000,
"skip_degree": 100000
}
],
"capacity": 10000,
"limit": 10,
"with_vertex": true
}
Response Status
Response Body
{
"paths": [
{
"objects": [
"1:vadas",
"1:marko",
"2:lop",
"1:josh",
"2:ripple"
]
}
],
"vertices": [
{
"id": "2:ripple",
"label": "software",
"type": "vertex",
"properties": {
"name": "ripple",
"lang": "java",
"price": 199
}
},
{
"id": "1:marko",
"label": "person",
"type": "vertex",
"properties": {
"name": "marko",
"age": 29,
"city": "Beijing"
}
},
{
"id": "1:josh",
"label": "person",
"type": "vertex",
"properties": {
"name": "josh",
"age": 32,
"city": "Beijing"
}
},
{
"id": "1:vadas",
"label": "person",
"type": "vertex",
"properties": {
"name": "vadas",
"age": 27,
"city": "Hongkong"
}
},
{
"id": "2:lop",
"label": "software",
"type": "vertex",
"properties": {
"name": "lop",
"lang": "java",
"price": 328
}
}
]
}
3.2.16.3 适用场景
适合查找各种复杂的模板路径,比如 personA -(朋友)-> personB -(同学)-> personC,其中"朋友"和"同学"边可以分别是最多 3 层和 4 层的情况
3.2.17 Crosspoints
3.2.17.1 功能介绍
根据起始顶点、目的顶点、方向、边的类型(可选)和最大深度等条件查找相交点
Params
- source:起始顶点 id,必填项
- target:目的顶点 id,必填项
- direction:起始顶点到目的顶点的方向,目的点到起始点是反方向,BOTH 时不考虑方向(OUT,IN,BOTH),选填项,默认是 BOTH
- label:边的类型,选填项,默认代表所有 edge label
- max_depth:步数,必填项
- max_degree:查询过程中,单个顶点遍历的最大邻接边数目,选填项,默认为 10000
- capacity:遍历过程中最大的访问的顶点数目,选填项,默认为 10000000
- limit:返回的交点的最大数目,选填项,默认为 10
3.2.17.2 使用方法
Method & Url
GET http://localhost:8080/graphspaces/DEFAULT/graphs/{graph}/traversers/crosspoints?source="2:lop"&target="2:ripple"&max_depth=5&direction=IN
Response Status
Response Body
{
"crosspoints":[
{
"crosspoint":"1:josh",
"objects":[
"2:lop",
"1:josh",
"2:ripple"
]
}
]
}
3.2.17.3 适用场景
查找两个顶点的交点及其路径,例如:
- 社交网络中,查找两个用户共同关注的话题或者大 V
- 家族关系中,查找共同的祖先
3.2.18 Customized Crosspoints
3.2.18.1 功能介绍
根据一批起始顶点、多种边规则(包括方向、边的类型和属性过滤)和最大深度等条件查找符合条件的所有的路径终点的交集
Params
sources:定义起始顶点,必填项,指定方式包括:
- ids:通过顶点 id 列表提供起始顶点
- label 和 properties:如果没有指定 ids,则使用 label 和 properties 的联合条件查询起始顶点
- label:顶点的类型
- properties:通过属性的值查询起始顶点
注意:properties 中的属性值可以是列表,表示只要 key 对应的 value 在列表中就可以
path_patterns:表示从起始顶点走过的路径规则,是一组规则的列表。必填项。每个规则是一个 PathPattern
- 每个 PathPattern 是一组 Step 列表,每个 Step 结构如下:
- direction:表示边的方向(OUT,IN,BOTH),默认是 BOTH
- labels:边的类型列表
- properties:通过属性的值过滤边
- max_degree:查询过程中,单个顶点遍历的最大邻接边数目,默认为 10000 (注:0.12 版之前 step 内仅支持 degree 作为参数名,0.12 开始统一使用 max_degree, 并向下兼容 degree 写法)
- skip_degree:用于设置查询过程中舍弃超级顶点的最小边数,即当某个顶点的邻接边数目大于 skip_degree 时,完全舍弃该顶点。选填项,如果开启时,需满足
skip_degree >= max_degree 约束,默认为 0 (不启用),表示不跳过任何点 (注意:开启此配置后,遍历时会尝试访问一个顶点的 skip_degree 条边,而不仅仅是 max_degree 条边,这样有额外的遍历开销,对查询性能影响可能有较大影响,请确认理解后再开启)
capacity:遍历过程中最大的访问的顶点数目,选填项,默认为 10000000
limit:返回的路径的最大数目,选填项,默认为 10
with_path:true 表示返回交点所在的路径,false 表示不返回交点所在的路径,选填项,默认为 false
with_vertex,选填项,默认为 false:
- true 表示返回结果包含完整的顶点信息(路径中的全部顶点)
- with_path 为 true 时,返回所有路径中的顶点的完整信息
- with_path 为 false 时,返回所有交点的完整信息
- false 时表示只返回顶点 id
3.2.18.2 使用方法
Method & Url
POST http://localhost:8080/graphspaces/DEFAULT/graphs/{graph}/traversers/customizedcrosspoints
Request Body
{
"sources":{
"ids":[
"2:lop",
"2:ripple"
]
},
"path_patterns":[
{
"steps":[
{
"direction":"IN",
"labels":[
"created"
],
"max_degree":-1
}
]
}
],
"with_path":true,
"with_vertex":true,
"capacity":-1,
"limit":-1
}
Response Status
Response Body
{
"crosspoints":[
"1:josh"
],
"paths":[
{
"objects":[
"2:ripple",
"1:josh"
]
},
{
"objects":[
"2:lop",
"1:josh"
]
}
],
"vertices":[
{
"id":"2:ripple",
"label":"software",
"type":"vertex",
"properties":{
"price":[
{
"id":"2:ripple>price",
"value":199
}
],
"name":[
{
"id":"2:ripple>name",
"value":"ripple"
}
],
"lang":[
{
"id":"2:ripple>lang",
"value":"java"
}
]
}
},
{
"id":"1:josh",
"label":"person",
"type":"vertex",
"properties":{
"city":[
{
"id":"1:josh>city",
"value":"Beijing"
}
],
"name":[
{
"id":"1:josh>name",
"value":"josh"
}
],
"age":[
{
"id":"1:josh>age",
"value":32
}
]
}
},
{
"id":"2:lop",
"label":"software",
"type":"vertex",
"properties":{
"price":[
{
"id":"2:lop>price",
"value":328
}
],
"name":[
{
"id":"2:lop>name",
"value":"lop"
}
],
"lang":[
{
"id":"2:lop>lang",
"value":"java"
}
]
}
}
]
}
3.2.18.3 适用场景
查询一组顶点通过多种路径在终点有交集的情况。例如:
- 在商品图谱中,多款手机、学习机、游戏机通过不同的低级别的类目路径,最终都属于一级类目的电子设备
3.2.19 Rings
3.2.19.1 功能介绍
根据起始顶点、方向、边的类型(可选)和最大深度等条件查找可达的环路
例如:1 -> 25 -> 775 -> 14690 -> 25, 其中环路为 25 -> 775 -> 14690 -> 25
Params
- source:起始顶点 id,必填项
- direction:起始顶点发出的边的方向(OUT,IN,BOTH),选填项,默认是 BOTH
- label:边的类型,选填项,默认代表所有 edge label
- max_depth:步数,必填项
- source_in_ring:环路是否包含起点,选填项,默认为 true
- max_degree:查询过程中,单个顶点遍历的最大邻接边数目,选填项,默认为 10000
- capacity:遍历过程中最大的访问的顶点数目,选填项,默认为 10000000
- limit:返回的可达环路的最大数目,选填项,默认为 10
3.2.19.2 使用方法
Method & Url
GET http://localhost:8080/graphspaces/DEFAULT/graphs/{graph}/traversers/rings?source="1:marko"&max_depth=2
Response Status
Response Body
{
"rings":[
{
"objects":[
"1:marko",
"1:josh",
"1:marko"
]
},
{
"objects":[
"1:marko",
"1:vadas",
"1:marko"
]
},
{
"objects":[
"1:marko",
"2:lop",
"1:marko"
]
}
]
}
3.2.19.3 适用场景
查询起始顶点可达的环路,例如:
- 风控项目中,查询一个用户可达的循环担保的人或者设备
- 设备关联网络中,发现一个设备周围的循环引用的设备
3.2.20 Rays
3.2.20.1 功能介绍
根据起始顶点、方向、边的类型(可选)和最大深度等条件查找发散到边界顶点的路径
例如:1 -> 25 -> 775 -> 14690 -> 2289 -> 18379, 其中 18379 为边界顶点,即没有从 18379 发出的边
Params
- source:起始顶点 id,必填项
- direction:起始顶点发出的边的方向(OUT,IN,BOTH),选填项,默认是 BOTH
- label:边的类型,选填项,默认代表所有 edge label
- max_depth:步数,必填项
- max_degree:查询过程中,单个顶点遍历的最大邻接边数目,选填项,默认为 10000
- capacity:遍历过程中最大的访问的顶点数目,选填项,默认为 10000000
- limit:返回的非环路的最大数目,选填项,默认为 10
3.2.20.2 使用方法
Method & Url
GET http://localhost:8080/graphspaces/DEFAULT/graphs/{graph}/traversers/rays?source="1:marko"&max_depth=2&direction=OUT
Response Status
Response Body
{
"rays":[
{
"objects":[
"1:marko",
"1:vadas"
]
},
{
"objects":[
"1:marko",
"2:lop"
]
},
{
"objects":[
"1:marko",
"1:josh",
"2:ripple"
]
},
{
"objects":[
"1:marko",
"1:josh",
"2:lop"
]
}
]
}
3.2.20.3 适用场景
查找起始顶点到某种关系的边界顶点的路径,例如:
- 家族关系中,查找一个人到所有还没有孩子的子孙的路径
- 设备关联网络中,找到某个设备到终端设备的路径
3.2.21.1 功能介绍
按照条件查询一批顶点对应的"梭形相似点"。当两个顶点跟很多共同的顶点之间有某种关系的时候,我们认为这两个点为"梭形相似点"。举个例子说明"梭形相似点":“读者 A"读了 100 本书,可以定义读过这 100 本书中的 80 本以上的读者,是"读者 A"的"梭形相似点”
Params
sources:定义起始顶点,必填项,指定方式包括:
- ids:通过顶点 id 列表提供起始顶点
- label 和 properties:如果没有指定 ids,则使用 label 和 properties 的联合条件查询起始顶点
- label:顶点的类型
- properties:通过属性的值查询起始顶点
注意:properties 中的属性值可以是列表,表示只要 key 对应的 value 在列表中就可以
label:边的类型,选填项,默认代表所有 edge label
direction:起始顶点向外发散的方向(OUT,IN,BOTH),选填项,默认是 BOTH
min_neighbors:最少邻居数目,邻居数目少于这个阈值时,认为起点不具备"梭形相似点"。比如想要找一个"读者 A"读过的书的"梭形相似点",那么min_neighbors为 100 时,表示"读者 A"至少要读过 100 本书才可以有"梭形相似点",必填项
alpha:相似度,代表:起点与"梭形相似点"的共同邻居数目占起点的全部邻居数目的比例,必填项
min_similars:“梭形相似点"的最少个数,只有当起点的"梭形相似点"数目大于或等于该值时,才会返回起点及其"梭形相似点”,选填项,默认值为 1
top:返回一个起点的"梭形相似点"中相似度最高的 top 个,必填项,0 表示全部
group_property:与min_groups一起使用,当起点跟其所有的"梭形相似点"某个属性的值有至少min_groups个不同值时,才会返回该起点及其"梭形相似点"。比如为"读者 A"推荐"异地"书友时,需要设置group_property为读者的"城市"属性,min_group至少为 2,选填项,不填代表不需要根据属性过滤
min_groups:与group_property一起使用,只有group_property设置时才有意义
max_degree:查询过程中,单个顶点遍历的最大邻接边数目,选填项,默认为 10000
capacity:遍历过程中最大的访问的顶点数目,选填项,默认为 10000000
limit:返回的结果数目上限(一个起点及其"梭形相似点"算一个结果),选填项,默认为 10
with_intermediary:是否返回起点及其"梭形相似点"共同关联的中间点,默认为 false
with_vertex,选填项,默认为 false:
- true 表示返回结果包含完整的顶点信息
- false 时表示只返回顶点 id
3.2.21.2 使用方法
Method & Url
POST http://localhost:8080/graphspaces/DEFAULT/graphs/hugegraph/traversers/fusiformsimilarity
Request Body
{
"sources":{
"ids":[],
"label": "person",
"properties": {
"name":"p1"
}
},
"label":"read",
"direction":"OUT",
"min_neighbors":8,
"alpha":0.75,
"min_similars":1,
"top":0,
"group_property":"city",
"min_group":2,
"max_degree": 10000,
"capacity": -1,
"limit": -1,
"with_intermediary": false,
"with_vertex":true
}
Response Status
Response Body
{
"similars": {
"3:p1": [
{
"id": "3:p2",
"score": 0.8888888888888888,
"intermediaries": [
]
},
{
"id": "3:p3",
"score": 0.7777777777777778,
"intermediaries": [
]
}
]
},
"vertices": [
{
"id": "3:p1",
"label": "person",
"type": "vertex",
"properties": {
"name": "p1",
"city": "Beijing"
}
},
{
"id": "3:p2",
"label": "person",
"type": "vertex",
"properties": {
"name": "p2",
"city": "Shanghai"
}
},
{
"id": "3:p3",
"label": "person",
"type": "vertex",
"properties": {
"name": "p3",
"city": "Beijing"
}
}
]
}
3.2.21.3 适用场景
查询一组顶点相似度很高的顶点。例如:
- 跟一个读者有类似书单的读者
- 跟一个玩家玩类似游戏的玩家
3.2.22 Vertices
3.2.22.1 根据顶点的 id 列表,批量查询顶点
Params
Method & Url
GET http://localhost:8080/graphspaces/DEFAULT/graphs/hugegraph/traversers/vertices?ids="1:marko"&ids="2:lop"
Response Status
Response Body
{
"vertices":[
{
"id":"1:marko",
"label":"person",
"type":"vertex",
"properties":{
"city":[
{
"id":"1:marko>city",
"value":"Beijing"
}
],
"name":[
{
"id":"1:marko>name",
"value":"marko"
}
],
"age":[
{
"id":"1:marko>age",
"value":29
}
]
}
},
{
"id":"2:lop",
"label":"software",
"type":"vertex",
"properties":{
"price":[
{
"id":"2:lop>price",
"value":328
}
],
"name":[
{
"id":"2:lop>name",
"value":"lop"
}
],
"lang":[
{
"id":"2:lop>lang",
"value":"java"
}
]
}
}
]
}
3.2.22.2 获取顶点 Shard 信息
通过指定的分片大小 split_size,获取顶点分片信息(可以与 3.2.21.3 中的 Scan 配合使用来获取顶点)。
Params
Method & Url
GET http://localhost:8080/graphspaces/DEFAULT/graphs/hugegraph/traversers/vertices/shards?split_size=67108864
Response Status
Response Body
{
"shards":[
{
"start": "0",
"end": "2165893",
"length": 0
},
{
"start": "2165893",
"end": "4331786",
"length": 0
},
{
"start": "4331786",
"end": "6497679",
"length": 0
},
{
"start": "6497679",
"end": "8663572",
"length": 0
},
......
]
}
3.2.22.3 根据 Shard 信息批量获取顶点
通过指定的分片信息批量查询顶点(Shard 信息的获取参见 3.2.21.2 Shard)。
Params
- start:分片起始位置,必填项
- end:分片结束位置,必填项
- page:分页位置,选填项,默认为 null,不分页;当 page 为“”时表示分页的第一页,从 start 指示的位置开始
- page_limit:分页获取顶点时,一页中顶点数目的上限,选填项,默认为 100000
Method & Url
GET http://localhost:8080/graphspaces/DEFAULT/graphs/hugegraph/traversers/vertices/scan?start=0&end=4294967295
Response Status
Response Body
{
"vertices":[
{
"id":"2:ripple",
"label":"software",
"type":"vertex",
"properties":{
"price":[
{
"id":"2:ripple>price",
"value":199
}
],
"name":[
{
"id":"2:ripple>name",
"value":"ripple"
}
],
"lang":[
{
"id":"2:ripple>lang",
"value":"java"
}
]
}
},
{
"id":"1:vadas",
"label":"person",
"type":"vertex",
"properties":{
"city":[
{
"id":"1:vadas>city",
"value":"Hongkong"
}
],
"name":[
{
"id":"1:vadas>name",
"value":"vadas"
}
],
"age":[
{
"id":"1:vadas>age",
"value":27
}
]
}
},
{
"id":"1:peter",
"label":"person",
"type":"vertex",
"properties":{
"city":[
{
"id":"1:peter>city",
"value":"Shanghai"
}
],
"name":[
{
"id":"1:peter>name",
"value":"peter"
}
],
"age":[
{
"id":"1:peter>age",
"value":35
}
]
}
},
{
"id":"1:josh",
"label":"person",
"type":"vertex",
"properties":{
"city":[
{
"id":"1:josh>city",
"value":"Beijing"
}
],
"name":[
{
"id":"1:josh>name",
"value":"josh"
}
],
"age":[
{
"id":"1:josh>age",
"value":32
}
]
}
},
{
"id":"1:marko",
"label":"person",
"type":"vertex",
"properties":{
"city":[
{
"id":"1:marko>city",
"value":"Beijing"
}
],
"name":[
{
"id":"1:marko>name",
"value":"marko"
}
],
"age":[
{
"id":"1:marko>age",
"value":29
}
]
}
},
{
"id":"2:lop",
"label":"software",
"type":"vertex",
"properties":{
"price":[
{
"id":"2:lop>price",
"value":328
}
],
"name":[
{
"id":"2:lop>name",
"value":"lop"
}
],
"lang":[
{
"id":"2:lop>lang",
"value":"java"
}
]
}
}
]
}
3.2.22.4 适用场景
- 按 id 列表查询顶点,可用于批量查询顶点,比如在 path 查询到多条路径之后,可以进一步查询某条路径的所有顶点属性。
- 获取分片和按分片查询顶点,可以用来遍历全部顶点
3.2.23 Edges
3.2.23.1 根据边的 id 列表,批量查询边
Params
Method & Url
GET http://localhost:8080/graphspaces/DEFAULT/graphs/hugegraph/traversers/edges?ids="S1:josh>1>>S2:lop"&ids="S1:josh>1>>S2:ripple"
Response Status
Response Body
{
"edges": [
{
"id": "S1:josh>1>>S2:lop",
"label": "created",
"type": "edge",
"inVLabel": "software",
"outVLabel": "person",
"inV": "2:lop",
"outV": "1:josh",
"properties": {
"date": "20091111",
"weight": 0.4
}
},
{
"id": "S1:josh>1>>S2:ripple",
"label": "created",
"type": "edge",
"inVLabel": "software",
"outVLabel": "person",
"inV": "2:ripple",
"outV": "1:josh",
"properties": {
"date": "20171210",
"weight": 1
}
}
]
}
3.2.23.2 获取边 Shard 信息
通过指定的分片大小 split_size,获取边分片信息(可以与 3.2.22.3 中的 Scan 配合使用来获取边)。
Params
Method & Url
GET http://localhost:8080/graphspaces/DEFAULT/graphs/hugegraph/traversers/edges/shards?split_size=4294967295
Response Status
Response Body
{
"shards":[
{
"start": "0",
"end": "1073741823",
"length": 0
},
{
"start": "1073741823",
"end": "2147483646",
"length": 0
},
{
"start": "2147483646",
"end": "3221225469",
"length": 0
},
{
"start": "3221225469",
"end": "4294967292",
"length": 0
},
{
"start": "4294967292",
"end": "4294967295",
"length": 0
}
]
}
3.2.23.3 根据 Shard 信息批量获取边
通过指定的分片信息批量查询边(Shard 信息的获取参见 3.2.22.2)。
Params
- start:分片起始位置,必填项
- end:分片结束位置,必填项
- page:分页位置,选填项,默认为 null,不分页;当 page 为“”时表示分页的第一页,从 start 指示的位置开始
- page_limit:分页获取边时,一页中边数目的上限,选填项,默认为 100000
Method & Url
GET http://localhost:8080/graphspaces/DEFAULT/graphs/hugegraph/traversers/edges/scan?start=0&end=3221225469
Response Status
Response Body
{
"edges":[
{
"id":"S1:peter>2>>S2:lop",
"label":"created",
"type":"edge",
"inVLabel":"software",
"outVLabel":"person",
"inV":"2:lop",
"outV":"1:peter",
"properties":{
"weight":0.2,
"date":"20170324"
}
},
{
"id":"S1:josh>2>>S2:lop",
"label":"created",
"type":"edge",
"inVLabel":"software",
"outVLabel":"person",
"inV":"2:lop",
"outV":"1:josh",
"properties":{
"weight":0.4,
"date":"20091111"
}
},
{
"id":"S1:josh>2>>S2:ripple",
"label":"created",
"type":"edge",
"inVLabel":"software",
"outVLabel":"person",
"inV":"2:ripple",
"outV":"1:josh",
"properties":{
"weight":1,
"date":"20171210"
}
},
{
"id":"S1:marko>1>20130220>S1:josh",
"label":"knows",
"type":"edge",
"inVLabel":"person",
"outVLabel":"person",
"inV":"1:josh",
"outV":"1:marko",
"properties":{
"weight":1,
"date":"20130220"
}
},
{
"id":"S1:marko>1>20160110>S1:vadas",
"label":"knows",
"type":"edge",
"inVLabel":"person",
"outVLabel":"person",
"inV":"1:vadas",
"outV":"1:marko",
"properties":{
"weight":0.5,
"date":"20160110"
}
},
{
"id":"S1:marko>2>>S2:lop",
"label":"created",
"type":"edge",
"inVLabel":"software",
"outVLabel":"person",
"inV":"2:lop",
"outV":"1:marko",
"properties":{
"weight":0.4,
"date":"20171210"
}
}
]
}
3.2.23.4 适用场景
- 按 id 列表查询边,可用于批量查询边
- 获取分片和按分片查询边,可以用来遍历全部边
5.1.11 - Rank API
Rank(图排序)REST 接口:执行图节点排序算法,如 PageRank、个性化 PageRank 等中心性分析。
4.1 rank API 概述
HugeGraphServer 除了上一节提到的遍历(traverser)方法,还提供了一类专门做推荐的方法,我们称为rank API,
可在图中为一个点推荐与其关系密切的其它点。
4.2 rank API 详解
4.2.1 Personal Rank API
Personal Rank 算法典型场景是用于推荐应用中,根据某个点现有的出边,推荐具有相近 / 相同关系的其他点,
比如根据某个人的阅读记录 / 习惯,向它推荐其他可能感兴趣的书,或潜在的书友,举例如下:
- 假设给定 1 个 Person 点 是 tom, 它喜欢
a,b,c,d,e 5 本书,我们的想给 tom 推荐一些书友,以及一些书,最容易的想法就是看看还有哪些人喜欢过这些书 (共同兴趣) - 那么此时,需要有其它的 Person 点比如 neo, 他喜欢
b,d,f 3 本书,以及 jay, 它喜欢 c,d,e,g 4 本书,lee 它喜欢 a,d,e,f 4 本书 - 由于 tom 已经看过的书不需要重复推荐,所以返回结果里应该期望推荐有共同喜好的其他书友看过,但 tom 没看过的书,比如推荐 “f” 和 “g” 书,且优先级 f > g
- 此时再计算 tom 的个性化 rank 值,就会返回排序后 TopN 推荐的 书友 + 书 的结果了 (如果只需要推荐的书,选择 OTHER_LABEL 即可)
4.2.1.0 数据准备
上面是一个简单的例子,这里再提供一个公开的 1MB 测试数据集 MovieLens 为例,
用户需下载该数据集,然后使用 HugeGraph-Loader 导入到 HugeGraph 中,简单起见,数据中顶点 user
和 movie 的属性都忽略,仅使用 id 字段即可,边 rating 的具体评分值也忽略。loader 使用的元数据
文件和输入源映射文件内容如下:
////////////////////////////////////////////////////////////
// UserID::Gender::Age::Occupation::Zip-code
// MovieID::Title::Genres
// UserID::MovieID::Rating::Timestamp
////////////////////////////////////////////////////////////
// Define schema
schema.propertyKey("id").asInt().ifNotExist().create();
schema.propertyKey("rate").asInt().ifNotExist().create();
schema.vertexLabel("user")
.properties("id")
.primaryKeys("id")
.ifNotExist()
.create();
schema.vertexLabel("movie")
.properties("id")
.primaryKeys("id")
.ifNotExist()
.create();
schema.edgeLabel("rating")
.sourceLabel("user")
.targetLabel("movie")
.properties("rate")
.ifNotExist()
.create();
{
"vertices": [
{
"label": "user",
"input": {
"type": "file",
"path": "users.dat",
"format": "TEXT",
"delimiter": "::",
"header": ["UserID", "Gender", "Age", "Occupation", "Zip-code"]
},
"ignored": ["Gender", "Age", "Occupation", "Zip-code"],
"mapping": {
"UserID": "id"
}
},
{
"label": "movie",
"input": {
"type": "file",
"path": "movies.dat",
"format": "TEXT",
"delimiter": "::",
"header": ["MovieID", "Title", "Genres"]
},
"ignored": ["Title", "Genres"],
"mapping": {
"MovieID": "id"
}
}
],
"edges": [
{
"label": "rating",
"source": ["UserID"],
"target": ["MovieID"],
"input": {
"type": "file",
"path": "ratings.dat",
"format": "TEXT",
"delimiter": "::",
"header": ["UserID", "MovieID", "Rating", "Timestamp"]
},
"ignored": ["Timestamp"],
"mapping": {
"UserID": "id",
"MovieID": "id",
"Rating": "rate"
}
}
]
}
注意将映射文件中input.path的值修改为自己本地的路径。
4.2.1.1 功能介绍
适用于二分图,给出所有源顶点相关的其他顶点及其相关性组成的列表。
二分图:也称二部图,是图论里的一种特殊模型,也是一种特殊的网络流。其最大的特点在于,可以将图里的顶点分为两个集合,两个集合之间的点有边相连,但集合内的点之间没有直接关联。
假设有一个用户和物品的二分图,基于随机游走的 PersonalRank 算法步骤如下:
- 选定一个起点用户 u,其初始权重为 1.0,从 Vu 开始游走(有 alpha 的概率走到邻居点,1 - alpha 的概率停留);
- 如果决定向外游走,那么会选取某一个类型的出边,例如
rating 来查找共同的打分人:- 那就从当前节点的邻居节点中按照均匀分布随机选择一个,并且按照均匀分布划分权重值;
- 给源顶点补偿权重 1 - alpha;
- 重复步骤 2;
- 达到一定步数或达到精度后收敛,得到推荐列表。
Params
必填项:
- source: 源顶点 id
- label: 源点出发的某类边 label,须连接两类不同顶点
选填项:
- alpha:每轮迭代时从某个点往外走的概率,与 PageRank 算法中的 alpha 类似,取值区间为 (0, 1], 默认值
0.85 - max_degree: 查询过程中,单个顶点遍历的最大邻接边数目,默认为
10000 - max_depth: 迭代次数,取值区间为 [2, 50], 默认值
5 - with_label:筛选结果中保留哪些结果,可选以下三类,默认为
BOTH_LABEL- SAME_LABEL:仅保留与源顶点相同类别的顶点
- OTHER_LABEL:仅保留与源顶点不同类别(二分图的另一端)的顶点
- BOTH_LABEL:同时保留与源顶点相同和相反类别的顶点
- limit: 返回的顶点的最大数目,默认为
100 - max_diff: 提前收敛的精度差,默认为
0.0001 (后续实现) - sorted:返回的结果是否根据 rank 排序,为 true 时降序排列,反之不排序,默认为
true
4.2.1.2 使用方法
Method & Url
POST http://localhost:8080/graphspaces/DEFAULT/graphs/hugegraph/traversers/personalrank
Request Body
{
"source": "1:1",
"label": "rating",
"alpha": 0.6,
"max_depth": 15,
"with_label": "OTHER_LABEL",
"sorted": true,
"limit": 10
}
Response Status
Response Body
{
"2:2858": 0.0005014026017816927,
"2:1196": 0.0004336708357653617,
"2:1210": 0.0004128083140214213,
"2:593": 0.00038117341069881513,
"2:480": 0.00037005373269728036,
"2:1198": 0.000366641614652057,
"2:2396": 0.0003622362410538888,
"2:2571": 0.0003593312457300953,
"2:589": 0.00035922123055598566,
"2:110": 0.0003466135844390885
}
4.2.1.3 适用场景
两类不同顶点连接形成的二分图中,给某个点推荐相关性最高的其他顶点,例如:
- 阅读推荐: 找出优先给某人推荐的其他书籍, 也可以同时推荐共同喜好最高的书友 (例: 微信 “你的好友也在看 xx 文章” 功能)
- 社交推荐: 找出拥有相同关注话题的其他博主, 也可以推荐可能感兴趣的新闻/消息 (例: Weibo 中的 “热点推荐” 功能)
- 商品推荐: 通过某人现在的购物习惯, 找出应优先推给它的商品列表, 也可以给它推荐带货播主 (例: TaoBao 的 “猜你喜欢” 功能)
4.2.2 Neighbor Rank API
4.2.2.0 数据准备
public class Loader {
public static void main(String[] args) {
HugeClient client = new HugeClient("http://127.0.0.1:8080", "hugegraph");
SchemaManager schema = client.schema();
schema.propertyKey("name").asText().ifNotExist().create();
schema.vertexLabel("person")
.properties("name")
.useCustomizeStringId()
.ifNotExist()
.create();
schema.vertexLabel("movie")
.properties("name")
.useCustomizeStringId()
.ifNotExist()
.create();
schema.edgeLabel("follow")
.sourceLabel("person")
.targetLabel("person")
.ifNotExist()
.create();
schema.edgeLabel("like")
.sourceLabel("person")
.targetLabel("movie")
.ifNotExist()
.create();
schema.edgeLabel("directedBy")
.sourceLabel("movie")
.targetLabel("person")
.ifNotExist()
.create();
GraphManager graph = client.graph();
Vertex O = graph.addVertex(T.label, "person", T.id, "O", "name", "O");
Vertex A = graph.addVertex(T.label, "person", T.id, "A", "name", "A");
Vertex B = graph.addVertex(T.label, "person", T.id, "B", "name", "B");
Vertex C = graph.addVertex(T.label, "person", T.id, "C", "name", "C");
Vertex D = graph.addVertex(T.label, "person", T.id, "D", "name", "D");
Vertex E = graph.addVertex(T.label, "movie", T.id, "E", "name", "E");
Vertex F = graph.addVertex(T.label, "movie", T.id, "F", "name", "F");
Vertex G = graph.addVertex(T.label, "movie", T.id, "G", "name", "G");
Vertex H = graph.addVertex(T.label, "movie", T.id, "H", "name", "H");
Vertex I = graph.addVertex(T.label, "movie", T.id, "I", "name", "I");
Vertex J = graph.addVertex(T.label, "movie", T.id, "J", "name", "J");
Vertex K = graph.addVertex(T.label, "person", T.id, "K", "name", "K");
Vertex L = graph.addVertex(T.label, "person", T.id, "L", "name", "L");
Vertex M = graph.addVertex(T.label, "person", T.id, "M", "name", "M");
O.addEdge("follow", A);
O.addEdge("follow", B);
O.addEdge("follow", C);
D.addEdge("follow", O);
A.addEdge("follow", B);
A.addEdge("like", E);
A.addEdge("like", F);
B.addEdge("like", G);
B.addEdge("like", H);
C.addEdge("like", I);
C.addEdge("like", J);
E.addEdge("directedBy", K);
F.addEdge("directedBy", B);
F.addEdge("directedBy", L);
G.addEdge("directedBy", M);
}
}
4.2.2.1 功能介绍
在一般图结构中,找出每一层与给定起点相关性最高的前 N 个顶点及其相关度,用图的语义理解就是:从起点往外走,
走到各层各个顶点的概率。
Params
- source: 源顶点 id,必填项
- alpha:每轮迭代时从某个点往外走的概率,与 PageRank 算法中的 alpha 类似,必填项,取值区间为 (0, 1]
- steps: 表示从起始顶点走过的路径规则,是一组 Step 的列表,每个 Step 对应结果中的一层,必填项。每个 Step 的结构如下:
- direction:表示边的方向(OUT, IN, BOTH),默认是 BOTH
- labels:边的类型列表,多个边类型取并集
- max_degree:查询过程中,单个顶点遍历的最大邻接边数目,默认为 10000 (注:0.12 版之前 step 内仅支持 degree 作为参数名,0.12 开始统一使用 max_degree, 并向下兼容 degree 写法)
- top:在结果中每一层只保留权重最高的前 N 个结果,默认为 100,最大值为 1000
- capacity: 遍历过程中最大的访问的顶点数目,选填项,默认为 10000000
4.2.2.2 使用方法
Method & Url
POST http://localhost:8080/graphspaces/DEFAULT/graphs/hugegraph/traversers/neighborrank
Request Body
{
"source":"O",
"steps":[
{
"direction":"OUT",
"labels":[
"follow"
],
"max_degree":-1,
"top":100
},
{
"direction":"OUT",
"labels":[
"follow",
"like"
],
"max_degree":-1,
"top":100
},
{
"direction":"OUT",
"labels":[
"directedBy"
],
"max_degree":-1,
"top":100
}
],
"alpha":0.9,
"capacity":-1
}
Response Status
Response Body
{
"ranks": [
{
"O": 1
},
{
"B": 0.4305,
"A": 0.3,
"C": 0.3
},
{
"G": 0.17550000000000002,
"H": 0.17550000000000002,
"I": 0.135,
"J": 0.135,
"E": 0.09000000000000001,
"F": 0.09000000000000001
},
{
"M": 0.15795,
"K": 0.08100000000000002,
"L": 0.04050000000000001
}
]
}
4.2.2.3 适用场景
为给定的起点在不同的层中找到最应该推荐的顶点。
- 比如:在观众、朋友、电影、导演的四层图结构中,根据某个观众的朋友们喜欢的电影,为这个观众推荐电影;或者根据这些电影是谁拍的,为其推荐导演。
5.1.12 - Variable API
Variable(变量)REST 接口:存储和管理键值对形式的全局变量,支持图级别的配置和状态管理。
5.1 Variables
Variables 可以用来存储有关整个图的数据,数据按照键值对的方式存取
5.1.1 创建或者更新某个键值对
Method & Url
PUT http://localhost:8080/graphspaces/DEFAULT/graphs/hugegraph/variables/name
Request Body
Response Status
Response Body
5.1.2 列出全部键值对
Method & Url
GET http://localhost:8080/graphspaces/DEFAULT/graphs/hugegraph/variables
Response Status
Response Body
5.1.3 列出某个键值对
Method & Url
GET http://localhost:8080/graphspaces/DEFAULT/graphs/hugegraph/variables/name
Response Status
Response Body
5.1.4 删除某个键值对
Method & Url
DELETE http://localhost:8080/graphspaces/DEFAULT/graphs/hugegraph/variables/name
Response Status
5.1.13 - Graphs API
Graphs(图管理)REST 接口:管理图实例的生命周期,包括创建、查询、克隆、清空和删除图数据库。
6.1 Graphs
重要提醒:1.7.0 及之后,动态创建图必须开启鉴权模式。非鉴权模式请参考图配置文件,通过配置文件静态创建图。
6.1.1 列出图空间中全部的图
Params
路径参数说明:
Method & Url
GET http://localhost:8080/graphspaces/DEFAULT/graphs
Response Status
Response Body
{
"graphs": [
"hugegraph",
"hugegraph1"
]
}
6.1.2 查看某个图的信息
Params
路径参数说明:
- graphspace: 图空间名称
- graph: 图名称
Method & Url
GET http://localhost:8080/graphspaces/DEFAULT/graphs/hugegraph
Response Status
Response Body
{
"name": "hugegraph",
"backend": "cassandra"
}
6.1.3 清空某个图的全部数据,包括 schema、vertex、edge 和 index 等,该操作需要管理员权限
Params
路径参数说明:
- graphspace: 图空间名称
- graph: 图名称
请求参数说明:
由于清空图是一个比较危险的操作,为避免用户误调用,我们给 API 添加了用于确认的参数:
- confirm_message: 默认为
I'm sure to delete all data
Method & Url
DELETE http://localhost:8080/graphspaces/DEFAULT/graphs/hugegraph/clear?confirm_message=I%27m+sure+to+delete+all+data
Response Status
6.1.4 克隆一个图 (管理员权限)
Params
路径参数说明:
- graphspace: 图空间名称
- graph: 要创建的新图名称
请求参数说明:
- clone_graph_name: 已有图的名称;从已有的图来克隆,用户可选择传递配置文件,传递时将替换已有图中的配置;
Method & Url
POST http://localhost:8080/graphspaces/DEFAULT/graphs/cloneGraph?clone_graph_name=hugegraph
Request Body (可选)
克隆一个非鉴权模式的图(设置 Content-Type: application/json)
{
"gremlin.graph": "org.apache.hugegraph.HugeFactory",
"backend": "rocksdb",
"serializer": "binary",
"store": "cloneGraph",
"rocksdb.data_path": "./rks-data-xx",
"rocksdb.wal_path": "./rks-data-xx"
}
Note:
- Rocksdb 存储路径不能与现有图相同(需使用不同的目录)
- 如需开启新图的权限系统,需替换设置
gremlin.graph=org.apache.hugegraph.auth.HugeFactoryAuthProxy
Response Status
Response Body
{
"name": "cloneGraph",
"backend": "rocksdb"
}
6.1.5 创建一个图,该操作需要管理员权限
Params
路径参数说明:
- graphspace: 图空间名称
- graph: 图名称
Method & Url
POST http://localhost:8080/graphspaces/DEFAULT/graphs/hugegraph-xx
Request Body
创建一个图(设置 Content-Type: application/json)
gremlin.graph 配置说明:
- 鉴权模式:
"gremlin.graph": "org.apache.hugegraph.auth.HugeFactoryAuthProxy"(推荐) - 非鉴权模式:
"gremlin.graph": "org.apache.hugegraph.HugeFactory"
注意!!
- 在 1.7.0 版本中,动态创建图会导致 NPE 错误。该问题已在 PR#2912 中修复。当前 master 版本和 1.7.0 之前的版本不受此问题影响。
- 1.7.0 及之前版本,如果 backend 是 hstore,必须在请求体加上 “task.scheduler_type”: “distributed”。同时请确保 HugeGraph-Server 已正确配置 PD,参见 HStore 配置。
RocksDB 示例:
{
"gremlin.graph": "org.apache.hugegraph.auth.HugeFactoryAuthProxy",
"backend": "rocksdb",
"serializer": "binary",
"store": "hugegraph",
"rocksdb.data_path": "./rks-data-xx",
"rocksdb.wal_path": "./rks-data-xx"
}
HStore 示例(适用于 1.7.0 及之前版本):
{
"gremlin.graph": "org.apache.hugegraph.auth.HugeFactoryAuthProxy",
"backend": "hstore",
"serializer": "binary",
"store": "hugegraph2",
"task.scheduler_type": "distributed",
"pd.peers": "127.0.0.1:8686"
}
Note: Rocksdb 存储路径不能与现有图相同(需使用不同的目录)
Response Status
Response Body
{
"name":"hugegraph2",
"backend": "rocksdb"
}
6.1.6 删除某个图及其全部数据
Params
路径参数说明:
- graphspace: 图空间名称
- graph: 图名称
请求参数说明:
由于删除图是一个比较危险的操作,为避免用户误调用,我们给 API 添加了用于确认的参数:
- confirm_message: 默认为
I'm sure to drop the graph
Method & Url
DELETE http://localhost:8080/graphspaces/DEFAULT/graphs/graphA?confirm_message=I%27m%20sure%20to%20drop%20the%20graph
Response Status
注意:对于 HugeGraph 1.5.0 及之前版本,如需创建或删除图,请继续使用旧的 text/plain(properties)格式请求体,而不是 JSON。
6.2 Conf
6.2.1 查看某个图的配置,该操作需要管理员权限
Method & Url
GET
http://localhost:8080/graphspaces/DEFAULT/graphs/hugegraph/conf
Response Status
Response Body
# gremlin entrence to create graph
gremlin.graph=org.apache.hugegraph.HugeFactory
# cache config
#schema.cache_capacity=1048576
#graph.cache_capacity=10485760
#graph.cache_expire=600
# schema illegal name template
#schema.illegal_name_regex=\s+|~.*
#vertex.default_label=vertex
backend=cassandra
serializer=cassandra
store=hugegraph
...=
6.3 Mode
合法的图模式包括:NONE,RESTORING,MERGING,LOADING
- None 模式(默认),元数据和图数据的写入属于正常状态。特别的:
- 元数据(schema)创建时不允许指定 ID
- 图数据(vertex)在 id strategy 为 Automatic 时,不允许指定 ID
- LOADING:批量导入数据时自动启用,特别的:
Restore 时存在两种不同的模式:Restoring 和 Merging
- Restoring 模式,恢复到一个新图中,特别的:
- 元数据(schema)创建时允许指定 ID
- 图数据(vertex)在 id strategy 为 Automatic 时,允许指定 ID
- Merging 模式,合并到一个已存在元数据和图数据的图中,特别的:
- 元数据(schema)创建时不允许指定 ID
- 图数据(vertex)在 id strategy 为 Automatic 时,允许指定 ID
正常情况下,图模式为 None,当需要 Restore 图时,需要根据需要临时修改图模式为 Restoring 模式或者 Merging
模式,并在完成 Restore 时,恢复图模式为 None。
6.3.1 查看某个图的模式。
Method & Url
GET http://localhost:8080/graphspaces/DEFAULT/graphs/hugegraph/mode
Response Status
Response Body
合法的图模式包括:NONE,RESTORING,MERGING
6.3.2 设置某个图的模式。该操作需要管理员权限
Method & Url
PUT http://localhost:8080/graphspaces/DEFAULT/graphs/hugegraph/mode
Request Body
合法的图模式包括:NONE,RESTORING,MERGING
Response Status
Response Body
6.3.3 查看某个图的读模式。
Params
Method & Url
GET http://localhost:8080/graphspaces/DEFAULT/graphs/hugegraph/graph_read_mode
Response Status
Response Body
{
"graph_read_mode": "ALL"
}
6.3.4 设置某个图的读模式。该操作需要管理员权限
Params
Method & Url
PUT http://localhost:8080/graphspaces/DEFAULT/graphs/hugegraph/graph_read_mode
Request Body
合法的图模式包括:ALL,OLTP_ONLY,OLAP_ONLY
Response Status
Response Body
{
"graph_read_mode": "OLTP_ONLY"
}
6.4 Snapshot
6.4.1 创建快照
Params
Method & Url
PUT http://localhost:8080/graphspaces/DEFAULT/graphs/hugegraph/snapshot_create
Response Status
Response Body
{
"hugegraph": "snapshot_created"
}
6.4.2 快照恢复
Params
Method & Url
PUT http://localhost:8080/graphspaces/DEFAULT/graphs/hugegraph/snapshot_resume
Response Status
Response Body
{
"hugegraph": "snapshot_resumed"
}
6.5 Compact
6.5.1 手动压缩图,该操作需要管理员权限
Params
Method & Url
PUT http://localhost:8080/graphspaces/DEFAULT/graphs/hugegraph/compact
Response Status
Response Body
{
"nodes": 1,
"cluster_id": "local",
"servers": {
"local": "OK"
}
}
5.1.14 - Task API
Task(任务管理)REST 接口:查询和管理异步任务的执行状态,如索引重建、图遍历等长时任务。
7.1 Task
7.1.1 列出某个图中全部的异步任务
Params
- status: 异步任务的状态
- limit:返回异步任务数目上限
Method & Url
GET http://localhost:8080/graphspaces/DEFAULT/graphs/hugegraph/tasks?status=success
Response Status
Response Body
{
"tasks": [{
"task_name": "hugegraph.traversal().V()",
"task_progress": 0,
"task_create": 1532943976585,
"task_status": "success",
"task_update": 1532943976736,
"task_result": "0",
"task_retries": 0,
"id": 2,
"task_type": "gremlin",
"task_callable": "org.apache.hugegraph.api.job.GremlinAPI$GremlinJob",
"task_input": "{\"gremlin\":\"hugegraph.traversal().V()\",\"bindings\":{},\"language\":\"gremlin-groovy\",\"aliases\":{\"hugegraph\":\"graph\"}}"
}]
}
7.1.2 查看某个异步任务的信息
Method & Url
GET http://localhost:8080/graphspaces/DEFAULT/graphs/hugegraph/tasks/2
Response Status
Response Body
{
"task_name": "hugegraph.traversal().V()",
"task_progress": 0,
"task_create": 1532943976585,
"task_status": "success",
"task_update": 1532943976736,
"task_result": "0",
"task_retries": 0,
"id": 2,
"task_type": "gremlin",
"task_callable": "org.apache.hugegraph.api.job.GremlinAPI$GremlinJob",
"task_input": "{\"gremlin\":\"hugegraph.traversal().V()\",\"bindings\":{},\"language\":\"gremlin-groovy\",\"aliases\":{\"hugegraph\":\"graph\"}}"
}
7.1.3 删除某个异步任务信息,不删除异步任务本身
Method & Url
DELETE http://localhost:8080/graphspaces/DEFAULT/graphs/hugegraph/tasks/2
Response Status
7.1.4 取消某个异步任务,该异步任务必须具有处理中断的能力
假设已经通过Gremlin API创建了一个异步任务如下:
"for (int i = 0; i < 10; i++) {" +
"hugegraph.addVertex(T.label, 'man');" +
"hugegraph.tx().commit();" +
"try {" +
"sleep(1000);" +
"} catch (InterruptedException e) {" +
"break;" +
"}" +
"}"
Method & Url
PUT http://localhost:8080/graphspaces/DEFAULT/graphs/hugegraph/tasks/2?action=cancel
请保证在 10 秒内发送该请求,如果超过 10 秒发送,任务可能已经执行完成,无法取消。
Response Status
Response Body
此时查询 label 为 man 的顶点数目,一定是小于 10 的。
5.1.15 - Gremlin API
Gremlin(图查询语言)REST 接口:通过 HTTP 接口执行 Gremlin 图遍历查询语言脚本。
8.1 Gremlin
⚠️ SEC 提醒:生产环境下安全使用原生查询接口
图查询语言 (如 Gremlin/Cypher) 本身的灵活性会带来一些潜在的安全隐患。为了保障核心安全,请避免直接在公网环境暴露任何相关的原生查询接口。
在必须对内暴露的生产场景中,必须开启 鉴权体系 (Auth) 并结合 IP 白名单作为双重保障机制,严格控制用户执行权限。同时建议结合 Audit Log (审计日志) 来审计具体执行的语句,以及采用 容器环境 (Docker/K8s) 部署以提升系统级的安全隔离。
8.1.1 向 HugeGraphServer 发送 gremlin 语句(GET),同步执行
Params
- gremlin: 要发送给
HugeGraphServer执行的gremlin语句 - bindings: 用来绑定参数,key 是字符串,value 是绑定的值(只能是字符串或者数字),功能类似于 MySQL 的 Prepared Statement,用于加速语句执行
- language: 发送语句的语言类型,默认为
gremlin-groovy - aliases: 为存在于图空间的已有变量添加别名
查询顶点
Method & Url
GET http://127.0.0.1:8080/gremlin?gremlin=hugegraph.traversal().V('1:marko')
Response Status
Response Body
{
"requestId": "c6ef47a8-b634-4b07-9d38-6b3b69a3a556",
"status": {
"message": "",
"code": 200,
"attributes": {}
},
"result": {
"data": [{
"id": "1:marko",
"label": "person",
"type": "vertex",
"properties": {
"city": [{
"id": "1:marko>city",
"value": "Beijing"
}],
"name": [{
"id": "1:marko>name",
"value": "marko"
}],
"age": [{
"id": "1:marko>age",
"value": 29
}]
}
}],
"meta": {}
}
}
8.1.2 向 HugeGraphServer 发送 gremlin 语句(POST),同步执行
Method & Url
POST http://localhost:8080/gremlin
查询顶点
Request Body
{
"gremlin": "hugegraph.traversal().V('1:marko')",
"bindings": {},
"language": "gremlin-groovy",
"aliases": {}
}
Response Status
Response Body
{
"requestId": "c6ef47a8-b634-4b07-9d38-6b3b69a3a556",
"status": {
"message": "",
"code": 200,
"attributes": {}
},
"result": {
"data": [{
"id": "1:marko",
"label": "person",
"type": "vertex",
"properties": {
"city": [{
"id": "1:marko>city",
"value": "Beijing"
}],
"name": [{
"id": "1:marko>name",
"value": "marko"
}],
"age": [{
"id": "1:marko>age",
"value": 29
}]
}
}],
"meta": {}
}
}
注意:
这里是直接使用图对象(hugegraph),先获取其遍历器(traversal()),再获取顶点。
不能直接写成graph.traversal().V()或g.V(),可以通过"aliases": {"graph": "hugegraph", "g": "__g_hugegraph"}
为图和遍历器添加别名后使用别名操作。其中,hugegraph是原生存在的变量,__g_hugegraph是HugeGraphServer额外添加的变量,
每个图都会存在一个对应的这样格式(_g${graph})的遍历器对象。
响应体的结构与其他 Vertex 或 Edge 的 RESTful API 的结构有区别,用户可能需要自行解析。
查询边
Request Body
{
"gremlin": "g.E('S1:marko>2>>S2:lop')",
"bindings": {},
"language": "gremlin-groovy",
"aliases": {
"graph": "hugegraph",
"g": "__g_hugegraph"
}
}
Response Status
Response Body
{
"requestId": "3f117cd4-eedc-4e08-a106-ee01d7bb8249",
"status": {
"message": "",
"code": 200,
"attributes": {}
},
"result": {
"data": [{
"id": "S1:marko>2>>S2:lop",
"label": "created",
"type": "edge",
"inVLabel": "software",
"outVLabel": "person",
"inV": "2:lop",
"outV": "1:marko",
"properties": {
"weight": 0.4,
"date": "20171210"
}
}],
"meta": {}
}
}
8.1.3 向 HugeGraphServer 发送 gremlin 语句(POST),异步执行
Method & Url
POST http://localhost:8080/graphspaces/DEFAULT/graphs/hugegraph/jobs/gremlin
查询顶点
Request Body
{
"gremlin": "g.V('1:marko')",
"bindings": {},
"language": "gremlin-groovy",
"aliases": {}
}
注意:
异步执行 Gremlin 语句暂不支持 aliases,可以使用 graph 代表要操作的图,也可以直接使用图的名字,例如 hugegraph;
另外g代表 traversal,等价于 graph.traversal() 或者 hugegraph.traversal()
Response Status
Response Body
注:
可以通过GET http://localhost:8080/graphspaces/DEFAULT/graphs/hugegraph/tasks/1(其中"1"是 task_id)来查询异步任务的执行状态,更多异步任务 RESTful API
查询边
Request Body
{
"gremlin": "g.E('S1:marko>2>>S2:lop')",
"bindings": {},
"language": "gremlin-groovy",
"aliases": {}
}
Response Status
Response Body
注:
可以通过GET http://localhost:8080/graphspaces/DEFAULT/graphs/hugegraph/tasks/2(其中"2"是 task_id)来查询异步任务的执行状态,更多异步任务 RESTful API
5.1.16 - Cypher API
Cypher(图查询语言)REST 接口:通过 HTTP 接口执行 OpenCypher 声明式图查询语言。
9.1 Cypher
9.1.1 向 HugeGraphServer 发送 Cypher 语句(GET),同步执行
Method & Url
GET /graphspaces/{graphspace}/graphs/{graph}/cypher?cypher={cypher}
Params
路径参数说明:
- graphspace: 图空间名称
- graph: 图名称
请求参数说明:
使用示例
GET
http://localhost:8080/graphspaces/DEFAULT/graphs/hugecypher1/cypher?cypher=match(n:person) return n.name as name order by n.name limit 1
Response Status
Response Body
{
"requestId": "766b9f48-2f10-40d9-951a-3027d0748ab7",
"status": {
"message": "",
"code": 200,
"attributes": {
}
},
"result": {
"data": [
{
"name": "hello"
}
],
"meta": {
}
}
}
9.1.2 向 HugeGraphServer 发送 Cypher 语句(POST),同步执行
Method & Url
POST /graphspaces/{graphspace}/graphs/{graph}/cypher
Params
路径参数说明:
- graphspace: 图空间名称
- graph: 图名称
Body
{cypher}
注意:
不是 JSON 格式,是纯文本的 Cypher 语句
使用示例
POST
http://localhost:8080/graphspaces/DEFAULT/graphs/hugecypher1/cypher
Request Body
match(n:person) return n.name as name order by n.name limit 1
Response Status
Response Body
{
"requestId": "f096bee0-e249-498f-b5a3-ea684fc84f57",
"status": {
"message": "",
"code": 200,
"attributes": {
}
},
"result": {
"data": [
{
"name": "hello"
}
],
"meta": {
}
}
}
5.1.17 - Authentication API
Authentication(认证鉴权)REST 接口:管理用户、角色、权限和访问控制,实现细粒度的图数据安全机制。
版本变更说明:
- 1.7.0+: Auth API 路径使用 GraphSpace 格式,如
/graphspaces/DEFAULT/auth/users,且 group/target 等 id 格式与 name 一致(如 admin) - 1.5.x 及更早: Auth API 路径包含 graph 名称,group/target 等 id 格式类似
-69:grant。参考 HugeGraph 1.5.x RESTful API
10.1 用户认证与权限控制
开启权限及相关配置请先参考 权限配置 文档
用户认证与权限控制概述:
HugeGraph 支持多用户认证、以及细粒度的权限访问控制,采用基于“用户 - 用户组 - 操作 - 资源”的 4 层设计,灵活控制用户角色与权限。
资源描述了图数据库中的数据,比如符合某一类条件的顶点,每一个资源包括 type、label、properties 三个要素,共有 18 种 type、
任意 label、任意 properties 的组合形成的资源,一个资源的内部条件是且关系,多个资源之间的条件是或关系。用户可以属于一个或多个用户组,
每个用户组可以拥有对任意个资源的操作权限,操作类型包括:读、写、删除、执行等种类。HugeGraph 支持动态创建用户、用户组、资源,
支持动态分配或取消权限。初始化数据库时超级管理员用户被创建,后续可通过超级管理员创建各类角色用户,新创建的用户如果被分配足够权限后,可以由其创建或管理更多的用户。
举例说明:
user(name=boss) -belong-> group(name=all) -access(read)-> target(graph=graph1, resource={label: person,
city: Beijing})
描述:用户’boss’拥有对’graph1’图中北京人的读权限。
接口说明:
用户认证与权限控制接口包括 5 类:UserAPI、GroupAPI、TargetAPI、BelongAPI、AccessAPI。
注意: 1.5.0 及之前,group/target 等 id 的格式类似 -69:grant,1.7.0 及之后,id 和 name 一致,如 admin HugeGraph 1.5.x RESTful API
10.2 用户(User)API
用户接口包括:创建用户,删除用户,修改用户,和查询用户相关信息接口。
10.2.1 创建用户
Params
- user_name: 用户名称
- user_password: 用户密码
- user_phone: 用户手机号
- user_email: 用户邮箱
其中 user_name 和 user_password 为必填。
Request Body
{
"user_name": "boss",
"user_password": "******",
"user_phone": "182****9088",
"user_email": "123@xx.com"
}
Method & Url
POST http://localhost:8080/graphspaces/DEFAULT/auth/users
Response Status
Response Body
返回报文中,密码为加密后的密文
{
"user_password": "******",
"user_email": "123@xx.com",
"user_update": "2020-11-17 14:31:07.833",
"user_name": "boss",
"user_creator": "admin",
"user_phone": "182****9088",
"id": "boss",
"user_create": "2020-11-17 14:31:07.833"
}
10.2.2 删除用户
Params
Method & Url
DELETE http://localhost:8080/graphspaces/DEFAULT/auth/users/test
Response Status
Response Body
10.2.3 修改用户
Params
Method & Url
PUT http://localhost:8080/graphspaces/DEFAULT/auth/users/test
Request Body
修改 user_name、user_password 和 user_phone
{
"user_name": "test",
"user_password": "******",
"user_phone": "183****9266"
}
Response Status
Response Body
返回结果是包含修改过的内容在内的整个用户组对象
{
"user_password": "******",
"user_update": "2020-11-12 10:29:30.455",
"user_name": "test",
"user_creator": "admin",
"user_phone": "183****9266",
"id": "test",
"user_create": "2020-11-12 10:27:13.601"
}
10.2.4 查询用户列表
Params
Method & Url
GET http://localhost:8080/graphspaces/DEFAULT/auth/users
Response Status
Response Body
{
"users": [
{
"user_password": "******",
"user_update": "2020-11-11 11:41:12.254",
"user_name": "admin",
"user_creator": "system",
"id": "admin",
"user_create": "2020-11-11 11:41:12.254"
}
]
}
10.2.5 查询某个用户
Params
Method & Url
GET http://localhost:8080/graphspaces/DEFAULT/auth/users/admin
Response Status
Response Body
{
"users": [
{
"user_password": "******",
"user_update": "2020-11-11 11:41:12.254",
"user_name": "admin",
"user_creator": "system",
"id": "admin",
"user_create": "2020-11-11 11:41:12.254"
}
]
}
10.2.6 查询某个用户的角色
Method & Url
GET http://localhost:8080/graphspaces/DEFAULT/auth/users/boss/role
Response Status
Response Body
{
"roles": {
"hugegraph": {
"READ": [
{
"type": "ALL",
"label": "*",
"properties": null
}
]
}
}
}
10.3 用户组(Group)API
用户组会赋予相应的资源权限,用户会被分配不同的用户组,即可拥有不同的资源权限。
用户组接口包括:创建用户组,删除用户组,修改用户组,和查询用户组相关信息接口。
10.3.1 创建用户组
Params
- group_name: 用户组名称
- group_description: 用户组描述
Request Body
{
"group_name": "all",
"group_description": "group can do anything"
}
Method & Url
POST http://localhost:8080/graphspaces/DEFAULT/auth/groups
Response Status
Response Body
{
"group_creator": "admin",
"group_name": "all",
"group_create": "2020-11-11 15:46:08.791",
"group_update": "2020-11-11 15:46:08.791",
"id": "-69:all",
"group_description": "group can do anything"
}
10.3.2 删除用户组
Params
Method & Url
DELETE http://localhost:8080/graphspaces/DEFAULT/auth/groups/-69:grant
Response Status
Response Body
10.3.3 修改用户组
Params
Method & Url
PUT http://localhost:8080/graphspaces/DEFAULT/auth/groups/-69:grant
Request Body
修改 group_description
{
"group_name": "grant",
"group_description": "grant"
}
Response Status
Response Body
返回结果是包含修改过的内容在内的整个用户组对象
{
"group_creator": "admin",
"group_name": "grant",
"group_create": "2020-11-12 09:50:58.458",
"group_update": "2020-11-12 09:57:58.155",
"id": "-69:grant",
"group_description": "grant"
}
10.3.4 查询用户组列表
Params
Method & Url
GET http://localhost:8080/graphspaces/DEFAULT/auth/groups
Response Status
Response Body
{
"groups": [
{
"group_creator": "admin",
"group_name": "all",
"group_create": "2020-11-11 15:46:08.791",
"group_update": "2020-11-11 15:46:08.791",
"id": "-69:all",
"group_description": "group can do anything"
}
]
}
10.3.5 查询某个用户组
Params
Method & Url
GET http://localhost:8080/graphspaces/DEFAULT/auth/groups/-69:all
Response Status
Response Body
{
"group_creator": "admin",
"group_name": "all",
"group_create": "2020-11-11 15:46:08.791",
"group_update": "2020-11-11 15:46:08.791",
"id": "-69:all",
"group_description": "group can do anything"
}
10.4 资源(Target)API
资源描述了图数据库中的数据,比如符合某一类条件的顶点,每一个资源包括 type、label、properties 三个要素,共有 18 种 type、
任意 label、任意 properties 的组合形成的资源,一个资源的内部条件是且关系,多个资源之间的条件是或关系。
资源接口包括:资源的创建、删除、修改和查询。
10.4.1 创建资源
Params
- target_name: 资源名称
- target_graph: 资源图
- target_url: 资源地址
- target_resources: 资源定义 (列表)
target_resources 可以包括多个 target_resource,以列表的形式存储。
每个 target_resource 包含:
- type:可选值 VERTEX, EDGE 等,可填 ALL,则表示可以是顶点或边;
- label:可选值,⼀个顶点或边类型的名称,可填*,则表示任意类型;
- properties:map 类型,可包含多个属性的键值对,必须匹配所有属性值,属性值⽀持填条件范围(age:
P.gte(18)),properties 如果为 null 表示任意属性均可,如果属性名和属性值均为‘*ʼ也表示任意属性均可。
如精细资源:“target_resources”: [{“type”:“VERTEX”,“label”:“person”,“properties”:{“city”:“Beijing”,“age”:“P.gte(20)”}}]**
资源定义含义:类型是’person’的顶点,且城市属性是’Beijing’,年龄属性大于等于 20。
Request Body
{
"target_name": "all",
"target_graph": "hugegraph",
"target_url": "127.0.0.1:8080",
"target_resources": [
{
"type": "ALL"
}
]
}
Method & Url
POST http://localhost:8080/graphspaces/DEFAULT/auth/targets
Response Status
Response Body
{
"target_creator": "admin",
"target_name": "all",
"target_url": "127.0.0.1:8080",
"target_graph": "hugegraph",
"target_create": "2020-11-11 15:32:01.192",
"target_resources": [
{
"type": "ALL",
"label": "*",
"properties": null
}
],
"id": "-77:all",
"target_update": "2020-11-11 15:32:01.192"
}
10.4.2 删除资源
Params
Method & Url
DELETE http://localhost:8080/graphspaces/DEFAULT/auth/targets/-77:gremlin
Response Status
Response Body
10.4.3 修改资源
Params
Method & Url
PUT http://localhost:8080/graphspaces/DEFAULT/auth/targets/-77:gremlin
Request Body
修改资源定义中的 type
{
"target_name": "gremlin",
"target_graph": "hugegraph",
"target_url": "127.0.0.1:8080",
"target_resources": [
{
"type": "NONE"
}
]
}
Response Status
Response Body
返回结果是包含修改过的内容在内的整个用户组对象
{
"target_creator": "admin",
"target_name": "gremlin",
"target_url": "127.0.0.1:8080",
"target_graph": "hugegraph",
"target_create": "2020-11-12 09:34:13.848",
"target_resources": [
{
"type": "NONE",
"label": "*",
"properties": null
}
],
"id": "-77:gremlin",
"target_update": "2020-11-12 09:37:12.780"
}
10.4.4 查询资源列表
Params
Method & Url
GET http://localhost:8080/graphspaces/DEFAULT/auth/targets
Response Status
Response Body
{
"targets": [
{
"target_creator": "admin",
"target_name": "all",
"target_url": "127.0.0.1:8080",
"target_graph": "hugegraph",
"target_create": "2020-11-11 15:32:01.192",
"target_resources": [
{
"type": "ALL",
"label": "*",
"properties": null
}
],
"id": "-77:all",
"target_update": "2020-11-11 15:32:01.192"
},
{
"target_creator": "admin",
"target_name": "grant",
"target_url": "127.0.0.1:8080",
"target_graph": "hugegraph",
"target_create": "2020-11-11 15:43:24.841",
"target_resources": [
{
"type": "GRANT",
"label": "*",
"properties": null
}
],
"id": "-77:grant",
"target_update": "2020-11-11 15:43:24.841"
}
]
}
10.4.5 查询某个资源
Params
Method & Url
GET http://localhost:8080/graphspaces/DEFAULT/auth/targets/-77:grant
Response Status
Response Body
{
"target_creator": "admin",
"target_name": "grant",
"target_url": "127.0.0.1:8080",
"target_graph": "hugegraph",
"target_create": "2020-11-11 15:43:24.841",
"target_resources": [
{
"type": "GRANT",
"label": "*",
"properties": null
}
],
"id": "-77:grant",
"target_update": "2020-11-11 15:43:24.841"
}
10.5 关联角色(Belong)API
关联用户和用户组的关系,一个用户可以关联一个或者多个用户组。用户组拥有相关资源的权限,不同用户组的资源权限可以理解为不同的角色。即给用户关联角色。
关联角色接口包括:用户关联角色的创建、删除、修改和查询。
10.5.1 创建用户的关联角色
Params
- user: 用户 Id
- group: 用户组 Id
- belong_description: 描述
Request Body
{
"user": "boss",
"group": "-69:all"
}
Method & Url
POST http://localhost:8080/graphspaces/DEFAULT/auth/belongs
Response Status
Response Body
{
"belong_create": "2020-11-11 16:19:35.422",
"belong_creator": "admin",
"belong_update": "2020-11-11 16:19:35.422",
"id": "Sboss>-82>>S-69:all",
"user": "boss",
"group": "-69:all"
}
10.5.2 删除关联角色
Params
Method & Url
DELETE http://localhost:8080/graphspaces/DEFAULT/auth/belongs/Sboss>-82>>S-69:grant
Response Status
Response Body
10.5.3 修改关联角色
关联角色只能修改描述,不能修改 user 和 group 属性,如果需要修改关联角色,需要删除原来关联关系,新增关联角色。
Params
Method & Url
PUT http://localhost:8080/graphspaces/DEFAULT/auth/belongs/Sboss>-82>>S-69:grant
Request Body
修改 belong_description
{
"belong_description": "update test"
}
Response Status
Response Body
返回结果是包含修改过的内容在内的整个用户组对象
{
"belong_description": "update test",
"belong_create": "2020-11-12 10:40:21.720",
"belong_creator": "admin",
"belong_update": "2020-11-12 10:42:47.265",
"id": "Sboss>-82>>S-69:grant",
"user": "boss",
"group": "-69:grant"
}
10.5.4 查询关联角色列表
Params
Method & Url
GET http://localhost:8080/graphspaces/DEFAULT/auth/belongs
Response Status
Response Body
{
"belongs": [
{
"belong_create": "2020-11-11 16:19:35.422",
"belong_creator": "admin",
"belong_update": "2020-11-11 16:19:35.422",
"id": "Sboss>-82>>S-69:all",
"user": "boss",
"group": "-69:all"
}
]
}
10.5.5 查看某个关联角色
Params
Method & Url
GET http://localhost:8080/graphspaces/DEFAULT/auth/belongs/Sboss>-82>>S-69:all
Response Status
Response Body
{
"belong_create": "2020-11-11 16:19:35.422",
"belong_creator": "admin",
"belong_update": "2020-11-11 16:19:35.422",
"id": "Sboss>-82>>S-69:all",
"user": "boss",
"group": "-69:all"
}
10.6 赋权(Access)API
给用户组赋予资源的权限,主要包含:读操作 (READ)、写操作 (WRITE)、删除操作 (DELETE)、执行操作 (EXECUTE) 等。
赋权接口包括:赋权的创建、删除、修改和查询。
10.6.1 创建赋权 (用户组赋予资源的权限)
Params
- group: 用户组 Id
- target: 资源 Id
- access_permission: 权限许可
- access_description: 赋权描述
access_permission:
- READ:读操作,所有的查询,包括查询 Schema、查顶点/边,查询顶点和边的数量 VERTEX_AGGR/EDGE_AGGR,也包括读图的状态 STATUS、变量 VAR、任务 TASK 等;
- WRITE:写操作,所有的创建、更新操作,包括给 Schema 增加 property key,给顶点增加或更新属性等;
- DELETE:删除操作,包括删除元数据、删除顶点/边;
- EXECUTE:执⾏操作,包括执⾏ Gremlin 语句、执⾏ Task、执⾏ metadata 函数;
Request Body
{
"group": "-69:all",
"target": "-77:all",
"access_permission": "READ"
}
Method & Url
POST http://localhost:8080/graphspaces/DEFAULT/auth/accesses
Response Status
Response Body
{
"access_permission": "READ",
"access_create": "2020-11-11 15:54:54.008",
"id": "S-69:all>-88>11>S-77:all",
"access_update": "2020-11-11 15:54:54.008",
"access_creator": "admin",
"group": "-69:all",
"target": "-77:all"
}
10.6.2 删除赋权
Params
Method & Url
DELETE http://localhost:8080/graphspaces/DEFAULT/auth/accesses/S-69:all>-88>12>S-77:all
Response Status
Response Body
10.6.3 修改赋权
赋权只能修改描述,不能修改用户组、资源和权限许可,如果需要修改赋权的关系,可以删除原来的赋权关系,新增赋权。
Params
Method & Url
PUT http://localhost:8080/graphspaces/DEFAULT/auth/accesses/S-69:all>-88>12>S-77:all
Request Body
修改 access_description
{
"access_description": "test"
}
Response Status
Response Body
返回结果是包含修改过的内容在内的整个用户组对象
{
"access_description": "test",
"access_permission": "WRITE",
"access_create": "2020-11-12 10:12:03.074",
"id": "S-69:all>-88>12>S-77:all",
"access_update": "2020-11-12 10:16:18.637",
"access_creator": "admin",
"group": "-69:all",
"target": "-77:all"
}
10.6.4 查询赋权列表
Params
Method & Url
GET http://localhost:8080/graphspaces/DEFAULT/auth/accesses
Response Status
Response Body
{
"accesses": [
{
"access_permission": "READ",
"access_create": "2020-11-11 15:54:54.008",
"id": "S-69:all>-88>11>S-77:all",
"access_update": "2020-11-11 15:54:54.008",
"access_creator": "admin",
"group": "-69:all",
"target": "-77:all"
}
]
}
10.6.5 查询某个赋权
Params
Method & Url
GET http://localhost:8080/graphspaces/DEFAULT/auth/accesses/S-69:all>-88>11>S-77:all
Response Status
Response Body
{
"access_permission": "READ",
"access_create": "2020-11-11 15:54:54.008",
"id": "S-69:all>-88>11>S-77:all",
"access_update": "2020-11-11 15:54:54.008",
"access_creator": "admin",
"group": "-69:all",
"target": "-77:all"
}
10.7 图空间管理员(Manager)API
重要提示:在使用以下 API 之前,需要先创建图空间(graphspace)。请参考 Graphspace API 创建名为 gs1 的图空间。文档中的示例均假设已存在名为 gs1 的图空间
- 图空间管理员 API 用于在 graphspace 维度给用户授予/回收管理员角色,并查询当前用户或其他用户在该 graphspace 下的角色信息。角色类型可取
SPACE、SPACE_MEMBER、ADMIN 。
10.7.1 检查当前登录用户是否拥有某个角色
Params
Method & Url
GET http://localhost:8080/graphspaces/gs1/auth/managers/check?type=WRITE
Response Status
Response Body
返回 true/false 字符串表示是否拥有对应角色。
10.7.2 查询图空间管理员列表
Params
Method & Url
GET http://localhost:8080/graphspaces/gs1/auth/managers?type=SPACE
Response Status
Response Body
{
"managers": [
{
"user": "admin",
"type": "SPACE",
"create_time": "2024-01-10 09:30:00"
}
]
}
10.7.3 授权/创建图空间管理员
- 下面在 gs1 下,将用户 boss 授权为 SPACE_MEMBER 角色
Request Body
{
"user": "boss",
"type": "SPACE_MEMBER"
}
Method & Url
POST http://localhost:8080/graphspaces/gs1/auth/managers
Response Status
Response Body
{
"user": "boss",
"type": "SPACE_MEMBER",
"manager_creator": "admin",
"manager_create": "2024-01-10 09:45:12"
}
10.7.4 取消图空间管理员权限
- 下面在 gs1 下,将用户 boss 的 SPACE_MEMBER 角色删除
Params
- user: 需要删除的用户 Id
- type: 需要删除的角色类型
Method & Url
DELETE http://localhost:8080/graphspaces/gs1/auth/managers?user=boss&type=SPACE_MEMBER
Response Status
Response Body
10.7.5 查询指定用户在图空间中的角色
Params
Method & Url
GET http://localhost:8080/graphspaces/gs1/auth/managers/role?user=boss
Response Status
Response Body
{
"roles": {
"boss": [
"READ",
"SPACE_MEMBER"
]
}
}
5.1.18 - Metrics API
Metrics(监控指标)REST 接口:获取系统运行时的性能指标、统计信息和健康状态数据。
HugeGraph 提供了获取监控信息的 Metrics 接口,比如各个 Gremlin 执行时间的统计、缓存的占用大小等。Metrics
接口包括如下几类:基础指标、统计指标、系统指标、后端存储指标。
1. 基础指标
1.1 获取所有基础指标
Params
- type:如果传值为
json,则以 json 格式返回,否则以 Promethaus 格式返回。
1.1.1 Method & Url
http://localhost:8080/metrics/?type=json
Response Status
Response Body
{
"gauges": {
"org.apache.hugegraph.backend.cache.Cache.edge-hugegraph.capacity": {
"value": 1000000
},
"org.apache.hugegraph.backend.cache.Cache.edge-hugegraph.expire": {
"value": 600000
},
"org.apache.hugegraph.backend.cache.Cache.edge-hugegraph.hits": {
"value": 0
},
"org.apache.hugegraph.backend.cache.Cache.edge-hugegraph.miss": {
"value": 0
},
"org.apache.hugegraph.backend.cache.Cache.edge-hugegraph.size": {
"value": 0
},
"org.apache.hugegraph.backend.cache.Cache.instances": {
"value": 7
},
"org.apache.hugegraph.backend.cache.Cache.schema-id-hugegraph.capacity": {
"value": 10000
},
"org.apache.hugegraph.backend.cache.Cache.schema-id-hugegraph.expire": {
"value": 0
},
"org.apache.hugegraph.backend.cache.Cache.schema-id-hugegraph.hits": {
"value": 0
},
"org.apache.hugegraph.backend.cache.Cache.schema-id-hugegraph.miss": {
"value": 0
},
"org.apache.hugegraph.backend.cache.Cache.schema-id-hugegraph.size": {
"value": 17
},
"org.apache.hugegraph.backend.cache.Cache.schema-name-hugegraph.capacity": {
"value": 10000
},
"org.apache.hugegraph.backend.cache.Cache.schema-name-hugegraph.expire": {
"value": 0
},
"org.apache.hugegraph.backend.cache.Cache.schema-name-hugegraph.hits": {
"value": 0
},
"org.apache.hugegraph.backend.cache.Cache.schema-name-hugegraph.miss": {
"value": 0
},
"org.apache.hugegraph.backend.cache.Cache.schema-name-hugegraph.size": {
"value": 17
},
"org.apache.hugegraph.backend.cache.Cache.token-hugegraph.capacity": {
"value": 10240
},
"org.apache.hugegraph.backend.cache.Cache.token-hugegraph.expire": {
"value": 600000
},
"org.apache.hugegraph.backend.cache.Cache.token-hugegraph.hits": {
"value": 0
},
"org.apache.hugegraph.backend.cache.Cache.token-hugegraph.miss": {
"value": 0
},
"org.apache.hugegraph.backend.cache.Cache.token-hugegraph.size": {
"value": 0
},
"org.apache.hugegraph.backend.cache.Cache.users-hugegraph.capacity": {
"value": 10240
},
"org.apache.hugegraph.backend.cache.Cache.users-hugegraph.expire": {
"value": 600000
},
"org.apache.hugegraph.backend.cache.Cache.users-hugegraph.hits": {
"value": 0
},
"org.apache.hugegraph.backend.cache.Cache.users-hugegraph.miss": {
"value": 0
},
"org.apache.hugegraph.backend.cache.Cache.users-hugegraph.size": {
"value": 0
},
"org.apache.hugegraph.backend.cache.Cache.users_pwd-hugegraph.capacity": {
"value": 10240
},
"org.apache.hugegraph.backend.cache.Cache.users_pwd-hugegraph.expire": {
"value": 600000
},
"org.apache.hugegraph.backend.cache.Cache.users_pwd-hugegraph.hits": {
"value": 0
},
"org.apache.hugegraph.backend.cache.Cache.users_pwd-hugegraph.miss": {
"value": 0
},
"org.apache.hugegraph.backend.cache.Cache.users_pwd-hugegraph.size": {
"value": 0
},
"org.apache.hugegraph.backend.cache.Cache.vertex-hugegraph.capacity": {
"value": 10000000
},
"org.apache.hugegraph.backend.cache.Cache.vertex-hugegraph.expire": {
"value": 600000
},
"org.apache.hugegraph.backend.cache.Cache.vertex-hugegraph.hits": {
"value": 0
},
"org.apache.hugegraph.backend.cache.Cache.vertex-hugegraph.miss": {
"value": 0
},
"org.apache.hugegraph.backend.cache.Cache.vertex-hugegraph.size": {
"value": 0
},
"org.apache.hugegraph.server.RestServer.max-write-threads": {
"value": 0
},
"org.apache.hugegraph.task.TaskManager.pending-tasks": {
"value": 0
},
"org.apache.hugegraph.task.TaskManager.workers": {
"value": 4
},
"org.apache.tinkerpop.gremlin.server.GremlinServer.gremlin-groovy.sessionless.class-cache.average-load-penalty": {
"value": 922769200
},
"org.apache.tinkerpop.gremlin.server.GremlinServer.gremlin-groovy.sessionless.class-cache.estimated-size": {
"value": 2
},
"org.apache.tinkerpop.gremlin.server.GremlinServer.gremlin-groovy.sessionless.class-cache.eviction-count": {
"value": 0
},
"org.apache.tinkerpop.gremlin.server.GremlinServer.gremlin-groovy.sessionless.class-cache.eviction-weight": {
"value": 0
},
"org.apache.tinkerpop.gremlin.server.GremlinServer.gremlin-groovy.sessionless.class-cache.hit-count": {
"value": 0
},
"org.apache.tinkerpop.gremlin.server.GremlinServer.gremlin-groovy.sessionless.class-cache.hit-rate": {
"value": 0
},
"org.apache.tinkerpop.gremlin.server.GremlinServer.gremlin-groovy.sessionless.class-cache.load-count": {
"value": 2
},
"org.apache.tinkerpop.gremlin.server.GremlinServer.gremlin-groovy.sessionless.class-cache.load-failure-count": {
"value": 0
},
"org.apache.tinkerpop.gremlin.server.GremlinServer.gremlin-groovy.sessionless.class-cache.load-failure-rate": {
"value": 0
},
"org.apache.tinkerpop.gremlin.server.GremlinServer.gremlin-groovy.sessionless.class-cache.load-success-count": {
"value": 2
},
"org.apache.tinkerpop.gremlin.server.GremlinServer.gremlin-groovy.sessionless.class-cache.long-run-compilation-count": {
"value": 0
},
"org.apache.tinkerpop.gremlin.server.GremlinServer.gremlin-groovy.sessionless.class-cache.miss-count": {
"value": 2
},
"org.apache.tinkerpop.gremlin.server.GremlinServer.gremlin-groovy.sessionless.class-cache.miss-rate": {
"value": 1
},
"org.apache.tinkerpop.gremlin.server.GremlinServer.gremlin-groovy.sessionless.class-cache.request-count": {
"value": 2
},
"org.apache.tinkerpop.gremlin.server.GremlinServer.gremlin-groovy.sessionless.class-cache.total-load-time": {
"value": 1845538400
},
"org.apache.tinkerpop.gremlin.server.GremlinServer.sessions": {
"value": 0
}
},
"counters": {
"favicon.ico/GET/FAILED_COUNTER": {
"count": 1
},
"favicon.ico/GET/TOTAL_COUNTER": {
"count": 1
},
"metrics/POST/FAILED_COUNTER": {
"count": 1
},
"metrics/POST/TOTAL_COUNTER": {
"count": 1
},
"metrics/backend/GET/SUCCESS_COUNTER": {
"count": 2
},
"metrics/backend/GET/TOTAL_COUNTER": {
"count": 2
},
"metrics/gauges/GET/SUCCESS_COUNTER": {
"count": 1
},
"metrics/gauges/GET/TOTAL_COUNTER": {
"count": 1
},
"metrics/system/GET/SUCCESS_COUNTER": {
"count": 2
},
"metrics/system/GET/TOTAL_COUNTER": {
"count": 2
},
"system/GET/FAILED_COUNTER": {
"count": 1
},
"system/GET/TOTAL_COUNTER": {
"count": 1
}
},
"histograms": {
"favicon.ico/GET/RESPONSE_TIME_HISTOGRAM": {
"count": 1,
"min": 1,
"mean": 1,
"max": 1,
"stddev": 0,
"p50": 1,
"p75": 1,
"p95": 1,
"p98": 1,
"p99": 1,
"p999": 1
},
"metrics/POST/RESPONSE_TIME_HISTOGRAM": {
"count": 1,
"min": 21,
"mean": 21,
"max": 21,
"stddev": 0,
"p50": 21,
"p75": 21,
"p95": 21,
"p98": 21,
"p99": 21,
"p999": 21
},
"metrics/backend/GET/RESPONSE_TIME_HISTOGRAM": {
"count": 2,
"min": 6,
"mean": 12.6852124529148,
"max": 20,
"stddev": 6.992918475157571,
"p50": 6,
"p75": 20,
"p95": 20,
"p98": 20,
"p99": 20,
"p999": 20
},
"metrics/gauges/GET/RESPONSE_TIME_HISTOGRAM": {
"count": 1,
"min": 7,
"mean": 7,
"max": 7,
"stddev": 0,
"p50": 7,
"p75": 7,
"p95": 7,
"p98": 7,
"p99": 7,
"p999": 7
},
"metrics/system/GET/RESPONSE_TIME_HISTOGRAM": {
"count": 2,
"min": 0,
"mean": 8.942674506664073,
"max": 40,
"stddev": 16.665399873223066,
"p50": 0,
"p75": 0,
"p95": 40,
"p98": 40,
"p99": 40,
"p999": 40
},
"system/GET/RESPONSE_TIME_HISTOGRAM": {
"count": 1,
"min": 2,
"mean": 2,
"max": 2,
"stddev": 0,
"p50": 2,
"p75": 2,
"p95": 2,
"p98": 2,
"p99": 2,
"p999": 2
}
},
"meters": {
"org.apache.hugegraph.api.API.commit-succeed": {
"count": 0,
"mean_rate": 0,
"m15_rate": 0,
"m5_rate": 0,
"m1_rate": 0,
"rate_unit": "events/second"
},
"org.apache.hugegraph.api.API.expected-error": {
"count": 0,
"mean_rate": 0,
"m15_rate": 0,
"m5_rate": 0,
"m1_rate": 0,
"rate_unit": "events/second"
},
"org.apache.hugegraph.api.API.illegal-arg": {
"count": 0,
"mean_rate": 0,
"m15_rate": 0,
"m5_rate": 0,
"m1_rate": 0,
"rate_unit": "events/second"
},
"org.apache.hugegraph.api.API.unknown-error": {
"count": 0,
"mean_rate": 0,
"m15_rate": 0,
"m5_rate": 0,
"m1_rate": 0,
"rate_unit": "events/second"
},
"org.apache.tinkerpop.gremlin.server.GremlinServer.errors": {
"count": 0,
"mean_rate": 0,
"m15_rate": 0,
"m5_rate": 0,
"m1_rate": 0,
"rate_unit": "events/second"
}
},
"timers": {
"org.apache.hugegraph.api.auth.AccessAPI.create": {
"count": 0,
"min": 0,
"mean": 0,
"max": 0,
"stddev": 0,
"p50": 0,
"p75": 0,
"p95": 0,
"p98": 0,
"p99": 0,
"p999": 0,
"duration_unit": "milliseconds",
"mean_rate": 0,
"m15_rate": 0,
"m5_rate": 0,
"m1_rate": 0,
"rate_unit": "calls/second"
},
"org.apache.hugegraph.api.auth.AccessAPI.delete": {
"count": 0,
"min": 0,
"mean": 0,
"max": 0,
"stddev": 0,
"p50": 0,
"p75": 0,
"p95": 0,
"p98": 0,
"p99": 0,
"p999": 0,
"duration_unit": "milliseconds",
"mean_rate": 0,
"m15_rate": 0,
"m5_rate": 0,
"m1_rate": 0,
"rate_unit": "calls/second"
},
"org.apache.hugegraph.api.auth.AccessAPI.get": {
"count": 0,
"min": 0,
"mean": 0,
"max": 0,
"stddev": 0,
"p50": 0,
"p75": 0,
"p95": 0,
"p98": 0,
"p99": 0,
"p999": 0,
"duration_unit": "milliseconds",
"mean_rate": 0,
"m15_rate": 0,
"m5_rate": 0,
"m1_rate": 0,
"rate_unit": "calls/second"
},
"org.apache.hugegraph.api.auth.AccessAPI.list": {
"count": 0,
"min": 0,
"mean": 0,
"max": 0,
"stddev": 0,
"p50": 0,
"p75": 0,
"p95": 0,
"p98": 0,
"p99": 0,
"p999": 0,
"duration_unit": "milliseconds",
"mean_rate": 0,
"m15_rate": 0,
"m5_rate": 0,
"m1_rate": 0,
"rate_unit": "calls/second"
},
...
}
}
1.1.2 Method & Url
http://localhost:8080/metrics/
Response Status
Response Body
# HELP hugegraph_info
# TYPE hugegraph_info untyped
hugegraph_info{version="0.69",
} 1.0
# HELP org_apache_hugegraph_backend_cache_Cache_edge_hugegraph_capacity
# TYPE org_apache_hugegraph_backend_cache_Cache_edge_hugegraph_capacity gauge
org_apache_hugegraph_backend_cache_Cache_edge_hugegraph_capacity 1000000
# HELP org_apache_hugegraph_backend_cache_Cache_edge_hugegraph_expire
# TYPE org_apache_hugegraph_backend_cache_Cache_edge_hugegraph_expire gauge
org_apache_hugegraph_backend_cache_Cache_edge_hugegraph_expire 600000
# HELP org_apache_hugegraph_backend_cache_Cache_edge_hugegraph_hits
# TYPE org_apache_hugegraph_backend_cache_Cache_edge_hugegraph_hits gauge
org_apache_hugegraph_backend_cache_Cache_edge_hugegraph_hits 0
# HELP org_apache_hugegraph_backend_cache_Cache_edge_hugegraph_miss
# TYPE org_apache_hugegraph_backend_cache_Cache_edge_hugegraph_miss gauge
org_apache_hugegraph_backend_cache_Cache_edge_hugegraph_miss 0
# HELP org_apache_hugegraph_backend_cache_Cache_edge_hugegraph_size
# TYPE org_apache_hugegraph_backend_cache_Cache_edge_hugegraph_size gauge
org_apache_hugegraph_backend_cache_Cache_edge_hugegraph_size 0
# HELP org_apache_hugegraph_backend_cache_Cache_instances
# TYPE org_apache_hugegraph_backend_cache_Cache_instances gauge
org_apache_hugegraph_backend_cache_Cache_instances 7
# HELP org_apache_hugegraph_backend_cache_Cache_schema_id_hugegraph_capacity
# TYPE org_apache_hugegraph_backend_cache_Cache_schema_id_hugegraph_capacity gauge
org_apache_hugegraph_backend_cache_Cache_schema_id_hugegraph_capacity 10000
# HELP org_apache_hugegraph_backend_cache_Cache_schema_id_hugegraph_expire
# TYPE org_apache_hugegraph_backend_cache_Cache_schema_id_hugegraph_expire gauge
org_apache_hugegraph_backend_cache_Cache_schema_id_hugegraph_expire 0
# HELP org_apache_hugegraph_backend_cache_Cache_schema_id_hugegraph_hits
# TYPE org_apache_hugegraph_backend_cache_Cache_schema_id_hugegraph_hits gauge
org_apache_hugegraph_backend_cache_Cache_schema_id_hugegraph_hits 0
# HELP org_apache_hugegraph_backend_cache_Cache_schema_id_hugegraph_miss
# TYPE org_apache_hugegraph_backend_cache_Cache_schema_id_hugegraph_miss gauge
org_apache_hugegraph_backend_cache_Cache_schema_id_hugegraph_miss 0
# HELP org_apache_hugegraph_backend_cache_Cache_schema_id_hugegraph_size
# TYPE org_apache_hugegraph_backend_cache_Cache_schema_id_hugegraph_size gauge
org_apache_hugegraph_backend_cache_Cache_schema_id_hugegraph_size 17
# HELP org_apache_hugegraph_backend_cache_Cache_schema_name_hugegraph_capacity
# TYPE org_apache_hugegraph_backend_cache_Cache_schema_name_hugegraph_capacity gauge
org_apache_hugegraph_backend_cache_Cache_schema_name_hugegraph_capacity 10000
# HELP org_apache_hugegraph_backend_cache_Cache_schema_name_hugegraph_expire
# TYPE org_apache_hugegraph_backend_cache_Cache_schema_name_hugegraph_expire gauge
org_apache_hugegraph_backend_cache_Cache_schema_name_hugegraph_expire 0
# HELP org_apache_hugegraph_backend_cache_Cache_schema_name_hugegraph_hits
# TYPE org_apache_hugegraph_backend_cache_Cache_schema_name_hugegraph_hits gauge
org_apache_hugegraph_backend_cache_Cache_schema_name_hugegraph_hits 0
# HELP org_apache_hugegraph_backend_cache_Cache_schema_name_hugegraph_miss
# TYPE org_apache_hugegraph_backend_cache_Cache_schema_name_hugegraph_miss gauge
org_apache_hugegraph_backend_cache_Cache_schema_name_hugegraph_miss 0
# HELP org_apache_hugegraph_backend_cache_Cache_schema_name_hugegraph_size
# TYPE org_apache_hugegraph_backend_cache_Cache_schema_name_hugegraph_size gauge
org_apache_hugegraph_backend_cache_Cache_schema_name_hugegraph_size 17
...
1.2 获取 Gauges 指标
Method & Url
http://localhost:8080/metrics/gauges
Response Status
Response Body
{
"org.apache.hugegraph.backend.cache.Cache.edge-hugegraph.capacity": {
"value": 1000000
},
"org.apache.hugegraph.backend.cache.Cache.edge-hugegraph.expire": {
"value": 600000
},
"org.apache.hugegraph.backend.cache.Cache.edge-hugegraph.hits": {
"value": 0
},
"org.apache.hugegraph.backend.cache.Cache.edge-hugegraph.miss": {
"value": 0
},
"org.apache.hugegraph.backend.cache.Cache.edge-hugegraph.size": {
"value": 0
},
"org.apache.hugegraph.backend.cache.Cache.instances": {
"value": 7
},
"org.apache.hugegraph.backend.cache.Cache.schema-id-hugegraph.capacity": {
"value": 10000
},
"org.apache.hugegraph.backend.cache.Cache.schema-id-hugegraph.expire": {
"value": 0
},
"org.apache.hugegraph.backend.cache.Cache.schema-id-hugegraph.hits": {
"value": 0
},
"org.apache.hugegraph.backend.cache.Cache.schema-id-hugegraph.miss": {
"value": 0
},
"org.apache.hugegraph.backend.cache.Cache.schema-id-hugegraph.size": {
"value": 17
},
"org.apache.hugegraph.backend.cache.Cache.schema-name-hugegraph.capacity": {
"value": 10000
},
"org.apache.hugegraph.backend.cache.Cache.schema-name-hugegraph.expire": {
"value": 0
},
"org.apache.hugegraph.backend.cache.Cache.schema-name-hugegraph.hits": {
"value": 0
},
"org.apache.hugegraph.backend.cache.Cache.schema-name-hugegraph.miss": {
"value": 0
},
"org.apache.hugegraph.backend.cache.Cache.schema-name-hugegraph.size": {
"value": 17
},
"org.apache.hugegraph.backend.cache.Cache.token-hugegraph.capacity": {
"value": 10240
},
"org.apache.hugegraph.backend.cache.Cache.token-hugegraph.expire": {
"value": 600000
},
"org.apache.hugegraph.backend.cache.Cache.token-hugegraph.hits": {
"value": 0
},
"org.apache.hugegraph.backend.cache.Cache.token-hugegraph.miss": {
"value": 0
},
"org.apache.hugegraph.backend.cache.Cache.token-hugegraph.size": {
"value": 0
},
"org.apache.hugegraph.backend.cache.Cache.users-hugegraph.capacity": {
"value": 10240
},
"org.apache.hugegraph.backend.cache.Cache.users-hugegraph.expire": {
"value": 600000
},
"org.apache.hugegraph.backend.cache.Cache.users-hugegraph.hits": {
"value": 0
},
"org.apache.hugegraph.backend.cache.Cache.users-hugegraph.miss": {
"value": 0
},
"org.apache.hugegraph.backend.cache.Cache.users-hugegraph.size": {
"value": 0
},
"org.apache.hugegraph.backend.cache.Cache.users_pwd-hugegraph.capacity": {
"value": 10240
},
"org.apache.hugegraph.backend.cache.Cache.users_pwd-hugegraph.expire": {
"value": 600000
},
"org.apache.hugegraph.backend.cache.Cache.users_pwd-hugegraph.hits": {
"value": 0
},
"org.apache.hugegraph.backend.cache.Cache.users_pwd-hugegraph.miss": {
"value": 0
},
"org.apache.hugegraph.backend.cache.Cache.users_pwd-hugegraph.size": {
"value": 0
},
"org.apache.hugegraph.backend.cache.Cache.vertex-hugegraph.capacity": {
"value": 10000000
},
"org.apache.hugegraph.backend.cache.Cache.vertex-hugegraph.expire": {
"value": 600000
},
"org.apache.hugegraph.backend.cache.Cache.vertex-hugegraph.hits": {
"value": 0
},
"org.apache.hugegraph.backend.cache.Cache.vertex-hugegraph.miss": {
"value": 0
},
"org.apache.hugegraph.backend.cache.Cache.vertex-hugegraph.size": {
"value": 0
},
"org.apache.hugegraph.server.RestServer.max-write-threads": {
"value": 0
},
"org.apache.hugegraph.task.TaskManager.pending-tasks": {
"value": 0
},
"org.apache.hugegraph.task.TaskManager.workers": {
"value": 4
},
"org.apache.tinkerpop.gremlin.server.GremlinServer.gremlin-groovy.sessionless.class-cache.average-load-penalty": {
"value": 9.227692E8
},
"org.apache.tinkerpop.gremlin.server.GremlinServer.gremlin-groovy.sessionless.class-cache.estimated-size": {
"value": 2
},
"org.apache.tinkerpop.gremlin.server.GremlinServer.gremlin-groovy.sessionless.class-cache.eviction-count": {
"value": 0
},
"org.apache.tinkerpop.gremlin.server.GremlinServer.gremlin-groovy.sessionless.class-cache.eviction-weight": {
"value": 0
},
"org.apache.tinkerpop.gremlin.server.GremlinServer.gremlin-groovy.sessionless.class-cache.hit-count": {
"value": 0
},
"org.apache.tinkerpop.gremlin.server.GremlinServer.gremlin-groovy.sessionless.class-cache.hit-rate": {
"value": 0.0
},
"org.apache.tinkerpop.gremlin.server.GremlinServer.gremlin-groovy.sessionless.class-cache.load-count": {
"value": 2
},
"org.apache.tinkerpop.gremlin.server.GremlinServer.gremlin-groovy.sessionless.class-cache.load-failure-count": {
"value": 0
},
"org.apache.tinkerpop.gremlin.server.GremlinServer.gremlin-groovy.sessionless.class-cache.load-failure-rate": {
"value": 0.0
},
"org.apache.tinkerpop.gremlin.server.GremlinServer.gremlin-groovy.sessionless.class-cache.load-success-count": {
"value": 2
},
"org.apache.tinkerpop.gremlin.server.GremlinServer.gremlin-groovy.sessionless.class-cache.long-run-compilation-count": {
"value": 0
},
"org.apache.tinkerpop.gremlin.server.GremlinServer.gremlin-groovy.sessionless.class-cache.miss-count": {
"value": 2
},
"org.apache.tinkerpop.gremlin.server.GremlinServer.gremlin-groovy.sessionless.class-cache.miss-rate": {
"value": 1.0
},
"org.apache.tinkerpop.gremlin.server.GremlinServer.gremlin-groovy.sessionless.class-cache.request-count": {
"value": 2
},
"org.apache.tinkerpop.gremlin.server.GremlinServer.gremlin-groovy.sessionless.class-cache.total-load-time": {
"value": 1845538400
},
"org.apache.tinkerpop.gremlin.server.GremlinServer.sessions": {
"value": 0
}
}
1.3 获取 Counters 指标
Method & Url
GET http://localhost:8080/metrics/counters
Response Status
Response Body
{
"favicon.ico/GET/FAILED_COUNTER": {
"count": 1
},
"favicon.ico/GET/TOTAL_COUNTER": {
"count": 1
},
"metrics//GET/SUCCESS_COUNTER": {
"count": 2
},
"metrics//GET/TOTAL_COUNTER": {
"count": 2
},
"metrics/POST/FAILED_COUNTER": {
"count": 1
},
"metrics/POST/TOTAL_COUNTER": {
"count": 1
},
"metrics/backend/GET/SUCCESS_COUNTER": {
"count": 2
},
"metrics/backend/GET/TOTAL_COUNTER": {
"count": 2
},
"metrics/gauges/GET/SUCCESS_COUNTER": {
"count": 1
},
"metrics/gauges/GET/TOTAL_COUNTER": {
"count": 1
},
"metrics/statistics/GET/SUCCESS_COUNTER": {
"count": 2
},
"metrics/statistics/GET/TOTAL_COUNTER": {
"count": 2
},
"metrics/system/GET/SUCCESS_COUNTER": {
"count": 2
},
"metrics/system/GET/TOTAL_COUNTER": {
"count": 2
},
"metrics/timers/GET/SUCCESS_COUNTER": {
"count": 1
},
"metrics/timers/GET/TOTAL_COUNTER": {
"count": 1
},
"system/GET/FAILED_COUNTER": {
"count": 1
},
"system/GET/TOTAL_COUNTER": {
"count": 1
}
}
1.4 获取 histograms 指标
Method & Url
GET http://localhost:8080/metrics/gauges
Response Status
Response Body
{
"favicon.ico/GET/RESPONSE_TIME_HISTOGRAM": {
"count": 1,
"min": 1,
"mean": 1.0,
"max": 1,
"stddev": 0.0,
"p50": 1.0,
"p75": 1.0,
"p95": 1.0,
"p98": 1.0,
"p99": 1.0,
"p999": 1.0
},
"metrics//GET/RESPONSE_TIME_HISTOGRAM": {
"count": 2,
"min": 10,
"mean": 10.0,
"max": 10,
"stddev": 0.0,
"p50": 10.0,
"p75": 10.0,
"p95": 10.0,
"p98": 10.0,
"p99": 10.0,
"p999": 10.0
},
"metrics/POST/RESPONSE_TIME_HISTOGRAM": {
"count": 1,
"min": 21,
"mean": 21.0,
"max": 21,
"stddev": 0.0,
"p50": 21.0,
"p75": 21.0,
"p95": 21.0,
"p98": 21.0,
"p99": 21.0,
"p999": 21.0
},
"metrics/backend/GET/RESPONSE_TIME_HISTOGRAM": {
"count": 2,
"min": 6,
"mean": 12.6852124529148,
"max": 20,
"stddev": 6.992918475157571,
"p50": 6.0,
"p75": 20.0,
"p95": 20.0,
"p98": 20.0,
"p99": 20.0,
"p999": 20.0
},
"metrics/gauges/GET/RESPONSE_TIME_HISTOGRAM": {
"count": 1,
"min": 7,
"mean": 7.0,
"max": 7,
"stddev": 0.0,
"p50": 7.0,
"p75": 7.0,
"p95": 7.0,
"p98": 7.0,
"p99": 7.0,
"p999": 7.0
},
"metrics/statistics/GET/RESPONSE_TIME_HISTOGRAM": {
"count": 2,
"min": 1,
"mean": 1.4551211076264199,
"max": 2,
"stddev": 0.49798181193626,
"p50": 1.0,
"p75": 2.0,
"p95": 2.0,
"p98": 2.0,
"p99": 2.0,
"p999": 2.0
},
"metrics/system/GET/RESPONSE_TIME_HISTOGRAM": {
"count": 2,
"min": 0,
"mean": 8.942674506664073,
"max": 40,
"stddev": 16.665399873223066,
"p50": 0.0,
"p75": 0.0,
"p95": 40.0,
"p98": 40.0,
"p99": 40.0,
"p999": 40.0
},
"metrics/timers/GET/RESPONSE_TIME_HISTOGRAM": {
"count": 1,
"min": 3,
"mean": 3.0,
"max": 3,
"stddev": 0.0,
"p50": 3.0,
"p75": 3.0,
"p95": 3.0,
"p98": 3.0,
"p99": 3.0,
"p999": 3.0
},
"system/GET/RESPONSE_TIME_HISTOGRAM": {
"count": 1,
"min": 2,
"mean": 2.0,
"max": 2,
"stddev": 0.0,
"p50": 2.0,
"p75": 2.0,
"p95": 2.0,
"p98": 2.0,
"p99": 2.0,
"p999": 2.0
}
}
1.5 获取 meters 指标
Method & Url
GET http://localhost:8080/metrics/meters
Response Status
Response Body
{
"org.apache.hugegraph.api.API.commit-succeed": {
"count": 0,
"mean_rate": 0.0,
"m15_rate": 0.0,
"m5_rate": 0.0,
"m1_rate": 0.0,
"rate_unit": "events/second"
},
"org.apache.hugegraph.api.API.expected-error": {
"count": 0,
"mean_rate": 0.0,
"m15_rate": 0.0,
"m5_rate": 0.0,
"m1_rate": 0.0,
"rate_unit": "events/second"
},
"org.apache.hugegraph.api.API.illegal-arg": {
"count": 0,
"mean_rate": 0.0,
"m15_rate": 0.0,
"m5_rate": 0.0,
"m1_rate": 0.0,
"rate_unit": "events/second"
},
"org.apache.hugegraph.api.API.unknown-error": {
"count": 0,
"mean_rate": 0.0,
"m15_rate": 0.0,
"m5_rate": 0.0,
"m1_rate": 0.0,
"rate_unit": "events/second"
},
"org.apache.tinkerpop.gremlin.server.GremlinServer.errors": {
"count": 0,
"mean_rate": 0.0,
"m15_rate": 0.0,
"m5_rate": 0.0,
"m1_rate": 0.0,
"rate_unit": "events/second"
}
}
1.6 获取 timers 指标
Method & Url
GET http://localhost:8080/metrics/timers
Response Status
Response Body
{
"org.apache.hugegraph.api.auth.AccessAPI.create": {
"count": 0,
"min": 0.0,
"mean": 0.0,
"max": 0.0,
"stddev": 0.0,
"p50": 0.0,
"p75": 0.0,
"p95": 0.0,
"p98": 0.0,
"p99": 0.0,
"p999": 0.0,
"duration_unit": "milliseconds",
"mean_rate": 0.0,
"m15_rate": 0.0,
"m5_rate": 0.0,
"m1_rate": 0.0,
"rate_unit": "calls/second"
},
"org.apache.hugegraph.api.auth.AccessAPI.delete": {
"count": 0,
"min": 0.0,
"mean": 0.0,
"max": 0.0,
"stddev": 0.0,
"p50": 0.0,
"p75": 0.0,
"p95": 0.0,
"p98": 0.0,
"p99": 0.0,
"p999": 0.0,
"duration_unit": "milliseconds",
"mean_rate": 0.0,
"m15_rate": 0.0,
"m5_rate": 0.0,
"m1_rate": 0.0,
"rate_unit": "calls/second"
},
...
}
2.统计指标
Params
- type:如果传值为 json,则以 json 格式返回,否则以 Promethaus 格式返回。
2.1 Method & Url
GET http://localhost:8080/metrics/statistics
Response Status
# HELP hugegraph_info
# TYPE hugegraph_info untyped
hugegraph_info{version="0.69",
} 1.0
# HELP metrics_POST
# TYPE metrics_POST gauge
metrics_POST{name=FAILED_REQUEST,} 1
metrics_POST{name=MEAN_RESPONSE_TIME,} 21.0
metrics_POST{
name=MAX_RESPONSE_TIME,
} 21
metrics_POST{name=SUCCESS_REQUEST,
} 0
metrics_POST{
name=TOTAL_REQUEST,
} 1
# HELP metrics_backend_GET
# TYPE metrics_backend_GET gauge
metrics_backend_GET{name=FAILED_REQUEST,
} 0
metrics_backend_GET{
name=MEAN_RESPONSE_TIME,
} 12.6852124529148
metrics_backend_GET{
name=MAX_RESPONSE_TIME,
} 20
metrics_backend_GET{
name=SUCCESS_REQUEST,
} 2
metrics_backend_GET{name=TOTAL_REQUEST,} 2
# HELP system_GET
# TYPE system_GET gauge
system_GET{name=FAILED_REQUEST,} 1
system_GET{name=MEAN_RESPONSE_TIME,} 2.0
system_GET{name=MAX_RESPONSE_TIME,} 2
system_GET{
name=SUCCESS_REQUEST,
} 0
system_GET{name=TOTAL_REQUEST,
} 1
# HELP metrics_gauges_GET
# TYPE metrics_gauges_GET gauge
metrics_gauges_GET{name=FAILED_REQUEST,} 0
metrics_gauges_GET{name=MEAN_RESPONSE_TIME,
} 7.0
metrics_gauges_GET{
name=MAX_RESPONSE_TIME,
} 7
metrics_gauges_GET{
name=SUCCESS_REQUEST,
} 1
metrics_gauges_GET{
name=TOTAL_REQUEST,
} 1
# HELP favicon.ico_GET
# TYPE favicon.ico_GET gauge
favicon.ico_GET{name=FAILED_REQUEST,
} 1
favicon.ico_GET{
name=MEAN_RESPONSE_TIME,
} 1.0
favicon.ico_GET{name=MAX_RESPONSE_TIME,} 1
favicon.ico_GET{name=SUCCESS_REQUEST,} 0
favicon.ico_GET{
name=TOTAL_REQUEST,
} 1
# HELP metrics__GET
# TYPE metrics__GET gauge
metrics__GET{name=FAILED_REQUEST,} 0
metrics__GET{name=MEAN_RESPONSE_TIME,} 10.0
metrics__GET{name=MAX_RESPONSE_TIME,
} 10
metrics__GET{
name=SUCCESS_REQUEST,
} 2
metrics__GET{
name=TOTAL_REQUEST,
} 2
# HELP metrics_system_GET
# TYPE metrics_system_GET gauge
metrics_system_GET{name=FAILED_REQUEST,} 0
metrics_system_GET{name=MEAN_RESPONSE_TIME,
} 8.942674506664073
metrics_system_GET{
name=MAX_RESPONSE_TIME,
} 40
metrics_system_GET{name=SUCCESS_REQUEST,} 2
metrics_system_GET{name=TOTAL_REQUEST,
} 2
Response Body
2.2 Method & Url
GET http://localhost:8080/metrics/statistics?type=json
Response Status
Response Body
{
"metrics/POST": {
"FAILED_REQUEST": 1,
"MEAN_RESPONSE_TIME": 21,
"MAX_RESPONSE_TIME": 21,
"SUCCESS_REQUEST": 0,
"TOTAL_REQUEST": 1
},
"metrics/backend/GET": {
"FAILED_REQUEST": 0,
"MEAN_RESPONSE_TIME": 12.6852124529148,
"MAX_RESPONSE_TIME": 20,
"SUCCESS_REQUEST": 2,
"TOTAL_REQUEST": 2
},
"system/GET": {
"FAILED_REQUEST": 1,
"MEAN_RESPONSE_TIME": 2,
"MAX_RESPONSE_TIME": 2,
"SUCCESS_REQUEST": 0,
"TOTAL_REQUEST": 1
},
"metrics/gauges/GET": {
"FAILED_REQUEST": 0,
"MEAN_RESPONSE_TIME": 7,
"MAX_RESPONSE_TIME": 7,
"SUCCESS_REQUEST": 1,
"TOTAL_REQUEST": 1
},
"favicon.ico/GET": {
"FAILED_REQUEST": 1,
"MEAN_RESPONSE_TIME": 1,
"MAX_RESPONSE_TIME": 1,
"SUCCESS_REQUEST": 0,
"TOTAL_REQUEST": 1
},
"metrics//GET": {
"FAILED_REQUEST": 0,
"MEAN_RESPONSE_TIME": 10,
"MAX_RESPONSE_TIME": 10,
"SUCCESS_REQUEST": 2,
"TOTAL_REQUEST": 2
},
"metrics/system/GET": {
"FAILED_REQUEST": 0,
"MEAN_RESPONSE_TIME": 8.942674506664073,
"MAX_RESPONSE_TIME": 40,
"SUCCESS_REQUEST": 2,
"TOTAL_REQUEST": 2
}
}
3.系统指标
系统指标主要返回机器运行指标,如内存、线程等信息。
Method & Url
GET http://localhost:8080/metrics/system
Response Status
Response Body
{
"basic": {
"mem": 1010,
"mem_total": 911,
"mem_used": 239,
"mem_free": 671,
"mem_unit": "MB",
"processors": 20,
"uptime": 137503,
"systemload_average": -1.0
},
"heap": {
"committed": 911,
"init": 254,
"used": 239,
"max": 3596
},
"nonheap": {
"committed": 98,
"init": 2,
"used": 95,
"max": 0
},
"thread": {
"peak": 82,
"daemon": 34,
"total_started": 108,
"count": 82
},
"class_loading": {
"count": 11495,
"loaded": 11495,
"unloaded": 0
},
"garbage_collector": {
"ps_scavenge_count": 16,
"ps_scavenge_time": 155,
"ps_marksweep_count": 3,
"ps_marksweep_time": 494,
"time_unit": "ms"
}
}
4.后端指标
hugeGraph 支持多种后端存储,后端指标包括内存、磁盘等信息。
Method & Url
GET http://localhost:8080/metrics/backend
Response Status
Response Body
{
"hugegraph": {
"backend": "rocksdb",
"nodes": 1,
"cluster_id": "local",
"servers": {
"local": {
"mem_unit": "MB",
"disk_unit": "GB",
"mem_used": 0.1,
"mem_used_readable": "103.53 KB",
"disk_usage": 0.03,
"disk_usage_readable": "29.03 KB",
"block_cache_usage": 0.00359344482421875,
"block_cache_pinned_usage": 0.00359344482421875,
"block_cache_capacity": 304.0,
"estimate_table_readers_mem": 0.019697189331054688,
"size_all_mem_tables": 0.07421875,
"cur_size_all_mem_tables": 0.07421875,
"estimate_live_data_size": 5.536526441574097E-5,
"total_sst_files_size": 5.536526441574097E-5,
"live_sst_files_size": 5.536526441574097E-5,
"estimate_pending_compaction_bytes": 0.0,
"estimate_num_keys": 0,
"num_entries_active_mem_table": 0,
"num_entries_imm_mem_tables": 0,
"num_deletes_active_mem_table": 0,
"num_deletes_imm_mem_tables": 0,
"num_running_flushes": 0,
"mem_table_flush_pending": 0,
"num_running_compactions": 0,
"compaction_pending": 0,
"num_immutable_mem_table": 0,
"num_snapshots": 0,
"oldest_snapshot_time": 0,
"num_live_versions": 38,
"current_super_version_number": 38
}
}
}
}
5.1.19 - Other API
Other(其他接口)REST 接口:提供系统版本查询和 API 版本信息等辅助功能。
11.1 Other
11.1.1 查看HugeGraph的版本信息
Method & Url
GET http://localhost:8080/versions
Response Status
Response Body
{
"versions": {
"version": "v1",
"core": "0.4.5.1",
"gremlin": "3.2.5",
"api": "0.13.2.0"
}
}
5.2 - HugeGraph Java Client
本文的代码都是java语言写的,但其风格与gremlin(groovy)是非常类似的。用户只需要把代码中的变量声明替换成def或直接去掉,
就能将java代码转变为groovy;另外就是每一行语句最后可以不加分号,groovy认为一行就是一条语句。
用户在HugeGraph-Hubble中编写的gremlin(groovy)可以参考本文的java代码,下面会举出几个例子。
1 HugeGraph-Client
HugeGraph-Client 是操作 graph 的总入口,用户必须先创建出 HugeGraph-Client 对象,与 HugeGraph-Server 建立连接(伪连接)后,才能获取到 schema、graph 以及 gremlin 的操作入口对象。
目前 HugeGraph-Client 只允许连接服务端已存在的图,无法自定义图进行创建。1.7.0 版本后,client 支持 graphSpace 设置,默认为DEFAULT。其创建方法如下:
// HugeGraphServer 地址:"http://localhost:8080"
// 图的名称:"hugegraph"
HugeClient hugeClient = HugeClient.builder("http://localhost:8080", "hugegraph")
//.builder("http://localhost:8080", "graphSpaceName", "hugegraph")
.configTimeout(20) // 默认 20s 超时
.configUser("**", "**") // 默认未开启用户权限
.build();
上述创建 HugeClient 的过程如果失败会抛出异常,用户需要 try-catch。如果成功则继续获取 schema、graph 以及 gremlin 的 manager。
在HugeGraph - Hubble中通过gremlin来操作时,不需要使用HugeClient,可以忽略。
2 元数据
2.1 SchemaManager
SchemaManager 用于管理 HugeGraph 中的四种元数据,分别是 PropertyKey(属性类型)、VertexLabel(顶点类型)、EdgeLabel(边类型)和 IndexLabel(索引标签)。在定义元数据信息之前必须先创建 SchemaManager 对象。
用户可使用如下方法获得 SchemaManager 对象:
SchemaManager schema = hugeClient.schema()
在HugeGraph-Hubble中通过gremlin创建schema对象:
下面分别对三种元数据的定义过程进行介绍。
2.2 PropertyKey
2.2.1 接口及参数介绍
PropertyKey 用来规范顶点和边的属性的约束,暂不支持定义属性的属性。
PropertyKey 允许定义的约束信息包括:name、datatype、cardinality、userdata,下面逐一介绍。
- name: 属性的名字,用来区分不同的 PropertyKey,不允许有同名的属性;
| interface | param | must set |
|---|
| propertyKey(String name) | name | y |
- datatype:属性值类型,必须从下表中选择符合具体业务场景的一项显式设置;
| interface | Java Class |
|---|
| asText() | String |
| asInt() | Integer |
| asDate() | Date |
| asUuid() | UUID |
| asBoolean() | Boolean |
| asByte() | Byte |
| asBlob() | Byte[] |
| asDouble() | Double |
| asFloat() | Float |
| asLong() | Long |
- cardinality:属性值是单值还是多值,多值的情况下又分为允许有重复值和不允许有重复值,该项默认为 single,如有必要可从下表中选择一项设置;
| interface | cardinality | description |
|---|
| valueSingle() | single | single value |
| valueList() | list | multi-values that allow duplicate value |
| valueSet() | set | multi-values that not allow duplicate value |
- userdata:用户可以自己添加一些约束或额外信息,然后自行检查传入的属性是否满足约束,或者必要的时候提取出额外信息
| interface | description |
|---|
| userdata(String key, Object value) | The same key, the latter will cover the former |
2.2.2 创建 PropertyKey
schema.propertyKey("name").asText().valueSet().ifNotExist().create()
在HugeGraph-Hubble中通过gremlin创建上述PropertyKey对象的语法完全一致,如果用户没有定义出schema变量,应该这样写:
graph.schema().propertyKey("name").asText().valueSet().ifNotExist().create()
以下的示例中,gremlin与java的语法完全一致,不再赘述。
- ifNotExist():为 create 添加判断机制,若当前 PropertyKey 已经存在则不再创建,否则创建该属性。若不添加判断,在 properkey 已存在的情况下会抛出异常信息,下同,不再赘述。
2.2.3 删除 PropertyKey
schema.propertyKey("name").remove()
2.2.4 查询 PropertyKey
// 获取 PropertyKey 对象
schema.getPropertyKey("name")
// 获取 PropertyKey 属性
schema.getPropertyKey("name").cardinality()
schema.getPropertyKey("name").dataType()
schema.getPropertyKey("name").name()
schema.getPropertyKey("name").userdata()
2.3 VertexLabel
2.3.1 接口及参数介绍
VertexLabel 用来定义顶点类型,描述顶点的约束信息:
VertexLabel 允许定义的约束信息包括:name、idStrategy、properties、primaryKeys 和 nullableKeys,下面逐一介绍。
- name: 属性的名字,用来区分不同的 VertexLabel,不允许有同名的属性;
| interface | param | must set |
|---|
| vertexLabel(String name) | name | y |
- idStrategy: 每一个 VertexLabel 都可以选择自己的 Id 策略,目前有三种策略供选择,即 Automatic(自动生成)、Customize(用户传入)和 PrimaryKey(主属性键)。其中 Automatic 使用 Snowflake 算法生成 Id,Customize 需要用户自行传入字符串或数字类型的 Id,PrimaryKey 则允许用户从 VertexLabel 的属性中选择若干主属性作为区分的依据,HugeGraph 内部会根据主属性的值拼接生成 Id。idStrategy 默认使用 Automatic 的,但如果用户没有显式设置 idStrategy 又调用了 primaryKeys(…) 方法设置了主属性,则 idStrategy 将自动使用 PrimaryKey;
| interface | idStrategy | description |
|---|
| useAutomaticId | AUTOMATIC | generate id automatically by Snowflake algorithm |
| useCustomizeStringId | CUSTOMIZE_STRING | passed id by user, must be string type |
| useCustomizeNumberId | CUSTOMIZE_NUMBER | passed id by user, must be number type |
| usePrimaryKeyId | PRIMARY_KEY | choose some important prop as primary key to splice id |
- properties: 定义顶点的属性,传入的参数是 PropertyKey 的 name
| interface | description |
|---|
| properties(String… properties) | allow to pass multi props |
- primaryKeys: 当用户选择了 PrimaryKey 的 Id 策略时,需要从 VertexLabel 的属性中选择若干主属性作为区分的依据;
| interface | description |
|---|
| primaryKeys(String… keys) | allow to choose multi prop as primaryKeys |
需要注意的是,Id 策略的选择与 primaryKeys 的设置有一些相互约束,不能随意调用,约束关系见下表:
| useAutomaticId | useCustomizeStringId | useCustomizeNumberId | usePrimaryKeyId |
|---|
| unset primaryKeys | AUTOMATIC | CUSTOMIZE_STRING | CUSTOMIZE_NUMBER | ERROR |
| set primaryKeys | ERROR | ERROR | ERROR | PRIMARY_KEY |
- nullableKeys: 对于通过 properties(…) 方法设置过的属性,默认全都是不可为空的,也就是在创建顶点时该属性必须赋值,这样可能对用户数据提出了太过严格的完整性要求。为避免这样的强约束,用户可以通过
本方法设置若干属性为可空的,这样添加顶点时该属性可以不赋值。
| interface | description |
|---|
| nullableKeys(String… properties) | allow to pass multi props |
注意:primaryKeys 和 nullableKeys 不能有交集,因为一个属性不能既作为主属性,又是可空的。
- enableLabelIndex:用户可以指定是否需要为 label 创建索引。不创建则无法全局搜索指定 label 的顶点和边,创建则可以全局搜索,做类似于
g.V().hasLabel('person'), g.E().has('label', 'person')这样的查询,
但是插入数据时性能上会更加慢,并且需要占用更多的存储空间。此项默认为 true。
| interface | description |
|---|
| enableLabelIndex(boolean enable) | Whether to create a label index |
- userdata:用户可以自己添加一些约束或额外信息,然后自行检查传入的属性是否满足约束,或者必要的时候提取出额外信息
| interface | description |
|---|
| userdata(String key, Object value) | The same key, the latter will cover the former |
2.3.2 创建 VertexLabel
// 使用 Automatic 的 Id 策略
schema.vertexLabel("person").properties("name", "age").ifNotExist().create();
schema.vertexLabel("person").useAutomaticId().properties("name", "age").ifNotExist().create();
// 使用 Customize_String 的 Id 策略
schema.vertexLabel("person").useCustomizeStringId().properties("name", "age").ifNotExist().create();
// 使用 Customize_Number 的 Id 策略
schema.vertexLabel("person").useCustomizeNumberId().properties("name", "age").ifNotExist().create();
// 使用 PrimaryKey 的 Id 策略
schema.vertexLabel("person").properties("name", "age").primaryKeys("name").ifNotExist().create();
schema.vertexLabel("person").usePrimaryKeyId().properties("name", "age").primaryKeys("name").ifNotExist().create();
2.3.3 追加 VertexLabel
VertexLabel 是可以追加约束的,不过仅限 properties 和 nullableKeys,而且追加的属性也必须添加到 nullableKeys 集合中。
schema.vertexLabel("person").properties("price").nullableKeys("price").append();
2.3.4 删除 VertexLabel
schema.vertexLabel("person").remove();
2.3.5 查询 VertexLabel
// 获取 VertexLabel 对象
schema.getVertexLabel("name")
// 获取 property key 属性
schema.getVertexLabel("person").idStrategy()
schema.getVertexLabel("person").primaryKeys()
schema.getVertexLabel("person").name()
schema.getVertexLabel("person").properties()
schema.getVertexLabel("person").nullableKeys()
schema.getVertexLabel("person").userdata()
2.4 EdgeLabel
2.4.1 接口及参数介绍
EdgeLabel 用来定义边类型,描述边的约束信息。
EdgeLabel 允许定义的约束信息包括:name、sourceLabel、targetLabel、frequency、properties、sortKeys 和 nullableKeys,下面逐一介绍。
- name: 属性的名字,用来区分不同的 EdgeLabel,不允许有同名的属性;
| interface | param | must set |
|---|
| edgeLabel(String name) | name | y |
| interface | param | must set |
|---|
| sourceLabel(String label) | label | y |
| targetLabel(String label) | label | y |
- frequency: 字面意思是频率,表示在两个具体的顶点间某个关系出现的次数,可以是单次(single)或多次(frequency),默认为 single;
| interface | frequency | description |
|---|
| singleTime() | single | a relationship can only occur once |
| multiTimes() | multiple | a relationship can occur many times |
| interface | description |
|---|
| properties(String… properties) | allow to pass multi props |
- sortKeys: 当 EdgeLabel 的 frequency 为 multiple 时,需要某些属性来区分这多次的关系,故引入了 sortKeys(排序键);
| interface | description |
|---|
| sortKeys(String… keys) | allow to choose multi prop as sortKeys |
- nullableKeys: 与顶点中的 nullableKeys 概念一致,不再赘述
注意:sortKeys 和 nullableKeys 也不能有交集。
| interface | description |
|---|
| userdata(String key, Object value) | The same key, the latter will cover the former |
2.4.2 创建 EdgeLabel
schema.edgeLabel("knows").link("person", "person").properties("date").ifNotExist().create();
schema.edgeLabel("created").multiTimes().link("person", "software").properties("date").sortKeys("date").ifNotExist().create();
2.4.3 追加 EdgeLabel
schema.edgeLabel("knows").properties("price").nullableKeys("price").append();
2.4.4 删除 EdgeLabel
schema.edgeLabel("knows").remove();
2.4.5 查询 EdgeLabel
// 获取 EdgeLabel 对象
schema.getEdgeLabel("knows")
// 获取 property key 属性
schema.getEdgeLabel("knows").frequency()
schema.getEdgeLabel("knows").sourceLabel()
schema.getEdgeLabel("knows").targetLabel()
schema.getEdgeLabel("knows").sortKeys()
schema.getEdgeLabel("knows").name()
schema.getEdgeLabel("knows").properties()
schema.getEdgeLabel("knows").nullableKeys()
schema.getEdgeLabel("knows").userdata()
2.5 IndexLabel
2.5.1 接口及参数介绍
IndexLabel 用来定义索引类型,描述索引的约束信息,主要是为了方便查询。
IndexLabel 允许定义的约束信息包括:name、baseType、baseValue、indexFields、indexType,下面逐一介绍。
- name: 属性的名字,用来区分不同的 IndexLabel,不允许有同名的属性;
| interface | param | must set |
|---|
| indexLabel(String name) | name | y |
baseType: 表示要为 VertexLabel 还是 EdgeLabel 建立索引, 与下面的 baseValue 配合使用;
baseValue: 指定要建立索引的 VertexLabel 或 EdgeLabel 的名称;
| interface | param | description |
|---|
| onV(String baseValue) | baseValue | build index for VertexLabel: ‘baseValue’ |
| onE(String baseValue) | baseValue | build index for EdgeLabel: ‘baseValue’ |
- indexFields: 要在哪些属性上建立索引,可以是为多列建立联合索引;
| interface | param | description |
|---|
| by(String… fields) | files | allow to build index for multi fields for secondary index |
- indexType: 建立的索引类型,目前支持五种,即 Secondary、Range、Search、Shard 和 Unique。
- Secondary 支持精确匹配的二级索引,允许建立联合索引,联合索引支持索引前缀搜索
- 单个属性,支持相等查询,比如:person 顶点的 city 属性的二级索引,可以用
g.V().has("city", "北京") 查询"city 属性值是北京"的全部顶点 - 联合索引,支持前缀查询和相等查询,比如:person 顶点的 city 和 street 属性的联合索引,可以用
g.V().has ("city", "北京").has('street', '中关村街道') 查询"city属性值是北京且street属性值是中关村"的全部顶点,或者g.V() .has("city", "北京")查询"city 属性值是北京"的全部顶点
secondary index 的查询都是基于"是"或者"相等"的查询条件,不支持"部分匹配"
- Range 支持数值类型的范围查询
- 必须是单个数字或者日期属性,比如:person 顶点的 age 属性的范围索引,可以用
g.V().has("age", P.gt(18)) 查询"age属性值大于18"的顶点。除了P.gt()以外,还支持P.gte(), P.lte(), P.lt(),
P.eq(), P.between(), P.inside()和P.outside()等
- Search 支持全文检索的索引
- 必须是单个文本属性,比如:person 顶点的 address 属性的全文索引,可以用
g.V().has("address", Text .contains('大厦')查询"address 属性中包含大厦"的全部顶点
search index 的查询是基于"是"或者"包含"的查询条件
- Shard 支持前缀匹配 + 数字范围查询的索引
- N 个属性的分片索引,支持前缀相等情况下的范围查询,比如:person 顶点的 city 和 age 属性的分片索引,可以用
g.V().has ("city", "北京").has("age", P.between(18, 30)) 查询"city 属性是北京且年龄大于等于 18 小于 30"的全部顶点 - shard index N 个属性全是文本属性时,等价于 secondary index
- shard index 只有单个数字或者日期属性时,等价于 range index
shard index 可以有任意数字或者日期属性,但是查询时最多只能提供一个范围查找条件,且该范围查找条件的属性的前缀属性都是相等查询条件
- Unique 支持属性值唯一性约束,即可以限定属性的值不重复,允许联合索引,但不支持查询
- 单个或者多个属性的唯一性索引,不可用来查询,只可对属性的值进行限定,当出现重复值时将报错
| interface | indexType | description |
|---|
| secondary() | Secondary | support prefix search |
| range() | Range | support range(numeric or date type) search |
| search() | Search | support full text search |
| shard() | Shard | support prefix + range(numeric or date type) search |
| unique() | Unique | support unique props value, not support search |
2.5.2 创建 IndexLabel
schema.indexLabel("personByAge").onV("person").by("age").range().ifNotExist().create();
schema.indexLabel("createdByDate").onE("created").by("date").secondary().ifNotExist().create();
schema.indexLabel("personByLived").onE("person").by("lived").search().ifNotExist().create();
schema.indexLabel("personByCityAndAge").onV("person").by("city", "age").shard().ifNotExist().create();
schema.indexLabel("personById").onV("person").by("id").unique().ifNotExist().create();
2.5.3 删除 IndexLabel
schema.indexLabel("personByAge").remove()
2.5.4 查询 IndexLabel
// 获取 IndexLabel 对象
schema.getIndexLabel("personByAge")
// 获取 property key 属性
schema.getIndexLabel("personByAge").baseType()
schema.getIndexLabel("personByAge").baseValue()
schema.getIndexLabel("personByAge").indexFields()
schema.getIndexLabel("personByAge").indexType()
schema.getIndexLabel("personByAge").name()
3 图数据
3.1 Vertex
顶点是构成图的最基本元素,一个图中可以有非常多的顶点。下面给出一个添加顶点的例子:
Vertex marko = graph.addVertex(T.label, "person", "name", "marko", "age", 29);
Vertex lop = graph.addVertex(T.label, "software", "name", "lop", "lang", "java", "price", 328);
- 添加顶点的关键是顶点属性,添加顶点函数的参数个数必须为偶数,且满足
key1 -> val1, key2 -> val2 ···的顺序排列,键值对之间的顺序是自由的。 - 参数中必须包含一对特殊的键值对,就是
T.label -> "val",用来定义该顶点的类别,以便于程序从缓存或后端获取到该 VertexLabel 的 schema 定义,然后做后续的约束检查。例子中的 label 定义为 person。 - 如果顶点类型的 Id 策略为
AUTOMATIC,则不允许用户传入 id 键值对。 - 如果顶点类型的 Id 策略为
CUSTOMIZE_STRING,则用户需要自己传入 String 类型 id 的值,键值对形如:"T.id", "123456"。 - 如果顶点类型的 Id 策略为
CUSTOMIZE_NUMBER,则用户需要自己传入 Number 类型 id 的值,键值对形如:"T.id", 123456。 - 如果顶点类型的 Id 策略为
PRIMARY_KEY,参数还必须全部包含该primaryKeys对应属性的名和值,如果不设置会抛出异常。比如之前person的primaryKeys是name,例子中就设置了name的值为marko。 - 对于非 nullableKeys 的属性,必须要赋值。
- 剩下的参数就是顶点其他属性的设置,但并非必须。
- 调用
addVertex方法后,顶点会立刻被插入到后端存储系统中。
3.2 Edge
有了点,还需要边才能构成完整的图。下面给出一个添加边的例子:
Edge knows1 = marko.addEdge("knows", vadas, "city", "Beijing");
- 由(源)顶点来调用添加边的函数,函数第一个参数为边的 label,第二个参数是目标顶点,这两个参数的位置和顺序是固定的。后续的参数就是
key1 -> val1, key2 -> val2 ···的顺序排列,设置边的属性,键值对顺序自由。 - 源顶点和目标顶点必须符合 EdgeLabel 中 source-label 和 target-label 的定义,不能随意添加。
- 对于非 nullableKeys 的属性,必须要赋值。
注意:当 frequency 为 multiple 时必须要设置 sortKeys 对应属性类型的值。
4 图管理
client支持一个物理部署中多个 GraphSpace,每个 GraphSpace 下可以含多个图(graph)。
- 兼容:不指定 GraphSpace 时,默认使用 “DEFAULT” 空间
4.1 创建GraphSpace
GraphSpaceManager spaceManager = hugeClient.graphSpace();
// 定义 GraphSpace 配置
GraphSpace graphSpace = new GraphSpace();
graphSpace.setName("myGraphSpace");
graphSpace.setDescription("Business data graph space");
graphSpace.setMaxGraphNumber(10); // 最大图数量
graphSpace.setMaxRoleNumber(100); // 最大角色数量
// 创建 GraphSpace
spaceManager.createGraphSpace(graphSpace);
4.2 GraphSpace 接口汇总
| 类别 | 接口 | 描述 |
|---|
| Manager - 查询 | listGraphSpace() | 获取所有 GraphSpace 列表 |
| getGraphSpace(String name) | 获取指定 GraphSpace |
| Manager - 创建/更新 | createGraphSpace(GraphSpace) | 创建 GraphSpace |
| updateGraphSpace(String, GraphSpace) | 更新配置 |
| Manager - 删除 | removeGraphSpace(String) | 删除指定 GraphSpace |
| GraphSpace - 属性 | getName() / getDescription() | 获取名称/描述 |
| getGraphNumber() | 获取图数量 |
| GraphSpace - 配置 | setDescription(String) | 设置描述 |
| setMaxGraphNumber(int) | 设置最大图数量 |
5 简单示例
简单示例见HugeGraph-Client
5.3 - Gremlin-Console
Gremlin-Console 是由 Tinkerpop 自己开发的一个交互式客户端,用户可以使用该客户端对 Graph 做各种操作,主要有两种使用模式:
- 单机离线调用模式
- Client/Server 请求模式
注:Gremlin-Console 只是便于用户快速上手体验,不建议在生产环境中使用。
1 单机离线调用模式
由于 lib 目录下已经包含了 HugeCore 的 jar 包,且 HugeGraph-Server 已经作为插件注册到 Gremlin-Console 中,用户可以直接写 Groovy 脚本调用 HugeGraph-Core 的代码,然后交由 Gremlin-Console 内的解析引擎执行,就能在不启动 Server 的情况下操作图。
这里提供一个示例,首先修改 hugegraph.properties 配置使用 Memory 后端 (使用其他后端可能会出现一些初始化问题):
backend=memory
serializer=text
然后输入下述命令:
> ./bin/gremlin-console.sh -- -i scripts/example.groovy
\,,,/
(o o)
-----oOOo-(3)-oOOo-----
plugin activated: HugeGraph
plugin activated: tinkerpop.server
plugin activated: tinkerpop.utilities
plugin activated: tinkerpop.tinkergraph
main dict load finished, time elapsed 644 ms
model load finished, time elapsed 35 ms.
>>>> query all vertices: size=6
>>>> query all edges: size=6
gremlin>
这里的 -- 会被 getopts 解析为最后一个 option,这样后面的 options 就可以传入 Gremlin-Console 进行处理了。-i 代表 Execute the specified script and leave the console open on completion,更多的选项可以参考 Gremlin-Console 的源代码。
其中 example.groovy 是 scripts 目录下的一个示例脚本,该脚本插入了一些数据,并在最后查询图中顶点和边的数量。
此时还可以继续输入 Gremlin 语句对图进行操作:
gremlin> g.V()
==>v[2:lop]
==>v[1:josh]
==>v[1:marko]
==>v[1:peter]
==>v[1:vadas]
==>v[2:ripple]
gremlin> g.E()
==>e[S1:josh>2>>S2:lop][1:josh-created->2:lop]
==>e[S1:josh>2>>S2:ripple][1:josh-created->2:ripple]
==>e[S1:marko>1>>S1:josh][1:marko-knows->1:josh]
==>e[S1:marko>1>>S1:vadas][1:marko-knows->1:vadas]
==>e[S1:marko>2>>S2:lop][1:marko-created->2:lop]
==>e[S1:peter>2>>S2:lop][1:peter-created->2:lop]
gremlin>
更多的 Gremlin 语句请参考 Tinkerpop 官网。
2 Client/Server 请求模式
因为 Gremlin-Console 只能通过 WebSocket 连接 HugeGraph-Server,默认 HugeGraph-Server 是对外提供 HTTP 连接的,所以先修改 gremlin-server 的配置。
注意:将连接方式修改为 WebSocket 后,HugeGraph-Client、HugeGraph-Loader、HugeGraph-Hubble 等配套工具都不能使用了。
# vim conf/gremlin-server.yaml
# ......
# If you want to start gremlin-server for gremlin-console (web-socket),
# please change `HttpChannelizer` to `WebSocketChannelizer` or comment this line.
channelizer: org.apache.tinkerpop.gremlin.server.channel.HttpChannelizer
# ......
将 channelizer: org.apache.tinkerpop.gremlin.server.channel.HttpChannelizer 修改成 channelizer: org.apache.tinkerpop.gremlin.server.channel.WebSocketChannelizer 或直接注释,然后按照步骤启动 HugeGraph-Server。
下面进入 Gremlin-Console:
> ./bin/gremlin-console.sh
\,,,/
(o o)
-----oOOo-(3)-oOOo-----
plugin activated: HugeGraph
plugin activated: tinkerpop.server
plugin activated: tinkerpop.utilities
plugin activated: tinkerpop.tinkergraph
连接 Server,需在配置文件中指定连接参数,在 conf 目录下有一个默认的 remote.yaml:
# cat conf/remote.yaml
hosts: [localhost]
port: 8182
serializer: {
className: org.apache.tinkerpop.gremlin.driver.ser.GraphSONMessageSerializerV1d0,
config: {
serializeResultToString: false,
ioRegistries: [org.apache.hugegraph.io.HugeGraphIoRegistry]
}
}
gremlin> :remote connect tinkerpop.server conf/remote.yaml
==>Configured localhost/127.0.0.1:8182
连接成功之后,如果在启动 HugeGraph-Server 的过程中导入了示例图,就可以在 Gremlin-Console 中直接进行查询:
gremlin> :> hugegraph.traversal().V()
==>[id:2:lop,label:software,type:vertex,properties:[name:lop,lang:java,price:328]]
==>[id:1:josh,label:person,type:vertex,properties:[name:josh,age:32,city:Beijing]]
==>[id:1:marko,label:person,type:vertex,properties:[name:marko,age:29,city:Beijing]]
==>[id:1:peter,label:person,type:vertex,properties:[name:peter,age:35,city:Shanghai]]
==>[id:1:vadas,label:person,type:vertex,properties:[name:vadas,age:27,city:Hongkong]]
==>[id:2:ripple,label:software,type:vertex,properties:[name:ripple,lang:java,price:199]]
注意:在 Client/Server 模式下,所有和 Server 有关的操作都要加上 :> ,如果不加,表示在 console 本地操作。
还可以把多条语句放在一个字符串变量中,然后一次性发给 Server:
gremlin> script = """
......1> graph = hugegraph;
......2> g = graph.traversal();
......3> g.V().toList().size();
......4> """
==>
graph = hugegraph;
g = graph.traversal();
g.V().toList().size();
gremlin> :> @script
==>6
gremlin>
更多关于 Gremlin-Console 的使用,请参考 Tinkerpop 官网。
6 - GUIDES
6.1 - HugeGraph Architecture Overview
1 概述
作为一套覆盖图数据库、图计算与图 AI 的全栈图系统,HugeGraph 以高性能图引擎(HugeGraph Server)为核心,支持 OLTP 和 OLAP 两种图计算类型。其中 OLTP 层实现了 Apache TinkerPop3 框架,支持 Gremlin 和 Cypher 查询语言,拥有功能齐全的应用工具链,还提供了插件式后端存储驱动框架。
下面是 HugeGraph 的整体架构图:
HugeGraph 包括三个层次的功能,分别是应用程序层、图引擎层和存储层。
- 应用程序层:
- Hubble: 一站式可视化分析平台,平台涵盖了从数据建模,到数据快速导入,再到数据的在线、离线分析、以及图的统一管理的全过程,实现了图应用的全流程向导式操作。
- Loader: 数据导入组件,能够将多种数据源的数据转化为图的顶点和边并批量导入到图数据库中。
- Tools: 命令行工具,用于部署、管理和备份/恢复 HugeGraph 中的数据。
- Computer: 分布式图处理系统 (OLAP),它是 Pregel 的一个实现,可以运行在 Kubernetes 上。
- Client: 使用 Java 编写的 HugeGraph 客户端,用户可以使用 Client 编写 Java 代码操作 HugeGraph,后续可根据需要提供 Python、Go、C++ 等多语言支持。
- 图引擎层:
- REST Server: 提供 RESTful API 用于查询 Graph/Schema 等信息,支持 Gremlin 和 Cypher 查询语言,提供服务监控和运维的 APIs。
- Graph Engine: 支持 OLTP 和 OLAP 两种图计算类型,其中 OLTP 实现了 Apache TinkerPop3 框架。
- Backend Interface: 实现将图数据存储到后端。
- 存储层:
- Storage Backend: 支持多种内置存储后端 (RocksDB/MySQL/HBase/…),也允许用户无需更改现有源码的情况下扩展自定义后端。
6.2 - HugeGraph Design Concepts
1. Property Graph
常见的图数据表示模型有两种,分别是RDF(Resource Description Framework)模型和属性图(Property Graph)模型。
RDF和Property Graph都是最基础、最有名的图表示模式,都能够表示各种图的实体关系建模。
RDF是W3C标准,而Property Graph是工业标准,受到广大图数据库厂商的广泛支持。HugeGraph目前采用Property Graph。
HugeGraph对应的存储概念模型也是参考Property Graph而设计的,具体示例详见下图:(此图为旧版设计已过时,请忽略它,后续更新)
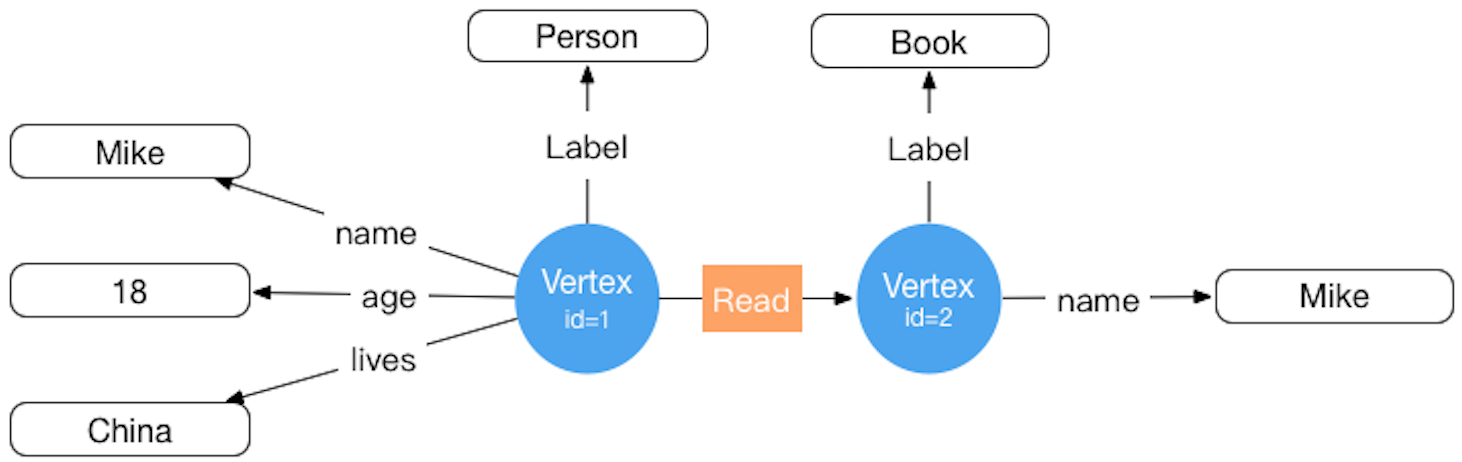
在HugeGraph内部,每个顶点 / 边由唯一的 VertexId / EdgeId 标识,属性存储在对应点 / 边内部。而顶点与顶点之间的关系 / 映射则是通过边来存储的。
顶点属性值通过边指针方式存储时,如果要更新一个顶点特定的属性值直接通过覆盖写入即可,其弊端是冗余存储了VertexId;
如果要更新关系的属性需要通过read-and-modify方式,先读取所有属性,修改部分属性,然后再写入存储系统,更新效率较低。
从经验来看顶点属性的修改需求较多,而边的属性修改需求较少,例如PageRank和Graph Cluster等计算都需要频繁修改顶点的属性值。
2. 图分区方案
对于分布式图数据库而言,图的分区存储方式有两种:分别是边分割存储(Edge Cut)和点分割存储(Vertex Cut),如下图所示。
使用Edge Cut方式存储图时,任何一个顶点只会出现在一台机器上,而边可能分布在不同机器上,这种存储方式有可能导致边多次存储。
使用Vertex Cut方式存储图时,任何一条边只会出现在一台机器上,而每相同的一个点可能分布到不同机器上,这种存储方式可能会导致顶点多次存储。
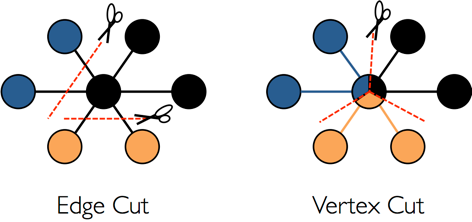
采用EdgeCut分区方案可以支持高性能的插入和更新操作,而VertexCut分区方案更适合静态图查询分析,因此EdgeCut适合OLTP图查询,VertexCut更适合OLAP的图查询。
HugeGraph目前采用EdgeCut的分区方案。
3. VertexId 策略
HugeGraph的Vertex支持三种ID策略,在同一个图数据库中不同的VertexLabel可以使用不同的Id策略,目前HugeGraph支持的Id策略分别是:
- 自动生成(AUTOMATIC):使用Snowflake算法自动生成全局唯一Id,Long类型;
- 主键(PRIMARY_KEY):通过VertexLabel+PrimaryKeyValues生成Id,String类型;
- 自定义(CUSTOMIZE_STRING|CUSTOMIZE_NUMBER):用户自定义Id,分为String和Long类型两种,需自己保证Id的唯一性;
默认的Id策略是AUTOMATIC,如果用户调用primaryKeys()方法并设置了正确的PrimaryKeys,则自动启用PRIMARY_KEY策略。
启用PRIMARY_KEY策略后HugeGraph能根据PrimaryKeys实现数据去重。
- AUTOMATIC ID策略
schema.vertexLabel("person")
.useAutomaticId()
.properties("name", "age", "city")
.create();
graph.addVertex(T.label, "person","name", "marko", "age", 18, "city", "Beijing");
- PRIMARY_KEY ID策略
schema.vertexLabel("person")
.usePrimaryKeyId()
.properties("name", "age", "city")
.primaryKeys("name", "age")
.create();
graph.addVertex(T.label, "person","name", "marko", "age", 18, "city", "Beijing");
- CUSTOMIZE_STRING ID策略
schema.vertexLabel("person")
.useCustomizeStringId()
.properties("name", "age", "city")
.create();
graph.addVertex(T.label, "person", T.id, "123456", "name", "marko","age", 18, "city", "Beijing");
- CUSTOMIZE_NUMBER ID策略
schema.vertexLabel("person")
.useCustomizeNumberId()
.properties("name", "age", "city")
.create();
graph.addVertex(T.label, "person", T.id, 123456, "name", "marko","age", 18, "city", "Beijing");
如果用户需要Vertex去重,有三种方案分别是:
- 采用PRIMARY_KEY策略,自动覆盖,适合大数据量批量插入,用户无法知道是否发生了覆盖行为
- 采用AUTOMATIC策略,read-and-modify,适合小数据量插入,用户可以明确知道是否发生覆盖
- 采用CUSTOMIZE_STRING或CUSTOMIZE_NUMBER策略,用户自己保证唯一
4. EdgeId 策略
HugeGraph的EdgeId是由srcVertexId+edgeLabel+sortKey+tgtVertexId四部分组合而成。其中sortKey是HugeGraph的一个重要概念。
在Edge中加入sortKey作为Edge的唯一标识的原因有两个:
- 如果两个顶点之间存在多条相同Label的边可通过
sortKey来区分 - 对于SuperNode的节点,可以通过
sortKey来排序截断。
由于EdgeId是由srcVertexId+edgeLabel+sortKey+tgtVertexId四部分组合,多次插入相同的Edge时HugeGraph会自动覆盖以实现去重。
需要注意的是如果批量插入模式下Edge的属性也将会覆盖。
另外由于HugeGraph的EdgeId采用自动去重策略,对于self-loop(一个顶点存在一条指向自身的边)的情况下HugeGraph认为仅有一条边,对于采用AUTOMATIC策略的图数据库(例如TitianDB
)则会认为该图存在两条边。
HugeGraph的边仅支持有向边,无向边可以创建Out和In两条边来实现。
5. HugeGraph transaction overview
TinkerPop事务概述
TinkerPop transaction事务是指对数据库执行操作的工作单元,一个事务内的一组操作要么执行成功,要么全部失败。
详细介绍请参考TinkerPop官方文档:http://tinkerpop.apache.org/docs/current/reference/#transactions
TinkerPop事务操作接口
- open 打开事务
- commit 提交事务
- rollback 回滚事务
- close 关闭事务
TinkerPop事务规范
- 事务必须显式提交后才可生效(未提交时修改操作只有本事务内查询可看到)
- 事务必须打开之后才可提交或回滚
- 如果事务设置自动打开则无需显式打开(默认方式),如果设置手动打开则必须显式打开
- 可设置事务关闭时:自动提交、自动回滚(默认方式)、手动(禁止显式关闭)等3种模式
- 事务在提交或回滚后必须是关闭状态
- 事务在查询后必须是打开状态
- 事务(非threaded tx)必须线程隔离,多线程操作同一事务互不影响
更多事务规范用例见:Transaction Test
HugeGraph事务实现
- 一个事务中所有的操作要么成功要么失败
- 一个事务只能读取到另外一个事务已提交的内容(Read committed)
- 所有未提交的操作均能在本事务中查询出来,包括:
- 增加顶点能够查询出该顶点
- 删除顶点能够过滤掉该顶点
- 删除顶点能够过滤掉该顶点相关边
- 增加边能够查询出该边
- 删除边能够过滤掉该边
- 增加/修改(顶点、边)属性能够在查询时生效
- 删除(顶点、边)属性能够在查询时生效
- 所有未提交的操作在事务回滚后均失效,包括:
示例:一个事务无法读取另一个事务未提交的内容
static void testUncommittedTx(final HugeGraph graph) throws InterruptedException {
final CountDownLatch latchUncommit = new CountDownLatch(1);
final CountDownLatch latchRollback = new CountDownLatch(1);
Thread thread = new Thread(() -> {
// this is a new transaction in the new thread
graph.tx().open();
System.out.println("current transaction operations");
Vertex james = graph.addVertex(T.label, "author",
"id", 1, "name", "James Gosling",
"age", 62, "lived", "Canadian");
Vertex java = graph.addVertex(T.label, "language", "name", "java",
"versions", Arrays.asList(6, 7, 8));
james.addEdge("created", java);
// we can query the uncommitted records in the current transaction
System.out.println("current transaction assert");
assert graph.vertices().hasNext() == true;
assert graph.edges().hasNext() == true;
latchUncommit.countDown();
try {
latchRollback.await();
} catch (InterruptedException e) {
throw new RuntimeException(e);
}
System.out.println("current transaction rollback");
graph.tx().rollback();
});
thread.start();
// query none result in other transaction when not commit()
latchUncommit.await();
System.out.println("other transaction assert for uncommitted");
assert !graph.vertices().hasNext();
assert !graph.edges().hasNext();
latchRollback.countDown();
thread.join();
// query none result in other transaction after rollback()
System.out.println("other transaction assert for rollback");
assert !graph.vertices().hasNext();
assert !graph.edges().hasNext();
}
事务实现原理
- 服务端内部通过将事务与线程绑定实现隔离(ThreadLocal)
- 本事务未提交的内容按照时间顺序覆盖老数据以供本事务查询最新版本数据
- 底层依赖后端数据库保证事务原子性操作(如Cassandra/RocksDB的batch接口均保证原子性)
注意
RESTful API暂时未暴露事务接口
TinkerPop API允许打开事务,请求完成时会自动关闭(Gremlin Server强制关闭)
6.3 - HugeGraph Plugin 机制及插件扩展流程
背景
- HugeGraph 不仅开源开放,而且要做到简单易用,一般用户无需更改源码也能轻松增加插件扩展功能。
- HugeGraph 支持多种内置存储后端,也允许用户无需更改现有源码的情况下扩展自定义后端。
- HugeGraph 支持全文检索,全文检索功能涉及到各语言分词,目前已内置 8 种中文分词器,也允许用户无需更改现有源码的情况下扩展自定义分词器。
可扩展维度
目前插件方式提供如下几个维度的扩展项:
插件实现机制
- HugeGraph 提供插件接口 HugeGraphPlugin,通过 Java SPI 机制支持插件化
- HugeGraph 提供了 4 个扩展项注册函数:
registerOptions()、registerBackend()、registerSerializer()、registerAnalyzer() - 插件实现者实现相应的 Options、Backend、Serializer 或 Analyzer 的接口
- 插件实现者实现 HugeGraphPlugin 接口的
register()方法,在该方法中注册上述第 3 点所列的具体实现类,并打成 jar 包 - 插件使用者将 jar 包放在 HugeGraph Server 安装目录的
plugins目录下,修改相关配置项为插件自定义值,重启即可生效
插件实现流程实例
1 新建一个 maven 项目
1.1 项目名称取名:hugegraph-plugin-demo
1.2 添加hugegraph-core Jar 包依赖
maven pom.xml 详细内容如下:
<?xml version="1.0" encoding="UTF-8"?>
<project xmlns="http://maven.apache.org/POM/4.0.0"
xmlns:xsi="http://www.w3.org/2001/XMLSchema-instance"
xsi:schemaLocation="http://maven.apache.org/POM/4.0.0 http://maven.apache.org/xsd/maven-4.0.0.xsd">
<modelVersion>4.0.0</modelVersion>
<groupId>org.apache.hugegraph</groupId>
<artifactId>hugegraph-plugin-demo</artifactId>
<version>1.0.0</version>
<packaging>jar</packaging>
<name>hugegraph-plugin-demo</name>
<dependencies>
<dependency>
<groupId>org.apache.hugegraph</groupId>
<artifactId>hugegraph-core</artifactId>
<version>${project.version}</version>
</dependency>
</dependencies>
</project>
2 实现扩展功能
2.1 扩展自定义后端
2.1.1 实现接口 BackendStoreProvider
- 可实现接口:
org.apache.hugegraph.backend.store.BackendStoreProvider - 或者继承抽象类:
org.apache.hugegraph.backend.store.AbstractBackendStoreProvider
以 RocksDB 后端 RocksDBStoreProvider 为例:
public class RocksDBStoreProvider extends AbstractBackendStoreProvider {
protected String database() {
return this.graph().toLowerCase();
}
@Override
protected BackendStore newSchemaStore(String store) {
return new RocksDBSchemaStore(this, this.database(), store);
}
@Override
protected BackendStore newGraphStore(String store) {
return new RocksDBGraphStore(this, this.database(), store);
}
@Override
public String type() {
return "rocksdb";
}
@Override
public String version() {
return "1.0";
}
}
2.1.2 实现接口 BackendStore
BackendStore 接口定义如下:
public interface BackendStore {
// Store name
public String store();
// Database name
public String database();
// Get the parent provider
public BackendStoreProvider provider();
// Open/close database
public void open(HugeConfig config);
public void close();
// Initialize/clear database
public void init();
public void clear();
// Add/delete data
public void mutate(BackendMutation mutation);
// Query data
public Iterator<BackendEntry> query(Query query);
// Transaction
public void beginTx();
public void commitTx();
public void rollbackTx();
// Get metadata by key
public <R> R metadata(HugeType type, String meta, Object[] args);
// Backend features
public BackendFeatures features();
// Generate an id for a specific type
public Id nextId(HugeType type);
}
2.1.3 扩展自定义序列化器
序列化器必须继承抽象类:org.apache.hugegraph.backend.serializer.AbstractSerializer(implements GraphSerializer, SchemaSerializer)
主要接口的定义如下:
public interface GraphSerializer {
public BackendEntry writeVertex(HugeVertex vertex);
public BackendEntry writeVertexProperty(HugeVertexProperty<?> prop);
public HugeVertex readVertex(HugeGraph graph, BackendEntry entry);
public BackendEntry writeEdge(HugeEdge edge);
public BackendEntry writeEdgeProperty(HugeEdgeProperty<?> prop);
public HugeEdge readEdge(HugeGraph graph, BackendEntry entry);
public BackendEntry writeIndex(HugeIndex index);
public HugeIndex readIndex(HugeGraph graph, ConditionQuery query, BackendEntry entry);
public BackendEntry writeId(HugeType type, Id id);
public Query writeQuery(Query query);
}
public interface SchemaSerializer {
public BackendEntry writeVertexLabel(VertexLabel vertexLabel);
public VertexLabel readVertexLabel(HugeGraph graph, BackendEntry entry);
public BackendEntry writeEdgeLabel(EdgeLabel edgeLabel);
public EdgeLabel readEdgeLabel(HugeGraph graph, BackendEntry entry);
public BackendEntry writePropertyKey(PropertyKey propertyKey);
public PropertyKey readPropertyKey(HugeGraph graph, BackendEntry entry);
public BackendEntry writeIndexLabel(IndexLabel indexLabel);
public IndexLabel readIndexLabel(HugeGraph graph, BackendEntry entry);
}
2.1.4 扩展自定义配置项
增加自定义后端时,可能需要增加新的配置项,实现流程主要包括:
- 增加配置项容器类,并实现接口
org.apache.hugegraph.config.OptionHolder - 提供单例方法
public static OptionHolder instance(),并在对象初始化时调用方法OptionHolder.registerOptions() - 增加配置项声明,单值配置项类型为
ConfigOption、多值配置项类型为ConfigListOption
以 RocksDB 配置项定义为例:
public class RocksDBOptions extends OptionHolder {
private RocksDBOptions() {
super();
}
private static volatile RocksDBOptions instance;
public static synchronized RocksDBOptions instance() {
if (instance == null) {
instance = new RocksDBOptions();
instance.registerOptions();
}
return instance;
}
public static final ConfigOption<String> DATA_PATH =
new ConfigOption<>(
"rocksdb.data_path",
"The path for storing data of RocksDB.",
disallowEmpty(),
"rocksdb-data"
);
public static final ConfigOption<String> WAL_PATH =
new ConfigOption<>(
"rocksdb.wal_path",
"The path for storing WAL of RocksDB.",
disallowEmpty(),
"rocksdb-data"
);
public static final ConfigListOption<String> DATA_DISKS =
new ConfigListOption<>(
"rocksdb.data_disks",
false,
"The optimized disks for storing data of RocksDB. " +
"The format of each element: `STORE/TABLE: /path/to/disk`." +
"Allowed keys are [graph/vertex, graph/edge_out, graph/edge_in, " +
"graph/secondary_index, graph/range_index]",
null,
String.class,
ImmutableList.of()
);
}
2.2 扩展自定义分词器
分词器需要实现接口org.apache.hugegraph.analyzer.Analyzer,以实现一个 SpaceAnalyzer 空格分词器为例。
package org.apache.hugegraph.plugin;
import java.util.Arrays;
import java.util.HashSet;
import java.util.Set;
import org.apache.hugegraph.analyzer.Analyzer;
public class SpaceAnalyzer implements Analyzer {
@Override
public Set<String> segment(String text) {
return new HashSet<>(Arrays.asList(text.split(" ")));
}
}
3. 实现插件接口,并进行注册
插件注册入口为HugeGraphPlugin.register(),自定义插件必须实现该接口方法,在其内部注册上述定义好的扩展项。
接口org.apache.hugegraph.plugin.HugeGraphPlugin定义如下:
public interface HugeGraphPlugin {
public String name();
public void register();
public String supportsMinVersion();
public String supportsMaxVersion();
}
并且 HugeGraphPlugin 提供了 4 个静态方法用于注册扩展项:
- registerOptions(String name, String classPath):注册配置项
- registerBackend(String name, String classPath):注册后端(BackendStoreProvider)
- registerSerializer(String name, String classPath):注册序列化器
- registerAnalyzer(String name, String classPath):注册分词器
下面以注册 SpaceAnalyzer 分词器为例:
package org.apache.hugegraph.plugin;
public class DemoPlugin implements HugeGraphPlugin {
@Override
public String name() {
return "demo";
}
@Override
public void register() {
HugeGraphPlugin.registerAnalyzer("demo", SpaceAnalyzer.class.getName());
}
}
4. 配置 SPI 入口
- 确保 services 目录存在:hugegraph-plugin-demo/resources/META-INF/services
- 在 services 目录下建立文本文件:org.apache.hugegraph.plugin.HugeGraphPlugin
- 文件内容如下:org.apache.hugegraph.plugin.DemoPlugin
5. 打 Jar 包
通过 maven 打包,在项目目录下执行命令mvn package,在 target 目录下会生成 Jar 包文件。
使用时将该 Jar 包拷到plugins目录,重启服务即可生效。
6.4 - HugeGraph工具链本地测试指南
本指南帮助开发者在本地运行 HugeGraph 工具链测试。
1. 核心概念
1.1 核心依赖:HugeGraph Server
工具链的集成测试和功能测试都依赖 HugeGraph Server,包括 Client、Loader、Hubble、Spark Connector、Tools 等组件。
1.2 测试类型
- 单元测试 (Unit Tests):测试单个函数/方法,不依赖外部服务
- API 测试 (ApiTestSuite):测试 API 接口,需要运行中的 HugeGraph Server
- 功能测试 (FuncTestSuite):端到端测试,需要完整的系统环境
2. 环境准备
2.1 系统要求
- 操作系统:Linux / macOS(Windows 使用 WSL2)
- JDK:>= 11,配置好
JAVA_HOME - Maven:>= 3.5
- Python:>= 3.11(仅 Hubble 测试需要)
2.2 克隆代码
git clone https://github.com/${GITHUB_USER_NAME}/hugegraph-toolchain.git
cd hugegraph-toolchain
3. 部署测试环境
方式选择
- 脚本部署(推荐):通过指定 Commit ID 精确控制 Server 版本,避免接口不兼容
- Docker 部署:快速启动,但可能版本滞后导致测试失败
详细安装说明参考 社区文档
3.1 脚本部署(推荐)
参数说明
$COMMIT_ID:指定 Server 源码的 Git Commit ID$DB_DATABASE / $DB_PASS:Loader JDBC 测试用的 MySQL 数据库名和密码
部署步骤
1. 安装 HugeGraph Server
# 设置版本
export COMMIT_ID="master" # 或特定 commit hash,如 "8b90977"
# 执行安装(脚本位于 /assembly/travis/ 目录)
hugegraph-client/assembly/travis/install-hugegraph-from-source.sh $COMMIT_ID
- 默认端口:http 8080, https 8443
- 确保端口未被占用
2. 安装可选依赖
# Hadoop (仅 Loader HDFS 测试需要)
hugegraph-loader/assembly/travis/install-hadoop.sh
# MySQL (仅 Loader JDBC 测试需要)
hugegraph-loader/assembly/travis/install-mysql.sh $DB_DATABASE $DB_PASS
3. 健康检查
curl http://localhost:8080/graphs
# 返回 {"graphs":["hugegraph"]} 表示成功
3.2 Docker 部署
注意:Docker 镜像可能版本滞后,如遇兼容性问题请使用脚本部署
快速启动
docker network create hugegraph-net
docker run -itd --name=server -p 8080:8080 --network hugegraph-net hugegraph/hugegraph:latest
docker-compose 配置(可选)
完整配置示例,包含 Server、MySQL、Hadoop 服务(需要 Docker Compose V2):
version: '3.8'
services:
hugegraph-server:
image: hugegraph/hugegraph:latest # 可以替换为特定版本,或构建自己的镜像
container_name: hugegraph-server
ports:
- "8080:8080" # HugeGraph Server HTTP 端口
environment:
# 根据需要配置HugeGraph Server的参数,例如后端存储
- HUGEGRAPH_SERVER_OPTIONS="-Dstore.backend=rocksdb"
volumes:
# 如果需要持久化数据或挂载配置文件,可以在这里添加卷
# - ./hugegraph-data:/opt/hugegraph/data
healthcheck:
test: ["CMD-SHELL", "curl -f http://localhost:8080/graphs || exit 1"]
interval: 5s
timeout: 3s
retries: 5
networks:
- hugegraph-net
# 如果需要hugegraph-loader的JDBC测试,可以添加以下服务
# mysql:
# image: mysql:5.7
# container_name: mysql-db
# environment:
# MYSQL_ROOT_PASSWORD: ${DB_PASS:-your_mysql_root_password} # 从环境变量读取,或使用默认值
# MYSQL_DATABASE: ${DB_DATABASE:-hugegraph_test_db} # 从环境变量读取,或使用默认值
# ports:
# - "3306:3306"
# volumes:
# - ./mysql-data:/var/lib/mysql # 数据持久化
# healthcheck:
# test: ["CMD", "mysqladmin", "ping", "-h", "localhost", "-p${DB_PASS:-your_mysql_root_password}"]
# interval: 5s
# timeout: 3s
# retries: 5
# networks:
# - hugegraph-net
# 如果需要hugegraph-loader的Hadoop/HDFS测试,可以添加以下服务
# namenode:
# image: johannestang/hadoop-namenode:2.0.0-hadoop2.8.5-java8
# container_name: namenode
# ports:
# - "0.0.0.0:9870:9870"
# - "0.0.0.0:8020:8020"
# environment:
# - CLUSTER_NAME=test-cluster
# - HDFS_NAMENODE_USER=root
# - HADOOP_CONF_DIR=/hadoop/etc/hadoop
# volumes:
# - ./config/core-site.xml:/hadoop/etc/hadoop/core-site.xml
# - ./config/hdfs-site.xml:/hadoop/etc/hadoop/hdfs-site.xml
# - namenode_data:/hadoop/dfs/name
# command: bash -c "if [ ! -d /hadoop/dfs/name/current ]; then hdfs namenode -format; fi && /entrypoint.sh"
# healthcheck:
# test: ["CMD", "hdfs", "dfsadmin", "-report"]
# interval: 5s
# timeout: 3s
# retries: 5
# networks:
# - hugegraph-net
# datanode:
# image: johannestang/hadoop-datanode:2.0.0-hadoop2.8.5-java8
# container_name: datanode
# depends_on:
# - namenode
# environment:
# - CLUSTER_NAME=test-cluster
# - HDFS_DATANODE_USER=root
# - HADOOP_CONF_DIR=/hadoop/etc/hadoop
# volumes:
# - ./config/core-site.xml:/hadoop/etc/hadoop/core-site.xml
# - ./config/hdfs-site.xml:/hadoop/etc/hadoop/hdfs-site.xml
# - datanode_data:/hadoop/dfs/data
# healthcheck:
# test: ["CMD", "hdfs", "dfsadmin", "-report"]
# interval: 5s
# timeout: 3s
# retries: 5
# networks:
# - hugegraph-net
networks:
hugegraph-net:
driver: bridge
volumes:
namenode_data:
datanode_data:
Hadoop 配置挂载
在与 docker-compose.yml 相同的目录下创建 ./config 文件夹用于挂载 Hadoop 配置文件。如果不需要 HDFS 测试,可以跳过此步骤。
📁 ./config/core-site.xml 内容:
<configuration>
<property>
<name>fs.defaultFS</name>
<value>hdfs://namenode:8020</value>
</property>
</configuration>
📁 ./config/hdfs-site.xml 内容:
<configuration>
<property>
<name>dfs.namenode.name.dir</name>
<value>/hadoop/hdfs/name</value>
</property>
<property>
<name>dfs.datanode.data.dir</name>
<value>/hadoop/hdfs/data</value>
</property>
<property>
<name>dfs.permissions.superusergroup</name>
<value>hadoop</value>
</property>
<property>
<name>dfs.support.append</name>
<value>true</value>
</property>
</configuration>
Docker 操作
# 启动服务
docker compose up -d
# 检查状态
docker compose ps
lsof -i:8080 # Server
lsof -i:8020 # Hadoop
lsof -i:3306 # MySQL
# 停止服务
docker compose down
4. 运行测试
各工具的测试流程:
4.1 hugegraph-client
编译
mvn -e compile -pl hugegraph-client -Dmaven.javadoc.skip=true -ntp
依赖服务
启动 HugeGraph Server(参考 第3节)
Server 鉴权配置
注意:Docker 镜像 <= 1.5.0 不支持鉴权测试,需 1.6.0+
ApiTest 需要鉴权配置,使用脚本安装可跳过。使用 Docker 需手动配置:
# 1. 修改鉴权模式
cp conf/rest-server.properties conf/rest-server.properties.backup
sed -i '/^auth.authenticator=/c\auth.authenticator=org.apache.hugegraph.auth.StandardAuthenticator' conf/rest-server.properties
grep auth.authenticator conf/rest-server.properties
# 2. 设置密码
# 注:测试代码中默认使用 "pa" 作为密码,设置时需与测试保持一致
bin/stop-hugegraph.sh
export PASSWORD="pa" # 设置为测试默认密码
echo -e "${PASSWORD}" | bin/init-store.sh
bin/start-hugegraph.sh
运行测试
# 检查环境
curl http://localhost:8080/graphs # 应返回 {"graphs":["hugegraph"]}
curl -u admin:pa http://localhost:8080/graphs # 鉴权测试(密码 pa 是测试默认值)
# 运行测试
cd hugegraph-client
mvn test -Dtest=UnitTestSuite -ntp # 单元测试
mvn test -Dtest=ApiTestSuite -ntp # API测试(需 Server)
mvn test -Dtest=FuncTestSuite -ntp # 功能测试(需 Server)
测试失败时检查 Server 日志:logs/hugegraph-server.log
4.2 hugegraph-loader
编译
mvn install -pl hugegraph-client,hugegraph-loader -am -Dmaven.javadoc.skip=true -DskipTests -ntp
依赖服务
- 必需:HugeGraph Server
- 可选:Hadoop (HDFS 测试)、MySQL (JDBC 测试)
运行测试
cd hugegraph-loader
mvn test -P unit -ntp # 单元测试
mvn test -P file -ntp # 文件测试(需 Server)
mvn test -P hdfs -ntp # HDFS测试(需 Server + Hadoop)
mvn test -P jdbc -ntp # JDBC测试(需 Server + MySQL)
mvn test -P kafka -ntp # Kafka测试(需 Server)
4.3 hugegraph-hubble
编译
mvn install -pl hugegraph-client,hugegraph-loader -am -Dmaven.javadoc.skip=true -DskipTests -ntp
cd hugegraph-hubble
mvn -e compile -Dmaven.javadoc.skip=true -ntp
依赖服务
1. 启动 Server(参考 第3节)
2. Python 环境
python -m venv venv
source venv/bin/activate # Windows: venv\Scripts\activate
python -m pip install -r hubble-dist/assembly/travis/requirements.txt
3. 构建并验证
mvn package -Dmaven.test.skip=true
# 可选:启动验证
# 兼容历史(-incubating-)与毕业后 TLP 命名
cd apache-hugegraph-hubble*/bin
./start-hubble.sh -d && sleep 10
curl http://localhost:8088/api/health
./stop-hubble.sh
运行测试
# 单元测试
mvn test -P unit-test -pl hugegraph-hubble/hubble-be -ntp
# API测试(需 Server + Hubble 运行)
curl http://localhost:8080/graphs # 检查 Server
curl http://localhost:8088/api/health # 检查 Hubble
cd hugegraph-hubble/hubble-dist
./assembly/travis/run-api-test.sh
4.4 hugegraph-spark-connector
编译
mvn install -pl hugegraph-client,hugegraph-spark-connector -am -Dmaven.javadoc.skip=true -DskipTests -ntp
运行测试
cd hugegraph-spark-connector
mvn test -ntp # 需 Server 运行
编译
mvn install -pl hugegraph-client,hugegraph-tools -am -Dmaven.javadoc.skip=true -DskipTests -ntp
运行测试
cd hugegraph-tools
mvn test -Dtest=FuncTestSuite -ntp # 需 Server 运行
5. 常见问题
服务连接问题
症状:无法连接 Server/MySQL/Hadoop
排查:
- 确认服务已启动(Server 必须在 8080 端口)
- 检查端口占用:
lsof -i:8080 - Docker 检查:
docker compose ps 和 docker compose logs
配置问题
症状:找不到文件、参数错误
排查:
- 检查环境变量:
echo $COMMIT_ID - 脚本权限:
chmod +x hugegraph-*/assembly/travis/*.sh
HDFS 测试失败
排查:
- 确认 NameNode/DataNode 运行正常
- 检查 Hadoop 日志
- 验证 HDFS 连接:
hdfs dfsadmin -report
JDBC 测试失败
排查:
- 确认 MySQL 运行正常
- 验证数据库连接:
mysql -u root -p$DB_PASS - 检查 MySQL 日志
6. 参考资料
6.5 - Backup Restore
描述
Backup 和 Restore 是备份图和恢复图的功能。备份和恢复的数据包括元数据(schema)和图数据(vertex 和 edge)。
Backup
将 HugeGraph 系统中的一张图的元数据和图数据以 JSON 格式导出。
Restore
将 Backup 导出的JSON格式的数据,重新导入到 HugeGraph 系统中的一个图中。
Restore 有两种模式:
- Restoring 模式,将 Backup 导出的元数据和图数据原封不动的恢复到 HugeGraph 系统中。可用于图的备份和恢复,一般目标图是新图(没有元数据和图数据)。比如:
- 系统升级,先备份图,然后升级系统,最后将图恢复到新的系统中
- 图迁移,从一个 HugeGraph 系统中,使用 Backup 功能将图导出,然后使用 Restore 功能将图导入另一个 HugeGraph 系统中
- Merging 模式,将 Backup 导出的元数据和图数据导入到另一个已经存在元数据或者图数据的图中,过程中元数据的 ID 可能发生改变,顶点和边的 ID 也会发生相应变化。
使用方法
可以使用hugegraph-tools进行图的备份和恢复。
Backup
bin/hugegraph backup -t all -d data
该命令将 http://127.0.0.1 的 hugegraph 图的全部元数据和图数据备份到data目录下。
Backup 在三种图模式下都可以正常工作
Restore
Restore 有两种模式: RESTORING 和 MERGING,备份之前首先要根据需要设置图模式。
步骤1:查看并设置图模式
bin/hugegraph graph-mode-get
该命令用于查看当前图模式,包括:NONE、RESTORING、MERGING。
bin/hugegraph graph-mode-set -m RESTORING
该命令用于设置图模式,Restore 之前可以设置成 RESTORING 或者 MERGING 模式,例子中设置成 RESTORING。
步骤2:Restore 数据
bin/hugegraph restore -t all -d data
该命令将data目录下的全部元数据和图数据重新导入到 http://127.0.0.1 的 hugegraph 图中。
步骤3:恢复图模式
bin/hugegraph graph-mode-set -m NONE
该命令用于恢复图模式为 NONE。
至此,一次完整的图备份和图恢复流程结束。
帮助
备份和恢复命令的详细使用方式可以参考hugegraph-tools文档。
Backup/Restore使用和实现的API说明
Backup
Backup 使用元数据和图数据的相应的 list(GET) API 导出,并未增加新的 API。
Restore
Restore 使用元数据和图数据的相应的 create(POST) API 导入,并未增加新的 API。
Restore 时存在两种不同的模式: Restoring 和 Merging,另外,还有常规模式 NONE(默认),区别如下:
- None 模式,元数据和图数据的写入属于正常状态,可参见功能说明。特别的:
- 元数据(schema)创建时不允许指定 ID
- 图数据(vertex)在 id strategy 为 Automatic 时,不允许指定 ID
- Restoring 模式,恢复到一个新图中,特别的:
- 元数据(schema)创建时允许指定 ID
- 图数据(vertex)在 id strategy 为 Automatic 时,允许指定 ID
- Merging 模式,合并到一个已存在元数据和图数据的图中,特别的:
- 元数据(schema)创建时不允许指定 ID
- 图数据(vertex)在 id strategy 为 Automatic 时,允许指定 ID
正常情况下,图模式为 None,当需要 Restore 图时,需要根据需要临时修改图模式为 Restoring 模式或者 Merging 模式,并在完成 Restore 时,恢复图模式为 None。
实现的设置图模式的 RESTful API 如下:
查看某个图的模式. 该操作需要管理员权限
Method & Url
GET http://localhost:8080/graphs/{graph}/mode
Response Status
Response Body
合法的图模式包括:NONE,RESTORING,MERGING
设置某个图的模式. 该操作需要管理员权限
Method & Url
PUT http://localhost:8080/graphs/{graph}/mode
Request Body
合法的图模式包括:NONE,RESTORING,MERGING
Response Status
Response Body
6.6 - HugeGraph Docker 集群部署指南
概述
HugeGraph 通过 Docker-Compose 可快速运行完整的分布式集群版(PD + Store + Server)。该方式适用于 Linux 和 Mac。
前置条件
- Docker Engine 20.10+ 或 Docker Desktop 4.x+
- Docker Compose v2
- Mac 运行 3 节点集群时,建议分配至少 12 GB 内存(设置 → 资源 → 内存)。[其他平台根据实际情况调整]
已测试环境:Linux(原生 Docker)和 macOS(Docker Desktop with ARM M4)
Compose 文件
在 HugeGraph 主仓库 docker/ 目录下提供了三个 compose 文件:
| 文件 | 描述 |
|---|
docker-compose.yml | 使用预构建镜像的** 1x3 单进程(节点)**快速启动 |
docker-compose.dev.yml | 从源码构建的单节点开发模式 |
docker-compose-3pd-3store-3server.yml | ** 3x3 进程**(模拟节点)分布式集群 |
注: 后续步骤皆为假设你本地已拉取 hugegraph 主仓库代码 (至少是 docker 目录)
单节点快速启动
cd hugegraph/docker
# 注意版本号请随时保持更新 → 1.x.0
HUGEGRAPH_VERSION=1.7.0 docker compose up -d
验证:
curl http://localhost:8080/versions
3 节点集群快速启动
cd hugegraph/docker
HUGEGRAPH_VERSION=1.7.0 docker compose -f docker-compose-3pd-3store-3server.yml up -d
默认内置的启动顺序:
- PD (节点)最先启动,且必须通过
/v1/health 健康检查 - Store (节点)在所有 PD 健康后再启动
- Server (节点)在所有 Store + PD 健康后最后启动
验证集群正常:(重要)
curl http://localhost:8620/v1/health # PD 健康检查
curl http://localhost:8520/v1/health # Store 健康检查
curl http://localhost:8080/versions # Server
curl http://localhost:8620/v1/stores # 已注册的 Store
curl http://localhost:8620/v1/partitions # 分区分配
环境变量参考
PD 变量
| 变量 | 必填 | 默认值 | 映射配置 |
|---|
HG_PD_GRPC_HOST | 是 | — | grpc.host |
HG_PD_RAFT_ADDRESS | 是 | — | raft.address |
HG_PD_RAFT_PEERS_LIST | 是 | — | raft.peers-list |
HG_PD_INITIAL_STORE_LIST | 是 | — | pd.initial-store-list |
HG_PD_GRPC_PORT | 否 | 8686 | grpc.port |
HG_PD_REST_PORT | 否 | 8620 | server.port |
HG_PD_DATA_PATH | 否 | /hugegraph-pd/pd_data | pd.data-path |
HG_PD_INITIAL_STORE_COUNT | 否 | 1 | pd.initial-store-count |
已弃用的别名:GRPC_HOST → HG_PD_GRPC_HOST、RAFT_ADDRESS → HG_PD_RAFT_ADDRESS、RAFT_PEERS → HG_PD_RAFT_PEERS_LIST
Store 变量
| 变量 | 必填 | 默认值 | 映射配置 |
|---|
HG_STORE_PD_ADDRESS | 是 | — | pdserver.address |
HG_STORE_GRPC_HOST | 是 | — | grpc.host |
HG_STORE_RAFT_ADDRESS | 是 | — | raft.address |
HG_STORE_GRPC_PORT | 否 | 8500 | grpc.port |
HG_STORE_REST_PORT | 否 | 8520 | server.port |
HG_STORE_DATA_PATH | 否 | /hugegraph-store/storage | app.data-path |
已弃用的别名:PD_ADDRESS → HG_STORE_PD_ADDRESS、GRPC_HOST → HG_STORE_GRPC_HOST、RAFT_ADDRESS → HG_STORE_RAFT_ADDRESS
Server 变量
| 变量 | 必填 | 默认值 | 映射配置 |
|---|
HG_SERVER_BACKEND | 是 | — | hugegraph.properties 中的 backend |
HG_SERVER_PD_PEERS | 是 | — | pd.peers |
STORE_REST | 否 | — | wait-partition.sh 使用 |
PASSWORD | 否 | — | 启用鉴权模式 |
已弃用的别名:BACKEND → HG_SERVER_BACKEND、PD_PEERS → HG_SERVER_PD_PEERS
端口参考
| 服务 | 宿主机端口 | 用途 |
|---|
| pd0 | 8620 | REST API |
| pd0 | 8686 | gRPC |
| pd1 | 8621 | REST API |
| pd1 | 8687 | gRPC |
| pd2 | 8622 | REST API |
| pd2 | 8688 | gRPC |
| store0 | 8500 | gRPC |
| store0 | 8520 | REST API |
| store1 | 8501 | gRPC |
| store1 | 8521 | REST API |
| store2 | 8502 | gRPC |
| store2 | 8522 | REST API |
| server0 | 8080 | Graph API |
| server1 | 8081 | Graph API |
| server2 | 8082 | Graph API |
故障排查
容器 OOM 退出(exit code 137):将 Docker Desktop 内存增加到 12 GB 以上 (或调整被 kill 的启动 jvm 内存设置)
Raft 选举超时:检查所有 PD 节点的 HG_PD_RAFT_PEERS_LIST 是否一致。验证连通性:docker exec hg-pd0 ping pd1
分区分配未完成:检查 curl http://localhost:8620/v1/stores — 3 个 Store 必须都显示 "state":"Up" 才能完成分区分配
连接被拒:确保 HG_* 环境变量使用容器主机名(pd0、store0),而非 127.0.0.1
查看运行时日志:使用 docker logs <container-name>(如 docker logs hg-pd0)可直接查看日志,无需进入容器。
容器监控与健康检查
版本说明:本节描述的行为不包含在 1.7.0 镜像中。请使用 HUGEGRAPH_VERSION=latest 或等待下一个发布版本。
进程监控模型
此前,三个 Docker 入口脚本均以 tail -f /dev/null 结尾,即使 Java 进程崩溃,容器仍会保持运行状态。由于容器从未退出,Docker 的 restart: unless-stopped 策略也不会触发。
现在,入口脚本直接监控 Java 进程:
- PD 和 Store 容器:入口脚本向启动脚本传入
-d false 参数,启动脚本通过 exec 直接替换为 Java 进程。容器进程即为 Java 进程——当 Java 退出(崩溃或正常关闭)时,容器立即退出,Docker 的重启策略随即触发。 - Server 容器:入口脚本使用
tail --pid=$PID -f /dev/null 阻塞,直到 Java 退出。SIGTERM/SIGINT 信号陷阱会将 docker stop 信号转发给 Java 并等待其正常关闭(退出码 0)。若 Java 崩溃,入口脚本以退出码 1 退出,从而触发重启策略。 - 所有镜像中的 PID 1 均为
dumb-init,负责将 Docker 信号转发给入口脚本进程。
健康检查端点
所有四个 Docker 镜像现已内置 HEALTHCHECK 指令。docker ps 将显示真实的健康状态。在 90 秒的启动期内,检查失败不计入统计;此后,连续三次失败将把容器标记为 unhealthy。
| 镜像 | 健康检查端点 | 端口 | 参数 |
|---|
hugegraph/hugegraph(server) | GET /versions | 8080 | --interval=15s --timeout=10s --start-period=90s --retries=3 |
hugegraph/hugegraph-hstore | GET /versions | 8080 | 同上 |
hugegraph/hugegraph-pd | GET /v1/health | 8620 | 同上 |
hugegraph/hugegraph-store | GET /v1/health | 8520 | 同上 |
注意:start-hugegraph.sh 中的 -m true 标志(基于 cron 的监控)仅适用于虚拟机/裸机部署,Docker 镜像中未安装也不使用该功能。Docker 用户应依赖内置的 HEALTHCHECK 和 Docker 重启策略。
6.7 - FAQ
如何选择后端存储? 选 RocksDB 还是分布式存储?
HugeGraph 支持多种部署模式,根据数据规模和场景选择:
- 单机模式:Server + RocksDB,适合开发测试和中小规模数据(< 4TB)
- 分布式模式:HugeGraph-PD + HugeGraph-Store (HStore),支持水平扩展和高可用(< 1000TB 数据规模),适合生产环境和大规模图数据应用
注:Cassandra、HBase、MySQL 等后端仅在 HugeGraph <= 1.5 版本中可用,官方后续不再单独维护
启动服务时提示:xxx (core dumped) xxx
请检查JDK版本是否为 Java11 (至少是Java8)
启动服务成功了,但是操作图时有类似于"无法连接到后端或连接未打开"的提示
第一次启动服务前,需要先使用init-store初始化后端,后续版本会将提示得更清晰直接。
所有的后端在使用前都需要执行init-store吗,序列化的选择可以随意填写么?
除了memory不需要,其他后端均需要,如:cassandra、hbase和rocksdb等,序列化需一一对应不可随意填写。
执行init-store报错:Exception in thread "main" java.lang.UnsatisfiedLinkError: /tmp/librocksdbjni3226083071221514754.so: /usr/lib64/libstdc++.so.6: version `GLIBCXX_3.4.10' not found (required by /tmp/librocksdbjni3226083071221514754.so)
RocksDB需要 gcc 4.3.0 (GLIBCXX_3.4.10) 及以上版本
执行init-store.sh时报错:NoHostAvailableException
NoHostAvailableException 是指无法连接到Cassandra服务,如果确定是要使用cassandra后端,请先安装并启动这个服务。至于这个提示本身可能不够直白,我们会更新到文档进行说明的。
bin目录下包含start-hugegraph.sh、start-restserver.sh和start-gremlinserver.sh三个似乎与启动有关的脚本,到底该使用哪个
自0.3.3版本以来,已经把 GremlinServer 和 RestServer 合并为 HugeGraphServer 了,使用start-hugegraph.sh启动即可,后两个在后续版本会被删掉。
配置了两个图,名字是hugegraph和hugegraph1,而启动服务的命令是start-hugegraph.sh,是只打开了hugegraph这个图吗
start-hugegraph.sh会打开所有gremlin-server.yaml的graphs下的图,这二者并无名字上的直接关系
服务启动成功后,使用curl查询所有顶点时返回乱码
服务端返回的批量顶点/边是压缩(gzip)过的,可以使用管道重定向至 gunzip 进行解压(curl http://example | gunzip),也可以用Firefox的postman或者Chrome浏览器的restlet插件发请求,会自动解压缩响应数据。
使用顶点Id通过RESTful API查询顶点时返回空,但是顶点确实是存在的
检查顶点Id的类型,如果是字符串类型,API的url中的id部分需要加上双引号,数字类型则不用加。
已经根据需要给顶点Id加上了双引号,但是通过RESTful API查询顶点时仍然返回空
检查顶点id中是否包含+、空格、/、?、%、&和=这些URL的保留字符,如果存在则需要进行编码。下表给出了编码值:
特殊字符 | 编码值
--------| ----
+ | %2B
空格 | %20
/ | %2F
? | %3F
% | %25
# | %23
& | %26
= | %3D
查询某一类别的顶点或边(query by label)时提示超时
由于属于某一label的数据量可能比较多,请加上limit限制。
通过RESTful API操作图是可以的,但是发送Gremlin语句就报错:Request Failed(500)
可能是GremlinServer的配置有误,检查gremlin-server.yaml的host、port是否与rest-server.properties的gremlinserver.url匹配,如不匹配则修改,然后重启服务。
使用Loader导数据出现Socket Timeout异常,然后导致Loader中断
持续地导入数据会使Server的压力过大,然后导致有些请求超时。可以通过调整Loader的参数来适当缓解Server压力(如:重试次数,重试间隔,错误容忍数等),降低该问题出现频率。
如何删除全部的顶点和边,RESTful API中没有这样的接口,调用gremlin的g.V().drop()会报错Vertices in transaction have reached capacity xxx
目前确实没有好办法删除全部的数据,用户如果是自己部署的Server和后端,可以直接清空数据库,重启Server。可以使用paging API或scan API先获取所有数据,再逐条删除。
清空了数据库,并且执行了init-store,但是添加schema时提示"xxx has existed"
HugeGraphServer内是有缓存的,清空数据库的同时是需要重启Server的,否则残留的缓存会产生不一致。
插入顶点或边的过程中报错:Id max length is 128, but got xxx {yyy} 或 Big id max length is 32768, but got xxx
为了保证查询性能,目前的后端存储对id列的长度做了限制,顶点id不能超过128字节,边id长度不能超过32768字节,索引id不能超过128字节。
是否支持嵌套属性,如果不支持,是否有什么替代方案
嵌套属性目前暂不支持。替代方案:可以把嵌套属性作为单独的顶点拿出来,然后用边连接起来。
一个EdgeLabel是否可以连接多对VertexLabel,比如"投资"关系,可以是"个人"投资"企业",也可以是"企业"投资"企业"
一个EdgeLabel不支持连接多对VertexLabel,需要用户将EdgeLabel拆分得更细一点,如:“个人投资”,“企业投资”。
通过RestAPI发送请求时提示HTTP 415 Unsupported Media Type
请求头中需要指定Content-Type:application/json
其他问题可以在对应项目的 issue 区搜索,例如 Server-Issues / Loader Issues
6.8 - 报告安全问题
报告 Apache HugeGraph 的安全问题
⚠️ SEC 提醒:致漏洞研究人员关于图查询语言的说明
鉴于图查询语言 (如 Gremlin/Cypher) 本身在解析与执行上的灵活性,HugeGraph 推荐在生产环境依赖 "Auth (配置鉴权) + IP 白名单 + Audit Log (审计日志)" 机制来践行最小权限原则。同时由于 Server 节点基本是无状态的,所有生产环境均明确建议使用容器环境 (Docker/K8s) 进行隔离部署。
近期社区已收到较多关于图查询语言灵活性的安全反馈。在 HugeGraph 安全体系整体重构完成前,对于在不启用或跳过 Auth 系统/避开授权身份的前提下执行 DSL 查询的情况,此类已知风险将不再单独视为新漏洞进行处理。
但是,如果在已开启 Auth 系统的环境中,仍能以匿名或未授权身份访问并进行漏洞利用,或者成功绕过 IP 白名单 / 逃逸容器造成严重越权或底层系统破坏,我们仍然将其视为高危安全漏洞,非常欢迎您随时向我们反馈!
遵循 ASF 的规范,HugeGraph 社区对解决修复项目中的安全问题保持非常积极和开放的态度。
我们强烈建议用户首先向我们的独立安全邮件列表报告此类问题,相关详细的流程规范请参考 ASF SEC 守则。
请注意,安全邮件组适用于报告未公开的安全漏洞并跟进漏洞处理的过程。常规的软件 Bug/Error 报告应该使用 Github Issue/Discussion
或是 HugeGraph-Dev 邮箱组。发送到安全邮件组但与安全问题无关的邮件将被忽略。
独立的安全邮件 (组) 地址为: security@hugegraph.apache.org
安全漏洞处理大体流程如下:
- 报告人私下向 Apache HugeGraph SEC 邮件组报告漏洞 (尽可能包括复现的版本/相关说明/复现方式/影响范围等)
- HugeGraph 项目安全团队与报告人私下合作/商讨漏洞解决方案 (初步确认后可申请
CVE 编号予以登记) - 项目创建一个新版本的受漏洞影响的软件包,以提供修复程序
- 合适的时间可公开漏洞的大体问题 & 描述如何应用修复程序 (遵循 ASF 规范,公告中不应携带复现细节等敏感信息)
- 正式的 CVE 发布及相关流程同 ASF-SEC 页面
已发现的安全漏洞 (CVEs)
HugeGraph 主仓库 (Server/PD/Store)
7 - QUERY LANGUAGE
7.1 - HugeGraph Gremlin
概述
HugeGraph支持Apache TinkerPop3的图形遍历查询语言Gremlin。 SQL是关系型数据库查询语言,而Gremlin是一种通用的图数据库查询语言,Gremlin可用于创建图的实体(Vertex和Edge)、修改实体内部属性、删除实体,也可执行图的查询操作。
Gremlin可用于创建图的实体(Vertex和Edge)、修改实体内部属性、删除实体,更主要的是可用于执行图的查询及分析操作。
TinkerPop Features
HugeGraph实现了TinkerPop框架,但是并没有实现TinkerPop所有的特性。
下表列出HugeGraph对TinkerPop各种特性的支持情况:
Graph Features
| Name | Description | Support |
|---|
| Computer | Determines if the {@code Graph} implementation supports {@link GraphComputer} based processing | false |
| Transactions | Determines if the {@code Graph} implementations supports transactions. | true |
| Persistence | Determines if the {@code Graph} implementation supports persisting it’s contents natively to disk.This feature does not refer to every graph’s ability to write to disk via the Gremlin IO packages(.e.g. GraphML), unless the graph natively persists to disk via those options somehow. For example,TinkerGraph does not support this feature as it is a pure in-sideEffects graph. | true |
| ThreadedTransactions | Determines if the {@code Graph} implementation supports threaded transactions which allow a transaction be executed across multiple threads via {@link Transaction#createThreadedTx()}. | false |
| ConcurrentAccess | Determines if the {@code Graph} implementation supports more than one connection to the same instance at the same time. For example, Neo4j embedded does not support this feature because concurrent access to the same database files by multiple instances is not possible. However, Neo4j HA could support this feature as each new {@code Graph} instance coordinates with the Neo4j cluster allowing multiple instances to operate on the same database. | false |
Vertex Features
| Name | Description | Support |
|---|
| UserSuppliedIds | Determines if an {@link Element} can have a user defined identifier. Implementation that do not support this feature will be expected to auto-generate unique identifiers. In other words, if the {@link Graph} allows {@code graph.addVertex(id,x)} to work and thus set the identifier of the newly added {@link Vertex} to the value of {@code x} then this feature should return true. In this case, {@code x} is assumed to be an identifier data type that the {@link Graph} will accept. | false |
| NumericIds | Determines if an {@link Element} has numeric identifiers as their internal representation. In other words,if the value returned from {@link Element#id()} is a numeric value then this method should be return {@code true}. Note that this feature is most generally used for determining the appropriate tests to execute in the Gremlin Test Suite. | false |
| StringIds | Determines if an {@link Element} has string identifiers as their internal representation. In other words, if the value returned from {@link Element#id()} is a string value then this method should be return {@code true}. Note that this feature is most generally used for determining the appropriate tests to execute in the Gremlin Test Suite. | false |
| UuidIds | Determines if an {@link Element} has UUID identifiers as their internal representation. In other words,if the value returned from {@link Element#id()} is a {@link UUID} value then this method should be return {@code true}.Note that this feature is most generally used for determining the appropriate tests to execute in the Gremlin Test Suite. | false |
| CustomIds | Determines if an {@link Element} has a specific custom object as their internal representation.In other words, if the value returned from {@link Element#id()} is a type defined by the graph implementations, such as OrientDB’s {@code Rid}, then this method should be return {@code true}.Note that this feature is most generally used for determining the appropriate tests to execute in the Gremlin Test Suite. | false |
| AnyIds | Determines if an {@link Element} any Java object is a suitable identifier. TinkerGraph is a good example of a {@link Graph} that can support this feature, as it can use any {@link Object} as a value for the identifier. Note that this feature is most generally used for determining the appropriate tests to execute in the Gremlin Test Suite. This setting should only return {@code true} if {@link #supportsUserSuppliedIds()} is {@code true}. | false |
| AddProperty | Determines if an {@link Element} allows properties to be added. This feature is set independently from supporting “data types” and refers to support of calls to {@link Element#property(String, Object)}. | true |
| RemoveProperty | Determines if an {@link Element} allows properties to be removed. | true |
| AddVertices | Determines if a {@link Vertex} can be added to the {@code Graph}. | true |
| MultiProperties | Determines if a {@link Vertex} can support multiple properties with the same key. | false |
| DuplicateMultiProperties | Determines if a {@link Vertex} can support non-unique values on the same key. For this value to be {@code true}, then {@link #supportsMetaProperties()} must also return true. By default this method, just returns what {@link #supportsMultiProperties()} returns. | false |
| MetaProperties | Determines if a {@link Vertex} can support properties on vertex properties. It is assumed that a graph will support all the same data types for meta-properties that are supported for regular properties. | false |
| RemoveVertices | Determines if a {@link Vertex} can be removed from the {@code Graph}. | true |
Edge Features
| Name | Description | Support |
|---|
| UserSuppliedIds | Determines if an {@link Element} can have a user defined identifier. Implementation that do not support this feature will be expected to auto-generate unique identifiers. In other words, if the {@link Graph} allows {@code graph.addVertex(id,x)} to work and thus set the identifier of the newly added {@link Vertex} to the value of {@code x} then this feature should return true. In this case, {@code x} is assumed to be an identifier data type that the {@link Graph} will accept. | false |
| NumericIds | Determines if an {@link Element} has numeric identifiers as their internal representation. In other words,if the value returned from {@link Element#id()} is a numeric value then this method should be return {@code true}. Note that this feature is most generally used for determining the appropriate tests to execute in the Gremlin Test Suite. | false |
| StringIds | Determines if an {@link Element} has string identifiers as their internal representation. In other words, if the value returned from {@link Element#id()} is a string value then this method should be return {@code true}. Note that this feature is most generally used for determining the appropriate tests to execute in the Gremlin Test Suite. | false |
| UuidIds | Determines if an {@link Element} has UUID identifiers as their internal representation. In other words,if the value returned from {@link Element#id()} is a {@link UUID} value then this method should be return {@code true}.Note that this feature is most generally used for determining the appropriate tests to execute in the Gremlin Test Suite. | false |
| CustomIds | Determines if an {@link Element} has a specific custom object as their internal representation.In other words, if the value returned from {@link Element#id()} is a type defined by the graph implementations, such as OrientDB’s {@code Rid}, then this method should be return {@code true}.Note that this feature is most generally used for determining the appropriate tests to execute in the Gremlin Test Suite. | false |
| AnyIds | Determines if an {@link Element} any Java object is a suitable identifier. TinkerGraph is a good example of a {@link Graph} that can support this feature, as it can use any {@link Object} as a value for the identifier. Note that this feature is most generally used for determining the appropriate tests to execute in the Gremlin Test Suite. This setting should only return {@code true} if {@link #supportsUserSuppliedIds()} is {@code true}. | false |
| AddProperty | Determines if an {@link Element} allows properties to be added. This feature is set independently from supporting “data types” and refers to support of calls to {@link Element#property(String, Object)}. | true |
| RemoveProperty | Determines if an {@link Element} allows properties to be removed. | true |
| AddEdges | Determines if an {@link Edge} can be added to a {@code Vertex}. | true |
| RemoveEdges | Determines if an {@link Edge} can be removed from a {@code Vertex}. | true |
Data Type Features
| Name | Description | Support |
|---|
| BooleanValues | | true |
| ByteValues | | true |
| DoubleValues | | true |
| FloatValues | | true |
| IntegerValues | | true |
| LongValues | | true |
| MapValues | Supports setting of a {@code Map} value. The assumption is that the {@code Map} can contain arbitrary serializable values that may or may not be defined as a feature itself | false |
| MixedListValues | Supports setting of a {@code List} value. The assumption is that the {@code List} can contain arbitrary serializable values that may or may not be defined as a feature itself. As this{@code List} is “mixed” it does not need to contain objects of the same type. | false |
| BooleanArrayValues | | false |
| ByteArrayValues | | true |
| DoubleArrayValues | | false |
| FloatArrayValues | | false |
| IntegerArrayValues | | false |
| LongArrayValues | | false |
| SerializableValues | | false |
| StringArrayValues | | false |
| StringValues | | true |
| UniformListValues | Supports setting of a {@code List} value. The assumption is that the {@code List} can contain arbitrary serializable values that may or may not be defined as a feature itself. As this{@code List} is “uniform” it must contain objects of the same type. | false |
Gremlin的步骤
HugeGraph支持Gremlin的所有步骤。有关Gremlin的完整参考信息,请参与Gremlin官网。
7.2 - HugeGraph Examples
1 概述
本示例将TitanDB Getting Started 为模板来演示 HugeGraph 的使用方法。通过对比 HugeGraph 和 TitanDB,了解 HugeGraph 和 TitanDB 的差异。
1.1 HugeGraph 与 TitanDB 的异同
HugeGraph 和 TitanDB 都是基于Apache TinkerPop3框架的图数据库,均支持Gremlin图查询语言,在使用方法和接口方面具有很多相似的地方。然而 HugeGraph 是全新设计开发的,其代码结构清晰,功能较为丰富,接口更为友好等特点。
HugeGraph 相对于 TitanDB 而言,其主要特点如下:
- HugeGraph 目前有 HugeGraph-API、HugeGraph-Client、HugeGraph-Loader、HugeGraph-Studio、HugeGraph-Spark 等完善的工具组件,可以完成系统集成、数据载入、图可视化查询、Spark 连接等功能;
- HugeGraph 具有 Server 和 Client 的概念,第三方系统可以通过 jar 引用、client、api 等多种方式接入,而 TitanDB 仅支持 jar 引用方式接入。
- HugeGraph 的 Schema 需要显式定义,所有的插入和查询均需要通过严格的 schema 校验,目前暂不支持 schema 的隐式创建。
- HugeGraph 充分利用后端存储系统的特点来实现数据高效存取,而 TitanDB 以统一的 Kv 结构无视后端的差异性。
- HugeGraph 的更新操作可以实现按需操作(例如:更新某个属性)性能更好。TitanDB 的更新是 read and update 方式。
- HugeGraph 的 VertexId 和 EdgeId 均支持拼接,可实现自动去重,同时查询性能更好。TitanDB 的所有 Id 均是自动生成,查询需要经索引。
1.2 人物关系图谱
本示例通过 Property Graph Model 图数据模型来描述希腊神话中各人物角色的关系(也被成为人物关系图谱),具体关系详见下图。
其中,圆形节点代表实体 (Vertex),箭头代表关系(Edge),方框的内容为属性。
该关系图谱中有两类顶点,分别是人物(character)和位置(location)如下表:
| 名称 | 类型 | 属性 |
|---|
| character | vertex | name,age,type |
| location | vertex | name |
有六种关系,分别是父子(father)、母子(mother)、兄弟(brother)、战斗(battled)、居住 (lives)、拥有宠物(pet)关于关系图谱的具体信息如下:
| 名称 | 类型 | source vertex label | target vertex label | 属性 |
|---|
| father | edge | character | character | - |
| mother | edge | character | character | - |
| brother | edge | character | character | - |
| pet | edge | character | character | - |
| lives | edge | character | location | reason |
在 HugeGraph 中,每个 edge label 只能作用于一对 source vertex label 和 target vertex label。也就是说,如果一个图内定义了一种关系 father 连接 character 和 character,那 farther 就不能再连接其他的 vertex labels。
因此本例子将原TitanDB中的monster, god, human, demigod均使用相同的vertex label: character来表示, 同时增加属性type来标识人物的类型。edge label与原TitanDB保持一致。当然为了满足edge label约束,也可以通过调整edge label的name来实现。
2 Graph Schema and Data Ingest Examples
HugeGraph 需要显示创建 Schema,因此需要依次创建 PropertyKey、VertexLabel、EdgeLabel,如果有需要索引还需要创建 IndexLabel。
2.1 Graph Schema
schema = hugegraph.schema()
schema.propertyKey("name").asText().ifNotExist().create()
schema.propertyKey("age").asInt().ifNotExist().create()
schema.propertyKey("time").asInt().ifNotExist().create()
schema.propertyKey("reason").asText().ifNotExist().create()
schema.propertyKey("type").asText().ifNotExist().create()
schema.vertexLabel("character").properties("name", "age", "type").primaryKeys("name").nullableKeys("age").ifNotExist().create()
schema.vertexLabel("location").properties("name").primaryKeys("name").ifNotExist().create()
schema.edgeLabel("father").link("character", "character").ifNotExist().create()
schema.edgeLabel("mother").link("character", "character").ifNotExist().create()
schema.edgeLabel("battled").link("character", "character").properties("time").ifNotExist().create()
schema.edgeLabel("lives").link("character", "location").properties("reason").nullableKeys("reason").ifNotExist().create()
schema.edgeLabel("pet").link("character", "character").ifNotExist().create()
schema.edgeLabel("brother").link("character", "character").ifNotExist().create()
2.2 Graph Data
// add vertices
Vertex saturn = graph.addVertex(T.label, "character", "name", "saturn", "age", 10000, "type", "titan")
Vertex sky = graph.addVertex(T.label, "location", "name", "sky")
Vertex sea = graph.addVertex(T.label, "location", "name", "sea")
Vertex jupiter = graph.addVertex(T.label, "character", "name", "jupiter", "age", 5000, "type", "god")
Vertex neptune = graph.addVertex(T.label, "character", "name", "neptune", "age", 4500, "type", "god")
Vertex hercules = graph.addVertex(T.label, "character", "name", "hercules", "age", 30, "type", "demigod")
Vertex alcmene = graph.addVertex(T.label, "character", "name", "alcmene", "age", 45, "type", "human")
Vertex pluto = graph.addVertex(T.label, "character", "name", "pluto", "age", 4000, "type", "god")
Vertex nemean = graph.addVertex(T.label, "character", "name", "nemean", "type", "monster")
Vertex hydra = graph.addVertex(T.label, "character", "name", "hydra", "type", "monster")
Vertex cerberus = graph.addVertex(T.label, "character", "name", "cerberus", "type", "monster")
Vertex tartarus = graph.addVertex(T.label, "location", "name", "tartarus")
// add edges
jupiter.addEdge("father", saturn)
jupiter.addEdge("lives", sky, "reason", "loves fresh breezes")
jupiter.addEdge("brother", neptune)
jupiter.addEdge("brother", pluto)
neptune.addEdge("lives", sea, "reason", "loves waves")
neptune.addEdge("brother", jupiter)
neptune.addEdge("brother", pluto)
hercules.addEdge("father", jupiter)
hercules.addEdge("mother", alcmene)
hercules.addEdge("battled", nemean, "time", 1)
hercules.addEdge("battled", hydra, "time", 2)
hercules.addEdge("battled", cerberus, "time", 12)
pluto.addEdge("brother", jupiter)
pluto.addEdge("brother", neptune)
pluto.addEdge("lives", tartarus, "reason", "no fear of death")
pluto.addEdge("pet", cerberus)
cerberus.addEdge("lives", tartarus)
2.3 Indices
HugeGraph 默认是自动生成 Id,如果用户通过primaryKeys指定VertexLabel的primaryKeys字段列表后,VertexLabel的 Id 策略将会自动切换到primaryKeys策略。启用primaryKeys策略后,HugeGraph 通过vertexLabel+primaryKeys拼接生成VertexId ,可实现自动去重,同时无需额外创建索引即可以使用primaryKeys中的属性进行快速查询。例如 “character” 和 “location” 都有primaryKeys("name")属性,因此在不额外创建索引的情况下可以通过g.V().hasLabel('character') .has('name','hercules')查询 vertex。
3 Graph Traversal Examples
3.1 Traversal Query
1. Find the grandfather of hercules
g.V().hasLabel('character').has('name','hercules').out('father').out('father')
也可以通过repeat方式:
g.V().hasLabel('character').has('name','hercules').repeat(__.out('father')).times(2)
2. Find the name of Hercules’s father
g.V().hasLabel('character').has('name','hercules').out('father').value('name')
3. Find the characters with age > 100
g.V().hasLabel('character').has('age',gt(100))
4. Find who are pluto’s cohabitants
g.V().hasLabel('character').has('name','pluto').out('lives').in('lives').values('name')
5. Find pluto can’t be his own cohabitant
pluto = g.V().hasLabel('character').has('name', 'pluto')
g.V(pluto).out('lives').in('lives').where(is(neq(pluto)).values('name')
// use 'as'
g.V().hasLabel('character').has('name', 'pluto').as('x').out('lives').in('lives').where(neq('x')).values('name')
6. Pluto’s Brothers
pluto = g.V().hasLabel('character').has('name', 'pluto').next()
// where do pluto's brothers live?
g.V(pluto).out('brother').out('lives').values('name')
// which brother lives in which place?
g.V(pluto).out('brother').as('god').out('lives').as('place').select('god','place')
// what is the name of the brother and the name of the place?
g.V(pluto).out('brother').as('god').out('lives').as('place').select('god','place').by('name')
推荐使用HugeGraph-Hubble 通过可视化的方式来执行上述代码。另外也可以通过 HugeGraph-Client、HugeApi、GremlinConsole 和 GremlinDriver 等多种方式执行上述代码。
3.2 总结
HugeGraph 目前支持 Gremlin 的语法,用户可以通过 Gremlin / REST-API 实现各种查询需求。
8 - PERFORMANCE
8.1 - HugeGraph BenchMark Performance
Note:
当前的性能指标测试基于很早期的版本。最新版本在性能和功能上都有显著的改进。我们鼓励您参考最新的发布版本,
该版本具有自主分布式存储和增强的计算推下能力。或者,您可以等待社区更新相关测试数据 (也欢迎反馈共建)。
1 测试环境
1.1 硬件信息
| CPU | Memory | 网卡 | 磁盘 |
|---|
| 48 Intel(R) Xeon(R) CPU E5-2650 v4 @ 2.20GHz | 128G | 10000Mbps | 750GB SSD |
1.2 软件信息
1.2.1 测试用例
测试使用graphdb-benchmark,一个图数据库测试集。该测试集主要包含 4 类测试:
Massive Insertion,批量插入顶点和边,一定数量的顶点或边一次性提交
Single Insertion,单条插入,每个顶点或者每条边立即提交
Query,主要是图数据库的基本查询操作:
- Find Neighbors,查询所有顶点的邻居
- Find Adjacent Nodes,查询所有边的邻接顶点
- Find Shortest Path,查询第一个顶点到 100 个随机顶点的最短路径
Clustering,基于 Louvain Method 的社区发现算法
1.2.2 测试数据集
测试使用人造数据和真实数据
本测试用到的数据集规模
| 名称 | vertex 数目 | edge 数目 | 文件大小 |
|---|
| email-enron.txt | 36,691 | 367,661 | 4MB |
| com-youtube.ungraph.txt | 1,157,806 | 2,987,624 | 38.7MB |
| amazon0601.txt | 403,393 | 3,387,388 | 47.9MB |
| com-lj.ungraph.txt | 3997961 | 34681189 | 479MB |
1.3 服务配置
HugeGraph 版本:0.5.6,RestServer 和 Gremlin Server 和 backends 都在同一台服务器上
- RocksDB 版本:rocksdbjni-5.8.6
Titan 版本:0.5.4, 使用 thrift+Cassandra 模式
- Cassandra 版本:cassandra-3.10,commit-log 和 data 共用 SSD
Neo4j 版本:2.0.1
graphdb-benchmark 适配的 Titan 版本为 0.5.4
2 测试结果
2.1 Batch 插入性能
| Backend | email-enron(30w) | amazon0601(300w) | com-youtube.ungraph(300w) | com-lj.ungraph(3000w) |
|---|
| HugeGraph | 0.629 | 5.711 | 5.243 | 67.033 |
| Titan | 10.15 | 108.569 | 150.266 | 1217.944 |
| Neo4j | 3.884 | 18.938 | 24.890 | 281.537 |
说明
- 表头"()“中数据是数据规模,以边为单位
- 表中数据是批量插入的时间,单位是 s
- 例如,HugeGraph 使用 RocksDB 插入 amazon0601 数据集的 300w 条边,花费 5.711s
结论
- 批量插入性能 HugeGraph(RocksDB) > Neo4j > Titan(thrift+Cassandra)
2.2 遍历性能
2.2.1 术语说明
- FN(Find Neighbor), 遍历所有 vertex, 根据 vertex 查邻接 edge, 通过 edge 和 vertex 查 other vertex
- FA(Find Adjacent), 遍历所有 edge,根据 edge 获得 source vertex 和 target vertex
2.2.2 FN 性能
| Backend | email-enron(3.6w) | amazon0601(40w) | com-youtube.ungraph(120w) | com-lj.ungraph(400w) |
|---|
| HugeGraph | 4.072 | 45.118 | 66.006 | 609.083 |
| Titan | 8.084 | 92.507 | 184.543 | 1099.371 |
| Neo4j | 2.424 | 10.537 | 11.609 | 106.919 |
说明
- 表头”()“中数据是数据规模,以顶点为单位
- 表中数据是遍历顶点花费的时间,单位是 s
- 例如,HugeGraph 使用 RocksDB 后端遍历 amazon0601 的所有顶点,并查找邻接边和另一顶点,总共耗时 45.118s
2.2.3 FA 性能
| Backend | email-enron(30w) | amazon0601(300w) | com-youtube.ungraph(300w) | com-lj.ungraph(3000w) |
|---|
| HugeGraph | 1.540 | 10.764 | 11.243 | 151.271 |
| Titan | 7.361 | 93.344 | 169.218 | 1085.235 |
| Neo4j | 1.673 | 4.775 | 4.284 | 40.507 |
说明
- 表头”()“中数据是数据规模,以边为单位
- 表中数据是遍历边花费的时间,单位是 s
- 例如,HugeGraph 使用 RocksDB 后端遍历 amazon0601 的所有边,并查询每条边的两个顶点,总共耗时 10.764s
结论
- 遍历性能 Neo4j > HugeGraph(RocksDB) > Titan(thrift+Cassandra)
2.3 HugeGraph-图常用分析方法性能
术语说明
- FS(Find Shortest Path), 寻找最短路径
- K-neighbor,从起始 vertex 出发,通过 K 跳边能够到达的所有顶点,包括 1, 2, 3…(K-1), K 跳边可达 vertex
- K-out, 从起始 vertex 出发,恰好经过 K 跳 out 边能够到达的顶点
FS 性能
| Backend | email-enron(30w) | amazon0601(300w) | com-youtube.ungraph(300w) | com-lj.ungraph(3000w) |
|---|
| HugeGraph | 0.494 | 0.103 | 3.364 | 8.155 |
| Titan | 11.818 | 0.239 | 377.709 | 575.678 |
| Neo4j | 1.719 | 1.800 | 1.956 | 8.530 |
说明
- 表头”()“中数据是数据规模,以边为单位
- 表中数据是找到从第一个顶点出发到达随机选择的 100 个顶点的最短路径的时间,单位是 s
- 例如,HugeGraph 使用 RocksDB 后端在图 amazon0601 中查找第一个顶点到 100 个随机顶点的最短路径,总共耗时 0.103s
结论
- 在数据规模小或者顶点关联关系少的场景下,HugeGraph 性能优于 Neo4j 和 Titan
- 随着数据规模增大且顶点的关联度增高,HugeGraph 与 Neo4j 性能趋近,都远高于 Titan
K-neighbor 性能
| 顶点 | 深度 | 一度 | 二度 | 三度 | 四度 | 五度 | 六度 |
|---|
| v1 | 时间 | 0.031s | 0.033s | 0.048s | 0.500s | 11.27s | OOM |
| v111 | 时间 | 0.027s | 0.034s | 0.115 | 1.36s | OOM | – |
| v1111 | 时间 | 0.039s | 0.027s | 0.052s | 0.511s | 10.96s | OOM |
说明
- HugeGraph-Server 的 JVM 内存设置为 32GB,数据量过大时会出现 OOM
K-out 性能
| 顶点 | 深度 | 一度 | 二度 | 三度 | 四度 | 五度 | 六度 |
|---|
| v1 | 时间 | 0.054s | 0.057s | 0.109s | 0.526s | 3.77s | OOM |
| 度 | 10 | 133 | 2453 | 50,830 | 1,128,688 | | |
| v111 | 时间 | 0.032s | 0.042s | 0.136s | 1.25s | 20.62s | OOM |
| 度 | 10 | 211 | 4944 | 113150 | 2,629,970 | | |
| v1111 | 时间 | 0.039s | 0.045s | 0.053s | 1.10s | 2.92s | OOM |
| 度 | 10 | 140 | 2555 | 50825 | 1,070,230 | | |
说明
- HugeGraph-Server 的 JVM 内存设置为 32GB,数据量过大时会出现 OOM
结论
- FS 场景,HugeGraph 性能优于 Neo4j 和 Titan
- K-neighbor 和 K-out 场景,HugeGraph 能够实现在 5 度范围内秒级返回结果
2.4 图综合性能测试-CW
| 数据库 | 规模 1000 | 规模 5000 | 规模 10000 | 规模 20000 |
|---|
| HugeGraph(core) | 20.804 | 242.099 | 744.780 | 1700.547 |
| Titan | 45.790 | 820.633 | 2652.235 | 9568.623 |
| Neo4j | 5.913 | 50.267 | 142.354 | 460.880 |
说明
- “规模"以顶点为单位
- 表中数据是社区发现完成需要的时间,单位是 s,例如 HugeGraph 使用 RocksDB 后端在规模 10000 的数据集,社区聚合不再变化,需要耗时 744.780s
- CW 测试是 CRUD 的综合评估
- 该测试中 HugeGraph 跟 Titan 一样,没有通过 client,直接对 core 操作
结论
- 社区聚类算法性能 Neo4j > HugeGraph > Titan
8.2 - HugeGraph-API Performance
HugeGraph API性能测试主要测试HugeGraph-Server对RESTful API请求的并发处理能力,包括:
- 顶点/边的单条插入
- 顶点/边的批量插入
- 顶点/边的查询
HugeGraph的每个发布版本的RESTful API的性能测试情况可以参考:
即将更新,敬请期待!
8.2.1 - v0.5.6 Stand-alone(RocksDB)
Note:
当前的性能指标测试基于很早期的版本。最新版本在性能和功能上都有显著的改进。我们鼓励您参考最新的发布版本,
该版本具有自主分布式存储和增强的计算推下能力。或者,您可以等待社区更新相关测试数据 (也欢迎反馈共建)。
1 测试环境
被压机器信息
| CPU | Memory | 网卡 | 磁盘 |
|---|
| 48 Intel(R) Xeon(R) CPU E5-2650 v4 @ 2.20GHz | 128G | 10000Mbps | 750GB SSD,2.7T HDD |
- 起压力机器信息:与被压机器同配置
- 测试工具:apache-Jmeter-2.5.1
注:起压机器和被压机器在同一机房
2 测试说明
2.1 名词定义(时间的单位均为 ms)
- Samples – 本次场景中一共完成了多少个线程
- Average – 平均响应时间
- Median – 统计意义上面的响应时间的中值
- 90% Line – 所有线程中 90% 的线程的响应时间都小于 xx
- Min – 最小响应时间
- Max – 最大响应时间
- Error – 出错率
- Throughput – 吞吐量
- KB/sec – 以流量做衡量的吞吐量
2.2 底层存储
后端存储使用 RocksDB,HugeGraph 与 RocksDB 都在同一机器上启动,server 相关的配置文件除主机和端口有修改外,其余均保持默认。
3 性能结果总结
- HugeGraph 单条插入顶点和边的速度在每秒 1w 左右
- 顶点和边的批量插入速度远大于单条插入速度
- 按 id 查询顶点和边的并发度可达到 13000 以上,且请求的平均延时小于 50ms
4 测试结果及分析
4.1 batch 插入
4.1.1 压力上限测试
测试方法
不断提升并发量,测试 server 仍能正常提供服务的压力上限
压力参数
持续时间:5min
顶点的最大插入速度:
结论:
- 并发 2200,顶点的吞吐量是 2026.8,每秒可处理的数据:2026.8*200=405360/s
边的最大插入速度
结论:
- 并发 900,边的吞吐量是 776.9,每秒可处理的数据:776.9*500=388450/s
4.2 single 插入
4.2.1 压力上限测试
测试方法
不断提升并发量,测试 server 仍能正常提供服务的压力上限
压力参数
- 持续时间:5min
- 服务异常标志:错误率大于 0.00%
顶点的单条插入
结论:
- 并发 11500,吞吐量为 10730,顶点的单条插入并发能力为 11500
边的单条插入

结论:
- 并发 9000,吞吐量是 8418,边的单条插入并发能力为 9000
4.3 按 id 查询
4.3.1 压力上限测试
测试方法
不断提升并发量,测试 server 仍能正常提供服务的压力上限
压力参数
- 持续时间:5min
- 服务异常标志:错误率大于 0.00%
顶点的按 id 查询

结论:
- 并发 14000,吞吐量是 12663,顶点的按 id 查询的并发能力为 14000,平均延时为 44ms
边的按 id 查询

结论:
- 并发 13000,吞吐量是 12225,边的按 id 查询的并发能力为 13000,平均延时为 12ms
8.2.2 - v0.5.6 Cluster(Cassandra)
Note:
当前的性能指标测试基于很早期的版本。最新版本在性能和功能上都有显著的改进。我们鼓励您参考最新的发布版本,
该版本具有自主分布式存储和增强的计算推下能力。或者,您可以等待社区更新相关测试数据 (也欢迎反馈共建)。
1 测试环境
被压机器信息
| CPU | Memory | 网卡 | 磁盘 |
|---|
| 48 Intel(R) Xeon(R) CPU E5-2650 v4 @ 2.20GHz | 128G | 10000Mbps | 750GB SSD,2.7T HDD |
- 起压力机器信息:与被压机器同配置
- 测试工具:apache-Jmeter-2.5.1
注:起压机器和被压机器在同一机房
2 测试说明
2.1 名词定义(时间的单位均为 ms)
- Samples – 本次场景中一共完成了多少个线程
- Average – 平均响应时间
- Median – 统计意义上面的响应时间的中值
- 90% Line – 所有线程中 90% 的线程的响应时间都小于 xx
- Min – 最小响应时间
- Max – 最大响应时间
- Error – 出错率
- Throughput – 吞吐量
- KB/sec – 以流量做衡量的吞吐量
2.2 底层存储
后端存储使用 15 节点 Cassandra 集群,HugeGraph 与 Cassandra 集群位于不同的服务器,server 相关的配置文件除主机和端口有修改外,其余均保持默认。
3 性能结果总结
- HugeGraph 单条插入顶点和边的速度分别为 9000 和 4500
- 顶点和边的批量插入速度分别为5w/s和15w/s,远大于单条插入速度
- 按 id 查询顶点和边的并发度可达到 12000 以上,且请求的平均延时小于 70ms
4 测试结果及分析
4.1 batch 插入
4.1.1 压力上限测试
测试方法
不断提升并发量,测试 server 仍能正常提供服务的压力上限
压力参数
持续时间:5min
顶点的最大插入速度:
结论:
- 并发 3500,顶点的吞吐量是 261,每秒可处理的数据:261*200=52200/s
边的最大插入速度
结论:
- 并发 1000,边的吞吐量是 323,每秒可处理的数据:323*500=161500/s
4.2 single 插入
4.2.1 压力上限测试
测试方法
不断提升并发量,测试 server 仍能正常提供服务的压力上限
压力参数
- 持续时间:5min
- 服务异常标志:错误率大于 0.00%
顶点的单条插入
结论:
- 并发 9000,吞吐量为 8400,顶点的单条插入并发能力为 9000
边的单条插入
结论:
- 并发 4500,吞吐量是 4160,边的单条插入并发能力为 4500
4.3 按 id 查询
4.3.1 压力上限测试
测试方法
不断提升并发量,测试 server 仍能正常提供服务的压力上限
压力参数
- 持续时间:5min
- 服务异常标志:错误率大于 0.00%
顶点的按 id 查询
结论:
- 并发 14500,吞吐量是 13576,顶点的按 id 查询的并发能力为 14500,平均延时为 11ms
边的按 id 查询
结论:
- 并发 12000,吞吐量是 10688,边的按 id 查询的并发能力为 12000,平均延时为 63ms
8.3 - HugeGraph-Loader Performance
Note:
当前的性能指标测试基于很早期的版本。最新版本在性能和功能上都有显著的改进。我们鼓励您参考最新的发布版本,
该版本具有自主分布式存储和增强的计算推下能力。或者,您可以等待社区更新相关测试数据 (也欢迎反馈共建)。
使用场景
当要批量插入的图数据(包括顶点和边)条数为 billion 级别及以下,或者总数据量小于 TB 时,
可以采用 HugeGraph-Loader 工具持续、高速导入图数据
性能
测试均采用网址数据的边数据
RocksDB 单机性能
- 关闭 label index,22.8w edges/s
- 开启 label index,15.3w edges/s
Cassandra 集群性能
- 默认开启 label index,6.3w edges/s
8.4 -
1 测试环境
1.1 硬件信息
| CPU | Memory | 网卡 | 磁盘 |
|---|
| 48 Intel(R) Xeon(R) CPU E5-2650 v4 @ 2.20GHz | 128G | 10000Mbps | 750GB SSD |
1.2 软件信息
1.2.1 测试用例
测试使用graphdb-benchmark,一个图数据库测试集。该测试集主要包含4类测试:
Massive Insertion,批量插入顶点和边,一定数量的顶点或边一次性提交
Single Insertion,单条插入,每个顶点或者每条边立即提交
Query,主要是图数据库的基本查询操作:
- Find Neighbors,查询所有顶点的邻居
- Find Adjacent Nodes,查询所有边的邻接顶点
- Find Shortest Path,查询第一个顶点到100个随机顶点的最短路径
Clustering,基于Louvain Method的社区发现算法
1.2.2 测试数据集
测试使用人造数据和真实数据
本测试用到的数据集规模
| 名称 | vertex数目 | edge数目 | 文件大小 |
|---|
| email-enron.txt | 36,691 | 367,661 | 4MB |
| com-youtube.ungraph.txt | 1,157,806 | 2,987,624 | 38.7MB |
| amazon0601.txt | 403,393 | 3,387,388 | 47.9MB |
1.3 服务配置
- HugeGraph版本:0.4.4,RestServer和Gremlin Server和backends都在同一台服务器上
- Cassandra版本:cassandra-3.10,commit-log 和data共用SSD
- RocksDB版本:rocksdbjni-5.8.6
- Titan版本:0.5.4, 使用thrift+Cassandra模式
graphdb-benchmark适配的Titan版本为0.5.4
2 测试结果
2.1 Batch插入性能
| Backend | email-enron(30w) | amazon0601(300w) | com-youtube.ungraph(300w) |
|---|
| Titan | 9.516 | 88.123 | 111.586 |
| RocksDB | 2.345 | 14.076 | 16.636 |
| Cassandra | 11.930 | 108.709 | 101.959 |
| Memory | 3.077 | 15.204 | 13.841 |
说明
- 表头"()“中数据是数据规模,以边为单位
- 表中数据是批量插入的时间,单位是s
- 例如,HugeGraph使用RocksDB插入amazon0601数据集的300w条边,花费14.076s,速度约为21w edges/s
结论
- RocksDB和Memory后端插入性能优于Cassandra
- HugeGraph和Titan同样使用Cassandra作为后端的情况下,插入性能接近
2.2 遍历性能
2.2.1 术语说明
- FN(Find Neighbor), 遍历所有vertex, 根据vertex查邻接edge, 通过edge和vertex查other vertex
- FA(Find Adjacent), 遍历所有edge,根据edge获得source vertex和target vertex
2.2.2 FN性能
| Backend | email-enron(3.6w) | amazon0601(40w) | com-youtube.ungraph(120w) |
|---|
| Titan | 7.724 | 70.935 | 128.884 |
| RocksDB | 8.876 | 65.852 | 63.388 |
| Cassandra | 13.125 | 126.959 | 102.580 |
| Memory | 22.309 | 207.411 | 165.609 |
说明
- 表头”()“中数据是数据规模,以顶点为单位
- 表中数据是遍历顶点花费的时间,单位是s
- 例如,HugeGraph使用RocksDB后端遍历amazon0601的所有顶点,并查找邻接边和另一顶点,总共耗时65.852s
2.2.3 FA性能
| Backend | email-enron(30w) | amazon0601(300w) | com-youtube.ungraph(300w) |
|---|
| Titan | 7.119 | 63.353 | 115.633 |
| RocksDB | 6.032 | 64.526 | 52.721 |
| Cassandra | 9.410 | 102.766 | 94.197 |
| Memory | 12.340 | 195.444 | 140.89 |
说明
- 表头”()“中数据是数据规模,以边为单位
- 表中数据是遍历边花费的时间,单位是s
- 例如,HugeGraph使用RocksDB后端遍历amazon0601的所有边,并查询每条边的两个顶点,总共耗时64.526s
结论
- HugeGraph RocksDB > Titan thrift+Cassandra > HugeGraph Cassandra > HugeGraph Memory
2.3 HugeGraph-图常用分析方法性能
术语说明
- FS(Find Shortest Path), 寻找最短路径
- K-neighbor,从起始vertex出发,通过K跳边能够到达的所有顶点, 包括1, 2, 3…(K-1), K跳边可达vertex
- K-out, 从起始vertex出发,恰好经过K跳out边能够到达的顶点
FS性能
| Backend | email-enron(30w) | amazon0601(300w) | com-youtube.ungraph(300w) |
|---|
| Titan | 11.333 | 0.313 | 376.06 |
| RocksDB | 44.391 | 2.221 | 268.792 |
| Cassandra | 39.845 | 3.337 | 331.113 |
| Memory | 35.638 | 2.059 | 388.987 |
说明
- 表头”()“中数据是数据规模,以边为单位
- 表中数据是找到从第一个顶点出发到达随机选择的100个顶点的最短路径的时间,单位是s
- 例如,HugeGraph使用RocksDB查找第一个顶点到100个随机顶点的最短路径,总共耗时2.059s
结论
- 在数据规模小或者顶点关联关系少的场景下,Titan最短路径性能优于HugeGraph
- 随着数据规模增大且顶点的关联度增高,HugeGraph最短路径性能优于Titan
K-neighbor性能
| 顶点 | 深度 | 一度 | 二度 | 三度 | 四度 | 五度 | 六度 |
|---|
| v1 | 时间 | 0.031s | 0.033s | 0.048s | 0.500s | 11.27s | OOM |
| v111 | 时间 | 0.027s | 0.034s | 0.115 | 1.36s | OOM | – |
| v1111 | 时间 | 0.039s | 0.027s | 0.052s | 0.511s | 10.96s | OOM |
说明
- HugeGraph-Server的JVM内存设置为32GB,数据量过大时会出现OOM
K-out性能
| 顶点 | 深度 | 一度 | 二度 | 三度 | 四度 | 五度 | 六度 |
|---|
| v1 | 时间 | 0.054s | 0.057s | 0.109s | 0.526s | 3.77s | OOM |
| 度 | 10 | 133 | 2453 | 50,830 | 1,128,688 | | |
| v111 | 时间 | 0.032s | 0.042s | 0.136s | 1.25s | 20.62s | OOM |
| 度 | 10 | 211 | 4944 | 113150 | 2,629,970 | | |
| v1111 | 时间 | 0.039s | 0.045s | 0.053s | 1.10s | 2.92s | OOM |
| 度 | 10 | 140 | 2555 | 50825 | 1,070,230 | | |
说明
- HugeGraph-Server的JVM内存设置为32GB,数据量过大时会出现OOM
结论
- FS场景,HugeGraph性能优于Titan
- K-neighbor和K-out场景,HugeGraph能够实现在5度范围内秒级返回结果
2.4 图综合性能测试-CW
| 数据库 | 规模1000 | 规模5000 | 规模10000 | 规模20000 |
|---|
| Titan | 45.943 | 849.168 | 2737.117 | 9791.46 |
| Memory(core) | 41.077 | 1825.905 | * | * |
| Cassandra(core) | 39.783 | 862.744 | 2423.136 | 6564.191 |
| RocksDB(core) | 33.383 | 199.894 | 763.869 | 1677.813 |
说明
- “规模"以顶点为单位
- 表中数据是社区发现完成需要的时间,单位是s,例如HugeGraph使用RocksDB后端在规模10000的数据集,社区聚合不再变化,需要耗时763.869s
- “*“表示超过10000s未完成
- CW测试是CRUD的综合评估
- 后三者分别是HugeGraph的不同后端,该测试中HugeGraph跟Titan一样,没有通过client,直接对core操作
结论
- HugeGraph在使用Cassandra后端时,性能略优于Titan,随着数据规模的增大,优势越来越明显,数据规模20000时,比Titan快30%
- HugeGraph在使用RocksDB后端时,性能远高于Titan和HugeGraph的Cassandra后端,分别比两者快了6倍和4倍
9 - Contribution Guidelines
9.1 - 如何参与 HugeGraph 社区
TODO: translate this article to Chinese
Thanks for taking the time to contribute! As an open source project, HugeGraph is looking forward to be contributed from everyone, and we are also grateful to all the contributors.
The following is a contribution guide for HugeGraph:
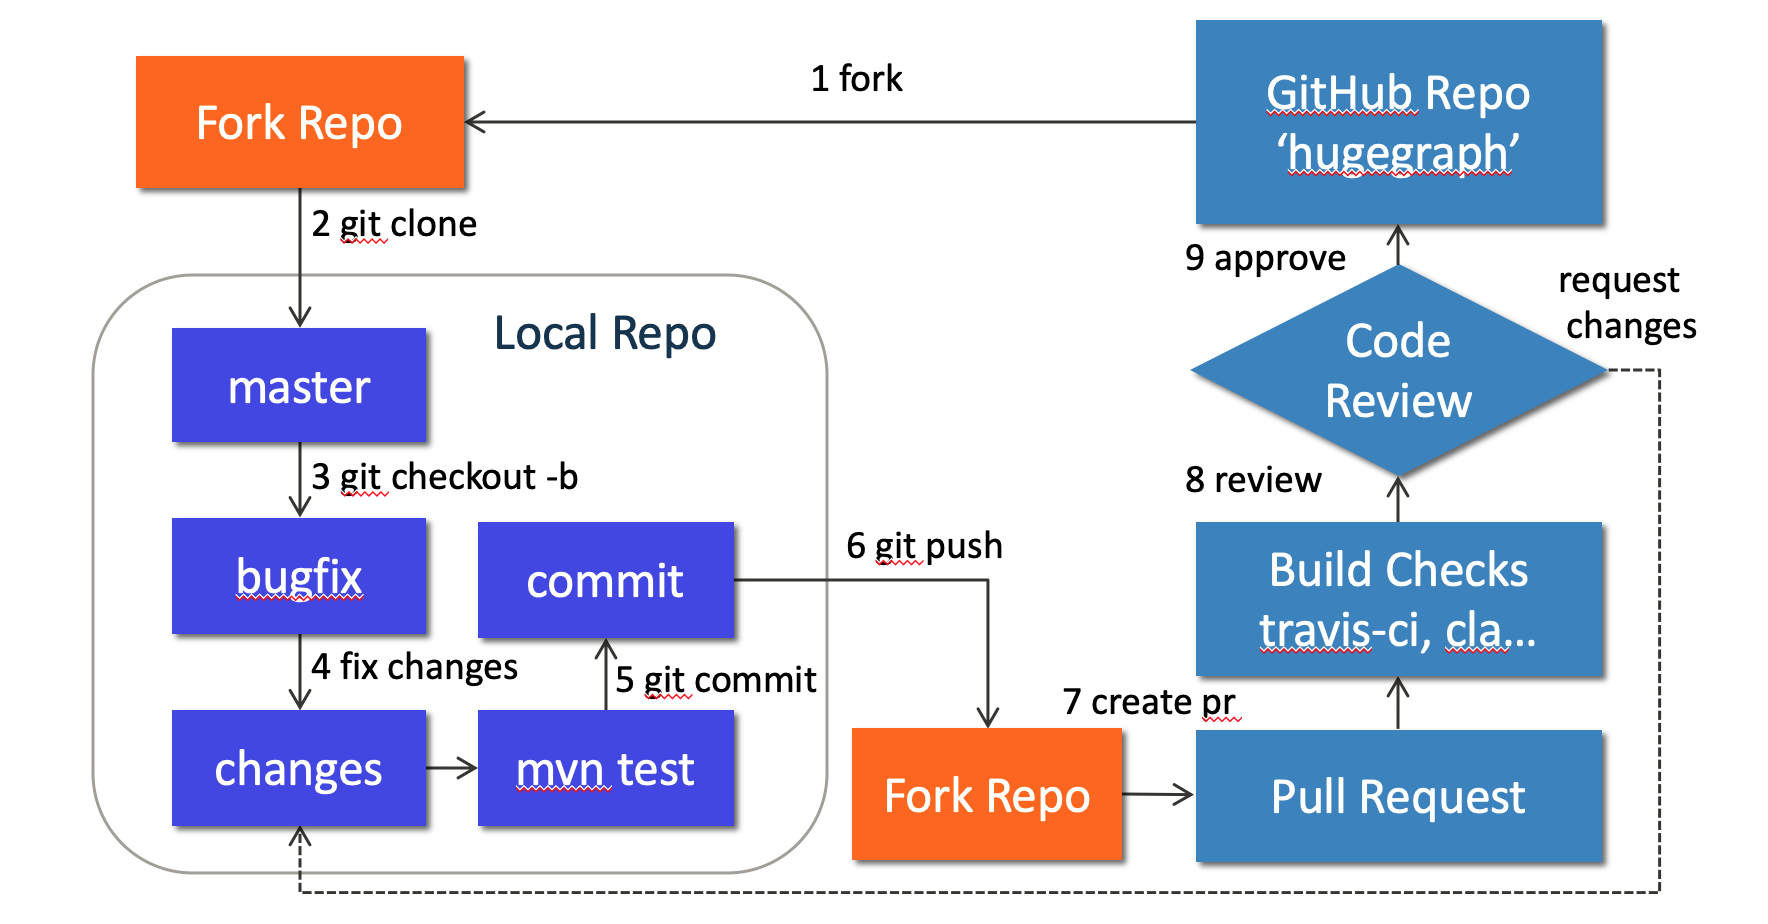
1. Preparation
建议: 使用 GitHub desktop 可以大幅简化和改善你提交 PR/Commit 的过程, 特别适合新人
We can contribute by reporting issues, submitting code patches or any other feedback.
Before submitting the code, we need to do some preparation:
Sign up or login to GitHub: https://github.com
Fork HugeGraph repo from GitHub: https://github.com/apache/hugegraph/fork
Clone code from fork repo to local: https://github.com/${GITHUB_USER_NAME}/hugegraph
# clone code from remote to local repo
git clone https://github.com/${GITHUB_USER_NAME}/hugegraph
Configure local HugeGraph repo
cd hugegraph
# add upstream to synchronize the latest code
git remote add hugegraph https://github.com/apache/hugegraph
# set name and email to push code to github
git config user.name "{full-name}" # like "Jermy Li"
git config user.email "{email-address-of-github}" # like "jermy@apache.org"
2. Create an Issue on GitHub
If you encounter bugs or have any questions, please go to GitHub Issues to report them and feel free to create an issue.
3. Make changes of code locally
3.1 Create a new branch
Please don’t use master branch for development. We should create a new branch instead:
# checkout master branch
git checkout master
# pull the latest code from official hugegraph
git pull hugegraph
# create new branch: bugfix-branch
git checkout -b bugfix-branch
3.2 Change the code
Assume that we need to modify some files like “HugeGraph.java” and “HugeFactory.java”:
# modify code to fix a bug
vim hugegraph-core/src/main/java/org/apache/hugegraph/HugeGraph.java
vim hugegraph-core/src/main/java/org/apache/hugegraph/HugeFactory.java
# run test locally (optional)
mvn test -Pcore-test,memory
Note: In order to be consistent with the code style easily, if you use IDEA as your IDE, you can import our code style configuration file.
3.2.1 添加第三方依赖
如果我们要在 HugeGraph 项目中添加新的第三方依赖, 我们需要做下面的几件事情:
- 找到第三方依赖的仓库,将依赖的
license 文件放到 ./hugegraph-dist/release-docs/licenses/ 路径下。 - 在./hugegraph-dist/release-docs/LICENSE 中声明该依赖的
LICENSE 信息。 - 找到仓库里的 NOTICE 文件,将其追加到 ./hugegraph-dist/release-docs/NOTICE 文件后面(如果没有NOTICE文件则跳过这一步)。
- 本地执行./hugegraph-dist/scripts/dependency/regenerate_known_dependencies.sh 脚本来更新依赖列表known-dependencies.txt (或者手动更新)。
例如:在项目中引入了第三方新依赖 -> ant-1.9.1.jar
- 项目源码位于:https://github.com/apache/ant/tree/rel/1.9.1
- LICENSE 文件:https://github.com/apache/ant/blob/rel/1.9.1/LICENSE
- NOTICE 文件:https://github.com/apache/ant/blob/rel/1.9.1/NOTICE
ant-1.9.1.jar 的 license 信息需要在 LICENSE 文件中指定,notice 信息需要在 NOTICE 文件中指定。 ant-1.9.1.jar 对应的详细 LICENSE 文件需要复制到我们的 licenses/ 目录下。最后更新 known-dependencies.txt 文件。
3.3 Commit changes to git repo
After the code has been completed, we submit them to the local git repo:
# add files to local git index
git add hugegraph-core/src/main/java/org/apache/hugegraph/HugeGraph.java
git add hugegraph-core/src/main/java/org/apache/hugegraph/HugeFactory.java
# commit to local git repo
git commit
Please edit the commit message after running git commit, we can explain what and how to fix a bug or implement a feature, the following is an example:
Fix bug: run deploy multiple times
fix #ISSUE_ID
Please remember to fill in the issue id, which was generated by GitHub after issue creation.
3.4 Push commit to GitHub fork repo
Push the local commit to GitHub fork repo:
# push the local commit to fork repo
git push origin bugfix-branch:bugfix-branch
Note that since GitHub requires submitting code through username + token (instead of using username + password directly), you need to create a GitHub token from https://github.com/settings/tokens:

4. Create a Pull Request
Go to the web page of GitHub fork repo, there would be a chance to create a Pull Request after pushing to a new branch, just click button “Compare & pull request” to do it. Then edit the description for proposed changes, which can just be copied from the commit message.
Note: please make sure the email address you used to submit the code is bound to the GitHub account. For how to bind the email address, please refer to https://github.com/settings/emails:

5. Code review
Maintainers will start the code review after all the automatic checks are passed:
- Check: Contributor License Agreement is signed
- Check: Travis CI builds is passed (automatically Test and Deploy)
The commit will be accepted and merged if there is no problem after review.
Please click on “Details” to find the problem if any check does not pass.
If there are checks not passed or changes requested, then continue to modify the code and push again.
6. More changes after review
If we have not passed the review, don’t be discouraged. Usually a commit needs to be reviewed several times before being accepted! Please follow the review comments and make further changes.
After the further changes, we submit them to the local repo:
# commit all updated files in a new commit,
# please feel free to enter any appropriate commit message, note that
# we will squash all commits in the pull request as one commit when
# merging into the master branch.
git commit -a
If there are conflicts that prevent the code from being merged, we need to rebase on master branch:
# synchronize the latest code
git checkout master
git pull hugegraph
# rebase on master
git checkout bugfix-branch
git rebase -i master
And push it to GitHub fork repo again:
# force push the local commit to fork repo
git push -f origin bugfix-branch:bugfix-branch
GitHub will automatically update the Pull Request after we push it, just wait for code review.
9.2 - 订阅社区邮箱
按照以下步骤订阅邮件列表:
您可以随时订阅邮件列表。此外,您也可以直接浏览历史邮件/所有邮件(即使没有订阅列表)。
注意事项:
- 如果您没有收到确认邮件,请在24小时后再重试发送邮件。
- 在成功订阅邮件列表之前,请勿发送电子邮件到 dev(未订阅发送的邮件将被自动拦截)。
HugeGraph提供了一个供开发和用户讨论的电子邮件列表。
有关邮件订阅的更多信息,请参阅:
退订邮件列表
如果您不再需要了解 HugeGraph 的最新动态,可以退订邮件列表。
退订邮件列表的步骤如下:
使用您订阅时的电子邮件发送邮件到 dev-unsubscribe@hugegraph.apache.org(主题和内容任意)。
收到确认邮件并回复。完成第一步后,您将收到来自 dev-help@hugegraph.apache.org 的确认邮件(如果未收到,请确认邮件是否被自动归类为垃圾邮件、推广邮件、订阅邮件等)。然后直接回复邮件,或点击邮件中的链接快速回复(主题和内容任意)。
收到再见邮件。完成上述步骤后,您将收到一封主题为 “GOODBYE from dev@hugegraph.apache.org” 的再见邮件,表示您已成功退订 Apache HugeGraph 邮件列表,您将不再接收来自 dev@hugegraph.apache.org 的邮件。
9.3 - 验证 Apache 发版
Note: 这篇文档会持续更新。
你需要使用 Java11 验证测试 (如果希望测试功能/运行时),从 1.5.0 版本开始 (除 client 外) 不再支持 Java8
毕业说明:Apache HugeGraph 已于 2026 年 1 月毕业。正式发版投票现由 HugeGraph 社区内部完成(dev@hugegraph.apache.org 上的 PMC binding 投票),不再需要 Incubator general@incubator.apache.org 审批。
验证阶段
当内部的临时发布和打包工作完成后,其他的社区开发者 (尤其是 PMC)
需要按 ASF 发版规范参与验证,可参考:
1. 准备工作
如果本地没有 svn 或 gpg 或 wget 环境,建议先安装一下 (windows 推荐使用 WSL2 环境,
或者至少是 git-bash), 同时确保安装 Java(推荐 11) 和 maven 软件。
# 1. 安装svn
# ubuntu/debian
sudo apt install subversion -y
# MacOS
brew install subversion
# 验证安装是否成功, 执行以下命令:
svn --version
# 2. 安装gpg
# ubuntu/debian
sudo apt-get install gnupg -y
# MacOS
brew install gnupg
# 验证安装是否成功, 执行以下命令:
gpg --version
# 3. 安装wget
# ubuntu/debian
sudo apt-get install wget -y
# MacOS
brew install wget
# 4. 下载 hugegraph-svn 目录 (版本号注意填写此次验证版本)
svn co https://dist.apache.org/repos/dist/dev/hugegraph/1.x.x/
# (注) 如果出现 svn 下载某个文件速度很慢的情况, 可以考虑 wget 单个文件下载, 如下 (或考虑使用 VPN / 代理)
wget https://dist.apache.org/repos/dist/dev/hugegraph/1.x.x/apache-hugegraph-toolchain-incubating-1.x.x.tar.gz
2. 检查 hash 值
首先需要检查 source + binary 包的文件完整性,通过 shasum 进行校验,确保和发布到 apache/github 上的
hash 值一致 (一般是 sha512)
执行命令:
for i in *.tar.gz; do echo $i; shasum -a 512 --check $i.sha512; done
3. 检查 gpg 签名
这个就是为了确保发布的包是由可信赖的人上传的,假设 tom 签名后上传,其他人应该下载 A 的公钥
然后进行签名确认, 相关命令:
# 1. 下载项目可信赖公钥到本地 (首次需要) & 导入
curl https://downloads.apache.org/hugegraph/KEYS > KEYS
gpg --import KEYS
# 导入后可以看到如下输出, 这代表导入了 x 个用户公钥
gpg: /home/ubuntu/.gnupg/trustdb.gpg: trustdb created
gpg: key BA7E78F8A81A885E: public key "imbajin (apache mail) <jin@apache.org>" imported
gpg: key 818108E7924549CC: public key "vaughn <vaughn@apache.org>" imported
gpg: key 28DCAED849C4180E: public key "coderzc (CODE SIGNING KEY) <zhaocong@apache.org>" imported
....
gpg: Total number processed: x
gpg: imported: x
# 2. 信任发版用户 (你需要信任 n 个邮件里提到的 gpg 用户名, >1则依次执行相同操作)
gpg --edit-key $USER # 这里填写具体用户名或者公钥串, 回车进入交互模式
gpg> trust
...输出选项..
Your decision? 5 # 选择5
Do you really want to set this key to ultimate trust? (y/N) y # 选择y, 然后 q 退出信任下一个用户
# (可选) 你也可以直接使用非交互模式的如下命令:
echo -e "5\ny\n" | gpg --batch --command-fd 0 --edit-key $USER trust
# 或者是信任所有当前导入过的 gpg 公钥 (请小心检查)
for key in $(gpg --no-tty --list-keys --with-colons | awk -F: '/^pub/ {print $5}'); do
echo -e "5\ny\n" | gpg --batch --command-fd 0 --edit-key "$key" trust
done
# 3. 检查签名(确保没有 Warning 输出, 每一个 source/binary 文件都提示 Good Signature)
#单个文件验证
gpg --verify xx.asc xxx-src.tar.gz
gpg --verify xx.asc xxx.tar.gz # 注:目前没有 bin/binary 后缀
# 一行脚本快速验证所有包 (推荐使用,请确保所有 gpg 公钥已经信任)
for i in *.tar.gz; do echo $i; gpg --verify $i.asc $i ; done
先确认了整体的"完整性 + 一致性", 然后接下来确认具体的内容 (关键)
4. 检查压缩包内容
这里检查准备工作下载的压缩包内容。分源码包 + 二进制包两个方面,源码包更为严格,挑核心的部分说
(完整的列表可参考官方 Wiki, 比较长)
A. 源码包
解压 *hugegraph*src.tar.gz后,进行如下检查:
- 包名/目录名应符合当前发版命名(历史版本可能仍包含
incubating),且不存在空的文件/文件夹 - 存在
LICENSE + NOTICE 且内容正常;历史 incubating 制品需检查 DISCLAIMER - 不存在 缺乏 License 的二进制文件
- 源码文件都包含标准
ASF License 头 (这个用插件跑一下为主) - 检查每个父 / 子模块的
pom.xml 版本号是否一致 (且符合期望) - 最后,确保源码可以正常 / 正确编译 (然后看看测试和规范)
PMC 同学请特别注意认真检查 LICENSE + NOTICE 文件,确保文件严格遵循了 ASF 的发版要求,
大部分的发版问题都与之相关
# 请优先使用/切换到 `java 11` 版本进行后序的编译和运行操作 (注:`Computer` 仅支持 `java >= 11`)
# java --version
# 尝试在 Unix 环境下编译测试是否正常
mvn clean package -DskipTests -Dcheckstyle.skip=true -P stage
B. 二进制包
解压 xxx-hugegraph.tar.gz后,进行如下检查:
- 包名/目录名应符合当前发版命名(历史版本可能仍包含
incubating) - 存在
LICENSE + NOTICE 且内容正常(历史 incubating 制品需检查 DISCLAIMER) - 服务启动
# hugegraph-server
bin/start-hugegraph.sh
# hugegraph-loader
bin/hugegraph-loader.sh -g hugegraph -f example/file/struct.json -s example/file/schema.groovy
# hugegraph-hubble
bin/start-hubble.sh
更多参考官网: https://hugegraph.apache.org/cn/docs/quickstart
注: 如果二进制包里面引入了第三方依赖, 则需要更新 LICENSE, 加入第三方依赖的 LICENSE; 若第三方依赖
LICENSE 是 Apache 2.0, 且对应的项目中包含了 NOTICE, 则还需要更新我们的 NOTICE 文件
5. 检查官网以及 github 等页面
- 确保官网至少满足 apache website check,
以及没有死链等
- 更新下载链接存在,以及版本更新说明页面更新
- …
邮件模板
检查完成后,你应该按不同角色回复邮件:(普通开发者 & PMC 成员)
[] +1 approve
[] +0 no opinion
[] -1 disapprove with the reason
+1 (non-binding)
I checked:
1. Download link/tag in mail are valid
2. Checksum and GPG signatures are OK
3. LICENSE & NOTICE & DISCLAIMER are exist
4. Build successfully on XX OS version XXX
5. No unexpected binary files
6. Date is right in the NOTICE file
7. Compile from source is fine under JavaX
8. No empty file & directory found
9. Test running xxx service OK
10. ....
特别注意 PMC 成员必须使用 binding 标记回复邮件,这对于统计有效投票很重要;
+1 (binding)
I checked:
1. Download link/tag in mail are valid
2. Checksum and GPG signatures are OK
3. LICENSE & NOTICE & DISCLAIMER are exist
4. Build successfully on XX OS Version XX
5. No unexpected binary files
6. Date is right in the NOTICE file
7. Compile from source is fine under JavaXX
8. No empty file & directory found
9. Test running XXX service OK
10. ....
9.4 - 在 IDEA 中配置 Server 开发环境
注意:下述配置仅供参考,基于这个版本,在 Linux 和 macOS 平台下进行了测试。
背景
在 Quick Start 部分已经介绍了使用脚本启停 HugeGraph-Server 的流程。下面以 Linux 平台为例,
介绍使用 IntelliJ IDEA 运行与调试 HugeGraph-Server 的流程。
本地启动的核心与脚本启动是一样的:
- 初始化数据库后端,执行
InitStore 类初始化图 - 启动 HugeGraph-Server,执行
HugeGraphServer 类加载初始化的图信息启动
在执行下述流程之前,请确保已经克隆了 HugeGraph 的源代码,并且已经配置了 Java 11 环境 & 可以参考这个
配置文档
git clone https://github.com/apache/hugegraph.git
步骤
1. 配置文件拷贝
为了避免配置文件的更改影响 Git 的追踪,建议将所需的配置文件拷贝到一个单独的文件夹中:
cp -r hugegraph-dist/src/assembly/static/scripts hugegraph-dist/src/assembly/static/conf path-to-your-directory
将 path-to-your-directory 替换为你创建的文件夹的路径。
在引入 ToplingDB 后,开发者需执行 preload-topling.sh 脚本,该脚本会将相关动态库和 Web Server 所需的静态资源自动解压至与 bin 同级的 library 目录中 (静态资源会同时拷贝到 /dev/shm/rocksdb_resource 中)。
2. InitStore 类初始化图
首先,需要在配置文件中配置数据库后端。以 RocksDB 为例,在 path-to-your-directory/conf/graphs/hugegraph.properties 文件中进行以下配置:
backend=rocksdb
serializer=binary
rocksdb.data_path=.
rocksdb.wal_path=.
然后,打开 IntelliJ IDEA 的 Run/Debug Configurations 面板,创建一个新的 Application 配置,按照以下步骤进行配置:
- 在
Use classpath of module 中选择 hugegraph-dist - 将
Main class 设置为 org.apache.hugegraph.cmd.InitStore - 设置运行参数为
conf/rest-server.properties,这里的路径是相对于工作路径的,需要将工作路径设置为 path-to-your-directory - (可选) ToplingDB 需要通过
LD_PRELOAD 机制预加载动态库,开发者需设置两个环境变量:LD_LIBRARY_PATH 指向 preload-topling.sh 解压出的 library 目录,LD_PRELOAD 设置为 libjemalloc.so:librocksdbjni-linux64.so,以确保相关库在运行时被正确加载- LD_LIBRARY_PATH=/path/to/your/library:$LD_LIBRARY_PATH
- LD_PRELOAD=libjemalloc.so:librocksdbjni-linux64.so
若在 Java 11 环境下为 HugeGraph-Server 配置了用户认证 (authenticator),需要参考二进制包的脚本配置,添加下述 VM options:
--add-exports=java.base/jdk.internal.reflect=ALL-UNNAMED
否则会报错:
java.lang.reflect.InaccessibleObjectException: Unable to make public static synchronized void jdk.internal.reflect.Reflection.registerFieldsToFilter(java.lang.Class,java.lang.String[]) accessible: module java.base does not "exports jdk.internal.reflect" to unnamed module @xxx
配置完成后运行,如果运行成功,将会输出以下类似运行日志:
2023-06-05 00:43:37 [main] [INFO] o.a.h.u.ConfigUtil - Scanning option 'graphs' directory './conf/graphs'
2023-06-05 00:43:37 [main] [INFO] o.a.h.c.InitStore - Init graph with config file: ./conf/graphs/hugegraph.properties
......
2023-06-05 00:43:39 [main] [INFO] o.a.h.b.s.r.RocksDBStore - Write down the backend version: 1.11
2023-06-05 00:43:39 [main] [INFO] o.a.h.StandardHugeGraph - Graph 'hugegraph' has been initialized
2023-06-05 00:43:39 [main] [INFO] o.a.h.StandardHugeGraph - Close graph standardhugegraph[hugegraph]
2023-06-05 00:43:39 [db-open-1] [INFO] o.a.h.b.s.r.RocksDBStore - Opening RocksDB with data path: ./m
2023-06-05 00:43:39 [db-open-1] [INFO] o.a.h.b.s.r.RocksDBStore - Opening RocksDB with data path: ./s
2023-06-05 00:43:39 [db-open-1] [INFO] o.a.h.b.s.r.RocksDBStore - Opening RocksDB with data path: ./g
2023-06-05 00:43:39 [main] [INFO] o.a.h.HugeFactory - HugeFactory shutdown
2023-06-05 00:43:39 [hugegraph-shutdown] [INFO] o.a.h.HugeFactory - HugeGraph is shutting down
3. 运行 HugeGraphServer
类似地,打开 IntelliJ IDEA 的 Run/Debug Configurations 面板,创建一个新的 Application 配置,按照以下步骤进行配置:
- 在
Use classpath of module 中选择 hugegraph-dist - 将
Main class 设置为 org.apache.hugegraph.dist.HugeGraphServer - 设置运行参数为
conf/gremlin-server.yaml conf/rest-server.properties,同样地,这里的路径是相对于工作路径的,需要将工作路径设置为 path-to-your-directory
类似的,若在 Java 11 环境下为 HugeGraph-Server 配置了用户认证 (authenticator),同样需要参考二进制包的脚本配置,添加下述 VM options:
--add-exports=java.base/jdk.internal.reflect=ALL-UNNAMED --add-modules=jdk.unsupported --add-exports=java.base/sun.nio.ch=ALL-UNNAMED
否则会报错:
java.lang.reflect.InaccessibleObjectException: Unable to make public static synchronized void jdk.internal.reflect.Reflection.registerFieldsToFilter(java.lang.Class,java.lang.String[]) accessible: module java.base does not "exports jdk.internal.reflect" to unnamed module @xxx
配置完成后运行,如果看到以下类似日志,表示 HugeGraphServer 已经成功启动:
......
2023-06-05 00:51:56 [gremlin-server-boss-1] [INFO] o.a.t.g.s.GremlinServer - Gremlin Server configured with worker thread pool of 1, gremlin pool of 8 and boss thread pool of 1.
2023-06-05 00:51:56 [gremlin-server-boss-1] [INFO] o.a.t.g.s.GremlinServer - Channel started at port 8182.
4. 调试 HugeGraphServer (可选)
在完成上述配置后,可以尝试对 HugeGraphServer 进行调试。在调试模式下运行 HugeGraphServer,并在以下位置设置断点:
public String list(@Context GraphManager manager,
@PathParam("graph") String graph, @QueryParam("label") String label,
@QueryParam("properties") String properties, ......) {
// ignore log
Map<String, Object> props = parseProperties(properties);
然后,使用 RESTful API 请求 HugeGraphServer:
curl "http://localhost:8080/graphs/hugegraph/graph/vertices" | gunzip
此时,可以在调试器中查看详细的变量信息。
5. Log4j2 日志配置
默认情况下,运行 InitStore 和 HugeGraphServer 时,读取的 Log4j2 配置文件路径为 hugegraph-dist/src/main/resources/log4j2.xml,而不是 path-to-your-directory/conf/log4j2.xml,这个配置文件是使用脚本启动 HugeGraph-Server 时读取的。
为了避免同时维护两份配置文件,可以考虑在 IntelliJ IDEA 运行与调试 HugeGraph-Server 时,修改读取的 Log4j2 配置文件路径:
- 打开之前创建的
Application 配置 - 点击
Modify options - Add VM options - 设置 VM options 为
-Dlog4j.configurationFile=conf/log4j2.xml
可能遇到的问题
1. java: package sun.misc does not exist
原因可能是在使用 Java 11 编译时触发了交叉编译,导致项目中使用的 sun.misc.Unsafe 找不到符号。有两种解决方案可供选择:
- 在 IntelliJ IDEA 的
Preferences/Settings 中找到 Java Compiler 面板,然后关闭 --release 选项 (推荐) - 或者将项目的 SDK 版本设置为 8 (Deprecated soon)
2. java: *.store.raft.rpc.RaftRequests does not exist (RPC Generated Files)
原因是源代码没有包含 RPC-generated 文件。可以尝试两种方法来解决:
- [命令] 在根目录下运行
mvn clean compile -DskipTests (推荐) - [UI] 在 IDEA 中,右键点击
hugegraph 模块,选择 Manve -> Generate Sources and Update Folders
3. Log4j2 日志无法打印 %l 等位置信息
这是因为 Log4j2 中使用了 asynchronous loggers,可以参考官方文档进行配置
参考
- HugeGraph-Server Quick Start
- hugegraph-server 本地调试文档 (Win/Unix)
- “package sun.misc does not exist” compilation error
- Cannot compile: java: package sun.misc does not exist
- The code-style config for HugeGraph in IDEA
9.5 - Apache HugeGraph Committer 指南
本文档概述了 Apache Committer 推选要求以及流程,对应的 ASF 官方文档可见:https://community.apache.org/newcommitter.html
候选人要求
- 候选人应遵守 Apache Code of Conduct
- PMC 成员将通过搜索邮件列表、issues、PRs、官网文档等方式,了解候选人如何与他人互动,以及他们所做的贡献
- 以下是在评估候选人是否适合成为 Committer 时需要考虑的一些要点:
- 与社区成员合作的能力
- 担任导师的能力
- 社区参与度
- 贡献程度
- 个人技能/能力
推选详细流程
讨论 (DISCUSS) → 投票 (VOTE) → 邀请 (INVITE) → 公告 (ANNOUNCE)
发起社区邮件讨论 (DISCUSS)
任何 HugeGraph 的 PMC 成员都可以发起投票讨论,在发现社区贡献者任何有价值的贡献并取得候选人本人同意后,可以在 private@hugegraph.apache.org 发起讨论。
讨论邮件里提议者要把候选人的贡献说清楚,并最好给出确认贡献的 URL 等信息,便于大家讨论分析。
下面是 HugeGraph 对应的邮件模板:(仅供参考)
Note: 后续将使用 xxx 指代候选人名,一般 xxx 为一个容易读的名字 (例如 Simon Jay)
ASF-INFRA 建议避免使用不易读的 ID 直接作为邮件人名代指 (例如避免 simon321 或 wh0isSim0n 😄)
另发送邮件最好选择 “纯文本” 模式,否则排版在 ASF Mail UI 中可能会乱
To: private@hugegraph.apache.org
Subject: [DISCUSS] XXX as a HugeGraph Committer Candidate
Hi all:
I am pleased to nominate xxx for the role of HugeGraph Committer based on his/her contributions over the past few months.
[ Candidate's Contribution Summary ]
Here are the relevant PRs (issues) he/she has participated in:
**Core Features:**
- Feature 1: [ Reference Links ]
- ...
**Fix/Chore/Release:**
**Doc:**
[ Candidate's Current Notable Contributions ]
His/Her contributions bring the following benefits to the community, helping us in the following ways:
[ Candidate's Contributions and Benefits to the Community ]
In view of the above contributions, I elect xxx as Committer of the HugeGraph project.
[ Reference Links ]
1. PR1
2. PR2
3. ...
Welcome everyone to share opinions~
Thanks!
对于讨论邮件中贡献链接,可以使用 GitHub Search 的统计功能,按需输入如下对应关键词查询即可,可以在此基础上添加新的 repo 如 repo:apache/hugegraph-computer,特别注意调整时间范围 (下面是一个模板参考,请自行调整参数):
- PR 提交次数
is:pr author:xxx repo:apache/hugegraph repo:apache/hugegraph-doc created:>2023-06-01 updated:<2023-12-25
- 代码提交/修改行数
- PR 提交关联 Issue 次数
linked:issue involves:xxx repo:apache/hugegraph repo:apache/hugegraph-doc created:>2023-06-01 updated:<2023-12-25
- PR Review 个数
type:pr reviewed-by:xxx repo:apache/hugegraph repo:apache/hugegraph-doc created:>2023-06-01 updated:<2023-12-25
- PR Review 行数
- 合并次数
type:pr author:xxx repo:apache/hugegraph repo:apache/hugegraph-doc created:>2023-06-01 updated:<2023-12-25
- 有效合并行数
- Issue 提交数
type:issue author:xxx repo:apache/hugegraph repo:apache/hugegraph-doc created:>2023-06-01 updated:<2023-12-25
- Issue 修复数
- 在 Issue 提交数的基础上选取状态为 closed 的 Issues
- Issue 参与数
type:issue involves:xxx repo:apache/hugegraph repo:apache/hugegraph-doc created:>2023-06-01 updated:<2023-12-25
- 评论 Issue 数
type:issue commenter:xxx repo:apache/hugegraph repo:apache/hugegraph-doc created:>2023-06-01 updated:<2023-12-25
- 评论 PR 数
type:pr commenter:xxx repo:apache/hugegraph repo:apache/hugegraph-doc created:>2023-06-01 updated:<2023-12-25
Mailing Lists 的参与则可使用 https://lists.apache.org/list?dev@hugegraph.apache.org:lte=10M:xxx 查询。
发起社区邮件投票 (VOTE)
如果讨论邮件在规定时间内没有收到分歧信息,投票发起者需要在 private@hugegraph.apache.org 发起对 Committer 的选举投票。
下面是对应的邮件模板:
To: private@hugegraph.apache.org
Subject: [VOTE] xxx as a HugeGraph Committer
Hi all:
Through the discussion of last week:
[ Discussion Mailing List Link ]
We have discussed and listed what xxx participated in the HugeGraph community.
I believe making him/her a Committer will enhance the work for HugeGraph.
So, I am happy to call VOTE to accept xxx as a HugeGraph Committer.
Voting will continue for at least 72 hours or until the required number of votes is reached.
Please vote accordingly:
[ ] +1 approve
[ ] +0 no opinion
[ ] -1 disapprove with the reason
Thanks!
然后 PMC 成员回复 +1 或 -1 的邮件回复表达意见,一般来说至少需要 ≥3 票 +1 才能结束投票。
宣布投票结果 (RESULT)
投票邮件结束后,投票发起者需要邮件里提醒投票结束。同时,投票发起者需要发起邮件宣布投票结果,发送至 private@hugegraph.apache.org,邮件模板可参考:
To: private@hugegraph.apache.org
Subject: [RESULTS][VOTE] xxx as a HugeGraph Committer
Hi all: The vote for "xxx" as a HugeGraph Committer has PASSED and closed now.
The result is as follows: X PMC +1 Votes:
- A (PMC ID)
- B
- C...
Vote thread:
put vote thread link here
Then I'm going to invite xxx to join us soon. Thanks for everyone's support!
向候选人发起邮件邀请 (INVITE)
宣布投票结果邮件发出后,投票发起人要给候选人发送邀请邮件。邀请邮件主送候选人,抄送 private@hugegraph.apache.org,被邀请的候选人必须通过指定的邮箱地址回复接受或者拒绝该邀请。
下面是对应可参考的邮件模板:
To: [ Candidate's Email ]
Cc: private@hugegraph.apache.org
Subject: Invitation to become HugeGraph committer: xxx
Hello xxx,
The HugeGraph Project Management Committee (PMC)
hereby offers you committer privileges to the project.
These privileges are offered on the understanding that you'll use them
reasonably and with common sense. We like to work on trust
rather than unnecessary constraints.
Being a committer enables you to more easily make
changes without needing to go through the patch
submission process.
Being a committer does not require you to
participate any more than you already do. It does
tend to make one even more committed. You will
probably find that you spend more time here.
Of course, you can decline and instead remain as a
contributor, participating as you do now.
A. This personal invitation is a chance for you to
accept or decline in private. Either way, please
let us know in reply to the private@hugegraph.apache.org
address only.
B. If you accept, the next step is to register an iCLA:
1. Details of the iCLA and the forms are found
through this link: https://www.apache.org/licenses/#clas
2. Instructions for its completion and return to
the Secretary of the ASF are found at
https://www.apache.org/licenses/#submitting
3. When you transmit the completed iCLA, request
to notify the Apache HugeGraph project and choose a
unique Apache ID. Look to see if your preferred
ID is already taken at
https://people.apache.org/committer-index.html
This will allow the Secretary to notify the PMC
when your iCLA has been recorded.
When recording of your iCLA is noted, you will
receive a follow-up message with the next steps for
establishing you as a committer.
With the expectation of your acceptance, welcome!
The Apache HugeGraph PMC
候选人接受邀请 (ACCEPT)
候选人应回复上述邮件 (选择 reply all),表明接受邀请,邮件模板可参考:
To: [ Sender's Email ]
Cc: private@hugegraph.apache.org
Subject: Re: Invitation to become HugeGraph committer: xxx
Hello Apache HugeGraph PMC,
I accept the invitation.
Thanks to the Apache HugeGraph Community for recognizing my work, I
will continue to actively participate in the work of the Apache
HugeGraph.
Next, I will follow the instructions to complete the next steps:
Signing and submitting iCLA and registering Apache ID.
xxx
当然,候选人也可以选择拒绝邀请,这里就没有模板了:)
一旦邀请被接受,候选人需要完成以下事项:
ICLA 签署流程
- 下载 ICLA
- 打开 PDF 并填写相关内容,均需要全英文填写,建议使用 PDF 工具编辑并署名
- Full name: 名字在前,姓氏在后
- Public name: 可以不填,默认和
Full name 相同 - 勾选 check this box only if you enter names with your family name first
- Postal Address: 英文地址,从小地方到大地方的顺序来写,需详细到门牌号
- Country: 所在国家英文
- E-mail: 邮箱地址,建议与上述邮件中使用的邮箱相同
- (optional) preferred Apache id(s): 选择一个 Apache committer 页面不存在的 SVN ID
- (optional) notify project:Apache HugeGraph
- 签名:务必使用 PDF 工具手写
- Date: 格式 xxxx-xx-xx
- 签署完之后将
icla.pdf 重命名为 姓名拼音-icla.pdf - 发送下述邮件,并附件引用
姓名拼音-icla.pdf
To: secretary@apache.org
Subject: ICLA Information
Hello everyone:
I have accepted the Apache HugeGraph PMC invitation to
become a HugeGraph committer, the attachment is my ICLA information.
(Optional) My GitHub account is https://github.com/xxx. Thanks!
xxx
更多注意事项可参考 https://github.com/apache/hugegraph/issues/1732
PMC 成员将等待 Apache secretary 团队确认 ICLA 备案,候选人和 PMC 成员将收到以下电子邮件:
Dear xxx,
This message acknowledges receipt of your ICLA, which has been filed in the Apache Software Foundation records.
Your account (with id xxx) has been requested for you and you should receive email with next steps
within the next few days (this process can take up to a week).
Please refer to https://www.apache.org/foundation/how-it-works.html#developers
for more information about roles at Apache.
设置 Apache 账号和开发环境 (CONFIG)
备案完成后,候选人将收到来自 root@apache.org 主题为 Welcome to the Apache Software Foundation 的邮件,此时需按照邮件中的步骤设置 Apache 账号和开发环境:
- 重置密码 https://id.apache.org/reset/enter
- 配置个人信息 https://whimsy.apache.org/roster/committer/xxx
- 关联 GitHub 账号 https://gitbox.apache.org/boxer
- 这一步需要配置 GitHub 双重身份验证 (2FA)
- 负责提名的 PMC 成员需通过 Roster 页面,将新的 Committer 添加到官方提交者列表中 (重要, 否则仓库权限不生效)
- 在这一步后,候选人即新的 Committer 才拥有对 GitHub HugeGraph 仓库的写权限
- (可选) 新的 Committer 可以使用 Apache 账号申请免费使用 Jetbrains 的全系列产品
发布公告邮件 (ANNOUNCE)
当候选人完成上述步骤后,候选人将正式成为 HugeGraph 的 Committer,此时需要向 dev@hugegraph.apache.org 发送公告邮件,邮件模板可参考:
To: dev@hugegraph.apache.org
Subject: [ANNOUNCE] New Committer: xxx
Hi everyone, The PMC for Apache HugeGraph has invited xxx to
become a Committer and we are pleased to announce that he/she has accepted.
xxx is being active in the HugeGraph community & dedicated to ... modules,
and we are glad to see his/her more interactions with the community in the future.
(Optional) His/Her GitHub account is https://github.com/xxx
Welcome xxx, and please enjoy your community journey~
Thanks!
The Apache HugeGraph PMC
更新治理信息入口
Apache HugeGraph 已于 2026 年 1 月毕业,治理信息不再通过 Incubator clutch 页面维护,而是通过 ASF committee/project 数据维护。
请优先检查:
若信息未自动同步,请按照 ASF 官方流程联系 Apache Community Development 或 ASF Infra 协助处理。
参考
- https://community.apache.org/newcommitter.html (ASF 官方文档)
- https://infra.apache.org/new-committers-guide.html
- https://www.apache.org/dev/pmc.html#newcommitter
- https://linkis.apache.org/zh-CN/community/how-to-vote-a-committer-pmc
- https://www.apache.org/licenses/contributor-agreements.html#submitting
- https://www.apache.org/licenses/cla-faq.html#printer
- https://linkis.apache.org/zh-CN/community/how-to-sign-apache-icla
- https://github.com/apache/hugegraph/issues/1732 (HugeGraph ICLA related issue)
10 - CHANGELOGS
10.2 - HugeGraph 1.5.0 Release Notes
WIP: This doc is under construction, please wait for the final version (BETA)
运行环境/版本说明
- 1.5.0版开始,
hugegraph 相关组件仅支持 Java 11 编译/运行环境
PS: 未来 HugeGraph 组件的版本会朝着 Java 11 -> Java 17 -> Java 21 演进
hugegraph
本版本新增了大量功能并进行了多项优化,尤其是针对自控分布式版本新后端 HStore (Raft + RocksDB) 的实现支持,欢迎试用反馈
API Changes
- BREAKING CHANGE: Support “parent & child”
EdgeLabel type #2662
Feature Changes
- Integrate
pd-grpc, pd-common, and pd-client #2498 - Integrate
store-grpc, store-common, and store-client #2476 - Integrate
store-rocksdb submodule #2513 - Integrate
pd-core into HugeGraph #2478 - Integrate
pd-service into HugeGraph #2528 - Integrate
pd-dist into HugeGraph and add core tests, client tests, and REST tests for PD #2532 - Integrate
server-hstore into HugeGraph #2534 - Integrate
store-core submodule #2548 - Integrate
store-node submodule #2537 - Support new backend Hstore #2560
- Support Docker deployment for PD and Store #2573
- Add a tool method
encode #2647 - Add basic
MiniCluster module for distributed system testing #2615 - Support disabling RocksDB auto-compaction via configuration #2586
Bug Fixes
- Switch RocksDB backend to memory when executing Gremlin examples #2518
- Avoid overriding backend config in Gremlin example scripts #2519
- Update resource references #2522
- Randomly generate default values #2568
- Update build artifact path for Docker deployment #2590
- Ensure thread safety for range attributes in PD #2641
- Correct server Docker copy source path #2637
- Fix JRaft Timer Metrics bug in Hstore #2602
- Enable JRaft MaxBodySize configuration #2633
Option Changes
- Mark old raft configs as deprecated #2661
- Enlarge bytes write limit and remove
big parameter when encoding/decoding string ID length #2622
Other Changes
- Add Swagger-UI LICENSE files #2495
- Translate CJK comments and punctuations to English across multiple modules #2536, #2623, #2645
- Introduce
install-dist module in root #2552 - Enable up-to-date checks for UI (CI) #2609
- Minor improvements for POM properties #2574
- Migrate HugeGraph Commons #2628
- Tar source and binary packages for HugeGraph with PD-Store #2594
- Refactor: Enhance cache invalidation of the partition → leader shard in
ClientCache #2588 - Refactor: Remove redundant properties in
LogMeta and PartitionMeta #2598
API Changes
- Support “parent & child”
EdgeLabel type #624
Feature Changes
- Support English interface & add a script/doc for it in Hubble #631
Bug Fixes
- Serialize source and target label for non-father EdgeLabel #628
- Encode/decode Chinese error after building Hubble package #627
- Configure IPv4 to fix timeout of
yarn install in Hubble #636 - Remove debugging output to speed up the frontend construction in Hubble #638
Other Changes
- Bump
express from 4.18.2 to 4.19.2 in Hubble Frontend #598 - Make IDEA support IssueNavigationLink #600
- Update
yarn.lock for Hubble #605 - Introduce
editorconfig-maven-plugin for verifying code style defined in .editorconfig #614 - Upgrade distribution version to 1.5.0 #639
Documentation Changes
- Clarify the contributing guidelines #604
- Enhance the README file for Hubble #613
- Update README style referring to the server’s style #615
hugegraph-ai
API Changes
- Added local LLM API and version API. #41, #44
- Implemented new API and optimized code structure. #63
- Support for graphspace and refactored all APIs. #67
Feature Changes
- Added openai’s apibase configuration and asynchronous methods in RAG web demo. #41, #58
- Support for multi reranker and enhanced UI. #73
- Node embedding, node classify, and graph classify with models based on DGL. #83
- Graph learning algorithm implementation (10+). #102
- Support for any openai-style API (standard). #95
Bug Fixes
- Fixed fusiform_similarity test in traverser for server 1.3.0. #37
- Avoid generating config twice and corrected e_cache type. #56, #117
- Fixed null value detection on vid attributes. #115
- Handled profile regenerate error. #98
Option Changes
- Added auth for fastapi and gradio. #70
- Support for multiple property types and importing graph from the entire doc. #84
Other Changes
- Reformatted documentation and updated README. #36, #81
- Introduced a black for code format in GitHub actions. #47
- Updated dependencies and environment preparations. #45, #65
- Enhanced user-friendly README. #82
hugegraph-computer
Feature Changes
- Support Single Source Shortest Path Algorithm #285
- Support Output Filter #303
Bug Fixes
- Fix: base-ref/head-ref Missed in Dependency-Review on Schedule Push #304
Option Changes
- Refactor(core): StringEncoding #300
Other Changes
- Improve(algorithm): Random Walk Vertex Inactive #301
- Upgrade Version to 1.3.0 #305
- Doc(readme): Clarify the Contributing Guidelines #306
- Doc(readme): Add Hyperlink to Apache 2.0 #308
- Migrate Project to Computer Directory #310
- Update for Release 1.5 #317
- Fix Path When Exporting Source Package #319
发布细节
Please check the release details/contributor in each repository:
10.3 - HugeGraph 1.3.0 Release Notes
运行环境/版本说明
- 优先在
hugegraph/toolchain/commons软件中使用 Java 11, 此次是这些模块最后一次主版本兼容 Java 8 了。(computer 则仅支持 Java11) - 另外相比 Java11, 使用 Java8 会失去一些安全性的保障,我们推荐生产或对外网暴露访问的环境使用 Java11 并开启 Auth 权限认证
1.3.0 是最后兼容 Java 8 的版本,在 1.5.0 开始就会全面使用 Java 11 (除client外).
PS: 未来 HugeGraph 组件的版本会朝着 Java 11 -> Java 17 -> Java 21 演进
hugegraph
在此次版本中我们修复了一些 SEC 相关的问题,如果是线上或者对外服务请升级到最新版本 + 开启权限认证
API Changes
- feat(api): optimize adjacent-edges query (#2408)
Feature Changes
- feat: support docker use the auth when starting (#2403)
- feat: added the OpenTelemetry trace support (#2477)
Bug Fix
- fix(core): task restore interrupt problem on restart server (#2401)
- fix(server): reinitialize the progress to set up graph auth friendly (#2411)
- fix(chore): remove zgc in dockerfile for ARM env (#2421)
- fix(server): make CacheManager constructor private to satisfy the singleton pattern (#2432)
- fix(server): unify the license headers (#2438)
- fix: format and clean code in dist and example modules (#2441)
- fix: format and clean code in core module (#2440)
- fix: format and clean code in modules (#2439)
- fix(server): clean up the code (#2456)
- fix(server): remove extra blank lines (#2459)
- fix(server): add tip for gremlin api NPE with an empty query (#2467)
- fix(server): fix the metric name when promthus collects hugegraph metric, see issue (#2462)
- fix(server):
serverStarted error when execute gremlin example (#2473) - fix(auth): enhance the URL check (#2422)
Option Changes
- refact(server): enhance the storage path in RocksDB & clean code (#2491)
Other Changes
- chore: add a license link (#2398)
- doc: enhance NOTICE info to keep it clear (#2409)
- chore(server): update swagger info for default server profile (#2423)
- fix(server): unify license header for protobuf file (#2448)
- chore: improve license header checker confs and pre-check header when validating (#2445)
- chore: unify to call SchemaLabel.getLabelId() (#2458)
- chore: refine the hg-style.xml specification (#2457)
- chore: Add a newline formatting configuration and a comment for warning (#2464)
- chore(server): clear context after req done (#2470)
API Changes
Feature Changes
- fix(loader): update shade plugin for spark loader (#566)
- fix(hubble): yarn install timeout in arm64 (#583)
- fix(loader): support file name with prefix for hdfs source (#571)
- feat(hubble): warp the exception info in HugeClientUtil (#589)
Bug Fix
- fix: concurrency issue causing file overwrite due to identical filenames (#572)
Option Changes
- feat(client): support user defined OKHTTPClient configs (#590)
Other Changes
- doc: update copyright date(year) in NOTICE (#567)
- chore(deps): bump ip from 1.1.5 to 1.1.9 in /hugegraph-hubble/hubble-fe (#580)
- refactor(hubble): enhance maven front plugin (#568)
- chore(deps): bump es5-ext from 0.10.53 to 0.10.63 in /hugegraph-hubble/hubble-fe (#582)
- chore(hubble): Enhance code style in hubble (#592)
- chore: upgrade version to 1.3.0 (#596)
- chore(ci): update profile commit id for 1.3 (#597)
hugegraph-commons
Feature Changes
- feat: support user defined RestClientConfig/HTTPClient params (#140)
Bug Fix
Other Changes
- chore: disable clean flatten for deploy (#141)
hugegraph-ai
这是 hugegraph-ai 的第一个发布版本,包含了多种特性,其中包括初始化的 Python 客户端、通过 LLM 构建知识图谱的能力,
以及基于 HugeGraph 的 RAG(Retrieval-Augmented Generation)集成。此外,该版本还在 python 客户端方面增加了重要的功能,
如变量 API、认证(auth)、度量(metric)、遍历器(traverser)和任务 API,以及使用 Gradio 创建交互式和可视化的演示。
除了这些新功能外,该版本还解决了多个错误和问题,确保了更加稳定和无误的用户体验。维护任务,如依赖更新、项目结构改进以及基本持续集成(CI)的添加,
进一步增强了项目的健壮性和开发工作流程。
这个版本的发布凝聚了 HugeGraph 社区的协作努力,感谢各位贡献者的付出。
Feature Changes
- feat: initialize hugegraph python client (#5)
- feat(llm): knowledge graph construction by llm (#7)
- feat: initialize rag based on HugeGraph (#20)
- feat(client): add variables api and test (#24)
- feat: add llm wenxinyiyan & config util & spo_triple_extract (#27)
- feat: add auth&metric&traverser&task api and ut (#28)
- feat: refactor construct knowledge graph task (#29)
- feat: Introduce gradio for creating interactive and visual demo (#30)
Bug Fix
- fix: invalid GitHub label (#3)
- fix: import error (#13)
- fix: function getEdgeByPage(): the generated query url does not include the parameter page (#15)
- fix: issue template (#23)
- fix: base-ref/head-ref missed in dependency-check-ci on branch push (#25)
Other Changes
- chore: add asf.yaml and ISSUE_TEMPLATE (#1)
- Bump urllib3 from 2.0.3 to 2.0.7 in /hugegraph-python (#8)
- chore: create .gitignore file for py (#9)
- refact: improve project structure & add some basic CI (#17)
- chore: Update LICENSE and NOTICE (#31)
- chore: add release scripts (#33)
- chore: change file chmod 755 (#34)
发布细节
Please check the release details/contributor in each repository:
10.4 - HugeGraph 1.2.0 Release Notes
Java version statement
In the future, we will gradually upgrade the java version, Java 11 -> Java 17 -> Java 21.
- Consider using Java 11 in hugegraph/hugegraph-toolchain/hugegraph-commons, also compatible with Java 8 now.
- hugegraph-computer required to use Java 11, not compatible with Java 8 now!
v1.2.0 是倒数第二个兼容 Java8 的大版本, 到 1.5.0 PD/Store 正式合入 master
后标志着 Java8 兼容的正式终结 (除 Client 外所有组件都将以 Java 11 作为基准,然后逐步迈向 Java17/21).
hugegraph
API Changes
- feat(api&core): in oltp apis, add statistics info and support full info about vertices and edges (#2262)
- feat(api): support embedded arthas agent in hugegraph-server (#2278,#2337)
- feat(api): support metric API Prometheus format & add statistic metric api (#2286)
- feat(api-core): support label & property filtering for both edge and vertex & support kout dfs mode (#2295)
- feat(api): support recording slow query log (#2327)
Feature Changes
- feat: support task auto manage by server role state machine (#2130)
- feat: support parallel compress snapshot (#2136)
- feat: use an enhanced CypherAPI to refactor it (#2143)
- feat(perf): support JMH benchmark in HG-test module (#2238)
- feat: optimising adjacency edge queries (#2242)
- Feat: IP white list (#2299)
- feat(cassandra): adapt cassandra from 3.11.12 to 4.0.10 (#2300)
- feat: support Cassandra with docker-compose in server (#2307)
- feat(core): support batch+parallel edges traverse (#2312)
- feat: adapt Dockerfile for new project structur (#2344)
- feat(server):swagger support auth for standardAuth mode by (#2360)
- feat(core): add IntMapByDynamicHash V1 implement (#2377)
Bug Fix
- fix: transfer add_peer/remove_peer command to leader (#2112)
- fix query dirty edges of a vertex with cache (#2166)
- fix exception of vertex-drop with index (#2181)
- fix: remove dup ‘From’ in filterExpiredResultFromFromBackend (#2207)
- fix: jdbc ssl mode parameter redundant (#2224)
- fix: error when start gremlin-console with sample script (#2231)
- fix(core): support order by id (#2233)
- fix: update ssl_mode value (#2235)
- fix: optimizing ClassNotFoundException error message for MYSQL (#2246)
- fix: asf invalid notification scheme ‘discussions_status’ (#2247)
- fix: asf invalid notification scheme ‘discussions_comment’ (#2250)
- fix: incorrect use of ‘NO_LIMIT’ variable (#2253)
- fix(core): close flat mapper iterator after usage (#2281)
- fix(dist): avoid var PRELOAD cover environmnet vars (#2302)
- fix: base-ref/head-ref missed in dependency-review on master (#2308)
- fix(core): handle schema Cache expandCapacity concurrent problem (#2332)
- fix: in wait-storage.sh, always wait for storage with default rocksdb (#2333)
- fix(api): refactor/downgrade record logic for slow log (#2347)
- fix(api): clean some code for release (#2348)
- fix: remove redirect-to-master from synchronous Gremlin API (#2356)
- fix HBase PrefixFilter bug (#2364)
- chore: fix curl failed to request https urls (#2378)
- fix(api): correct the vertex id in the edge-existence api (#2380)
- fix: github action build docker image failed during the release 1.2 process (#2386)
- fix: TinkerPop unit test lack some lables (#2387)
Option Changes
- feat(dist): support pre-load test graph data in docker container (#2241)
Other Changes
- refact: use standard UTF-8 charset & enhance CI configs (#2095)
- move validate release to hugegraph-doc (#2109)
- refact: use a slim way to build docker image on latest code & support zgc (#2118)
- chore: remove stage-repo in pom due to release done & update mail rule (#2128)
- doc: update issue template & README file (#2131)
- chore: cmn algorithm optimization (#2134)
- add github token for license check comment (#2139)
- chore: disable PR up-to-date in branch (#2150)
- refact(core): remove lock of globalMasterInfo to optimize perf (#2151)
- chore: async remove left index shouldn’t effect query (#2199)
- refact(rocksdb): clean & reformat some code (#2200)
- refact(core): optimized batch removal of remaining indices consumed by a single consumer (#2203)
- add com.janeluo.ikkanalyzer dependency to core model (#2206)
- refact(core): early stop unnecessary loops in edge cache (#2211)
- doc: update README & add QR code (#2218)
- chore: update .asf.yaml for mail rule (#2221)
- chore: improve the UI & content in README (#2227)
- chore: add pr template (#2234)
- doc: modify ASF and remove meaningless CLA (#2237)
- chore(dist): replace wget to curl to download swagger-ui (#2277)
- Update StandardStateMachineCallback.java (#2290)
- doc: update README about start server with example graph (#2315)
- README.md tiny improve (#2320)
- doc: README.md tiny improve (#2331)
- refact: adjust project structure for merge PD & Store[Breaking Change] (#2338)
- chore: disable raft test in normal PR due to timeout problem (#2349)
- chore(ci): add stage profile settings (#2361)
- refact(api): update common 1.2 & fix jersey client code problem (#2365)
- chore: move server info into GlobalMasterInfo (#2370)
- chore: reset hugegraph version to 1.2.0 (#2382)
hugegraph-computer
Feature Changes
- feat: implement fast-failover for MessageRecvManager and DataClientManager (#243)
- feat: implement parallel send data in load graph step (#248)
- feat(k8s): init operator project & add webhook (#259, #263)
- feat(core): support load vertex/edge snapshot (#269)
- feat(k8s): Add MinIO as internal(default) storage (#272)
- feat(algorithm): support random walk in computer (#274, #280)
- feat: use ‘foreground’ delete policy to cancel k8s job (#290)
Bug Fix
- fix: superstep not take effect (#237)
- fix(k8s): modify inconsistent apiGroups (#270)
- fix(algorithm): record loop is not copied (#276)
- refact(core): adaptor for common 1.2 & fix a string of possible CI problem (#286)
- fix: remove okhttp1 due to conflicts risk (#294)
- fix(core): io.grpc.grpc-core dependency conflic (#296)
Option Changes
- feat(core): isolate namespace for different input data source (#252)
- refact(core): support auth config for computer task (#265)
Other Changes
- remove apache stage repo & update notification rule (#232)
- chore: fix empty license file (#233)
- chore: enhance mailbox settings & enable require ci (#235)
- fix: typo errors in start-computer.sh (#238)
- [Feature-241] Add PULL_REQUEST_TEMPLATE (#242, #257)
- chore: change etcd url only for ci (#245)
- doc: update readme & add QR code (#249)
- doc(k8s): add building note for missing classes (#254)
- chore: reduce mail to dev list (#255)
- add: dependency-review (#266)
- chore: correct incorrect comment (#268)
- refactor(api): ListValue.getFirst() replaces ListValue.get(0) (#282)
- Improve: Passing workerId to WorkerStat & Skip wait worker close if master executes failed (#292)
- chore: add check dependencies (#293)
- chore(license): update license for 1.2.0 (#299)
API Changes
- feat(client): support edgeExistence api (#544)
- refact(client): update tests for new OLTP traverser APIs (#550)
Feature Changes
- feat(spark): support spark-sink connector for loader (#497)
- feat(loader): support kafka as datasource (#506)
- feat(client): support go client for hugegraph (#514)
- feat(loader): support docker for loader (#530)
- feat: update common version and remove jersey code (#538)
Bug Fix
- fix: convert numbers to strings (#465)
- fix: hugegraph-spark-loader shell string length limit (#469)
- fix: spark loader meet Exception: Class is not registered (#470)
- fix: spark loader Task not serializable (#471)
- fix: spark with loader has dependency conflicts (#480)
- fix: spark-loader example schema and struct mismatch (#504)
- fix(loader): error log (#499)
- fix: checkstyle && add suppressions.xml (#500)
- fix(loader): resolve error in loader script (#510)
- fix: base-ref/head-ref missed in dependency-check-ci on branch push (#516, #551)
- fix yarn network connection on linux/arm64 arch (#519)
- fix(hubble): drop-down box could not display all options (#535)
- fix(hubble): build with node and yarn (#543)
- fix(loader): loader options (#548)
- fix(hubble): parent override children dep version (#549)
- fix: exclude okhttp1 which has different groupID with okhttp3 (#555)
- fix: github action build docker image failed (#556, #557)
- fix: build error with npm not exist & tiny improve (#558)
Option Changes
- set default data when create graph (#447)
Other Changes
- chore: remove apache stage repo & update mail rule (#433, #474, #479)
- refact: clean extra store file in all modules (#434)
- chore: use fixed node.js version 16 to avoid ci problem (#437, #441)
- chore(hubble): use latest code in Dockerfile (#440)
- chore: remove maven plugin for docker build (#443)
- chore: improve spark parallel (#450)
- doc: fix build status badge link (#455)
- chore: keep hadoop-hdfs-client and hadoop-common version consistent (#457)
- doc: add basic contact info & QR code in README (#462, #475)
- chore: disable PR up-to-date in branch (#473)
- chore: auto add pr auto label by path (#466, #528)
- chore: unify the dependencies versions of the entire project (#478)
- chore(deps): bump async, semver, word-wrap, browserify-sign in hubble-fe (#484, #491, #494, #529)
- chore: add pr template (#498)
- doc(hubble): add docker-compose to start with server (#522)
- chore(ci): add stage profile settings (#536)
- chore(client): increase the api num as the latest server commit + 10 (#546)
- chore(spark): install hugegraph from source (#552)
- doc: adjust docker related desc in readme (#559)
- chore(license): update license for 1.2 (#560, #561)
hugegraph-commons
Feature Changes
- feat(common): replace jersey dependencies with OkHttp (Breaking Change) (#133)
Bug Fix
- fix(common): handle spring-boot2/jersey dependency conflicts (#131)
- fix: Assert.assertThrows() should check result of exceptionConsumer (#135)
- fix(common): json param convert (#137)
Other Changes
- refact(common): add more construction methods for convenient (#132)
- add: dependency-review (#134)
- refact(common): rename jsonutil to avoid conflicts with server (#136)
- doc: update README for release (#138)
- update licence (#139)
Release Details
Please check the release details in each repository:
10.5 - HugeGraph 1.0.0 Release Notes
OLTP API & Client 更新
API/Client 接口更新
- 支持热更新
trace开关的 /exception/trace API。 - 支持 Cypher 图查询语言 API。
- 支持通过 Swagger UI 接口来查看提供的 API 列表。
- 将各算法中 ’limit’ 参数的类型由 long 调整为 int。
- 支持在 Client 端跳过 Server 对 HBase 写入数据 (Beta)。
Core & Server
功能更新
- 支持 Java 11 版本。
- 支持 2 个新的 OLTP 算法:adamic-adar 和 resource-allocation。
- 支持 HBase 后端使用哈希 RowKey,并且允许预初始化 HBase 表。
- 支持 Cypher 图查询语言。
- 支持集群 Master 角色的自动管理与故障转移。
- 支持 16 个 OLAP 算法,包括:LPA, Louvain, PageRank, BetweennessCentrality, RingsDetect 等。
- 根据 Apache 基金会对项目的发版要求进行适配,包括 License 合规性、发版流程、代码风格等,支持 Apache 版本发布。
Bug 修复
- 修复无法根据多个 Label 和属性来查询边数据。
- 增加对环路检测算法的最大深度限制。
- 修复 tree() 语句返回结果异常问题。
- 修复批量更新边传入 Id 时的检查异常问题。
- 解决非预期的 Task 状态问题。
- 解决在更新顶点时未清除边缓存的问题。
- 修复 MySQL 后端执行 g.V() 时的错误。
- 修复因为 server-info 无法超时导致的问题。
- 导出了 ConditionP 类型用于 Gremlin 中用户使用。
- 修复 within + Text.contains 查询问题。
- 修复 addIndexLabel/removeIndexLabel 接口的竞争条件问题。
- 限制仅 Admin 允许输出图实例。
- 修复 Profile API 的检查问题。
- 修复在 count().is(0) 查询中 Empty Graph 的问题。
- 修复在异常时无法关闭服务的问题。
- 修复在 Apple M1 系统上的 JNA 报错 UnsatisfiedLinkError 的问题。
- 修复启动 RpcServer 时报 NPE 的问题。
- 修复 ACTION_CLEARED 参数数量的问题。
- 修复 RpcServer 服务启动问题。
- 修复用户传入参数可能得数字转换隐患问题。
- 移除了 Word 分词器依赖。
- 修复 Cassandra 与 MySQL 后端在异常时未优雅关闭迭代器的问题。
配置项更新
- 将配置项
raft.endpoint 从 Graph 作用域移动到 Server 作用域中。
其它修改
- refact(core): enhance schema job module.
- refact(raft): improve raft module & test & install snapshot and add peer.
- refact(core): remove early cycle detection & limit max depth.
- cache: fix assert node.next==empty.
- fix apache license conflicts: jnr-posix and jboss-logging.
- chore: add logo in README & remove outdated log4j version.
- refact(core): improve CachedGraphTransaction perf.
- chore: update CI config & support ci robot & add codeQL SEC-check & graph option.
- refact: ignore security check api & fix some bugs & clean code.
- doc: enhance CONTRIBUTING.md & README.md.
- refact: add checkstyle plugin & clean/format the code.
- refact(core): improve decode string empty bytes & avoid array-construct columns in BackendEntry.
- refact(cassandra): translate ipv4 to ipv6 metrics & update cassandra dependency version.
- chore: use .asf.yaml for apache workflow & replace APPLICATION_JSON with TEXT_PLAIN.
- feat: add system schema store.
- refact(rocksdb): update rocksdb version to 6.22 & improve rocksdb code.
- refact: update mysql scope to test & clean protobuf style/configs.
- chore: upgrade Dockerfile server to 0.12.0 & add editorconfig & improve ci.
- chore: upgrade grpc version.
- feat: support updateIfPresent/updateIfAbsent operation.
- chore: modify abnormal logs & upgrade netty-all to 4.1.44.
- refact: upgrade dependencies & adopt new analyzer & clean code.
- chore: improve .gitignore & update ci configs & add RAT/flatten plugin.
- chore(license): add dependencies-check ci & 3rd-party dependency licenses.
- refact: Shutdown log when shutdown process & fix tx leak & enhance the file path.
- refact: rename package to apache & dependency in all modules (Breaking Change).
- chore: add license checker & update antrun plugin & fix building problem in windows.
- feat: support one-step script for apache release v1.0.0 release.
Computer (OLAP)
Algorithm Changes
- 支持 PageRank 算法。
- 支持 WCC 算法。
- 支持 degree centrality 算法。
- 支持 triangle count 算法。
- 支持 rings detection 算法。
- 支持 LPA 算法。
- 支持 k-core 算法。
- 支持 closeness centrality 算法。
- 支持 betweenness centrality 算法。
- 支持 cluster coefficient 算法。
- feat: init module computer-core & computer-algorithm & etcd dependency.
- feat: add Id as base type of vertex id.
- feat: init Vertex/Edge/Properties & JsonStructGraphOutput.
- feat: load data from hugegraph server.
- feat: init basic combiner, Bsp4Worker, Bsp4Master.
- feat: init sort & transport interface & basic FileInput/Output Stream.
- feat: init computation & ComputerOutput/Driver interface.
- feat: init Partitioner and HashPartitioner
- feat: init Master/WorkerService module.
- feat: init Heap/LoserTree sorting.
- feat: init rpc module.
- feat: init transport server, client, en/decode, flowControl, heartbeat.
- feat: init DataDirManager & PointerCombiner.
- feat: init aggregator module & add copy() and assign() methods to Value class.
- feat: add startAsync and finishAsync on client side, add onStarted and onFinished on server side.
- feat: init store/sort module.
- feat: link managers in worker sending end.
- feat: implement data receiver of worker.
- feat: implement StreamGraphInput and EntryInput.
- feat: add Sender and Receiver to process compute message.
- feat: add seqfile fromat.
- feat: add ComputeManager.
- feat: add computer-k8s and computer-k8s-operator.
- feat: add startup and make docker image code.
- feat: sort different type of message use different combiner.
- feat: add HDFS output format.
- feat: mount config-map and secret to container.
- feat: support java11.
- feat: support partition concurrent compute.
- refact: abstract computer-api from computer-core.
- refact: optimize data receiving.
- fix: release file descriptor after input and compute.
- doc: add operator deploy readme.
- feat: prepare for Apache release.
- 支持 Loader 使用 SQL 格式来选取从关系数据库导入哪些数据。
- 支持 Loader 从 Spark 导入数据(包括 JDBC 方式)。
- 支持 Loader 增加 Flink-CDC 模式。
- 解决 Loader 导入 ORC 格式数据时,报错 NPE。
- 解决 Loader 在 Spark/Flink 模式时未缓存 Schema 的问题。
- 解决 Loader 的 Json 反序列化问题。
- 解决 Loader 的 Jackson 版本冲突与依赖问题。
- 支持 Hubble 高级算法接口的 UI 界面。
- 支持 Hubble 中 Gremlin 语句的高亮格式显示。
- 支持 Hubble 使用 Docker 镜像部署。
- 支持 输出构建日志。
- 解决 Hubble 的端口输入框问题。
- 支持 Apache 项目发版的适配。
Commons (common,rpc)
- 支持 assert-throws 方法返回 Future。
- 增加 Cnm 与 Anm 方法到 CollectionUtil 中。
- 支持 用户自定义的 content-type。
- 支持 Apache 项目发版的适配。
Release Details
更加详细的版本变更信息,可以查看各个子仓库的链接:
11 -
Contributor Agreement
Individual Contributor exclusive License Agreement
(including the TRADITIONAL PATENT LICENSE OPTION)
Thank you for your interest in contributing to HugeGraph’s all projects (“We” or “Us”).
The purpose of this contributor agreement (“Agreement”) is to clarify and document the rights granted by contributors to Us. To make this document effective, please follow the comment of GitHub CLA-Assistant when submitting a new pull request.
How to use this Contributor Agreement
If You are an employee and have created the Contribution as part of your employment, You need to have Your employer approve this Agreement or sign the Entity version of this document. If You do not own the Copyright in the entire work of authorship, any other author of the Contribution should also sign this – in any event, please contact Us at hugegraph@googlegroups.com
1. Definitions
“You” means the individual Copyright owner who Submits a Contribution to Us.
“Contribution” means any original work of authorship, including any original modifications or additions to an existing work of authorship, Submitted by You to Us, in which You own the Copyright.
“Copyright” means all rights protecting works of authorship, including copyright, moral and neighboring rights, as appropriate, for the full term of their existence.
“Material” means the software or documentation made available by Us to third parties. When this Agreement covers more than one software project, the Material means the software or documentation to which the Contribution was Submitted. After You Submit the Contribution, it may be included in the Material.
“Submit” means any act by which a Contribution is transferred to Us by You by means of tangible or intangible media, including but not limited to electronic mailing lists, source code control systems, and issue tracking systems that are managed by, or on behalf of, Us, but excluding any transfer that is conspicuously marked or otherwise designated in writing by You as “Not a Contribution.”
“Documentation” means any non-software portion of a Contribution.
2. License grant
2.1 Copyright license to Us
Subject to the terms and conditions of this Agreement, You hereby grant to Us a worldwide, royalty-free, Exclusive, perpetual and irrevocable (except as stated in Section 8.2) license, with the right to transfer an unlimited number of non-exclusive licenses or to grant sublicenses to third parties, under the Copyright covering the Contribution to use the Contribution by all means, including, but not limited to:
- publish the Contribution,
- modify the Contribution,
- prepare derivative works based upon or containing the Contribution and/or to combine the Contribution with other Materials,
- reproduce the Contribution in original or modified form,
- distribute, to make the Contribution available to the public, display and publicly perform the Contribution in original or modified form.
2.2 Moral rights
Moral Rights remain unaffected to the extent they are recognized and not waivable by applicable law. Notwithstanding, You may add your name to the attribution mechanism customary used in the Materials you Contribute to, such as the header of the source code files of Your Contribution, and We will respect this attribution when using Your Contribution.
2.3 Copyright license back to You
Upon such grant of rights to Us, We immediately grant to You a worldwide, royalty-free, non-exclusive, perpetual and irrevocable license, with the right to transfer an unlimited number of non-exclusive licenses or to grant sublicenses to third parties, under the Copyright covering the Contribution to use the Contribution by all means, including, but not limited to:
- publish the Contribution,
- modify the Contribution,
- prepare derivative works based upon or containing the Contribution and/or to combine the Contribution with other Materials,
- reproduce the Contribution in original or modified form,
- distribute, to make the Contribution available to the public, display and publicly perform the Contribution in original or modified form.
This license back is limited to the Contribution and does not provide any rights to the Material.
3. Patents
3.1 Patent license
Subject to the terms and conditions of this Agreement You hereby grant to Us and to recipients of Materials distributed by Us a worldwide, royalty-free, non-exclusive, perpetual and irrevocable (except as stated in Section 3.2) patent license, with the right to transfer an unlimited number of non-exclusive licenses or to grant sublicenses to third parties, to make, have made, use, sell, offer for sale, import and otherwise transfer the Contribution and the Contribution in combination with any Material (and portions of such combination). This license applies to all patents owned or controlled by You, whether already acquired or hereafter acquired, that would be infringed by making, having made, using, selling, offering for sale, importing or otherwise transferring of Your Contribution(s) alone or by combination of Your Contribution(s) with any Material.
3.2 Revocation of patent license
You reserve the right to revoke the patent license stated in section 3.1 if We make any infringement claim that is targeted at your Contribution and not asserted for a Defensive Purpose. An assertion of claims of the Patents shall be considered for a “Defensive Purpose” if the claims are asserted against an entity that has filed, maintained, threatened, or voluntarily participated in a patent infringement lawsuit against Us or any of Our licensees.
4. License obligations by Us
We agree to (sub)license the Contribution or any Materials containing, based on or derived from your Contribution under the terms of any licenses the Free Software Foundation classifies as Free Software License and which are approved by the Open Source Initiative as Open Source licenses.
More specifically and in strict accordance with the above paragraph, we agree to (sub)license the Contribution or any Materials containing, based on or derived from the Contribution only in accordance with our licensing policy available at: http://www.apache.org/licenses/LICENSE-2.0.
In addition, We may use the following licenses for Documentation in the Contribution: GFDL-1.2 (including any right to adopt any future version of a license).
We agree to license patents owned or controlled by You only to the extent necessary to (sub)license Your Contribution(s) and the combination of Your Contribution(s) with the Material under the terms of any licenses the Free Software Foundation classifies as Free Software licenses and which are approved by the Open Source Initiative as Open Source licenses..
5. Disclaimer
THE CONTRIBUTION IS PROVIDED “AS IS”. MORE PARTICULARLY, ALL EXPRESS OR IMPLIED WARRANTIES INCLUDING, WITHOUT LIMITATION, ANY IMPLIED WARRANTY OF SATISFACTORY QUALITY, FITNESS FOR A PARTICULAR PURPOSE AND NON-INFRINGEMENT ARE EXPRESSLY DISCLAIMED BY YOU TO US AND BY US TO YOU. TO THE EXTENT THAT ANY SUCH WARRANTIES CANNOT BE DISCLAIMED, SUCH WARRANTY IS LIMITED IN DURATION AND EXTENT TO THE MINIMUM PERIOD AND EXTENT PERMITTED BY LAW.
6. Consequential damage waiver
TO THE MAXIMUM EXTENT PERMITTED BY APPLICABLE LAW, IN NO EVENT WILL YOU OR WE BE LIABLE FOR ANY LOSS OF PROFITS, LOSS OF ANTICIPATED SAVINGS, LOSS OF DATA, INDIRECT, SPECIAL, INCIDENTAL, CONSEQUENTIAL AND EXEMPLARY DAMAGES ARISING OUT OF THIS AGREEMENT REGARDLESS OF THE LEGAL OR EQUITABLE THEORY (CONTRACT, TORT OR OTHERWISE) UPON WHICH THE CLAIM IS BASED.
7. Approximation of disclaimer and damage waiver
IF THE DISCLAIMER AND DAMAGE WAIVER MENTIONED IN SECTION 5. AND SECTION 6. CANNOT BE GIVEN LEGAL EFFECT UNDER APPLICABLE LOCAL LAW, REVIEWING COURTS SHALL APPLY LOCAL LAW THAT MOST CLOSELY APPROXIMATES AN ABSOLUTE WAIVER OF ALL CIVIL OR CONTRACTUAL LIABILITY IN CONNECTION WITH THE CONTRIBUTION.
8. Term
8.1 This Agreement shall come into effect upon Your acceptance of the terms and conditions.
8.2 This Agreement shall apply for the term of the copyright and patents licensed here. However, You shall have the right to terminate the Agreement if We do not fulfill the obligations as set forth in Section 4. Such termination must be made in writing.
8.3 In the event of a termination of this Agreement Sections 5, 6, 7, 8 and 9 shall survive such termination and shall remain in full force thereafter. For the avoidance of doubt, Free and Open Source Software (sub)licenses that have already been granted for Contributions at the date of the termination shall remain in full force after the termination of this Agreement.
9 Miscellaneous
9.1 This Agreement and all disputes, claims, actions, suits or other proceedings arising out of this agreement or relating in any way to it shall be governed by the laws of China excluding its private international law provisions.
9.2 This Agreement sets out the entire agreement between You and Us for Your Contributions to Us and overrides all other agreements or understandings.
9.3 In case of Your death, this agreement shall continue with Your heirs. In case of more than one heir, all heirs must exercise their rights through a commonly authorized person.
9.4 If any provision of this Agreement is found void and unenforceable, such provision will be replaced to the extent possible with a provision that comes closest to the meaning of the original provision and that is enforceable. The terms and conditions set forth in this Agreement shall apply notwithstanding any failure of essential purpose of this Agreement or any limited remedy to the maximum extent possible under law.
9.5 You agree to notify Us of any facts or circumstances of which you become aware that would make this Agreement inaccurate in any respect.
12 -
HugeGraph Docs
Quickstart
Config
API
Guides
Query Language
ChangeLogs