Documentation
Apache HugeGraph Documentation
Apache HugeGraph is a complete graph database ecosystem, supporting OLTP real-time queries, OLAP offline analysis, and AI intelligent applications.
Quick Navigation by Scenario
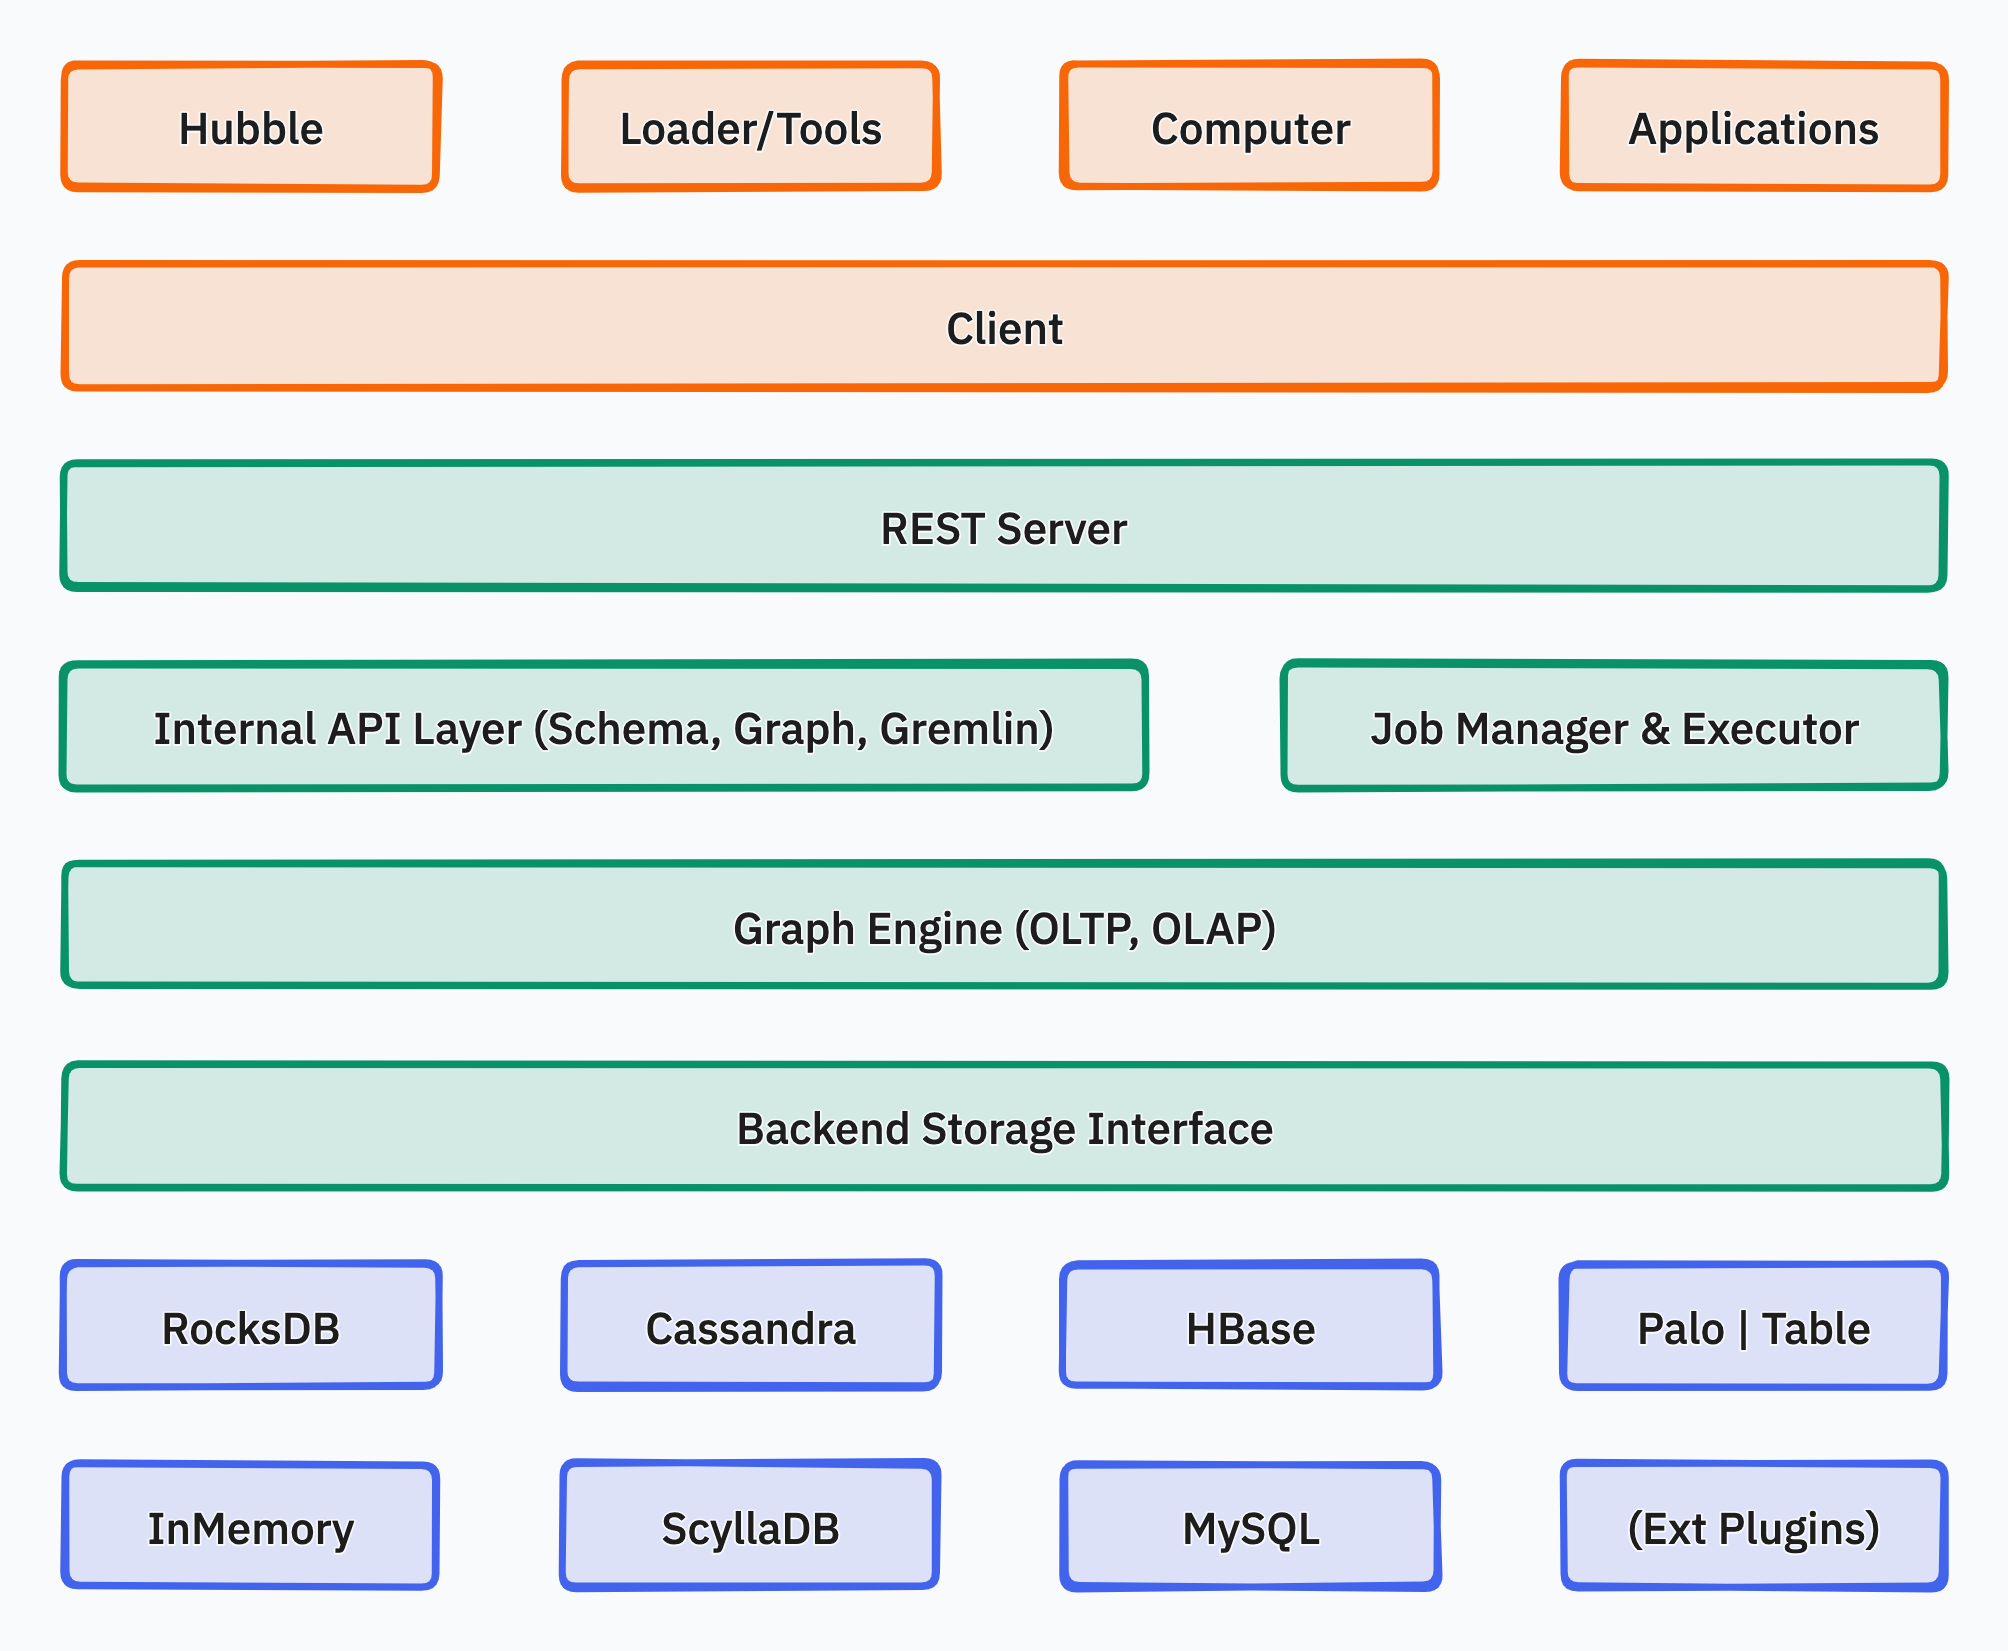
Ecosystem Overview
┌─────────────────────────────────────────────────────────────────┐
│                  Apache HugeGraph Ecosystem                      │
├─────────────────────────────────────────────────────────────────┤
│  ┌─────────────┐  ┌─────────────┐  ┌─────────────────────────┐  │
│  │ HugeGraph   │  │ HugeGraph   │  │ HugeGraph-AI            │  │
│  │ Server      │  │ Computer    │  │ (GraphRAG/ML/Python)    │  │
│  │ (OLTP)      │  │ (OLAP)      │  │                         │  │
│  └─────────────┘  └─────────────┘  └─────────────────────────┘  │
│         │               │                    │                   │
│  ┌──────┴───────────────┴────────────────────┴──────────────┐   │
│  │              HugeGraph Toolchain                          │   │
│  │  Hubble (UI) | Loader | Client (Java/Go/Python) | Tools   │   │
│  └───────────────────────────────────────────────────────────┘   │
└─────────────────────────────────────────────────────────────────┘
Core Components
- HugeGraph Server - Core graph database with REST API + Gremlin + Cypher support
- HugeGraph Toolchain - Client SDKs, data import, visualization, and operational tools
- HugeGraph Computer - Distributed graph computing (Vermeer high-performance in-memory / Computer massive external storage)
- HugeGraph-AI - GraphRAG, knowledge graph construction, 20+ graph ML algorithms
Deployment Modes
| Mode | Use Case | Data Scale |
|---|
| Standalone | High-speed stable, compute-storage integrated | < 4TB |
| Distributed | Massive storage, compute-storage separated | < 1000TB |
| Docker | Quick start | Any |
📖 Detailed Introduction
1 - Introduction with HugeGraph
What is Apache HugeGraph?
Apache HugeGraph is an easy-to-use, efficient, and general-purpose open-source full-stack graph system (GitHub), covering three major areas: Graph Database (OLTP real-time queries), Graph Computing (OLAP large-scale analysis), and Graph AI (GraphRAG / Graph Machine Learning).
HugeGraph supports the rapid storage and querying of tens of billions of vertices and edges, possessing excellent OLTP performance. Its graph engine is fully compliant with the Apache TinkerPop 3 framework and supports both Gremlin and Cypher (OpenCypher standard) query languages.
Typical Application Scenarios: Deep relationship exploration, association analysis, path search, feature extraction, community detection, knowledge graphs, etc.
Applicable Fields: Network security, telecom anti-fraud, financial risk control, personalized recommendations, social networks, intelligent Q&A, etc.
Ecosystem Overview
┌──────────────────────────────────────────────────────────────┐
│         Apache HugeGraph - Full-Stack Graph System           │
├──────────────────┬────────────────────┬──────────────────────┤
│  Graph DB (OLTP) │    Graph Compute   │       Graph AI       │
│  HugeGraph       │  Vermeer (Memory)  │    HugeGraph-AI      │
│  Server          │  Computer (Dist.)  │  GraphRAG/GNN/Py     │
├──────────────────┴────────────────────┴──────────────────────┤
│                    HugeGraph Toolchain                       │
│  Hubble | Loader | Client(Java/Go/Py) | Spark | Tools        │
└──────────────────────────────────────────────────────────────┘
Core Components
🗄️ HugeGraph Server — Graph Engine (OLTP)
The core module of the HugeGraph project, providing high-performance graph data storage and real-time query capabilities:
- Core Engine: Supports Property Graph modeling, including complete Schema management for VertexLabel, EdgeLabel, PropertyKey, and IndexLabel.
- Dual Query Languages: Fully compatible with Gremlin (TinkerPop 3) and Cypher (OpenCypher).
- REST API: Built-in REST Server, providing RESTful graph operation interfaces.
- Multi-type Indexes: Exact query, range query, and complex condition combination queries.
- Pluggable Storage Backends: For 1.7.0 and later, supports
RocksDB (standalone default), HStore (distributed), HBase, and Memory; for 1.5.x or earlier, supports MySQL / PostgreSQL / Cassandra, etc.
Submodules:
Core: Graph engine implementation, connecting downwards to Backend and upwards to API.Backend: Adapter layer for multiple backend storages.API: RESTful access layer, compatible with Gremlin/Cypher queries.
📖 Server Quick Start
📊 Graph Computing Engine (OLAP)
Provides two complementary graph analysis engines:
- Vermeer (Recommended): High-performance pure in-memory graph computing engine, simple to deploy, fast response, suitable for small to medium-scale graph analysis and quick onboarding.
- HugeGraph-Computer: Distributed OLAP engine based on the Pregel model, can run on Kubernetes / Yarn clusters, suitable for mega-scale graph algorithm tasks.
📖 Computing Quick Start
🤖 HugeGraph-AI — Graph AI Ecosystem
An independent AI component of HugeGraph, bridging graphs with Large Language Models (LLMs):
- GraphRAG: Graph-based Retrieval-Augmented Generation, enabling LLM intelligent Q&A.
- Knowledge Graph Construction: Automatically extracting entities and relationships from unstructured text to build knowledge graphs.
- Graph Neural Networks: Supports training and inference of GNN models.
- 20+ Graph Machine Learning Algorithms: Built-in rich graph analysis algorithms, continuously updated.
- Python Client: Convenient Python SDK for AI applications.
📖 HugeGraph-AI Quick Start
A complete tool ecosystem surrounding the graph system (toolchain repository):
| Tool | Description |
|---|
| Hubble | Web visualization platform: one-stop operation for data modeling → batch importing → online/offline analysis. |
| Loader | Data import tool: supports multiple data sources like local files, HDFS, MySQL, and formats like TXT/CSV/JSON. |
| Client | Multi-language SDKs: Java / Python / Go. |
| Spark-connector | Spark integration: supports batch graph data read/write via Spark, suitable for big data offline processing. |
| Tools | Command-line operational tools: graph management, backup/restore, Gremlin execution, etc. |
Deployment Modes
HugeGraph supports two primary deployment modes:
| Mode | Core Components | Suitable Scenarios | Data Scale | High Availability (HA) |
|---|
| Standalone | Server + RocksDB | Development, testing, single-node production | < 4TB | Basic |
| Distributed | Server + PD (3-5 nodes) + Store (3+ nodes) | Production environments, horizontal scaling | < 1000TB | ✅ |
Docker Quick Experience:
docker run -itd --name=hugegraph -p 8080:8080 hugegraph/hugegraph
Quick Start Navigation
System Features
- Easy to Use: Dual Gremlin/Cypher query languages + RESTful API, comprehensive toolchain, extremely easy to get started.
- Efficient: Deeply optimized graph storage and queries, millisecond-level response, supports thousands of concurrent online operations, fast import of billions of data records.
- Universal: Supports both OLTP and OLAP modes, seamlessly integrates with Apache Hadoop, Spark, and Flink big data ecosystems.
- Scalable: Distributed storage, multi-replica data, horizontal scaling, flexible expansion through pluggable backends.
- Open: Apache 2.0 License, fully open-source, warmly welcoming community contributions.

2 - Download Apache HugeGraph
Instructions:
- It is recommended to use the latest version of the HugeGraph software package. Please select Java11 for the runtime environment.
- To verify downloads, use the corresponding hash (SHA512), signature, and Project Signature Verification KEYS.
- Instructions for checking hash (SHA512) and signatures are on the Validate Release page, and you can also refer to ASF official instructions.
- Note: The version numbers of all components of HugeGraph have been kept consistent, and the version numbers of Maven repositories such as
client/loader/hubble/common are the same. You can refer to these for dependency references maven example. - Compatibility note: after HugeGraph graduated in January 2026, download paths moved from
/incubator/hugegraph to /hugegraph. Historical release file names may still include -incubating-.
Latest Version 1.7.0
Binary Packages
Source Packages
Please refer to build from source.
Archived Versions
Note: 1.3.0 is the last major version compatible with Java8, please switch to or migrate to Java11 as soon as possible (lower versions of Java have potentially more SEC risks and performance impacts). Starting from version 1.5.0, a Java11 runtime environment is required.
1.5.0
Binary Packages
Source Packages
1.3.0
Binary Packages
Source Packages
1.2.0
Binary Packages
Source Packages
1.0.0
Binary Packages
Source Packages
3 - Quick Start
3.1 - HugeGraph (OLTP)
DeepWiki provides real-time updated project documentation with more comprehensive and accurate content, suitable for quickly understanding the latest project information.
📖 https://deepwiki.com/apache/hugegraph
GitHub Access: https://github.com/apache/hugegraph
3.1.1 - HugeGraph-Server Quick Start
1 HugeGraph-Server Overview
HugeGraph-Server is the core server component of the HugeGraph project. It includes submodules such as graph-core, backend, and API.
The Core module implements the TinkerPop interfaces. The Backend module manages data storage. Starting from 1.7.0, supported backends include RocksDB (the default standalone backend), HStore (distributed), HBase, and Memory. The API module provides an HTTP server that converts client requests into calls to the Core module.
⚠️ Important Change: Starting from version 1.7.0, legacy backends such as MySQL, PostgreSQL, Cassandra, and ScyllaDB have been removed. If you need to use these backends, please use version 1.5.x or earlier.
The documentation uses both HugeGraph-Server and HugeGraphServer, and the same pattern applies to other components. The two names are nearly interchangeable: HugeGraph-Server usually refers to the server-side codebase, while HugeGraphServer refers to the running service process.
2 Dependency for Building/Running
2.1 Install Java 11 (JDK 11)
Use Java 11 to run HugeGraph-Server. Versions earlier than 1.5.0 kept basic compatibility with Java 8, but Java 11 is recommended.
Before continuing, run java -version to confirm your JDK version.
Note: Running HugeGraph-Server on Java 8 loses some security protections and may reduce performance. Please upgrade as soon as possible. Java 8 is no longer supported starting from 1.7.0.
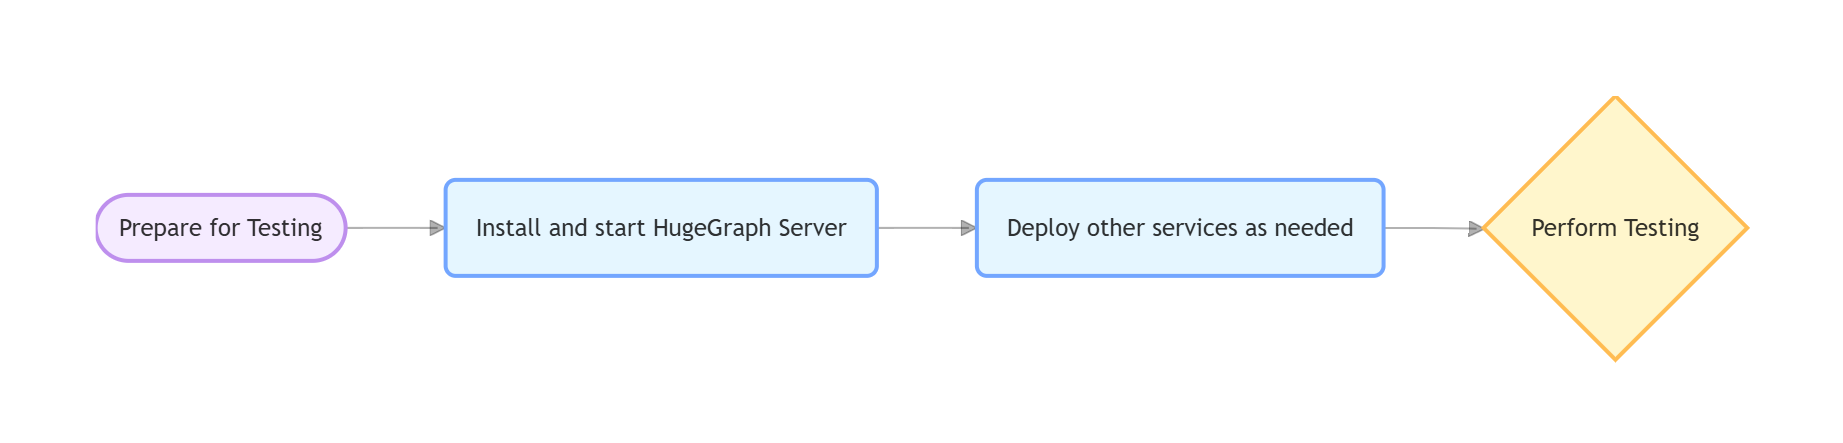
3 Deploy
There are four ways to deploy HugeGraph-Server components:
- Method 1: Use Docker container (Convenient for Test/Dev)
- Method 2: Download the binary tarball
- Method 3: Source code compilation
- Method 4: One-click deployment
⚠️ SEC Reminder: Due to the high flexibility of graph query languages (like Gremlin/Cypher), exposing native query endpoints directly presents potential security risks. Therefore, please avoid exposing any query-related endpoints directly in public network environments. In production environments, it is imperative to enable the Authentication System (Auth) combined with an IP Whitelist to establish a dual assurance mechanism, along with an Audit Log to track specific query statements. It is strongly recommended to adopt a Containerized Environment (Docker/K8s) for deployment to achieve better system-level security isolation.
3.1 Use Docker container (Convenient for Test/Dev)
You can refer to the Docker deployment guide.
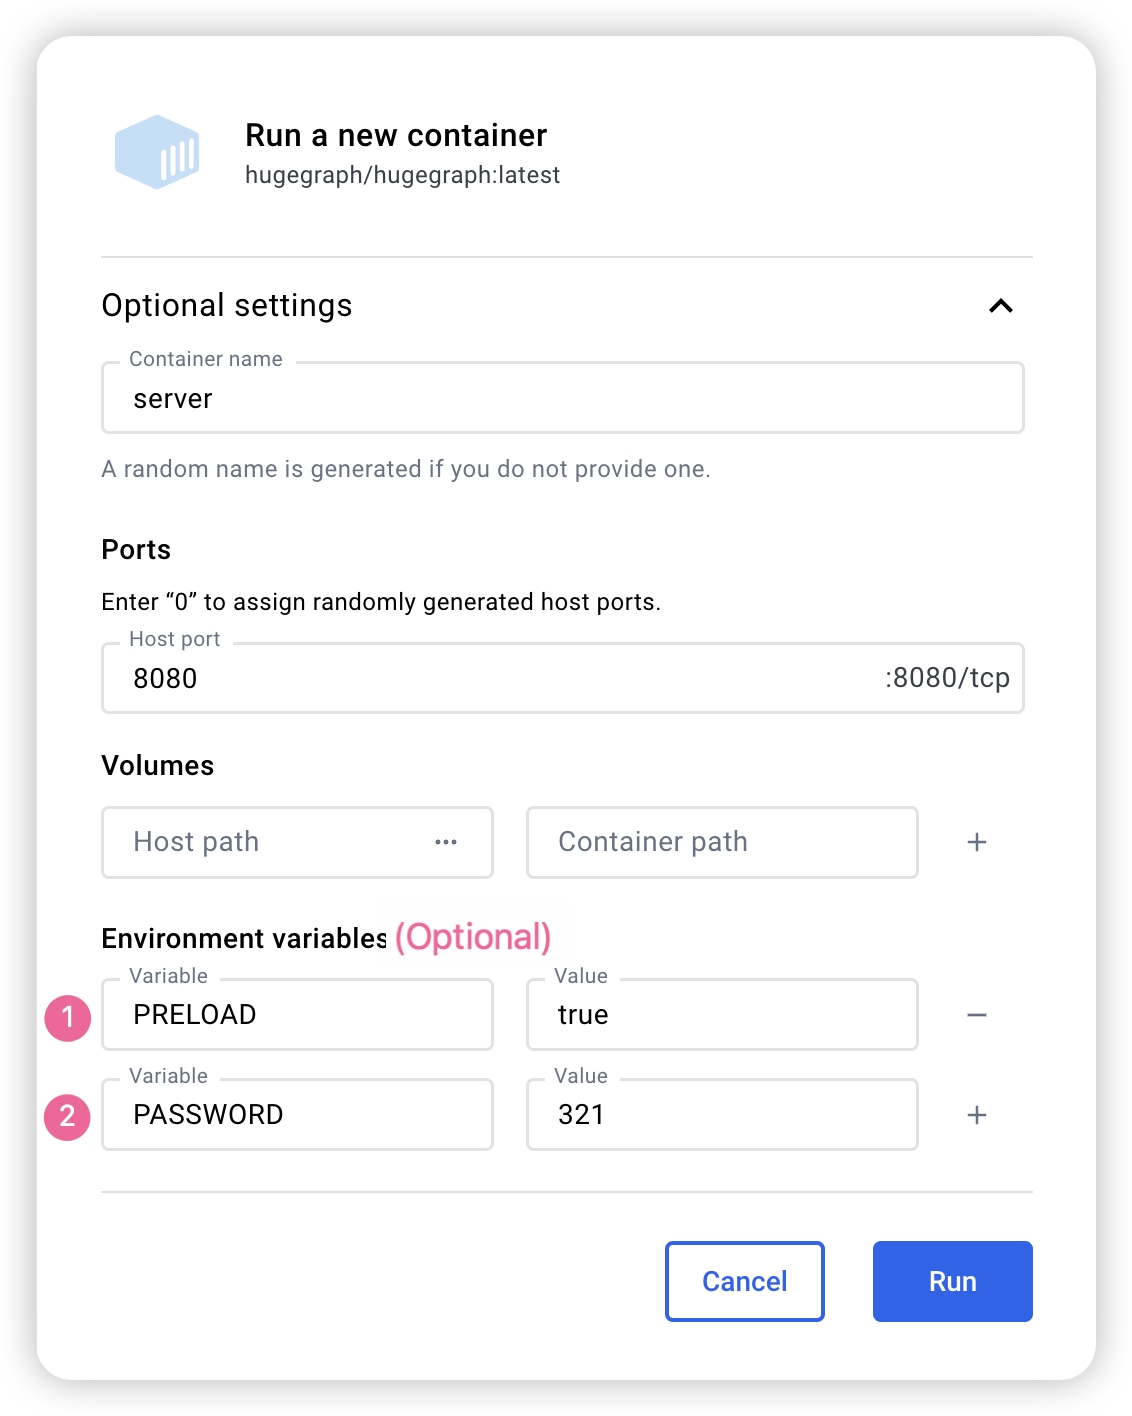
You can use docker run -itd --name=server -p 8080:8080 -e PASSWORD=xxx hugegraph/hugegraph:1.7.0 to quickly start a HugeGraph-Server instance with a built-in RocksDB backend.
Optional:
- You can use
docker exec -it server bash to enter the container for troubleshooting or other maintenance operations. - You can use
docker run -itd --name=server -p 8080:8080 -e PRELOAD="true" hugegraph/hugegraph:1.7.0 to preload a built-in sample graph at startup. You can verify it through the RESTful API. See 5.1.8 for details. - You can use
-e PASSWORD=xxx to enable authentication mode and set the admin password. See Config Authentication for details.
If you use Docker Desktop, you can set the options as follows:
Note: The Docker Compose files use bridge networking (hg-net) and work on Linux and Mac (Docker Desktop). For the 3-node distributed cluster on Mac (Docker Desktop), allocate at least 12 GB of memory (Settings → Resources → Memory). On Linux, Docker uses host memory directly.
If you want a single, unified setup for multiple HugeGraph services, you can use docker compose.
Two compose files are available in the docker/ directory:
- Single-node quickstart (pre-built images):
docker/docker-compose.yml - Single-node dev build (build from source):
docker/docker-compose.dev.yml
cd hugegraph/docker
# Keep the version aligned with the latest release, for example 1.x.0
HUGEGRAPH_VERSION=1.7.0 docker compose up -d
To enable authentication, add PASSWORD=xxx to the service environment in the compose file or pass -e PASSWORD=xxx to docker run.
See docker/README.md for the full setup guide.
Note:
HugeGraph Docker images are provided as a convenient way to start HugeGraph quickly, but they are not official ASF distribution artifacts. You can find more details in the ASF Release Distribution Policy.
We recommend using a release tag (such as 1.7.0 or 1.x.0) for stable deployments. Use the latest tag only if you want the newest features still under development.
3.2 Download the binary tarball
You could download the binary tarball from the download page of the ASF site like this:
# use the latest version, here is 1.7.0 for example
wget https://downloads.apache.org/hugegraph/{version}/apache-hugegraph-incubating-{version}.tar.gz
tar zxf *hugegraph*.tar.gz

# (Optional) verify the integrity with SHA512 (recommended)
shasum -a 512 apache-hugegraph-incubating-{version}.tar.gz
curl https://downloads.apache.org/hugegraph/{version}/apache-hugegraph-incubating-{version}.tar.gz.sha512
3.3 Source code compilation
Please ensure that the wget/curl commands are installed before compiling the source code
Download HugeGraph source code in either of the following 2 ways (so as the other HugeGraph repos/modules):
- download the stable/release version from the ASF site
- clone the unstable/latest version by GitBox(ASF) or GitHub
# Way 1. download release package from the ASF site
wget https://downloads.apache.org/hugegraph/{version}/apache-hugegraph-incubating-src-{version}.tar.gz
tar zxf *hugegraph*.tar.gz

# (Optional) verify the integrity with SHA512 (recommended)
shasum -a 512 apache-hugegraph-incubating-src-{version}.tar.gz
curl https://downloads.apache.org/hugegraph/{version}/apache-hugegraph-incubating-{version}-src.tar.gz.sha512

# Way2 : clone the latest code by git way (e.g GitHub)
git clone https://github.com/apache/hugegraph.git
Compile and generate tarball
cd *hugegraph
# (Optional) use "-P stage" param if you build failed with the latest code(during pre-release period)
mvn package -DskipTests -ntp
The execution log is as follows:
......
[INFO] Reactor Summary for hugegraph 1.5.0:
[INFO]
[INFO] hugegraph .......................................... SUCCESS [  2.405 s]
[INFO] hugegraph-core ..................................... SUCCESS [ 13.405 s]
[INFO] hugegraph-api ...................................... SUCCESS [ 25.943 s]
[INFO] hugegraph-cassandra ................................ SUCCESS [ 54.270 s]
[INFO] hugegraph-scylladb ................................. SUCCESS [  1.032 s]
[INFO] hugegraph-rocksdb .................................. SUCCESS [ 34.752 s]
[INFO] hugegraph-mysql .................................... SUCCESS [  1.778 s]
[INFO] hugegraph-palo ..................................... SUCCESS [  1.070 s]
[INFO] hugegraph-hbase .................................... SUCCESS [ 32.124 s]
[INFO] hugegraph-postgresql ............................... SUCCESS [  1.823 s]
[INFO] hugegraph-dist ..................................... SUCCESS [ 17.426 s]
[INFO] hugegraph-example .................................. SUCCESS [  1.941 s]
[INFO] hugegraph-test ..................................... SUCCESS [01:01 min]
[INFO] ------------------------------------------------------------------------
[INFO] BUILD SUCCESS
[INFO] ------------------------------------------------------------------------
......
After successful execution, *hugegraph-*.tar.gz files will be generated in the hugegraph directory, which is the tarball generated by compilation.
Outdated tools
#### 3.4 One-click deployment (Outdated)HugeGraph-Tools provides a command-line tool for one-click deployment, users can use this tool to quickly download, decompress, configure and start HugeGraphServer and HugeGraph-Hubble with one click.
Of course, you should download the tarball of HugeGraph-Toolchain first.
# download toolchain binary package, it includes loader + tool + hubble
# please check the latest version (e.g. here is 1.7.0)
wget https://downloads.apache.org/hugegraph/1.7.0/apache-hugegraph-toolchain-incubating-1.7.0.tar.gz
tar zxf *hugegraph-*.tar.gz

# enter the tool's package
cd *hugegraph*/*tool*
note: ${version} is the version, The latest version can refer to Download Page, or click the link to download directly from the Download page
The general entry script for HugeGraph-Tools is bin/hugegraph, Users can use the help command to view its usage, here only the commands for one-click deployment are introduced.
bin/hugegraph deploy -v {hugegraph-version} -p {install-path} [-u {download-path-prefix}]
{hugegraph-version} indicates the version of HugeGraphServer and HugeGraphStudio to be deployed, users can view the conf/version-mapping.yaml file for version information, {install-path} specify the installation directory of HugeGraphServer and HugeGraphStudio, {download-path-prefix} optional, specify the download address of HugeGraphServer and HugeGraphStudio tarball, use default download URL if not provided, for example, to start HugeGraph-Server and HugeGraphStudio version 0.6, write the above command as bin/hugegraph deploy -v 0.6 -p services.
4 Config
If you need to quickly start HugeGraph just for testing, then you only need to modify a few configuration items (see next section).
For detailed configuration introduction, please refer to configuration document and introduction to configuration items
5 Startup
5.1 Use a startup script to startup
Startup is divided into “first startup” and “non-first startup”. On the first startup, you need to initialize the backend database before starting the service.
If the service was stopped manually, or needs to be started again for any other reason, you can usually start it directly because the backend database is persistent.
When HugeGraphServer starts, it connects to the backend storage and checks its version information. If the backend has not been initialized, or if it was initialized with an incompatible version (for example, old-version data), HugeGraphServer will fail to start and report an error.
If you need to access HugeGraphServer externally, modify the restserver.url configuration item in rest-server.properties (the default is http://127.0.0.1:8080) and change it to the machine name or IP address.
Since the configuration (hugegraph.properties) and startup steps required by various backends are slightly different, the following will introduce the configuration and startup of each backend one by one.
Note: Configure Server Authentication before starting HugeGraphServer if you need Auth mode (especially for production or public network environments).
5.1.1 Distributed Storage (HStore)
Click to expand/collapse Distributed Storage configuration and startup method
Distributed storage is a new feature introduced after HugeGraph 1.5.0, which implements distributed data storage and computation based on HugeGraph-PD and HugeGraph-Store components.
To use the distributed storage engine, you need to deploy HugeGraph-PD and HugeGraph-Store first. See HugeGraph-PD Quick Start and HugeGraph-Store Quick Start.
After ensuring that both PD and Store services are started, modify the hugegraph.properties configuration of HugeGraph-Server:
backend=hstore
serializer=binary
task.scheduler_type=distributed

# PD service address, multiple PD addresses are separated by commas, configure PD's RPC port
pd.peers=127.0.0.1:8686,127.0.0.1:8687,127.0.0.1:8688
# Simple example (with authentication)
gremlin.graph=org.apache.hugegraph.auth.HugeFactoryAuthProxy

# Specify storage backend hstore
backend=hstore
serializer=binary
store=hugegraph

# Specify the task scheduler (for versions 1.7.0 and earlier, hstore storage is required)
task.scheduler_type=distributed

# pd config
pd.peers=127.0.0.1:8686
Then enable PD discovery in rest-server.properties (required for every HugeGraph-Server node):
usePD=true

# notice: must have this conf in 1.7.0
pd.peers=127.0.0.1:8686,127.0.0.1:8687,127.0.0.1:8688
# If auth is needed
# auth.authenticator=org.apache.hugegraph.auth.StandardAuthenticator
If configuring multiple HugeGraph-Server nodes, you need to modify the rest-server.properties configuration file for each node, for example:
Node 1 (Master node):
usePD=true
restserver.url=http://127.0.0.1:8081
gremlinserver.url=http://127.0.0.1:8181
pd.peers=127.0.0.1:8686

rpc.server_host=127.0.0.1
rpc.server_port=8091

server.id=server-1
server.role=master
Node 2 (Worker node):
usePD=true
restserver.url=http://127.0.0.1:8082
gremlinserver.url=http://127.0.0.1:8182
pd.peers=127.0.0.1:8686

rpc.server_host=127.0.0.1
rpc.server_port=8092

server.id=server-2
server.role=worker
Also, you need to modify the port configuration in gremlin-server.yaml for each node:
Node 1:
host: 127.0.0.1
port: 8181
Node 2:
host: 127.0.0.1
port: 8182
Initialize the database:
cd *hugegraph-${version}
bin/init-store.sh
Start the Server:
The startup sequence for using the distributed storage engine is:
- Start HugeGraph-PD
- Start HugeGraph-Store
- Initialize the database (only for the first time)
- Start HugeGraph-Server
Verify that the service is started properly:
curl http://localhost:8081/graphs
# Should return: {"graphs":["hugegraph"]}
The sequence to stop the services should be the reverse of the startup sequence:
- Stop HugeGraph-Server
- Stop HugeGraph-Store
- Stop HugeGraph-PD
Docker Distributed Cluster
Run the full distributed cluster (3 PD + 3 Store + 3 Server) with Docker Compose:
cd hugegraph/docker
HUGEGRAPH_VERSION=1.7.0 docker compose -f docker-compose-3pd-3store-3server.yml up -d
Services communicate via container hostnames on the hg-net bridge network. Configuration is injected via environment variables:
# Server configuration
HG_SERVER_BACKEND: hstore
HG_SERVER_PD_PEERS: pd0:8686,pd1:8686,pd2:8686
Verify the cluster:
curl http://localhost:8080/versions
curl http://localhost:8620/v1/stores
To view runtime logs for any container use docker logs <container-name> (e.g. docker logs hg-pd0).
See docker/README.md for the full environment variable reference, port table, and troubleshooting guide.
5.1.2 Memory
Click to expand/collapse Memory configuration and startup methods
Update hugegraph.properties
backend=memory
serializer=text
The data of the Memory backend is stored in memory and cannot be persisted. It does not need to initialize the backend. This is the only backend that does not require initialization.
Start server
bin/start-hugegraph.sh
Starting HugeGraphServer...
Connecting to HugeGraphServer (http://127.0.0.1:8080/graphs)....OK
The prompted url is the same as the restserver.url configured in rest-server.properties
5.1.3 RocksDB / ToplingDB
Click to expand/collapse RocksDB configuration and startup methods
RocksDB is an embedded database that does not require manual installation and deployment. GCC version >= 4.3.0 (GLIBCXX_3.4.10) is required. If not, GCC needs to be upgraded in advance
Update hugegraph.properties
backend=rocksdb
serializer=binary
rocksdb.data_path=.
rocksdb.wal_path=.
Initialize the database (required on the first startup, or a new configuration was manually added under ‘conf/graphs/’)
cd *hugegraph-${version}
bin/init-store.sh
Start server
bin/start-hugegraph.sh
Starting HugeGraphServer...
Connecting to HugeGraphServer (http://127.0.0.1:8080/graphs)....OK
ToplingDB (Beta): As a high-performance alternative to RocksDB, please refer to the configuration guide: ToplingDB Quick Start
5.1.4 Cassandra
⚠️ Deprecated: This backend has been removed starting from HugeGraph 1.7.0. If you need to use it, please refer to version 1.5.x documentation.
Click to expand/collapse Cassandra configuration and startup methods
users need to install Cassandra by themselves, requiring version 3.0 or above, download link
Update hugegraph.properties
backend=cassandra
serializer=cassandra

# cassandra backend config
cassandra.host=localhost
cassandra.port=9042
cassandra.username=
cassandra.password=
#cassandra.connect_timeout=5
#cassandra.read_timeout=20

#cassandra.keyspace.strategy=SimpleStrategy
#cassandra.keyspace.replication=3
Initialize the database (required on the first startup, or a new configuration was manually added under ‘conf/graphs/’)
cd *hugegraph-${version}
bin/init-store.sh
Initing HugeGraph Store...
2017-12-01 11:26:51 1424  [main] [INFO ] org.apache.hugegraph.HugeGraph [] - Opening backend store: 'cassandra'
2017-12-01 11:26:52 2389  [main] [INFO ] org.apache.hugegraph.backend.store.cassandra.CassandraStore [] - Failed to connect keyspace: hugegraph, try init keyspace later
2017-12-01 11:26:52 2472  [main] [INFO ] org.apache.hugegraph.backend.store.cassandra.CassandraStore [] - Failed to connect keyspace: hugegraph, try init keyspace later
2017-12-01 11:26:52 2557  [main] [INFO ] org.apache.hugegraph.backend.store.cassandra.CassandraStore [] - Failed to connect keyspace: hugegraph, try init keyspace later
2017-12-01 11:26:53 2797  [main] [INFO ] org.apache.hugegraph.backend.store.cassandra.CassandraStore [] - Store initialized: huge_graph
2017-12-01 11:26:53 2945  [main] [INFO ] org.apache.hugegraph.backend.store.cassandra.CassandraStore [] - Store initialized: huge_schema
2017-12-01 11:26:53 3044  [main] [INFO ] org.apache.hugegraph.backend.store.cassandra.CassandraStore [] - Store initialized: huge_index
2017-12-01 11:26:53 3046  [pool-3-thread-1] [INFO ] org.apache.hugegraph.backend.Transaction [] - Clear cache on event 'store.init'
2017-12-01 11:26:59 9720  [main] [INFO ] org.apache.hugegraph.HugeGraph [] - Opening backend store: 'cassandra'
2017-12-01 11:27:00 9805  [main] [INFO ] org.apache.hugegraph.backend.store.cassandra.CassandraStore [] - Failed to connect keyspace: hugegraph1, try init keyspace later
2017-12-01 11:27:00 9886  [main] [INFO ] org.apache.hugegraph.backend.store.cassandra.CassandraStore [] - Failed to connect keyspace: hugegraph1, try init keyspace later
2017-12-01 11:27:00 9955  [main] [INFO ] org.apache.hugegraph.backend.store.cassandra.CassandraStore [] - Failed to connect keyspace: hugegraph1, try init keyspace later
2017-12-01 11:27:00 10175 [main] [INFO ] org.apache.hugegraph.backend.store.cassandra.CassandraStore [] - Store initialized: huge_graph
2017-12-01 11:27:00 10321 [main] [INFO ] org.apache.hugegraph.backend.store.cassandra.CassandraStore [] - Store initialized: huge_schema
2017-12-01 11:27:00 10413 [main] [INFO ] org.apache.hugegraph.backend.store.cassandra.CassandraStore [] - Store initialized: huge_index
2017-12-01 11:27:00 10413 [pool-3-thread-1] [INFO ] org.apache.hugegraph.backend.Transaction [] - Clear cache on event 'store.init'
Start server
bin/start-hugegraph.sh
Starting HugeGraphServer...
Connecting to HugeGraphServer (http://127.0.0.1:8080/graphs)....OK
5.1.5 ScyllaDB
⚠️ Deprecated: This backend has been removed starting from HugeGraph 1.7.0. If you need to use it, please refer to version 1.5.x documentation.
Click to expand/collapse ScyllaDB configuration and startup methods
users need to install ScyllaDB by themselves, version 2.1 or above is recommended, download link
Update hugegraph.properties
backend=scylladb
serializer=scylladb

# cassandra backend config
cassandra.host=localhost
cassandra.port=9042
cassandra.username=
cassandra.password=
#cassandra.connect_timeout=5
#cassandra.read_timeout=20

#cassandra.keyspace.strategy=SimpleStrategy
#cassandra.keyspace.replication=3
Since the scylladb database itself is an “optimized version” based on cassandra, if the user does not have scylladb installed, they can also use cassandra as the backend storage directly. They only need to change the backend and serializer to scylladb, and the host and post point to the seeds and port of the cassandra cluster. Yes, but it is not recommended to do so, it will not take advantage of scylladb itself.
Initialize the database (required on the first startup, or a new configuration was manually added under ‘conf/graphs/’)
cd *hugegraph-${version}
bin/init-store.sh
Start server
bin/start-hugegraph.sh
Starting HugeGraphServer...
Connecting to HugeGraphServer (http://127.0.0.1:8080/graphs)....OK
5.1.6 HBase
Click to expand/collapse HBase configuration and startup methods
users need to install HBase by themselves, requiring version 2.0 or above,download link
Update hugegraph.properties
backend=hbase
serializer=hbase

# hbase backend config
hbase.hosts=localhost
hbase.port=2181
# Note: recommend to modify the HBase partition number by the actual/env data amount & RS amount before init store
# it may influence the loading speed a lot
#hbase.enable_partition=true
#hbase.vertex_partitions=10
#hbase.edge_partitions=30
Initialize the database (required on the first startup, or a new configuration was manually added under ‘conf/graphs/’)
cd *hugegraph-${version}
bin/init-store.sh
Start server
bin/start-hugegraph.sh
Starting HugeGraphServer...
Connecting to HugeGraphServer (http://127.0.0.1:8080/graphs)....OK
for more other backend configurations, please refer tointroduction to configuration options
5.1.7 MySQL
⚠️ Deprecated: This backend has been removed starting from HugeGraph 1.7.0. If you need to use it, please refer to version 1.5.x documentation.
Click to expand/collapse MySQL configuration and startup methods
Because MySQL is licensed under the GPL and incompatible with the Apache License, users must install MySQL themselves, download link
Download the MySQL driver package, such as mysql-connector-java-8.0.30.jar, and place it in the lib directory of HugeGraph-Server.
Update hugegraph.properties to configure the database URL, username, and password.
store is the database name; it will be created automatically if it doesn’t exist.
backend=mysql
serializer=mysql

store=hugegraph

# mysql backend config
jdbc.driver=com.mysql.cj.jdbc.Driver
jdbc.url=jdbc:mysql://127.0.0.1:3306
jdbc.username=
jdbc.password=
jdbc.reconnect_max_times=3
jdbc.reconnect_interval=3
jdbc.ssl_mode=false
Initialize the database (required for first startup or when manually adding new configurations to conf/graphs/)
cd *hugegraph-${version}
bin/init-store.sh
Start server
bin/start-hugegraph.sh
Starting HugeGraphServer...
Connecting to HugeGraphServer (http://127.0.0.1:8080/graphs)....OK
5.1.8 Create an example graph when startup
Pass the -p true argument when starting the script to enable preload, which creates a sample graph.
bin/start-hugegraph.sh -p true
Starting HugeGraphServer in daemon mode...
Connecting to HugeGraphServer (http://127.0.0.1:8080/graphs)......OK
And use the RESTful API to request HugeGraphServer and get the following result:
> curl "http://localhost:8080/graphs/hugegraph/graph/vertices" | gunzip

{"vertices":[{"id":"2:lop","label":"software","type":"vertex","properties":{"name":"lop","lang":"java","price":328}},{"id":"1:josh","label":"person","type":"vertex","properties":{"name":"josh","age":32,"city":"Beijing"}},{"id":"1:marko","label":"person","type":"vertex","properties":{"name":"marko","age":29,"city":"Beijing"}},{"id":"1:peter","label":"person","type":"vertex","properties":{"name":"peter","age":35,"city":"Shanghai"}},{"id":"1:vadas","label":"person","type":"vertex","properties":{"name":"vadas","age":27,"city":"Hongkong"}},{"id":"2:ripple","label":"software","type":"vertex","properties":{"name":"ripple","lang":"java","price":199}}]}
This indicates the successful creation of the sample graph.
5.2 Use Docker to startup
In 3.1 Use Docker container, we introduced how to deploy hugegraph-server with Docker. You can also switch storage backends or preload a sample graph by setting the corresponding parameters.
5.2.1 Uses Cassandra as storage
⚠️ Deprecated: Cassandra backend has been removed starting from HugeGraph 1.7.0. If you need to use it, please refer to version 1.5.x documentation.
Click to expand/collapse Cassandra configuration and startup methods
When using Docker, we can use Cassandra as the backend storage. We highly recommend using docker-compose directly to manage both the server and Cassandra.
The sample docker-compose.yml can be obtained on GitHub, and you can start it with docker-compose up -d. (If using Cassandra 4.0 as the backend storage, it takes approximately two minutes to initialize. Please be patient.)
version: "3"

services:
  graph:
    image: hugegraph/hugegraph
    container_name: cas-server
    ports:
      - 8080:8080
    environment:
      hugegraph.backend: cassandra
      hugegraph.serializer: cassandra
      hugegraph.cassandra.host: cas-cassandra
      hugegraph.cassandra.port: 9042
    networks:
      - ca-network
    depends_on:
      - cassandra
    healthcheck:
      test: ["CMD", "bin/gremlin-console.sh", "--" ,"-e", "scripts/remote-connect.groovy"]
      interval: 10s
      timeout: 30s
      retries: 3

  cassandra:
    image: cassandra:4
    container_name: cas-cassandra
    ports:
      - 7000:7000
      - 9042:9042
    security_opt:
      - seccomp:unconfined
    networks:
      - ca-network
    healthcheck:
      test: ["CMD", "cqlsh", "--execute", "describe keyspaces;"]
      interval: 10s
      timeout: 30s
      retries: 5

networks:
  ca-network:

volumes:
  hugegraph-data:
In this YAML file, configuration parameters related to Cassandra need to be passed as environment variables in the format of hugegraph.<parameter_name>.
Specifically, the hugegraph.properties file contains settings such as backend=xxx and cassandra.host=xxx. To pass these settings through environment variables, prepend hugegraph. to the configuration keys, for example hugegraph.backend and hugegraph.cassandra.host.
Refer to 4 Config for the remaining settings.
5.2.2 Create an example graph when starting a server
Set the environment variable PRELOAD=true when starting Docker so that sample data is loaded during startup.
Use docker run
Use docker run -itd --name=server -p 8080:8080 -e PRELOAD=true hugegraph/hugegraph:1.7.0
Use docker-compose
Create a docker-compose.yml file like the following and set PRELOAD=true in the environment. example.groovy is a predefined script used to preload sample data. If needed, you can mount a new example.groovy script to change the preload data.
version: '3'
services:
  server:
    image: hugegraph/hugegraph:1.7.0
    container_name: server
    environment:
      - PRELOAD=true
      - PASSWORD=xxx
    volumes:
      - /path/to/yourscript:/hugegraph/scripts/example.groovy
    ports:
      - 8080:8080
Use docker-compose up -d to start the container.
And use the RESTful API to request HugeGraphServer and get the following result:
> curl "http://localhost:8080/graphs/hugegraph/graph/vertices" | gunzip

{"vertices":[{"id":"2:lop","label":"software","type":"vertex","properties":{"name":"lop","lang":"java","price":328}},{"id":"1:josh","label":"person","type":"vertex","properties":{"name":"josh","age":32,"city":"Beijing"}},{"id":"1:marko","label":"person","type":"vertex","properties":{"name":"marko","age":29,"city":"Beijing"}},{"id":"1:peter","label":"person","type":"vertex","properties":{"name":"peter","age":35,"city":"Shanghai"}},{"id":"1:vadas","label":"person","type":"vertex","properties":{"name":"vadas","age":27,"city":"Hongkong"}},{"id":"2:ripple","label":"software","type":"vertex","properties":{"name":"ripple","lang":"java","price":199}}]}
This indicates that the sample graph was created successfully.
6. Access server
6.1 Service startup status check
Use jps to see a service process
curl request RESTfulAPI
echo `curl -o /dev/null -s -w %{http_code} "http://localhost:8080/graphs/hugegraph/graph/vertices"`
Return 200, which means the server starts normally.
6.2 Request Server
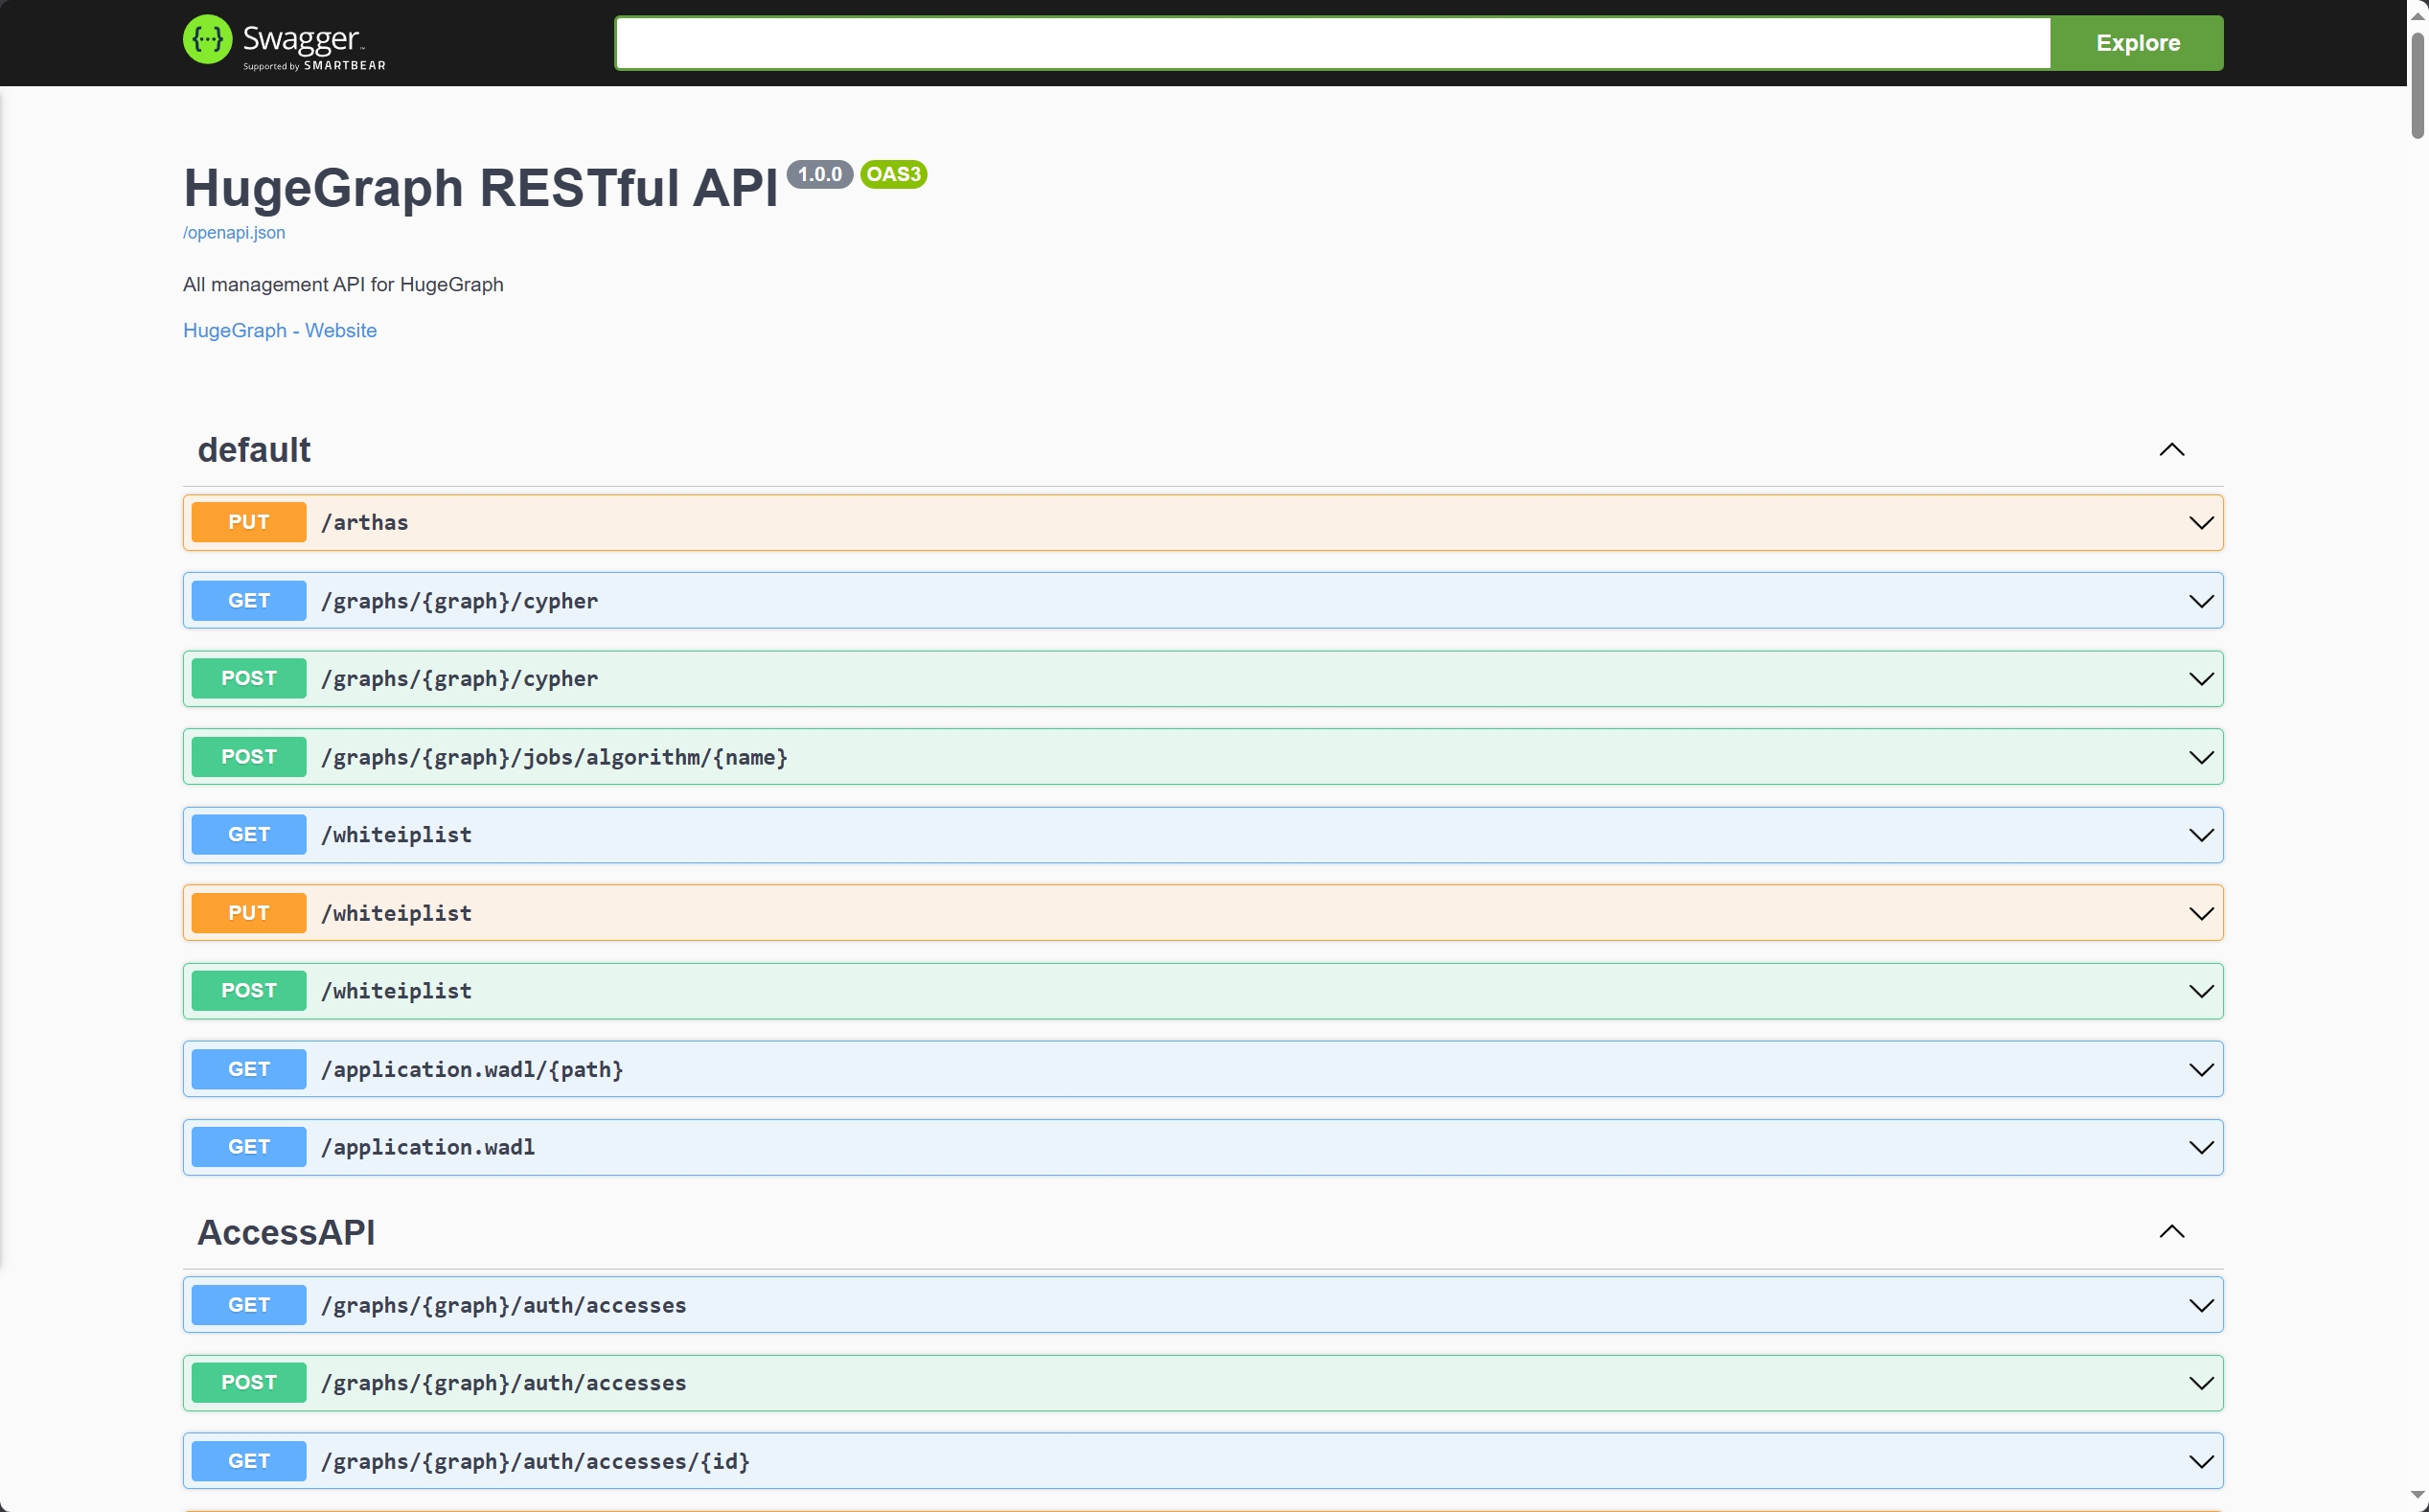
The RESTful API of HugeGraphServer includes various types of resources, typically including graph, schema, gremlin, traverser and task.
graph contains vertices、edgesschema contains vertexlabels、 propertykeys、 edgelabels、indexlabelsgremlin contains various Gremlin statements, such as g.v(), which can be executed synchronously or asynchronouslytraverser contains various advanced queries including shortest paths, intersections, N-step reachable neighbors, etc.task contains query and delete with asynchronous tasks
curl http://localhost:8080/graphs/hugegraph/graph/vertices
explanation
Since there are many vertices and edges in the graph, for list-type requests, such as getting all vertices, getting all edges, etc., the server will compress the data and return it, so when use curl, you get a bunch of garbled characters, you can redirect to gunzip for decompression. It is recommended to use the Chrome browser + Restlet plugin to send HTTP requests for testing.
curl "http://localhost:8080/graphs/hugegraph/graph/vertices" | gunzip
The current default configuration of HugeGraphServer can only be accessed locally, and the configuration can be modified so that it can be accessed on other machines.
vim conf/rest-server.properties

restserver.url=http://0.0.0.0:8080
response body:
{
    "vertices": [
        {
            "id": "2lop",
            "label": "software",
            "type": "vertex",
            "properties": {
                "price": [
                    {
                        "id": "price",
                        "value": 328
                    }
                ],
                "name": [
                    {
                        "id": "name",
                        "value": "lop"
                    }
                ],
                "lang": [
                    {
                        "id": "lang",
                        "value": "java"
                    }
                ]
            }
        },
        {
            "id": "1josh",
            "label": "person",
            "type": "vertex",
            "properties": {
                "name": [
                    {
                        "id": "name",
                        "value": "josh"
                    }
                ],
                "age": [
                    {
                        "id": "age",
                        "value": 32
                    }
                ]
            }
        },
        ...
    ]
}
For the detailed API, please refer to RESTful-API
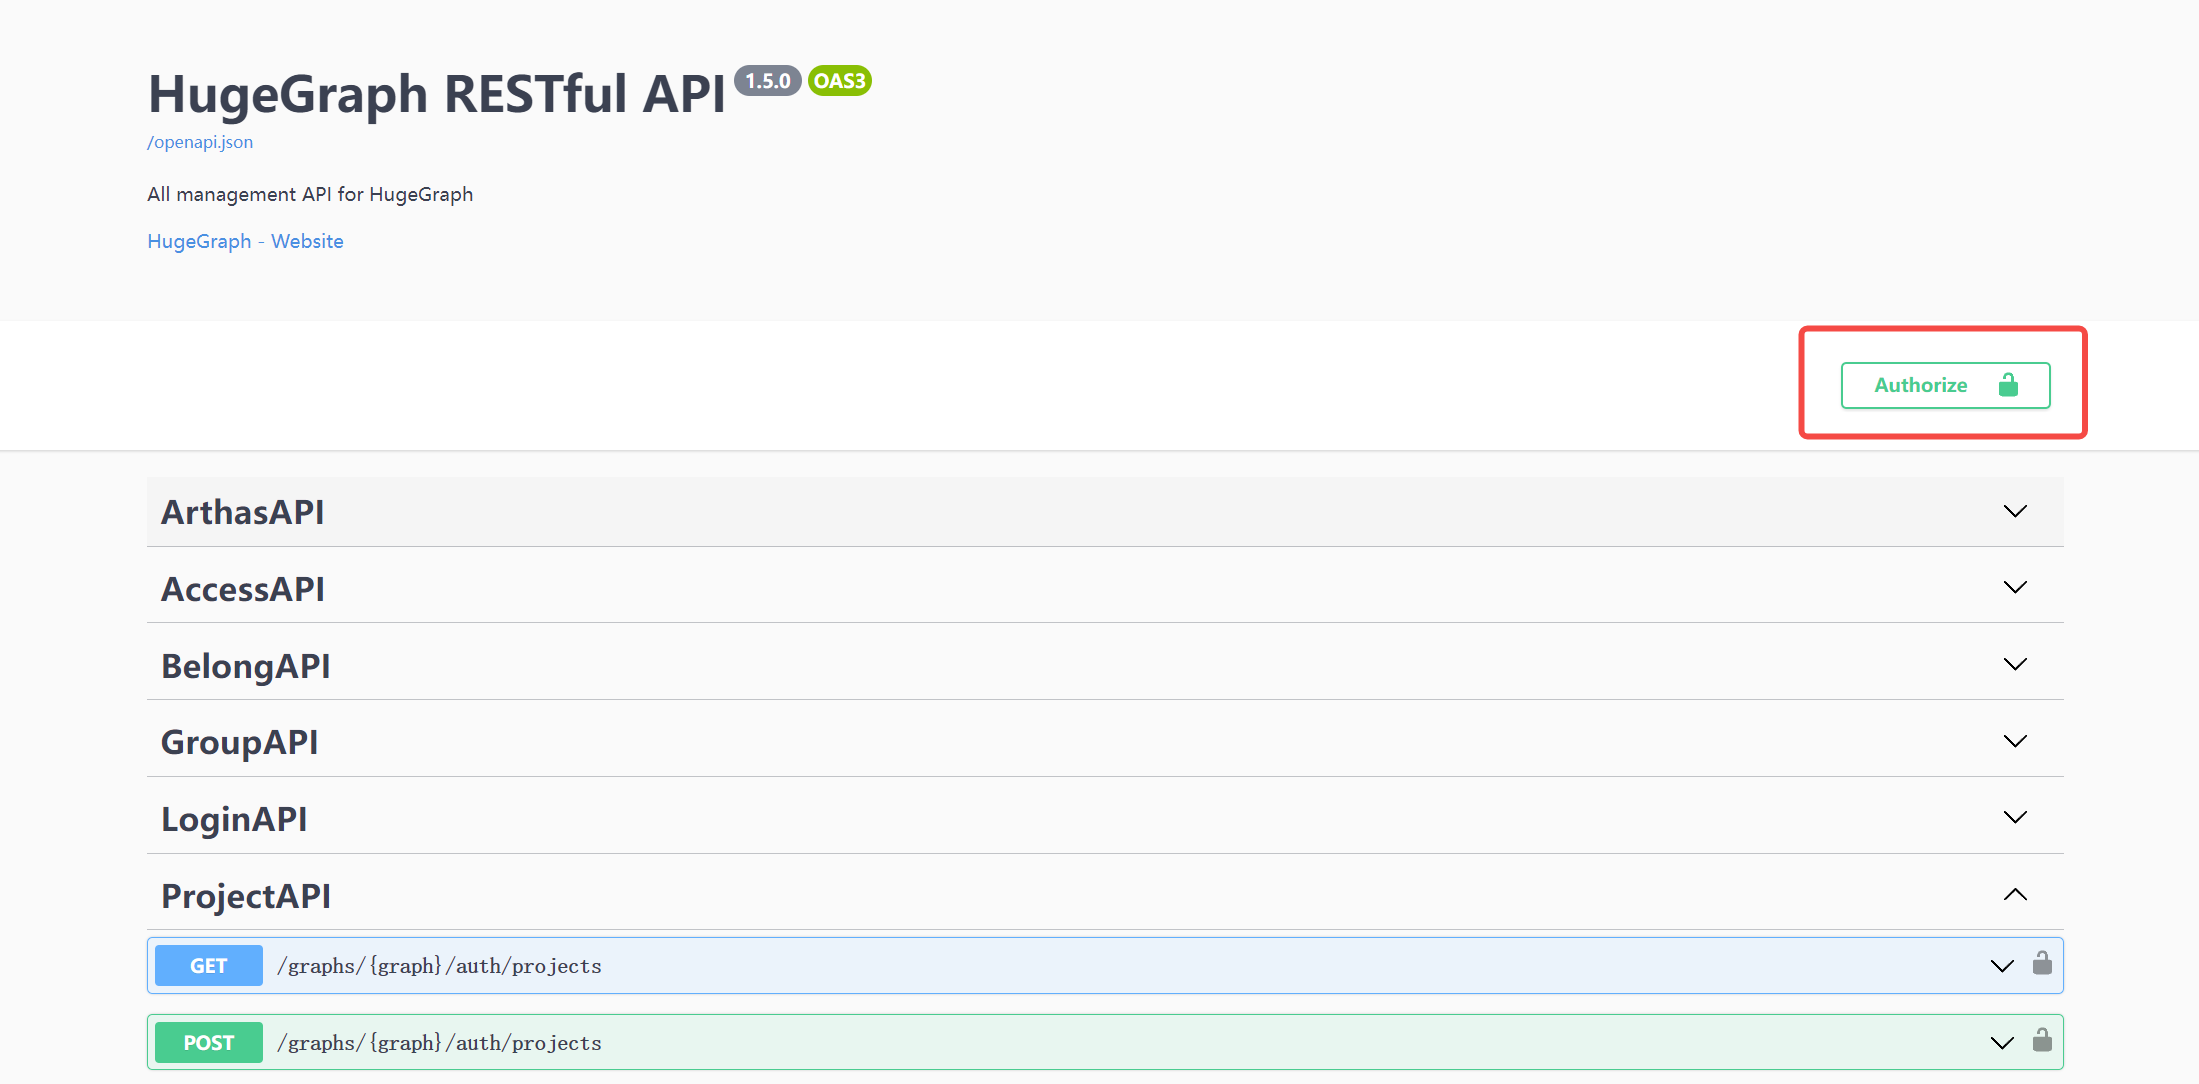
You can also visit localhost:8080/swagger-ui/index.html to check the API.
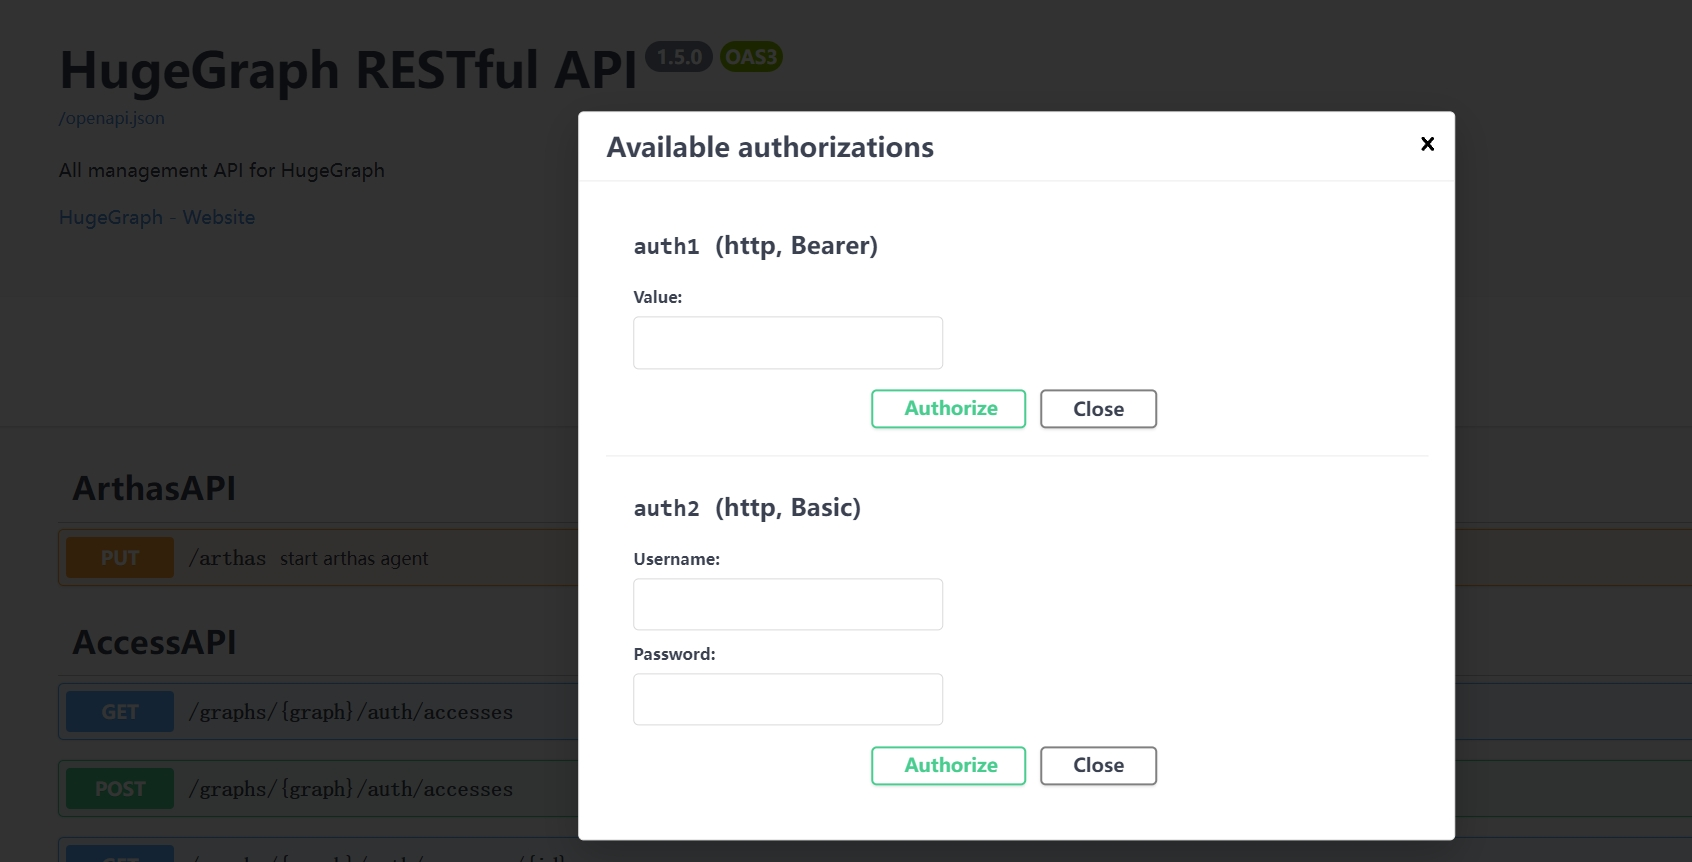
When using Swagger UI to debug the API provided by HugeGraph, if HugeGraph Server turns on authentication mode, you can enter authentication information on the Swagger page.
Currently, HugeGraph supports setting authentication information in two forms: Basic and Bearer.
7 Stop Server
$cd *hugegraph-${version}
$bin/stop-hugegraph.sh
8 Debug Server with IntelliJ IDEA
Please refer to Setup Server in IDEA
3.1.2 - HugeGraph-PD Quick Start
1 HugeGraph-PD Overview
HugeGraph-PD (Placement Driver) is the metadata management component of HugeGraph’s distributed version, responsible for managing the distribution of graph data and coordinating storage nodes. It plays a central role in distributed HugeGraph, maintaining cluster status and coordinating HugeGraph-Store storage nodes.
2 Prerequisites
2.1 Requirements
- Operating System: Linux or macOS (Windows has not been fully tested)
- Java version: ≥ 11
- Maven version: ≥ 3.5.0
3 Deployment
There are two ways to deploy the HugeGraph-PD component:
- Method 1: Download the tar package
- Method 2: Compile from source
3.1 Download the tar package
Download the latest version of HugeGraph-PD from the Apache HugeGraph official download page:
# Replace {version} with the latest version number, e.g., 1.5.0
wget https://downloads.apache.org/hugegraph/{version}/apache-hugegraph-incubating-{version}.tar.gz
tar zxf apache-hugegraph-incubating-{version}.tar.gz
cd apache-hugegraph-incubating-{version}/apache-hugegraph-pd-incubating-{version}
3.2 Compile from source
# 1. Clone the source code
git clone https://github.com/apache/hugegraph.git

# 2. Build the project
cd hugegraph
mvn clean install -DskipTests=true

# 3. After successful compilation, the PD module build artifacts will be located at
#    apache-hugegraph-incubating-{version}/apache-hugegraph-pd-incubating-{version}
#    target/apache-hugegraph-incubating-{version}.tar.gz
3.3 Docker Deployment
The HugeGraph-PD Docker image is available on Docker Hub as hugegraph/pd.
Note: The following steps assume you have already cloned or pulled the HugeGraph main repository locally, or at least have its docker/ directory available.
Use the docker compose setup to deploy the complete 3-node cluster (PD + Store + Server):
cd hugegraph/docker
# Keep the version aligned with the latest release, for example 1.x.0
HUGEGRAPH_VERSION=1.7.0 docker compose -f docker-compose-3pd-3store-3server.yml up -d
To run a single PD node via docker run, configuration is provided via environment variables:
docker run -d \
  -p 8620:8620 \
  -p 8686:8686 \
  -p 8610:8610 \
  -e HG_PD_GRPC_HOST=<your-ip> \
  -e HG_PD_RAFT_ADDRESS=<your-ip>:8610 \
  -e HG_PD_RAFT_PEERS_LIST=<your-ip>:8610 \
  -e HG_PD_INITIAL_STORE_LIST=<store-ip>:8500 \
  -v /path/to/data:/hugegraph-pd/pd_data \
  --name hugegraph-pd \
  hugegraph/pd:1.7.0
Environment variable reference:
| Variable | Required | Default | Description |
|---|
HG_PD_GRPC_HOST | Yes | — | This node’s hostname/IP for gRPC (e.g. pd0 in Docker, 192.168.1.10 on bare metal) |
HG_PD_RAFT_ADDRESS | Yes | — | This node’s Raft address (e.g. pd0:8610) |
HG_PD_RAFT_PEERS_LIST | Yes | — | All PD peers (e.g. pd0:8610,pd1:8610,pd2:8610) |
HG_PD_INITIAL_STORE_LIST | Yes | — | Expected store gRPC addresses (e.g. store0:8500,store1:8500,store2:8500) |
HG_PD_GRPC_PORT | No | 8686 | gRPC server port |
HG_PD_REST_PORT | No | 8620 | REST API port |
HG_PD_DATA_PATH | No | /hugegraph-pd/pd_data | Metadata storage path |
HG_PD_INITIAL_STORE_COUNT | No | 1 | Minimum stores required for cluster availability |
Note: In Docker bridge networking, use container hostnames (e.g. pd0) for HG_PD_GRPC_HOST and HG_PD_RAFT_ADDRESS instead of IP addresses.
Deprecated aliases: GRPC_HOST, RAFT_ADDRESS, RAFT_PEERS, PD_INITIAL_STORE_LIST still work but log a deprecation warning. Use the HG_PD_* names for new deployments.
To view runtime logs for a running PD container use docker logs <container-name> (e.g. docker logs hg-pd0).
See docker/README.md for the full cluster setup guide.
4 Configuration
The main configuration file for PD is conf/application.yml. Here are the key configuration items:
spring:
  application:
    name: hugegraph-pd

grpc:
  # gRPC port for cluster mode
  port: 8686
  host: 127.0.0.1

server:
  # REST service port
  port: 8620

pd:
  # Storage path
  data-path: ./pd_data
  # Auto-expansion check cycle (seconds)
  patrol-interval: 1800
  # Minimum number of Store nodes required for cluster availability
  initial-store-count: 1
  # Store configuration information, format is IP:gRPC port
  initial-store-list: 127.0.0.1:8500

raft:
  # Cluster mode
  address: 127.0.0.1:8610
  # Raft addresses of all PD nodes in the cluster
  peers-list: 127.0.0.1:8610

store:
  # Store offline time (seconds). After this time, the store is considered permanently unavailable
  max-down-time: 172800
  # Whether to enable store monitoring data storage
  monitor_data_enabled: true
  # Monitoring data interval
  monitor_data_interval: 1 minute
  # Monitoring data retention time
  monitor_data_retention: 1 day
  initial-store-count: 1

partition:
  # Default number of replicas per partition
  default-shard-count: 1
  # Default maximum number of replicas per machine
  store-max-shard-count: 12
For multi-node deployment, you need to modify the port and address configurations for each node to ensure proper communication between nodes.
5 Start and Stop
5.1 Start PD
In the PD installation directory, execute:
./bin/start-hugegraph-pd.sh
The startup script supports a -d flag to control daemon mode:
-d true (default): run as a background daemon; the script returns immediately.-d false: run in foreground — the script execs Java, so the container/supervisor process IS Java. Use this when running under Docker or a process supervisor (systemd, supervisord) so crashes are detected and the service is restarted automatically.
After successful startup, you can see logs similar to the following in logs/hugegraph-pd-stdout.log:
YYYY-mm-dd xx:xx:xx [main] [INFO] o.a.h.p.b.HugePDServer - Started HugePDServer in x.xxx seconds (JVM running for x.xxx)
5.2 Stop PD
In the PD installation directory, execute:
./bin/stop-hugegraph-pd.sh
6 Verification
Confirm that the PD service is running properly:
curl http://localhost:8620/actuator/health
If it returns {"status":"UP"}, it indicates that the PD service has been successfully started.
Additionally, you can verify Store node status through the PD API:
curl http://localhost:8620/v1/stores
If the response shows state as Up, the corresponding Store node is running normally. The example below shows a single Store node. In a healthy 3-node deployment, the storeId list should contain three IDs, and stateCountMap.Up, numOfService, and numOfNormalService should all be 3.
{
  "message": "OK",
  "data": {
    "stores": [
      {
        "storeId": 8319292642220586694,
        "address": "127.0.0.1:8500",
        "raftAddress": "127.0.0.1:8510",
        "version": "",
        "state": "Up",
        "deployPath": "/Users/{your_user_name}/hugegraph/apache-hugegraph-incubating-1.5.0/apache-hugegraph-store-incubating-1.5.0/lib/hg-store-node-1.5.0.jar",
        "dataPath": "./storage",
        "startTimeStamp": 1754027127969,
        "registedTimeStamp": 1754027127969,
        "lastHeartBeat": 1754027909444,
        "capacity": 494384795648,
        "available": 346535829504,
        "partitionCount": 0,
        "graphSize": 0,
        "keyCount": 0,
        "leaderCount": 0,
        "serviceName": "127.0.0.1:8500-store",
        "serviceVersion": "",
        "serviceCreatedTimeStamp": 1754027127000,
        "partitions": []
      }
    ],
    "stateCountMap": {
      "Up": 1
    },
    "numOfService": 1,
    "numOfNormalService": 1
  },
  "status": 0
}
3.1.3 - HugeGraph-Store Quick Start
1 HugeGraph-Store Overview
HugeGraph-Store is the storage node component of HugeGraph’s distributed version, responsible for actually storing and managing graph data. It works in conjunction with HugeGraph-PD to form HugeGraph’s distributed storage engine, providing high availability and horizontal scalability.
2 Prerequisites
2.1 Requirements
- Operating System: Linux or macOS (Windows has not been fully tested)
- Java version: ≥ 11
- Maven version: ≥ 3.5.0
- Deploy HugeGraph-PD first for multi-node deployment
3 Deployment
There are two ways to deploy the HugeGraph-Store component:
- Method 1: Download the tar package
- Method 2: Compile from source
3.1 Download the tar package
Download the latest version of HugeGraph-Store from the Apache HugeGraph official download page:
# Replace {version} with the latest version number, e.g., 1.5.0
wget https://downloads.apache.org/hugegraph/{version}/apache-hugegraph-incubating-{version}.tar.gz
tar zxf apache-hugegraph-incubating-{version}.tar.gz
cd apache-hugegraph-incubating-{version}/apache-hugegraph-hstore-incubating-{version}
3.2 Compile from source
# 1. Clone the source code
git clone https://github.com/apache/hugegraph.git

# 2. Build the project
cd hugegraph
mvn clean install -DskipTests=true

# 3. After successful compilation, the Store module build artifacts will be located at
#    apache-hugegraph-incubating-{version}/apache-hugegraph-hstore-incubating-{version}
#    target/apache-hugegraph-incubating-{version}.tar.gz
3.3 Docker Deployment
The HugeGraph-Store Docker image is available on Docker Hub as hugegraph/store.
Note: The following steps assume you have already cloned or pulled the HugeGraph main repository locally, or at least have its docker/ directory available.
Use the compose file to deploy the complete 3-node cluster (PD + Store + Server):
cd hugegraph/docker
# Keep the version aligned with the latest release, for example 1.x.0
HUGEGRAPH_VERSION=1.7.0 docker compose -f docker-compose-3pd-3store-3server.yml up -d
To run a single Store node via docker run:
docker run -d \
  -p 8520:8520 \
  -p 8500:8500 \
  -p 8510:8510 \
  -e HG_STORE_PD_ADDRESS=<pd-ip>:8686 \
  -e HG_STORE_GRPC_HOST=<your-ip> \
  -e HG_STORE_RAFT_ADDRESS=<your-ip>:8510 \
  -v /path/to/storage:/hugegraph-store/storage \
  --name hugegraph-store \
  hugegraph/store:1.7.0
Environment variable reference:
| Variable | Required | Default | Description |
|---|
HG_STORE_PD_ADDRESS | Yes | — | PD gRPC addresses (e.g. pd0:8686,pd1:8686,pd2:8686) |
HG_STORE_GRPC_HOST | Yes | — | This node’s hostname/IP for gRPC (e.g. store0) |
HG_STORE_RAFT_ADDRESS | Yes | — | This node’s Raft address (e.g. store0:8510) |
HG_STORE_GRPC_PORT | No | 8500 | gRPC server port |
HG_STORE_REST_PORT | No | 8520 | REST API port |
HG_STORE_DATA_PATH | No | /hugegraph-store/storage | Data storage path |
Note: In Docker bridge networking, use container hostnames (e.g. store0) for HG_STORE_GRPC_HOST instead of IP addresses.
Deprecated aliases: PD_ADDRESS, GRPC_HOST, RAFT_ADDRESS still work but log a deprecation warning. Use the HG_STORE_* names for new deployments.
4 Configuration
The main configuration file for Store is conf/application.yml. Here are the key configuration items:
pdserver:
  # PD service address, multiple PD addresses are separated by commas (configure PD's gRPC port)
  address: 127.0.0.1:8686

grpc:
  # gRPC service address
  host: 127.0.0.1
  port: 8500
  netty-server:
    max-inbound-message-size: 1000MB

raft:
  # raft cache queue size
  disruptorBufferSize: 1024
  address: 127.0.0.1:8510
  max-log-file-size: 600000000000
  # Snapshot generation time interval, in seconds
  snapshotInterval: 1800

server:
  # REST service address
  port: 8520

app:
  # Storage path, supports multiple paths separated by commas
  data-path: ./storage
  #raft-path: ./storage

spring:
  application:
    name: store-node-grpc-server
  profiles:
    active: default
    include: pd

logging:
  config: 'file:./conf/log4j2.xml'
  level:
    root: info
For multi-node deployment, you need to modify the following configurations for each Store node:
grpc.port (RPC port) for each noderaft.address (Raft protocol port) for each nodeserver.port (REST port) for each nodeapp.data-path (data storage path) for each node
5 Start and Stop
5.1 Start Store
Ensure that the PD service is already started, then in the Store installation directory, execute:
./bin/start-hugegraph-store.sh
The startup script supports a -d flag to control daemon mode:
-d true (default): run as a background daemon; the script returns immediately.-d false: run in foreground — the script execs Java, so the container/supervisor process IS Java. Use this when running under Docker or a process supervisor (systemd, supervisord) so crashes are detected and the service is restarted automatically.
After successful startup, you can see logs similar to the following in logs/hugegraph-store-server.log:
YYYY-mm-dd xx:xx:xx [main] [INFO] o.a.h.s.n.StoreNodeApplication - Started StoreNodeApplication in x.xxx seconds (JVM running for x.xxx)
5.2 Stop Store
In the Store installation directory, execute:
./bin/stop-hugegraph-store.sh
6 Multi-Node Deployment Example
Below is a configuration example for a three-node deployment:
6.1 Three-Node Configuration Reference
- 3 PD nodes
- raft ports: 8610, 8611, 8612
- rpc ports: 8686, 8687, 8688
- rest ports: 8620, 8621, 8622
- 3 Store nodes
- raft ports: 8510, 8511, 8512
- rpc ports: 8500, 8501, 8502
- rest ports: 8520, 8521, 8522
6.2 Store Node Configuration
For the three Store nodes, the main configuration differences are as follows:
Node A:
grpc:
  port: 8500
raft:
  address: 127.0.0.1:8510
server:
  port: 8520
app:
  data-path: ./storage-a
Node B:
grpc:
  port: 8501
raft:
  address: 127.0.0.1:8511
server:
  port: 8521
app:
  data-path: ./storage-b
Node C:
grpc:
  port: 8502
raft:
  address: 127.0.0.1:8512
server:
  port: 8522
app:
  data-path: ./storage-c
All nodes should point to the same PD cluster:
pdserver:
  address: 127.0.0.1:8686,127.0.0.1:8687,127.0.0.1:8688
6.3 Docker Distributed Cluster Configuration
The distributed Store cluster definition is included in docker/docker-compose-3pd-3store-3server.yml. Each Store node gets its own hostname and environment variables:
# store0
HG_STORE_PD_ADDRESS: pd0:8686,pd1:8686,pd2:8686
HG_STORE_GRPC_HOST: store0
HG_STORE_GRPC_PORT: "8500"
HG_STORE_REST_PORT: "8520"
HG_STORE_RAFT_ADDRESS: store0:8510
HG_STORE_DATA_PATH: /hugegraph-store/storage

# store1
HG_STORE_PD_ADDRESS: pd0:8686,pd1:8686,pd2:8686
HG_STORE_GRPC_HOST: store1
HG_STORE_RAFT_ADDRESS: store1:8510

# store2
HG_STORE_PD_ADDRESS: pd0:8686,pd1:8686,pd2:8686
HG_STORE_GRPC_HOST: store2
HG_STORE_RAFT_ADDRESS: store2:8510
Store nodes start only after all PD nodes pass healthchecks (/v1/health), enforced via depends_on: condition: service_healthy.
To view runtime logs for a running Store container use docker logs <container-name> (e.g. docker logs hg-store0).
See docker/README.md for the full setup guide.
7 Verify Store Service
Confirm that the Store service is running properly:
curl http://localhost:8520/actuator/health
If it returns {"status":"UP"}, it indicates that the Store service has been successfully started.
Additionally, you can check the status of Store nodes in the cluster through the PD API:
curl http://localhost:8620/v1/stores
If Store is configured successfully, the response should include status information for the current node, and state: "Up" means the node is running normally.
The example below shows a single Store node. If all three nodes are configured correctly and running, the storeId list should contain three IDs, and stateCountMap.Up, numOfService, and numOfNormalService should all be 3.
{
  "message": "OK",
  "data": {
    "stores": [
      {
        "storeId": 8319292642220586694,
        "address": "127.0.0.1:8500",
        "raftAddress": "127.0.0.1:8510",
        "version": "",
        "state": "Up",
        "deployPath": "/Users/{your_user_name}/hugegraph/apache-hugegraph-incubating-1.5.0/apache-hugegraph-store-incubating-1.5.0/lib/hg-store-node-1.5.0.jar",
        "dataPath": "./storage",
        "startTimeStamp": 1754027127969,
        "registedTimeStamp": 1754027127969,
        "lastHeartBeat": 1754027909444,
        "capacity": 494384795648,
        "available": 346535829504,
        "partitionCount": 0,
        "graphSize": 0,
        "keyCount": 0,
        "leaderCount": 0,
        "serviceName": "127.0.0.1:8500-store",
        "serviceVersion": "",
        "serviceCreatedTimeStamp": 1754027127000,
        "partitions": []
      }
    ],
    "stateCountMap": {
      "Up": 1
    },
    "numOfService": 1,
    "numOfNormalService": 1
  },
  "status": 0
}
3.2 - HugeGraph ToolChain
Testing Guide: For running toolchain tests locally, please refer to HugeGraph Toolchain Local Testing Guide
DeepWiki provides real-time updated project documentation with more comprehensive and accurate content, suitable for quickly understanding the latest project information.
📖 https://deepwiki.com/apache/hugegraph-toolchain
GitHub Access: https://github.com/apache/hugegraph-toolchain
3.2.1 - HugeGraph-Hubble Quick Start
1 HugeGraph-Hubble Overview
Note: The current version of Hubble has not yet added Auth/Login related interfaces and
standalone protection, it will be added in the next Release version (> 1.5).
Please be careful not to expose it in a public network environment or untrusted networks to
avoid related SEC issues (you can also use IP & port whitelist + HTTPS)
Testing Guide: For running HugeGraph-Hubble tests locally, please refer to HugeGraph Toolchain Local Testing Guide
HugeGraph-Hubble is HugeGraph’s one-stop visual analysis platform. The platform covers the whole
process from data modeling, to efficient data import, to real-time and offline analysis of data, and
unified management of graphs, realizing the whole process wizard of graph application. It is designed
to improve the user’s use fluency, lower the user’s use threshold, and provide a more efficient and easy-to-use user experience.
The platform mainly includes the following modules:
Graph Management
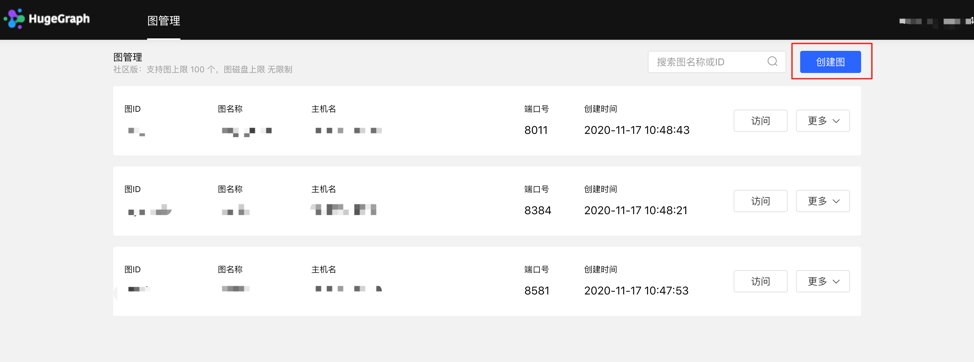
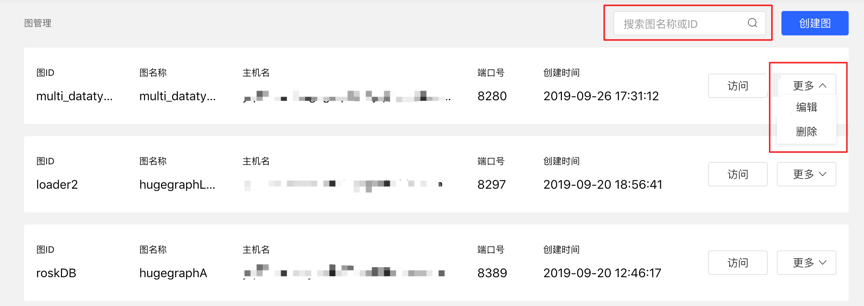
The graph management module realizes the unified management of multiple graphs and graph access, editing, deletion, and query by creating graph and connecting the platform and graph data.
The metadata modeling module realizes the construction and management of graph models by creating attribute libraries, vertex types, edge types, and index types. The platform provides two modes, list mode and graph mode, which can display the metadata model in real time, which is more intuitive. At the same time, it also provides a metadata reuse function across graphs, which saves the tedious and repetitive creation process of the same metadata, greatly improves modeling efficiency and enhances ease of use.
Graph Analysis
By inputting the graph traversal language Gremlin, high-performance general analysis of graph data can be realized, and functions such as customized multidimensional path query of vertices can be provided, and three kinds of graph result display methods are provided, including: graph form, table form, Json form, and multidimensional display. The data form meets the needs of various scenarios used by users. It provides functions such as running records and collection of common statements, realizing the traceability of graph operations, and the reuse and sharing of query input, which is fast and efficient. It supports the export of graph data, and the export format is JSON format.
Task Management
For Gremlin tasks that need to traverse the whole graph, index creation and reconstruction,
and other time-consuming asynchronous tasks, the platform provides corresponding task management
functions to achieve unified management and result viewing of asynchronous tasks.
Data Import
“Note: The data import function is currently suitable for preliminary use. For formal data import,
please use hugegraph-loader, which has much better performance, stability, and functionality.”
Data import is to convert the user’s business data into the vertices and edges of the graph and
insert it into the graph database. The platform provides a wizard-style visual import module.
By creating import tasks, the management of import tasks and the parallel operation of multiple
import tasks are realized. Improve import performance. After entering the import task, you only
need to follow the platform step prompts, upload files as needed, and fill in the content to easily
implement the import process of graph data. At the same time, it supports breakpoint resuming,
error retry mechanism, etc., which reduces import costs and improves efficiency.
2 Deploy
There are three ways to deploy hugegraph-hubble
- Use Docker (Convenient for Test/Dev)
- Download the Toolchain binary package
- Source code compilation
2.1 Use docker (Convenient for Test/Dev)
Special Note: If you are starting hubble with Docker, and hubble and the server are on the same host. When configuring the hostname for the graph on the Hubble web page, please do not directly set it to localhost/127.0.0.1. This will refer to the hubble container internally rather than the host machine, resulting in a connection failure to the server.
If hubble and server is in the same docker network, we recommend using the container_name (in our example, it is server) as the hostname, and 8080 as the port. Or you can use the host IP as the hostname, and the port is configured by the host for the server.
We can use docker run -itd --name=hubble -p 8088:8088 hugegraph/hubble:1.5.0 to quick start hubble.
Alternatively, you can use Docker Compose to start hubble. Additionally, if hubble and the graph is in the same Docker network, you can access the graph using the container name of the graph, eliminating the need for the host machine’s IP address.
Use docker-compose up -d,docker-compose.yml is following:
version: '3'
services:
  server:
    image: hugegraph/hugegraph:1.5.0
    container_name: server
    environment:
      - PASSWORD=xxx
    ports:
      - 8080:8080

  hubble:
    image: hugegraph/hubble:1.5.0
    container_name: hubble
    ports:
      - 8088:8088
Note:
The docker image of hugegraph-hubble is a convenience release to start hugegraph-hubble quickly, but not official distribution artifacts. You can find more details from ASF Release Distribution Policy.
Recommend to use release tag(like 1.5.0) for the stable version. Use latest tag to experience the newest functions in development.
hubble is in the toolchain project. First, download the binary tar tarball
wget https://downloads.apache.org/hugegraph/{version}/apache-hugegraph-toolchain-incubating-{version}.tar.gz
tar -xvf apache-hugegraph-toolchain-incubating-{version}.tar.gz
cd apache-hugegraph-toolchain-incubating-{version}.tar.gz/apache-hugegraph-hubble-incubating-{version}
Run hubble
Then, we can see:
starting HugeGraphHubble ..............timed out with http status 502
2023-08-30 20:38:34 [main] [INFO ] o.a.h.HugeGraphHubble [] - Starting HugeGraphHubble v1.0.0 on cpu05 with PID xxx (~/apache-hugegraph-toolchain-incubating-1.0.0/apache-hugegraph-hubble-incubating-1.0.0/lib/hubble-be-1.0.0.jar started by $USER in ~/apache-hugegraph-toolchain-incubating-1.0.0/apache-hugegraph-hubble-incubating-1.0.0)
...
2023-08-30 20:38:38 [main] [INFO ] c.z.h.HikariDataSource [] - hugegraph-hubble-HikariCP - Start completed.
2023-08-30 20:38:41 [main] [INFO ] o.a.c.h.Http11NioProtocol [] - Starting ProtocolHandler ["http-nio-0.0.0.0-8088"]
2023-08-30 20:38:41 [main] [INFO ] o.a.h.HugeGraphHubble [] - Started HugeGraphHubble in 7.379 seconds (JVM running for 8.499)
Then use a web browser to access ip:8088 and you can see the Hubble page. You can stop the service using bin/stop-hubble.sh.
2.3 Source code compilation
Note: The plugin frontend-maven-plugin has been added to hugegraph-hubble/hubble-be/pom.xml. To compile hubble, you do not need to install Nodejs V16.x and yarn environment in your local environment in advance. You can directly execute the following steps.
Download the toolchain source code.
git clone https://github.com/apache/hugegraph-toolchain.git
Compile hubble. It depends on the loader and client, so you need to build these dependencies in advance during the compilation process (you can skip this step later).
cd hugegraph-toolchain
sudo pip install -r hugegraph-hubble/hubble-dist/assembly/travis/requirements.txt
mvn install -pl hugegraph-client,hugegraph-loader -am -Dmaven.javadoc.skip=true -DskipTests -ntp
cd hugegraph-hubble
mvn -e compile package -Dmaven.javadoc.skip=true -Dmaven.test.skip=true -ntp
cd apache-hugegraph-hubble-incubating*
Run hubble
The module usage process of the platform is as follows:
4.1 Graph Management
4.1.1 Graph creation
Under the graph management module, click [Create graph], and realize the connection of multiple graphs by filling in the graph ID, graph name, host name, port number, username, and password information.
Create graph by filling in the content as follows:
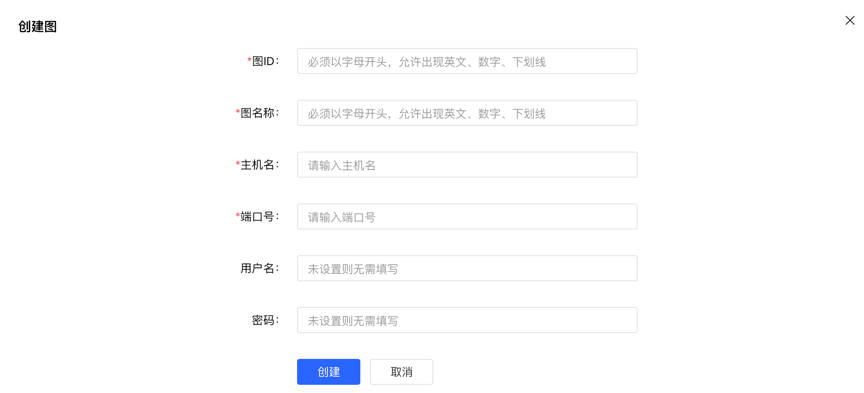
Special Note: If you are starting hubble with Docker, and hubble and the server are on the same host. When configuring the hostname for the graph on the Hubble web page, please do not directly set it to localhost/127.0.0.1. If hubble and server is in the same docker network, we recommend using the container_name (in our example, it is graph) as the hostname, and 8080 as the port. Or you can use the host IP as the hostname, and the port is configured by the host for the server.
4.1.2 Graph Access
Realize the information access to the graph space. After entering, you can perform operations such as multidimensional query analysis, metadata management, data import, and algorithm analysis of the graph.

4.1.3 Graph management
- Users can achieve unified management of graphs through overview, search, and information editing and deletion of single graphs.
- Search range: You can search for the graph name and ID.
4.2.1 Module entry
Left navigation:

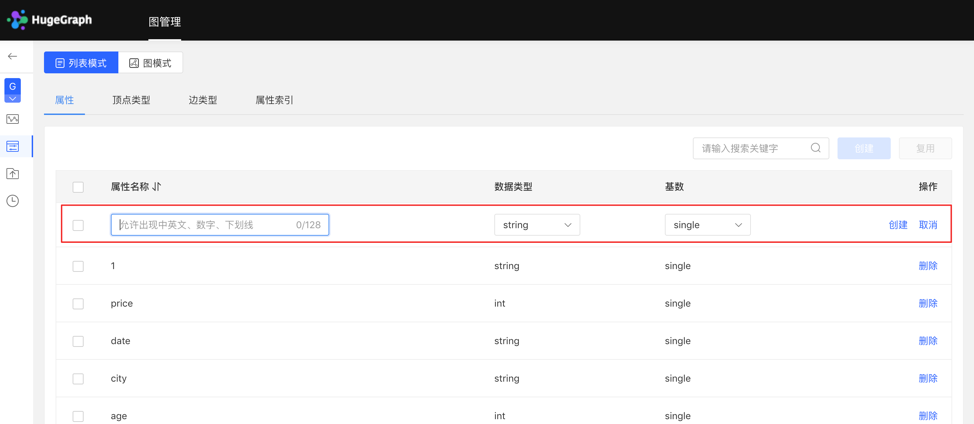
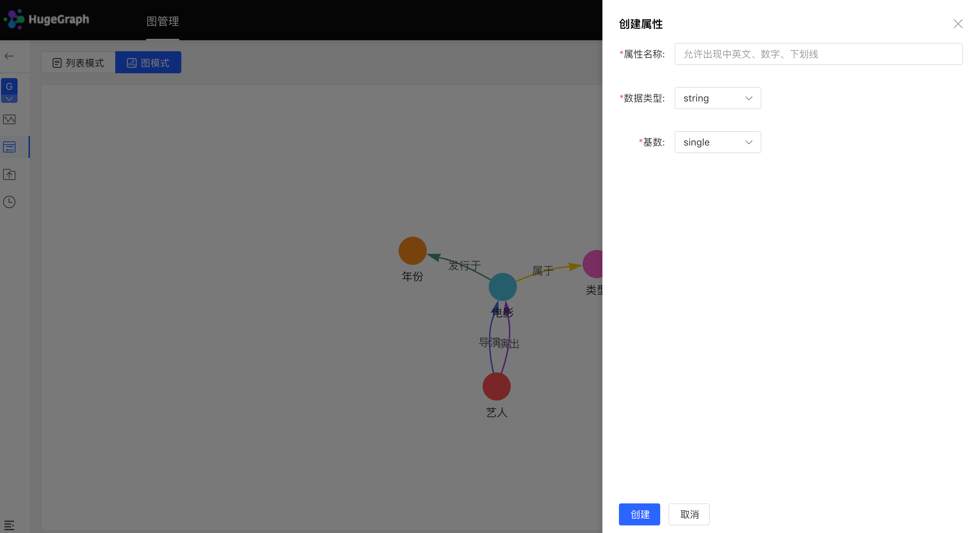
4.2.2 Property type
4.2.2.1 Create type
- Fill in or select the attribute name, data type, and cardinality to complete the creation of the attribute.
- Created attributes can be used as attributes of vertex type and edge type.
List mode:
Graph mode:
4.2.2.2 Reuse
- The platform provides the [Reuse] function, which can directly reuse the metadata of other graphs.
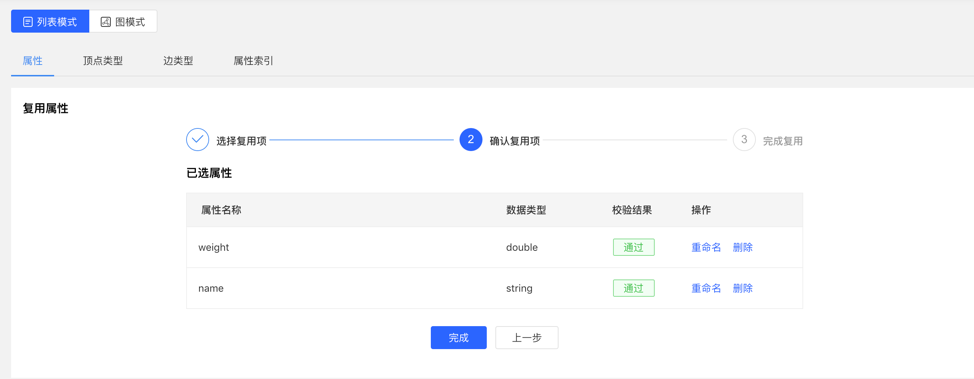
- Select the graph ID that needs to be reused, and continue to select the attributes that need to be reused. After that, the platform will check whether there is a conflict. After passing, the metadata can be reused.
Select reuse items:
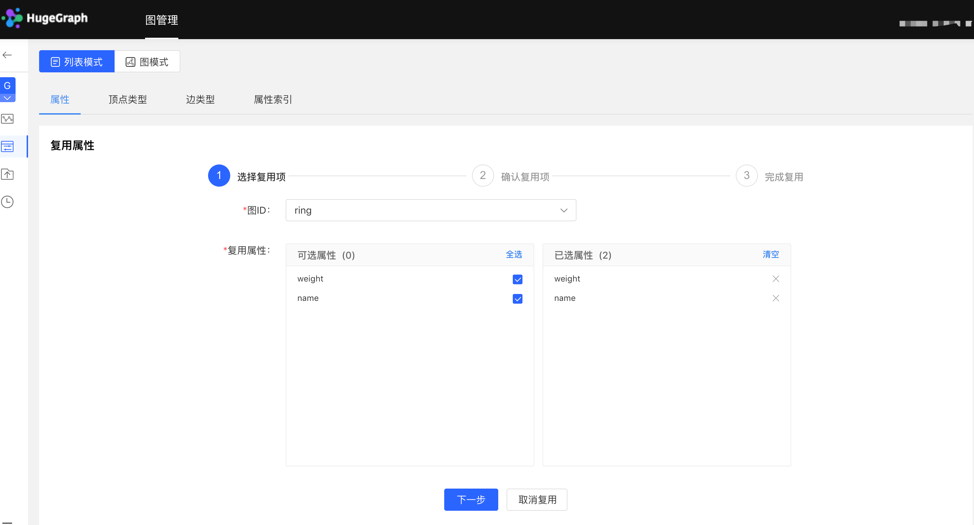
Check reuse items:
4.2.2.3 Management
- You can delete a single item or delete it in batches in the attribute list.
4.2.3 Vertex type
4.2.3.1 Create type
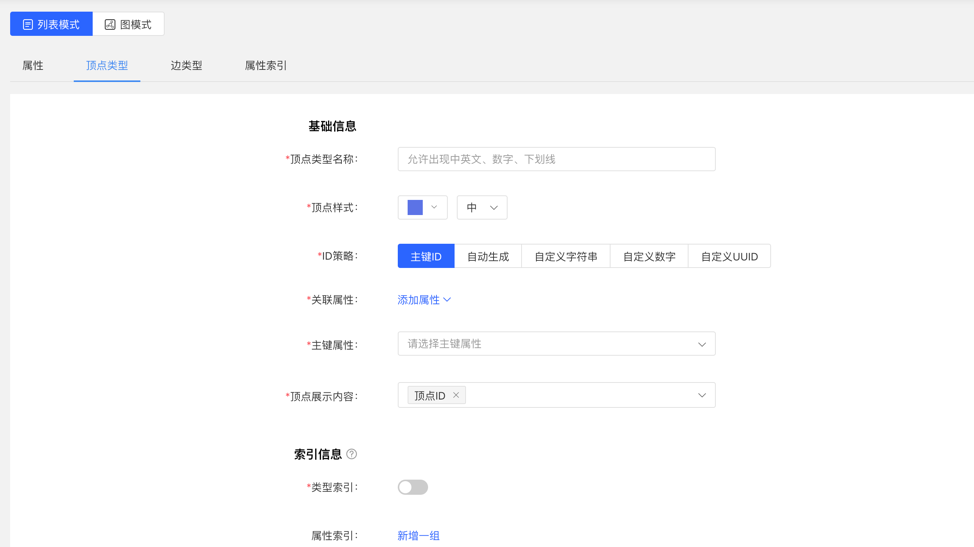
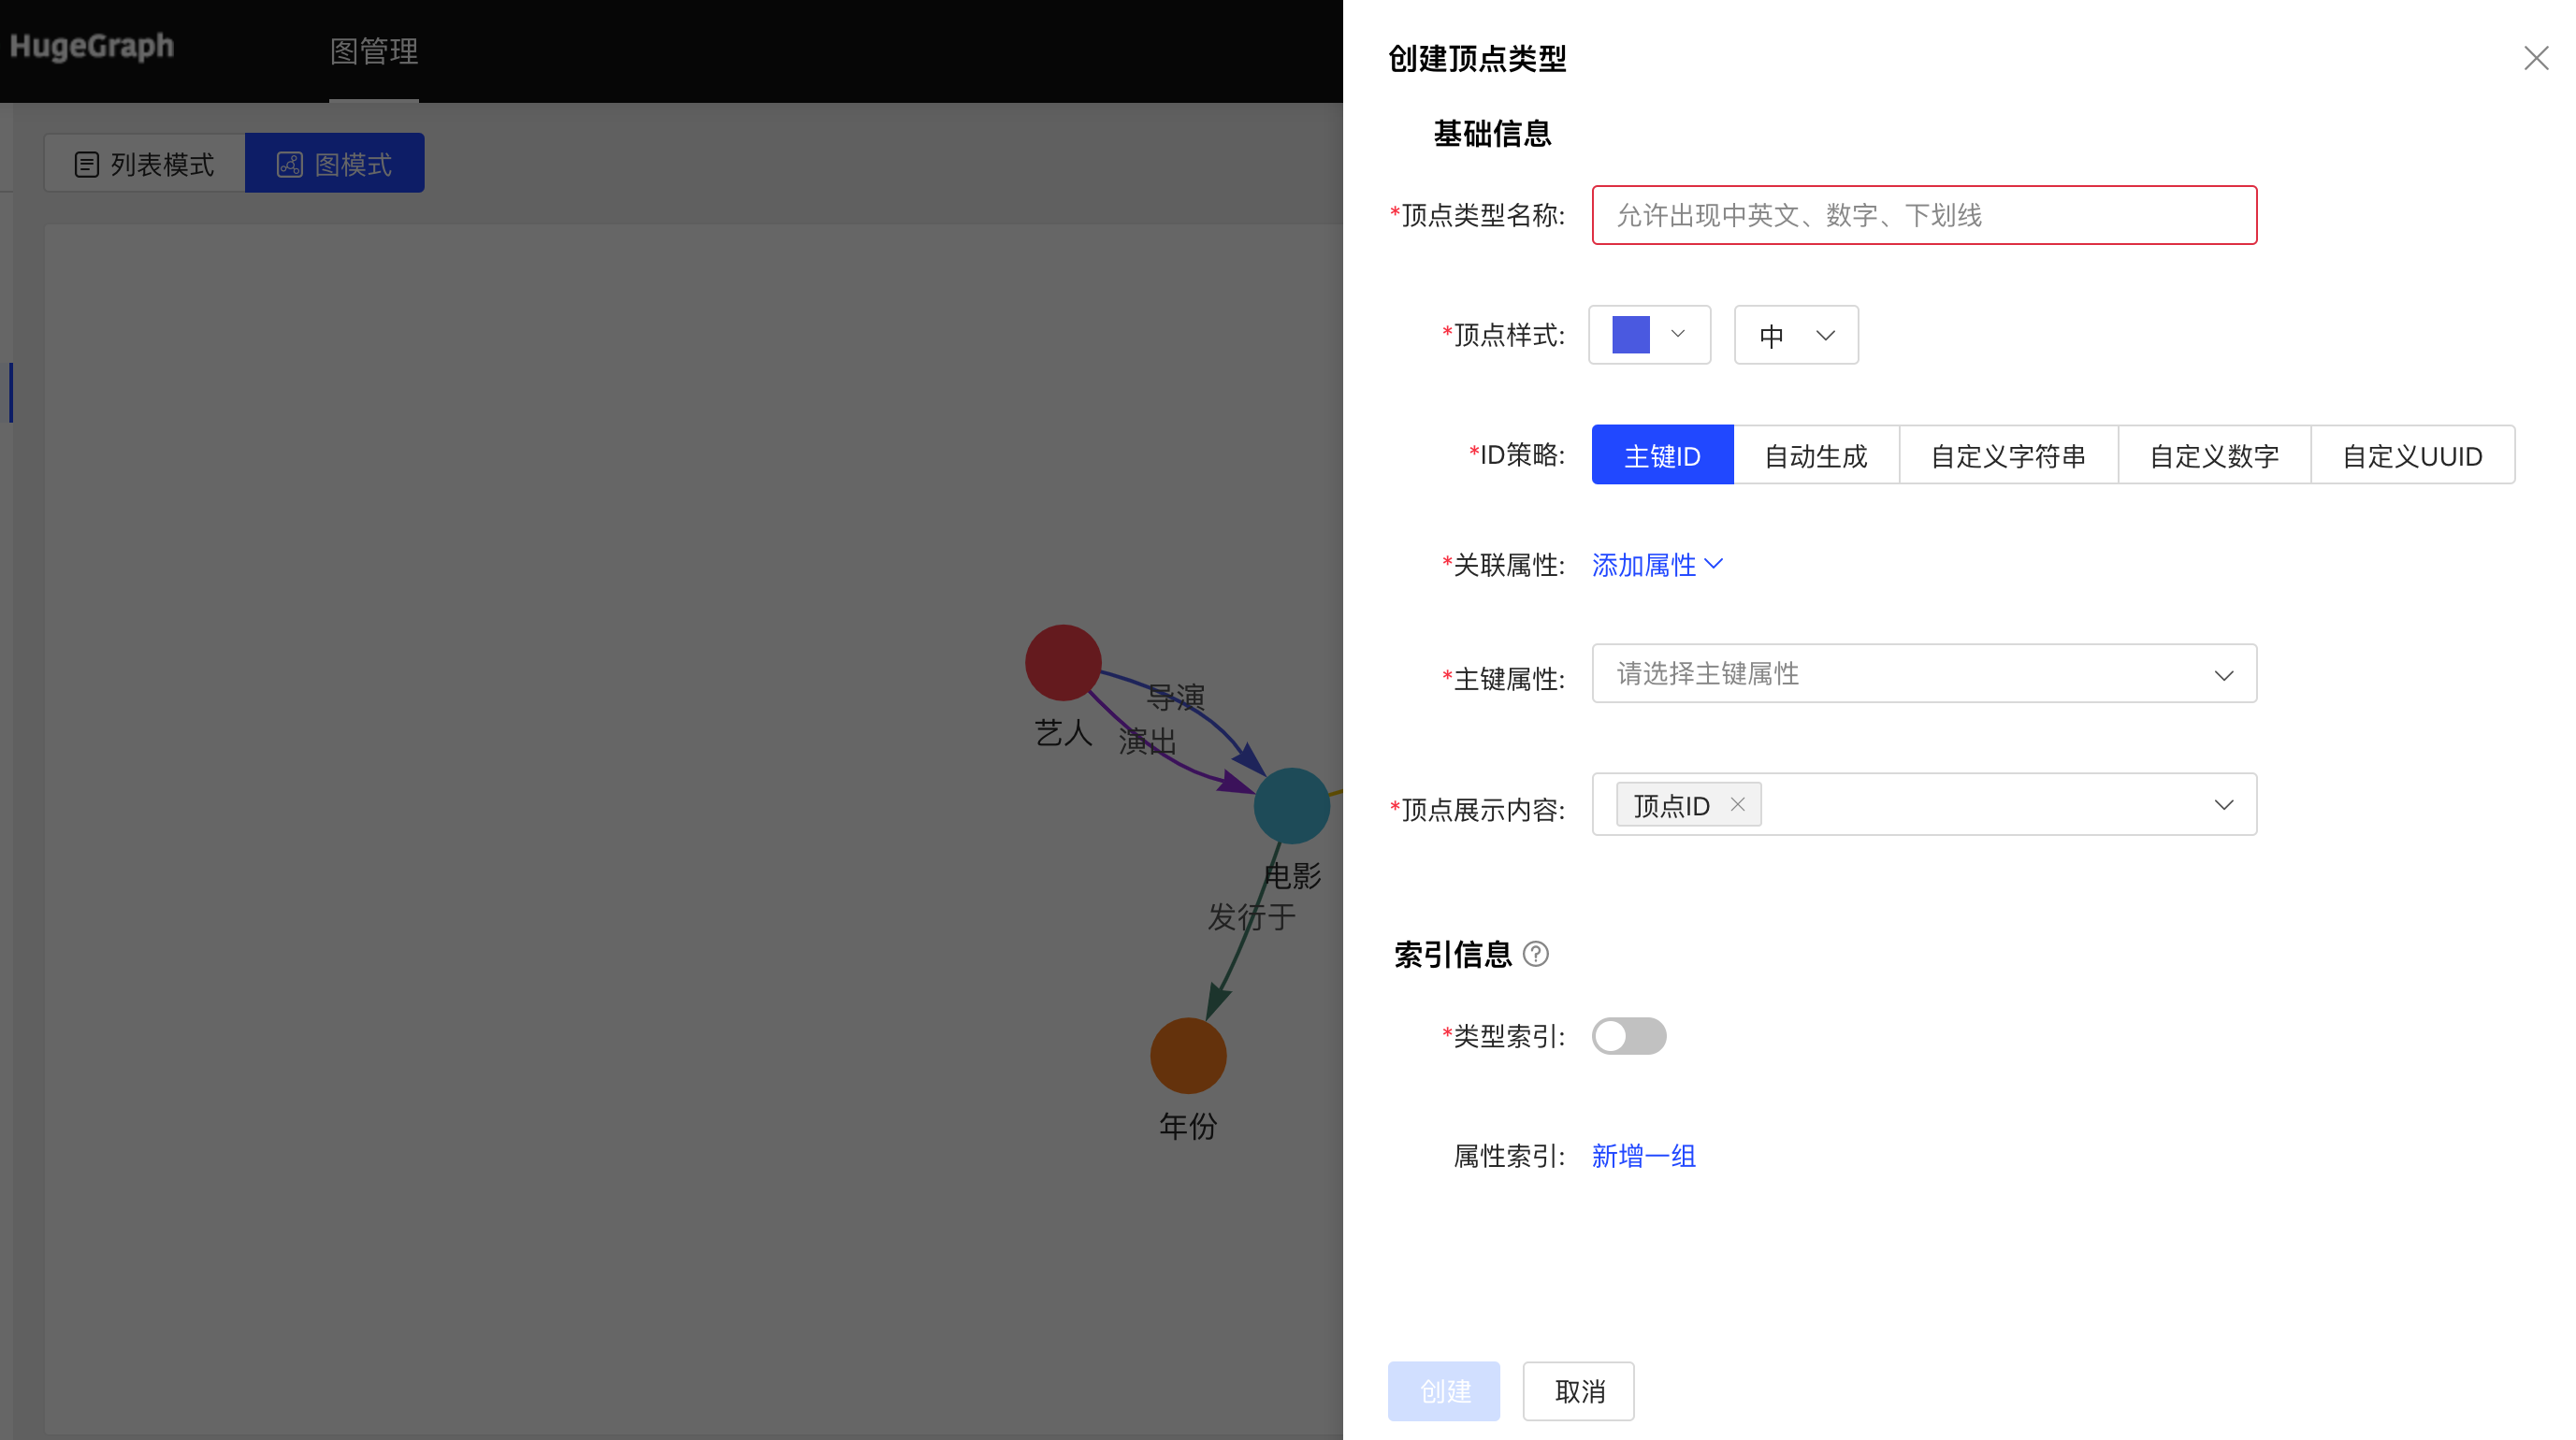
- Fill in or select the vertex type name, ID strategy, association attribute, primary key attribute, vertex style, content displayed below the vertex in the query result, and index information: including whether to create a type index, and the specific content of the attribute index, complete the vertex Type creation.
List mode:
Graph mode:
4.2.3.2 Reuse
- The multiplexing of vertex types will reuse the attributes and attribute indexes associated with this type together.
- The reuse method is similar to the property reuse, see 3.2.2.2.
4.2.3.3 Administration
Editing operations are available. The vertex style, association type, vertex display content, and attribute index can be edited, and the rest cannot be edited.
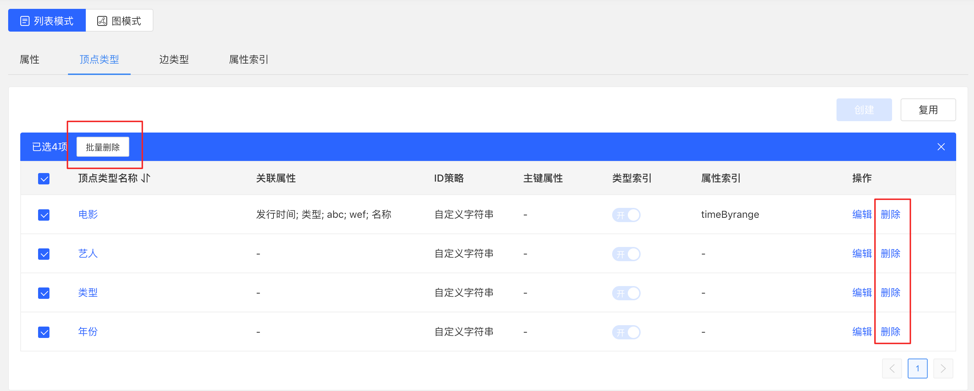
You can delete a single item or delete it in batches.
4.2.4 Edge Types
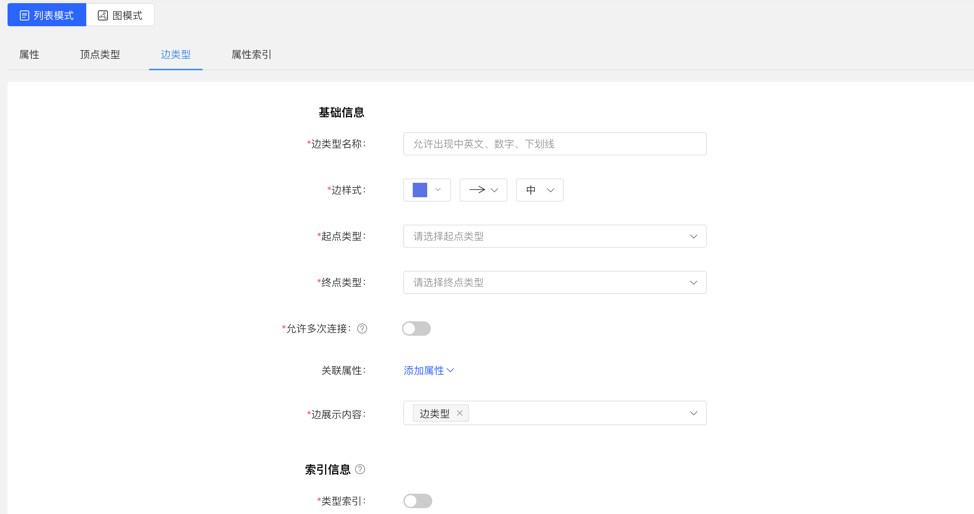
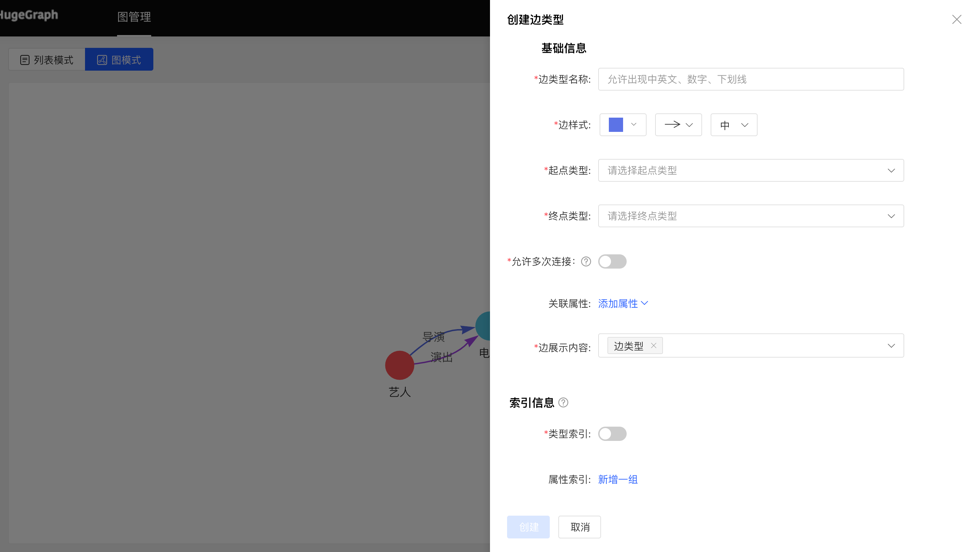
4.2.4.1 Create
- Fill in or select the edge type name, start point type, end point type, associated attributes, whether to allow multiple connections, edge style, content displayed below the edge in the query result, and index information: including whether to create a type index, and attribute index The specific content, complete the creation of the edge type.
List mode:
Graph mode:
4.2.4.2 Reuse
- The reuse of the edge type will reuse the start point type, end point type, associated attribute and attribute index of this type.
- The reuse method is similar to the property reuse, see 3.2.2.2.
4.2.4.3 Administration
- Editing operations are available. Edge styles, associated attributes, edge display content, and attribute indexes can be edited, and the rest cannot be edited, the same as the vertex type.
- You can delete a single item or delete it in batches.
4.2.5 Index Types
Displays vertex and edge indices for vertex types and edge types.
4.3 Data Import
Note:currently, we recommend to use hugegraph-loader to import data formally. The built-in import of hubble is used for testing and getting started.
The usage process of data import is as follows:

4.3.1 Module entrance
Left navigation:

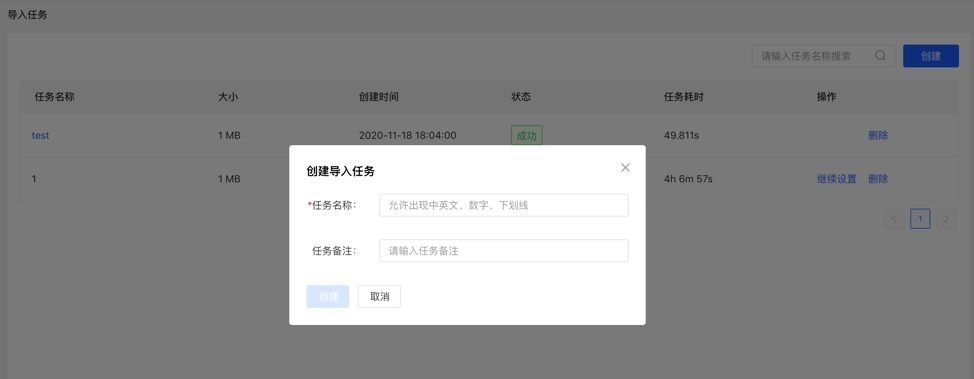
4.3.2 Create task
- Fill in the task name and remarks (optional) to create an import task.
- Multiple import tasks can be created and imported in parallel.
4.3.3 Uploading files
- Upload the file that needs to be composed. The currently supported format is CSV, which will be updated continuously in the future.
- Multiple files can be uploaded at the same time.
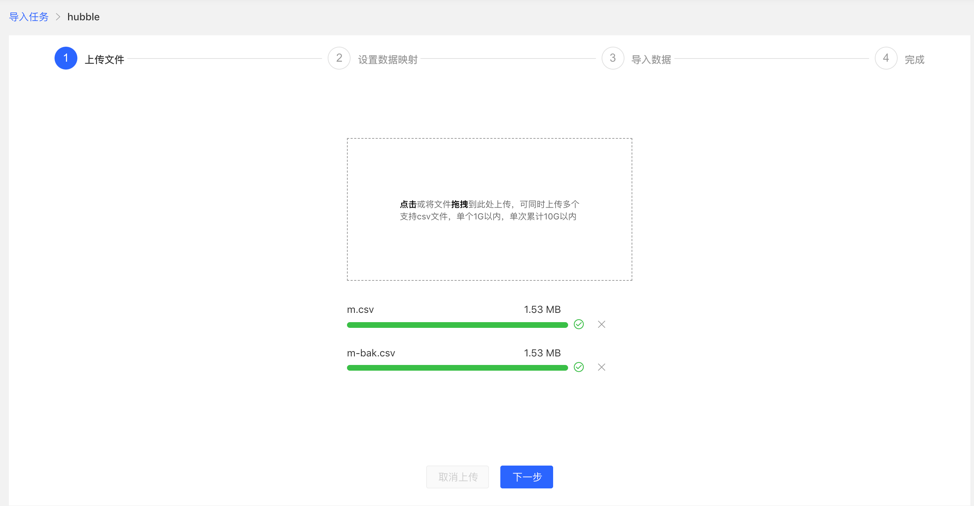
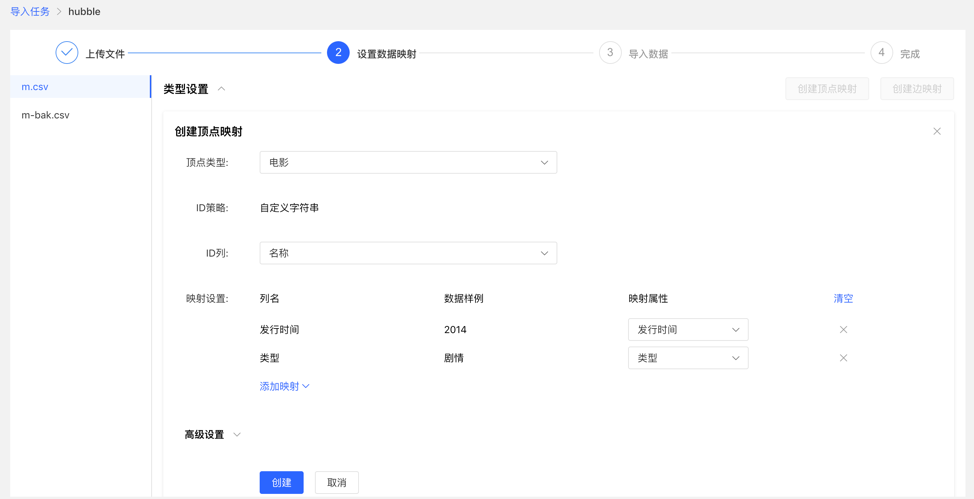
4.3.4 Setting up data mapping
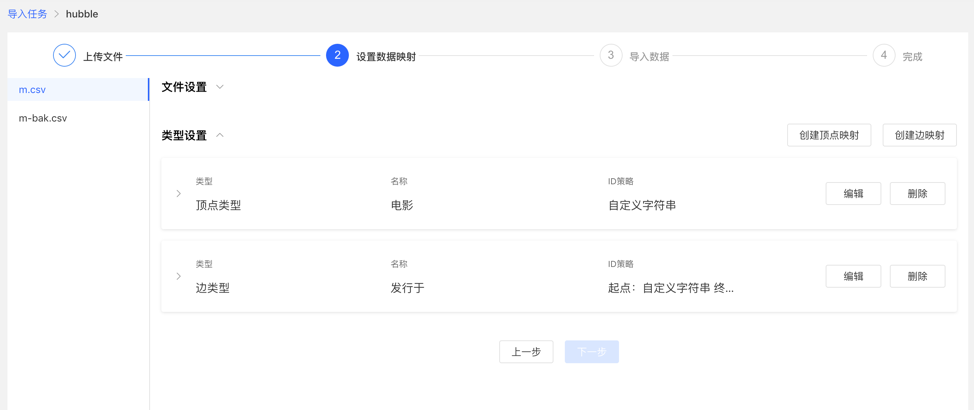
Set up data mapping for uploaded files, including file settings and type settings
File settings: Check or fill in whether to include the header, separator, encoding format and other settings of the file itself, all set the default values, no need to fill in manually
Type setting:
Vertex map and edge map:
【Vertex Type】: Select the vertex type, and upload the column data in the file for its ID mapping;
【Edge Type】: Select the edge type and map the column data of the uploaded file to the ID column of its start point type and end point type;
Mapping settings: upload the column data in the file for the attribute mapping of the selected vertex type. Here, if the attribute name is the same as the header name of the file, the mapping attribute can be automatically matched, and there is no need to manually fill in the selection.
After completing the setting, the setting list will be displayed before proceeding to the next step. It supports the operations of adding, editing and deleting mappings.
Fill in the settings map:
Mapping list:
4.3.5 Import data
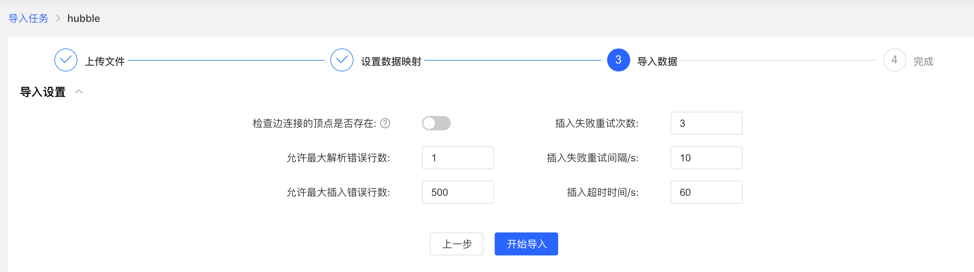
Before importing, you need to fill in the import setting parameters. After filling in, you can start importing data into the gallery.
- Import settings
- The import setting parameter items are as shown in the figure below, all set the default value, no need to fill in manually
- Import details
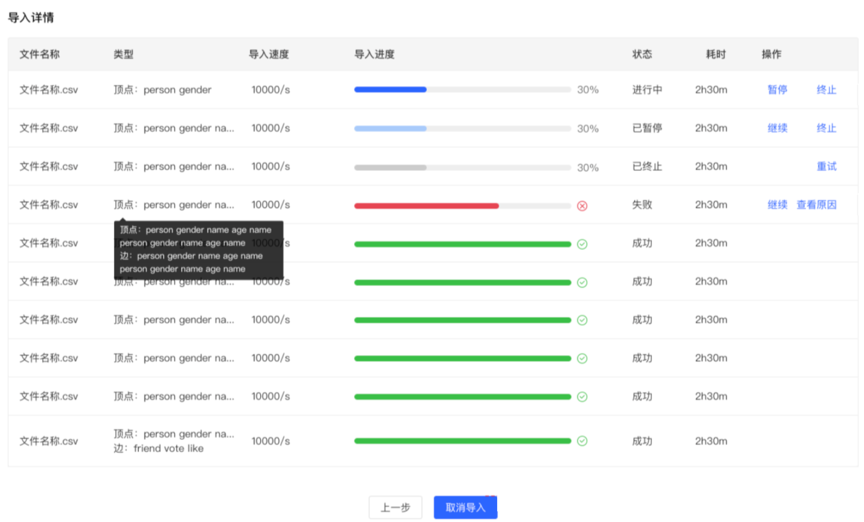
- Click Start Import to start the file import task
- The import details provide the mapping type, import speed, import progress, time-consuming and the specific status of the current task set for each uploaded file, and can pause, resume, stop and other operations for each task
- If the import fails, you can view the specific reason
4.4 Data Analysis
4.4.1 Module entry
Left navigation:

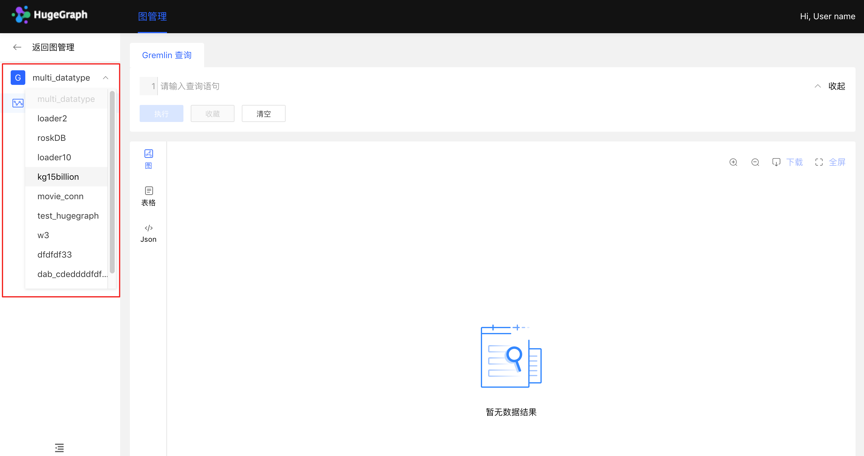
4.4.2 Multi-graphs switching
By switching the entrance on the left, flexibly switch the operation space of multiple graphs
4.4.3 Graph Analysis and Processing
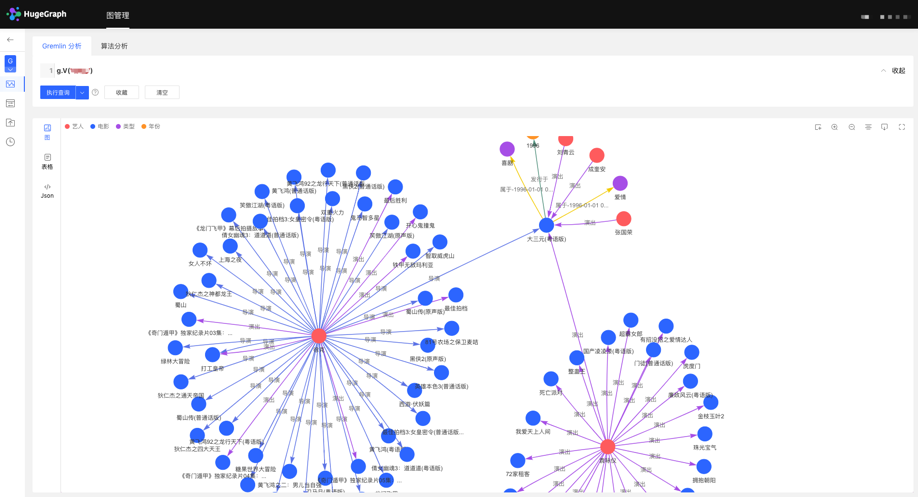
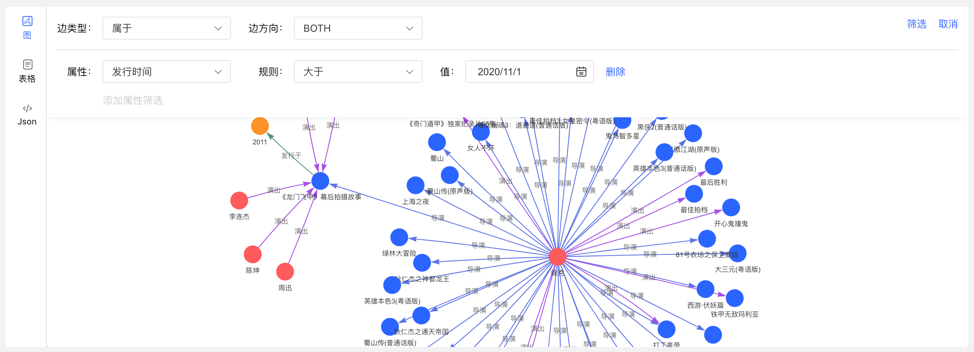
HugeGraph supports Gremlin, a graph traversal query language of Apache TinkerPop3. Gremlin is a general graph database query language. By entering Gremlin statements and clicking execute, you can perform query and analysis operations on graph data, and create and delete vertices/edges. vertex/edge attribute modification, etc.
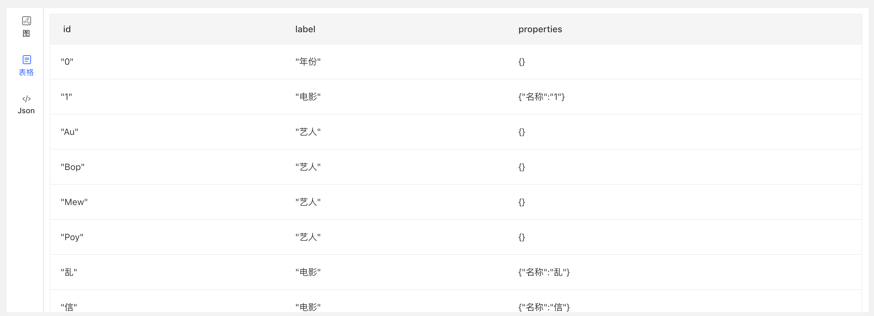
After Gremlin query, below is the graph result display area, which provides 3 kinds of graph result display modes: [Graph Mode], [Table Mode], [Json Mode].
⚠️ SEC Reminder: Hubble allows the direct input and execution of native Gremlin query statements on the web interface, which grants users relatively high operational privileges. Please avoid exposing the Hubble service to public network environments. It is recommended to ensure that the graph database server has enabled the Authentication System (Auth) combined with an IP Whitelist for strict permission control when in use, preventing unauthorized access or malware execution risks.
Support zoom, center, full screen, export and other operations.
【Picture Mode】
【Table mode】
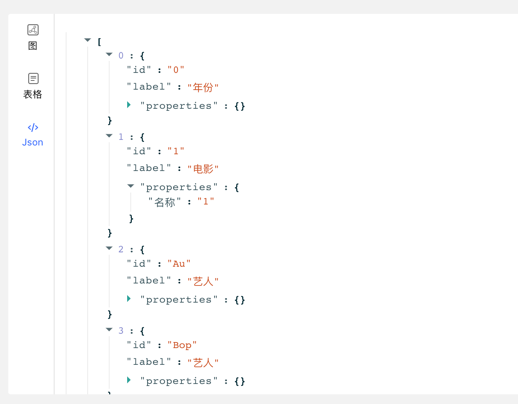
【Json mode】
4.4.4 Data Details
Click the vertex/edge entity to view the data details of the vertex/edge, including vertex/edge type, vertex ID, attribute and corresponding value, expand the information display dimension of the graph, and improve the usability.
4.4.5 Multidimensional Path Query of Graph Results
In addition to the global query, an in-depth customized query and hidden operations can be performed for the vertices in the query result to realize customized mining of graph results.
Right-click a vertex, and the menu entry of the vertex appears, which can be displayed, inquired, hidden, etc.
- Expand: Click to display the vertices associated with the selected point.
- Query: By selecting the edge type and edge direction associated with the selected point, and then selecting its attributes and corresponding filtering rules under this condition, a customized path display can be realized.
- Hide: When clicked, hides the selected point and its associated edges.
Double-clicking a vertex also displays the vertex associated with the selected point.
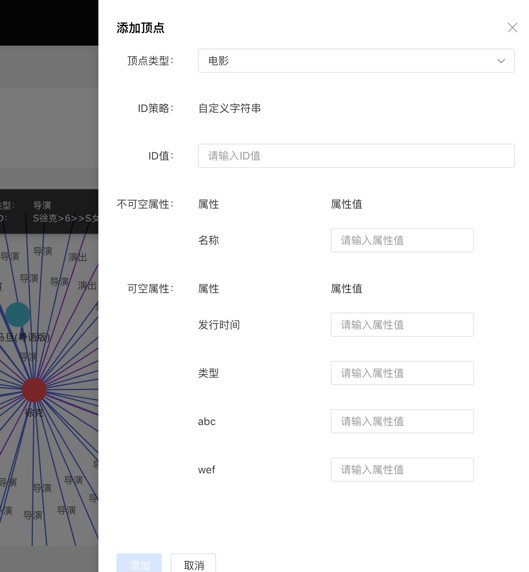
4.4.6 Add vertex/edge
4.4.6.1 Added vertex
In the graph area, two entries can be used to dynamically add vertices, as follows:
- Click on the graph area panel, the Add Vertex entry appears
- Click the first icon in the action bar in the upper right corner
Complete the addition of vertices by selecting or filling in the vertex type, ID value, and attribute information.
The entry is as follows:
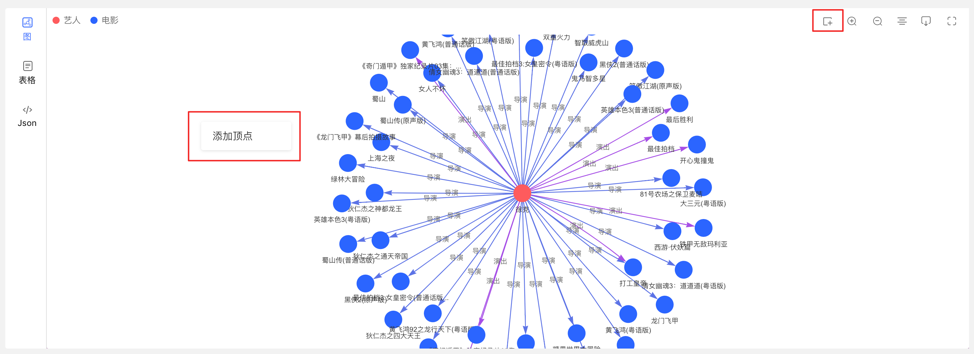
Add the vertex content as follows:
4.4.6.2 Add edge
Right-click a vertex in the graph result to add the outgoing or incoming edge of that point.
4.4.7 Execute the query of records and favorites
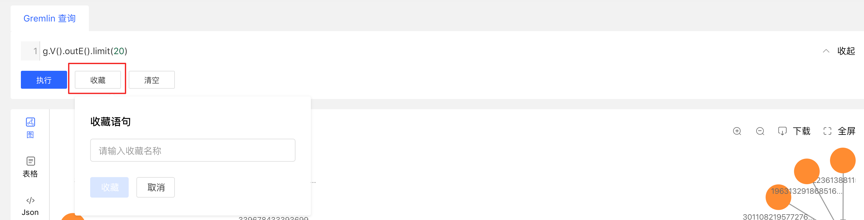
- Record each query record at the bottom of the graph area, including: query time, execution type, content, status, time-consuming, as well as [collection] and [load] operations, to achieve a comprehensive record of graph execution, with traces to follow, and Can quickly load and reuse execution content
- Provides the function of collecting sentences, which can be used to collect frequently used sentences, which is convenient for fast calling of high-frequency sentences.
4.5 Task Management
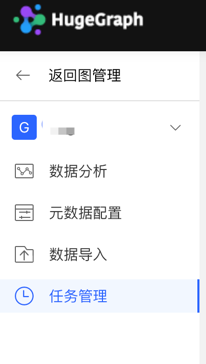
4.5.1 Module entry
Left navigation:
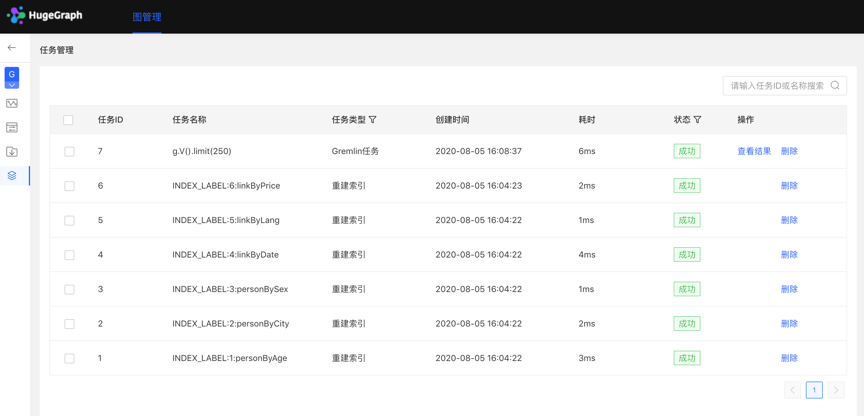
4.5.2 Task Management
- Provide unified management and result viewing of asynchronous tasks. There are 4 types of asynchronous tasks, namely:
- gremlin: Gremlin tasks
- algorithm: OLAP algorithm task
- remove_schema: remove metadata
- rebuild_index: rebuild the index
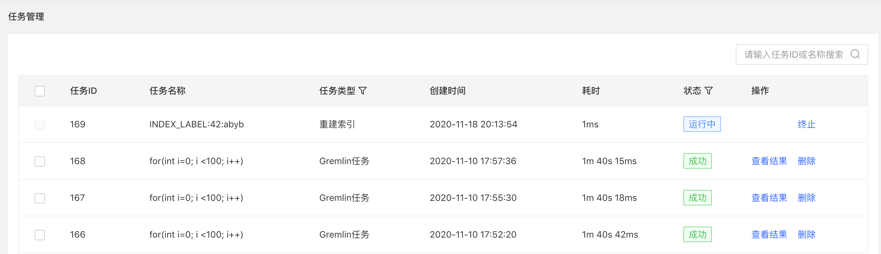
- The list displays the asynchronous task information of the current graph, including task ID, task name, task type, creation time, time-consuming, status, operation, and realizes the management of asynchronous tasks.
- Support filtering by task type and status
- Support searching for task ID and task name
- Asynchronous tasks can be deleted or deleted in batches
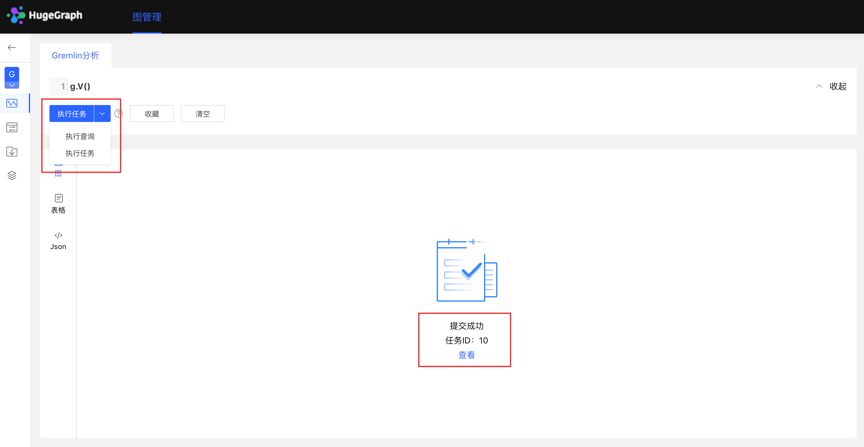
4.5.3 Gremlin asynchronous tasks
- Create a task
- The data analysis module currently supports two Gremlin operations, Gremlin query and Gremlin task; if the user switches to the Gremlin task, after clicking execute, an asynchronous task will be created in the asynchronous task center;
- Task submission
- After the task is submitted successfully, the graph area returns the submission result and task ID
- Mission details
- Provide [View] entry, you can jump to the task details to view the specific execution of the current task After jumping to the task center, the currently executing task line will be displayed directly
Click to view the entry to jump to the task management list, as follows:
- View the results
- The results are displayed in the form of JSON
4.5.4 OLAP algorithm tasks
There is no visual OLAP algorithm execution on Hubble. You can call the RESTful API to perform OLAP algorithm tasks, find the corresponding tasks by ID in the task management, and view the progress and results.
- Create a task
- In the metadata modeling module, when deleting metadata, an asynchronous task for deleting metadata can be created
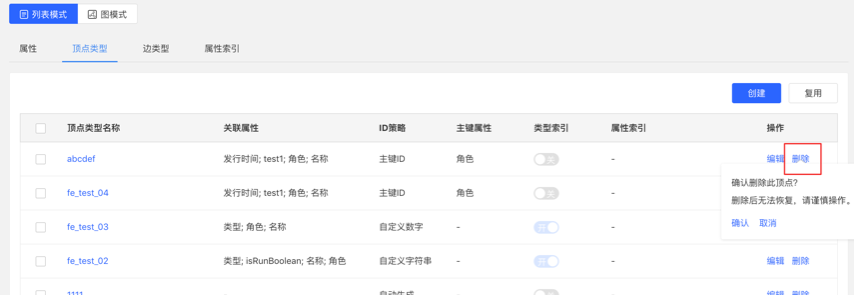
- When editing an existing vertex/edge type operation, when adding an index, an asynchronous task of creating an index can be created
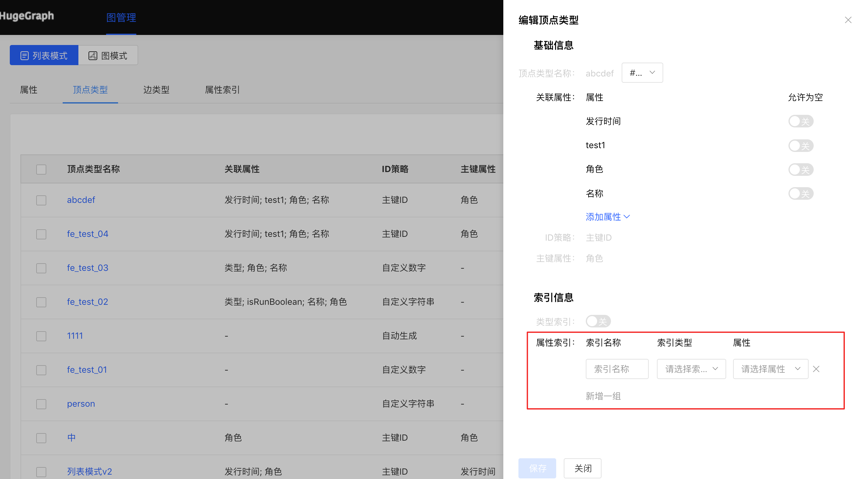
- Task details
- After confirming/saving, you can jump to the task center to view the details of the current task
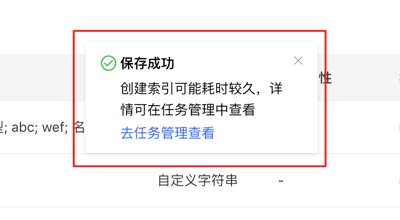
5 Configuration
HugeGraph-Hubble can be configured through the conf/hugegraph-hubble.properties file.
5.1 Server Configuration
| Configuration Item | Default Value | Description |
|---|
hubble.host | 0.0.0.0 | The address that Hubble service binds to |
hubble.port | 8088 | The port that Hubble service listens on |
5.2 Gremlin Query Limits
These settings control query result limits to prevent memory issues:
| Configuration Item | Default Value | Description |
|---|
gremlin.suffix_limit | 250 | Maximum query suffix length |
gremlin.vertex_degree_limit | 100 | Maximum vertex degree to display |
gremlin.edges_total_limit | 500 | Maximum number of edges returned |
gremlin.batch_query_ids | 100 | ID batch query size |
3.2.2 - HugeGraph-Loader Quick Start
1 HugeGraph-Loader Overview
HugeGraph-Loader is the data import component of HugeGraph, which can convert data from various data sources into graph vertices and edges and import them into the graph database in batches.
Currently supported data sources include:
- Local disk file or directory, supports TEXT, CSV and JSON format files, supports compressed files
- HDFS file or directory supports compressed files
- Mainstream relational databases, such as MySQL, PostgreSQL, Oracle, SQL Server
Local disk files and HDFS files support resumable uploads.
It will be explained in detail below.
Note: HugeGraph-Loader requires HugeGraph Server service, please refer to HugeGraph-Server Quick Start to download and start Server
Testing Guide: For running HugeGraph-Loader tests locally, please refer to HugeGraph Toolchain Local Testing Guide
2 Get HugeGraph-Loader
There are two ways to get HugeGraph-Loader:
- Use docker image (Convenient for Test/Dev)
- Download the compiled tarball
- Clone source code then compile and install
2.1 Use Docker image (Convenient for Test/Dev)
We can deploy the loader service using docker run -itd --name loader hugegraph/loader:1.5.0. For the data that needs to be loaded, it can be copied into the loader container either by mounting -v /path/to/data/file:/loader/file or by using docker cp.
Alternatively, to start the loader using docker-compose, the command is docker-compose up -d. An example of the docker-compose.yml is as follows:
version: '3'

services:
  server:
    image: hugegraph/hugegraph:1.3.0
    container_name: server
    ports:
      - 8080:8080

  loader:
    image: hugegraph/loader:1.3.0
    container_name: loader
    # mount your own data here
    # volumes:
      # - /path/to/data/file:/loader/file
The specific data loading process can be referenced under 4.5 User Docker to load data
Note:
The docker image of hugegraph-loader is a convenience release to start hugegraph-loader quickly, but not official distribution artifacts. You can find more details from ASF Release Distribution Policy.
Recommend to use release tag(like 1.5.0) for the stable version. Use latest tag to experience the newest functions in development.
2.2 Download the compiled archive
Download the latest version of the HugeGraph-Toolchain release package:
wget https://downloads.apache.org/hugegraph/{version}/apache-hugegraph-toolchain-incubating-{version}.tar.gz
tar zxf *hugegraph*.tar.gz
2.3 Clone source code to compile and install
Clone the latest version of HugeGraph-Loader source package:
# 1. get from github
git clone https://github.com/apache/hugegraph-toolchain.git

# 2. get from direct  (e.g. here is 1.0.0, please choose the latest version)
wget https://downloads.apache.org/hugegraph/{version}/apache-hugegraph-toolchain-incubating-{version}-src.tar.gz
click to fold/collapse hwo to install ojdbc
Due to the license limitation of the Oracle OJDBC, you need to manually install ojdbc to the local maven repository.
Visit the Oracle jdbc downloads page. Select Oracle Database 12c Release 2 (12.2.0.1) drivers, as shown in the following figure.
After opening the link, select “ojdbc8.jar”.
Install ojdbc8 to the local maven repository, enter the directory where ojdbc8.jar is located, and execute the following command.
mvn install:install-file -Dfile=./ojdbc8.jar -DgroupId=com.oracle -DartifactId=ojdbc8 -Dversion=12.2.0.1 -Dpackaging=jar
Compile and generate tar package:
cd hugegraph-loader
mvn clean package -DskipTests
3 How to use
The basic process of using HugeGraph-Loader is divided into the following steps:
- Write graph schema
- Prepare data files
- Write input source map files
- Execute command import
3.1 Construct graph schema
This step is the modeling process. Users need to have a clear idea of their existing data and the graph model they want to create, and then write the schema to build the graph model.
For example, if you want to create a graph with two types of vertices and two types of edges, the vertices are “people” and “software”, the edges are “people know people” and “people create software”, and these vertices and edges have some attributes, For example, the vertex “person” has: “name”, “age” and other attributes,
“Software” includes: “name”, “sale price” and other attributes; side “knowledge” includes: “date” attribute and so on.

graph model example
After designing the graph model, we can use groovy to write the definition of schema and save it to a file, here named schema.groovy.
// Create some properties
schema.propertyKey("name").asText().ifNotExist().create();
schema.propertyKey("age").asInt().ifNotExist().create();
schema.propertyKey("city").asText().ifNotExist().create();
schema.propertyKey("date").asText().ifNotExist().create();
schema.propertyKey("price").asDouble().ifNotExist().create();

// Create the person vertex type, which has three attributes: name, age, city, and the primary key is name
schema.vertexLabel("person").properties("name", "age", "city").primaryKeys("name").ifNotExist().create();
// Create a software vertex type, which has two properties: name, price, the primary key is name
schema.vertexLabel("software").properties("name", "price").primaryKeys("name").ifNotExist().create();

// Create the knows edge type, which goes from person to person
schema.edgeLabel("knows").sourceLabel("person").targetLabel("person").ifNotExist().create();
// Create the created edge type, which points from person to software
schema.edgeLabel("created").sourceLabel("person").targetLabel("software").ifNotExist().create();
Please refer to the corresponding section in hugegraph-client for the detailed description of the schema.
3.2 Prepare data
The data sources currently supported by HugeGraph-Loader include:
- local disk file or directory
- HDFS file or directory
- Partial relational database
- Kafka topic
3.2.1 Data source structure
3.2.1.1 Local disk file or directory
The user can specify a local disk file as the data source. If the data is scattered in multiple files, a certain directory is also supported as the data source, but multiple directories are not supported as the data source for the time being.
For example, my data is scattered in multiple files, part-0, part-1 … part-n. To perform the import, it must be ensured that they are placed in one directory. Then in the loader’s mapping file, specify path as the directory.
Supported file formats include:
TEXT is a text file with custom delimiters, the first line is usually the header, and the name of each column is recorded, and no header line is allowed (specified in the mapping file). Each remaining row represents a record, which will be converted into a vertex/edge; each column of the row corresponds to a field, which will be converted into the id, label or attribute of the vertex/edge;
An example is as follows:
id|name|lang|price|ISBN
1|lop|java|328|ISBN978-7-107-18618-5
2|ripple|java|199|ISBN978-7-100-13678-5
CSV is a TEXT file with commas , as delimiters. When a column value itself contains a comma, the column value needs to be enclosed in double quotes, for example:
marko,29,Beijing
"li,nary",26,"Wu,han"
The JSON file requires that each line is a JSON string, and the format of each line needs to be consistent.
{"source_name": "marko", "target_name": "vadas", "date": "20160110", "weight": 0.5}
{"source_name": "marko", "target_name": "josh", "date": "20130220", "weight": 1.0}
3.2.1.2 HDFS file or directory
Users can also specify HDFS files or directories as data sources, all of the above requirements for local disk files or directories apply here. In addition, since HDFS usually stores compressed files, loader also provides support for compressed files, and local disk file or directory also supports compressed files.
Currently supported compressed file types include: GZIP, BZ2, XZ, LZMA, SNAPPY_RAW, SNAPPY_FRAMED, Z, DEFLATE, LZ4_BLOCK, LZ4_FRAMED, ORC, and PARQUET.
3.2.1.3 Mainstream relational database
The loader also supports some relational databases as data sources, and currently supports MySQL, PostgreSQL, Oracle, and SQL Server.
However, the requirements for the table structure are relatively strict at present. If association query needs to be done during the import process, such a table structure is not allowed. The associated query means: after reading a row of the table, it is found that the value of a certain column cannot be used directly (such as a foreign key), and you need to do another query to determine the true value of the column.
For example, Suppose there are three tables, person, software and created
// person schema
id | name | age | city
// software schema
id | name | lang | price
// created schema
id | p_id | s_id | date
If the id strategy of person or software is specified as PRIMARY_KEY when modeling (schema), choose name as the primary key (note: this is the concept of vertex-label in hugegraph), when importing edge data, the source vertex and target need to be spliced out. For the id of the vertex, you must go to the person/software table with p_id/s_id to find the corresponding name. In the case of the schema that requires additional query, the loader does not support it temporarily. In this case, the following two methods can be used instead:
- The id strategy of person and software is still specified as PRIMARY_KEY, but the id column of the person table and software table is used as the primary key attribute of the vertex, so that the id can be generated by directly splicing p_id and s_id with the label of the vertex when importing an edge;
- Specify the id policy of person and software as CUSTOMIZE, and then directly use the id column of the person table and the software table as the vertex id, so that p_id and s_id can be used directly when importing edges;
The key point is to make the edge use p_id and s_id directly, don’t check it again.
3.2.2 Prepare vertex and edge data
3.2.2.1 Vertex Data
The vertex data file consists of data line by line. Generally, each line is used as a vertex, and each column is used as a vertex attribute. The following description uses CSV format as an example.
- person vertex data (the data itself does not contain a header)
Tom,48,Beijing
Jerry,36,Shanghai
- software vertex data (the data itself contains the header)
name,price
Photoshop,999
Office,388
3.2.2.2 Edge data
The edge data file consists of data line by line. Generally, each line is used as an edge. Some columns are used as the IDs of the source and target vertices, and other columns are used as edge attributes. The following uses JSON format as an example.
{"source_name": "Tom", "target_name": "Jerry", "date": "2008-12-12"}
{"source_name": "Tom", "target_name": "Photoshop"}
{"source_name": "Tom", "target_name": "Office"}
{"source_name": "Jerry", "target_name": "Office"}
3.3 Write data source mapping file
3.3.1 Mapping file overview
The mapping file of the input source is used to describe how to establish the mapping relationship between the input source data and the vertex type/edge type of the graph. It is organized in JSON format and consists of multiple mapping blocks, each of which is responsible for mapping an input source. Mapped to vertices and edges.
Specifically, each mapping block contains an input source and multiple vertex mapping and edge mapping blocks, and the input source block corresponds to the local disk file or directory, HDFS file or directory and relational database are responsible for describing the basic information of the data source, such as where the data is, what format, what is the delimiter, etc. The vertex map/edge map is bound to the input source, which columns of the input source can be selected, which columns are used as ids, which columns are used as attributes, and what attributes are mapped to each column, the values of the columns are mapped to what values of attributes, and so on.
In the simplest terms, each mapping block describes: where is the file to be imported, which type of vertices/edges each line of the file is to be used as which columns of the file need to be imported, and the corresponding vertices/edges of these columns. what properties, etc.
Note: The format of the mapping file before version 0.11.0 and the format after 0.11.0 has changed greatly. For the convenience of expression, the mapping file (format) before 0.11.0 is called version 1.0, and the version after 0.11.0 is version 2.0. And unless otherwise specified, the “map file” refers to version 2.0.
Click to expand/collapse the skeleton of the map file for version 2.0
{
  "version": "2.0",
  "structs": [
    {
      "id": "1",
      "input": {
      },
      "vertices": [
        {},
        {}
      ],
      "edges": [
        {},
        {}
      ]
    }
  ]
}
Two versions of the mapping file are given directly here (the above graph model and data file are described)
Click to expand/collapse the mapping file for version 2.0
{
  "version": "2.0",
  "structs": [
    {
      "id": "1",
      "skip": false,
      "input": {
        "type": "FILE",
        "path": "vertex_person.csv",
        "file_filter": {
          "extensions": [
            "*"
          ]
        },
        "format": "CSV",
        "delimiter": ",",
        "date_format": "yyyy-MM-dd HH:mm:ss",
        "time_zone": "GMT+8",
        "skipped_line": {
          "regex": "(^#|^//).*|"
        },
        "compression": "NONE",
        "header": [
          "name",
          "age",
          "city"
        ],
        "charset": "UTF-8",
        "list_format": {
          "start_symbol": "[",
          "elem_delimiter": "|",
          "end_symbol": "]"
        }
      },
      "vertices": [
        {
          "label": "person",
          "skip": false,
          "id": null,
          "unfold": false,
          "field_mapping": {},
          "value_mapping": {},
          "selected": [],
          "ignored": [],
          "null_values": [
            ""
          ],
          "update_strategies": {}
        }
      ],
      "edges": []
    },
    {
      "id": "2",
      "skip": false,
      "input": {
        "type": "FILE",
        "path": "vertex_software.csv",
        "file_filter": {
          "extensions": [
            "*"
          ]
        },
        "format": "CSV",
        "delimiter": ",",
        "date_format": "yyyy-MM-dd HH:mm:ss",
        "time_zone": "GMT+8",
        "skipped_line": {
          "regex": "(^#|^//).*|"
        },
        "compression": "NONE",
        "header": null,
        "charset": "UTF-8",
        "list_format": {
          "start_symbol": "",
          "elem_delimiter": ",",
          "end_symbol": ""
        }
      },
      "vertices": [
        {
          "label": "software",
          "skip": false,
          "id": null,
          "unfold": false,
          "field_mapping": {},
          "value_mapping": {},
          "selected": [],
          "ignored": [],
          "null_values": [
            ""
          ],
          "update_strategies": {}
        }
      ],
      "edges": []
    },
    {
      "id": "3",
      "skip": false,
      "input": {
        "type": "FILE",
        "path": "edge_knows.json",
        "file_filter": {
          "extensions": [
            "*"
          ]
        },
        "format": "JSON",
        "delimiter": null,
        "date_format": "yyyy-MM-dd HH:mm:ss",
        "time_zone": "GMT+8",
        "skipped_line": {
          "regex": "(^#|^//).*|"
        },
        "compression": "NONE",
        "header": null,
        "charset": "UTF-8",
        "list_format": null
      },
      "vertices": [],
      "edges": [
        {
          "label": "knows",
          "skip": false,
          "source": [
            "source_name"
          ],
          "unfold_source": false,
          "target": [
            "target_name"
          ],
          "unfold_target": false,
          "field_mapping": {
            "source_name": "name",
            "target_name": "name"
          },
          "value_mapping": {},
          "selected": [],
          "ignored": [],
          "null_values": [
            ""
          ],
          "update_strategies": {}
        }
      ]
    },
    {
      "id": "4",
      "skip": false,
      "input": {
        "type": "FILE",
        "path": "edge_created.json",
        "file_filter": {
          "extensions": [
            "*"
          ]
        },
        "format": "JSON",
        "delimiter": null,
        "date_format": "yyyy-MM-dd HH:mm:ss",
        "time_zone": "GMT+8",
        "skipped_line": {
          "regex": "(^#|^//).*|"
        },
        "compression": "NONE",
        "header": null,
        "charset": "UTF-8",
        "list_format": null
      },
      "vertices": [],
      "edges": [
        {
          "label": "created",
          "skip": false,
          "source": [
            "source_name"
          ],
          "unfold_source": false,
          "target": [
            "target_name"
          ],
          "unfold_target": false,
          "field_mapping": {
            "source_name": "name",
            "target_name": "name"
          },
          "value_mapping": {},
          "selected": [],
          "ignored": [],
          "null_values": [
            ""
          ],
          "update_strategies": {}
        }
      ]
    }
  ]
}
Click to expand/collapse the mapping file for version 1.0
{
  "vertices": [
    {
      "label": "person",
      "input": {
        "type": "file",
        "path": "vertex_person.csv",
        "format": "CSV",
        "header": ["name", "age", "city"],
        "charset": "UTF-8"
      }
    },
    {
      "label": "software",
      "input": {
        "type": "file",
        "path": "vertex_software.csv",
        "format": "CSV"
      }
    }
  ],
  "edges": [
    {
      "label": "knows",
      "source": ["source_name"],
      "target": ["target_name"],
      "input": {
        "type": "file",
        "path": "edge_knows.json",
        "format": "JSON"
      },
      "field_mapping": {
        "source_name": "name",
        "target_name": "name"
      }
    },
    {
      "label": "created",
      "source": ["source_name"],
      "target": ["target_name"],
      "input": {
        "type": "file",
        "path": "edge_created.json",
        "format": "JSON"
      },
      "field_mapping": {
        "source_name": "name",
        "target_name": "name"
      }
    }
  ]
}
The 1.0 version of the mapping file is centered on the vertex and edge, and sets the input source; while the 2.0 version is centered on the input source, and sets the vertex and edge mapping. Some input sources (such as a file) can generate both vertices and edges. If you write in the 1.0 format, you need to write an input block in each of the vertex and edge mapping blocks. The two input blocks are exactly the same; and the 2.0 version only needs to write input once. Therefore, compared with version 1.0, version 2.0 can save some repetitive writing of input.
In the bin directory of hugegraph-loader-{version}, there is a script tool mapping-convert.sh that can directly convert the mapping file of version 1.0 to version 2.0. The usage is as follows:
bin/mapping-convert.sh struct.json
A struct-v2.json will be generated in the same directory as struct.json.
Input sources are currently divided into five categories: FILE, HDFS, JDBC, KAFKA and GRAPH, which are distinguished by the type node. We call them local file input sources, HDFS input sources, JDBC input sources, KAFKA input sources and GRAPH input source, which are described below.
- id: The id of the input source. This field is used to support some internal functions. It is not required (it will be automatically generated if it is not filled in). It is strongly recommended to write it, which is very helpful for debugging;
- skip: whether to skip the input source, because the JSON file cannot add comments, if you do not want to import an input source during a certain import, but do not want to delete the configuration of the input source, you can set it to true to skip it, the default is false, not required;
- input: input source map block, composite structure
- type: an input source type, file or FILE must be filled;
- path: the path of the local file or directory, the absolute path or the relative path relative to the mapping file, it is recommended to use the absolute path, required;
- file_filter: filter files with compound conditions from
path, compound structure, currently only supports configuration extensions, represented by child node extensions, the default is “*”, which means to keep all files; - format: the format of the local file, the optional values are CSV, TEXT and JSON, which must be uppercase and required;
- header: the column name of each column of the file, if not specified, the first line of the data file will be used as the header; when the file itself has a header and the header is specified, the first line of the file will be treated as a normal data line; JSON The file does not need to specify a header, optional;
- delimiter: The column delimiter of the file line, the default is comma
"," as the delimiter, the JSON file does not need to be specified, optional; - charset: the encoded character set of the file, the default is
UTF-8, optional; - date_format: custom date format, the default value is yyyy-MM-dd HH:mm:ss, optional; if the date is presented in the form of a timestamp, this item must be written as
timestamp (fixed writing); - time_zone: Set which time zone the date data is in, the default value is
GMT+8, optional; - skipped_line: The line to be skipped, compound structure, currently only the regular expression of the line to be skipped can be configured, described by the child node
regex, no line is skipped by default, optional; - compression: The compression format of the file, the optional values are NONE, GZIP, BZ2, XZ, LZMA, SNAPPY_RAW, SNAPPY_FRAMED, Z, DEFLATE, LZ4_BLOCK, LZ4_FRAMED, ORC and PARQUET, the default is NONE, which means a non-compressed file, optional;
- list_format: When a column of the file (non-JSON) is a collection structure (the Cardinality of the PropertyKey in the corresponding figure is Set or List), you can use this item to set the start character, separator, and end character of the column, compound structure :
- start_symbol: The start character of the collection structure column (the default value is
[, JSON format currently does not support specification) - elem_delimiter: the delimiter of the collection structure column (the default value is
|, JSON format currently only supports native , delimiter) - end_symbol: the end character of the collection structure column (the default value is
], the JSON format does not currently support specification)
The nodes and meanings of the above local file input source are basically applicable here. Only the different and unique nodes of the HDFS input source are listed below.
- type: input source type, must fill in hdfs or HDFS, required;
- path: the path of the HDFS file or directory, it must be the absolute path of HDFS, required;
- core_site_path: the path of the core-site.xml file of the HDFS cluster, the key point is to specify the address of the NameNode (
fs.default.name) and the implementation of the file system (fs.hdfs.impl);
As mentioned above, it supports multiple relational databases, but because their mapping structures are very similar, they are collectively referred to as JDBC input sources, and then use the vendor node to distinguish different databases.
- type: input source type, must fill in jdbc or JDBC, required;
- vendor: database type, optional options are [MySQL, PostgreSQL, Oracle, SQLServer], case-insensitive, required;
- driver: the type of driver used by jdbc, required;
- url: the url of the database that jdbc wants to connect to, required;
- database: the name of the database to be connected, required;
- schema: The name of the schema to be connected, different databases have different requirements, and the details are explained below;
- table: the name of the table to be connected, at least one of
table or custom_sql is required; - custom_sql: custom SQL statement, at least one of
table or custom_sql is required; - username: username to connect to the database, required;
- password: password for connecting to the database, required;
- batch_size: The size of one page when obtaining table data by page, the default is 500, optional;
MYSQL
| Node | Fixed value or common value |
|---|
| vendor | MYSQL |
| driver | com.mysql.cj.jdbc.Driver |
| url | jdbc:mysql://127.0.0.1:3306 |
schema: nullable, if filled in, it must be the same as the value of database
POSTGRESQL
| Node | Fixed value or common value |
|---|
| vendor | POSTGRESQL |
| driver | org.postgresql.Driver |
| url | jdbc:postgresql://127.0.0.1:5432 |
schema: nullable, default is “public”
ORACLE
| Node | Fixed value or common value |
|---|
| vendor | ORACLE |
| driver | oracle.jdbc.driver.OracleDriver |
| url | jdbc:oracle:thin:@127.0.0.1:1521 |
schema: nullable, the default value is the same as the username
SQLSERVER
| Node | Fixed value or common value |
|---|
| vendor | SQLSERVER |
| driver | com.microsoft.sqlserver.jdbc.SQLServerDriver |
| url | jdbc:sqlserver://127.0.0.1:1433 |
schema: required
- type: input source type,
kafka or KAFKA, required; - bootstrap_server: set the list of kafka bootstrap servers;
- topic: the topic to subscribe to;
- group: group of Kafka consumers;
- from_beginning: set whether to read from the beginning;
- format: format of the local file, options are CSV, TEXT and JSON, must be uppercase, required;
- header: column name of each column of the file, if not specified, the first line of the data file will be used as the header; when the file itself has a header and the header is specified, the first line of the file will be treated as an ordinary data line; JSON files do not need to specify the header, optional;
- delimiter: delimiter of the file line, default is comma “,” as delimiter, JSON files do not need to specify, optional;
- charset: encoding charset of the file, default is UTF-8, optional;
- date_format: customized date format, default value is yyyy-MM-dd HH:mm:ss, optional; if the date is presented in the form of timestamp, this item must be written as timestamp (fixed);
- extra_date_formats: a customized list of another date formats, empty by default, optional; each item in the list is an alternate date format to the date_format specified date format;
- time_zone: set which time zone the date data is in, default is GMT+8, optional;
- skipped_line: the line you want to skip, composite structure, currently can only configure the regular expression of the line to be skipped, described by the child node regex, the default is not to skip any line, optional;
- early_stop: the record pulled from Kafka broker at a certain time is empty, stop the task, default is false, only for debugging, optional;
- type: Data source type; must be filled in as
graph or GRAPH (required); - graphspace: Source graphSpace name; default is
DEFAULT; - graph: Source graph name (required);
- username: HugeGraph username;
- password: HugeGraph password;
- selected_vertices: Filtering rules for vertices to be synchronized;
- ignored_vertices: Filtering rules for vertices to be ignored;
- selected_edges: Filtering rules for edges to be synchronized;
- ignored_edges: Filtering rules for edges to be ignored;
- pd-peers: HugeGraph-PD node addresses;
- meta-endpoints: Meta service endpoints of the source cluster;
- cluster: Source cluster name;
- batch_size: Batch size for reading data from the source graph; default is 500;
3.3.3 Vertex and Edge Mapping
The nodes of vertex and edge mapping (a key in the JSON file) have a lot of the same parts. The same parts are introduced first, and then the unique nodes of vertex map and edge map are introduced respectively.
Nodes of the same section
- label:
label to which the vertex/edge data to be imported belongs, required; - field_mapping: Map the column name of the input source column to the attribute name of the vertex/edge, optional;
- value_mapping: map the data value of the input source to the attribute value of the vertex/edge, optional;
- selected: select some columns to insert, other unselected ones are not inserted, cannot exist at the same time as
ignored, optional; - ignored: ignore some columns so that they do not participate in insertion, cannot exist at the same time as
selected, optional; - null_values: You can specify some strings to represent null values, such as “NULL”. If the vertex/edge attribute corresponding to this column is also a nullable attribute, the value of this attribute will not be set when constructing the vertex/edge, optional ;
- update_strategies: If the data needs to be updated in batches in a specific way, you can specify a specific update strategy for each attribute (see below for details), optional;
- unfold: Whether to unfold the column, each unfolded column will form a row with other columns, which is equivalent to unfolding into multiple rows; for example, the value of a certain column (id column) of the file is
[1,2,3], The values of other columns are 18,Beijing. When unfold is set, this row will become 3 rows, namely: 1,18,Beijing, 2,18,Beijing and 3,18, Beijing. Note that this will only expand the column selected as id. Default false, optional;
Update strategy supports 8 types: (requires all uppercase)
- Value accumulation:
SUM - Take the greater of the two numbers/dates:
BIGGER - Take the smaller of two numbers/dates:
SMALLER - Set property takes union:
UNION - Set attribute intersection:
INTERSECTION - List attribute append element:
APPEND - List/Set attribute delete element:
ELIMINATE - Override an existing property:
OVERRIDE
Note: If the newly imported attribute value is empty, the existing old data will be used instead of the empty value. For the effect, please refer to the following example
// The update strategy is specified in the JSON file as follows
{
  "vertices": [
    {
      "label": "person",
      "update_strategies": {
        "age": "SMALLER",
        "set": "UNION"
      },
      "input": {
        "type": "file",
        "path": "vertex_person.txt",
        "format": "TEXT",
        "header": ["name", "age", "set"]
      }
    }
  ]
}

// 1. Write a line of data with the OVERRIDE update strategy (null means empty here)
'a b null null'

// 2. Write another line
'null null c d'

// 3. Finally we can get
'a b c d'

// If there is no update strategy, you will get
'null null c d'
Note : After adopting the batch update strategy, the number of disk read requests will increase significantly, and the import speed will be several times slower than that of pure write coverage (at this time HDD disk [IOPS](https://en.wikipedia .org/wiki/IOPS) will be the bottleneck, SSD is recommended for speed)
Unique Nodes for Vertex Maps
- id: Specify a column as the id column of the vertex. When the vertex id policy is
CUSTOMIZE, it is required; when the id policy is PRIMARY_KEY, it must be empty;
Unique Nodes for Edge Maps
- source: Select certain columns of the input source as the id column of source vertex. When the id policy of the source vertex is
CUSTOMIZE, a certain column must be specified as the id column of the vertex; when the id policy of the source vertex is When PRIMARY_KEY, one or more columns must be specified for splicing the id of the generated vertex, that is, no matter which id strategy is used, this item is required; - target: Specify certain columns as the id columns of target vertex, similar to source, so I won’t repeat them;
- unfold_source: Whether to unfold the source column of the file, the effect is similar to that in the vertex map, and will not be repeated;
- unfold_target: Whether to unfold the target column of the file, the effect is similar to that in the vertex mapping, and will not be repeated;
3.4 Execute command import
After preparing the graph model, data file, and input source mapping relationship file, the data file can be imported into the graph database.
The import process is controlled by commands submitted by the user, and the user can control the specific process of execution through different parameters.
3.4.1 Parameter description
| Parameter | Default value | Required or not | Description |
|---|
-f or --file | | Y | Path to configure script |
-g or --graph | | Y | Graph name |
--graphspace | DEFAULT | | Graph space name |
-s or --schema | | Y | Schema file path |
-h or --host or -i | localhost | | Address of HugeGraphServer |
-p or --port | 8080 | | Port number of HugeGraphServer |
--username | null | | When HugeGraphServer enables permission authentication, the username of the current graph |
--password | null | | When HugeGraphServer enables permission authentication, the password of the current graph |
--create-graph | false | | Whether to automatically create the graph if it does not exist |
--token | null | | When HugeGraphServer has enabled authorization authentication, the token of the current graph |
--protocol | http | | Protocol for sending requests to the server, optional http or https |
--pd-peers | | | PD service node addresses |
--pd-token | | | Token for accessing PD service |
--meta-endpoints | | | Meta information storage service addresses |
--direct | false | | Whether to directly connect to HugeGraph-Store |
--route-type | NODE_PORT | | Route selection method (optional values: NODE_PORT / DDS / BOTH) |
--cluster | hg | | Cluster name |
--trust-store-file | | | When the request protocol is https, the client’s certificate file path |
--trust-store-password | | | When the request protocol is https, the client certificate password |
--clear-all-data | false | | Whether to clear the original data on the server before importing data |
--clear-timeout | 240 | | Timeout for clearing the original data on the server before importing data |
--incremental-mode | false | | Whether to use the breakpoint resume mode; only input sources FILE and HDFS support this mode. Enabling this mode allows starting the import from where the last import stopped |
--failure-mode | false | | When failure mode is true, previously failed data will be imported. Generally, the failed data file needs to be manually corrected and edited before re-importing |
--batch-insert-threads | CPUs | | Batch insert thread pool size (CPUs is the number of logical cores available to the current OS) |
--single-insert-threads | 8 | | Size of single insert thread pool |
--max-conn | 4 * CPUs | | The maximum number of HTTP connections between HugeClient and HugeGraphServer; it is recommended to adjust this when adjusting threads |
--max-conn-per-route | 2 * CPUs | | The maximum number of HTTP connections for each route between HugeClient and HugeGraphServer; it is recommended to adjust this item when adjusting threads |
--batch-size | 500 | | The number of data items in each batch when importing data |
--max-parse-errors | 1 | | The maximum number of data parsing errors allowed (per line); the program exits when this value is reached |
--max-insert-errors | 500 | | The maximum number of data insertion errors allowed (per row); the program exits when this value is reached |
--timeout | 60 | | Timeout (seconds) for insert result return |
--shutdown-timeout | 10 | | Waiting time for multithreading to stop (seconds) |
--retry-times | 0 | | Number of retries when a specific exception occurs |
--retry-interval | 10 | | Interval before retry (seconds) |
--check-vertex | false | | Whether to check if the vertices connected by the edge exist when inserting the edge |
--print-progress | true | | Whether to print the number of imported items in real time on the console |
--dry-run | false | | Enable this mode to only parse data without importing; usually used for testing |
--help or -help | false | | Print help information |
--parser-threads or --parallel-count | max(2,CPUS) | | Parallel read pipelines for data files |
--start-file | 0 | | Start file index for partial loading |
--end-file | -1 | | End file index for partial loading |
--scatter-sources | false | | Scatter multiple sources for I/O optimization |
--cdc-flush-interval | 30000 | | The flush interval for Flink CDC |
--cdc-sink-parallelism | 1 | | The sink parallelism for Flink CDC |
--max-read-errors | 1 | | The maximum number of read error lines before exiting |
--max-read-lines | -1L | | The maximum number of read lines, task stops when reached |
--test-mode | false | | Whether the loader works in test mode |
--use-prefilter | false | | Whether to filter vertex in advance |
--short-id | | | Mapping customized ID to shorter ID |
--vertex-edge-limit | -1L | | The maximum number of vertex’s edges |
--sink-type | true | | Sink to different storage type switch |
--vertex-partitions | 64 | | The number of partitions of the HBase vertex table |
--edge-partitions | 64 | | The number of partitions of the HBase edge table |
--vertex-table-name | | | HBase vertex table name |
--edge-table-name | | | HBase edge table name |
--hbase-zk-quorum | | | HBase ZooKeeper quorum |
--hbase-zk-port | | | HBase ZooKeeper port |
--hbase-zk-parent | | | HBase ZooKeeper parent |
--restore | false | | Set graph mode to RESTORING |
--backend | hstore | | The backend store type when creating graph if not exists |
--serializer | binary | | The serializer type when creating graph if not exists |
--scheduler-type | distributed | | The task scheduler type when creating graph if not exists |
--batch-failure-fallback | true | | Whether to fallback to single insert when batch insert fails |
3.4.2 Breakpoint Continuation Mode
Usually, the Loader task takes a long time to execute. If the import interrupt process exits for some reason, and next time you want to continue the import from the interrupted point, this is the scenario of using breakpoint continuation.
The user sets the command line parameter –incremental-mode to true to open the breakpoint resume mode. The key to breakpoint continuation lies in the progress file. When the import process exits, the import progress at the time of exit will be recorded.
Recorded in the progress file, the progress file is located in the ${struct} directory, the file name is like load-progress ${date}, ${struct} is the prefix of the mapping file, and ${date} is the start of the import
moment. For example, for an import task started at 2019-10-10 12:30:30, the mapping file used is struct-example.json, then the path of the progress file is the same as struct-example.json
Sibling struct-example/load-progress 2019-10-10 12:30:30.
Note: The generation of progress files is independent of whether –incremental-mode is turned on or not, and a progress file is generated at the end of each import.
If the data file formats are all legal and the import task is stopped by the user (CTRL + C or kill, kill -9 is not supported), that is to say, if there is no error record, the next import only needs to be set to
Continue for the breakpoint.
But if the limit of –max-parse-errors or –max-insert-errors is reached because too much data is invalid or network abnormality is reached, Loader will record these original rows that failed to insert into
In the failed file, after the user modifies the data lines in the failed file, set –reload-failure to true to import these “failed files” as input sources (does not affect the normal file import),
Of course, if there is still a problem with the modified data line, it will be logged again to the failure file (don’t worry about duplicate lines).
Each vertex map or edge map will generate its own failure file when data insertion fails. The failure file is divided into a parsing failure file (suffix .parse-error) and an insertion failure file (suffix .insert-error).
They are stored in the ${struct}/current directory. For example, there is a vertex mapping person, and an edge mapping knows in the mapping file, each of which has some error lines. When the Loader exits, you will see the following files in the ${struct}/current directory:
- person-b4cd32ab.parse-error: Vertex map person parses wrong data
- person-b4cd32ab.insert-error: Vertex map person inserts wrong data
- knows-eb6b2bac.parse-error: edge map knows parses wrong data
- knows-eb6b2bac.insert-error: edge map knows inserts wrong data
.parse-error and .insert-error do not always exist together. Only lines with parsing errors will have .parse-error files, and only lines with insertion errors will have .insert-error files.
3.4.3 logs directory file description
The log and error data during program execution will be written into the hugegraph-loader.log file.
3.4.4 Execute command
Run bin/hugegraph-loader and pass in parameters
bin/hugegraph-loader -g {GRAPH_NAME} -f ${INPUT_DESC_FILE} -s ${SCHEMA_FILE} -h {HOST} -p {PORT}
4 Complete example
Given below is an example in the example directory of the hugegraph-loader package. (GitHub address)
4.1 Prepare data
Vertex file: example/file/vertex_person.csv
marko,29,Beijing
vadas,27,Hongkong
josh,32,Beijing
peter,35,Shanghai
"li,nary",26,"Wu,han"
tom,null,NULL
Vertex file: example/file/vertex_software.txt
id|name|lang|price|ISBN
1|lop|java|328|ISBN978-7-107-18618-5
2|ripple|java|199|ISBN978-7-100-13678-5
Edge file: example/file/edge_knows.json
{"source_name": "marko", "target_name": "vadas", "date": "20160110", "weight": 0.5}
{"source_name": "marko", "target_name": "josh", "date": "20130220", "weight": 1.0}
Edge file: example/file/edge_created.json
{"aname": "marko", "bname": "lop", "date": "20171210", "weight": 0.4}
{"aname": "josh", "bname": "lop", "date": "20091111", "weight": 0.4}
{"aname": "josh", "bname": "ripple", "date": "20171210", "weight": 1.0}
{"aname": "peter", "bname": "lop", "date": "20170324", "weight": 0.2}
4.2 Write schema
Click to expand/collapse the schema file: example/file/schema.groovy
schema.propertyKey("name").asText().ifNotExist().create();
schema.propertyKey("age").asInt().ifNotExist().create();
schema.propertyKey("city").asText().ifNotExist().create();
schema.propertyKey("weight").asDouble().ifNotExist().create();
schema.propertyKey("lang").asText().ifNotExist().create();
schema.propertyKey("date").asText().ifNotExist().create();
schema.propertyKey("price").asDouble().ifNotExist().create();

schema.vertexLabel("person").properties("name", "age", "city").primaryKeys("name").ifNotExist().create();
schema.vertexLabel("software").properties("name", "lang", "price").primaryKeys("name").ifNotExist().create();

schema.indexLabel("personByAge").onV("person").by("age").range().ifNotExist().create();
schema.indexLabel("personByCity").onV("person").by("city").secondary().ifNotExist().create();
schema.indexLabel("personByAgeAndCity").onV("person").by("age", "city").secondary().ifNotExist().create();
schema.indexLabel("softwareByPrice").onV("software").by("price").range().ifNotExist().create();

schema.edgeLabel("knows").sourceLabel("person").targetLabel("person").properties("date", "weight").ifNotExist().create();
schema.edgeLabel("created").sourceLabel("person").targetLabel("software").properties("date", "weight").ifNotExist().create();

schema.indexLabel("createdByDate").onE("created").by("date").secondary().ifNotExist().create();
schema.indexLabel("createdByWeight").onE("created").by("weight").range().ifNotExist().create();
schema.indexLabel("knowsByWeight").onE("knows").by("weight").range().ifNotExist().create();
Click to expand/collapse the input source mapping file example/file/struct.json
{
  "vertices": [
    {
      "label": "person",
      "input": {
        "type": "file",
        "path": "example/file/vertex_person.csv",
        "format": "CSV",
        "header": ["name", "age", "city"],
        "charset": "UTF-8",
        "skipped_line": {
          "regex": "(^#|^//).*"
        }
      },
      "null_values": ["NULL", "null", ""]
    },
    {
      "label": "software",
      "input": {
        "type": "file",
        "path": "example/file/vertex_software.txt",
        "format": "TEXT",
        "delimiter": "|",
        "charset": "GBK"
      },
      "id": "id",
      "ignored": ["ISBN"]
    }
  ],
  "edges": [
    {
      "label": "knows",
      "source": ["source_name"],
      "target": ["target_name"],
      "input": {
        "type": "file",
        "path": "example/file/edge_knows.json",
        "format": "JSON",
        "date_format": "yyyyMMdd"
      },
      "field_mapping": {
        "source_name": "name",
        "target_name": "name"
      }
    },
    {
      "label": "created",
      "source": ["source_name"],
      "target": ["target_id"],
      "input": {
        "type": "file",
        "path": "example/file/edge_created.json",
        "format": "JSON",
        "date_format": "yyyy-MM-dd"
      },
      "field_mapping": {
        "source_name": "name"
      }
    }
  ]
}
4.4 Command to import
sh bin/hugegraph-loader.sh -g hugegraph -f example/file/struct.json -s example/file/schema.groovy
After the import is complete, statistics similar to the following will appear:
vertices/edges has been loaded this time : 8/6
--------------------------------------------------
count metrics
     input read success            : 14
     input read failure            : 0
     vertex parse success          : 8
     vertex parse failure          : 0
     vertex insert success         : 8
     vertex insert failure         : 0
     edge parse success            : 6
     edge parse failure            : 0
     edge insert success           : 6
     edge insert failure           : 0
4.5 Use Docker to load data
4.5.1 Use docker exec to load data directly
4.5.1.1 Prepare data
If you just want to try out the loader, you can import the built-in example dataset without needing to prepare additional data yourself.
If using custom data, before importing data with the loader, we need to copy the data into the container.
First, following the steps in 4.1–4.3, we can prepare the data and then use docker cp to copy the prepared data into the loader container.
Suppose we’ve prepared the corresponding dataset following the above steps, stored in the hugegraph-dataset folder with the following file structure:
tree -f hugegraph-dataset/

hugegraph-dataset
├── hugegraph-dataset/edge_created.json
├── hugegraph-dataset/edge_knows.json
├── hugegraph-dataset/schema.groovy
├── hugegraph-dataset/struct.json
├── hugegraph-dataset/vertex_person.csv
└── hugegraph-dataset/vertex_software.txt
Copy the files into the container.
docker cp hugegraph-dataset loader:/loader/dataset
docker exec -it loader ls /loader/dataset

edge_created.json  edge_knows.json  schema.groovy  struct.json  vertex_person.csv  vertex_software.txt
4.5.1.2 Data loading
Taking the built-in example dataset as an example, we can use the following command to load the data.
If you need to import your custom dataset, you need to modify the paths for -f (data script) and -s (schema) configurations.
You can refer to 3.4.1-Parameter description for the rest of the parameters.
docker exec -it loader bin/hugegraph-loader.sh -g hugegraph -f example/file/struct.json -s example/file/schema.groovy -h server -p 8080
If loading a custom dataset, following the previous example, you would use:
docker exec -it loader bin/hugegraph-loader.sh -g hugegraph -f /loader/dataset/struct.json -s /loader/dataset/schema.groovy -h server -p 8080
If loader and server are in the same Docker network, you can specify -h {server_container_name}; otherwise, you need to specify the IP of the server host (in our example, server_container_name is server).
Then we can see the result:
HugeGraphLoader worked in NORMAL MODE
vertices/edges loaded this time : 8/6
--------------------------------------------------
count metrics
    input read success            : 14
    input read failure            : 0
    vertex parse success          : 8
    vertex parse failure          : 0
    vertex insert success         : 8
    vertex insert failure         : 0
    edge parse success            : 6
    edge parse failure            : 0
    edge insert success           : 6
    edge insert failure           : 0
--------------------------------------------------
meter metrics
    total time                    : 0.199s
    read time                     : 0.046s
    load time                     : 0.153s
    vertex load time              : 0.077s
    vertex load rate(vertices/s)  : 103
    edge load time                : 0.112s
    edge load rate(edges/s)       : 53
You can also use curl or hubble to observe the import result. Here’s an example using curl:
> curl "http://localhost:8080/graphs/hugegraph/graph/vertices" | gunzip
{"vertices":[{"id":1,"label":"software","type":"vertex","properties":{"name":"lop","lang":"java","price":328.0}},{"id":2,"label":"software","type":"vertex","properties":{"name":"ripple","lang":"java","price":199.0}},{"id":"1:tom","label":"person","type":"vertex","properties":{"name":"tom"}},{"id":"1:josh","label":"person","type":"vertex","properties":{"name":"josh","age":32,"city":"Beijing"}},{"id":"1:marko","label":"person","type":"vertex","properties":{"name":"marko","age":29,"city":"Beijing"}},{"id":"1:peter","label":"person","type":"vertex","properties":{"name":"peter","age":35,"city":"Shanghai"}},{"id":"1:vadas","label":"person","type":"vertex","properties":{"name":"vadas","age":27,"city":"Hongkong"}},{"id":"1:li,nary","label":"person","type":"vertex","properties":{"name":"li,nary","age":26,"city":"Wu,han"}}]}
If you want to check the import result of edges, you can use curl "http://localhost:8080/graphs/hugegraph/graph/edges" | gunzip.
4.5.2 Enter the docker container to load data
Besides using docker exec directly for data import, we can also enter the container for data loading. The basic process is similar to 4.5.1.
Enter the container by docker exec -it loader bash and execute the command:
sh bin/hugegraph-loader.sh -g hugegraph -f example/file/struct.json -s example/file/schema.groovy -h server -p 8080
The results of the execution will be similar to those shown in 4.5.1.
4.6 Import data by spark-loader
Spark version: Spark 3+, other versions has not been tested.
HugeGraph Toolchain version: toolchain-1.0.0
The parameters of spark-loader are divided into two parts. Note: Because the abbreviations of
these two-parameter names have overlapping parts, please use the full name of the parameter.
And there is no need to guarantee the order between the two parameters.
Example:
sh bin/hugegraph-spark-loader.sh --master yarn \
--deploy-mode cluster --name spark-hugegraph-loader --file ./hugegraph.json \
--username admin --token admin --host xx.xx.xx.xx --port 8093 \
--graph graph-test --num-executors 6 --executor-cores 16 --executor-memory 15g
3.2.3 - HugeGraph-Tools Quick Start
HugeGraph-Tools is an automated deployment, management and backup/restore component of HugeGraph.
Testing Guide: For running HugeGraph-Tools tests locally, please refer to HugeGraph Toolchain Local Testing Guide
There are two ways to get HugeGraph-Tools:
- Download the compiled tarball
- Clone source code then compile and install
2.1 Download the compiled archive
Download the latest version of the HugeGraph-Toolchain package:
wget https://downloads.apache.org/hugegraph/1.0.0/apache-hugegraph-toolchain-incubating-1.0.0.tar.gz
tar zxf *hugegraph*.tar.gz
2.2 Clone source code to compile and install
Please ensure that the wget command is installed before compiling the source code
Download the latest version of the HugeGraph-Tools source package:
# 1. get from github
git clone https://github.com/apache/hugegraph-toolchain.git

# 2. get from direct  (e.g. here is 1.0.0, please choose the latest version)
wget https://downloads.apache.org/hugegraph/1.0.0/apache-hugegraph-toolchain-incubating-1.0.0-src.tar.gz
Compile and generate tar package:
cd hugegraph-tools
mvn package -DskipTests
Generate tar package hugegraph-tools-${version}.tar.gz
3 How to use
3.1 Function overview
After decompression, enter the hugegraph-tools directory, you can use bin/hugegraph or bin/hugegraph help to view the usage information. mainly divided:
- Graph management type, graph-mode-set, graph-mode-get, graph-list, graph-get, graph-clear, graph-create, graph-clone and graph-drop
- Asynchronous task management type, task-list, task-get, task-delete, task-cancel and task-clear
- Gremlin type, gremlin-execute and gremlin-schedule
- Backup/Restore type, backup, restore, migrate, schedule-backup and dump
- Authentication data backup/restore type, auth-backup and auth-restore
- Install deployment type, deploy, clear, start-all and stop-all
Usage: hugegraph [options] [command] [command options]
3.2 [options]-Global Variable
options is a global variable of HugeGraph-Tools, which can be configured in hugegraph-tools/bin/hugegraph, including:
- –graph,HugeGraph-Tools The name of the graph to operate on, the default value is hugegraph
- –url,The service address of HugeGraph-Server, the default is http://127.0.0.1:8080
- –user,When HugeGraph-Server opens authentication, pass username
- –password,When HugeGraph-Server opens authentication, pass the user’s password
- –timeout,Timeout when connecting to HugeGraph-Server, the default is 30s
- –trust-store-file,The path of the certificate file, when –url uses https, the truststore file used by HugeGraph-Client, the default is empty, which means using the built-in truststore file conf/hugegraph.truststore of hugegraph-tools
- –trust-store-password,The password of the certificate file, when –url uses https, the password of the truststore used by HugeGraph-Client, the default is empty, representing the password of the built-in truststore file of hugegraph-tools
The above global variables can also be set through environment variables. One way is to use export on the command line to set temporary environment variables, which are valid until the command line is closed
| Global Variable | Environment Variable | Example |
|---|
| –url | HUGEGRAPH_URL | export HUGEGRAPH_URL=http://127.0.0.1:8080 |
| –graph | HUGEGRAPH_GRAPH | export HUGEGRAPH_GRAPH=hugegraph |
| –user | HUGEGRAPH_USERNAME | export HUGEGRAPH_USERNAME=admin |
| –password | HUGEGRAPH_PASSWORD | export HUGEGRAPH_PASSWORD=test |
| –timeout | HUGEGRAPH_TIMEOUT | export HUGEGRAPH_TIMEOUT=30 |
| –trust-store-file | HUGEGRAPH_TRUST_STORE_FILE | export HUGEGRAPH_TRUST_STORE_FILE=/tmp/trust-store |
| –trust-store-password | HUGEGRAPH_TRUST_STORE_PASSWORD | export HUGEGRAPH_TRUST_STORE_PASSWORD=xxxx |
Another way is to set the environment variable in the bin/hugegraph script:
#!/bin/bash

# Set environment here if needed
#export HUGEGRAPH_URL=
#export HUGEGRAPH_GRAPH=
#export HUGEGRAPH_USERNAME=
#export HUGEGRAPH_PASSWORD=
#export HUGEGRAPH_TIMEOUT=
#export HUGEGRAPH_TRUST_STORE_FILE=
#export HUGEGRAPH_TRUST_STORE_PASSWORD=
3.3 Graph Management Type, graph-mode-set, graph-mode-get, graph-list, graph-get, graph-clear, graph-create, graph-clone and graph-drop
- graph-mode-set, set graph restore mode
- –graph-mode or -m, required, specifies the mode to be set, legal values include [NONE, RESTORING, MERGING, LOADING]
- graph-mode-get, get graph restore mode
- graph-list, list all graphs in a HugeGraph-Server
- graph-get, get a graph and its storage backend type
- graph-clear, clear all schema and data of a graph
- –confirm-message or -c, required, delete confirmation information, manual input is required, double confirmation to prevent accidental deletion, “I’m sure to delete all data”, including double quotes
- graph-create, create a new graph with configuration file
- –name or -n, optional, the name of the new graph, default is hugegraph
- –file or -f, required, the path to the graph configuration file
- graph-clone, clone an existing graph
- –name or -n, optional, the name of the cloned graph, default is hugegraph
- –clone-graph-name, optional, the name of the source graph to clone from, default is hugegraph
- graph-drop, drop a graph (different from graph-clear, this completely removes the graph)
- –confirm-message or -c, required, confirmation message “I’m sure to drop the graph”, including double quotes
When you need to restore the backup graph to a new graph, you need to set the graph mode to RESTORING mode; when you need to merge the backup graph into an existing graph, you need to first set the graph mode to MERGING model.
3.4 Asynchronous task management Type,task-list、task-get and task-delete
- task-list,List the asynchronous tasks in a graph, which can be filtered according to the status of the tasks
- –status,Optional, specify the status of the task to view, i.e. filter tasks by status
- –limit,Optional, specify the number of tasks to be obtained, the default is -1, which means to obtain all eligible tasks
- task-get,Get detailed information about an asynchronous task
- –task-id,Required, specifies the ID of the asynchronous task
- task-delete,Delete information about an asynchronous task
- –task-id,Required, specifies the ID of the asynchronous task
- task-cancel,Cancel the execution of an asynchronous task
- –task-id,ID of the asynchronous task to cancel
- task-clear,Clean up completed asynchronous tasks
- –force,Optional. When set, it means to clean up all asynchronous tasks. Unfinished ones are canceled first, and then all asynchronous tasks are cleared. By default, only completed asynchronous tasks are cleaned up
3.5 Gremlin Type,gremlin-execute and gremlin-schedule
⚠️ SEC Reminder: The execution of Gremlin depends on the actual logic of the statements, which may involve scenarios such as large-scale data modification and high-risk system calls with potential implicit hazards. Please use this tool only in secure and trusted network environments. It is imperative to configure and secure HugeGraph-Server with the Authentication System (Auth) and an IP Whitelist to restrict execution requests on the server side. Never hand over the tool or expose the execution entry to unauthorized personnel.
- gremlin-execute, send Gremlin statements to HugeGraph-Server to execute query or modification operations, execute synchronously, and return results after completion
- –file or -f, specify the script file to execute, UTF-8 encoding, mutually exclusive with –script
- –script or -s, specifies the script string to execute, mutually exclusive with –file
- –aliases or -a, Gremlin alias settings, the format is: key1=value1,key2=value2,…
- –bindings or -b, Gremlin binding settings, the format is: key1=value1,key2=value2,…
- –language or -l, the language of the Gremlin script, the default is gremlin-groovy
–file and –script are mutually exclusive, one of them must be set
- gremlin-schedule, send Gremlin statements to HugeGraph-Server to perform query or modification operations, asynchronous execution, and return the asynchronous task id immediately after the task is submitted
- –file or -f, specify the script file to execute, UTF-8 encoding, mutually exclusive with –script
- –script or -s, specifies the script string to execute, mutually exclusive with –file
- –bindings or -b, Gremlin binding settings, the format is: key1=value1,key2=value2,…
- –language or -l, the language of the Gremlin script, the default is gremlin-groovy
–file and –script are mutually exclusive, one of them must be set
3.6 Backup/Restore Type
- backup, back up the schema or data in a certain graph out of the HugeGraph system, and store it on the local disk or HDFS in the form of JSON
- –format, the backup format, optional values include [json, text], the default is json
- –all-properties, whether to back up all properties of vertices/edges, only valid when –format is text, default false
- –label, the type of vertices/edges to be backed up, only valid when –format is text, only valid when backing up vertices or edges
- –properties, properties of vertices/edges to be backed up, separated by commas, only valid when –format is text, valid only when backing up vertices or edges
- –compress, whether to compress data during backup, the default is true
- –directory or -d, the directory to store schema or data, the default is ‘./{graphName}’ for local directory, and ‘{fs.default.name}/{graphName}’ for HDFS
- –huge-types or -t, the data types to be backed up, separated by commas, the optional value is ‘all’ or a combination of one or more [vertex, edge, vertex_label, edge_label, property_key, index_label], ‘all’ Represents all 6 types, namely vertices, edges and all schemas
- –log or -l, specify the log directory, the default is the current directory
- –retry, specify the number of failed retries, the default is 3
- –thread-num or -T, the number of threads to use, default is Math.min(10, Math.max(4, CPUs / 2))
- –split-size or -s, specifies the size of splitting vertices or edges when backing up, the default is 1048576
- -D, use the mode of -Dkey=value to specify dynamic parameters, and specify HDFS configuration items when backing up data to HDFS, for example: -Dfs.default.name=hdfs://localhost:9000
- restore, restore schema or data stored in JSON format to a new graph (RESTORING mode) or merge into an existing graph (MERGING mode)
- –directory or -d, the directory to store schema or data, the default is ‘./{graphName}’ for local directory, and ‘{fs.default.name}/{graphName}’ for HDFS
- –clean, whether to delete the directory specified by –directory after the recovery map is completed, the default is false
- –huge-types or -t, data types to restore, separated by commas, optional value is ‘all’ or a combination of one or more [vertex, edge, vertex_label, edge_label, property_key, index_label], ‘all’ Represents all 6 types, namely vertices, edges and all schemas
- –log or -l, specify the log directory, the default is the current directory
- –retry, specify the number of failed retries, the default is 3
- –thread-num or -T, the number of threads to use, default is Math.min(10, Math.max(4, CPUs / 2))
- -D, use the mode of -Dkey=value to specify dynamic parameters, which are used to specify HDFS configuration items when restoring graphs from HDFS, for example: -Dfs.default.name=hdfs://localhost:9000
restore command can be used only if –format is executed as backup for json
- migrate, migrate the currently connected graph to another HugeGraphServer
- –target-graph, the name of the target graph, the default is hugegraph
- –target-url, the HugeGraphServer where the target graph is located, the default is http://127.0.0.1:8081
- –target-username, the username to access the target map
- –target-password, the password to access the target map
- –target-timeout, the timeout for accessing the target map
- –target-trust-store-file, access the truststore file used by the target graph
- –target-trust-store-password, the password to access the truststore used by the target map
- –directory or -d, during the migration process, the directory where the schema or data of the source graph is stored. For a local directory, the default is ‘./{graphName}’; for HDFS, the default is ‘{fs.default.name}/ {graphName}’
- –huge-types or -t, the data types to be migrated, separated by commas, the optional value is ‘all’ or a combination of one or more [vertex, edge, vertex_label, edge_label, property_key, index_label], ‘all’ Represents all 6 types, namely vertices, edges and all schemas
- –log or -l, specify the log directory, the default is the current directory
- –retry, specify the number of failed retries, the default is 3
- –split-size or -s, specify the size of the vertex or edge block when backing up the source graph during the migration process, the default is 1048576
- -D, use the mode of -Dkey=value to specify dynamic parameters, which are used to specify HDFS configuration items when the data needs to be backed up to HDFS during the migration process, for example: -Dfs.default.name=hdfs://localhost: 9000
- –graph-mode or -m, the mode to set the target graph when restoring the source graph to the target graph, legal values include [RESTORING, MERGING]
- –keep-local-data, whether to keep the backup of the source map generated in the process of migrating the map, the default is false, that is, the backup of the source map is not kept after the default migration map ends
- schedule-backup, periodically back up the graph and keep a certain number of the latest backups (currently only supports local file systems)
- –directory or -d, required, specifies the directory of the backup data
- –backup-num, optional, specifies the number of latest backups to save, defaults to 3
- –interval, an optional item, specifies the backup cycle, the format is the same as the Linux crontab format
- dump, export all the vertices and edges of the entire graph, and store them in
vertex vertex-edge1 vertex-edge2...JSON format by default.
Users can also customize the storage format, just need to be in hugegraph-tools/src/main/java/com/baidu/hugegraph/formatter
Implement a class inherited from Formatter in the directory, such as CustomFormatter, and specify this class as formatter when using it, for example
bin/hugegraph dump -f CustomFormatter- –formatter or -f, specify the formatter to use, the default is JsonFormatter
- –directory or -d, the directory where schema or data is stored, the default is the current directory
- –log or -l, specify the log directory, the default is the current directory
- –retry, specify the number of failed retries, the default is 3
- –split-size or -s, specifies the size of splitting vertices or edges when backing up, the default is 1048576
- -D, use the mode of -Dkey=value to specify dynamic parameters, and specify HDFS configuration items when backing up data to HDFS, for example: -Dfs.default.name=hdfs://localhost:9000
3.7 Authentication data backup/restore type
- auth-backup, backup authentication data to a specified directory
- –types or -t, types of authentication data to back up, separated by commas, optional value is ‘all’ or a combination of one or more [user, group, target, belong, access], ‘all’ represents all 5 types
- –directory or -d, directory to store backup data, defaults to current directory
- –log or -l, specify the log directory, the default is the current directory
- –retry, specify the number of failed retries, the default is 3
- –thread-num or -T, the number of threads to use, default is Math.min(10, Math.max(4, CPUs / 2))
- -D, use the mode of -Dkey=value to specify dynamic parameters, and specify HDFS configuration items when backing up data to HDFS, for example: -Dfs.default.name=hdfs://localhost:9000
- auth-restore, restore authentication data from a specified directory
- –types or -t, types of authentication data to restore, separated by commas, optional value is ‘all’ or a combination of one or more [user, group, target, belong, access], ‘all’ represents all 5 types
- –directory or -d, directory where backup data is stored, defaults to current directory
- –log or -l, specify the log directory, the default is the current directory
- –retry, specify the number of failed retries, the default is 3
- –thread-num or -T, the number of threads to use, default is Math.min(10, Math.max(4, CPUs / 2))
- –strategy, conflict handling strategy, optional values are [stop, ignore], default is stop. stop means stop restoring when encountering conflicts, ignore means ignore conflicts and continue restoring
- –init-password, initial password to set when restoring users, required when restoring user data
- -D, use the mode of -Dkey=value to specify dynamic parameters, which are used to specify HDFS configuration items when restoring data from HDFS, for example: -Dfs.default.name=hdfs://localhost:9000
3.8 Install the deployment type
- deploy, one-click download, install and start HugeGraph-Server and HugeGraph-Studio
- -v, required, specifies the version number of HugeGraph-Server and HugeGraph-Studio installed, the latest is 0.9
- -p, required, specifies the installed HugeGraph-Server and HugeGraph-Studio directories
- -u, optional, specifies the link to download the HugeGraph-Server and HugeGraph-Studio compressed packages
- clear, clean up HugeGraph-Server and HugeGraph-Studio directories and tarballs
- -p, required, specifies the directory of HugeGraph-Server and HugeGraph-Studio to be cleaned
- start-all, start HugeGraph-Server and HugeGraph-Studio with one click, and start monitoring, automatically pull up the service when the service dies
- -v, required, specifies the version number of HugeGraph-Server and HugeGraph-Studio to be started, the latest is 0.9
- -p, required, specifies the directory where HugeGraph-Server and HugeGraph-Studio are installed
- stop-all, close HugeGraph-Server and HugeGraph-Studio with one click
There is an optional parameter -u in the deploy command. When provided, the specified download address will be used instead of the default download address to download the tar package, and the address will be written into the ~/hugegraph-download-url-prefix file; if no address is specified later When -u and ~/hugegraph-download-url-prefix are not specified, the tar package will be downloaded from the address specified by ~/hugegraph-download-url-prefix; if there is neither -u nor ~/hugegraph-download-url-prefix, it will be downloaded from the default download address
3.9 Specific command parameters
The specific parameters of each subcommand are as follows:
Usage: hugegraph [options] [command] [command options]
  Options:
    --graph
      Name of graph
      Default: hugegraph
    --password
      Password of user
    --timeout
      Connection timeout
      Default: 30
    --trust-store-file
      The path of client truststore file used when https protocol is enabled
    --trust-store-password
      The password of the client truststore file used when the https protocol
      is enabled
    --url
      The URL of HugeGraph-Server
      Default: http://127.0.0.1:8080
    --user
      Name of user
  Commands:
    graph-list      List all graphs
      Usage: graph-list

    graph-get      Get graph info
      Usage: graph-get

    graph-clear      Clear graph schema and data
      Usage: graph-clear [options]
        Options:
        * --confirm-message, -c
            Confirm message of graph clear is "I'm sure to delete all data".
            (Note: include "")

    graph-mode-set      Set graph mode
      Usage: graph-mode-set [options]
        Options:
        * --graph-mode, -m
            Graph mode, include: [NONE, RESTORING, MERGING]
            Possible Values: [NONE, RESTORING, MERGING, LOADING]

    graph-mode-get      Get graph mode
      Usage: graph-mode-get

    task-list      List tasks
      Usage: task-list [options]
        Options:
          --limit
            Limit number, no limit if not provided
            Default: -1
          --status
            Status of task

    task-get      Get task info
      Usage: task-get [options]
        Options:
        * --task-id
            Task id
            Default: 0

    task-delete      Delete task
      Usage: task-delete [options]
        Options:
        * --task-id
            Task id
            Default: 0

    task-cancel      Cancel task
      Usage: task-cancel [options]
        Options:
        * --task-id
            Task id
            Default: 0

    task-clear      Clear completed tasks
      Usage: task-clear [options]
        Options:
          --force
            Force to clear all tasks, cancel all uncompleted tasks firstly,
            and delete all completed tasks
            Default: false

    gremlin-execute      Execute Gremlin statements
      Usage: gremlin-execute [options]
        Options:
          --aliases, -a
            Gremlin aliases, valid format is: 'key1=value1,key2=value2...'
            Default: {}
          --bindings, -b
            Gremlin bindings, valid format is: 'key1=value1,key2=value2...'
            Default: {}
          --file, -f
            Gremlin Script file to be executed, UTF-8 encoded, exclusive to
            --script
          --language, -l
            Gremlin script language
            Default: gremlin-groovy
          --script, -s
            Gremlin script to be executed, exclusive to --file

    gremlin-schedule      Execute Gremlin statements as asynchronous job
      Usage: gremlin-schedule [options]
        Options:
          --bindings, -b
            Gremlin bindings, valid format is: 'key1=value1,key2=value2...'
            Default: {}
          --file, -f
            Gremlin Script file to be executed, UTF-8 encoded, exclusive to
            --script
          --language, -l
            Gremlin script language
            Default: gremlin-groovy
          --script, -s
            Gremlin script to be executed, exclusive to --file

    backup      Backup graph schema/data. If directory is on HDFS, use -D to
            set HDFS params. For exmaple:
            -Dfs.default.name=hdfs://localhost:9000
      Usage: backup [options]
        Options:
          --all-properties
            All properties to be backup flag
            Default: false
          --compress
            compress flag
            Default: true
          --directory, -d
            Directory of graph schema/data, default is './{graphname}' in
            local file system or '{fs.default.name}/{graphname}' in HDFS
          --format
            File format, valid is [json, text]
            Default: json
          --huge-types, -t
            Type of schema/data. Concat with ',' if more than one. 'all' means
            all vertices, edges and schema, in other words, 'all' equals with
            'vertex,edge,vertex_label,edge_label,property_key,index_label'
            Default: [PROPERTY_KEY, VERTEX_LABEL, EDGE_LABEL, INDEX_LABEL, VERTEX, EDGE]
          --label
            Vertex or edge label, only valid when type is vertex or edge
          --log, -l
            Directory of log
            Default: ./logs
          --properties
            Vertex or edge properties to backup, only valid when type is
            vertex or edge
            Default: []
          --retry
            Retry times, default is 3
            Default: 3
          --split-size, -s
            Split size of shard
            Default: 1048576
          -D
            HDFS config parameters
            Syntax: -Dkey=value
            Default: {}

    schedule-backup      Schedule backup task
      Usage: schedule-backup [options]
        Options:
          --backup-num
            The number of latest backups to keep
            Default: 3
        * --directory, -d
            The directory of backups stored
          --interval
            The interval of backup, format is: "a b c d e". 'a' means minute
            (0 - 59), 'b' means hour (0 - 23), 'c' means day of month (1 -
            31), 'd' means month (1 - 12), 'e' means day of week (0 - 6)
            (Sunday=0), "*" means all
            Default: "0 0 * * *"

    dump      Dump graph to files
      Usage: dump [options]
        Options:
          --directory, -d
            Directory of graph schema/data, default is './{graphname}' in
            local file system or '{fs.default.name}/{graphname}' in HDFS
          --formatter, -f
            Formatter to customize format of vertex/edge
            Default: JsonFormatter
          --log, -l
            Directory of log
            Default: ./logs
          --retry
            Retry times, default is 3
            Default: 3
          --split-size, -s
            Split size of shard
            Default: 1048576
          -D
            HDFS config parameters
            Syntax: -Dkey=value
            Default: {}

    restore      Restore graph schema/data. If directory is on HDFS, use -D to
            set HDFS params if needed. For
            exmaple:-Dfs.default.name=hdfs://localhost:9000
      Usage: restore [options]
        Options:
          --clean
            Whether to remove the directory of graph data after restored
            Default: false
          --directory, -d
            Directory of graph schema/data, default is './{graphname}' in
            local file system or '{fs.default.name}/{graphname}' in HDFS
          --huge-types, -t
            Type of schema/data. Concat with ',' if more than one. 'all' means
            all vertices, edges and schema, in other words, 'all' equals with
            'vertex,edge,vertex_label,edge_label,property_key,index_label'
            Default: [PROPERTY_KEY, VERTEX_LABEL, EDGE_LABEL, INDEX_LABEL, VERTEX, EDGE]
          --log, -l
            Directory of log
            Default: ./logs
          --retry
            Retry times, default is 3
            Default: 3
          -D
            HDFS config parameters
            Syntax: -Dkey=value
            Default: {}

    migrate      Migrate graph
      Usage: migrate [options]
        Options:
          --directory, -d
            Directory of graph schema/data, default is './{graphname}' in
            local file system or '{fs.default.name}/{graphname}' in HDFS
          --graph-mode, -m
            Mode used when migrating to target graph, include: [RESTORING,
            MERGING]
            Default: RESTORING
            Possible Values: [NONE, RESTORING, MERGING, LOADING]
          --huge-types, -t
            Type of schema/data. Concat with ',' if more than one. 'all' means
            all vertices, edges and schema, in other words, 'all' equals with
            'vertex,edge,vertex_label,edge_label,property_key,index_label'
            Default: [PROPERTY_KEY, VERTEX_LABEL, EDGE_LABEL, INDEX_LABEL, VERTEX, EDGE]
          --keep-local-data
            Whether to keep the local directory of graph data after restored
            Default: false
          --log, -l
            Directory of log
            Default: ./logs
          --retry
            Retry times, default is 3
            Default: 3
          --split-size, -s
            Split size of shard
            Default: 1048576
          --target-graph
            The name of target graph to migrate
            Default: hugegraph
          --target-password
            The password of target graph to migrate
          --target-timeout
            The timeout to connect target graph to migrate
            Default: 0
          --target-trust-store-file
            The trust store file of target graph to migrate
          --target-trust-store-password
            The trust store password of target graph to migrate
          --target-url
            The url of target graph to migrate
            Default: http://127.0.0.1:8081
          --target-user
            The username of target graph to migrate
          -D
            HDFS config parameters
            Syntax: -Dkey=value
            Default: {}

    deploy      Install HugeGraph-Server and HugeGraph-Studio
      Usage: deploy [options]
        Options:
        * -p
            Install path of HugeGraph-Server and HugeGraph-Studio
          -u
            Download url prefix path of HugeGraph-Server and HugeGraph-Studio
        * -v
            Version of HugeGraph-Server and HugeGraph-Studio

    start-all      Start HugeGraph-Server and HugeGraph-Studio
      Usage: start-all [options]
        Options:
        * -p
            Install path of HugeGraph-Server and HugeGraph-Studio
        * -v
            Version of HugeGraph-Server and HugeGraph-Studio

    clear      Clear HugeGraph-Server and HugeGraph-Studio
      Usage: clear [options]
        Options:
        * -p
            Install path of HugeGraph-Server and HugeGraph-Studio

    stop-all      Stop HugeGraph-Server and HugeGraph-Studio
      Usage: stop-all

    help      Print usage
      Usage: help
3.10 Specific command example
1. gremlin statement
# Execute gremlin synchronously
./bin/hugegraph --url http://127.0.0.1:8080 --graph hugegraph gremlin-execute --script 'g.V().count()'

# Execute gremlin asynchronously
./bin/hugegraph --url http://127.0.0.1:8080 --graph hugegraph gremlin-schedule --script 'g.V().count()'
2. Show task status
./bin/hugegraph --url http://127.0.0.1:8080 --graph hugegraph task-list

./bin/hugegraph --url http://127.0.0.1:8080 --graph hugegraph task-list --limit 5

./bin/hugegraph --url http://127.0.0.1:8080 --graph hugegraph task-list --status success
3. Set and show graph mode
./bin/hugegraph --url http://127.0.0.1:8080 --graph hugegraph graph-mode-set -m RESTORING MERGING NONE

./bin/hugegraph --url http://127.0.0.1:8080 --graph hugegraph graph-mode-set -m RESTORING

./bin/hugegraph --url http://127.0.0.1:8080 --graph hugegraph graph-mode-get

./bin/hugegraph --url http://127.0.0.1:8080 --graph hugegraph graph-list
4. Cleanup Graph
./bin/hugegraph --url http://127.0.0.1:8080 --graph hugegraph graph-clear -c "I'm sure to delete all data"
5. Backup Graph
./bin/hugegraph --url http://127.0.0.1:8080 --graph hugegraph backup -t all --directory ./backup-test
6. Periodic Backup Graph
./bin/hugegraph --url http://127.0.0.1:8080 --graph hugegraph --interval */2 * * * * schedule-backup -d ./backup-0.10.2
7. Recovery Graph
# set graph mode
./bin/hugegraph --url http://127.0.0.1:8080 --graph hugegraph graph-mode-set -m RESTORING

# recovery graph
./bin/hugegraph --url http://127.0.0.1:8080 --graph hugegraph restore -t all --directory ./backup-test

# restore graph mode
./bin/hugegraph --url http://127.0.0.1:8080 --graph hugegraph graph-mode-set -m NONE
8. Graph Migration
./bin/hugegraph --url http://127.0.0.1:8080 --graph hugegraph migrate --target-url http://127.0.0.1:8090 --target-graph hugegraph
3.2.4 - HugeGraph-Spark-Connector Quick Start
1 HugeGraph-Spark-Connector Overview
HugeGraph-Spark-Connector is a Spark connector application for reading and writing HugeGraph data in Spark standard format.
2 Environment Requirements
- Java 8+
- Maven 3.6+
- Spark 3.x
- Scala 2.12
3 Building
3.1 Build without executing tests
mvn clean package -DskipTests
3.2 Build with default tests
4 Usage
First add the dependency in your pom.xml:
<dependency>
    <groupId>org.apache.hugegraph</groupId>
    <artifactId>hugegraph-spark-connector</artifactId>
    <version>${revision}</version>
</dependency>
4.1 Schema Definition Example
If we have a graph, the schema is defined as follows:
schema.propertyKey("name").asText().ifNotExist().create()
schema.propertyKey("age").asInt().ifNotExist().create()
schema.propertyKey("city").asText().ifNotExist().create()
schema.propertyKey("weight").asDouble().ifNotExist().create()
schema.propertyKey("lang").asText().ifNotExist().create()
schema.propertyKey("date").asText().ifNotExist().create()
schema.propertyKey("price").asDouble().ifNotExist().create()

schema.vertexLabel("person")
        .properties("name", "age", "city")
        .useCustomizeStringId()
        .nullableKeys("age", "city")
        .ifNotExist()
        .create()

schema.vertexLabel("software")
        .properties("name", "lang", "price")
        .primaryKeys("name")
        .ifNotExist()
        .create()

schema.edgeLabel("knows")
        .sourceLabel("person")
        .targetLabel("person")
        .properties("date", "weight")
        .ifNotExist()
        .create()

schema.edgeLabel("created")
        .sourceLabel("person")
        .targetLabel("software")
        .properties("date", "weight")
        .ifNotExist()
        .create()
4.2 Vertex Sink (Scala)
val df = sparkSession.createDataFrame(Seq(
  Tuple3("marko", 29, "Beijing"),
  Tuple3("vadas", 27, "HongKong"),
  Tuple3("Josh", 32, "Beijing"),
  Tuple3("peter", 35, "ShangHai"),
  Tuple3("li,nary", 26, "Wu,han"),
  Tuple3("Bob", 18, "HangZhou"),
)) toDF("name", "age", "city")

df.show()

df.write
  .format("org.apache.hugegraph.spark.connector.DataSource")
  .option("host", "127.0.0.1")
  .option("port", "8080")
  .option("graph", "hugegraph")
  .option("data-type", "vertex")
  .option("label", "person")
  .option("id", "name")
  .option("batch-size", 2)
  .mode(SaveMode.Overwrite)
  .save()
4.3 Edge Sink (Scala)
val df = sparkSession.createDataFrame(Seq(
  Tuple4("marko", "vadas", "20160110", 0.5),
  Tuple4("peter", "Josh", "20230801", 1.0),
  Tuple4("peter", "li,nary", "20130220", 2.0)
)).toDF("source", "target", "date", "weight")

df.show()

df.write
  .format("org.apache.hugegraph.spark.connector.DataSource")
  .option("host", "127.0.0.1")
  .option("port", "8080")
  .option("graph", "hugegraph")
  .option("data-type", "edge")
  .option("label", "knows")
  .option("source-name", "source")
  .option("target-name", "target")
  .option("batch-size", 2)
  .mode(SaveMode.Overwrite)
  .save()
5 Configuration Parameters
5.1 Client Configs
Client Configs are used to configure hugegraph-client.
| Parameter | Default Value | Description |
|---|
host | localhost | Address of HugeGraphServer |
port | 8080 | Port of HugeGraphServer |
graph | hugegraph | Graph space name |
protocol | http | Protocol for sending requests to the server, optional http or https |
username | null | Username of the current graph when HugeGraphServer enables permission authentication |
token | null | Token of the current graph when HugeGraphServer has enabled authorization authentication |
timeout | 60 | Timeout (seconds) for inserting results to return |
max-conn | CPUS * 4 | The maximum number of HTTP connections between HugeClient and HugeGraphServer |
max-conn-per-route | CPUS * 2 | The maximum number of HTTP connections for each route between HugeClient and HugeGraphServer |
trust-store-file | null | The client’s certificate file path when the request protocol is https |
trust-store-token | null | The client’s certificate password when the request protocol is https |
5.2 Graph Data Configs
Graph Data Configs are used to set graph space configuration.
| Parameter | Default Value | Description |
|---|
data-type | | Graph data type, must be vertex or edge |
label | | Label to which the vertex/edge data to be imported belongs |
id | | Specify a column as the id column of the vertex. When the vertex id policy is CUSTOMIZE, it is required; when the id policy is PRIMARY_KEY, it must be empty |
source-name | | Select certain columns of the input source as the id column of source vertex. When the id policy of the source vertex is CUSTOMIZE, a certain column must be specified as the id column of the vertex; when the id policy of the source vertex is PRIMARY_KEY, one or more columns must be specified for splicing the id of the generated vertex, that is, no matter which id strategy is used, this item is required |
target-name | | Specify certain columns as the id columns of target vertex, similar to source-name |
selected-fields | | Select some columns to insert, other unselected ones are not inserted, cannot exist at the same time as ignored-fields |
ignored-fields | | Ignore some columns so that they do not participate in insertion, cannot exist at the same time as selected-fields |
batch-size | 500 | The number of data items in each batch when importing data |
5.3 Common Configs
Common Configs contains some common configurations.
| Parameter | Default Value | Description |
|---|
delimiter | , | Separator of source-name, target-name, selected-fields or ignored-fields |
6 License
The same as HugeGraph, hugegraph-spark-connector is also licensed under Apache 2.0 License.
3.3 - HugeGraph-AI


DeepWiki provides real-time updated project documentation with more comprehensive and accurate content, suitable for quickly understanding the latest project information.
📖 https://deepwiki.com/apache/hugegraph-ai
hugegraph-ai integrates HugeGraph with artificial intelligence capabilities, providing comprehensive support for developers to build AI-powered graph applications.
✨ Key Features
- GraphRAG: Build intelligent question-answering systems with graph-enhanced retrieval
- Text2Gremlin: Natural language to graph query conversion with REST API
- Knowledge Graph Construction: Automated graph building from text using LLMs
- Graph ML: Integration with 21 graph learning algorithms (GCN, GAT, GraphSAGE, etc.)
- Python Client: Easy-to-use Python interface for HugeGraph operations
- AI Agents: Intelligent graph analysis and reasoning capabilities
🎉 What’s New in v1.5.0
- Text2Gremlin REST API: Convert natural language queries to Gremlin commands via REST endpoints
- Multi-Model Vector Support: Each graph instance can use independent embedding models
- Bilingual Prompt Support: Switch between English and Chinese prompts (EN/CN)
- Semi-Automatic Schema Generation: Intelligent schema inference from text data
- Semi-Automatic Prompt Generation: Context-aware prompt templates
- Enhanced Reranker Support: Integration with Cohere and SiliconFlow rerankers
- LiteLLM Multi-Provider Support: Unified interface for OpenAI, Anthropic, Gemini, and more
🚀 Quick Start
[!NOTE]
For a complete deployment guide and detailed examples, please refer to hugegraph-llm/README.md
Prerequisites
- Python 3.10+ (required for hugegraph-llm)
- uv 0.7+ (recommended package manager)
- HugeGraph Server 1.5+ (required)
- Docker (optional, for containerized deployment)
Option 1: Docker Deployment (Recommended)
# Clone the repository
git clone https://github.com/apache/hugegraph-ai.git
cd hugegraph-ai

# Set up environment and start services
cp docker/env.template docker/.env
# Edit docker/.env to set your PROJECT_PATH
cd docker
docker-compose -f docker-compose-network.yml up -d

# Access services:
# - HugeGraph Server: http://localhost:8080
# - RAG Service: http://localhost:8001
Option 2: Source Installation
# 1. Start HugeGraph Server
docker run -itd --name=server -p 8080:8080 hugegraph/hugegraph

# 2. Clone and set up the project
git clone https://github.com/apache/hugegraph-ai.git
cd hugegraph-ai/hugegraph-llm

# 3. Install dependencies
uv venv && source .venv/bin/activate
uv pip install -e .

# 4. Start the demo
python -m hugegraph_llm.demo.rag_demo.app
# Visit http://127.0.0.1:8001
Basic Usage Examples
GraphRAG - Question Answering
from hugegraph_llm.operators.graph_rag_task import RAGPipeline

# Initialize RAG pipeline
graph_rag = RAGPipeline()

# Ask questions about your graph
result = (graph_rag
    .extract_keywords(text="Tell me about Al Pacino.")
    .keywords_to_vid()
    .query_graphdb(max_deep=2, max_graph_items=30)
    .synthesize_answer()
    .run())
Knowledge Graph Construction
from hugegraph_llm.models.llms.init_llm import LLMs
from hugegraph_llm.operators.kg_construction_task import KgBuilder

# Build KG from text
TEXT = "Your text content here..."
builder = KgBuilder(LLMs().get_chat_llm())

(builder
    .import_schema(from_hugegraph="hugegraph")
    .chunk_split(TEXT)
    .extract_info(extract_type="property_graph")
    .commit_to_hugegraph()
    .run())
Graph Machine Learning
from pyhugegraph.client import PyHugeClient
# Connect to HugeGraph and run ML algorithms
# See hugegraph-ml documentation for detailed examples
📦 Modules
Large language model integration for graph applications:
- GraphRAG: Retrieval-augmented generation with graph data
- Knowledge Graph Construction: Build KGs from text automatically
- Natural Language Interface: Query graphs using natural language
- AI Agents: Intelligent graph analysis and reasoning
Graph machine learning with 21 implemented algorithms:
- Node Classification: GCN, GAT, GraphSAGE, APPNP, AGNN, ARMA, DAGNN, DeeperGCN, GRAND, JKNet, Cluster-GCN
- Graph Classification: DiffPool, GIN
- Graph Embedding: DGI, BGRL, GRACE
- Link Prediction: SEAL, P-GNN, GATNE
- Fraud Detection: CARE-GNN, BGNN
- Post-Processing: C&S (Correct & Smooth)
Python client for HugeGraph operations:
- Schema Management: Define vertex/edge labels and properties
- CRUD Operations: Create, read, update, delete graph data
- Gremlin Queries: Execute graph traversal queries
- REST API: Complete HugeGraph REST API coverage
📚 Learn More
🤝 Contributing
We welcome contributions! Please see our contribution guidelines for details.
Development Setup:
- Use GitHub Desktop for easier PR management
- Run
./style/code_format_and_analysis.sh before submitting PRs - Check existing issues before reporting bugs

📄 License
hugegraph-ai is licensed under Apache 2.0 License.

3.3.1 - HugeGraph-LLM
Please refer to the AI repository README for the most up-to-date documentation, and the official website regularly is updated and synchronized.
Bridge the gap between Graph Databases and Large Language Models
AI summarizes the project documentation:
🎯 Overview
HugeGraph-LLM is a comprehensive toolkit that combines the power of graph databases with large language models.
It enables seamless integration between HugeGraph and LLMs for building intelligent applications.
Key Features
- 🏗️ Knowledge Graph Construction - Build KGs automatically using LLMs + HugeGraph
- 🗣️ Natural Language Querying - Operate graph databases using natural language (Gremlin/Cypher)
- 🔍 Graph-Enhanced RAG - Leverage knowledge graphs to improve answer accuracy (GraphRAG & Graph Agent)
For detailed source code doc, visit our DeepWiki page. (Recommended)
📋 Prerequisites
[!IMPORTANT]
- Python: 3.10+ (not tested on 3.12)
- HugeGraph Server: 1.3+ (recommended: 1.5+)
- UV Package Manager: 0.7+
🚀 Quick Start
Choose your preferred deployment method:
Option 1: Docker Compose (Recommended)
The fastest way to get started with both HugeGraph Server and RAG Service:
# 1. Set up environment
cp docker/env.template docker/.env
# Edit docker/.env and set PROJECT_PATH to your actual project path

# 2. Deploy services
cd docker
docker-compose -f docker-compose-network.yml up -d

# 3. Verify deployment
docker-compose -f docker-compose-network.yml ps

# 4. Access services
# HugeGraph Server: http://localhost:8080
# RAG Service: http://localhost:8001
Option 2: Individual Docker Containers
For more control over individual components:
Available Images
hugegraph/rag - Development image with source code accesshugegraph/rag-bin - Production-optimized binary (compiled with Nuitka)
# 1. Create network
docker network create -d bridge hugegraph-net

# 2. Start HugeGraph Server
docker run -itd --name=server -p 8080:8080 --network hugegraph-net hugegraph/hugegraph

# 3. Start RAG Service
docker pull hugegraph/rag:latest
docker run -itd --name rag \
  -v /path/to/your/hugegraph-llm/.env:/home/work/hugegraph-llm/.env \
  -p 8001:8001 --network hugegraph-net hugegraph/rag

# 4. Monitor logs
docker logs -f rag
Option 3: Build from Source
For development and customization:
# 1. Start HugeGraph Server
docker run -itd --name=server -p 8080:8080 hugegraph/hugegraph

# 2. Install UV package manager
curl -LsSf https://astral.sh/uv/install.sh | sh

# 3. Clone and setup project
git clone https://github.com/apache/hugegraph-ai.git
cd hugegraph-ai/hugegraph-llm

# 4. Create virtual environment and install dependencies
uv venv && source .venv/bin/activate
uv pip install -e .

# 5. Launch RAG demo
python -m hugegraph_llm.demo.rag_demo.app
# Access at: http://127.0.0.1:8001

# 6. (Optional) Custom host/port
python -m hugegraph_llm.demo.rag_demo.app --host 127.0.0.1 --port 18001
Additional Setup (Optional)
# Download NLTK stopwords for better text processing
python ./hugegraph_llm/operators/common_op/nltk_helper.py

# Update configuration files
python -m hugegraph_llm.config.generate --update
[!TIP]
Check our Quick Start Guide for detailed usage examples and query logic explanations.
💡 Usage Examples
Knowledge Graph Construction
Interactive Web Interface
Use the Gradio interface for visual knowledge graph building:
Input Options:
- Text: Direct text input for RAG index creation
- Files: Upload TXT or DOCX files (multiple selection supported)
Schema Configuration:
- Custom Schema: JSON format following our template
- HugeGraph Schema: Use existing graph instance schema (e.g., “hugegraph”)
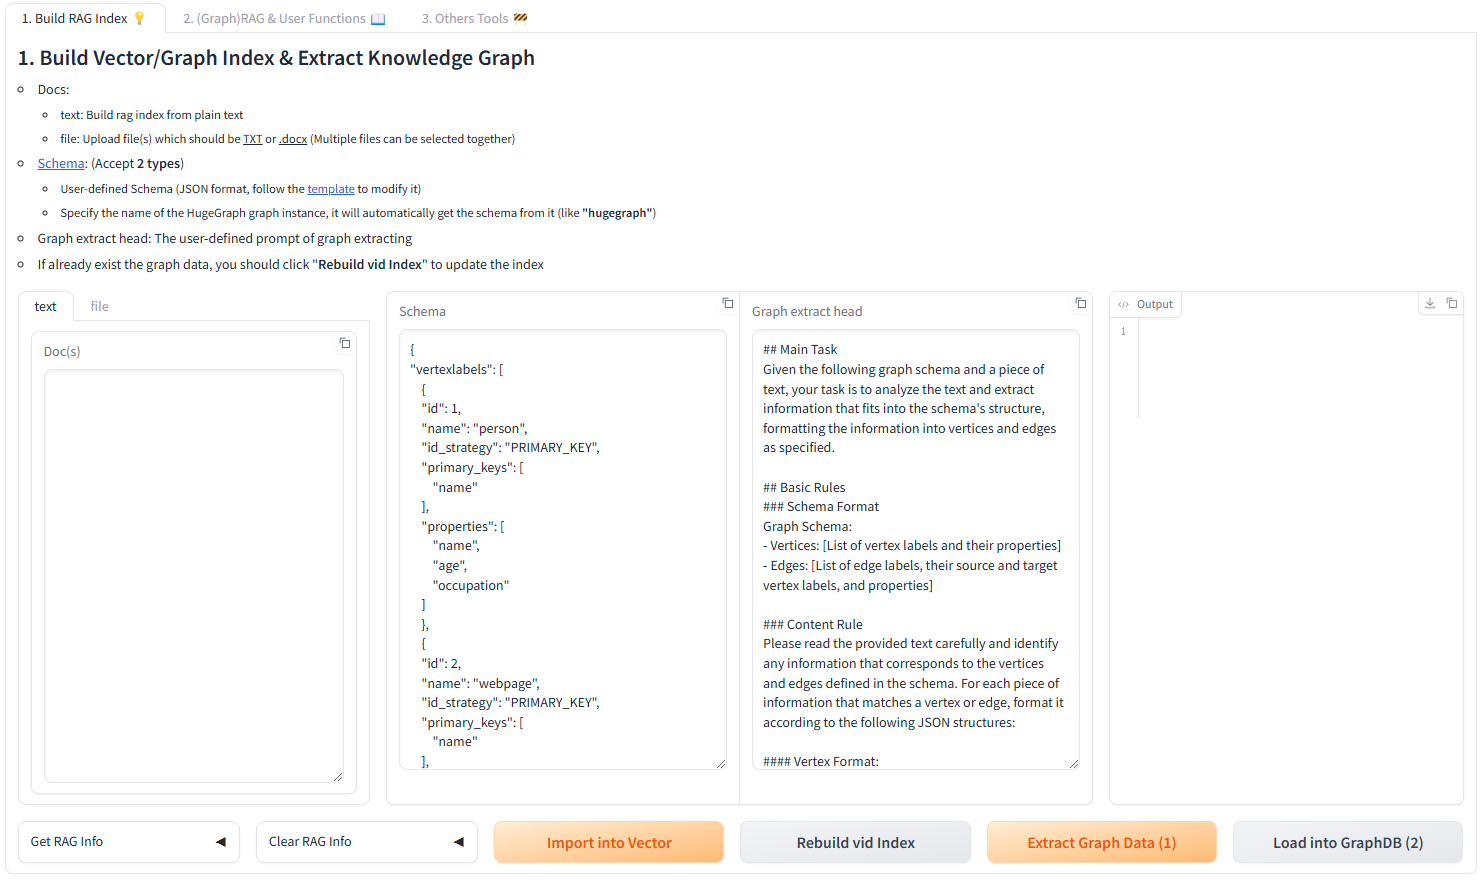
Programmatic Construction
Build knowledge graphs with code using the KgBuilder class:
from hugegraph_llm.models.llms.init_llm import LLMs
from hugegraph_llm.operators.kg_construction_task import KgBuilder

# Initialize and chain operations
TEXT = "Your input text here..."
builder = KgBuilder(LLMs().get_chat_llm())

(
    builder
    .import_schema(from_hugegraph="talent_graph").print_result()
    .chunk_split(TEXT).print_result()
    .extract_info(extract_type="property_graph").print_result()
    .commit_to_hugegraph()
    .run()
)
Pipeline Workflow:
graph LR
    A[Import Schema] --> B[Chunk Split]
    B --> C[Extract Info]
    C --> D[Commit to HugeGraph]
    D --> E[Execute Pipeline]

    style A fill:#fff2cc
    style B fill:#d5e8d4
    style C fill:#dae8fc
    style D fill:#f8cecc
    style E fill:#e1d5e7
Graph-Enhanced RAG
Leverage HugeGraph for retrieval-augmented generation:
from hugegraph_llm.operators.graph_rag_task import RAGPipeline

# Initialize RAG pipeline
graph_rag = RAGPipeline()

# Execute RAG workflow
(
    graph_rag
    .extract_keywords(text="Tell me about Al Pacino.")
    .keywords_to_vid()
    .query_graphdb(max_deep=2, max_graph_items=30)
    .merge_dedup_rerank()
    .synthesize_answer(vector_only_answer=False, graph_only_answer=True)
    .run(verbose=True)
)
RAG Pipeline Flow:
graph TD
    A[User Query] --> B[Extract Keywords]
    B --> C[Match Graph Nodes]
    C --> D[Retrieve Graph Context]
    D --> E[Rerank Results]
    E --> F[Generate Answer]

    style A fill:#e3f2fd
    style B fill:#f3e5f5
    style C fill:#e8f5e8
    style D fill:#fff3e0
    style E fill:#fce4ec
    style F fill:#e0f2f1
🔧 Configuration
After running the demo, configuration files are automatically generated:
- Environment:
hugegraph-llm/.env - Prompts:
hugegraph-llm/src/hugegraph_llm/resources/demo/config_prompt.yaml
[!NOTE]
Configuration changes are automatically saved when using the web interface. For manual changes, simply refresh the page to load updates.
LLM Provider Configuration
This project uses LiteLLM for multi-provider LLM support, enabling unified access to OpenAI, Anthropic, Google, Cohere, and 100+ other providers.
Option 1: Direct LLM Connection (OpenAI, Ollama)
# .env configuration
chat_llm_type=openai           # or ollama/local
openai_api_key=sk-xxx
openai_api_base=https://api.openai.com/v1
openai_language_model=gpt-4o-mini
openai_max_tokens=4096
Option 2: LiteLLM Multi-Provider Support
LiteLLM acts as a unified proxy for multiple LLM providers:
# .env configuration
chat_llm_type=litellm
extract_llm_type=litellm
text2gql_llm_type=litellm

# LiteLLM settings
litellm_api_base=http://localhost:4000  # LiteLLM proxy server
litellm_api_key=sk-1234                  # LiteLLM API key

# Model selection (provider/model format)
litellm_language_model=anthropic/claude-3-5-sonnet-20241022
litellm_max_tokens=4096
Supported Providers: OpenAI, Anthropic, Google (Gemini), Azure, Cohere, Bedrock, Vertex AI, Hugging Face, and more.
For full provider list and configuration details, visit LiteLLM Providers.
Reranker Configuration
Rerankers improve RAG accuracy by reordering retrieved results. Supported providers:
# Cohere Reranker
reranker_type=cohere
cohere_api_key=your-cohere-key
cohere_rerank_model=rerank-english-v3.0

# SiliconFlow Reranker
reranker_type=siliconflow
siliconflow_api_key=your-siliconflow-key
siliconflow_rerank_model=BAAI/bge-reranker-v2-m3
Text2Gremlin Configuration
Convert natural language to Gremlin queries:
from hugegraph_llm.operators.graph_rag_task import Text2GremlinPipeline

# Initialize pipeline
text2gremlin = Text2GremlinPipeline()

# Generate Gremlin query
result = (
    text2gremlin
    .query_to_gremlin(query="Find all movies directed by Francis Ford Coppola")
    .execute_gremlin_query()
    .run()
)
REST API Endpoint: See the REST API documentation for HTTP endpoint details.
📚 Additional Resources
- Graph Visualization: Use HugeGraph Hubble for data analysis and schema management
- API Documentation: Explore our REST API endpoints for integration
- Community: Join our discussions and contribute to the project
License: Apache License 2.0 | Community: Apache HugeGraph
3.3.2 - HugeGraph-ML
HugeGraph-ML integrates HugeGraph with popular graph learning libraries, enabling end-to-end machine learning workflows directly on graph data.
Overview
hugegraph-ml provides a unified interface for applying graph neural networks and machine learning algorithms to data stored in HugeGraph. It eliminates the need for complex data export/import pipelines by seamlessly converting HugeGraph data to formats compatible with leading ML frameworks.
Key Features
- Direct HugeGraph Integration: Query graph data directly from HugeGraph without manual exports
- 21 Implemented Algorithms: Comprehensive coverage of node classification, graph classification, embedding, and link prediction
- DGL Backend: Leverages Deep Graph Library (DGL) for efficient training
- End-to-End Workflows: From data loading to model training and evaluation
- Modular Tasks: Reusable task abstractions for common ML scenarios
Prerequisites
- Python: 3.9+ (standalone module)
- HugeGraph Server: 1.0+ (recommended: 1.5+)
- UV Package Manager: 0.7+ (for dependency management)
Installation
1. Start HugeGraph Server
# Option 1: Docker (recommended)
docker run -itd --name=hugegraph -p 8080:8080 hugegraph/hugegraph

# Option 2: Binary packages
# See https://hugegraph.apache.org/docs/download/download/
2. Clone and Setup
git clone https://github.com/apache/hugegraph-ai.git
cd hugegraph-ai/hugegraph-ml
3. Install Dependencies
# uv sync automatically creates .venv and installs all dependencies
uv sync

# Activate virtual environment
source .venv/bin/activate
4. Navigate to Source Directory
[!NOTE]
All examples assume you’re in the activated virtual environment.
Implemented Algorithms
HugeGraph-ML currently implements 21 graph machine learning algorithms across multiple categories:
Node Classification (11 algorithms)
Predict labels for graph nodes based on network structure and features.
| Algorithm | Paper | Description |
|---|
| GCN | Kipf & Welling, 2017 | Graph Convolutional Networks |
| GAT | Veličković et al., 2018 | Graph Attention Networks |
| GraphSAGE | Hamilton et al., 2017 | Inductive representation learning |
| APPNP | Klicpera et al., 2019 | Personalized PageRank propagation |
| AGNN | Thekumparampil et al., 2018 | Attention-based GNN |
| ARMA | Bianchi et al., 2019 | Autoregressive moving average filters |
| DAGNN | Liu et al., 2020 | Deep adaptive graph neural networks |
| DeeperGCN | Li et al., 2020 | Very deep GCN architectures |
| GRAND | Feng et al., 2020 | Graph random neural networks |
| JKNet | Xu et al., 2018 | Jumping knowledge networks |
| Cluster-GCN | Chiang et al., 2019 | Scalable GCN training via clustering |
Graph Classification (2 algorithms)
Classify entire graphs based on their structure and node features.
Graph Embedding (3 algorithms)
Learn unsupervised node representations for downstream tasks.
Link Prediction (3 algorithms)
Predict missing or future connections in graphs.
Fraud Detection (2 algorithms)
Detect anomalous nodes in graphs (e.g., fraudulent accounts).
Post-Processing (1 algorithm)
Improve predictions via label propagation.
Usage Examples
Example 1: Node Embedding with DGI
Perform unsupervised node embedding on the Cora dataset using Deep Graph Infomax (DGI).
Step 1: Import Dataset (if needed)
from hugegraph_ml.utils.dgl2hugegraph_utils import import_graph_from_dgl

# Import Cora dataset from DGL to HugeGraph
import_graph_from_dgl("cora")
Step 2: Convert Graph Data
from hugegraph_ml.data.hugegraph2dgl import HugeGraph2DGL

# Convert HugeGraph data to DGL format
hg2d = HugeGraph2DGL()
graph = hg2d.convert_graph(vertex_label="CORA_vertex", edge_label="CORA_edge")
Step 3: Initialize Model
from hugegraph_ml.models.dgi import DGI

# Create DGI model
model = DGI(n_in_feats=graph.ndata["feat"].shape[1])
Step 4: Train and Generate Embeddings
from hugegraph_ml.tasks.node_embed import NodeEmbed

# Train model and generate node embeddings
node_embed_task = NodeEmbed(graph=graph, model=model)
embedded_graph = node_embed_task.train_and_embed(
    add_self_loop=True,
    n_epochs=300,
    patience=30
)
Step 5: Downstream Task (Node Classification)
from hugegraph_ml.models.mlp import MLPClassifier
from hugegraph_ml.tasks.node_classify import NodeClassify

# Use embeddings for node classification
model = MLPClassifier(
    n_in_feat=embedded_graph.ndata["feat"].shape[1],
    n_out_feat=embedded_graph.ndata["label"].unique().shape[0]
)
node_clf_task = NodeClassify(graph=embedded_graph, model=model)
node_clf_task.train(lr=1e-3, n_epochs=400, patience=40)
print(node_clf_task.evaluate())
Expected Output:
{'accuracy': 0.82, 'loss': 0.5714246034622192}
Full Example: See dgi_example.py
Example 2: Node Classification with GRAND
Directly classify nodes using the GRAND model (no separate embedding step needed).
from hugegraph_ml.data.hugegraph2dgl import HugeGraph2DGL
from hugegraph_ml.models.grand import GRAND
from hugegraph_ml.tasks.node_classify import NodeClassify

# Load graph
hg2d = HugeGraph2DGL()
graph = hg2d.convert_graph(vertex_label="CORA_vertex", edge_label="CORA_edge")

# Initialize GRAND model
model = GRAND(
    n_in_feats=graph.ndata["feat"].shape[1],
    n_out_feats=graph.ndata["label"].unique().shape[0]
)

# Train and evaluate
node_clf_task = NodeClassify(graph=graph, model=model)
node_clf_task.train(lr=1e-2, n_epochs=1500, patience=100)
print(node_clf_task.evaluate())
Full Example: See grand_example.py
Core Components
HugeGraph2DGL Converter
Seamlessly converts HugeGraph data to DGL graph format:
from hugegraph_ml.data.hugegraph2dgl import HugeGraph2DGL

hg2d = HugeGraph2DGL()
graph = hg2d.convert_graph(
    vertex_label="person",      # Vertex label to extract
    edge_label="knows",         # Edge label to extract
    directed=False              # Graph directionality
)
Task Abstractions
Reusable task objects for common ML workflows:
| Task | Class | Purpose |
|---|
| Node Embedding | NodeEmbed | Generate unsupervised node embeddings |
| Node Classification | NodeClassify | Predict node labels |
| Graph Classification | GraphClassify | Predict graph-level labels |
| Link Prediction | LinkPredict | Predict missing edges |
Best Practices
- Start with Small Datasets: Test your pipeline on small graphs (e.g., Cora, Citeseer) before scaling
- Use Early Stopping: Set
patience parameter to avoid overfitting - Tune Hyperparameters: Adjust learning rate, hidden dimensions, and epochs based on dataset size
- Monitor GPU Memory: Large graphs may require batch training (e.g., Cluster-GCN)
- Validate Schema: Ensure vertex/edge labels match your HugeGraph schema
Troubleshooting
| Issue | Solution |
|---|
| “Connection refused” to HugeGraph | Verify server is running on port 8080 |
| CUDA out of memory | Reduce batch size or use CPU-only mode |
| Model convergence issues | Try different learning rates (1e-2, 1e-3, 1e-4) |
| ImportError for DGL | Run uv sync to reinstall dependencies |
Contributing
To add a new algorithm:
- Create model file in
src/hugegraph_ml/models/your_model.py - Inherit from base model class and implement
forward() method - Add example script in
src/hugegraph_ml/examples/ - Update this documentation with algorithm details
See Also
3.3.3 - Configuration Reference
This document provides a comprehensive reference for all configuration options in HugeGraph-LLM.
Configuration Files
- Environment File:
.env (created from template or auto-generated) - Prompt Configuration:
src/hugegraph_llm/resources/demo/config_prompt.yaml
[!TIP]
Run python -m hugegraph_llm.config.generate --update to auto-generate or update configuration files with defaults.
Environment Variables Overview
1. Language and Model Type Selection
# Prompt language (affects system prompts and generated text)
LANGUAGE=EN                     # Options: EN | CN

# LLM Type for different tasks
CHAT_LLM_TYPE=openai           # Chat/RAG: openai | litellm | ollama/local
EXTRACT_LLM_TYPE=openai        # Entity extraction: openai | litellm | ollama/local
TEXT2GQL_LLM_TYPE=openai       # Text2Gremlin: openai | litellm | ollama/local

# Embedding type
EMBEDDING_TYPE=openai          # Options: openai | litellm | ollama/local

# Reranker type (optional)
RERANKER_TYPE=                 # Options: cohere | siliconflow | (empty for none)
2. OpenAI Configuration
Each LLM task (chat, extract, text2gql) has independent configuration:
2.1 Chat LLM (RAG Answer Generation)
OPENAI_CHAT_API_BASE=https://api.openai.com/v1
OPENAI_CHAT_API_KEY=sk-your-api-key-here
OPENAI_CHAT_LANGUAGE_MODEL=gpt-4o-mini
OPENAI_CHAT_TOKENS=8192        # Max tokens for chat responses
OPENAI_EXTRACT_API_BASE=https://api.openai.com/v1
OPENAI_EXTRACT_API_KEY=sk-your-api-key-here
OPENAI_EXTRACT_LANGUAGE_MODEL=gpt-4o-mini
OPENAI_EXTRACT_TOKENS=1024     # Max tokens for extraction
2.3 Text2GQL LLM (Natural Language to Gremlin)
OPENAI_TEXT2GQL_API_BASE=https://api.openai.com/v1
OPENAI_TEXT2GQL_API_KEY=sk-your-api-key-here
OPENAI_TEXT2GQL_LANGUAGE_MODEL=gpt-4o-mini
OPENAI_TEXT2GQL_TOKENS=4096    # Max tokens for query generation
2.4 Embedding Model
OPENAI_EMBEDDING_API_BASE=https://api.openai.com/v1
OPENAI_EMBEDDING_API_KEY=sk-your-api-key-here
OPENAI_EMBEDDING_MODEL=text-embedding-3-small
[!NOTE]
You can use different API keys/endpoints for each task to optimize costs or use specialized models.
3. LiteLLM Configuration (Multi-Provider Support)
LiteLLM enables unified access to 100+ LLM providers (OpenAI, Anthropic, Google, Azure, etc.).
3.1 Chat LLM
LITELLM_CHAT_API_BASE=http://localhost:4000       # LiteLLM proxy URL
LITELLM_CHAT_API_KEY=sk-litellm-key              # LiteLLM API key
LITELLM_CHAT_LANGUAGE_MODEL=anthropic/claude-3-5-sonnet-20241022
LITELLM_CHAT_TOKENS=8192
LITELLM_EXTRACT_API_BASE=http://localhost:4000
LITELLM_EXTRACT_API_KEY=sk-litellm-key
LITELLM_EXTRACT_LANGUAGE_MODEL=openai/gpt-4o-mini
LITELLM_EXTRACT_TOKENS=256
3.3 Text2GQL LLM
LITELLM_TEXT2GQL_API_BASE=http://localhost:4000
LITELLM_TEXT2GQL_API_KEY=sk-litellm-key
LITELLM_TEXT2GQL_LANGUAGE_MODEL=openai/gpt-4o-mini
LITELLM_TEXT2GQL_TOKENS=4096
3.4 Embedding
LITELLM_EMBEDDING_API_BASE=http://localhost:4000
LITELLM_EMBEDDING_API_KEY=sk-litellm-key
LITELLM_EMBEDDING_MODEL=openai/text-embedding-3-small
Model Format: provider/model-name
Examples:
openai/gpt-4o-minianthropic/claude-3-5-sonnet-20241022google/gemini-2.0-flash-expazure/gpt-4
See LiteLLM Providers for the complete list.
4. Ollama Configuration (Local Deployment)
Run local LLMs with Ollama for privacy and cost control.
4.1 Chat LLM
OLLAMA_CHAT_HOST=127.0.0.1
OLLAMA_CHAT_PORT=11434
OLLAMA_CHAT_LANGUAGE_MODEL=llama3.1:8b
OLLAMA_EXTRACT_HOST=127.0.0.1
OLLAMA_EXTRACT_PORT=11434
OLLAMA_EXTRACT_LANGUAGE_MODEL=llama3.1:8b
4.3 Text2GQL LLM
OLLAMA_TEXT2GQL_HOST=127.0.0.1
OLLAMA_TEXT2GQL_PORT=11434
OLLAMA_TEXT2GQL_LANGUAGE_MODEL=qwen2.5-coder:7b
4.4 Embedding
OLLAMA_EMBEDDING_HOST=127.0.0.1
OLLAMA_EMBEDDING_PORT=11434
OLLAMA_EMBEDDING_MODEL=nomic-embed-text
[!TIP]
Download models: ollama pull llama3.1:8b or ollama pull qwen2.5-coder:7b
5. Reranker Configuration
Rerankers improve RAG accuracy by reordering retrieved results based on relevance.
5.1 Cohere Reranker
RERANKER_TYPE=cohere
COHERE_BASE_URL=https://api.cohere.com/v1/rerank
RERANKER_API_KEY=your-cohere-api-key
RERANKER_MODEL=rerank-english-v3.0
Available models:
rerank-english-v3.0 (English)rerank-multilingual-v3.0 (100+ languages)
5.2 SiliconFlow Reranker
RERANKER_TYPE=siliconflow
RERANKER_API_KEY=your-siliconflow-api-key
RERANKER_MODEL=BAAI/bge-reranker-v2-m3
6. HugeGraph Connection
Configure connection to your HugeGraph server instance.
# Server connection
GRAPH_IP=127.0.0.1
GRAPH_PORT=8080
GRAPH_NAME=hugegraph            # Graph instance name
GRAPH_USER=admin                # Username
GRAPH_PWD=admin-password        # Password
GRAPH_SPACE=                    # Graph space (optional, for multi-tenancy)
7. Query Parameters
Control graph traversal behavior and result limits.
# Graph traversal limits
MAX_GRAPH_PATH=10               # Max path depth for graph queries
MAX_GRAPH_ITEMS=30              # Max items to retrieve from graph
EDGE_LIMIT_PRE_LABEL=8          # Max edges per label type

# Property filtering
LIMIT_PROPERTY=False            # Limit properties in results (True/False)
8. Vector Search Configuration
Configure vector similarity search parameters.
# Vector search thresholds
VECTOR_DIS_THRESHOLD=0.9        # Min cosine similarity (0-1, higher = stricter)
TOPK_PER_KEYWORD=1              # Top-K results per extracted keyword
9. Rerank Configuration
# Rerank result limits
TOPK_RETURN_RESULTS=20          # Number of top results after reranking
Configuration Priority
The system loads configuration in the following order (later sources override earlier ones):
- Default Values (in
*_config.py files) - Environment Variables (from
.env file) - Runtime Updates (via Web UI or API calls)
Example Configurations
Minimal Setup (OpenAI)
# Language
LANGUAGE=EN

# LLM Types
CHAT_LLM_TYPE=openai
EXTRACT_LLM_TYPE=openai
TEXT2GQL_LLM_TYPE=openai
EMBEDDING_TYPE=openai

# OpenAI Credentials (single key for all tasks)
OPENAI_API_BASE=https://api.openai.com/v1
OPENAI_API_KEY=sk-your-api-key-here
OPENAI_LANGUAGE_MODEL=gpt-4o-mini
OPENAI_EMBEDDING_MODEL=text-embedding-3-small

# HugeGraph Connection
GRAPH_IP=127.0.0.1
GRAPH_PORT=8080
GRAPH_NAME=hugegraph
GRAPH_USER=admin
GRAPH_PWD=admin
Production Setup (LiteLLM + Reranker)
# Bilingual support
LANGUAGE=EN

# LiteLLM for flexibility
CHAT_LLM_TYPE=litellm
EXTRACT_LLM_TYPE=litellm
TEXT2GQL_LLM_TYPE=litellm
EMBEDDING_TYPE=litellm

# LiteLLM Proxy
LITELLM_CHAT_API_BASE=http://localhost:4000
LITELLM_CHAT_API_KEY=sk-litellm-master-key
LITELLM_CHAT_LANGUAGE_MODEL=anthropic/claude-3-5-sonnet-20241022
LITELLM_CHAT_TOKENS=8192

LITELLM_EXTRACT_API_BASE=http://localhost:4000
LITELLM_EXTRACT_API_KEY=sk-litellm-master-key
LITELLM_EXTRACT_LANGUAGE_MODEL=openai/gpt-4o-mini
LITELLM_EXTRACT_TOKENS=256

LITELLM_TEXT2GQL_API_BASE=http://localhost:4000
LITELLM_TEXT2GQL_API_KEY=sk-litellm-master-key
LITELLM_TEXT2GQL_LANGUAGE_MODEL=openai/gpt-4o-mini
LITELLM_TEXT2GQL_TOKENS=4096

LITELLM_EMBEDDING_API_BASE=http://localhost:4000
LITELLM_EMBEDDING_API_KEY=sk-litellm-master-key
LITELLM_EMBEDDING_MODEL=openai/text-embedding-3-small

# Cohere Reranker for better accuracy
RERANKER_TYPE=cohere
COHERE_BASE_URL=https://api.cohere.com/v1/rerank
RERANKER_API_KEY=your-cohere-key
RERANKER_MODEL=rerank-multilingual-v3.0

# HugeGraph with authentication
GRAPH_IP=prod-hugegraph.example.com
GRAPH_PORT=8080
GRAPH_NAME=production_graph
GRAPH_USER=rag_user
GRAPH_PWD=secure-password
GRAPH_SPACE=prod_space

# Optimized query parameters
MAX_GRAPH_PATH=15
MAX_GRAPH_ITEMS=50
VECTOR_DIS_THRESHOLD=0.85
TOPK_RETURN_RESULTS=30
Local/Offline Setup (Ollama)
# Language
LANGUAGE=EN

# All local models via Ollama
CHAT_LLM_TYPE=ollama/local
EXTRACT_LLM_TYPE=ollama/local
TEXT2GQL_LLM_TYPE=ollama/local
EMBEDDING_TYPE=ollama/local

# Ollama endpoints
OLLAMA_CHAT_HOST=127.0.0.1
OLLAMA_CHAT_PORT=11434
OLLAMA_CHAT_LANGUAGE_MODEL=llama3.1:8b

OLLAMA_EXTRACT_HOST=127.0.0.1
OLLAMA_EXTRACT_PORT=11434
OLLAMA_EXTRACT_LANGUAGE_MODEL=llama3.1:8b

OLLAMA_TEXT2GQL_HOST=127.0.0.1
OLLAMA_TEXT2GQL_PORT=11434
OLLAMA_TEXT2GQL_LANGUAGE_MODEL=qwen2.5-coder:7b

OLLAMA_EMBEDDING_HOST=127.0.0.1
OLLAMA_EMBEDDING_PORT=11434
OLLAMA_EMBEDDING_MODEL=nomic-embed-text

# No reranker for offline setup
RERANKER_TYPE=

# Local HugeGraph
GRAPH_IP=127.0.0.1
GRAPH_PORT=8080
GRAPH_NAME=hugegraph
GRAPH_USER=admin
GRAPH_PWD=admin
Configuration Validation
After modifying .env, verify your configuration:
- Via Web UI: Visit
http://localhost:8001 and check the settings panel - Via Python:
from hugegraph_llm.config import settings
print(settings.llm_config)
print(settings.hugegraph_config)
- Via REST API:
curl http://localhost:8001/config
Troubleshooting
| Issue | Solution |
|---|
| “API key not found” | Check *_API_KEY is set correctly in .env |
| “Connection refused” | Verify GRAPH_IP and GRAPH_PORT are correct |
| “Model not found” | For Ollama: run ollama pull <model-name> |
| “Rate limit exceeded” | Reduce MAX_GRAPH_ITEMS or use different API keys |
| “Embedding dimension mismatch” | Delete existing vectors and rebuild with correct model |
See Also
3.3.4 - GraphRAG UI Details
Follow up main doc to introduce the basic UI function & details, welcome to update and improve at any time, thanks
1. Core Logic of the Project
Build RAG Index Responsibilities:
- Split and vectorize text
- Extract text into a graph (construct a knowledge graph) and vectorize the vertices
(Graph)RAG & User Functions Responsibilities:
- Retrieve relevant content from the constructed knowledge graph and vector database based on the query to supplement the prompt.
2. (Processing Flow) Build RAG Index
Construct a knowledge graph, chunk vector, and graph vid vector from the text.

graph TD;
    A[Raw Text] --> B[Text Segmentation]
    B --> C[Vectorization]
    C --> D[Store in Vector Database]

    A --> F[Text Segmentation]
    F --> G[LLM extracts graph based on schema \nand segmented text]
    G --> H[Store graph in Graph Database, \nautomatically vectorize vertices \nand store in Vector Database]

    I[Retrieve vertices from Graph Database] --> J[Vectorize vertices and store in Vector Database \nNote: Incremental update]
- Doc(s): Input text
- Schema: The schema of the graph, which can be provided as a JSON-formatted schema or as the graph name (if it exists in the database).
- Graph Extract Prompt Header: The header of the prompt
- Output: Display results
Get RAG Info
Clear RAG Data
- Clear Chunks Vector Index: Clear chunk vector
- Clear Graph Vid Vector Index: Clear graph vid vector
- Clear Graph Data: Clear Graph Data
Import into Vector: Convert the text in Doc(s) into vectors (requires chunking the text first and then converting the chunks into vectors)
Extract Graph Data (1): Extract graph data from Doc(s) based on the Schema, using the Graph Extract Prompt Header and chunked content as the prompt
Load into GraphDB (2): Store the extracted graph data into the database (automatically calls Update Vid Embedding to store vectors in the vector database)
Update Vid Embedding: Convert graph vid into vectors
Execution Flow:
- Input text into the Doc(s) field.
- Click the Import into Vector button to split and vectorize the text, storing it in the vector database.
- Input the graph Schema into the Schema field.
- Click the Extract Graph Data (1) button to extract the text into a graph.
- Click the Load into GraphDB (2) button to store the extracted graph into the graph database (this automatically calls Update Vid Embedding to store the vectors in the vector database).
- Click the Update Vid Embedding button to vectorize the graph vertices and store them in the vector database.
3. (Processing Flow) (Graph)RAG & User Functions
The Import into Vector button in the previous module converts text (chunks) into vectors, and the Update Vid Embedding button converts graph vid into vectors. These vectors are stored separately to supplement the context for queries (answer generation) in this module. In other words, the previous module prepares the data for RAG (vectorization), while this module executes RAG.
This module consists of two parts:
- HugeGraph RAG Query
- (Batch) Back-testing
The first part handles single queries, while the second part handles multiple queries at once. Below is an explanation of the first part.

graph TD;
A[Question] --> B[Vectorize the question and search \nfor the most similar chunk in the Vector Database (chunk)]
A --> F[Extract keywords using LLM]
F --> G[Match vertices precisely in Graph Database \nusing keywords; perform fuzzy matching in \nVector Database (graph vid)]
G --> H[Generate Gremlin query using matched vertices and query with LLM]
H --> I[Execute Gremlin query; if successful, finish; if failed, fallback to BFS]
B --> J[Sort results]
I --> J
J --> K[Generate answer]
- Question: Input the query
- Query Prompt: The prompt template used to ask the final question to the LLM
- Keywords Extraction Prompt: The prompt template for extracting keywords from the question
- Template Num: < 0 means disable text2gql; = 0 means no template(zero-shot); > 0 means using the specified number of templates
Query Scope Selection:
- Basic LLM Answer: Does not use RAG functionality
- Vector-only Answer: Uses only vector-based retrieval (queries chunk vectors in the vector database)
- Graph-only Answer: Uses only graph-based retrieval (queries graph vid vectors in the vector database and the graph database)
- Graph-Vector Answer: Uses both graph-based and vector-based retrieval

Execution Flow:
Graph-only Answer:
- Extract keywords from the question using the Keywords Extraction Prompt.

Use the extracted keywords to:
First, perform an exact match in the graph database.
If no match is found, perform a fuzzy match in the vector database (graph vid vector) to retrieve relevant vertices.
text2gql: Call the text2gql-related interface, using the matched vertices as entities to convert the question into a Gremlin query and execute it in the graph database.
BFS: If text2gql fails (LLM-generated queries might be invalid), fall back to executing a graph query using a predefined Gremlin query template (essentially a BFS traversal).
Vector-only Answer:
Sorting and Answer Generation:
After executing the retrieval, sort the search (retrieval) results to construct the final prompt.
Generate answers based on different prompt configurations and display them in different output fields:
- Basic LLM Answer
- Vector-only Answer
- Graph-only Answer
- Graph-Vector Answer

4. (Processing Flow) Text2Gremlin
Converts natural language queries into Gremlin queries.
This module consists of two parts:
- Build Vector Template Index (Optional): Vectorizes query/gremlin pairs from sample files and stores them in the vector database for reference when generating Gremlin queries.
- Natural Language to Gremlin: Converts natural language queries into Gremlin queries.
The first part is straightforward, so the focus is on the second part.

graph TD;
A[Gremlin Pairs File] --> C[Vectorize query]
C --> D[Store in Vector Database]
F[Natural Language Query] --> G[Search for the most similar query \nin the Vector Database \n(If no Gremlin pairs exist in the Vector Database, \ndefault files will be automatically vectorized) \nand retrieve the corresponding Gremlin]
G --> H[Add the matched pair to the prompt \nand use LLM to generate the Gremlin \ncorresponding to the Natural Language Query]
- Natural Language Query: Input the natural language text to be converted into Gremlin.

- Schema: Input the graph schema.
Execution Flow:
Input the query (natural language) into the Natural Language Query field.
Input the graph schema into the Schema field.
Click the Text2Gremlin button, and the following execution logic applies:
Convert the query into a vector.
Construct the prompt:
- Retrieve the graph schema.
- Query the vector database for example vectors, retrieving query-gremlin pairs similar to the input query (if the vector database lacks examples, it automatically initializes with examples from the resources folder).

- Generate the Gremlin query using the constructed prompt.
Input Gremlin queries to execute corresponding operations.
6. Language Switching (v1.5.0+)
HugeGraph-LLM supports bilingual prompts for improved accuracy across languages.
Switching Between English and Chinese
The system language affects:
- System prompts: Internal prompts used by the LLM
- Keyword extraction: Language-specific extraction logic
- Answer generation: Response formatting and style
Configuration Method 1: Environment Variable
Edit your .env file:
# English prompts (default)
LANGUAGE=EN

# Chinese prompts
LANGUAGE=CN
Restart the service after changing the language setting.
Configuration Method 2: Web UI (Dynamic)
If available in your deployment, use the settings panel in the Web UI to switch languages without restarting:
- Navigate to the Settings or Configuration tab
- Select Language:
EN or CN - Click Save - changes apply immediately
Language-Specific Behavior
| Language | Keyword Extraction | Answer Style | Use Case |
|---|
EN | English NLP models | Professional, concise | International users, English documents |
CN | Chinese NLP models | Natural Chinese phrasing | Chinese users, Chinese documents |
[!TIP]
Match the LANGUAGE setting to your primary document language for best RAG accuracy.
REST API Language Override
When using the REST API, you can specify custom prompts per request to override the default language setting:
curl -X POST http://localhost:8001/rag \
  -H "Content-Type: application/json" \
  -d '{
    "query": "告诉我关于阿尔·帕西诺的信息",
    "graph_only": true,
    "keywords_extract_prompt": "请从以下文本中提取关键实体...",
    "answer_prompt": "请根据以下上下文回答问题..."
  }'
See the REST API Reference for complete parameter details.
3.3.5 - REST API Reference
HugeGraph-LLM provides REST API endpoints for integrating RAG and Text2Gremlin capabilities into your applications.
Base URL
Change host/port as configured when starting the service:
python -m hugegraph_llm.demo.rag_demo.app --host 127.0.0.1 --port 8001
Authentication
Currently, the API supports optional token-based authentication:
# Enable authentication in .env
ENABLE_LOGIN=true
USER_TOKEN=your-user-token
ADMIN_TOKEN=your-admin-token
Pass tokens in request headers:
Authorization: Bearer <token>
RAG Endpoints
1. Complete RAG Query
POST /rag
Execute a full RAG pipeline including keyword extraction, graph retrieval, vector search, reranking, and answer generation.
Request Body
{
  "query": "Tell me about Al Pacino's movies",
  "raw_answer": false,
  "vector_only": false,
  "graph_only": true,
  "graph_vector_answer": false,
  "graph_ratio": 0.5,
  "rerank_method": "cohere",
  "near_neighbor_first": false,
  "gremlin_tmpl_num": 5,
  "max_graph_items": 30,
  "topk_return_results": 20,
  "vector_dis_threshold": 0.9,
  "topk_per_keyword": 1,
  "custom_priority_info": "",
  "answer_prompt": "",
  "keywords_extract_prompt": "",
  "gremlin_prompt": "",
  "client_config": {
    "url": "127.0.0.1:8080",
    "graph": "hugegraph",
    "user": "admin",
    "pwd": "admin",
    "gs": ""
  }
}
Parameters:
| Field | Type | Required | Default | Description |
|---|
query | string | Yes | - | User’s natural language question |
raw_answer | boolean | No | false | Return LLM answer without retrieval |
vector_only | boolean | No | false | Use only vector search (no graph) |
graph_only | boolean | No | false | Use only graph retrieval (no vector) |
graph_vector_answer | boolean | No | false | Combine graph and vector results |
graph_ratio | float | No | 0.5 | Ratio of graph vs vector results (0-1) |
rerank_method | string | No | "" | Reranker: “cohere”, “siliconflow”, "" |
near_neighbor_first | boolean | No | false | Prioritize direct neighbors |
gremlin_tmpl_num | integer | No | 5 | Number of Gremlin templates to try |
max_graph_items | integer | No | 30 | Max items from graph retrieval |
topk_return_results | integer | No | 20 | Top-K after reranking |
vector_dis_threshold | float | No | 0.9 | Vector similarity threshold (0-1) |
topk_per_keyword | integer | No | 1 | Top-K vectors per keyword |
custom_priority_info | string | No | "" | Custom context to prioritize |
answer_prompt | string | No | "" | Custom answer generation prompt |
keywords_extract_prompt | string | No | "" | Custom keyword extraction prompt |
gremlin_prompt | string | No | "" | Custom Gremlin generation prompt |
client_config | object | No | null | Override graph connection settings |
Response
{
  "query": "Tell me about Al Pacino's movies",
  "graph_only": {
    "answer": "Al Pacino starred in The Godfather (1972), directed by Francis Ford Coppola...",
    "context": ["The Godfather is a 1972 crime film...", "..."],
    "graph_paths": ["..."],
    "keywords": ["Al Pacino", "movies"]
  }
}
Example (curl)
curl -X POST http://localhost:8001/rag \
  -H "Content-Type: application/json" \
  -d '{
    "query": "Tell me about Al Pacino",
    "graph_only": true,
    "max_graph_items": 30
  }'
2. Graph Retrieval Only
POST /rag/graph
Retrieve graph context without generating an answer. Useful for debugging or custom processing.
Request Body
{
  "query": "Al Pacino movies",
  "max_graph_items": 30,
  "topk_return_results": 20,
  "vector_dis_threshold": 0.9,
  "topk_per_keyword": 1,
  "gremlin_tmpl_num": 5,
  "rerank_method": "cohere",
  "near_neighbor_first": false,
  "custom_priority_info": "",
  "gremlin_prompt": "",
  "get_vertex_only": false,
  "client_config": {
    "url": "127.0.0.1:8080",
    "graph": "hugegraph",
    "user": "admin",
    "pwd": "admin",
    "gs": ""
  }
}
Additional Parameter:
| Field | Type | Default | Description |
|---|
get_vertex_only | boolean | false | Return only vertex IDs without full details |
Response
{
  "graph_recall": {
    "query": "Al Pacino movies",
    "keywords": ["Al Pacino", "movies"],
    "match_vids": ["1:Al Pacino", "2:The Godfather"],
    "graph_result_flag": true,
    "gremlin": "g.V('1:Al Pacino').outE().inV().limit(30)",
    "graph_result": [
      {"id": "1:Al Pacino", "label": "person", "properties": {"name": "Al Pacino"}},
      {"id": "2:The Godfather", "label": "movie", "properties": {"title": "The Godfather"}}
    ],
    "vertex_degree_list": [5, 12]
  }
}
Example (curl)
curl -X POST http://localhost:8001/rag/graph \
  -H "Content-Type: application/json" \
  -d '{
    "query": "Al Pacino",
    "max_graph_items": 30,
    "get_vertex_only": false
  }'
Text2Gremlin Endpoint
3. Natural Language to Gremlin
POST /text2gremlin
Convert natural language queries to executable Gremlin commands.
Request Body
{
  "query": "Find all movies directed by Francis Ford Coppola",
  "example_num": 5,
  "gremlin_prompt": "",
  "output_types": ["GREMLIN", "RESULT"],
  "client_config": {
    "url": "127.0.0.1:8080",
    "graph": "hugegraph",
    "user": "admin",
    "pwd": "admin",
    "gs": ""
  }
}
Parameters:
| Field | Type | Required | Default | Description |
|---|
query | string | Yes | - | Natural language query |
example_num | integer | No | 5 | Number of example templates to use |
gremlin_prompt | string | No | "" | Custom prompt for Gremlin generation |
output_types | array | No | null | Output types: [“GREMLIN”, “RESULT”, “CYPHER”] |
client_config | object | No | null | Graph connection override |
Output Types:
GREMLIN: Generated Gremlin queryRESULT: Execution result from graphCYPHER: Cypher query (if requested)
Response
{
  "gremlin": "g.V().has('person','name','Francis Ford Coppola').out('directed').hasLabel('movie').values('title')",
  "result": [
    "The Godfather",
    "The Godfather Part II",
    "Apocalypse Now"
  ]
}
Example (curl)
curl -X POST http://localhost:8001/text2gremlin \
  -H "Content-Type: application/json" \
  -d '{
    "query": "Find all movies directed by Francis Ford Coppola",
    "output_types": ["GREMLIN", "RESULT"]
  }'
Configuration Endpoints
4. Update Graph Connection
POST /config/graph
Dynamically update HugeGraph connection settings.
Request Body
{
  "url": "127.0.0.1:8080",
  "name": "hugegraph",
  "user": "admin",
  "pwd": "admin",
  "gs": ""
}
Response
{
  "status_code": 201,
  "message": "Graph configuration updated successfully"
}
5. Update LLM Configuration
POST /config/llm
Update chat/extract LLM settings at runtime.
Request Body (OpenAI)
{
  "llm_type": "openai",
  "api_key": "sk-your-api-key",
  "api_base": "https://api.openai.com/v1",
  "language_model": "gpt-4o-mini",
  "max_tokens": 4096
}
Request Body (Ollama)
{
  "llm_type": "ollama/local",
  "host": "127.0.0.1",
  "port": 11434,
  "language_model": "llama3.1:8b"
}
6. Update Embedding Configuration
POST /config/embedding
Update embedding model settings.
Request Body
{
  "llm_type": "openai",
  "api_key": "sk-your-api-key",
  "api_base": "https://api.openai.com/v1",
  "language_model": "text-embedding-3-small"
}
7. Update Reranker Configuration
POST /config/rerank
Configure reranker settings.
Request Body (Cohere)
{
  "reranker_type": "cohere",
  "api_key": "your-cohere-key",
  "reranker_model": "rerank-multilingual-v3.0",
  "cohere_base_url": "https://api.cohere.com/v1/rerank"
}
Request Body (SiliconFlow)
{
  "reranker_type": "siliconflow",
  "api_key": "your-siliconflow-key",
  "reranker_model": "BAAI/bge-reranker-v2-m3"
}
Error Responses
All endpoints return standard HTTP status codes:
| Code | Meaning |
|---|
| 200 | Success |
| 201 | Created (config updated) |
| 400 | Bad Request (invalid parameters) |
| 500 | Internal Server Error |
| 501 | Not Implemented |
Error response format:
{
  "detail": "Error message describing what went wrong"
}
Python Client Example
import requests

BASE_URL = "http://localhost:8001"

# 1. Configure graph connection
graph_config = {
    "url": "127.0.0.1:8080",
    "name": "hugegraph",
    "user": "admin",
    "pwd": "admin"
}
requests.post(f"{BASE_URL}/config/graph", json=graph_config)

# 2. Execute RAG query
rag_request = {
    "query": "Tell me about Al Pacino",
    "graph_only": True,
    "max_graph_items": 30
}
response = requests.post(f"{BASE_URL}/rag", json=rag_request)
print(response.json())

# 3. Generate Gremlin from natural language
text2gql_request = {
    "query": "Find all directors who worked with Al Pacino",
    "output_types": ["GREMLIN", "RESULT"]
}
response = requests.post(f"{BASE_URL}/text2gremlin", json=text2gql_request)
print(response.json())
See Also
3.4 - HugeGraph Computing (OLAP)
DeepWiki provides real-time updated project documentation with more comprehensive and accurate content, suitable for quickly understanding the latest project information.
📖 https://deepwiki.com/apache/hugegraph-computer
GitHub Access: https://github.com/apache/hugegraph-computer
3.4.1 - HugeGraph-Vermeer Quick Start
1. Overview of Vermeer
1.1 Architecture
Vermeer is a high-performance, memory-first graph computing framework written in Go (start once, execute any task), supporting ultra-fast computation of 15+ OLAP graph algorithms (most tasks complete in seconds to minutes), with master and worker roles. Currently, there is only one master (HA can be added), and there can be multiple workers.
The master is responsible for communication, forwarding, and aggregation, with minimal computation and resource usage. Workers are computation nodes used to store graph data and run computation tasks, consuming a large amount of memory and CPU. The grpc and rest modules handle internal communication and external calls, respectively.
The framework’s runtime configuration can be passed via command-line parameters or specified in configuration files located in the config/ directory. The --env parameter can specify which configuration file to use, e.g., --env=master specifies using master.ini. Note that the master needs to specify the listening port, and the worker needs to specify the listening port and the master’s ip:port.
1.2 Running Method
- Option 1: Docker Compose (Recommended)
Please ensure that docker-compose.yaml exists in your project root directory. If it doesn’t, here is an example:
services:
  vermeer-master:
    image: hugegraph/vermeer
    container_name: vermeer-master
    volumes:
      - ~/.config:/go/bin/config # Change here to your actual config path
    command: --env=master
    networks:
      vermeer_network:
        ipv4_address: 172.20.0.10 # Assign a static IP for the master

  vermeer-worker:
    image: hugegraph/vermeer
    container_name: vermeer-worker
    volumes:
      - ~/:/go/bin/config # Change here to your actual config path
    command: --env=worker
    networks:
      vermeer_network:
        ipv4_address: 172.20.0.11 # Assign a static IP for the worker

networks:
  vermeer_network:
    driver: bridge
    ipam:
      config:
        - subnet: 172.20.0.0/24 # Define the subnet for your network
Modify docker-compose.yaml
- Volume: For example, change both instances of
~/:/go/bin/config to /home/user/config:/go/bin/config (or your own configuration directory). - Subnet: Modify the subnet IP based on your actual situation. Note that the ports each container needs to access are specified in the config file. Please refer to the contents of the project’s
config folder for details.
Build the Image and Start in the Project Directory (or docker build first, then docker-compose up)
# Build the image (in the project root vermeer directory)
docker build -t hugegraph/vermeer .

# Start the services (in the vermeer root directory)
docker-compose up -d
# Or use the new CLI:
# docker compose up -d
View Logs / Stop / Remove
docker-compose logs -f
docker-compose down
- Option 2: Start individually via
docker run (Manually create network and assign static IP)
Ensure the CONFIG_DIR has proper read/execute permissions for the Docker process.
Build the image:
docker build -t hugegraph/vermeer .
Create a custom bridge network (one-time operation):
docker network create --driver bridge \
  --subnet 172.20.0.0/24 \
  vermeer_network
Run master (adjust CONFIG_DIR to your absolute configuration path, and you can adjust the IP as needed based on your actual situation).
CONFIG_DIR=/home/user/config

docker run -d \
  --name vermeer-master \
  --network vermeer_network --ip 172.20.0.10 \
  -v ${CONFIG_DIR}:/go/bin/config \
  hugegraph/vermeer \
  --env=master
Run worker:
docker run -d \
  --name vermeer-worker \
  --network vermeer_network --ip 172.20.0.11 \
  -v ${CONFIG_DIR}:/go/bin/config \
  hugegraph/vermeer \
  --env=worker
View logs / Stop / Remove:
docker logs -f vermeer-master
docker logs -f vermeer-worker

docker stop vermeer-master vermeer-worker
docker rm vermeer-master vermeer-worker

# Remove the custom network (if needed)
docker network rm vermeer_network
- Option 3: Build from Source
Build. You can refer Vermeer Readme.
Enter the directory and input ./vermeer --env=master or ./vermeer --env=worker01.
2. Task Creation REST API
2.1 Introduction
This REST API provides all task creation functions, including reading graph data and various computation functions, offering both asynchronous and synchronous return interfaces. The returned content includes information about the created tasks. The overall process of using Vermeer is to first create a task to read the graph data, and after the graph is read, create a computation task to execute the computation. The graph will not be automatically deleted; multiple computation tasks can be run on one graph without repeated reading. If deletion is needed, the delete graph interface can be used. Task statuses can be divided into graph reading task status and computation task status. Generally, the client only needs to know four statuses: created, in progress, completed, and error. The graph status is the basis for determining whether the graph is available. If the graph is being read or the graph status is erroneous, the graph cannot be used to create computation tasks. The delete graph interface is only available when the graph is in the loaded or error status and has no computation tasks.
Available URLs are as follows:
- Asynchronous return interface: POST http://master_ip:port/tasks/create returns only whether the task creation is successful, and the task status needs to be actively queried to determine completion.
- Synchronous return interface: POST http://master_ip:port/tasks/create/sync returns after the task is completed.
2.2 Loading Graph Data
Refer to the Vermeer parameter list document for specific parameters.
Vermeer provides three ways to load data:
- Load from Local Files
You can obtain the dataset in advance, such as the Twitter-2010 dataset. Acquisition method: https://snap.stanford.edu/data/twitter-2010.html The first Twitter-2010.text.gz is sufficient.
Request Example:
POST http://localhost:8688/tasks/create
{
 "task_type": "load",
 "graph": "testdb",
 "params": {
  "load.parallel": "50",
  "load.type": "local",
  "load.vertex_files": "{\"localhost\":\"data/twitter-2010.v_[0,99]\"}",
  "load.edge_files": "{\"localhost\":\"data/twitter-2010.e_[0,99]\"}",
  "load.use_out_degree": "1",
  "load.use_outedge": "1"
 }
}
- Load from HugeGraph
Request Example:
⚠️ Security Warning: Never store real passwords in configuration files or code. Use environment variables or a secure credential management system instead.
POST http://localhost:8688/tasks/create
{
  "task_type": "load",
  "graph": "testdb",
  "params": {
    "load.parallel": "50",
    "load.type": "hugegraph",
    "load.hg_pd_peers": "[\"<your-hugegraph-ip>:8686\"]",
    "load.hugegraph_name": "DEFAULT/hugegraph2/g",
    "load.hugegraph_username": "admin",
    "load.hugegraph_password": "<your-password-here>",
    "load.use_out_degree": "1",
    "load.use_outedge": "1"
  }
}
- Load from HDFS
Request Example:
POST http://localhost:8688/tasks/create
{
  "task_type": "load",
  "graph": "testdb",
  "params": {
    "load.parallel": "50",
    "load.type": "hdfs",
    "load.hdfs_namenode": "name_node1:9000",
    "load.hdfs_conf_path": "/path/to/conf",
    "load.krb_realm": "EXAMPLE.COM",
    "load.krb_name": "user@EXAMPLE.COM",
    "load.krb_keytab_path": "/path/to/keytab",
    "load.krb_conf_path": "/path/to/krb5.conf",
    "load.hdfs_use_krb": "1",
    "load.vertex_files": "/data/graph/vertices",
    "load.edge_files": "/data/graph/edges",
    "load.use_out_degree": "1",
    "load.use_outedge": "1"
  }
}
2.3 Output Computation Results
All Vermeer computation tasks support multiple result output methods, which can be customized: local, hdfs, afs, or hugegraph. Add the corresponding parameters under the params parameter when sending the request to take effect. When output.need_statistics is set to 1, it supports outputting statistical information of the computation results, which will be written in the interface task information. The statistical mode operators currently support “count” and “modularity,” but only for community detection algorithms.
Refer to the Vermeer parameter list document for specific parameters.
Request example:
POST http://localhost:8688/tasks/create
{
 "task_type": "compute",
 "graph": "testdb",
 "params": {
 "compute.algorithm": "pagerank",
 "compute.parallel": "10",
 "compute.max_step": "10",
 "output.type": "local",
 "output.parallel": "1",
 "output.file_path": "result/pagerank"
  }
}
3. Supported Algorithms
The PageRank algorithm, also known as the web ranking algorithm, is a technique used by search engines to calculate the relevance and importance of web pages (nodes) based on their mutual hyperlinks.
- If a web page is linked to by many other web pages, it indicates that the web page is relatively important, and its PageRank value will be relatively high.
- If a web page with a high PageRank value links to other web pages, the PageRank value of the linked web pages will also increase accordingly.
The PageRank algorithm is suitable for scenarios such as web page ranking and identifying key figures in social networks.
Request example:
POST http://localhost:8688/tasks/create
{
 "task_type": "compute",
 "graph": "testdb",
 "params": {
 "compute.algorithm": "pagerank",
 "compute.parallel":"10",
 "output.type":"local",
 "output.parallel":"1",
 "output.file_path":"result/pagerank",
 "compute.max_step":"10"
 }
}
3.2 WCC (Weakly Connected Components)
The weakly connected components algorithm calculates all connected subgraphs in an undirected graph and outputs the weakly connected subgraph ID to which each vertex belongs, indicating the connectivity between points and distinguishing different connected communities.
Request example:
POST http://localhost:8688/tasks/create
{
 "task_type": "compute",
 "graph": "testdb",
 "params": {
 "compute.algorithm": "wcc",
 "compute.parallel":"10",
 "output.type":"local",
 "output.parallel":"1",
 "output.file_path":"result/wcc",
 "compute.max_step":"10"
 }
}
3.3 LPA (Label Propagation Algorithm)
The label propagation algorithm is a graph clustering algorithm commonly used in social networks to discover potential communities.
Request example:
POST http://localhost:8688/tasks/create
{
 "task_type": "compute",
 "graph": "testdb",
 "params": {
 "compute.algorithm": "lpa",
 "compute.parallel":"10",
 "output.type":"local",
 "output.parallel":"1",
 "output.file_path":"result/lpa",
 "compute.max_step":"10"
 }
}
3.4 Degree Centrality
The degree centrality algorithm calculates the degree centrality value of each node in the graph, supporting both undirected and directed graphs. Degree centrality is an important indicator of node importance; the more edges a node has with other nodes, the higher its degree centrality value, and the more important the node is in the graph. In an undirected graph, degree centrality is calculated based on edge information to count the number of times a node appears, resulting in the degree centrality value of the node. In a directed graph, it is based on the direction of the edges, filtering based on input or output-edge information to count the number of times a node appears, resulting in the in-degree or out-degree value of the node. It indicates the importance of each point, with more important points having higher degrees.
Request example:
POST http://localhost:8688/tasks/create
{
 "task_type": "compute",
 "graph": "testdb",
 "params": {
 "compute.algorithm": "degree",
 "compute.parallel":"10",
 "output.type":"local",
 "output.parallel":"1",
 "output.file_path":"result/degree",
 "degree.direction":"both"
 }
}
3.5 Closeness Centrality
Closeness centrality is used to calculate the inverse of the shortest distance from a node to all other reachable nodes, accumulating and normalizing the value. Closeness centrality can be used to measure the time it takes for information to be transmitted from the node to other nodes. The larger the closeness centrality of a node, the closer its position in the graph is to the center, suitable for scenarios such as identifying key nodes in social networks.
Request example:
POST http://localhost:8688/tasks/create
{
 "task_type": "compute",
 "graph": "testdb",
 "params": {
 "compute.algorithm": "closeness_centrality",
 "compute.parallel":"10",
 "output.type":"local",
 "output.parallel":"1",
 "output.file_path":"result/closeness_centrality",
 "closeness_centrality.sample_rate":"0.01"
 }
}
3.6 Betweenness Centrality
The betweenness centrality algorithm determines the value of a node as a “bridge” node; the larger the value, the more likely it is to be a necessary path between two points in the graph. Typical examples include mutual followers in social networks. It is suitable for measuring the degree of aggregation around a node in a community.
Request example:
POST http://localhost:8688/tasks/create
{
"task_type": "compute",
"graph": "testdb",
"params": {
"compute.algorithm": "betweenness_centrality",
"compute.parallel":"10",
"output.type":"local",
"output.parallel":"1",
"output.file_path":"result/betweenness_centrality",
"betweenness_centrality.sample_rate":"0.01"
}
}
3.7 Triangle Count
The triangle count algorithm calculates the number of triangles passing through each vertex, suitable for calculating the relationships between users and whether the associations form triangles. The more triangles, the higher the degree of association between nodes in the graph, and the tighter the organizational relationship. In social networks, triangles indicate cohesive communities, and identifying triangles helps understand clustering and interconnections among individuals or groups in the network. In financial or transaction networks, the presence of triangles may indicate suspicious or fraudulent activities, and triangle counting can help identify transaction patterns that may require further investigation.
The output result is the Triangle Count corresponding to each vertex, i.e., the number of triangles the vertex is part of.
Note: This algorithm is for undirected graphs and ignores edge directions.
Request example:
POST http://localhost:8688/tasks/create
{
"task_type": "compute",
"graph": "testdb",
"params": {
"compute.algorithm": "triangle_count",
"compute.parallel":"10",
"output.type":"local",
"output.parallel":"1",
"output.file_path":"result/triangle_count"
}
}
3.8 K-Core
The K-Core algorithm marks all vertices with a degree of K, suitable for graph pruning and finding the core part of the graph.
Request example:
POST http://localhost:8688/tasks/create
{
"task_type": "compute",
"graph": "testdb",
"params": {
"compute.algorithm": "kcore",
"compute.parallel":"10",
"output.type":"local",
"output.parallel":"1",
"output.file_path":"result/kcore",
"kcore.degree_k":"5"
}
}
3.9 SSSP (Single Source Shortest Path)
The single source the shortest path algorithm calculates the shortest distance from one point to all other points.
Request example:
POST http://localhost:8688/tasks/create
{
"task_type": "compute",
"graph": "testdb",
"params": {
"compute.algorithm": "sssp",
"compute.parallel":"10",
"output.type":"local",
"output.parallel":"1",
"output.file_path":"result/degree",
"sssp.source":"tom"
}
}
3.10 KOUT
Starting from a point, get the k-layer nodes of this point.
Request example:
POST http://localhost:8688/tasks/create
{
"task_type": "compute",
"graph": "testdb",
"params": {
"compute.algorithm": "kout",
"compute.parallel":"10",
"output.type":"local",
"output.parallel":"1",
"output.file_path":"result/kout",
"kout.source":"tom",
"compute.max_step":"6"
}
}
3.11 Louvain
The Louvain algorithm is a community detection algorithm based on modularity. The basic idea is that nodes in the network try to traverse all neighbor community labels and choose the community label that maximizes the modularity increment. After maximizing modularity, each community is regarded as a new node, and the process is repeated until the modularity no longer increases.
The distributed Louvain algorithm implemented on Vermeer is affected by factors such as node order and parallel computation. Due to the random traversal order of the Louvain algorithm, community compression also has a certain randomness, leading to different results in multiple executions. However, the overall trend will not change significantly.
Request example:
POST http://localhost:8688/tasks/create
{
"task_type": "compute",
"graph": "testdb",
"params": {
"compute.algorithm": "louvain",
"compute.parallel":"10",
"compute.max_step":"1000",
"louvain.threshold":"0.0000001",
"louvain.resolution":"1.0",
"louvain.step":"10",
"output.type":"local",
"output.parallel":"1",
"output.file_path":"result/louvain"
}
}
3.12 Jaccard Similarity Coefficient
The Jaccard index, also known as the Jaccard similarity coefficient, is used to compare the similarity and diversity between finite sample sets. The larger the Jaccard coefficient value, the higher the similarity of the samples. It is used to calculate the Jaccard similarity coefficient between a given source point and all other points in the graph.
Request example:
POST http://localhost:8688/tasks/create
{
"task_type": "compute",
"graph": "testdb",
"params": {
"compute.algorithm": "jaccard",
"compute.parallel":"10",
"compute.max_step":"2",
"jaccard.source":"123",
"output.type":"local",
"output.parallel":"1",
"output.file_path":"result/jaccard"
}
}
The goal of personalized PageRank is to calculate the relevance of all nodes relative to user u. Starting from the node corresponding to user u, at each node, there is a probability of 1-d to stop walking and start again from u, or a probability of d to continue walking, randomly selecting a node from the nodes pointed to by the current node to walk down. It is used to calculate the personalized PageRank score starting from a given starting point, suitable for scenarios such as social recommendations.
Since the calculation requires using out-degree, load.use_out_degree needs to be set to 1 when reading the graph.
Request example:
POST http://localhost:8688/tasks/create
{
"task_type": "compute",
"graph": "testdb",
"params": {
"compute.algorithm": "ppr",
"compute.parallel":"100",
"compute.max_step":"10",
"ppr.source":"123",
"ppr.damping":"0.85",
"ppr.diff_threshold":"0.00001",
"output.type":"local",
"output.parallel":"1",
"output.file_path":"result/ppr"
}
}
3.14 Global Kout
Calculate the k-degree neighbors of all nodes in the graph (excluding themselves and 1~k-1 degree neighbors). Due to the severe memory expansion of the global kout algorithm, k is currently limited to 1 and 2. Additionally, the global kout algorithm supports filtering functions (parameters such as “compute.filter”:“risk_level==1”), and the filtering condition is judged when calculating the k-degree. The final result set includes those that meet the filtering condition. The algorithm’s final output is the number of neighbors that meet the condition.
Request example:
POST http://localhost:8688/tasks/create
{
"task_type": "compute",
"graph": "testdb",
"params": {
"compute.algorithm": "kout_all",
"compute.parallel":"10",
"output.type":"local",
"output.parallel":"10",
"output.file_path":"result/kout",
"compute.max_step":"2",
"compute.filter":"risk_level==1"
}
}
3.15 Clustering Coefficient
The clustering coefficient represents the coefficient of the clustering degree of nodes in a graph. In real networks, especially in specific networks, nodes tend to establish a tightly organized relationship due to relatively high-density connection points. The clustering coefficient algorithm (Cluster Coefficient) is used to calculate the clustering degree of nodes in the graph. This algorithm is for local clustering coefficients. The local clustering coefficient can measure the clustering degree around each node in the graph.
Request example:
POST http://localhost:8688/tasks/create
{
"task_type": "compute",
"graph": "testdb",
"params": {
"compute.algorithm": "clustering_coefficient",
"compute.parallel":"100",
"compute.max_step":"10",
"output.type":"local",
"output.parallel":"1",
"output.file_path":"result/cc"
}
}
3.16 SCC (Strongly Connected Components)
In the mathematical theory of directed graphs, if every vertex of a graph can be reached from any other point in the graph, the graph is said to be strongly connected. The parts of any directed graph that can achieve strong connectivity are called strongly connected components. It indicates the connectivity between points and distinguishes different connected communities.
Request example:
POST http://localhost:8688/tasks/create
{
"task_type": "compute",
"graph": "testdb",
"params": {
"compute.algorithm": "scc",
"compute.parallel":"10",
"output.type":"local",
"output.parallel":"1",
"output.file_path":"result/scc",
"compute.max_step":"200"
}
}
🚧, further updates and improvements will be made at any time. Suggestions and feedback are welcome.
3.4.2 - HugeGraph-Computer Quick Start
1 HugeGraph-Computer Overview
The HugeGraph-Computer is a distributed graph processing system for HugeGraph (OLAP). It is an implementation of Pregel. It runs on a Kubernetes(K8s) framework.(It focuses on supporting graph data volumes of hundreds of billions to trillions, using disk for sorting and acceleration, which is one of the biggest differences from Vermeer)
Features
- Support distributed MPP graph computing, and integrates with HugeGraph as graph input/output storage.
- Based on the BSP (Bulk Synchronous Parallel) model, an algorithm performs computing through multiple parallel iterations; every iteration is a superstep.
- Auto memory management. The framework will never be OOM(Out of Memory) since it will split some data to disk if it doesn’t have enough memory to hold all the data.
- The part of edges or the messages of super node can be in memory, so you will never lose it.
- You can load the data from HDFS or HugeGraph, or any other system.
- You can output the results to HDFS or HugeGraph, or any other system.
- Easy to develop a new algorithm. You just need to focus on vertex-only processing just like as in a single server, without worrying about message transfer and memory/storage management.
2 Dependency for Building/Running
2.1 Install Java 11 (JDK 11)
Must use ≥ Java 11 to run Computer, and configure by yourself.
Be sure to execute the java -version command to check the jdk version before reading
3 Get Started
To run the algorithm with HugeGraph-Computer, you need to install Java 11 or later versions.
You also need to deploy HugeGraph-Server and Etcd.
There are two ways to get HugeGraph-Computer:
- Download the compiled tarball
- Clone source code then compile and package
3.1.1 Download the compiled archive
Download the latest version of the HugeGraph-Computer release package:
wget https://downloads.apache.org/hugegraph/${version}/apache-hugegraph-computer-incubating-${version}.tar.gz
tar zxvf apache-hugegraph-computer-incubating-${version}.tar.gz -C hugegraph-computer
3.1.2 Clone source code to compile and package
Clone the latest version of HugeGraph-Computer source package:
$ git clone https://github.com/apache/hugegraph-computer.git
Compile and generate tar package:
cd hugegraph-computer
mvn clean package -DskipTests
Edit conf/computer.properties to configure the connection to HugeGraph-Server and etcd:
# Job configuration
job.id=local_pagerank_001
job.partitions_count=4
# HugeGraph connection (✅ Correct configuration keys)
hugegraph.url=http://localhost:8080
hugegraph.name=hugegraph
# If authentication is enabled on HugeGraph-Server
hugegraph.username=
hugegraph.password=
# BSP coordination (✅ Correct key: bsp.etcd_endpoints)
bsp.etcd_endpoints=http://localhost:2379
bsp.max_super_step=10
# Algorithm parameters (⚠️ Required)
algorithm.params_class=org.apache.hugegraph.computer.algorithm.centrality.pagerank.PageRankParams
Important Configuration Notes:
- Use
bsp.etcd_endpoints (NOT bsp.etcd.url) for etcd connection algorithm.params_class is required for all algorithms- For multiple etcd endpoints, use comma-separated list:
http://host1:2379,http://host2:2379
3.1.4 Start master node
You can use -c parameter specify the configuration file, more computer config please see:Computer Config Options
cd hugegraph-computer
bin/start-computer.sh -d local -r master
3.1.5 Start worker node
bin/start-computer.sh -d local -r worker
3.1.6 Query algorithm results
3.1.6.1 Enable OLAP index query for server
If the OLAP index is not enabled, it needs to be enabled. More reference: modify-graphs-read-mode
PUT http://localhost:8080/graphs/hugegraph/graph_read_mode
"ALL"
3.1.6.2 Query page_rank property value:
curl "http://localhost:8080/graphs/hugegraph/graph/vertices?page&limit=3" | gunzip
To run an algorithm with HugeGraph-Computer, you need to deploy HugeGraph-Server first
3.2.1 Install HugeGraph-Computer CRD
# Kubernetes version >= v1.16
kubectl apply -f https://raw.githubusercontent.com/apache/hugegraph-computer/master/computer-k8s-operator/manifest/hugegraph-computer-crd.v1.yaml
# Kubernetes version < v1.16
kubectl apply -f https://raw.githubusercontent.com/apache/hugegraph-computer/master/computer-k8s-operator/manifest/hugegraph-computer-crd.v1beta1.yaml
3.2.2 Show CRD
kubectl get crd
NAME CREATED AT
hugegraphcomputerjobs.hugegraph.apache.org 2021-09-16T08:01:08Z
3.2.3 Install hugegraph-computer-operator&etcd-server
kubectl apply -f https://raw.githubusercontent.com/apache/hugegraph-computer/master/computer-k8s-operator/manifest/hugegraph-computer-operator.yaml
3.2.4 Wait for hugegraph-computer-operator&etcd-server deployment to complete
kubectl get pod -n hugegraph-computer-operator-system
NAME READY STATUS RESTARTS AGE
hugegraph-computer-operator-controller-manager-58c5545949-jqvzl 1/1 Running 0 15h
hugegraph-computer-operator-etcd-28lm67jxk5 1/1 Running 0 15h
3.2.5 Submit a job
More computer crd please see: Computer CRD
More computer config please see: Computer Config Options
Basic Example:
cat <<EOF | kubectl apply --filename -
apiVersion: hugegraph.apache.org/v1
kind: HugeGraphComputerJob
metadata:
namespace: hugegraph-computer-operator-system
name: &jobName pagerank-sample
spec:
jobId: *jobName
algorithmName: page_rank # ✅ Correct: use underscore format (matches algorithm implementation)
image: hugegraph/hugegraph-computer:latest
jarFile: /hugegraph/hugegraph-computer/algorithm/builtin-algorithm.jar
pullPolicy: Always
workerCpu: "4"
workerMemory: "4Gi"
workerInstances: 5
computerConf:
job.partitions_count: "20"
algorithm.params_class: org.apache.hugegraph.computer.algorithm.centrality.pagerank.PageRankParams
hugegraph.url: http://${hugegraph-server-host}:${hugegraph-server-port}
hugegraph.name: hugegraph
EOF
Complete Example with Advanced Features:
cat <<EOF | kubectl apply --filename -
apiVersion: hugegraph.apache.org/v1
kind: HugeGraphComputerJob
metadata:
namespace: hugegraph-computer-operator-system
name: &jobName pagerank-advanced
spec:
jobId: *jobName
algorithmName: page_rank # ✅ Correct: underscore format
image: hugegraph/hugegraph-computer:latest
jarFile: /hugegraph/hugegraph-computer/algorithm/builtin-algorithm.jar
pullPolicy: Always
# Resource limits
masterCpu: "2"
masterMemory: "2Gi"
workerCpu: "4"
workerMemory: "4Gi"
workerInstances: 5
# JVM options
jvmOptions: "-Xmx3g -Xms3g -XX:+UseG1GC"
# Environment variables (optional)
envVars:
- name: REMOTE_JAR_URI
value: "http://example.com/custom-algorithm.jar" # Download custom algorithm JAR
- name: LOG_LEVEL
value: "INFO"
# Computer configuration
computerConf:
# Job settings
job.partitions_count: "20"
# Algorithm parameters (⚠️ Required)
algorithm.params_class: org.apache.hugegraph.computer.algorithm.centrality.pagerank.PageRankParams
page_rank.alpha: "0.85" # PageRank damping factor
# HugeGraph connection
hugegraph.url: http://hugegraph-server:8080
hugegraph.name: hugegraph
hugegraph.username: "" # Fill if authentication is enabled
hugegraph.password: ""
# BSP configuration (⚠️ System-managed in K8s, do not override)
# bsp.etcd_endpoints is automatically set by operator
bsp.max_super_step: "20"
bsp.log_interval: "30000"
# Snapshot configuration (optional)
snapshot.write: "true" # Enable snapshot writing
snapshot.load: "false" # Do not load from snapshot this time
snapshot.name: "pagerank-snapshot-v1"
snapshot.minio_endpoint: "http://minio:9000"
snapshot.minio_access_key: "minioadmin"
snapshot.minio_secret_key: "minioadmin"
snapshot.minio_bucket_name: "hugegraph-snapshots"
# Output configuration
output.result_name: "page_rank"
output.batch_size: "500"
output.with_adjacent_edges: "false"
EOF
Configuration Notes:
| Configuration Key | ⚠️ Important Notes |
|---|
algorithmName | Must use page_rank (underscore format), matches the algorithm’s name() method return value |
bsp.etcd_endpoints | System-managed in K8s - automatically set by operator, do not override in computerConf |
algorithm.params_class | Required - must specify for all algorithms |
REMOTE_JAR_URI | Optional environment variable to download custom algorithm JAR from remote URL |
snapshot.* | Optional - enable snapshots for checkpoint recovery or repeated computations |
3.2.6 Show job
kubectl get hcjob/pagerank-sample -n hugegraph-computer-operator-system
NAME JOBID JOBSTATUS
pagerank-sample pagerank-sample RUNNING
3.2.7 Show log of nodes
# Show the master log
kubectl logs -l component=pagerank-sample-master -n hugegraph-computer-operator-system
# Show the worker log
kubectl logs -l component=pagerank-sample-worker -n hugegraph-computer-operator-system
# Show diagnostic log of a job
# NOTE: diagnostic log exist only when the job fails, and it will only be saved for one hour.
kubectl get event --field-selector reason=ComputerJobFailed --field-selector involvedObject.name=pagerank-sample -n hugegraph-computer-operator-system
3.2.8 Show success event of a job
NOTE: it will only be saved for one hour
kubectl get event --field-selector reason=ComputerJobSucceed --field-selector involvedObject.name=pagerank-sample -n hugegraph-computer-operator-system
3.2.9 Query algorithm results
If the output to Hugegraph-Server is consistent with Locally, if output to HDFS, please check the result file in the directory of /hugegraph-computer/results/{jobId} directory.
3.3 Local Mode vs Kubernetes Mode
Understanding the differences helps you choose the right deployment mode for your use case.
| Feature | Local Mode | Kubernetes Mode |
|---|
| Configuration | conf/computer.properties file | CRD YAML computerConf field |
| Etcd Management | Manual deployment of external etcd | Operator auto-deploys etcd StatefulSet |
| Worker Scaling | Manual start of multiple processes | CRD workerInstances field auto-scales |
| Resource Isolation | Shared host resources | Pod-level CPU/Memory limits |
| Remote JAR | JAR_FILE_PATH environment variable | CRD remoteJarUri or envVars.REMOTE_JAR_URI |
| Log Viewing | Local logs/ directory | kubectl logs command |
| Fault Recovery | Manual process restart | K8s auto-restarts failed pods |
| Use Cases | Development, testing, small datasets | Production, large-scale data |
Local Mode Prerequisites:
- Java 11+
- HugeGraph-Server running on localhost:8080
- Etcd running on localhost:2379
K8s Mode Prerequisites:
- Kubernetes cluster (version 1.16+)
- HugeGraph-Server accessible from cluster
- HugeGraph-Computer Operator installed
Configuration Key Differences:
# Local Mode (computer.properties)
bsp.etcd_endpoints=http://localhost:2379 # ✅ User-configured
job.workers_count=4 # User-configured
# K8s Mode (CRD)
spec:
workerInstances: 5 # Overrides job.workers_count
computerConf:
# bsp.etcd_endpoints is auto-set by operator, do NOT configure
job.partitions_count: "20"
3.4 Common Troubleshooting
3.4.1 Configuration Errors
Error: “Failed to connect to etcd”
Symptoms: Master or Worker cannot connect to etcd
Local Mode Solutions:
# Check configuration key name (common mistake)
grep "bsp.etcd_endpoints" conf/computer.properties
# Should output: bsp.etcd_endpoints=http://localhost:2379
# ❌ WRONG: bsp.etcd.url (old/incorrect key)
# ✅ CORRECT: bsp.etcd_endpoints
# Test etcd connectivity
curl http://localhost:2379/version
K8s Mode Solutions:
# Check Operator etcd service
kubectl get svc hugegraph-computer-operator-etcd -n hugegraph-computer-operator-system
# Verify etcd pod is running
kubectl get pods -n hugegraph-computer-operator-system -l app=hugegraph-computer-operator-etcd
# Should show: Running status
# Test connectivity from worker pod
kubectl exec -it pagerank-sample-worker-0 -n hugegraph-computer-operator-system -- \
curl http://hugegraph-computer-operator-etcd:2379/version
Error: “Algorithm class not found”
Symptoms: Cannot find algorithm implementation class
Cause: Incorrect algorithmName format
# ❌ WRONG formats:
algorithmName: pageRank # Camel case
algorithmName: PageRank # Title case
# ✅ CORRECT format (matches PageRank.name() return value):
algorithmName: page_rank # Underscore lowercase
Verification:
# Check algorithm implementation in source code
# File: computer-algorithm/.../PageRank.java
# Method: public String name() { return "page_rank"; }
Error: “Required option ‘algorithm.params_class’ is missing”
Solution:
computerConf:
algorithm.params_class: org.apache.hugegraph.computer.algorithm.centrality.pagerank.PageRankParams # ⚠️ Required
3.4.2 K8s Deployment Issues
Issue: REMOTE_JAR_URI not working
Solution:
spec:
envVars:
- name: REMOTE_JAR_URI
value: "http://example.com/my-algorithm.jar"
Issue: Etcd connection timeout in K8s
Check Operator etcd:
# Verify etcd is running
kubectl get pods -n hugegraph-computer-operator-system -l app=hugegraph-computer-operator-etcd
# Should show: Running
# From worker pod, test etcd connectivity
kubectl exec -it pagerank-sample-worker-0 -n hugegraph-computer-operator-system -- \
curl http://hugegraph-computer-operator-etcd:2379/version
Issue: Snapshot/MinIO configuration problems
Verify MinIO service:
# Test MinIO reachability
kubectl run -it --rm debug --image=alpine --restart=Never -- sh
wget -O- http://minio:9000/minio/health/live
# Test bucket permissions (requires MinIO client)
mc config host add myminio http://minio:9000 minioadmin minioadmin
mc ls myminio/hugegraph-snapshots
3.4.3 Job Status Checks
Check job overall status:
kubectl get hcjob pagerank-sample -n hugegraph-computer-operator-system
# Output example:
# NAME JOBSTATUS SUPERSTEP MAXSUPERSTEP SUPERSTEPSTAT
# pagerank-sample Running 5 20 COMPUTING
Check detailed events:
kubectl describe hcjob pagerank-sample -n hugegraph-computer-operator-system
Check failure reasons:
kubectl get events --field-selector reason=ComputerJobFailed \
--field-selector involvedObject.name=pagerank-sample \
-n hugegraph-computer-operator-system
Real-time master logs:
kubectl logs -f -l component=pagerank-sample-master -n hugegraph-computer-operator-system
All worker logs:
kubectl logs -l component=pagerank-sample-worker -n hugegraph-computer-operator-system --all-containers=true
4. Built-In algorithms document
4.1 Supported algorithms list:
Centrality Algorithm:
- PageRank
- BetweennessCentrality
- ClosenessCentrality
- DegreeCentrality
- ClusteringCoefficient
- Kcore
- Lpa
- TriangleCount
- Wcc
Path Algorithm:
- RingsDetection
- RingsDetectionWithFilter
More algorithms please see: Built-In algorithms
4.2 Algorithm describe
TODO
5 Algorithm development guide
TODO
6 Note
- If some classes under computer-k8s cannot be found, you need to execute
mvn compile in advance to generate corresponding classes.
3.4.3 - HugeGraph-Computer Configuration Reference
Computer Config Options
Default Value Notes:
- Configuration items listed below show the code default values (defined in
ComputerOptions.java) - When the packaged configuration file (
conf/computer.properties in the distribution) specifies a different value, it’s noted as: value (packaged: value) - Example:
300000 (packaged: 100000) means the code default is 300000, but the distributed package defaults to 100000 - For production deployments, the packaged defaults take precedence unless you explicitly override them
1. Basic Configuration
Core job settings for HugeGraph-Computer.
| config option | default value | description |
|---|
| hugegraph.url | http://127.0.0.1:8080 | The HugeGraph server URL to load data and write results back. |
| hugegraph.name | hugegraph | The graph name to load data and write results back. |
| hugegraph.username | "" (empty) | The username for HugeGraph authentication (leave empty if authentication is disabled). |
| hugegraph.password | "" (empty) | The password for HugeGraph authentication (leave empty if authentication is disabled). |
| job.id | local_0001 (packaged: local_001) | The job identifier on YARN cluster or K8s cluster. |
| job.namespace | "" (empty) | The job namespace that can separate different data sources. 🔒 Managed by system - do not modify manually. |
| job.workers_count | 1 | The number of workers for computing one graph algorithm job. 🔒 Managed by system - do not modify manually in K8s. |
| job.partitions_count | 1 | The number of partitions for computing one graph algorithm job. |
| job.partitions_thread_nums | 4 | The number of threads for partition parallel compute. |
2. Algorithm Configuration
Algorithm-specific configuration for computation logic.
| config option | default value | description |
|---|
| algorithm.params_class | org.apache.hugegraph.computer.core.config.Null | ⚠️ REQUIRED The class used to transfer algorithm parameters before the algorithm is run. |
| algorithm.result_class | org.apache.hugegraph.computer.core.config.Null | The class of vertex’s value, used to store the computation result for the vertex. |
| algorithm.message_class | org.apache.hugegraph.computer.core.config.Null | The class of message passed when computing a vertex. |
Configuration for loading input data from HugeGraph or other sources.
| config option | default value | description |
|---|
| input.source_type | hugegraph-server | The source type to load input data, allowed values: [‘hugegraph-server’, ‘hugegraph-loader’]. The ‘hugegraph-loader’ means use hugegraph-loader to load data from HDFS or file. If using ‘hugegraph-loader’, please configure ‘input.loader_struct_path’ and ‘input.loader_schema_path’. |
| input.loader_struct_path | "" (empty) | The struct path of loader input, only takes effect when input.source_type=loader is enabled. |
| input.loader_schema_path | "" (empty) | The schema path of loader input, only takes effect when input.source_type=loader is enabled. |
| config option | default value | description |
|---|
| input.split_size | 1048576 (1 MB) | The input split size in bytes. |
| input.split_max_splits | 10000000 | The maximum number of input splits. |
| input.split_page_size | 500 | The page size for streamed load input split data. |
| input.split_fetch_timeout | 300 | The timeout in seconds to fetch input splits. |
| config option | default value | description |
|---|
| input.filter_class | org.apache.hugegraph.computer.core.input.filter.DefaultInputFilter | The class to create input-filter object. Input-filter is used to filter vertex edges according to user needs. |
| input.edge_direction | OUT | The direction of edges to load, allowed values: [OUT, IN, BOTH]. When the value is BOTH, edges in both OUT and IN directions will be loaded. |
| input.edge_freq | MULTIPLE | The frequency of edges that can exist between a pair of vertices, allowed values: [SINGLE, SINGLE_PER_LABEL, MULTIPLE]. SINGLE means only one edge can exist between a pair of vertices (identified by sourceId + targetId); SINGLE_PER_LABEL means each edge label can have one edge between a pair of vertices (identified by sourceId + edgeLabel + targetId); MULTIPLE means many edges can exist between a pair of vertices (identified by sourceId + edgeLabel + sortValues + targetId). |
| input.max_edges_in_one_vertex | 200 | The maximum number of adjacent edges allowed to be attached to a vertex. The adjacent edges will be stored and transferred together as a batch unit. |
| config option | default value | description |
|---|
| input.send_thread_nums | 4 | The number of threads for parallel sending of vertices or edges. |
4. Snapshot & Storage Configuration
HugeGraph-Computer supports snapshot functionality to save vertex/edge partitions to local storage or MinIO object storage, enabling checkpoint recovery or accelerating repeated computations.
4.1 Basic Snapshot Configuration
| config option | default value | description |
|---|
| snapshot.write | false | Whether to write snapshots of input vertex/edge partitions. |
| snapshot.load | false | Whether to load from snapshots of vertex/edge partitions. |
| snapshot.name | "" (empty) | User-defined snapshot name to distinguish different snapshots. |
4.2 MinIO Integration (Optional)
MinIO can be used as a distributed object storage backend for snapshots in K8s deployments.
| config option | default value | description |
|---|
| snapshot.minio_endpoint | "" (empty) | MinIO service endpoint (e.g., http://minio:9000). Required when using MinIO. |
| snapshot.minio_access_key | minioadmin | MinIO access key for authentication. |
| snapshot.minio_secret_key | minioadmin | MinIO secret key for authentication. |
| snapshot.minio_bucket_name | "" (empty) | MinIO bucket name for storing snapshot data. |
Usage Scenarios:
- Checkpoint Recovery: Resume from snapshots after job failures, avoiding data reloading
- Repeated Computations: Load data from snapshots when running the same algorithm multiple times
- A/B Testing: Save multiple snapshot versions of the same dataset to test different algorithm parameters
Example: Local Snapshot (in computer.properties):
snapshot.write=true
snapshot.name=pagerank-snapshot-20260201
Example: MinIO Snapshot (in K8s CRD computerConf):
computerConf:
snapshot.write: "true"
snapshot.name: "pagerank-snapshot-v1"
snapshot.minio_endpoint: "http://minio:9000"
snapshot.minio_access_key: "my-access-key"
snapshot.minio_secret_key: "my-secret-key"
snapshot.minio_bucket_name: "hugegraph-snapshots"
5. Worker & Master Configuration
Configuration for worker and master computation logic.
5.1 Master Configuration
| config option | default value | description |
|---|
| master.computation_class | org.apache.hugegraph.computer.core.master.DefaultMasterComputation | Master-computation is computation that can determine whether to continue to the next superstep. It runs at the end of each superstep on the master. |
5.2 Worker Computation
| config option | default value | description |
|---|
| worker.computation_class | org.apache.hugegraph.computer.core.config.Null | The class to create worker-computation object. Worker-computation is used to compute each vertex in each superstep. |
| worker.combiner_class | org.apache.hugegraph.computer.core.config.Null | Combiner can combine messages into one value for a vertex. For example, PageRank algorithm can combine messages of a vertex to a sum value. |
| worker.partitioner | org.apache.hugegraph.computer.core.graph.partition.HashPartitioner | The partitioner that decides which partition a vertex should be in, and which worker a partition should be in. |
5.3 Worker Combiners
| config option | default value | description |
|---|
| worker.vertex_properties_combiner_class | org.apache.hugegraph.computer.core.combiner.OverwritePropertiesCombiner | The combiner can combine several properties of the same vertex into one properties at input step. |
| worker.edge_properties_combiner_class | org.apache.hugegraph.computer.core.combiner.OverwritePropertiesCombiner | The combiner can combine several properties of the same edge into one properties at input step. |
5.4 Worker Buffers
| config option | default value | description |
|---|
| worker.received_buffers_bytes_limit | 104857600 (100 MB) | The limit bytes of buffers of received data. The total size of all buffers can’t exceed this limit. If received buffers reach this limit, they will be merged into a file (spill to disk). |
| worker.write_buffer_capacity | 52428800 (50 MB) | The initial size of write buffer that used to store vertex or message. |
| worker.write_buffer_threshold | 52428800 (50 MB) | The threshold of write buffer. Exceeding it will trigger sorting. The write buffer is used to store vertex or message. |
5.5 Worker Data & Timeouts
| config option | default value | description |
|---|
| worker.data_dirs | [jobs] | The directories separated by ‘,’ that received vertices and messages can persist into. |
| worker.wait_sort_timeout | 600000 (10 minutes) | The max timeout (in ms) for message-handler to wait for sort-thread to sort one batch of buffers. |
| worker.wait_finish_messages_timeout | 86400000 (24 hours) | The max timeout (in ms) for message-handler to wait for finish-message of all workers. |
6. I/O & Output Configuration
Configuration for output computation results.
6.1 Output Class & Result
| config option | default value | description |
|---|
| output.output_class | org.apache.hugegraph.computer.core.output.LogOutput | The class to output the computation result of each vertex. Called after iteration computation. |
| output.result_name | value | The value is assigned dynamically by #name() of instance created by WORKER_COMPUTATION_CLASS. |
| output.result_write_type | OLAP_COMMON | The result write-type to output to HugeGraph, allowed values: [OLAP_COMMON, OLAP_SECONDARY, OLAP_RANGE]. |
6.2 Output Behavior
| config option | default value | description |
|---|
| output.with_adjacent_edges | false | Whether to output the adjacent edges of the vertex. |
| output.with_vertex_properties | false | Whether to output the properties of the vertex. |
| output.with_edge_properties | false | Whether to output the properties of the edge. |
6.3 Batch Output
| config option | default value | description |
|---|
| output.batch_size | 500 | The batch size of output. |
| output.batch_threads | 1 | The number of threads used for batch output. |
| output.single_threads | 1 | The number of threads used for single output. |
6.4 HDFS Output
| config option | default value | description |
|---|
| output.hdfs_url | hdfs://127.0.0.1:9000 | The HDFS URL for output. |
| output.hdfs_user | hadoop | The HDFS user for output. |
| output.hdfs_path_prefix | /hugegraph-computer/results | The directory of HDFS output results. |
| output.hdfs_delimiter | , (comma) | The delimiter of HDFS output. |
| output.hdfs_merge_partitions | true | Whether to merge output files of multiple partitions. |
| output.hdfs_replication | 3 | The replication number of HDFS. |
| output.hdfs_core_site_path | "" (empty) | The HDFS core site path. |
| output.hdfs_site_path | "" (empty) | The HDFS site path. |
| output.hdfs_kerberos_enable | false | Whether Kerberos authentication is enabled for HDFS. |
| output.hdfs_kerberos_principal | "" (empty) | The HDFS principal for Kerberos authentication. |
| output.hdfs_kerberos_keytab | "" (empty) | The HDFS keytab file for Kerberos authentication. |
| output.hdfs_krb5_conf | /etc/krb5.conf | Kerberos configuration file path. |
6.5 Retry & Timeout
| config option | default value | description |
|---|
| output.retry_times | 3 | The retry times when output fails. |
| output.retry_interval | 10 | The retry interval (in seconds) when output fails. |
| output.thread_pool_shutdown_timeout | 60 | The timeout (in seconds) of output thread pool shutdown. |
7. Network & Transport Configuration
Configuration for network communication between workers and master.
7.1 Server Configuration
| config option | default value | description |
|---|
| transport.server_host | 127.0.0.1 | 🔒 Managed by system The server hostname or IP to listen on to transfer data. Do not modify manually. |
| transport.server_port | 0 | 🔒 Managed by system The server port to listen on to transfer data. The system will assign a random port if set to 0. Do not modify manually. |
| transport.server_threads | 4 | The number of transport threads for server. |
7.2 Client Configuration
| config option | default value | description |
|---|
| transport.client_threads | 4 | The number of transport threads for client. |
| transport.client_connect_timeout | 3000 | The timeout (in ms) of client connect to server. |
7.3 Protocol Configuration
| config option | default value | description |
|---|
| transport.provider_class | org.apache.hugegraph.computer.core.network.netty.NettyTransportProvider | The transport provider, currently only supports Netty. |
| transport.io_mode | AUTO | The network IO mode, allowed values: [NIO, EPOLL, AUTO]. AUTO means selecting the appropriate mode automatically. |
| transport.tcp_keep_alive | true | Whether to enable TCP keep-alive. |
| transport.transport_epoll_lt | false | Whether to enable EPOLL level-trigger (only effective when io_mode=EPOLL). |
7.4 Buffer Configuration
| config option | default value | description |
|---|
| transport.send_buffer_size | 0 | The size of socket send-buffer in bytes. 0 means using system default value. |
| transport.receive_buffer_size | 0 | The size of socket receive-buffer in bytes. 0 means using system default value. |
| transport.write_buffer_high_mark | 67108864 (64 MB) | The high water mark for write buffer in bytes. It will trigger sending unavailable if the number of queued bytes > write_buffer_high_mark. |
| transport.write_buffer_low_mark | 33554432 (32 MB) | The low water mark for write buffer in bytes. It will trigger sending available if the number of queued bytes < write_buffer_low_mark. |
7.5 Flow Control
| config option | default value | description |
|---|
| transport.max_pending_requests | 8 | The max number of client unreceived ACKs. It will trigger sending unavailable if the number of unreceived ACKs >= max_pending_requests. |
| transport.min_pending_requests | 6 | The minimum number of client unreceived ACKs. It will trigger sending available if the number of unreceived ACKs < min_pending_requests. |
| transport.min_ack_interval | 200 | The minimum interval (in ms) of server reply ACK. |
7.6 Timeouts
| config option | default value | description |
|---|
| transport.close_timeout | 10000 | The timeout (in ms) of close server or close client. |
| transport.sync_request_timeout | 10000 | The timeout (in ms) to wait for response after sending sync-request. |
| transport.finish_session_timeout | 0 | The timeout (in ms) to finish session. 0 means using (transport.sync_request_timeout × transport.max_pending_requests). |
| transport.write_socket_timeout | 3000 | The timeout (in ms) to write data to socket buffer. |
| transport.server_idle_timeout | 360000 (6 minutes) | The max timeout (in ms) of server idle. |
7.7 Heartbeat
| config option | default value | description |
|---|
| transport.heartbeat_interval | 20000 (20 seconds) | The minimum interval (in ms) between heartbeats on client side. |
| transport.max_timeout_heartbeat_count | 120 | The maximum times of timeout heartbeat on client side. If the number of timeouts waiting for heartbeat response continuously > max_timeout_heartbeat_count, the channel will be closed from client side. |
7.8 Advanced Network Settings
| config option | default value | description |
|---|
| transport.max_syn_backlog | 511 | The capacity of SYN queue on server side. 0 means using system default value. |
| transport.recv_file_mode | true | Whether to enable receive buffer-file mode. It will receive buffer and write to file from socket using zero-copy if enabled. Note: Requires OS support for zero-copy (e.g., Linux sendfile/splice). |
| transport.network_retries | 3 | The number of retry attempts for network communication if network is unstable. |
8. Storage & Persistence Configuration
Configuration for HGKV (HugeGraph Key-Value) storage engine and value files.
8.1 HGKV Configuration
| config option | default value | description |
|---|
| hgkv.max_file_size | 2147483648 (2 GB) | The max number of bytes in each HGKV file. |
| hgkv.max_data_block_size | 65536 (64 KB) | The max byte size of HGKV file data block. |
| hgkv.max_merge_files | 10 | The max number of files to merge at one time. |
| hgkv.temp_file_dir | /tmp/hgkv | This folder is used to store temporary files during the file merging process. |
8.2 Value File Configuration
| config option | default value | description |
|---|
| valuefile.max_segment_size | 1073741824 (1 GB) | The max number of bytes in each segment of value-file. |
9. BSP & Coordination Configuration
Configuration for Bulk Synchronous Parallel (BSP) protocol and etcd coordination.
| config option | default value | description |
|---|
| bsp.etcd_endpoints | http://localhost:2379 | 🔒 Managed by system in K8s The endpoints to access etcd. For multiple endpoints, use comma-separated list: http://host1:port1,http://host2:port2. Do not modify manually in K8s deployments. |
| bsp.max_super_step | 10 (packaged: 2) | The max super step of the algorithm. |
| bsp.register_timeout | 300000 (packaged: 100000) | The max timeout (in ms) to wait for master and workers to register. |
| bsp.wait_workers_timeout | 86400000 (24 hours) | The max timeout (in ms) to wait for workers BSP event. |
| bsp.wait_master_timeout | 86400000 (24 hours) | The max timeout (in ms) to wait for master BSP event. |
| bsp.log_interval | 30000 (30 seconds) | The log interval (in ms) to print the log while waiting for BSP event. |
Configuration for performance optimization.
| config option | default value | description |
|---|
| allocator.max_vertices_per_thread | 10000 | Maximum number of vertices per thread processed in each memory allocator. |
| sort.thread_nums | 4 | The number of threads performing internal sorting. |
11. System Administration Configuration
⚠️ Configuration items managed by the system - users are prohibited from modifying these manually.
The following configuration items are automatically managed by the K8s Operator, Driver, or runtime system. Manual modification will cause cluster communication failures or job scheduling errors.
| config option | managed by | description |
|---|
| bsp.etcd_endpoints | K8s Operator | Automatically set to operator’s etcd service address |
| transport.server_host | Runtime | Automatically set to pod/container hostname |
| transport.server_port | Runtime | Automatically assigned random port |
| job.namespace | K8s Operator | Automatically set to job namespace |
| job.id | K8s Operator | Automatically set to job ID from CRD |
| job.workers_count | K8s Operator | Automatically set from CRD workerInstances |
| rpc.server_host | Runtime | RPC server hostname (system-managed) |
| rpc.server_port | Runtime | RPC server port (system-managed) |
| rpc.remote_url | Runtime | RPC remote URL (system-managed) |
Why These Are Forbidden:
- BSP/RPC Configuration: Must match the actual deployed etcd/RPC services. Manual overrides break coordination.
- Job Configuration: Must match K8s CRD specifications. Mismatches cause worker count errors.
- Transport Configuration: Must use actual pod hostnames/ports. Manual values prevent inter-worker communication.
K8s Operator Config Options
NOTE: Option needs to be converted through environment variable settings, e.g. k8s.internal_etcd_url => INTERNAL_ETCD_URL
| config option | default value | description |
|---|
| k8s.auto_destroy_pod | true | Whether to automatically destroy all pods when the job is completed or failed. |
| k8s.close_reconciler_timeout | 120 | The max timeout (in ms) to close reconciler. |
| k8s.internal_etcd_url | http://127.0.0.1:2379 | The internal etcd URL for operator system. |
| k8s.max_reconcile_retry | 3 | The max retry times of reconcile. |
| k8s.probe_backlog | 50 | The maximum backlog for serving health probes. |
| k8s.probe_port | 9892 | The port that the controller binds to for serving health probes. |
| k8s.ready_check_internal | 1000 | The time interval (ms) of check ready. |
| k8s.ready_timeout | 30000 | The max timeout (in ms) of check ready. |
| k8s.reconciler_count | 10 | The max number of reconciler threads. |
| k8s.resync_period | 600000 | The minimum frequency at which watched resources are reconciled. |
| k8s.timezone | Asia/Shanghai | The timezone of computer job and operator. |
| k8s.watch_namespace | hugegraph-computer-system | The namespace to watch custom resources in. Use ‘*’ to watch all namespaces. |
HugeGraph-Computer CRD
CRD: https://github.com/apache/hugegraph-computer/blob/master/computer-k8s-operator/manifest/hugegraph-computer-crd.v1.yaml
| spec | default value | description | required |
|---|
| algorithmName | | The name of algorithm. | true |
| jobId | | The job id. | true |
| image | | The image of algorithm. | true |
| computerConf | | The map of computer config options. | true |
| workerInstances | | The number of worker instances, it will override the ‘job.workers_count’ option. | true |
| pullPolicy | Always | The pull-policy of image, detail please refer to: https://kubernetes.io/docs/concepts/containers/images/#image-pull-policy | false |
| pullSecrets | | The pull-secrets of Image, detail please refer to: https://kubernetes.io/docs/concepts/containers/images/#specifying-imagepullsecrets-on-a-pod | false |
| masterCpu | | The cpu limit of master, the unit can be ’m’ or without unit detail please refer to: https://kubernetes.io/docs/concepts/configuration/manage-resources-containers/#meaning-of-cpu | false |
| workerCpu | | The cpu limit of worker, the unit can be ’m’ or without unit detail please refer to: https://kubernetes.io/docs/concepts/configuration/manage-resources-containers/#meaning-of-cpu | false |
| masterMemory | | The memory limit of master, the unit can be one of Ei、Pi、Ti、Gi、Mi、Ki detail please refer to: https://kubernetes.io/docs/concepts/configuration/manage-resources-containers/#meaning-of-memory | false |
| workerMemory | | The memory limit of worker, the unit can be one of Ei、Pi、Ti、Gi、Mi、Ki detail please refer to: https://kubernetes.io/docs/concepts/configuration/manage-resources-containers/#meaning-of-memory | false |
| log4jXml | | The content of log4j.xml for computer job. | false |
| jarFile | | The jar path of computer algorithm. | false |
| remoteJarUri | | The remote jar uri of computer algorithm, it will overlay algorithm image. | false |
| jvmOptions | | The java startup parameters of computer job. | false |
| envVars | | please refer to: https://kubernetes.io/docs/tasks/inject-data-application/define-interdependent-environment-variables/ | false |
| envFrom | | please refer to: https://kubernetes.io/docs/tasks/inject-data-application/define-environment-variable-container/ | false |
| masterCommand | bin/start-computer.sh | The run command of master, equivalent to ‘Entrypoint’ field of Docker. | false |
| masterArgs | ["-r master", “-d k8s”] | The run args of master, equivalent to ‘Cmd’ field of Docker. | false |
| workerCommand | bin/start-computer.sh | The run command of worker, equivalent to ‘Entrypoint’ field of Docker. | false |
| workerArgs | ["-r worker", “-d k8s”] | The run args of worker, equivalent to ‘Cmd’ field of Docker. | false |
| volumes | | Please refer to: https://kubernetes.io/docs/concepts/storage/volumes/ | false |
| volumeMounts | | Please refer to: https://kubernetes.io/docs/concepts/storage/volumes/ | false |
| secretPaths | | The map of k8s-secret name and mount path. | false |
| configMapPaths | | The map of k8s-configmap name and mount path. | false |
| podTemplateSpec | | Please refer to: https://kubernetes.io/docs/reference/kubernetes-api/workload-resources/pod-template-v1/#PodTemplateSpec | false |
| securityContext | | Please refer to: https://kubernetes.io/docs/tasks/configure-pod-container/security-context/ | false |
KubeDriver Config Options
| config option | default value | description |
|---|
| k8s.build_image_bash_path | | The path of command used to build image. |
| k8s.enable_internal_algorithm | true | Whether enable internal algorithm. |
| k8s.framework_image_url | hugegraph/hugegraph-computer:latest | The image url of computer framework. |
| k8s.image_repository_password | | The password for login image repository. |
| k8s.image_repository_registry | | The address for login image repository. |
| k8s.image_repository_url | hugegraph/hugegraph-computer | The url of image repository. |
| k8s.image_repository_username | | The username for login image repository. |
| k8s.internal_algorithm | [pageRank] | The name list of all internal algorithm. Note: Algorithm names use camelCase here (e.g., pageRank), but algorithm implementations return underscore_case (e.g., page_rank). |
| k8s.internal_algorithm_image_url | hugegraph/hugegraph-computer:latest | The image url of internal algorithm. |
| k8s.jar_file_dir | /cache/jars/ | The directory where the algorithm jar will be uploaded. |
| k8s.kube_config | ~/.kube/config | The path of k8s config file. |
| k8s.log4j_xml_path | | The log4j.xml path for computer job. |
| k8s.namespace | hugegraph-computer-system | The namespace of hugegraph-computer system. |
| k8s.pull_secret_names | [] | The names of pull-secret for pulling image. |
3.5 - HugeGraph Client
3.5.1 - HugeGraph-Java-Client
1 Overview Of Hugegraph
HugeGraph-Client sends HTTP request to HugeGraph-Server to get and parse the execution result of Server.
We support HugeGraph-Client for Java/Go/Python language.
You can use Client-API to write code to operate HugeGraph, such as adding, deleting, modifying, and querying schema and graph data, or executing gremlin statements.
HugeGraph client SDK tool based on Go language (version >=1.2.0)
2 What You Need
- Java 11 (also supports Java 8)
- Maven 3.5+
3 How To Use
The basic steps to use HugeGraph-Client are as follows:
- Build a new Maven project by IDEA or Eclipse
- Add HugeGraph-Client dependency in a pom file;
- Create an object to invoke the interface of HugeGraph-Client
See the complete example in the following section for the detail.
4 Complete Example
4.1 Build New Maven Project
Using IDEA or Eclipse to create the project:
4.2 Add Hugegraph-Client Dependency In POM
<dependencies>
<dependency>
<groupId>org.apache.hugegraph</groupId>
<artifactId>hugegraph-client</artifactId>
<!-- Update to the latest release version -->
<version>1.7.0</version>
</dependency>
</dependencies>
Note: The versions of all graph components remain consistent
4.3 Example
4.3.1 SingleExample
import java.io.IOException;
import java.util.Iterator;
import java.util.List;
import org.apache.hugegraph.driver.GraphManager;
import org.apache.hugegraph.driver.GremlinManager;
import org.apache.hugegraph.driver.HugeClient;
import org.apache.hugegraph.driver.SchemaManager;
import org.apache.hugegraph.structure.constant.T;
import org.apache.hugegraph.structure.graph.Edge;
import org.apache.hugegraph.structure.graph.Path;
import org.apache.hugegraph.structure.graph.Vertex;
import org.apache.hugegraph.structure.gremlin.Result;
import org.apache.hugegraph.structure.gremlin.ResultSet;
public class SingleExample {
public static void main(String[] args) throws IOException {
// If connect failed will throw a exception.
HugeClient hugeClient = HugeClient.builder("http://localhost:8080",
"DEFAULT",
"hugegraph")
.configUser("username", "password")
// This is an example. In a production environment, secure credentials should be used.
.build();
SchemaManager schema = hugeClient.schema();
schema.propertyKey("name").asText().ifNotExist().create();
schema.propertyKey("age").asInt().ifNotExist().create();
schema.propertyKey("city").asText().ifNotExist().create();
schema.propertyKey("weight").asDouble().ifNotExist().create();
schema.propertyKey("lang").asText().ifNotExist().create();
schema.propertyKey("date").asDate().ifNotExist().create();
schema.propertyKey("price").asInt().ifNotExist().create();
schema.vertexLabel("person")
.properties("name", "age", "city")
.primaryKeys("name")
.ifNotExist()
.create();
schema.vertexLabel("software")
.properties("name", "lang", "price")
.primaryKeys("name")
.ifNotExist()
.create();
schema.indexLabel("personByCity")
.onV("person")
.by("city")
.secondary()
.ifNotExist()
.create();
schema.indexLabel("personByAgeAndCity")
.onV("person")
.by("age", "city")
.secondary()
.ifNotExist()
.create();
schema.indexLabel("softwareByPrice")
.onV("software")
.by("price")
.range()
.ifNotExist()
.create();
schema.edgeLabel("knows")
.sourceLabel("person")
.targetLabel("person")
.properties("date", "weight")
.ifNotExist()
.create();
schema.edgeLabel("created")
.sourceLabel("person").targetLabel("software")
.properties("date", "weight")
.ifNotExist()
.create();
schema.indexLabel("createdByDate")
.onE("created")
.by("date")
.secondary()
.ifNotExist()
.create();
schema.indexLabel("createdByWeight")
.onE("created")
.by("weight")
.range()
.ifNotExist()
.create();
schema.indexLabel("knowsByWeight")
.onE("knows")
.by("weight")
.range()
.ifNotExist()
.create();
GraphManager graph = hugeClient.graph();
Vertex marko = graph.addVertex(T.LABEL, "person", "name", "marko",
"age", 29, "city", "Beijing");
Vertex vadas = graph.addVertex(T.LABEL, "person", "name", "vadas",
"age", 27, "city", "Hongkong");
Vertex lop = graph.addVertex(T.LABEL, "software", "name", "lop",
"lang", "java", "price", 328);
Vertex josh = graph.addVertex(T.LABEL, "person", "name", "josh",
"age", 32, "city", "Beijing");
Vertex ripple = graph.addVertex(T.LABEL, "software", "name", "ripple",
"lang", "java", "price", 199);
Vertex peter = graph.addVertex(T.LABEL, "person", "name", "peter",
"age", 35, "city", "Shanghai");
marko.addEdge("knows", vadas, "date", "2016-01-10", "weight", 0.5);
marko.addEdge("knows", josh, "date", "2013-02-20", "weight", 1.0);
marko.addEdge("created", lop, "date", "2017-12-10", "weight", 0.4);
josh.addEdge("created", lop, "date", "2009-11-11", "weight", 0.4);
josh.addEdge("created", ripple, "date", "2017-12-10", "weight", 1.0);
peter.addEdge("created", lop, "date", "2017-03-24", "weight", 0.2);
GremlinManager gremlin = hugeClient.gremlin();
System.out.println("==== Path ====");
ResultSet resultSet = gremlin.gremlin("g.V().outE().path()").execute();
Iterator<Result> results = resultSet.iterator();
results.forEachRemaining(result -> {
System.out.println(result.getObject().getClass());
Object object = result.getObject();
if (object instanceof Vertex) {
System.out.println(((Vertex) object).id());
} else if (object instanceof Edge) {
System.out.println(((Edge) object).id());
} else if (object instanceof Path) {
List<Object> elements = ((Path) object).objects();
elements.forEach(element -> {
System.out.println(element.getClass());
System.out.println(element);
});
} else {
System.out.println(object);
}
});
hugeClient.close();
}
}
4.3.2 BatchExample
import java.util.ArrayList;
import java.util.List;
import org.apache.hugegraph.driver.GraphManager;
import org.apache.hugegraph.driver.HugeClient;
import org.apache.hugegraph.driver.SchemaManager;
import org.apache.hugegraph.structure.graph.Edge;
import org.apache.hugegraph.structure.graph.Vertex;
public class BatchExample {
public static void main(String[] args) {
HugeClient hugeClient = HugeClient.builder("http://localhost:8080",
"DEFAULT",
"hugegraph")
.configUser("username", "password")
// This is an example. In a production environment, secure credentials should be used.
.build();
SchemaManager schema = hugeClient.schema();
schema.propertyKey("name").asText().ifNotExist().create();
schema.propertyKey("age").asInt().ifNotExist().create();
schema.propertyKey("lang").asText().ifNotExist().create();
schema.propertyKey("date").asDate().ifNotExist().create();
schema.propertyKey("price").asInt().ifNotExist().create();
schema.vertexLabel("person")
.properties("name", "age")
.primaryKeys("name")
.ifNotExist()
.create();
schema.vertexLabel("person")
.properties("price")
.nullableKeys("price")
.append();
schema.vertexLabel("software")
.properties("name", "lang", "price")
.primaryKeys("name")
.ifNotExist()
.create();
schema.indexLabel("softwareByPrice")
.onV("software").by("price")
.range()
.ifNotExist()
.create();
schema.edgeLabel("knows")
.link("person", "person")
.properties("date")
.ifNotExist()
.create();
schema.edgeLabel("created")
.link("person", "software")
.properties("date")
.ifNotExist()
.create();
schema.indexLabel("createdByDate")
.onE("created").by("date")
.secondary()
.ifNotExist()
.create();
// get schema object by name
System.out.println(schema.getPropertyKey("name"));
System.out.println(schema.getVertexLabel("person"));
System.out.println(schema.getEdgeLabel("knows"));
System.out.println(schema.getIndexLabel("createdByDate"));
// list all schema objects
System.out.println(schema.getPropertyKeys());
System.out.println(schema.getVertexLabels());
System.out.println(schema.getEdgeLabels());
System.out.println(schema.getIndexLabels());
GraphManager graph = hugeClient.graph();
Vertex marko = new Vertex("person").property("name", "marko")
.property("age", 29);
Vertex vadas = new Vertex("person").property("name", "vadas")
.property("age", 27);
Vertex lop = new Vertex("software").property("name", "lop")
.property("lang", "java")
.property("price", 328);
Vertex josh = new Vertex("person").property("name", "josh")
.property("age", 32);
Vertex ripple = new Vertex("software").property("name", "ripple")
.property("lang", "java")
.property("price", 199);
Vertex peter = new Vertex("person").property("name", "peter")
.property("age", 35);
Edge markoKnowsVadas = new Edge("knows").source(marko).target(vadas)
.property("date", "2016-01-10");
Edge markoKnowsJosh = new Edge("knows").source(marko).target(josh)
.property("date", "2013-02-20");
Edge markoCreateLop = new Edge("created").source(marko).target(lop)
.property("date",
"2017-12-10");
Edge joshCreateRipple = new Edge("created").source(josh).target(ripple)
.property("date",
"2017-12-10");
Edge joshCreateLop = new Edge("created").source(josh).target(lop)
.property("date", "2009-11-11");
Edge peterCreateLop = new Edge("created").source(peter).target(lop)
.property("date",
"2017-03-24");
List<Vertex> vertices = new ArrayList<>();
vertices.add(marko);
vertices.add(vadas);
vertices.add(lop);
vertices.add(josh);
vertices.add(ripple);
vertices.add(peter);
List<Edge> edges = new ArrayList<>();
edges.add(markoKnowsVadas);
edges.add(markoKnowsJosh);
edges.add(markoCreateLop);
edges.add(joshCreateRipple);
edges.add(joshCreateLop);
edges.add(peterCreateLop);
vertices = graph.addVertices(vertices);
vertices.forEach(vertex -> System.out.println(vertex));
edges = graph.addEdges(edges, false);
edges.forEach(edge -> System.out.println(edge));
hugeClient.close();
}
}
4.4 Run The Example
Before running Example, you need to start the Server. For the startup process, seeHugeGraph-Server Quick Start.
SeeIntroduce basic API of HugeGraph-Client.
3.5.2 - HugeGraph Python Client Quick Start
The hugegraph-python-client is a Python client/SDK for HugeGraph Database.
It is used to define graph structures, perform CRUD operations on graph data, manage schemas, and execute Gremlin queries. Both the hugegraph-llm and hugegraph-ml modules depend on this foundational library.
Installation
Install the released package (Stable)
To install the hugegraph-python-client, you can use uv/pip or source code building:
# uv is optional, you can use pip directly
uv pip install hugegraph-python # Note: may not the latest version, recommend to install from source
# WIP: we will use 'hugegraph-python-client' as the package name soon
Install from Source (Latest Code)
To install from the source, clone the repository and install the required dependencies:
git clone https://github.com/apache/hugegraph-ai.git
cd hugegraph-ai/hugegraph-python-client
# Normal install
uv pip install .
# (Optional) install the devel version
uv pip install -e .
Usage
Defining Graph Structures
You can use the hugegraph-python-client to define graph structures. Below is an example of how to define a graph:
from pyhugegraph.client import PyHugeClient
# Initialize the client
# For HugeGraph API version ≥ v3: (Or enable graphspace function)
# - The 'graphspace' parameter becomes relevant if graphspaces are enabled.(default name is 'DEFAULT')
# - Otherwise, the graphspace parameter is optional and can be ignored.
client = PyHugeClient("127.0.0.1", "8080", user="admin", pwd="admin", graph="hugegraph", graphspace="DEFAULT")
''''
Note:
Could refer to the official REST-API doc of your HugeGraph version for accurate details.
If some API is not as expected, please submit a issue or contact us.
''''
schema = client.schema()
schema.propertyKey("name").asText().ifNotExist().create()
schema.propertyKey("birthDate").asText().ifNotExist().create()
schema.vertexLabel("Person").properties("name", "birthDate").usePrimaryKeyId().primaryKeys("name").ifNotExist().create()
schema.vertexLabel("Movie").properties("name").usePrimaryKeyId().primaryKeys("name").ifNotExist().create()
schema.edgeLabel("ActedIn").sourceLabel("Person").targetLabel("Movie").ifNotExist().create()
print(schema.getVertexLabels())
print(schema.getEdgeLabels())
print(schema.getRelations())
# Init Graph
g = client.graph()
v_al_pacino = g.addVertex("Person", {"name": "Al Pacino", "birthDate": "1940-04-25"})
v_robert = g.addVertex("Person", {"name": "Robert De Niro", "birthDate": "1943-08-17"})
v_godfather = g.addVertex("Movie", {"name": "The Godfather"})
v_godfather2 = g.addVertex("Movie", {"name": "The Godfather Part II"})
v_godfather3 = g.addVertex("Movie", {"name": "The Godfather Coda The Death of Michael Corleone"})
g.addEdge("ActedIn", v_al_pacino.id, v_godfather.id, {})
g.addEdge("ActedIn", v_al_pacino.id, v_godfather2.id, {})
g.addEdge("ActedIn", v_al_pacino.id, v_godfather3.id, {})
g.addEdge("ActedIn", v_robert.id, v_godfather2.id, {})
res = g.getVertexById(v_al_pacino.id).label
print(res)
g.close()
Schema Management
The hugegraph-python-client provides comprehensive schema management capabilities.
Define Property Keys
# Define a property key
client.schema().propertyKey('name').dataType('STRING').cardinality('SINGLE').create()
Define Vertex Labels
# Define a vertex label
client.schema().vertexLabel('person').properties('name', 'age').primaryKeys('name').create()
Define Edge Labels
# Define an edge label
client.schema().edgeLabel('knows').sourceLabel('person').targetLabel('person').properties('since').create()
Define Index Labels
# Define an index label
client.schema().indexLabel('personByName').onV('person').by('name').secondary().create()
CRUD Operations
The client allows you to perform CRUD operations on the graph data. Below are examples of how to create, read, update, and delete vertices and edges:
Create Vertices and Edges
# Create vertices
v1 = client.graph().addVertex('person').property('name', 'John').property('age', 29).create()
v2 = client.graph().addVertex('person').property('name', 'Jane').property('age', 25).create()
# Create an edge
client.graph().addEdge(v1, 'knows', v2).property('since', '2020').create()
Read Vertices and Edges
# Get a vertex by ID
vertex = client.graph().getVertexById(v1.id)
print(vertex)
# Get an edge by ID
edge = client.graph().getEdgeById(edge.id)
print(edge)
Update Vertices and Edges
# Update a vertex
client.graph().updateVertex(v1.id).property('age', 30).update()
# Update an edge
client.graph().updateEdge(edge.id).property('since', '2021').update()
Delete Vertices and Edges
# Delete a vertex
client.graph().deleteVertex(v1.id)
# Delete an edge
client.graph().deleteEdge(edge.id)
Execute Gremlin Queries
The client also supports executing Gremlin queries:
# Execute a Gremlin query
g = client.gremlin()
res = g.exec("g.V().limit(5)")
print(res)
Other info is under 🚧 (Welcome to add more docs for it, users could refer java-client-doc for similar usage)
Contributing
- Welcome to contribute to
hugegraph-python-client. Please see the Guidelines for more information. - Code format: Please run
./style/code_format_and_analysis.sh to format your code before submitting a PR.
Thank you to all the people who already contributed to hugegraph-python-client!
- GitHub Issues: Feedback on usage issues and functional requirements (quick response)
3.5.3 - HugeGraph Go Client Quick Start
A HugeGraph Client SDK tool based on the Go language.
Software Architecture
(Software architecture description)
Installation Tutorial
go get github.com/apache/hugegraph-toolchain/hugegraph-client-go
Implemented APIs
| API | Description |
|---|
| schema | Get schema information |
| version | Get version information |
Usage Instructions
1. Initialize the Client
package main
import (
"log"
"os"
"github.com/apache/hugegraph-toolchain/hugegraph-client-go"
"github.com/apache/hugegraph-toolchain/hugegraph-client-go/hgtransport"
)
func main() {
client, err := hugegraph.NewCommonClient(hugegraph.Config{
Host: "127.0.0.1",
Port: 8080,
Graph: "hugegraph",
Username: "", // Fill in the username according to the actual situation
Password: "", // Fill in the password according to the actual situation
Logger: &hgtransport.ColorLogger{
Output: os.Stdout,
EnableRequestBody: true,
EnableResponseBody: true,
},
})
if err != nil {
log.Fatalf("Error creating the client: %s\n", err)
}
// Use the client for operations...
_ = client // Avoid "imported and not used" error
}
2. Get HugeGraph Version
package main
import (
"fmt"
"log"
"os"
"github.com/apache/hugegraph-toolchain/hugegraph-client-go"
"github.com/apache/hugegraph-toolchain/hugegraph-client-go/hgtransport"
)
// initClient initializes and returns a HugeGraph client instance
func initClient() *hugegraph.CommonClient {
client, err := hugegraph.NewCommonClient(hugegraph.Config{
Host: "127.0.0.1",
Port: 8080,
Graph: "hugegraph",
Username: "",
Password: "",
Logger: &hgtransport.ColorLogger{
Output: os.Stdout,
EnableRequestBody: true,
EnableResponseBody: true,
},
})
if err != nil {
log.Fatalf("Error creating the client: %s\n", err)
}
return client
}
func getVersion() {
client := initClient()
// Assume client has a Version method that returns version information and an error
// res, err := client.Version() // Actual call
// Simulate return, as the client.Version() return type in the original README does not fully match the usage here
type VersionInfo struct {
Versions struct {
Version string `json:"version"`
Core string `json:"core"`
Gremlin string `json:"gremlin"`
API string `json:"api"`
} `json:"versions"`
// Body io.ReadCloser // Assume there is a Body to close, adjust according to the actual SDK
}
// Simulate API call and return
res := &VersionInfo{
Versions: struct {
Version string `json:"version"`
Core string `json:"core"`
Gremlin string `json:"gremlin"`
API string `json:"api"`
}{
Version: "1.0.0", // Example version
Core: "1.0.0",
Gremlin: "3.x.x",
API: "v1",
},
}
// err := error(nil) // Assume no error
// if err != nil {
// log.Fatalf("Error getting the response: %s\n", err)
// }
// defer res.Body.Close() // If there is a Body, it needs to be closed
fmt.Println(res.Versions)
fmt.Println(res.Versions.Version)
}
func main() {
getVersion()
}
Structure of the Return Value
package main
// VersionResponse defines the structure returned by the version API
type VersionResponse struct {
Versions struct {
Version string `json:"version"` // hugegraph version
Core string `json:"core"` // hugegraph core version
Gremlin string `json:"gremlin"` // hugegraph gremlin version
API string `json:"api"` // hugegraph api version
} `json:"versions"`
}
API Reference
4 - HugeGraph-Server Configuration
This section covers HugeGraph-Server configuration, including:
4.1 - Server Startup Guide
1 Overview
The directory for the configuration files is hugegraph-release/conf, and all the configurations related to the service and the graph itself are located in this directory.
The main configuration files include gremlin-server.yaml, rest-server.properties, and hugegraph.properties.
The HugeGraphServer integrates the GremlinServer and RestServer internally, and gremlin-server.yaml and rest-server.properties are used to configure these two servers.
- GremlinServer: GremlinServer accepts Gremlin statements from users, parses them, and then invokes the Core code.
- RestServer: It provides a RESTful API that, based on different HTTP requests, calls the corresponding Core API. If the user’s request body is a Gremlin statement, it will be forwarded to GremlinServer to perform operations on the graph data.
Now let’s introduce these three configuration files one by one.
2. gremlin-server.yaml
The default content of the gremlin-server.yaml file is as follows:
# host and port of gremlin server, need to be consistent with host and port in rest-server.properties
#host: 127.0.0.1
#port: 8182
# timeout in ms of gremlin query
evaluationTimeout: 30000
channelizer: org.apache.tinkerpop.gremlin.server.channel.WsAndHttpChannelizer
# don't set graph at here, this happens after support for dynamically adding graph
graphs: {
}
scriptEngines: {
gremlin-groovy: {
staticImports: [
org.opencypher.gremlin.process.traversal.CustomPredicates.*',
org.opencypher.gremlin.traversal.CustomFunctions.*
],
plugins: {
org.apache.hugegraph.plugin.HugeGraphGremlinPlugin: {},
org.apache.tinkerpop.gremlin.server.jsr223.GremlinServerGremlinPlugin: {},
org.apache.tinkerpop.gremlin.jsr223.ImportGremlinPlugin: {
classImports: [
java.lang.Math,
org.apache.hugegraph.backend.id.IdGenerator,
org.apache.hugegraph.type.define.Directions,
org.apache.hugegraph.type.define.NodeRole,
org.apache.hugegraph.traversal.algorithm.CollectionPathsTraverser,
org.apache.hugegraph.traversal.algorithm.CountTraverser,
org.apache.hugegraph.traversal.algorithm.CustomizedCrosspointsTraverser,
org.apache.hugegraph.traversal.algorithm.CustomizePathsTraverser,
org.apache.hugegraph.traversal.algorithm.FusiformSimilarityTraverser,
org.apache.hugegraph.traversal.algorithm.HugeTraverser,
org.apache.hugegraph.traversal.algorithm.JaccardSimilarTraverser,
org.apache.hugegraph.traversal.algorithm.KneighborTraverser,
org.apache.hugegraph.traversal.algorithm.KoutTraverser,
org.apache.hugegraph.traversal.algorithm.MultiNodeShortestPathTraverser,
org.apache.hugegraph.traversal.algorithm.NeighborRankTraverser,
org.apache.hugegraph.traversal.algorithm.PathsTraverser,
org.apache.hugegraph.traversal.algorithm.PersonalRankTraverser,
org.apache.hugegraph.traversal.algorithm.SameNeighborTraverser,
org.apache.hugegraph.traversal.algorithm.ShortestPathTraverser,
org.apache.hugegraph.traversal.algorithm.SingleSourceShortestPathTraverser,
org.apache.hugegraph.traversal.algorithm.SubGraphTraverser,
org.apache.hugegraph.traversal.algorithm.TemplatePathsTraverser,
org.apache.hugegraph.traversal.algorithm.steps.EdgeStep,
org.apache.hugegraph.traversal.algorithm.steps.RepeatEdgeStep,
org.apache.hugegraph.traversal.algorithm.steps.WeightedEdgeStep,
org.apache.hugegraph.traversal.optimize.ConditionP,
org.apache.hugegraph.traversal.optimize.Text,
org.apache.hugegraph.traversal.optimize.TraversalUtil,
org.apache.hugegraph.util.DateUtil,
org.opencypher.gremlin.traversal.CustomFunctions,
org.opencypher.gremlin.traversal.CustomPredicate
],
methodImports: [
java.lang.Math#*,
org.opencypher.gremlin.traversal.CustomPredicate#*,
org.opencypher.gremlin.traversal.CustomFunctions#*
]
},
org.apache.tinkerpop.gremlin.jsr223.ScriptFileGremlinPlugin: {
files: [scripts/empty-sample.groovy]
}
}
}
}
serializers:
- { className: org.apache.tinkerpop.gremlin.driver.ser.GraphBinaryMessageSerializerV1,
config: {
serializeResultToString: false,
ioRegistries: [org.apache.hugegraph.io.HugeGraphIoRegistry]
}
}
- { className: org.apache.tinkerpop.gremlin.driver.ser.GraphSONMessageSerializerV1d0,
config: {
serializeResultToString: false,
ioRegistries: [org.apache.hugegraph.io.HugeGraphIoRegistry]
}
}
- { className: org.apache.tinkerpop.gremlin.driver.ser.GraphSONMessageSerializerV2d0,
config: {
serializeResultToString: false,
ioRegistries: [org.apache.hugegraph.io.HugeGraphIoRegistry]
}
}
- { className: org.apache.tinkerpop.gremlin.driver.ser.GraphSONMessageSerializerV3d0,
config: {
serializeResultToString: false,
ioRegistries: [org.apache.hugegraph.io.HugeGraphIoRegistry]
}
}
metrics: {
consoleReporter: {enabled: false, interval: 180000},
csvReporter: {enabled: false, interval: 180000, fileName: ./metrics/gremlin-server-metrics.csv},
jmxReporter: {enabled: false},
slf4jReporter: {enabled: false, interval: 180000},
gangliaReporter: {enabled: false, interval: 180000, addressingMode: MULTICAST},
graphiteReporter: {enabled: false, interval: 180000}
}
maxInitialLineLength: 4096
maxHeaderSize: 8192
maxChunkSize: 8192
maxContentLength: 65536
maxAccumulationBufferComponents: 1024
resultIterationBatchSize: 64
writeBufferLowWaterMark: 32768
writeBufferHighWaterMark: 65536
ssl: {
enabled: false
}
There are many configuration options mentioned above, but for now, let’s focus on the following options: channelizer and graphs.
graphs: This option specifies the graphs that need to be opened when the GremlinServer starts. It is a map structure where the key is the name of the graph and the value is the configuration file path for that graph.channelizer: The GremlinServer supports two communication modes with clients: WebSocket and HTTP (default). If WebSocket is chosen, users can quickly experience the features of HugeGraph using Gremlin-Console, but it does not support importing large-scale data. It is recommended to use HTTP for communication, as all peripheral components of HugeGraph are implemented based on HTTP.
By default, the GremlinServer serves at localhost:8182. If you need to modify it, configure the host and port settings.
host: The hostname or IP address of the machine where the GremlinServer is deployed. Currently, HugeGraphServer does not support distributed deployment, and GremlinServer is not directly exposed to users.port: The port number of the machine where the GremlinServer is deployed.
Additionally, you need to add the corresponding configuration gremlinserver.url=http://host:port in rest-server.properties.
3. rest-server.properties
The default content of the rest-server.properties file is as follows:
# bind url
# could use '0.0.0.0' or specified (real)IP to expose external network access
restserver.url=http://127.0.0.1:8080
#restserver.enable_graphspaces_filter=false
# gremlin server url, need to be consistent with host and port in gremlin-server.yaml
#gremlinserver.url=http://127.0.0.1:8182
graphs=./conf/graphs
# The maximum thread ratio for batch writing, only take effect if the batch.max_write_threads is 0
batch.max_write_ratio=80
batch.max_write_threads=0
# configuration of arthas
arthas.telnet_port=8562
arthas.http_port=8561
arthas.ip=127.0.0.1
arthas.disabled_commands=jad
# authentication configs
# choose 'org.apache.hugegraph.auth.StandardAuthenticator' or a custom implementation
#auth.authenticator=
# for StandardAuthenticator mode
#auth.graph_store=hugegraph
# auth client config
#auth.remote_url=127.0.0.1:8899,127.0.0.1:8898,127.0.0.1:8897
# TODO: Deprecated & removed later (useless from version 1.5.0)
# rpc server configs for multi graph-servers or raft-servers
#rpc.server_host=127.0.0.1
#rpc.server_port=8091
#rpc.server_timeout=30
# rpc client configs (like enable to keep cache consistency)
#rpc.remote_url=127.0.0.1:8091,127.0.0.1:8092,127.0.0.1:8093
#rpc.client_connect_timeout=20
#rpc.client_reconnect_period=10
#rpc.client_read_timeout=40
#rpc.client_retries=3
#rpc.client_load_balancer=consistentHash
# raft group initial peers
#raft.group_peers=127.0.0.1:8091,127.0.0.1:8092,127.0.0.1:8093
# lightweight load balancing (beta)
server.id=server-1
server.role=master
# slow query log
log.slow_query_threshold=1000
# jvm(in-heap) memory usage monitor, set 1 to disable it
memory_monitor.threshold=0.85
memory_monitor.period=2000
restserver.url: The URL at which the RestServer provides its services. Modify it according to the actual environment. If you can’t connet to server from other IP address, try to modify it as specific IP; or modify it as http://0.0.0.0 to listen all network interfaces as a convenient solution, but need to take care of the network area that might access.graphs: The RestServer also needs to open graphs when it starts. This option is a map structure where the key is the name of the graph and the value is the configuration file path for that graph.
Note: Both gremlin-server.yaml and rest-server.properties contain the graphs configuration option, and the init-store command initializes based on the graphs specified in the graphs section of gremlin-server.yaml.
The gremlinserver.url configuration option is the URL at which the GremlinServer provides services to the RestServer. By default, it is set to http://localhost:8182. If you need to modify it, it should match the host and port settings in gremlin-server.yaml.
4. hugegraph.properties
hugegraph.properties is a type of file. If the system has multiple graphs, there will be multiple similar files. This file is used to configure parameters related to graph storage and querying. The default content of the file is as follows:
# gremlin entrence to create graph
gremlin.graph=org.apache.hugegraph.HugeFactory
# cache config
#schema.cache_capacity=100000
# vertex-cache default is 1000w, 10min expired
#vertex.cache_capacity=10000000
#vertex.cache_expire=600
# edge-cache default is 100w, 10min expired
#edge.cache_capacity=1000000
#edge.cache_expire=600
# schema illegal name template
#schema.illegal_name_regex=\s+|~.*
#vertex.default_label=vertex
backend=rocksdb
serializer=binary
store=hugegraph
raft.mode=false
raft.safe_read=false
raft.use_snapshot=false
raft.endpoint=127.0.0.1:8281
raft.group_peers=127.0.0.1:8281,127.0.0.1:8282,127.0.0.1:8283
raft.path=./raft-log
raft.use_replicator_pipeline=true
raft.election_timeout=10000
raft.snapshot_interval=3600
raft.backend_threads=48
raft.read_index_threads=8
raft.queue_size=16384
raft.queue_publish_timeout=60
raft.apply_batch=1
raft.rpc_threads=80
raft.rpc_connect_timeout=5000
raft.rpc_timeout=60000
# if use 'ikanalyzer', need download jar from 'https://github.com/apache/hugegraph-doc/raw/ik_binary/dist/server/ikanalyzer-2012_u6.jar' to lib directory
search.text_analyzer=jieba
search.text_analyzer_mode=INDEX
# rocksdb backend config
#rocksdb.data_path=/path/to/disk
#rocksdb.wal_path=/path/to/disk
# cassandra backend config
cassandra.host=localhost
cassandra.port=9042
cassandra.username=
cassandra.password=
#cassandra.connect_timeout=5
#cassandra.read_timeout=20
#cassandra.keyspace.strategy=SimpleStrategy
#cassandra.keyspace.replication=3
# hbase backend config
#hbase.hosts=localhost
#hbase.port=2181
#hbase.znode_parent=/hbase
#hbase.threads_max=64
# mysql backend config
#jdbc.driver=com.mysql.jdbc.Driver
#jdbc.url=jdbc:mysql://127.0.0.1:3306
#jdbc.username=root
#jdbc.password=
#jdbc.reconnect_max_times=3
#jdbc.reconnect_interval=3
#jdbc.ssl_mode=false
# postgresql & cockroachdb backend config
#jdbc.driver=org.postgresql.Driver
#jdbc.url=jdbc:postgresql://localhost:5432/
#jdbc.username=postgres
#jdbc.password=
# palo backend config
#palo.host=127.0.0.1
#palo.poll_interval=10
#palo.temp_dir=./palo-data
#palo.file_limit_size=32
Pay attention to the following uncommented items:
gremlin.graph: The entry point for GremlinServer startup. Users should not modify this item.backend: The backend storage used, with options including memory, cassandra, scylladb, mysql, hbase, postgresql, and rocksdb.serializer: Mainly for internal use, used to serialize schema, vertices, and edges to the backend. The corresponding options are text, cassandra, scylladb, and binary (Note: The rocksdb backend should have a value of binary, while for other backends, the values of backend and serializer should remain consistent. For example, for the hbase backend, the value should be hbase).store: The name of the database used for storing the graph in the backend. In Cassandra and ScyllaDB, it corresponds to the keyspace name. The value of this item is unrelated to the graph name in GremlinServer and RestServer, but for clarity, it is recommended to use the same name.cassandra.host: This item is only meaningful when the backend is set to cassandra or scylladb. It specifies the seeds of the Cassandra/ScyllaDB cluster.cassandra.port: This item is only meaningful when the backend is set to cassandra or scylladb. It specifies the native port of the Cassandra/ScyllaDB cluster.rocksdb.data_path: This item is only meaningful when the backend is set to rocksdb. It specifies the data directory for RocksDB.rocksdb.wal_path: This item is only meaningful when the backend is set to rocksdb. It specifies the log directory for RocksDB.admin.token: A token used to retrieve server configuration information. For example: http://localhost:8080/graphs/hugegraph/conf?token=162f7848-0b6d-4faf-b557-3a0797869c55
5. Multi-Graph Configuration
Our system can have multiple graphs, and the backend of each graph can be different, such as hugegraph_rocksdb and hugegraph_mysql, where hugegraph_rocksdb uses RocksDB as the backend, and hugegraph_mysql uses MySQL as a backend.
The configuration method is simple:
[Optional]: Modify rest-server.properties
You can modify the graph profile directory in the graphs option of rest-server.properties. The default configuration is graphs=./conf/graphs, if you want to change it to another directory then adjust the graphs option, e.g. adjust it to graphs=/etc/hugegraph/graphs, example is as follows:
Modify hugegraph_mysql_backend.properties and hugegraph_rocksdb_backend.properties based on hugegraph.properties under conf/graphs path
The modified part of hugegraph_mysql_backend.properties is as follows:
backend=mysql
serializer=mysql
store=hugegraph_mysql
# mysql backend config
jdbc.driver=com.mysql.cj.jdbc.Driver
jdbc.url=jdbc:mysql://127.0.0.1:3306
jdbc.username=root
jdbc.password=xxx
jdbc.reconnect_max_times=3
jdbc.reconnect_interval=3
jdbc.ssl_mode=false
The modified part of hugegraph_rocksdb_backend.properties is as follows:
backend=rocksdb
serializer=binary
store=hugegraph_rocksdb
Stop the server, execute init-store.sh (to create a new database for the new graph), and restart the server.
$ ./bin/stop-hugegraph.sh
$ ./bin/init-store.sh
Initializing HugeGraph Store...
2023-06-11 14:16:14 [main] [INFO] o.a.h.u.ConfigUtil - Scanning option 'graphs' directory './conf/graphs'
2023-06-11 14:16:14 [main] [INFO] o.a.h.c.InitStore - Init graph with config file: ./conf/graphs/hugegraph_rocksdb_backend.properties
...
2023-06-11 14:16:15 [main] [INFO] o.a.h.StandardHugeGraph - Graph 'hugegraph_rocksdb' has been initialized
2023-06-11 14:16:15 [main] [INFO] o.a.h.c.InitStore - Init graph with config file: ./conf/graphs/hugegraph_mysql_backend.properties
...
2023-06-11 14:16:16 [main] [INFO] o.a.h.StandardHugeGraph - Graph 'hugegraph_mysql' has been initialized
2023-06-11 14:16:16 [main] [INFO] o.a.h.StandardHugeGraph - Close graph standardhugegraph[hugegraph_rocksdb]
...
2023-06-11 14:16:16 [main] [INFO] o.a.h.HugeFactory - HugeFactory shutdown
2023-06-11 14:16:16 [hugegraph-shutdown] [INFO] o.a.h.HugeFactory - HugeGraph is shutting down
Initialization finished.
$ ./bin/start-hugegraph.sh
Starting HugeGraphServer...
Connecting to HugeGraphServer (http://127.0.0.1:8080/graphs)...OK
Started [pid 21614]
Check out created graphs:
curl http://127.0.0.1:8080/graphs/
{"graphs":["hugegraph_rocksdb","hugegraph_mysql"]}
Get details of the graph
curl http://127.0.0.1:8080/graphs/hugegraph_mysql_backend
{"name":"hugegraph_mysql","backend":"mysql"}
curl http://127.0.0.1:8080/graphs/hugegraph_rocksdb_backend
{"name":"hugegraph_rocksdb","backend":"rocksdb"}
4.2 - Server Complete Configuration Manual
Gremlin Server Config Options
Corresponding configuration file gremlin-server.yaml
| config option | default value | description |
|---|
| host | 127.0.0.1 | The host or ip of Gremlin Server. |
| port | 8182 | The listening port of Gremlin Server. |
| graphs | hugegraph: conf/hugegraph.properties | The map of graphs with name and config file path. |
| scriptEvaluationTimeout | 30000 | The timeout for gremlin script execution(millisecond). |
| channelizer | org.apache.tinkerpop.gremlin.server.channel.HttpChannelizer | Indicates the protocol which the Gremlin Server provides service. |
| authentication | authenticator: org.apache.hugegraph.auth.StandardAuthenticator, config: {tokens: conf/rest-server.properties} | The authenticator and config(contains tokens path) of authentication mechanism. |
Rest Server & API Config Options
Corresponding configuration file rest-server.properties
| config option | default value | description |
|---|
| graphs | [hugegraph:conf/hugegraph.properties] | The map of graphs’ name and config file. |
| server.id | server-1 | The id of rest server, used for license verification. |
| server.role | master | The role of nodes in the cluster, available types are [master, worker, computer] |
| restserver.url | http://127.0.0.1:8080 | The url for listening of rest server. |
| ssl.keystore_file | server.keystore | The path of server keystore file used when https protocol is enabled. |
| ssl.keystore_password | | The password of the path of the server keystore file used when the https protocol is enabled. |
| restserver.max_worker_threads | 2 * CPUs | The maximum worker threads of rest server. |
| restserver.min_free_memory | 64 | The minimum free memory(MB) of rest server, requests will be rejected when the available memory of system is lower than this value. |
| restserver.request_timeout | 30 | The time in seconds within which a request must complete, -1 means no timeout. |
| restserver.connection_idle_timeout | 30 | The time in seconds to keep an inactive connection alive, -1 means no timeout. |
| restserver.connection_max_requests | 256 | The max number of HTTP requests allowed to be processed on one keep-alive connection, -1 means unlimited. |
| gremlinserver.url | http://127.0.0.1:8182 | The url of gremlin server. |
| gremlinserver.max_route | 8 | The max route number for gremlin server. |
| gremlinserver.timeout | 30 | The timeout in seconds of waiting for gremlin server. |
| batch.max_edges_per_batch | 2500 | The maximum number of edges submitted per batch. |
| batch.max_vertices_per_batch | 2500 | The maximum number of vertices submitted per batch. |
| batch.max_write_ratio | 70 | The maximum thread ratio for batch writing, only take effect if the batch.max_write_threads is 0. |
| batch.max_write_threads | 0 | The maximum threads for batch writing, if the value is 0, the actual value will be set to batch.max_write_ratio * restserver.max_worker_threads. |
| auth.authenticator | | The class path of authenticator implementation. e.g., org.apache.hugegraph.auth.StandardAuthenticator, or a custom implementation. |
| auth.graph_store | hugegraph | The name of graph used to store authentication information, like users, only for org.apache.hugegraph.auth.StandardAuthenticator. |
| auth.audit_log_rate | 1000.0 | The max rate of audit log output per user, default value is 1000 records per second. |
| auth.cache_capacity | 10240 | The max cache capacity of each auth cache item. |
| auth.cache_expire | 600 | The expiration time in seconds of vertex cache. |
| auth.remote_url | | If the address is empty, it provide auth service, otherwise it is auth client and also provide auth service through rpc forwarding. The remote url can be set to multiple addresses, which are concat by ‘,’. |
| auth.token_expire | 86400 | The expiration time in seconds after token created |
| auth.token_secret | FXQXbJtbCLxODc6tGci732pkH1cyf8Qg | Secret key of HS256 algorithm. |
| exception.allow_trace | true | Whether to allow exception trace stack. |
| memory_monitor.threshold | 0.85 | The threshold of JVM(in-heap) memory usage monitoring , 1 means disabling this function. |
| memory_monitor.period | 2000 | The period in ms of JVM(in-heap) memory usage monitoring. |
| log.slow_query_threshold | 1000 | Slow query log threshold in milliseconds, 0 means disabled. |
Corresponding configuration file rest-server.properties
| config option | default value | description |
|---|
| pd.peers | 127.0.0.1:8686 | PD server addresses (comma separated). |
| meta.endpoints | http://127.0.0.1:2379 | Meta service endpoints. |
Basic Config Options
Basic Config Options and Backend Config Options correspond to configuration files:{graph-name}.properties, such as hugegraph.properties
| config option | default value | description |
|---|
| gremlin.graph | org.apache.hugegraph.HugeFactory | Gremlin entrance to create graph. |
| backend | rocksdb | The data store type. For version 1.7.0+: [memory, rocksdb, hstore, hbase]. Note: cassandra, scylladb, mysql, postgresql were removed in 1.7.0 (use <= 1.5.x for legacy backends). |
| serializer | binary | The serializer for backend store, available values are [text, binary, cassandra, hbase, mysql]. |
| store | hugegraph | The database name like Cassandra Keyspace. |
| store.connection_detect_interval | 600 | The interval in seconds for detecting connections, if the idle time of a connection exceeds this value, detect it and reconnect if needed before using, value 0 means detecting every time. |
| store.graph | g | The graph table name, which store vertex, edge and property. |
| store.schema | m | The schema table name, which store meta data. |
| store.system | s | The system table name, which store system data. |
| schema.illegal_name_regex | .\s+$|~. | The regex specified the illegal format for schema name. |
| schema.cache_capacity | 10000 | The max cache size(items) of schema cache. |
| vertex.cache_type | l2 | The type of vertex cache, allowed values are [l1, l2]. |
| vertex.cache_capacity | 10000000 | The max cache size(items) of vertex cache. |
| vertex.cache_expire | 600 | The expire time in seconds of vertex cache. |
| vertex.check_customized_id_exist | false | Whether to check the vertices exist for those using customized id strategy. |
| vertex.default_label | vertex | The default vertex label. |
| vertex.tx_capacity | 10000 | The max size(items) of vertices(uncommitted) in transaction. |
| vertex.check_adjacent_vertex_exist | false | Whether to check the adjacent vertices of edges exist. |
| vertex.lazy_load_adjacent_vertex | true | Whether to lazy load adjacent vertices of edges. |
| vertex.part_edge_commit_size | 5000 | Whether to enable the mode to commit part of edges of vertex, enabled if commit size > 0, 0 means disabled. |
| vertex.encode_primary_key_number | true | Whether to encode number value of primary key in vertex id. |
| vertex.remove_left_index_at_overwrite | false | Whether remove left index at overwrite. |
| edge.cache_type | l2 | The type of edge cache, allowed values are [l1, l2]. |
| edge.cache_capacity | 1000000 | The max cache size(items) of edge cache. |
| edge.cache_expire | 600 | The expiration time in seconds of edge cache. |
| edge.tx_capacity | 10000 | The max size(items) of edges(uncommitted) in transaction. |
| query.page_size | 500 | The size of each page when querying by paging. |
| query.batch_size | 1000 | The size of each batch when querying by batch. |
| query.ignore_invalid_data | true | Whether to ignore invalid data of vertex or edge. |
| query.index_intersect_threshold | 1000 | The maximum number of intermediate results to intersect indexes when querying by multiple single index properties. |
| query.ramtable_edges_capacity | 20000000 | The maximum number of edges in ramtable, include OUT and IN edges. |
| query.ramtable_enable | false | Whether to enable ramtable for query of adjacent edges. |
| query.ramtable_vertices_capacity | 10000000 | The maximum number of vertices in ramtable, generally the largest vertex id is used as capacity. |
| query.optimize_aggregate_by_index | false | Whether to optimize aggregate query(like count) by index. |
| oltp.concurrent_depth | 10 | The min depth to enable concurrent oltp algorithm. |
| oltp.concurrent_threads | 10 | Thread number to concurrently execute oltp algorithm. |
| oltp.collection_type | EC | The implementation type of collections used in oltp algorithm. |
| rate_limit.read | 0 | The max rate(times/s) to execute query of vertices/edges. |
| rate_limit.write | 0 | The max rate(items/s) to add/update/delete vertices/edges. |
| task.wait_timeout | 10 | Timeout in seconds for waiting for the task to complete,such as when truncating or clearing the backend. |
| task.input_size_limit | 16777216 | The job input size limit in bytes. |
| task.result_size_limit | 16777216 | The job result size limit in bytes. |
| task.sync_deletion | false | Whether to delete schema or expired data synchronously. |
| task.ttl_delete_batch | 1 | The batch size used to delete expired data. |
| computer.config | /conf/computer.yaml | The config file path of computer job. |
| search.text_analyzer | ikanalyzer | Choose a text analyzer for searching the vertex/edge properties, available type are [word, ansj, hanlp, smartcn, jieba, jcseg, mmseg4j, ikanalyzer]. if use ‘ikanalyzer’, need download jar from ‘https://github.com/apache/hugegraph-doc/raw/ik_binary/dist/server/ikanalyzer-2012_u6.jar' to lib directory |
| search.text_analyzer_mode | smart | Specify the mode for the text analyzer, the available mode of analyzer are {word: [MaximumMatching, ReverseMaximumMatching, MinimumMatching, ReverseMinimumMatching, BidirectionalMaximumMatching, BidirectionalMinimumMatching, BidirectionalMaximumMinimumMatching, FullSegmentation, MinimalWordCount, MaxNgramScore, PureEnglish], ansj: [BaseAnalysis, IndexAnalysis, ToAnalysis, NlpAnalysis], hanlp: [standard, nlp, index, nShort, shortest, speed], smartcn: [], jieba: [SEARCH, INDEX], jcseg: [Simple, Complex], mmseg4j: [Simple, Complex, MaxWord], ikanalyzer: [smart, max_word]}. |
| snowflake.datacenter_id | 0 | The datacenter id of snowflake id generator. |
| snowflake.force_string | false | Whether to force the snowflake long id to be a string. |
| snowflake.worker_id | 0 | The worker id of snowflake id generator. |
| raft.mode | false | Whether the backend storage works in raft mode. |
| raft.safe_read | false | Whether to use linearly consistent read. |
| raft.use_snapshot | false | Whether to use snapshot. |
| raft.endpoint | 127.0.0.1:8281 | The peerid of current raft node. |
| raft.group_peers | 127.0.0.1:8281,127.0.0.1:8282,127.0.0.1:8283 | The peers of current raft group. |
| raft.path | ./raft-log | The log path of current raft node. |
| raft.use_replicator_pipeline | true | Whether to use replicator line, when turned on it multiple logs can be sent in parallel, and the next log doesn’t have to wait for the ack message of the current log to be sent. |
| raft.election_timeout | 10000 | Timeout in milliseconds to launch a round of election. |
| raft.snapshot_interval | 3600 | The interval in seconds to trigger snapshot save. |
| raft.backend_threads | current CPU v-cores | The thread number used to apply task to backend. |
| raft.read_index_threads | 8 | The thread number used to execute reading index. |
| raft.apply_batch | 1 | The apply batch size to trigger disruptor event handler. |
| raft.queue_size | 16384 | The disruptor buffers size for jraft RaftNode, StateMachine and LogManager. |
| raft.queue_publish_timeout | 60 | The timeout in second when publish event into disruptor. |
| raft.rpc_threads | 80 | The rpc threads for jraft RPC layer. |
| raft.rpc_connect_timeout | 5000 | The rpc connect timeout for jraft rpc. |
| raft.rpc_timeout | 60000 | The rpc timeout for jraft rpc. |
| raft.rpc_buf_low_water_mark | 10485760 | The ChannelOutboundBuffer’s low water mark of netty, when buffer size less than this size, the method ChannelOutboundBuffer.isWritable() will return true, it means that low downstream pressure or good network. |
| raft.rpc_buf_high_water_mark | 20971520 | The ChannelOutboundBuffer’s high water mark of netty, only when buffer size exceed this size, the method ChannelOutboundBuffer.isWritable() will return false, it means that the downstream pressure is too great to process the request or network is very congestion, upstream needs to limit rate at this time. |
| raft.read_strategy | ReadOnlyLeaseBased | The linearizability of read strategy. |
RocksDB Backend Config Options
| config option | default value | description |
|---|
| backend | | Must be set to rocksdb. |
| serializer | | Must be set to binary. |
| rocksdb.data_disks | [] | The optimized disks for storing data of RocksDB. The format of each element: STORE/TABLE: /path/disk.Allowed keys are [g/vertex, g/edge_out, g/edge_in, g/vertex_label_index, g/edge_label_index, g/range_int_index, g/range_float_index, g/range_long_index, g/range_double_index, g/secondary_index, g/search_index, g/shard_index, g/unique_index, g/olap] |
| rocksdb.data_path | rocksdb-data/data | The path for storing data of RocksDB. |
| rocksdb.wal_path | rocksdb-data/wal | The path for storing WAL of RocksDB. |
| rocksdb.option_path | | The YAML file for configuring ToplingDB/RocksDB parameters. |
| rocksdb.open_http | false | Whether to start ToplingDB HTTP service. Security: enable only in trusted networks and restrict access (firewall/ACL); the port and document_root are configured in the YAML (http.listening_ports/document_root). |
| rocksdb.allow_mmap_reads | false | Allow the OS to mmap file for reading sst tables. |
| rocksdb.allow_mmap_writes | false | Allow the OS to mmap file for writing. |
| rocksdb.block_cache_capacity | 8388608 | The amount of block cache in bytes that will be used by RocksDB, 0 means no block cache. |
| rocksdb.bloom_filter_bits_per_key | -1 | The bits per key in bloom filter, a good value is 10, which yields a filter with ~ 1% false positive rate, -1 means no bloom filter. |
| rocksdb.bloom_filter_block_based_mode | false | Use block based filter rather than full filter. |
| rocksdb.bloom_filter_whole_key_filtering | true | True if place whole keys in the bloom filter, else place the prefix of keys. |
| rocksdb.bottommost_compression | NO_COMPRESSION | The compression algorithm for the bottommost level of RocksDB, allowed values are none/snappy/z/bzip2/lz4/lz4hc/xpress/zstd. |
| rocksdb.bulkload_mode | false | Switch to the mode to bulk load data into RocksDB. |
| rocksdb.cache_index_and_filter_blocks | false | Indicating if we’d put index/filter blocks to the block cache. |
| rocksdb.compaction_style | LEVEL | Set compaction style for RocksDB: LEVEL/UNIVERSAL/FIFO. |
| rocksdb.compression | SNAPPY_COMPRESSION | The compression algorithm for compressing blocks of RocksDB, allowed values are none/snappy/z/bzip2/lz4/lz4hc/xpress/zstd. |
| rocksdb.compression_per_level | [NO_COMPRESSION, NO_COMPRESSION, SNAPPY_COMPRESSION, SNAPPY_COMPRESSION, SNAPPY_COMPRESSION, SNAPPY_COMPRESSION, SNAPPY_COMPRESSION] | The compression algorithms for different levels of RocksDB, allowed values are none/snappy/z/bzip2/lz4/lz4hc/xpress/zstd. |
| rocksdb.delayed_write_rate | 16777216 | The rate limit in bytes/s of user write requests when need to slow down if the compaction gets behind. |
| rocksdb.log_level | INFO | The info log level of RocksDB. |
| rocksdb.max_background_jobs | 8 | Maximum number of concurrent background jobs, including flushes and compactions. |
| rocksdb.level_compaction_dynamic_level_bytes | false | Whether to enable level_compaction_dynamic_level_bytes, if it’s enabled we give max_bytes_for_level_multiplier a priority against max_bytes_for_level_base, the bytes of base level is dynamic for a more predictable LSM tree, it is useful to limit worse case space amplification. Turning this feature on/off for an existing DB can cause unexpected LSM tree structure so it’s not recommended. |
| rocksdb.max_bytes_for_level_base | 536870912 | The upper-bound of the total size of level-1 files in bytes. |
| rocksdb.max_bytes_for_level_multiplier | 10.0 | The ratio between the total size of level (L+1) files and the total size of level L files for all L. |
| rocksdb.max_open_files | -1 | The maximum number of open files that can be cached by RocksDB, -1 means no limit. |
| rocksdb.max_subcompactions | 4 | The value represents the maximum number of threads per compaction job. |
| rocksdb.max_write_buffer_number | 6 | The maximum number of write buffers that are built up in memory. |
| rocksdb.max_write_buffer_number_to_maintain | 0 | The total maximum number of write buffers to maintain in memory. |
| rocksdb.min_write_buffer_number_to_merge | 2 | The minimum number of write buffers that will be merged together. |
| rocksdb.num_levels | 7 | Set the number of levels for this database. |
| rocksdb.optimize_filters_for_hits | false | This flag allows us to not store filters for the last level. |
| rocksdb.optimize_mode | true | Optimize for heavy workloads and big datasets. |
| rocksdb.pin_l0_filter_and_index_blocks_in_cache | false | Indicating if we’d put index/filter blocks to the block cache. |
| rocksdb.sst_path | | The path for ingesting SST file into RocksDB. |
| rocksdb.target_file_size_base | 67108864 | The target file size for compaction in bytes. |
| rocksdb.target_file_size_multiplier | 1 | The size ratio between a level L file and a level (L+1) file. |
| rocksdb.use_direct_io_for_flush_and_compaction | false | Enable the OS to use direct read/writes in flush and compaction. |
| rocksdb.use_direct_reads | false | Enable the OS to use direct I/O for reading sst tables. |
| rocksdb.write_buffer_size | 134217728 | Amount of data in bytes to build up in memory. |
| rocksdb.max_manifest_file_size | 104857600 | The max size of manifest file in bytes. |
| rocksdb.skip_stats_update_on_db_open | false | Whether to skip statistics update when opening the database, setting this flag true allows us to not update statistics. |
| rocksdb.max_file_opening_threads | 16 | The max number of threads used to open files. |
| rocksdb.max_total_wal_size | 0 | Total size of WAL files in bytes. Once WALs exceed this size, we will start forcing the flush of column families related, 0 means no limit. |
| rocksdb.db_write_buffer_size | 0 | Total size of write buffers in bytes across all column families, 0 means no limit. |
| rocksdb.delete_obsolete_files_period | 21600 | The periodicity in seconds when obsolete files get deleted, 0 means always do full purge. |
| rocksdb.hard_pending_compaction_bytes_limit | 274877906944 | The hard limit to impose on pending compaction in bytes. |
| rocksdb.level0_file_num_compaction_trigger | 2 | Number of files to trigger level-0 compaction. |
| rocksdb.level0_slowdown_writes_trigger | 20 | Soft limit on number of level-0 files for slowing down writes. |
| rocksdb.level0_stop_writes_trigger | 36 | Hard limit on number of level-0 files for stopping writes. |
| rocksdb.soft_pending_compaction_bytes_limit | 68719476736 | The soft limit to impose on pending compaction in bytes. |
K8s Config Options (Optional)
Corresponding configuration file rest-server.properties
| config option | default value | description |
|---|
| server.use_k8s | false | Whether to enable K8s multi-tenancy mode. |
| k8s.namespace | hugegraph-computer-system | K8s namespace for compute jobs. |
| k8s.kubeconfig | | Path to kubeconfig file. |
Arthas Diagnostic Config Options (Optional)
Corresponding configuration file rest-server.properties
| config option | default value | description |
|---|
| arthas.telnetPort | 8562 | Arthas telnet port. |
| arthas.httpPort | 8561 | Arthas HTTP port. |
| arthas.ip | 0.0.0.0 | Arthas bind IP. |
HBase Backend Config Options
| config option | default value | description |
|---|
| backend | | Must be set to hbase. |
| serializer | | Must be set to hbase. |
| hbase.hosts | localhost | The hostnames or ip addresses of HBase zookeeper, separated with commas. |
| hbase.port | 2181 | The port address of HBase zookeeper. |
| hbase.threads_max | 64 | The max threads num of hbase connections. |
| hbase.znode_parent | /hbase | The znode parent path of HBase zookeeper. |
| hbase.zk_retry | 3 | The recovery retry times of HBase zookeeper. |
| hbase.aggregation_timeout | 43200 | The timeout in seconds of waiting for aggregation. |
| hbase.kerberos_enable | false | Is Kerberos authentication enabled for HBase. |
| hbase.kerberos_keytab | | The HBase’s key tab file for kerberos authentication. |
| hbase.kerberos_principal | | The HBase’s principal for kerberos authentication. |
| hbase.krb5_conf | etc/krb5.conf | Kerberos configuration file, including KDC IP, default realm, etc. |
| hbase.hbase_site | /etc/hbase/conf/hbase-site.xml | The HBase’s configuration file |
| hbase.enable_partition | true | Is pre-split partitions enabled for HBase. |
| hbase.vertex_partitions | 10 | The number of partitions of the HBase vertex table. |
| hbase.edge_partitions | 30 | The number of partitions of the HBase edge table. |
≤ 1.5 Version Config (Legacy)
The following backend stores are no longer supported in version 1.7.0+ and are only available in version 1.5.x and earlier:
Cassandra Backend Config Options
| config option | default value | description |
|---|
| backend | | Must be set to cassandra. |
| serializer | | Must be set to cassandra. |
| cassandra.host | localhost | The seeds hostname or ip address of cassandra cluster. |
| cassandra.port | 9042 | The seeds port address of cassandra cluster. |
| cassandra.connect_timeout | 5 | The cassandra driver connect server timeout(seconds). |
| cassandra.read_timeout | 20 | The cassandra driver read from server timeout(seconds). |
| cassandra.keyspace.strategy | SimpleStrategy | The replication strategy of keyspace, valid value is SimpleStrategy or NetworkTopologyStrategy. |
| cassandra.keyspace.replication | [3] | The keyspace replication factor of SimpleStrategy, like ‘[3]’.Or replicas in each datacenter of NetworkTopologyStrategy, like ‘[dc1:2,dc2:1]’. |
| cassandra.username | | The username to use to login to cassandra cluster. |
| cassandra.password | | The password corresponding to cassandra.username. |
| cassandra.compression_type | none | The compression algorithm of cassandra transport: none/snappy/lz4. |
| cassandra.jmx_port=7199 | 7199 | The port of JMX API service for cassandra. |
| cassandra.aggregation_timeout | 43200 | The timeout in seconds of waiting for aggregation. |
ScyllaDB Backend Config Options
| config option | default value | description |
|---|
| backend | | Must be set to scylladb. |
| serializer | | Must be set to scylladb. |
Other options are consistent with the Cassandra backend.
MySQL & PostgreSQL Backend Config Options
| config option | default value | description |
|---|
| backend | | Must be set to mysql. |
| serializer | | Must be set to mysql. |
| jdbc.driver | com.mysql.jdbc.Driver | The JDBC driver class to connect database. |
| jdbc.url | jdbc:mysql://127.0.0.1:3306 | The url of database in JDBC format. |
| jdbc.username | root | The username to login database. |
| jdbc.password | ****** | The password corresponding to jdbc.username. |
| jdbc.ssl_mode | false | The SSL mode of connections with database. |
| jdbc.reconnect_interval | 3 | The interval(seconds) between reconnections when the database connection fails. |
| jdbc.reconnect_max_times | 3 | The reconnect times when the database connection fails. |
| jdbc.storage_engine | InnoDB | The storage engine of backend store database, like InnoDB/MyISAM/RocksDB for MySQL. |
| jdbc.postgresql.connect_database | template1 | The database used to connect when init store, drop store or check store exist. |
PostgreSQL Backend Config Options
| config option | default value | description |
|---|
| backend | | Must be set to postgresql. |
| serializer | | Must be set to postgresql. |
Other options are consistent with the MySQL backend.
The driver and url of the PostgreSQL backend should be set to:
jdbc.driver=org.postgresql.Driverjdbc.url=jdbc:postgresql://localhost:5432/
4.3 - Built-in User Authentication and Authorization Configuration and Usage in HugeGraph
Overview
To facilitate authentication usage in different user scenarios, HugeGraph currently provides built-in authorization StandardAuthenticator mode,
which supports multi-user authentication and fine-grained access control. It adopts a 4-layer design based on “User-UserGroup-Operation-Resource” to
flexibly control user roles and permissions (supports multiple GraphServers).
Some key designs of the StandardAuthenticator mode include:
- During initialization, a super administrator (
admin) user is created. Subsequently, other users can be created by the super administrator. Once newly created users are assigned sufficient permissions, they can create or manage more users. - It supports dynamic creation of users, user groups, and resources, as well as dynamic allocation or revocation of permissions.
- Users can belong to one or multiple user groups. Each user group can have permissions to operate on any number of resources. The types of operations include read, write, delete, execute, and others.
- “Resource” describes the data in the graph database, such as vertices that meet certain criteria. Each resource consists of three elements:
type, label, and properties. There are 18 types in total, with the ability to combine any label and properties. The internal condition of a resource is an AND relationship, while the condition between multiple resources is an OR relationship.
Here is an example to illustrate:
// Scenario: A user only has data read permission for the Beijing area
user(name=xx) -belong-> group(name=xx) -access(read)-> target(graph=graph1, resource={label: person, city: Beijing})
By default, HugeGraph does not enable user authentication, and it needs to be enabled by modifying the configuration file.
⚠️ SEC Reminder: Security of Graph Query Languages (Gremlin/Cypher)
Due to potential system security risks brought about by the flexibility of graph query languages, please avoid exposing any query-related endpoints directly to public/external network environments. In actual production deployments, please use the Authentication System outlined here combined with an IP Whitelist as a dual-security mechanism, and we recommend enabling Audit Logs to pinpoint the exact queries executed by users. Given the stateless nature of the Server, it is strongly recommended overall to use a Containerized Environment (Docker/K8s) architecture to effectively isolate underlying system safety risks at a minimal cost.
You need to modify the configuration file to enable this feature. HugeGraph provides built-in authentication mode: StandardAuthenticator. This mode supports multi-user authentication and fine-grained permission control. Additionally, developers can implement their own HugeAuthenticator interface to integrate with their existing authentication systems.
HugeGraph authentication modes adopt HTTP Basic Authentication. In simple terms, when sending an HTTP request, you need to set the Authentication header to Basic and provide the corresponding username and password. The corresponding HTTP plaintext format is as follows:
GET http://localhost:8080/graphs/hugegraph/schema/vertexlabels
Authorization: Basic admin xxxx
Warning: Versions of HugeGraph-Server prior to 1.5.0 have a JWT-related security vulnerability in the Auth mode.
Users are advised to update to a newer version or manually set the JWT token’s secretKey. It can be set in the rest-server.properties file by setting the auth.token_secret information:
auth.token_secret=XXXX # should be a 32-chars string, consist of A-Z, a-z and 0-9
You can also generate it with the following command:
RANDOM_STRING=$(head /dev/urandom | tr -dc A-Za-z0-9 | head -c 32)
echo "auth.token_secret=${RANDOM_STRING}" >> rest-server.properties
StandardAuthenticator Mode
The StandardAuthenticator mode supports user authentication and permission control by storing user information in the database backend. This
implementation authenticates users based on their names and passwords (encrypted) stored in the database and controls user permissions based on their
roles. Below is the specific configuration process (requires service restart):
Configure the authenticator and its rest-server file path in the gremlin-server.yaml configuration file:
authentication: {
authenticator: org.apache.hugegraph.auth.StandardAuthenticator,
authenticationHandler: org.apache.hugegraph.auth.WsAndHttpBasicAuthHandler,
config: {tokens: conf/rest-server.properties}
}
Configure the authenticator and graph_store information in the rest-server.properties configuration file:
auth.authenticator=org.apache.hugegraph.auth.StandardAuthenticator
auth.graph_store=hugegraph
# Auth Client Config
# If GraphServer and AuthServer are deployed separately, you also need to specify the following configuration. Fill in the IP:RPC port of AuthServer.
# auth.remote_url=127.0.0.1:8899,127.0.0.1:8898,127.0.0.1:8897
In the above configuration, the graph_store option specifies which graph to use for storing user information. If there are multiple graphs, you can choose any of them.
In the hugegraph{n}.properties configuration file, configure the gremlin.graph information:
gremlin.graph=org.apache.hugegraph.auth.HugeFactoryAuthProxy
For detailed API calls and explanations regarding permissions, please refer to the Authentication-API documentation.
Custom User Authentication System
If you need to support a more flexible user system, you can customize the authenticator for extension.
Simply implement the org.apache.hugegraph.auth.HugeAuthenticator interface with your custom authenticator,
and then modify the authenticator configuration item in the configuration file to point to your implementation.
Switching authentication mode
After the authentication configuration completed, enter the admin password on the command line when executing init store.sh for the first time. (For non-Docker mode)
If deployed based on Docker image or if HugeGraph has already been initialized and needs to be converted to authentication mode,
relevant graph data needs to be deleted and HugeGraph needs to be restarted. If there is already business data in the diagram,
it is temporarily not possible to directly convert the authentication mode (version<=1.2.0)
Improvements for this feature have been included in the latest release (available in the latest docker image), please refer to PR 2411. Seamless switching is now available.
# stop the hugeGraph firstly
bin/stop-hugegraph.sh
# delete the store data (here we use the default path for rocksdb)
# there is no need to delete in the latest version (fixed in https://github.com/apache/hugegraph/pull/2411)
rm -rf rocksdb-data/
# init store again
bin/init-store.sh
# start hugeGraph again
bin/start-hugegraph.sh
Use docker to enable authentication mode
For versions of the hugegraph/hugegraph image equal to or greater than 1.2.0, you can enable authentication mode while starting the Docker image.
The steps are as follows:
1. Use docker run
To enable authentication mode, add the environment variable PASSWORD=xxx (you can freely set the password) in the docker run command:
docker run -itd -e PASSWORD=xxx --name=server -p 8080:8080 hugegraph/hugegraph:1.5.0
2. Use docker-compose
Use docker-compose and set the environment variable PASSWORD=xxx:
version: '3'
services:
server:
image: hugegraph/hugegraph:1.5.0
container_name: server
ports:
- 8080:8080
environment:
- PASSWORD=xxx
3. Enter the container to enable authentication mode
Enter the container first:
docker exec -it server bash
# Modify the config quickly, the modified file are save in the conf-bak folder
bin/enable-auth.sh
Then follow Switching authentication mode
4.4 - Configuring HugeGraphServer to Use HTTPS Protocol
Overview
By default, HugeGraphServer uses the HTTP protocol. However, if you have security requirements for your requests, you can configure it to use HTTPS.
Server Configuration
Modify the conf/rest-server.properties configuration file and change the schema part of restserver.url to https.
# Set the protocol to HTTPS
restserver.url=https://127.0.0.1:8080
# Server keystore file path. This default value is automatically effective when using HTTPS, and you can modify it as needed.
ssl.keystore_file=conf/hugegraph-server.keystore
# Server keystore file password. This default value is automatically effective when using HTTPS, and you can modify it as needed.
ssl.keystore_password=******
The server’s conf directory already includes a keystore file named hugegraph-server.keystore, and the password for this file is hugegraph. These are the default values when enabling the HTTPS protocol. Users can generate their own keystore file and password, and then modify the values of ssl.keystore_file and ssl.keystore_password.
Client Configuration
Using HTTPS in HugeGraph-Client
When constructing a HugeClient, pass the HTTPS-related configurations. Here’s an example in Java:
String url = "https://localhost:8080";
String graphName = "hugegraph";
HugeClientBuilder builder = HugeClient.builder(url, graphName);
// Client keystore file path
String trustStoreFilePath = "hugegraph.truststore";
// Client keystore password
String trustStorePassword = "******";
builder.configSSL(trustStoreFilePath, trustStorePassword);
HugeClient hugeClient = builder.build();
Note: Before version 1.9.0, HugeGraph-Client was created directly using the new keyword and did not support the HTTPS protocol. Starting from version 1.9.0, it changed to use the builder pattern and supports configuring the HTTPS protocol.
Using HTTPS in HugeGraph-Loader
When starting an import task, add the following options in the command line:
# HTTPS
--protocol https
# Client certificate file path. When specifying --protocol as https, the default value conf/hugegraph.truststore is automatically used, and you can modify it as needed.
--trust-store-file {file}
# Client certificate file password. When specifying --protocol as https, the default value hugegraph is automatically used, and you can modify it as needed.
--trust-store-password {password}
Under the conf directory of hugegraph-loader, there is already a default client certificate file named hugegraph.truststore, and its password is hugegraph.
When executing commands, add the following options in the command line:
# Client certificate file path. When using the HTTPS protocol in the URL, the default value conf/hugegraph.truststore is automatically used, and you can modify it as needed.
--trust-store-file {file}
# Client certificate file password. When using the HTTPS protocol in the URL, the default value hugegraph is automatically used, and you can modify it as needed.
--trust-store-password {password}
# When executing migration commands and using the --target-url with the HTTPS protocol, the default value conf/hugegraph.truststore is automatically used, and you can modify it as needed.
--target-trust-store-file {target-file}
# When executing migration commands and using the --target-url with the HTTPS protocol, the default value hugegraph is automatically used, and you can modify it as needed.
--target-trust-store-password {target-password}
Under the conf directory of hugegraph-tools, there is already a default client certificate file named hugegraph.truststore, and its password is hugegraph.
How to Generate Certificate Files
This section provides an example of generating certificates. If the default certificate is sufficient or if you already know how to generate certificates, you can skip this section.
Server
- Generate the server’s private key and import it into the server’s keystore file. The
server.keystore is for the server’s use and contains its private key.
keytool -genkey -alias serverkey -keyalg RSA -keystore server.keystore
During the process, fill in the description information according to your requirements. The description information for the default certificate is as follows:
First and Last Name: hugegraph
Organizational Unit Name: hugegraph
Organization Name: hugegraph
City or Locality Name: BJ
State or Province Name: BJ
Country Code: CN
- Export the server certificate based on the server’s private key.
keytool -export -alias serverkey -keystore server.keystore -file server.crt
server.crt is the server’s certificate.
Client
keytool -import -alias serverkey -file server.crt -keystore client.truststore
client.truststore is for the client’s use and contains the trusted certificate.
5 - API
5.1 - HugeGraph RESTful API
⚠️ Version compatibility notes
- HugeGraph 1.7.0+ introduces graphspaces, and REST paths follow
/graphspaces/{graphspace}/graphs/{graph}. - HugeGraph 1.5.x and earlier still rely on the legacy
/graphs/{graph} path, and the create/clone graph APIs require Content-Type: text/plain; 1.7.0+ expects JSON bodies. - The default graphspace name is
DEFAULT, which you can use directly if you do not need multi-tenant isolation. - Note: Before version 1.5.0, the format of ids such as group/target was similar to -69:grant. After version 1.7.0, the id and name were consistent, such as admin HugeGraph 1.5.x RESTful API
Besides the documentation below, you can also open swagger-ui at localhost:8080/swagger-ui/index.html to explore the RESTful API. Here is an example
5.1.1 - Graphspace API
Graphspace REST API: Multi-tenancy and resource isolation for creating, viewing, updating, and deleting graph spaces with prerequisites and constraints.
2.0 Graphspace
HugeGraph implements multi-tenancy through graph spaces, which isolate compute/storage resources per tenant.
Prerequisites
- Graphspace currently only works in HStore mode.
- In non-HStore mode you can only use the default graphspace
DEFAULT; creating/deleting/updating other graphspaces is not supported. - Set
usePD=true in rest-server.properties and backend=hstore in hugegraph.properties. - Graphspace enables strict authentication by default (default credential:
admin:pa). Change the password immediately to avoid unauthorized access.
2.0.1 Create a graphspace
Method & Url
POST http://localhost:8080/graphspaces
Request Body
Note: CPU/memory and Kubernetes-related capabilities are not publicly available yet.
| Name | Required | Type | Default | Range/Note | Description |
|---|
| name | Yes | String | | Lowercase letters, digits, underscore; must start with a letter; max length 48 | Graphspace name |
| description | Yes | String | | | Description |
| cpu_limit | Yes | Int | | > 0 | CPU cores for the graphspace |
| memory_limit | Yes | Int | | > 0 (GB) | Memory quota in GB |
| storage_limit | Yes | Int | | > 0 | Maximum disk usage |
| compute_cpu_limit | No | Int | 0 | >= 0 | Extra HugeGraph-Computer CPU cores; falls back to cpu_limit if unset or 0 |
| compute_memory_limit | No | Int | 0 | >= 0 | Extra HugeGraph-Computer memory in GB; falls back to memory_limit if unset or 0 |
| oltp_namespace | Yes | String | | | Kubernetes namespace for OLTP HugeGraph-Server |
| olap_namespace | Yes | String | | Resources are merged when identical to oltp_namespace | Kubernetes namespace for OLAP / HugeGraph-Computer |
| storage_namespace | Yes | String | | | Kubernetes namespace for HugeGraph-Store |
| operator_image_path | No | String | | | HugeGraph-Computer operator image registry |
| internal_algorithm_image_url | No | String | | | HugeGraph-Computer algorithm image registry |
| max_graph_number | Yes | Int | | > 0 | Maximum number of graphs that can be created inside the graphspace |
| max_role_number | Yes | Int | | > 0 | Maximum number of roles that can be created inside the graphspace |
| auth | No | Boolean | false | true / false | Whether to enable authentication for the graphspace |
| configs | No | Map | | | Additional configuration |
{
"name": "gs1",
"description": "1st graph space",
"max_graph_number": 100,
"cpu_limit": 1000,
"memory_limit": 8192,
"storage_limit": 1000000,
"max_role_number": 10,
"auth": true,
"configs": {}
}
Response Status
Response Body
{
"name": "gs1",
"description": "1st graph space",
"cpu_limit": 1000,
"memory_limit": 8192,
"storage_limit": 1000000,
"compute_cpu_limit": 0,
"compute_memory_limit": 0,
"oltp_namespace": "hugegraph-server",
"olap_namespace": "hugegraph-server",
"storage_namespace": "hugegraph-server",
"operator_image_path": "127.0.0.1/hugegraph-registry/hugegraph-computer-operator:3.1.1",
"internal_algorithm_image_url": "127.0.0.1/hugegraph-registry/hugegraph-computer-algorithm:3.1.1",
"max_graph_number": 100,
"max_role_number": 10,
"cpu_used": 0,
"memory_used": 0,
"storage_used": 0,
"graph_number_used": 0,
"role_number_used": 0,
"auth": true
}
2.0.2 List all graphspaces
Method & Url
GET http://localhost:8080/graphspaces
Response Status
Response Body
{
"graphSpaces": [
"gs1",
"DEFAULT"
]
}
2.0.3 Get graphspace details
Params
Path parameters
- graphspace: Graphspace name
Method & Url
GET http://localhost:8080/graphspaces/gs1
Response Status
Response Body
{
"name": "gs1",
"description": "1st graph space",
"cpu_limit": 1000,
"memory_limit": 8192,
"storage_limit": 1000000,
"oltp_namespace": "hugegraph-server",
"olap_namespace": "hugegraph-server",
"storage_namespace": "hugegraph-server",
"operator_image_path": "127.0.0.1/hugegraph-registry/hugegraph-computer-operator:3.1.1",
"internal_algorithm_image_url": "127.0.0.1/hugegraph-registry/hugegraph-computer-algorithm:3.1.1",
"compute_cpu_limit": 0,
"compute_memory_limit": 0,
"max_graph_number": 100,
"max_role_number": 10,
"cpu_used": 0,
"memory_used": 0,
"storage_used": 0,
"graph_number_used": 0,
"role_number_used": 0,
"auth": true
}
2.0.4 Update a graphspace
auth cannot be changed once a graphspace is created.
Params
Path parameter
- graphspace: Graphspace name
Request parameters
- action: Must be
"update" - update: Container for the actual fields to update (see table below)
| Name | Required | Type | Range/Note | Description |
|---|
| name | Yes | String | | Graphspace name |
| description | Yes | String | | Description |
| cpu_limit | Yes | Int | > 0 | CPU cores for OLTP HugeGraph-Server |
| memory_limit | Yes | Int | > 0 (GB) | Memory quota (GB) for OLTP HugeGraph-Server |
| storage_limit | Yes | Int | > 0 | Maximum disk usage |
| compute_cpu_limit | No | Int | >= 0 | Extra HugeGraph-Computer CPU cores; falls back to cpu_limit if unset or 0 |
| compute_memory_limit | No | Int | >= 0 | Extra HugeGraph-Computer memory in GB; falls back to memory_limit if unset or 0 |
| oltp_namespace | Yes | String | | Kubernetes namespace for OLTP HugeGraph-Server |
| olap_namespace | Yes | String | Resources are merged when identical to oltp_namespace | Kubernetes namespace for OLAP |
| storage_namespace | Yes | String | | Kubernetes namespace for HugeGraph-Store |
| operator_image_path | No | String | | HugeGraph-Computer operator image registry |
| internal_algorithm_image_url | No | String | | HugeGraph-Computer algorithm image registry |
| max_graph_number | Yes | Int | > 0 | Maximum number of graphs |
| max_role_number | Yes | Int | > 0 | Maximum number of roles |
Method & Url
PUT http://localhost:8080/graphspaces/gs1
Request Body
{
"action": "update",
"update": {
"name": "gs1",
"description": "1st graph space",
"cpu_limit": 2000,
"memory_limit": 40960,
"storage_limit": 2048,
"oltp_namespace": "hugegraph-server",
"olap_namespace": "hugegraph-server",
"operator_image_path": "127.0.0.1/hugegraph-registry/hugegraph-computer-operator:3.1.1",
"internal_algorithm_image_url": "127.0.0.1/hugegraph-registry/hugegraph-computer-algorithm:3.1.1",
"max_graph_number": 1000,
"max_role_number": 100
}
}
Response Status
Response Body
{
"name": "gs1",
"description": "1st graph space",
"cpu_limit": 2000,
"memory_limit": 40960,
"storage_limit": 2048,
"oltp_namespace": "hugegraph-server",
"olap_namespace": "hugegraph-server",
"storage_namespace": "hugegraph-server",
"operator_image_path": "127.0.0.1/hugegraph-registry/hugegraph-computer-operator:3.1.1",
"internal_algorithm_image_url": "127.0.0.1/hugegraph-registry/hugegraph-computer-algorithm:3.1.1",
"compute_cpu_limit": 0,
"compute_memory_limit": 0,
"max_graph_number": 1000,
"max_role_number": 100,
"cpu_used": 0,
"memory_used": 0,
"storage_used": 0,
"graph_number_used": 0,
"role_number_used": 0,
"auth": true
}
2.0.5 Delete a graphspace
Params
Path parameter
- graphspace: Graphspace name
Method & Url
DELETE http://localhost:8080/graphspaces/gs1
Response Status
Warning: deleting a graphspace releases all resources that belong to it.
5.1.2 - Schema API
Schema REST API: Query the complete schema definition of a graph, including property keys, vertex labels, edge labels, and index labels.
1.1 Schema
HugeGraph provides a single interface to get all Schema information of a graph, including: PropertyKey, VertexLabel, EdgeLabel and IndexLabel.
Method & Url
GET http://localhost:8080/graphspaces/{graphspace}/graphs/{graph_name}/schema
e.g: GET http://localhost:8080/graphspaces/DEFAULT/graphs/hugegraph/schema
Response Status
Response Body
{
"propertykeys": [
{
"id": 7,
"name": "price",
"data_type": "DOUBLE",
"cardinality": "SINGLE",
"aggregate_type": "NONE",
"write_type": "OLTP",
"properties": [],
"status": "CREATED",
"user_data": {
"~create_time": "2023-05-08 17:49:05.316"
}
},
{
"id": 6,
"name": "date",
"data_type": "TEXT",
"cardinality": "SINGLE",
"aggregate_type": "NONE",
"write_type": "OLTP",
"properties": [],
"status": "CREATED",
"user_data": {
"~create_time": "2023-05-08 17:49:05.309"
}
},
{
"id": 3,
"name": "city",
"data_type": "TEXT",
"cardinality": "SINGLE",
"aggregate_type": "NONE",
"write_type": "OLTP",
"properties": [],
"status": "CREATED",
"user_data": {
"~create_time": "2023-05-08 17:49:05.287"
}
},
{
"id": 2,
"name": "age",
"data_type": "INT",
"cardinality": "SINGLE",
"aggregate_type": "NONE",
"write_type": "OLTP",
"properties": [],
"status": "CREATED",
"user_data": {
"~create_time": "2023-05-08 17:49:05.280"
}
},
{
"id": 5,
"name": "lang",
"data_type": "TEXT",
"cardinality": "SINGLE",
"aggregate_type": "NONE",
"write_type": "OLTP",
"properties": [],
"status": "CREATED",
"user_data": {
"~create_time": "2023-05-08 17:49:05.301"
}
},
{
"id": 4,
"name": "weight",
"data_type": "DOUBLE",
"cardinality": "SINGLE",
"aggregate_type": "NONE",
"write_type": "OLTP",
"properties": [],
"status": "CREATED",
"user_data": {
"~create_time": "2023-05-08 17:49:05.294"
}
},
{
"id": 1,
"name": "name",
"data_type": "TEXT",
"cardinality": "SINGLE",
"aggregate_type": "NONE",
"write_type": "OLTP",
"properties": [],
"status": "CREATED",
"user_data": {
"~create_time": "2023-05-08 17:49:05.250"
}
}
],
"vertexlabels": [
{
"id": 1,
"name": "person",
"id_strategy": "PRIMARY_KEY",
"primary_keys": [
"name"
],
"nullable_keys": [
"age",
"city"
],
"index_labels": [
"personByAge",
"personByCity",
"personByAgeAndCity"
],
"properties": [
"name",
"age",
"city"
],
"status": "CREATED",
"ttl": 0,
"enable_label_index": true,
"user_data": {
"~create_time": "2023-05-08 17:49:05.336"
}
},
{
"id": 2,
"name": "software",
"id_strategy": "CUSTOMIZE_NUMBER",
"primary_keys": [],
"nullable_keys": [],
"index_labels": [
"softwareByPrice"
],
"properties": [
"name",
"lang",
"price"
],
"status": "CREATED",
"ttl": 0,
"enable_label_index": true,
"user_data": {
"~create_time": "2023-05-08 17:49:05.347"
}
}
],
"edgelabels": [
{
"id": 1,
"name": "knows",
"source_label": "person",
"target_label": "person",
"frequency": "SINGLE",
"sort_keys": [],
"nullable_keys": [],
"index_labels": [
"knowsByWeight"
],
"properties": [
"weight",
"date"
],
"status": "CREATED",
"ttl": 0,
"enable_label_index": true,
"user_data": {
"~create_time": "2023-05-08 17:49:08.437"
}
},
{
"id": 2,
"name": "created",
"source_label": "person",
"target_label": "software",
"frequency": "SINGLE",
"sort_keys": [],
"nullable_keys": [],
"index_labels": [
"createdByDate",
"createdByWeight"
],
"properties": [
"weight",
"date"
],
"status": "CREATED",
"ttl": 0,
"enable_label_index": true,
"user_data": {
"~create_time": "2023-05-08 17:49:08.446"
}
}
],
"indexlabels": [
{
"id": 1,
"name": "personByAge",
"base_type": "VERTEX_LABEL",
"base_value": "person",
"index_type": "RANGE_INT",
"fields": [
"age"
],
"status": "CREATED",
"user_data": {
"~create_time": "2023-05-08 17:49:05.375"
}
},
{
"id": 2,
"name": "personByCity",
"base_type": "VERTEX_LABEL",
"base_value": "person",
"index_type": "SECONDARY",
"fields": [
"city"
],
"status": "CREATED",
"user_data": {
"~create_time": "2023-05-08 17:49:06.898"
}
},
{
"id": 3,
"name": "personByAgeAndCity",
"base_type": "VERTEX_LABEL",
"base_value": "person",
"index_type": "SECONDARY",
"fields": [
"age",
"city"
],
"status": "CREATED",
"user_data": {
"~create_time": "2023-05-08 17:49:07.407"
}
},
{
"id": 4,
"name": "softwareByPrice",
"base_type": "VERTEX_LABEL",
"base_value": "software",
"index_type": "RANGE_DOUBLE",
"fields": [
"price"
],
"status": "CREATED",
"user_data": {
"~create_time": "2023-05-08 17:49:07.916"
}
},
{
"id": 5,
"name": "createdByDate",
"base_type": "EDGE_LABEL",
"base_value": "created",
"index_type": "SECONDARY",
"fields": [
"date"
],
"status": "CREATED",
"user_data": {
"~create_time": "2023-05-08 17:49:08.454"
}
},
{
"id": 6,
"name": "createdByWeight",
"base_type": "EDGE_LABEL",
"base_value": "created",
"index_type": "RANGE_DOUBLE",
"fields": [
"weight"
],
"status": "CREATED",
"user_data": {
"~create_time": "2023-05-08 17:49:08.963"
}
},
{
"id": 7,
"name": "knowsByWeight",
"base_type": "EDGE_LABEL",
"base_value": "knows",
"index_type": "RANGE_DOUBLE",
"fields": [
"weight"
],
"status": "CREATED",
"user_data": {
"~create_time": "2023-05-08 17:49:09.473"
}
}
]
}
5.1.3 - PropertyKey API
PropertyKey REST API: Define data types and cardinality constraints for all properties in the graph, serving as fundamental schema elements.
1.2 PropertyKey
Params Description:
- name: The name of the property type, required.
- data_type: The data type of the property type, including: bool, byte, int, long, float, double, text, blob, date, uuid. The default data type is
text (Represent a string type) - cardinality: The cardinality of the property type, including: single, list, set. The default cardinality is
single.
Request Body Field Description:
- id: The ID value of the property type.
- properties: The properties of the property type. For properties, this field is empty.
- user_data: Setting the common information of the property type, such as setting the value range of the age property from 0 to 100. Currently, no validation is performed on this field, and it is only a reserved entry for future expansion.
1.2.1 Create a PropertyKey
Method & Url
POST http://localhost:8080/graphspaces/DEFAULT/graphs/hugegraph/schema/propertykeys
Request Body
{
"name": "age",
"data_type": "INT",
"cardinality": "SINGLE"
}
Response Status
Response Body
{
"property_key": {
"id": 1,
"name": "age",
"data_type": "INT",
"cardinality": "SINGLE",
"aggregate_type": "NONE",
"write_type": "OLTP",
"properties": [],
"status": "CREATED",
"user_data": {
"~create_time": "2022-05-13 13:47:23.745"
}
},
"task_id": 0
}
1.2.2 Add or Remove userdata for an existing PropertyKey
Params
- action: Indicates whether the current action is to add or remove userdata. Possible values are
append (add) and eliminate (remove).
Method & Url
PUT http://localhost:8080/graphspaces/DEFAULT/graphs/hugegraph/schema/propertykeys/age?action=append
Request Body
{
"name": "age",
"user_data": {
"min": 0,
"max": 100
}
}
Response Status
Response Body
{
"property_key": {
"id": 1,
"name": "age",
"data_type": "INT",
"cardinality": "SINGLE",
"aggregate_type": "NONE",
"write_type": "OLTP",
"properties": [],
"status": "CREATED",
"user_data": {
"min": 0,
"max": 100,
"~create_time": "2022-05-13 13:47:23.745"
}
},
"task_id": 0
}
1.2.3 Get all PropertyKeys
Method & Url
GET http://localhost:8080/graphspaces/DEFAULT/graphs/hugegraph/schema/propertykeys
Response Status
Response Body
{
"propertykeys": [
{
"id": 3,
"name": "city",
"data_type": "TEXT",
"cardinality": "SINGLE",
"properties": [],
"user_data": {}
},
{
"id": 2,
"name": "age",
"data_type": "INT",
"cardinality": "SINGLE",
"properties": [],
"user_data": {}
},
{
"id": 5,
"name": "lang",
"data_type": "TEXT",
"cardinality": "SINGLE",
"properties": [],
"user_data": {}
},
{
"id": 4,
"name": "weight",
"data_type": "DOUBLE",
"cardinality": "SINGLE",
"properties": [],
"user_data": {}
},
{
"id": 6,
"name": "date",
"data_type": "TEXT",
"cardinality": "SINGLE",
"properties": [],
"user_data": {}
},
{
"id": 1,
"name": "name",
"data_type": "TEXT",
"cardinality": "SINGLE",
"properties": [],
"user_data": {}
},
{
"id": 7,
"name": "price",
"data_type": "INT",
"cardinality": "SINGLE",
"properties": [],
"user_data": {}
}
]
}
1.2.4 Get PropertyKey according to name
Method & Url
GET http://localhost:8080/graphspaces/DEFAULT/graphs/hugegraph/schema/propertykeys/age
Where age is the name of the PropertyKey to be retrieved.
Response Status
Response Body
{
"id": 1,
"name": "age",
"data_type": "INT",
"cardinality": "SINGLE",
"aggregate_type": "NONE",
"write_type": "OLTP",
"properties": [],
"status": "CREATED",
"user_data": {
"min": 0,
"max": 100,
"~create_time": "2022-05-13 13:47:23.745"
}
}
1.2.5 Delete PropertyKey according to name
Method & Url
DELETE http://localhost:8080/graphspaces/DEFAULT/graphs/hugegraph/schema/propertykeys/age
Where age is the name of the PropertyKey to be deleted.
Response Status
Response Body
5.1.4 - VertexLabel API
VertexLabel REST API: Define vertex types, ID strategies, and associated properties that determine vertex structure and constraints.
1.3 VertexLabel
Assuming that the PropertyKeys listed in 1.1.3 have already been created.
Params Description:
- id: The ID value of the vertex type.
- name: The name of the vertex type, required.
- id_strategy: The ID strategy for the vertex type, including primary key ID, auto-generated, custom string, custom number, custom UUID. The default strategy is primary key ID.
- properties: The property types associated with the vertex type.
- primary_keys: The primary key properties. This field must have a value when the ID strategy is PRIMARY_KEY, and must be empty for other ID strategies.
- enable_label_index: Whether to enable label indexing. It is disabled by default.
- index_names: The indexes created for the vertex type. See details in section 3.4.
- nullable_keys: Nullable properties.
- user_data: Setting the common information of the vertex type, similar to the property type.
1.3.1 Create a VertexLabel
Method & Url
POST http://localhost:8080/graphspaces/DEFAULT/graphs/hugegraph/schema/vertexlabels
Request Body
{
"name": "person",
"id_strategy": "DEFAULT",
"properties": [
"name",
"age"
],
"primary_keys": [
"name"
],
"nullable_keys": [],
"enable_label_index": true
}
Response Status
Response Body
{
"id": 1,
"primary_keys": [
"name"
],
"id_strategy": "PRIMARY_KEY",
"name": "person2",
"index_names": [
],
"properties": [
"name",
"age"
],
"nullable_keys": [
],
"enable_label_index": true,
"user_data": {}
}
Starting from version v0.11.2, hugegraph-server supports Time-to-Live (TTL) functionality for vertices. The TTL for vertices is set through VertexLabel. For example, if you want the vertices of type “person” to have a lifespan of one day, you need to set the TTL field to 86400000 (in milliseconds) when creating the “person” VertexLabel.
{
"name": "person",
"id_strategy": "DEFAULT",
"properties": [
"name",
"age"
],
"primary_keys": [
"name"
],
"nullable_keys": [],
"ttl": 86400000,
"enable_label_index": true
}
Additionally, if the vertex has a property called “createdTime” and you want to use it as the starting point for calculating the vertex’s lifespan, you can set the ttl_start_time field in the VertexLabel. For example, if the “person” VertexLabel has a property called “createdTime” of type Date, and you want the vertices of type “person” to live for one day starting from the creation time, the Request Body for creating the “person” VertexLabel would be as follows:
{
"name": "person",
"id_strategy": "DEFAULT",
"properties": [
"name",
"age",
"createdTime"
],
"primary_keys": [
"name"
],
"nullable_keys": [],
"ttl": 86400000,
"ttl_start_time": "createdTime",
"enable_label_index": true
}
1.3.2 Add properties or userdata to an existing VertexLabel, or remove userdata (removing properties is currently not supported)
Params
- action: Indicates whether the current action is to add or remove. Possible values are
append (add) and eliminate (remove).
Method & Url
PUT http://localhost:8080/graphspaces/DEFAULT/graphs/hugegraph/schema/vertexlabels/person?action=append
Request Body
{
"name": "person",
"properties": [
"city"
],
"nullable_keys": ["city"],
"user_data": {
"super": "animal"
}
}
Response Status
Response Body
{
"id": 1,
"primary_keys": [
"name"
],
"id_strategy": "PRIMARY_KEY",
"name": "person",
"index_names": [
],
"properties": [
"city",
"name",
"age"
],
"nullable_keys": [
"city"
],
"enable_label_index": true,
"user_data": {
"super": "animal"
}
}
1.3.3 Get all VertexLabels
Method & Url
GET http://localhost:8080/graphspaces/DEFAULT/graphs/hugegraph/schema/vertexlabels
Response Status
Response Body
{
"vertexlabels": [
{
"id": 1,
"primary_keys": [
"name"
],
"id_strategy": "PRIMARY_KEY",
"name": "person",
"index_names": [
],
"properties": [
"city",
"name",
"age"
],
"nullable_keys": [
"city"
],
"enable_label_index": true,
"user_data": {
"super": "animal"
}
},
{
"id": 2,
"primary_keys": [
"name"
],
"id_strategy": "PRIMARY_KEY",
"name": "software",
"index_names": [
],
"properties": [
"price",
"name",
"lang"
],
"nullable_keys": [
"price"
],
"enable_label_index": false,
"user_data": {}
}
]
}
1.3.4 Get VertexLabel by name
Method & Url
GET http://localhost:8080/graphspaces/DEFAULT/graphs/hugegraph/schema/vertexlabels/person
Response Status
Response Body
{
"id": 1,
"primary_keys": [
"name"
],
"id_strategy": "PRIMARY_KEY",
"name": "person",
"index_names": [
],
"properties": [
"city",
"name",
"age"
],
"nullable_keys": [
"city"
],
"enable_label_index": true,
"user_data": {
"super": "animal"
}
}
1.3.5 Delete VertexLabel by name
Deleting a VertexLabel will result in the removal of corresponding vertices and related index data. This operation will generate an asynchronous task.
Method & Url
DELETE http://localhost:8080/graphspaces/DEFAULT/graphs/hugegraph/schema/vertexlabels/person
Response Status
Response Body
Note:
You can use GET http://localhost:8080/graphspaces/DEFAULT/graphs/hugegraph/tasks/1 (where “1” is the task_id) to query the execution status of the asynchronous task. For more information, refer to the Asynchronous Task RESTful API.
5.1.5 - EdgeLabel API
EdgeLabel REST API: Define edge types and relationship constraints between source and target vertices to construct graph connection rules.
1.4 EdgeLabel
Assuming PropertyKeys from version 1.2.3 and VertexLabels from version 1.3.3 have already been created.
Params Explanation
- name: Name of the vertex type, required.
- source_label: Name of the source vertex type, required.
- target_label: Name of the target vertex type, required.
- frequency: Whether there can be multiple edges between two points, can have values SINGLE or MULTIPLE, optional (default value: SINGLE).
- properties: Property types associated with the edge type, optional.
- sort_keys: Specifies a list of differentiating key properties when multiple associations are allowed.
- nullable_keys: Nullable properties, optional (default: nullable).
- enable_label_index: Whether to enable type indexing, disabled by default.
1.4.1 Create an EdgeLabel
Method & Url
POST http://localhost:8080/graphspaces/DEFAULT/graphs/hugegraph/schema/edgelabels
Request Body
{
"name": "created",
"source_label": "person",
"target_label": "software",
"frequency": "SINGLE",
"properties": [
"date"
],
"sort_keys": [],
"nullable_keys": [],
"enable_label_index": true
}
Response Status
Response Body
{
"id": 1,
"sort_keys": [
],
"source_label": "person",
"name": "created",
"index_names": [
],
"properties": [
"date"
],
"target_label": "software",
"frequency": "SINGLE",
"nullable_keys": [
],
"enable_label_index": true,
"user_data": {}
}
Starting from version 0.11.2 of hugegraph-server, the TTL (Time to Live) feature for edges is supported. The TTL for edges is set through EdgeLabel. For example, if you want the “knows” type of edge to have a lifespan of one day, you need to set the TTL field to 86400000 when creating the “knows” EdgeLabel, where the unit is milliseconds.
{
"id": 1,
"sort_keys": [
],
"source_label": "person",
"name": "knows",
"index_names": [
],
"properties": [
"date",
"createdTime"
],
"target_label": "person",
"frequency": "SINGLE",
"nullable_keys": [
],
"enable_label_index": true,
"ttl": 86400000,
"user_data": {}
}
Additionally, when the edge has a property called “createdTime” and you want to use the “createdTime” property as the starting point for calculating the edge’s lifespan, you can set the ttl_start_time field in the EdgeLabel. For example, if the knows EdgeLabel has a property called “createdTime” which is of type Date, and you want the “knows” type of edge to live for one day from the time of creation, the Request Body for creating the knows EdgeLabel would be as follows:
{
"id": 1,
"sort_keys": [
],
"source_label": "person",
"name": "knows",
"index_names": [
],
"properties": [
"date",
"createdTime"
],
"target_label": "person",
"frequency": "SINGLE",
"nullable_keys": [
],
"enable_label_index": true,
"ttl": 86400000,
"ttl_start_time": "createdTime",
"user_data": {}
}
1.4.2 Add properties or userdata to an existing EdgeLabel, or remove userdata (removing properties is currently not supported)
Params
- action: Indicates whether the current action is to add or remove, with values
append (add) and eliminate (remove).
Method & Url
PUT http://localhost:8080/graphspaces/DEFAULT/graphs/hugegraph/schema/edgelabels/created?action=append
Request Body
{
"name": "created",
"properties": [
"weight"
],
"nullable_keys": [
"weight"
]
}
Response Status
Response Body
{
"id": 2,
"sort_keys": [
],
"source_label": "person",
"name": "created",
"index_names": [
],
"properties": [
"date",
"weight"
],
"target_label": "software",
"frequency": "SINGLE",
"nullable_keys": [
"weight"
],
"enable_label_index": true,
"user_data": {}
}
1.4.3 Get all EdgeLabels
Method & Url
GET http://localhost:8080/graphspaces/DEFAULT/graphs/hugegraph/schema/edgelabels
Response Status
Response Body
{
"edgelabels": [
{
"id": 1,
"sort_keys": [
],
"source_label": "person",
"name": "created",
"index_names": [
],
"properties": [
"date",
"weight"
],
"target_label": "software",
"frequency": "SINGLE",
"nullable_keys": [
"weight"
],
"enable_label_index": true,
"user_data": {}
},
{
"id": 2,
"sort_keys": [
],
"source_label": "person",
"name": "knows",
"index_names": [
],
"properties": [
"date",
"weight"
],
"target_label": "person",
"frequency": "SINGLE",
"nullable_keys": [
],
"enable_label_index": false,
"user_data": {}
}
]
}
1.4.4 Get EdgeLabel by name
Method & Url
GET http://localhost:8080/graphspaces/DEFAULT/graphs/hugegraph/schema/edgelabels/created
Response Status
Response Body
{
"id": 1,
"sort_keys": [
],
"source_label": "person",
"name": "created",
"index_names": [
],
"properties": [
"date",
"city",
"weight"
],
"target_label": "software",
"frequency": "SINGLE",
"nullable_keys": [
"city",
"weight"
],
"enable_label_index": true,
"user_data": {}
}
1.4.5 Delete EdgeLabel by name
Deleting an EdgeLabel will result in the deletion of corresponding edges and related index data. This operation will generate an asynchronous task.
Method & Url
DELETE http://localhost:8080/graphspaces/DEFAULT/graphs/hugegraph/schema/edgelabels/created
Response Status
Response Body
Note:
You can query the execution status of an asynchronous task by using GET http://localhost:8080/graphspaces/DEFAULT/graphs/hugegraph/tasks/1 (where “1” is the task_id). For more information, refer to the Asynchronous Task RESTful API.
5.1.6 - IndexLabel API
IndexLabel REST API: Create indexes on vertex and edge properties to accelerate property-based queries and filtering operations.
1.5 IndexLabel
Assuming PropertyKeys from version 1.1.3, VertexLabels from version 1.2.3, and EdgeLabels from version 1.3.3 have already been created.
1.5.1 Create an IndexLabel
Method & Url
POST http://localhost:8080/graphspaces/DEFAULT/graphs/hugegraph/schema/indexlabels
Request Body
{
"name": "personByCity",
"base_type": "VERTEX_LABEL",
"base_value": "person",
"index_type": "SECONDARY",
"fields": [
"city"
]
}
Response Status
Response Body
{
"index_label": {
"id": 1,
"base_type": "VERTEX_LABEL",
"base_value": "person",
"name": "personByCity",
"fields": [
"city"
],
"index_type": "SECONDARY"
},
"task_id": 2
}
1.5.2 Get all IndexLabels
Method & Url
GET http://localhost:8080/graphspaces/DEFAULT/graphs/hugegraph/schema/indexlabels
Response Status
Response Body
{
"indexlabels": [
{
"id": 3,
"base_type": "VERTEX_LABEL",
"base_value": "software",
"name": "softwareByPrice",
"fields": [
"price"
],
"index_type": "RANGE"
},
{
"id": 4,
"base_type": "EDGE_LABEL",
"base_value": "created",
"name": "createdByDate",
"fields": [
"date"
],
"index_type": "SECONDARY"
},
{
"id": 1,
"base_type": "VERTEX_LABEL",
"base_value": "person",
"name": "personByCity",
"fields": [
"city"
],
"index_type": "SECONDARY"
},
{
"id": 3,
"base_type": "VERTEX_LABEL",
"base_value": "person",
"name": "personByAgeAndCity",
"fields": [
"age",
"city"
],
"index_type": "SECONDARY"
}
]
}
1.5.3 Get IndexLabel by name
Method & Url
GET http://localhost:8080/graphspaces/DEFAULT/graphs/hugegraph/schema/indexlabels/personByCity
Response Status
Response Body
{
"id": 1,
"base_type": "VERTEX_LABEL",
"base_value": "person",
"name": "personByCity",
"fields": [
"city"
],
"index_type": "SECONDARY"
}
1.5.4 Delete IndexLabel by name
Deleting an IndexLabel will result in the deletion of related index data. This operation will generate an asynchronous task.
Method & Url
DELETE http://localhost:8080/graphspaces/DEFAULT/graphs/hugegraph/schema/indexlabels/personByCity
Response Status
Response Body
Note:
You can query the execution status of an asynchronous task by using GET http://localhost:8080/graphspaces/DEFAULT/graphs/hugegraph/tasks/1 (where “1” is the task_id). For more information, refer to the Asynchronous Task RESTful API.
5.1.7 - Rebuild API
Rebuild REST API: Rebuild graph schema indexes to ensure consistency between index data and graph data.
1.6 Rebuild
1.6.1 Rebuild IndexLabel
Method & Url
PUT http://localhost:8080/graphspaces/DEFAULT/graphs/hugegraph/jobs/rebuild/indexlabels/personByCity
Response Status
Response Body
Note:
You can get the asynchronous job status by GET http://localhost:8080/graphspaces/DEFAULT/graphs/hugegraph/tasks/${task_id} (the task_id here should be 1). See More AsyncJob RESTfull API
1.6.2 Rebulid all Indexs of VertexLabel
Method & Url
PUT http://localhost:8080/graphspaces/DEFAULT/graphs/hugegraph/jobs/rebuild/vertexlabels/person
Response Status
Response Body
Note:
You can get the asynchronous job status by GET http://localhost:8080/graphspaces/DEFAULT/graphs/hugegraph/tasks/${task_id} (the task_id here should be 2). See More AsyncJob RESTfull API
1.6.3 Rebulid all Indexs of EdgeLabel
Method & Url
PUT http://localhost:8080/graphspaces/DEFAULT/graphs/hugegraph/jobs/rebuild/edgelabels/created
Response Status
Response Body
Note:
You can get the asynchronous job status by GET http://localhost:8080/graphspaces/DEFAULT/graphs/hugegraph/tasks/${task_id} (the task_id here should be 3). See More AsyncJob RESTfull API
5.1.8 - Vertex API
Vertex REST API: Create, query, update, and delete vertex data in the graph with support for batch operations and conditional filtering.
2.1 Vertex
In vertex types, the Id strategy determines the type of the vertex Id, with the corresponding relationships as follows:
| Id_Strategy | id type |
|---|
| AUTOMATIC | number |
| PRIMARY_KEY | string |
| CUSTOMIZE_STRING | string |
| CUSTOMIZE_NUMBER | number |
| CUSTOMIZE_UUID | uuid |
For the GET/PUT/DELETE API of a vertex, the id part in the URL should be passed as the id value with type information. This type information is indicated by whether the JSON string is enclosed in quotes, meaning:
- When the id type is
number, the id in the URL is without quotes, for example: xxx/vertices/123456. - When the id type is
string, the id in the URL is enclosed in quotes, for example: xxx/vertices/"123456".
The next example requires first creating the graph schema from the following groovy script
schema.propertyKey("name").asText().ifNotExist().create();
schema.propertyKey("age").asInt().ifNotExist().create();
schema.propertyKey("city").asText().ifNotExist().create();
schema.propertyKey("weight").asDouble().ifNotExist().create();
schema.propertyKey("lang").asText().ifNotExist().create();
schema.propertyKey("price").asDouble().ifNotExist().create();
schema.propertyKey("hobby").asText().valueList().ifNotExist().create();
schema.vertexLabel("person").properties("name", "age", "city", "weight", "hobby").primaryKeys("name").nullableKeys("age", "city", "weight", "hobby").ifNotExist().create();
schema.vertexLabel("software").properties("name", "lang", "price").primaryKeys("name").nullableKeys("lang", "price").ifNotExist().create();
schema.indexLabel("personByAge").onV("person").by("age").range().ifNotExist().create();
2.1.1 Create a vertex
Method & Url
POST http://localhost:8080/graphspaces/DEFAULT/graphs/hugegraph/graph/vertices
Request Body
{
"label": "person",
"properties": {
"name": "marko",
"age": 29
}
}
Response Status
Response Body
{
"id": "1:marko",
"label": "person",
"type": "vertex",
"properties": {
"name": "marko",
"age": 29
}
}
2.1.2 Create multiple vertices
Method & Url
POST http://localhost:8080/graphspaces/DEFAULT/graphs/hugegraph/graph/vertices/batch
Request Body
[
{
"label": "person",
"properties": {
"name": "marko",
"age": 29
}
},
{
"label": "software",
"properties": {
"name": "ripple",
"lang": "java",
"price": 199
}
}
]
Response Status
Response Body
[
"1:marko",
"2:ripple"
]
2.1.3 Update vertex properties
Method & Url
PUT http://127.0.0.1:8080/graphspaces/DEFAULT/graphs/hugegraph/graph/vertices/"1:marko"?action=append
Request Body
{
"label": "person",
"properties": {
"age": 30,
"city": "Beijing"
}
}
Note: There are three categories for property values: single, set, and list. If it is single, it means adding or updating the property value. If it is set or list, it means appending the property value.
Response Status
Response Body
{
"id": "1:marko",
"label": "person",
"type": "vertex",
"properties": {
"name": "marko",
"age": 30,
"city": "Beijing"
}
}
2.1.4 Batch Update Vertex Properties
Function Description
Batch update properties of vertices and support various update strategies, including:
- SUM: Numeric accumulation
- BIGGER: Take the larger value between two numbers/dates
- SMALLER: Take the smaller value between two numbers/dates
- UNION: Take the union of set properties
- INTERSECTION: Take the intersection of set properties
- APPEND: Append elements to list properties
- ELIMINATE: Remove elements from list/set properties
- OVERRIDE: Override existing properties, if the new property is null, the old property is still used
Assuming the original vertex and properties are:
{
"vertices": [
{
"id": "2:lop",
"label": "software",
"type": "vertex",
"properties": {
"name": "lop",
"lang": "java",
"price": 328
}
},
{
"id": "1:josh",
"label": "person",
"type": "vertex",
"properties": {
"name": "josh",
"age": 32,
"city": "Beijing",
"weight": 0.1,
"hobby": [
"reading",
"football"
]
}
}
]
}
Add vertices with the following command:
curl -H "Content-Type: application/json" -d '[{"label":"person","properties":{"name":"josh","age":32,"city":"Beijing","weight":0.1,"hobby":["reading","football"]}},{"label":"software","properties":{"name":"lop","lang":"java","price":328}}]' http://127.0.0.1:8080/graphspaces/DEFAULT/graphs/hugegraph/graph/vertices/batch
Method & Url
PUT http://127.0.0.1:8080/graphspaces/DEFAULT/graphs/hugegraph/graph/vertices/batch
Request Body
{
"vertices": [
{
"label": "software",
"type": "vertex",
"properties": {
"name": "lop",
"lang": "c++",
"price": 299
}
},
{
"label": "person",
"type": "vertex",
"properties": {
"name": "josh",
"city": "Shanghai",
"weight": 0.2,
"hobby": [
"swimming"
]
}
}
],
"update_strategies": {
"price": "BIGGER",
"age": "OVERRIDE",
"city": "OVERRIDE",
"weight": "SUM",
"hobby": "UNION"
},
"create_if_not_exist": true
}
Response Status
Response Body
{
"vertices": [
{
"id": "2:lop",
"label": "software",
"type": "vertex",
"properties": {
"name": "lop",
"lang": "c++",
"price": 328
}
},
{
"id": "1:josh",
"label": "person",
"type": "vertex",
"properties": {
"name": "josh",
"age": 32,
"city": "Shanghai",
"weight": 0.3,
"hobby": [
"reading",
"football",
"swimming"
]
}
}
]
}
Result Analysis:
- The lang property does not specify an update strategy and is directly overwritten by the new value, regardless of whether the new value is null.
- The price property specifies the BIGGER update strategy. The old property value is 328, and the new property value is 299, so the old property value of 328 is retained.
- The age property specifies the OVERRIDE update strategy, but the new property value does not include age, which is equivalent to age being null. Therefore, the original property value of 32 is still retained.
- The city property also specifies the OVERRIDE update strategy, and the new property value is not null, so it overrides the old value.
- The weight property specifies the SUM update strategy. The old property value is 0.1, and the new property value is 0.2. The final value is 0.3.
- The hobby property (cardinality is Set) specifies the UNION update strategy, so the new value is taken as the union with the old value.
The usage of other update strategies can be inferred in a similar manner and will not be further elaborated.
2.1.5 Delete Vertex Properties
Method & Url
PUT http://127.0.0.1:8080/graphspaces/DEFAULT/graphs/hugegraph/graph/vertices/"1:marko"?action=eliminate
Request Body
{
"label": "person",
"properties": {
"city": "Beijing"
}
}
Note: Here, the properties (keys and all values) will be directly deleted, regardless of whether the property values are single, set, or list.
Response Status
Response Body
{
"id": "1:marko",
"label": "person",
"type": "vertex",
"properties": {
"name": "marko",
"age": 30
}
}
2.1.6 Get Vertices that Meet the Criteria
Params
- label: Vertex type
- properties: Property key-value pairs (precondition: indexes are created for property queries)
- limit: Maximum number of results
- page: Page number
All of the above parameters are optional. If the page parameter is provided, the limit parameter must also be provided, and no other parameters are allowed. label, properties, and limit can be combined in any way.
Property key-value pairs consist of the property name and value in JSON format. Multiple property key-value pairs are allowed as query conditions. The property value supports exact matching, range matching, and fuzzy matching. For exact matching, use the format properties={"age":29}, for range matching, use the format properties={"age":"P.gt(29)"}, and for fuzzy matching, use the format properties={"city": "P.textcontains("ChengDu China")}. The following expressions are supported for range matching:
| Expression | Explanation |
|---|
| P.eq(number) | Vertices with property value equal to number |
| P.neq(number) | Vertices with property value not equal to number |
| P.lt(number) | Vertices with property value less than number |
| P.lte(number) | Vertices with property value less than or equal to number |
| P.gt(number) | Vertices with property value greater than number |
| P.gte(number) | Vertices with property value greater than or equal to number |
| P.between(number1,number2) | Vertices with property value greater than or equal to number1 and less than number2 |
| P.inside(number1,number2) | Vertices with property value greater than number1 and less than number2 |
| P.outside(number1,number2) | Vertices with property value less than number1 and greater than number2 |
| P.within(value1,value2,value3,…) | Vertices with property value equal to any of the given values |
Query all vertices with age 29 and label person
Method & Url
GET http://localhost:8080/graphspaces/DEFAULT/graphs/hugegraph/graph/vertices?label=person&properties={"age":29}&limit=1
Response Status
Response Body
{
"vertices": [
{
"id": "1:marko",
"label": "person",
"type": "vertex",
"properties": {
"name": "marko",
"age": 30
}
}
]
}
Paginate through all vertices, retrieve the first page (page without parameter value), limited to 3 records
Add vertices with the following command:
curl -H "Content-Type: application/json" -d '[{"label":"person","properties":{"name":"peter","age":29,"city":"Shanghai"}},{"label":"person","properties":{"name":"vadas","age":27,"city":"Hongkong"}}]' http://localhost:8080/graphspaces/DEFAULT/graphs/hugegraph/graph/vertices/batch
Method & Url
GET http://localhost:8080/graphspaces/DEFAULT/graphs/hugegraph/graph/vertices?page&limit=3
Response Status
Response Body
{
"vertices": [
{
"id": "2:lop",
"label": "software",
"type": "vertex",
"properties": {
"name": "lop",
"lang": "c++",
"price": 328
}
},
{
"id": "1:josh",
"label": "person",
"type": "vertex",
"properties": {
"name": "josh",
"age": 32,
"city": "Shanghai",
"weight": 0.3,
"hobby": [
"reading",
"football",
"swimming"
]
}
},
{
"id": "1:marko",
"label": "person",
"type": "vertex",
"properties": {
"name": "marko",
"age": 30
}
}
],
"page": "CIYxOnBldGVyAAAAAAAAAAM="
}
The returned body contains information about the page number of the next page, "page": "CIYxOnBldGVyAAAAAAAAAAM". When querying the next page, assign this value to the page parameter.
Paginate and retrieve all vertices, including the next page (passing the page value returned from the previous page), limited to 3 items.
Method & Url
GET http://localhost:8080/graphspaces/DEFAULT/graphs/hugegraph/graph/vertices?page=CIYxOnBldGVyAAAAAAAAAAM=&limit=3
Response Status
Response Body
{
"vertices": [
{
"id": "1:peter",
"label": "person",
"type": "vertex",
"properties": {
"name": "peter",
"age": 29,
"city": "Shanghai"
}
},
{
"id": "1:vadas",
"label": "person",
"type": "vertex",
"properties": {
"name": "vadas",
"age": 27,
"city": "Hongkong"
}
},
{
"id": "2:ripple",
"label": "software",
"type": "vertex",
"properties": {
"name": "ripple",
"lang": "java",
"price": 199
}
}
],
"page": null
}
At this point, "page": null indicates that there are no more pages available. (Note: When using Cassandra as the backend for performance reasons, if the returned page happens to be the last page, the page value may not be empty. When requesting the next page using that page value, it will return empty data and page = null. The same applies to other similar situations.)
2.1.7 Retrieve Vertex by ID
Method & Url
GET http://localhost:8080/graphspaces/DEFAULT/graphs/hugegraph/graph/vertices/"1:marko"
Response Status
Response Body
{
"id": "1:marko",
"label": "person",
"type": "vertex",
"properties": {
"name": "marko",
"age": 30
}
}
2.1.8 Delete Vertex by ID
Params
- label: Vertex type, optional parameter
Delete the vertex based on ID only.
Method & Url
DELETE http://localhost:8080/graphspaces/DEFAULT/graphs/hugegraph/graph/vertices/"1:marko"
Response Status
Delete Vertex by Label+ID
When deleting a vertex by specifying both the Label parameter and the ID, it generally offers better performance compared to deleting by ID alone.
Method & Url
DELETE http://localhost:8080/graphspaces/DEFAULT/graphs/hugegraph/graph/vertices/"1:marko"?label=person
Response Status
5.1.9 - Edge API
Edge REST API: Create, query, update, and delete relationship data between vertices with support for batch operations and directional queries.
2.2 Edge
The modification of the vertex ID format also affects the ID of the edge, as well as the formats of the source vertex and target vertex IDs.
The EdgeId is formed by concatenating src-vertex-id + direction + label + sort-values + tgt-vertex-id, but the vertex ID types are not distinguished by quotation marks here. Instead, they are distinguished by prefixes:
- When the ID type is number, the vertex ID in the EdgeId has a prefix
L, like “L123456>1»L987654”. - When the ID type is string, the vertex ID in the EdgeId has a prefix
S, like “S1:peter>1»S2:lop”.
The following example requires creating a graph schema based on the following groovy script:
import org.apache.hugegraph.HugeFactory
import org.apache.tinkerpop.gremlin.structure.T
conf = "conf/graphs/hugegraph.properties"
graph = HugeFactory.open(conf)
schema = graph.schema()
schema.propertyKey("name").asText().ifNotExist().create()
schema.propertyKey("age").asInt().ifNotExist().create()
schema.propertyKey("city").asText().ifNotExist().create()
schema.propertyKey("weight").asDouble().ifNotExist().create()
schema.propertyKey("lang").asText().ifNotExist().create()
schema.propertyKey("date").asText().ifNotExist().create()
schema.propertyKey("price").asInt().ifNotExist().create()
schema.vertexLabel("person").properties("name", "age", "city").primaryKeys("name").ifNotExist().create()
schema.vertexLabel("software").properties("name", "lang", "price").primaryKeys("name").ifNotExist().create()
schema.indexLabel("personByCity").onV("person").by("city").secondary().ifNotExist().create()
schema.indexLabel("personByAgeAndCity").onV("person").by("age", "city").secondary().ifNotExist().create()
schema.indexLabel("softwareByPrice").onV("software").by("price").range().ifNotExist().create()
schema.edgeLabel("knows").sourceLabel("person").targetLabel("person").properties("date", "weight").ifNotExist().create()
schema.edgeLabel("created").sourceLabel("person").targetLabel("software").properties("date", "weight").ifNotExist().create()
schema.indexLabel("createdByDate").onE("created").by("date").secondary().ifNotExist().create()
schema.indexLabel("createdByWeight").onE("created").by("weight").range().ifNotExist().create()
schema.indexLabel("knowsByWeight").onE("knows").by("weight").range().ifNotExist().create()
marko = graph.addVertex(T.label, "person", "name", "marko", "age", 29, "city", "Beijing")
vadas = graph.addVertex(T.label, "person", "name", "vadas", "age", 27, "city", "Hongkong")
lop = graph.addVertex(T.label, "software", "name", "lop", "lang", "java", "price", 328)
josh = graph.addVertex(T.label, "person", "name", "josh", "age", 32, "city", "Beijing")
ripple = graph.addVertex(T.label, "software", "name", "ripple", "lang", "java", "price", 199)
peter = graph.addVertex(T.label, "person", "name", "peter", "age", 35, "city", "Shanghai")
graph.tx().commit()
g = graph.traversal()
2.2.1 Creating an Edge
Params
Path Parameter Description:
- graph: The graph to operate on
Request Body Description:
- label: The edge type name (required)
- outV: The source vertex id (required)
- inV: The target vertex id (required)
- outVLabel: The source vertex type (required)
- inVLabel: The target vertex type (required)
- properties: The properties associated with the edge. The internal structure of the object is as follows:
- name: The property name
- value: The property value
Method & Url
POST http://localhost:8080/graphspaces/DEFAULT/graphs/hugegraph/graph/edges
Request Body
{
"label": "created",
"outV": "1:marko",
"inV": "2:lop",
"outVLabel": "person",
"inVLabel": "software",
"properties": {
"date": "20171210",
"weight": 0.4
}
}
Response Status
Response Body
{
"id": "S1:marko>2>>S2:lop",
"label": "created",
"type": "edge",
"outV": "1:marko",
"outVLabel": "person",
"inV": "2:lop",
"inVLabel": "software",
"properties": {
"weight": 0.4,
"date": "20171210"
}
}
2.2.2 Creating Multiple Edges
Params
Path Parameter Description:
- graph: The graph to operate on
Request Parameter Description:
- check_vertex: Whether to check the existence of vertices (true | false). When set to true, an error will be thrown if the source or target vertices of the edge to be inserted do not exist. Default is true.
Request Body Description:
Method & Url
POST http://localhost:8080/graphspaces/DEFAULT/graphs/hugegraph/graph/edges/batch
Request Body
[
{
"label": "knows",
"outV": "1:marko",
"inV": "1:vadas",
"outVLabel": "person",
"inVLabel": "person",
"properties": {
"date": "20160110",
"weight": 0.5
}
},
{
"label": "knows",
"outV": "1:marko",
"inV": "1:josh",
"outVLabel": "person",
"inVLabel": "person",
"properties": {
"date": "20130220",
"weight": 1.0
}
}
]
Response Status
Response Body
[
"S1:marko>1>>S1:vadas",
"S1:marko>1>>S1:josh"
]
2.2.3 Updating Edge Properties
Params
Path Parameter Description:
- graph: The graph to operate on
- id: The ID of the edge to be operated on
Request Parameter Description:
- action: The append action
Request Body Description:
Method & Url
PUT http://localhost:8080/graphspaces/DEFAULT/graphs/hugegraph/graph/edges/S1:marko>2>>S2:lop?action=append
Request Body
{
"properties": {
"weight": 1.0
}
}
NOTE: There are three categories of property values: single, set, and list. If it is single, it means adding or updating the property value. If it is set or list, it means appending the property value.
Response Status
Response Body
{
"id": "S1:marko>2>>S2:lop",
"label": "created",
"type": "edge",
"outV": "1:marko",
"outVLabel": "person",
"inV": "2:lop",
"inVLabel": "software",
"properties": {
"weight": 1.0,
"date": "20171210"
}
}
2.2.4 Batch Updating Edge Properties
Params
Path Parameter Description:
- graph: The graph to operate on
Request Body Description:
- edges: List of edge information
- update_strategies: For each property, you can set its update strategy individually, including:
- SUM: Only supports number type
- BIGGER/SMALLER: Only supports date/number type
- UNION/INTERSECTION: Only supports set type
- APPEND/ELIMINATE: Only supports collection type
- OVERRIDE
- check_vertex: Whether to check the existence of vertices (true | false). When set to true, an error will be thrown if the source or target vertices of the edge to be inserted do not exist. Default is true.
- create_if_not_exist: Currently only supports setting to true
Method & Url
PUT http://127.0.0.1:8080/graphspaces/DEFAULT/graphs/hugegraph/graph/edges/batch
Request Body
{
"edges": [
{
"label": "knows",
"outV": "1:marko",
"inV": "1:vadas",
"outVLabel": "person",
"inVLabel": "person",
"properties": {
"date": "20160111",
"weight": 1.0
}
},
{
"label": "knows",
"outV": "1:marko",
"inV": "1:josh",
"outVLabel": "person",
"inVLabel": "person",
"properties": {
"date": "20130221",
"weight": 0.5
}
}
],
"update_strategies": {
"weight": "SUM",
"date": "OVERRIDE"
},
"check_vertex": false,
"create_if_not_exist": true
}
Response Status
Response Body
{
"edges": [
{
"id": "S1:marko>1>>S1:vadas",
"label": "knows",
"type": "edge",
"outV": "1:marko",
"outVLabel": "person",
"inV": "1:vadas",
"inVLabel": "person",
"properties": {
"weight": 1.5,
"date": "20160111"
}
},
{
"id": "S1:marko>1>>S1:josh",
"label": "knows",
"type": "edge",
"outV": "1:marko",
"outVLabel": "person",
"inV": "1:josh",
"inVLabel": "person",
"properties": {
"weight": 1.5,
"date": "20130221"
}
}
]
}
2.2.5 Deleting Edge Properties
Params
Path Parameter Description:
- graph: The graph to operate on
- id: The ID of the edge to be operated on
Request Parameter Description:
- action: The eliminate action
Request Body Description:
Method & Url
PUT http://localhost:8080/graphspaces/DEFAULT/graphs/hugegraph/graph/edges/S1:marko>2>>S2:lop?action=eliminate
Request Body
{
"properties": {
"weight": 1.0
}
}
NOTE: This will directly delete the properties (removing the key and all values), regardless of whether the property values are single, set, or list.
Response Status
Response Body
It is not possible to delete an attribute that is not set as nullable.
{
"exception": "class java.lang.IllegalArgumentException",
"message": "Can't remove non-null edge property 'p[weight->1.0]'",
"cause": ""
}
2.2.6 Fetching Edges that Match the Criteria
Params
Path Parameter:
- graph: The graph to operate on
Request Parameters:
- vertex_id: Vertex ID
- direction: Edge direction (OUT | IN | BOTH), default is BOTH
- label: Edge label
- properties: Key-value pairs of properties (requires pre-built indexes for property queries)
- keep_start_p: Default is false. When set to true, the range matching input expression will not be automatically escaped. For example,
properties={"age":"P.gt(0.8)"} will be interpreted as an exact match, i.e., the age property is equal to “P.gt(0.8)” - offset: Offset, default is 0
- limit: Number of queries, default is 100
- page: Page number
Key-value pairs of properties consist of the property name and value in JSON format. Multiple key-value pairs are allowed as query conditions. Property values support exact matching and range matching. For exact matching, it is in the form properties={"weight":0.8}. For range matching, it is in the form properties={"age":"P.gt(0.8)"}. The expressions supported by range matching are as follows:
| Expression | Description |
|---|
| P.eq(number) | Edges with property value equal to number |
| P.neq(number) | Edges with property value not equal to number |
| P.lt(number) | Edges with property value less than number |
| P.lte(number) | Edges with property value less than or equal to number |
| P.gt(number) | Edges with property value greater than number |
| P.gte(number) | Edges with property value greater than or equal to number |
| P.between(number1,number2) | Edges with property value greater than or equal to number1 and less than number2 |
| P.inside(number1,number2) | Edges with property value greater than number1 and less than number2 |
| P.outside(number1,number2) | Edges with property value less than number1 and greater than number2 |
| P.within(value1,value2,value3,…) | Edges with property value equal to any of the given values |
| P.textcontains(value) | Edges with property value containing the given value (string type) |
| P.contains(value) | Edges with property value containing the given value (collection type) |
Edges connected to the vertex person:marko(vertex_id=“1:marko”) with label knows and date property equal to “20160111”
Method & Url
GET http://127.0.0.1:8080/graphspaces/DEFAULT/graphs/hugegraph/graph/edges?vertex_id="1:marko"&label=knows&properties={"date":"P.within(\"20160111\")"}
Response Status
Response Body
{
"edges": [
{
"id": "S1:marko>1>>S1:vadas",
"label": "knows",
"type": "edge",
"outV": "1:marko",
"outVLabel": "person",
"inV": "1:vadas",
"inVLabel": "person",
"properties": {
"weight": 1.5,
"date": "20160111"
}
}
]
}
Paginate and retrieve all edges, get the first page (page without parameter value), limit to 2 entries
Method & Url
GET http://127.0.0.1:8080/graphspaces/DEFAULT/graphs/hugegraph/graph/edges?page&limit=2
Response Status
Response Body
{
"edges": [
{
"id": "S1:marko>1>>S1:josh",
"label": "knows",
"type": "edge",
"outV": "1:marko",
"outVLabel": "person",
"inV": "1:josh",
"inVLabel": "person",
"properties": {
"weight": 1.5,
"date": "20130221"
}
},
{
"id": "S1:marko>1>>S1:vadas",
"label": "knows",
"type": "edge",
"outV": "1:marko",
"outVLabel": "person",
"inV": "1:vadas",
"inVLabel": "person",
"properties": {
"weight": 1.5,
"date": "20160111"
}
}
],
"page": "EoYxOm1hcmtvgggCAIQyOmxvcAAAAAAAAAAC"
}
The returned body contains the page number information for the next page, "page": "EoYxOm1hcmtvgggCAIQyOmxvcAAAAAAAAAAC". When querying the next page, assign this value to the page parameter.
Paginate and retrieve all edges, get the next page (include the page value returned from the previous page), limit to 2 entries
Method & Url
GET http://127.0.0.1:8080/graphspaces/DEFAULT/graphs/hugegraph/graph/edges?page=EoYxOm1hcmtvgggCAIQyOmxvcAAAAAAAAAAC&limit=2
Response Status
Response Body
{
"edges": [
{
"id": "S1:marko>2>>S2:lop",
"label": "created",
"type": "edge",
"outV": "1:marko",
"outVLabel": "person",
"inV": "2:lop",
"inVLabel": "software",
"properties": {
"weight": 1.0,
"date": "20171210"
}
}
],
"page": null
}
When "page": null is returned, it indicates that there are no more pages available.
NOTE: When the backend is Cassandra, for performance considerations, if the returned page happens to be the last page, the page value may not be empty. When requesting the next page data using that page value, it will return empty data and page = null. Similar situations apply for other cases.
2.2.7 Fetching Edge by ID
Params
Path parameter description:
- graph: The graph to be operated on.
- id: The ID of the edge to be operated on.
Method & Url
GET http://localhost:8080/graphspaces/DEFAULT/graphs/hugegraph/graph/edges/S1:marko>2>>S2:lop
Response Status
Response Body
{
"id": "S1:marko>2>>S2:lop",
"label": "created",
"type": "edge",
"outV": "1:marko",
"outVLabel": "person",
"inV": "2:lop",
"inVLabel": "software",
"properties": {
"weight": 1.0,
"date": "20171210"
}
}
2.2.8 Deleting Edge by ID
Params
Path parameter description:
- graph: The graph to be operated on.
- id: The ID of the edge to be operated on.
Request parameter description:
- label: The label of the edge.
Deleting Edge by ID only
Method & Url
DELETE http://localhost:8080/graphspaces/DEFAULT/graphs/hugegraph/graph/edges/S1:marko>2>>S2:lop
Response Status
Deleting Edge by Label + ID
In general, specifying the Label parameter along with the ID to delete an edge will provide better performance compared to deleting by ID only.
Method & Url
DELETE http://localhost:8080/graphspaces/DEFAULT/graphs/hugegraph/graph/edges/S1:marko>1>>S1:vadas?label=knows
Response Status
5.1.10 - Traverser API
Traverser REST API: Execute complex graph algorithms and path queries including shortest path, k-neighbors, similarity computation, and advanced analytics.
3.1 Overview of Traverser API
HugeGraphServer provides a RESTful API interface for the HugeGraph graph database. In addition to the basic CRUD operations for vertices and edges, it also offers several traversal methods, which we refer to as the traverser API. These traversal methods implement various complex graph algorithms, making it convenient for users to analyze and explore the graph.
The Traverser API supported by HugeGraph includes:
- K-out API: It finds neighbors that are exactly N steps away from a given starting vertex. There are two versions:
- The basic version uses the GET method to find neighbors that are exactly N steps away from a given starting vertex.
- The advanced version uses the POST method to find neighbors that are exactly N steps away from a given starting vertex. The advanced version differs from the basic version in the following ways:
- Supports counting the number of neighbors only
- Supports filtering by edge and vertex properties
- Supports returning the shortest path to reach the neighbor
- K-neighbor API: It finds all neighbors that are within N steps of a given starting vertex. There are two versions:
- The basic version uses the GET method to find all neighbors that are within N steps of a given starting vertex.
- The advanced version uses the POST method to find all neighbors that are within N steps of a given starting vertex. The advanced version differs from the basic version in the following ways:
- Supports counting the number of neighbors only
- Supports filtering by edge and vertex properties
- Supports returning the shortest path to reach the neighbor
- Same Neighbors: It queries the common neighbors of two vertices.
- Jaccard Similarity API: It calculates the Jaccard similarity, which includes two types:
- One type uses the GET method to calculate the similarity (intersection over union) of neighbors between two vertices.
- The other type uses the POST method to find the top N vertices with the highest Jaccard similarity to a given starting vertex in the entire graph.
- Shortest Path API: It finds the shortest path between two vertices.
- All Shortest Paths: It finds all shortest paths between two vertices.
- Weighted Shortest Path: It finds the shortest weighted path from a starting vertex to a target vertex.
- Single Source Shortest Path: It finds the weighted shortest path from a single source vertex to all other vertices.
- Multi Node Shortest Path: It finds the shortest path between every pair of specified vertices.
- Paths API: It finds all paths between two vertices. There are two versions:
- The basic version uses the GET method to find all paths between a given starting vertex and an ending vertex.
- The advanced version uses the POST method to find all paths that meet certain conditions between a set of starting vertices and a set of ending vertices.
3.2 Detailed Explanation of Traverser API
In the following, we provide a detailed explanation of the Traverser API:
- Customized Paths API: It traverses all paths that pass through a batch of vertices according to a specific pattern.
- Template Path API: It specifies a starting point, an ending point, and the path information between them to find matching paths.
- Crosspoints API: It finds the intersection (common ancestors or common descendants) between two vertices.
- Customized Crosspoints API: It traverses multiple patterns starting from a batch of vertices and finds the intersections with the vertices reached in the final step.
- Rings API: It finds the cyclic paths that can be reached from a starting vertex.
- Rays API: It finds the paths from a starting vertex that reach the boundaries (i.e., paths without cycles).
- Fusiform Similarity API: It finds the fusiform similar vertices to a given vertex.
- Vertices API:
- Batch querying vertices by ID.
- Getting the partitions of vertices.
- Querying vertices by partition.
- Edges API:
- Batch querying edges by ID.
- Getting the partitions of edges.
- Querying edges by partition.
3.2 Detailed Explanation of Traverser API
The usage examples provided in this section are based on the graph presented on the TinkerPop official website:
The data import program is as follows:
public class Loader {
public static void main(String[] args) {
HugeClient client = new HugeClient("http://127.0.0.1:8080", "hugegraph");
SchemaManager schema = client.schema();
schema.propertyKey("name").asText().ifNotExist().create();
schema.propertyKey("age").asInt().ifNotExist().create();
schema.propertyKey("city").asText().ifNotExist().create();
schema.propertyKey("weight").asDouble().ifNotExist().create();
schema.propertyKey("lang").asText().ifNotExist().create();
schema.propertyKey("date").asText().ifNotExist().create();
schema.propertyKey("price").asInt().ifNotExist().create();
schema.vertexLabel("person")
.properties("name", "age", "city")
.primaryKeys("name")
.nullableKeys("age")
.ifNotExist()
.create();
schema.vertexLabel("software")
.properties("name", "lang", "price")
.primaryKeys("name")
.nullableKeys("price")
.ifNotExist()
.create();
schema.indexLabel("personByCity")
.onV("person")
.by("city")
.secondary()
.ifNotExist()
.create();
schema.indexLabel("personByAgeAndCity")
.onV("person")
.by("age", "city")
.secondary()
.ifNotExist()
.create();
schema.indexLabel("softwareByPrice")
.onV("software")
.by("price")
.range()
.ifNotExist()
.create();
schema.edgeLabel("knows")
.multiTimes()
.sourceLabel("person")
.targetLabel("person")
.properties("date", "weight")
.sortKeys("date")
.nullableKeys("weight")
.ifNotExist()
.create();
schema.edgeLabel("created")
.sourceLabel("person").targetLabel("software")
.properties("date", "weight")
.nullableKeys("weight")
.ifNotExist()
.create();
schema.indexLabel("createdByDate")
.onE("created")
.by("date")
.secondary()
.ifNotExist()
.create();
schema.indexLabel("createdByWeight")
.onE("created")
.by("weight")
.range()
.ifNotExist()
.create();
schema.indexLabel("knowsByWeight")
.onE("knows")
.by("weight")
.range()
.ifNotExist()
.create();
GraphManager graph = client.graph();
Vertex marko = graph.addVertex(T.label, "person", "name", "marko",
"age", 29, "city", "Beijing");
Vertex vadas = graph.addVertex(T.label, "person", "name", "vadas",
"age", 27, "city", "Hongkong");
Vertex lop = graph.addVertex(T.label, "software", "name", "lop",
"lang", "java", "price", 328);
Vertex josh = graph.addVertex(T.label, "person", "name", "josh",
"age", 32, "city", "Beijing");
Vertex ripple = graph.addVertex(T.label, "software", "name", "ripple",
"lang", "java", "price", 199);
Vertex peter = graph.addVertex(T.label, "person", "name", "peter",
"age", 35, "city", "Shanghai");
marko.addEdge("knows", vadas, "date", "20160110", "weight", 0.5);
marko.addEdge("knows", josh, "date", "20130220", "weight", 1.0);
marko.addEdge("created", lop, "date", "20171210", "weight", 0.4);
josh.addEdge("created", lop, "date", "20091111", "weight", 0.4);
josh.addEdge("created", ripple, "date", "20171210", "weight", 1.0);
peter.addEdge("created", lop, "date", "20170324", "weight", 0.2);
}
}
The vertex IDs are:
"2:ripple",
"1:vadas",
"1:peter",
"1:josh",
"1:marko",
"2:lop"
The edge IDs are:
"S1:peter>2>>S2:lop",
"S1:josh>2>>S2:lop",
"S1:josh>2>>S2:ripple",
"S1:marko>1>20130220>S1:josh",
"S1:marko>1>20160110>S1:vadas",
"S1:marko>2>>S2:lop"
3.2.1 K-out API (GET, Basic Version)
3.2.1.1 Functionality Overview
The K-out API allows you to find vertices that are exactly “depth” steps away from a given starting vertex, considering the specified direction, edge type (optional), and depth.
Params
- source: ID of the starting vertex (required)
- direction: Direction of traversal from the starting vertex (OUT, IN, BOTH). Optional, default is BOTH.
- max_depth: Number of steps (required)
- label: Edge type (optional), represents all edge labels by default
- nearest: When nearest is set to true, it means the shortest path length from the starting vertex to the result vertices is equal to the depth, and there is no shorter path. When nearest is set to false, it means there is at least one path of length depth from the starting vertex to the result vertices (not necessarily the shortest and may contain cycles). Optional, default is true.
- max_degree: Maximum number of adjacent edges to traverse per vertex during the query. Optional, default is 10000.
- capacity: Maximum number of vertices to be visited during the traversal. Optional, default is 10000000.
- limit: Maximum number of vertices to be returned. Optional, default is 10000000.
3.2.1.2 Usage Example
Method & Url
GET http://localhost:8080/graphs/{graph}/traversers/kout?source="1:marko"&max_depth=2
Response Status
Response Body
{
"vertices":[
"2:ripple",
"1:peter"
]
}
3.2.1.3 Use Cases
Finding vertices that are exactly N steps away in a relationship. Two examples:
- In a family relationship, finding all grandchildren of a person. The set of vertices that can be reached by person A through two consecutive “son” edges.
- Discovering potential friends in a social network. For example, finding users who are two degrees of friendship away from the target user, reachable through two consecutive “friend” edges.
3.2.2 K-out API (POST, Advanced Version)
3.2.2.1 Functionality Overview
The K-out API allows you to find vertices that are exactly “depth” steps away from a given starting vertex, considering the specified steps (including direction, edge type, and attribute filtering).
The advanced version differs from the basic version of K-out API in the following aspects:
- Supports counting the number of neighbors only
- Supports edge attribute filtering
- Supports returning the shortest path to the neighbor
Params
- source: The ID of the starting vertex, required.
- steps: Steps from the starting point, required, with the following structure:
- direction: Represents the direction of the edges (OUT, IN, BOTH), default is BOTH.
- edge_steps: The step set of edges, supporting label and properties filtering for the edge. If edge_steps is empty, the edge is not filtered.
- label: Edge types.
- properties: Filter edges based on property values.
- vertex_steps: The step set of vertices, supporting label and properties filtering for the vertex. If vertex_steps is empty, the vertex is not filtered.
- label: Vertex types.
- properties: Filter vertices based on property values.
- max_degree: Maximum number of adjacent edges to traverse for a single vertex, default is 10000 (Note: Prior to version 0.12, the parameter name was “degree” instead of “max_degree”. Starting from version 0.12, “max_degree” is used uniformly, while still supporting the “degree” syntax for backward compatibility).
- skip_degree: Sets the minimum number of edges to skip super vertices during the query process. If the number of adjacent edges for a vertex is greater than skip_degree, the vertex is completely skipped. Optional. If enabled, it should satisfy the constraint
skip_degree >= max_degree. Default is 0 (not enabled), indicating no skipping of any vertices (Note: Enabling this configuration means that during traversal, an attempt will be made to access skip_degree edges of a vertex, not just max_degree edges. This incurs additional traversal overhead and may have a significant impact on query performance. Please enable it only after understanding the implications).
- max_depth: Number of steps, required.
- nearest: When nearest is true, it means the shortest path length from the starting vertex to the result vertex is equal to depth, and there is no shorter path. When nearest is false, it means there is a path of length depth from the starting vertex to the result vertex (not necessarily the shortest and can contain cycles). Optional, default is true.
- count_only: Boolean value, true indicates only counting the number of results without returning specific results, false indicates returning specific results. Default is false.
- with_path: When true, it returns the shortest path from the starting vertex to each neighbor. When false, it does not return the shortest path. Optional, default is false.
- with_edge: Optional parameter, default is false:
- When true, the result will include complete edge information (all edges in the path):
- When with_path is true, it returns complete information of all edges in all paths.
- When with_path is false, no information is returned.
- When false, it only returns edge IDs.
- with_vertex: Optional parameter, default is false:
- When true, the result will include complete vertex information (all vertices in the path):
- When with_path is true, it returns complete information of all vertices in all paths.
- When with_path is false, it returns complete information of all neighbors.
- When false, it only returns vertex IDs.
- capacity: Maximum number of vertices to visit during traversal. Optional, default is 10000000.
- limit: Maximum number of vertices to return. Optional, default is 10000000.
- traverse_mode: Traversal mode. There are two options: “breadth_first_search” and “depth_first_search”, default is “breadth_first_search”.
3.2.2.2 Usage
Method & Url
POST http://localhost:8080/graphs/{graph}/traversers/kout
Request Body
{
"source": "1:marko",
"steps": {
"direction": "BOTH",
"edge_steps": [
{
"label": "knows",
"properties": {
"weight": "P.gt(0.1)"
}
},
{
"label": "created",
"properties": {
"weight": "P.gt(0.1)"
}
}
],
"vertex_steps": [
{
"label": "person",
"properties": {
"age": "P.lt(32)"
}
},
{
"label": "software",
"properties": {}
}
],
"max_degree": 10000,
"skip_degree": 100000
},
"max_depth": 1,
"nearest": true,
"limit": 10000,
"with_vertex": true,
"with_path": true,
"with_edge": true
}
Response Status
Response Body
{
"size": 2,
"kout": [
"1:vadas",
"2:lop"
],
"paths": [
{
"objects": [
"1:marko",
"2:lop"
]
},
{
"objects": [
"1:marko",
"1:vadas"
]
}
],
"vertices": [
{
"id": "1:marko",
"label": "person",
"type": "vertex",
"properties": {
"name": "marko",
"age": 29,
"city": "Beijing"
}
},
{
"id": "1:vadas",
"label": "person",
"type": "vertex",
"properties": {
"name": "vadas",
"age": 27,
"city": "Hongkong"
}
},
{
"id": "2:lop",
"label": "software",
"type": "vertex",
"properties": {
"name": "lop",
"lang": "java",
"price": 328
}
}
],
"edges": [
{
"id": "S1:marko>1>20160110>S1:vadas",
"label": "knows",
"type": "edge",
"outV": "1:marko",
"outVLabel": "person",
"inV": "1:vadas",
"inVLabel": "person",
"properties": {
"weight": 0.5,
"date": "20160110"
}
},
{
"id": "S1:marko>2>>S2:lop",
"label": "created",
"type": "edge",
"outV": "1:marko",
"outVLabel": "person",
"inV": "2:lop",
"inVLabel": "software",
"properties": {
"weight": 0.4,
"date": "20171210"
}
}
]
}
3.2.2.3 Use Cases
Refer to 3.2.1.3.
3.2.3 K-neighbor (GET, Basic Version)
3.2.3.1 Function Introduction
Find all vertices that are reachable within depth steps, including the starting vertex, based on the starting vertex, direction, edge type (optional), and depth.
Equivalent to the union of: starting vertex, K-out(1), K-out(2), …, K-out(max_depth).
Params
- source: ID of the starting vertex, required.
- direction: Direction in which the starting vertex’s edges extend (OUT, IN, BOTH). Optional, default is BOTH.
- max_depth: Number of steps, required.
- label: Edge type, optional, default represents all edge labels.
- max_degree: Maximum number of adjacent edges to traverse for a single vertex during the query process. Optional, default is 10000.
- limit: Maximum number of vertices to return, also represents the maximum number of vertices to visit during traversal. Optional, default is 10000000.
3.2.3.2 Usage
Method & Url
GET http://localhost:8080/graphs/{graph}/traversers/kneighbor?source=“1:marko”&max_depth=2
Response Status
Response Body
{
"vertices":[
"2:ripple",
"1:marko",
"1:josh",
"1:vadas",
"1:peter",
"2:lop"
]
}
3.2.3.3 Use Cases
Find all vertices reachable within N steps, for example:
- In a family relationship, find all descendants within five generations of a person. This can be achieved by traversing five consecutive “parent-child” edges from person A.
- In a social network, discover friend circles. For example, users who can be reached by 1, 2, or 3 “friend” edges from the target user can form the target user’s friend circle.
3.2.4 K-neighbor API (POST, Advanced Version)
3.2.4.1 Function Introduction
Find all vertices that are reachable within depth steps from the starting vertex, based on the starting vertex, steps (including direction, edge type, and filter properties), and depth.
The difference from the Basic Version of K-neighbor API is that:
- It supports counting the number of neighbors only.
- It supports filtering edges based on their properties.
- It supports returning the shortest path to reach the neighbors.
Params
- source: Starting vertex ID, required.
- steps: Steps from the starting point, required, with the following structure:
- direction: Represents the direction of the edges (OUT, IN, BOTH), default is BOTH.
- edge_steps: The step set of edges, supporting label and properties filtering for the edge. If edge_steps is empty, the edge is not filtered.
- label: Edge types.
- properties: Filter edges based on property values.
- vertex_steps: The step set of vertices, supporting label and properties filtering for the vertex. If vertex_steps is empty, the vertex is not filtered.
- label: Vertex types.
- properties: Filter vertices based on property values.
- max_degree: Maximum number of adjacent edges to traverse for each vertex during the query process. Default is 10000. (Note: Before version 0.12, the parameter name within the step only supported “degree.” Starting from version 0.12, it is unified as “max_degree” and is backward compatible with the “degree” notation.)
- skip_degree: Used to set the minimum number of edges to discard super vertices during the query process. When the number of adjacent edges for a vertex exceeds skip_degree, the vertex is completely discarded. This is an optional parameter. If enabled, it should satisfy the constraint
skip_degree >= max_degree. Default is 0 (not enabled), which means no vertices are skipped. (Note: When this configuration is enabled, the traversal will attempt to access skip_degree edges for each vertex, not just max_degree edges. This incurs additional traversal overhead and may significantly impact query performance. Please make sure to understand this before enabling.)
- max_depth: Number of steps, required.
- count_only: Boolean value. If true, only the count of results is returned without the actual results. If false, the specific results are returned. Default is false.
- with_path: If true, the shortest path from the starting point to each neighbor is returned. If false, the shortest path from the starting point to each neighbor is not returned. This is an optional parameter. Default is false.
- with_edge: Optional parameter, default is false:
- When true, the result will include complete edge information (all edges in the path):
- When with_path is true, it returns complete information of all edges in all paths.
- When with_path is false, no information is returned.
- When false, it only returns edge IDs.
- with_vertex: Optional parameter, default is false:
- When true, the result will include complete vertex information (all vertices in the path):
- When with_path is true, it returns complete information of all vertices in all paths.
- When with_path is false, it returns complete information of all neighbors.
- When false, it only returns vertex IDs.
- limit: Maximum number of vertices to be returned. Also, the maximum number of vertices visited during the traversal process. This is an optional parameter. Default is 10000000.
3.2.4.2 Usage Method
Method & Url
POST http://localhost:8080/graphs/{graph}/traversers/kneighbor
Request Body
{
"source": "1:marko",
"steps": {
"direction": "BOTH",
"edge_steps": [
{
"label": "knows",
"properties": {
"weight": "P.gt(0.1)"
}
},
{
"label": "created",
"properties": {
"weight": "P.gt(0.1)"
}
}
],
"vertex_steps": [
{
"label": "person",
"properties": {
"age": "P.lt(32)"
}
},
{
"label": "software",
"properties": {}
}
],
"max_degree": 10000,
"skip_degree": 100000
},
"max_depth": 1,
"nearest": true,
"limit": 10000,
"with_vertex": true,
"with_path": true,
"with_edge": true
}
Response Status
Response Body
{
"size": 4,
"kneighbor": [
"1:josh",
"2:lop",
"1:peter",
"2:ripple"
],
"paths": [
{
"objects": [
"1:marko",
"2:lop"
]
},
{
"objects": [
"1:marko",
"2:lop",
"1:peter"
]
},
{
"objects": [
"1:marko",
"1:josh"
]
},
{
"objects": [
"1:marko",
"1:josh",
"2:ripple"
]
}
],
"vertices": [
{
"id": "2:ripple",
"label": "software",
"type": "vertex",
"properties": {
"name": "ripple",
"lang": "java",
"price": 199
}
},
{
"id": "1:marko",
"label": "person",
"type": "vertex",
"properties": {
"name": "marko",
"age": 29,
"city": "Beijing"
}
},
{
"id": "1:josh",
"label": "person",
"type": "vertex",
"properties": {
"name": "josh",
"age": 32,
"city": "Beijing"
}
},
{
"id": "1:peter",
"label": "person",
"type": "vertex",
"properties": {
"name": "peter",
"age": 35,
"city": "Shanghai"
}
},
{
"id": "2:lop",
"label": "software",
"type": "vertex",
"properties": {
"name": "lop",
"lang": "java",
"price": 328
}
}
],
"edges": [
{
"id": "S1:josh>2>>S2:ripple",
"label": "created",
"type": "edge",
"outV": "1:josh",
"outVLabel": "person",
"inV": "2:ripple",
"inVLabel": "software",
"properties": {
"weight": 1.0,
"date": "20171210"
}
},
{
"id": "S1:marko>2>>S2:lop",
"label": "created",
"type": "edge",
"outV": "1:marko",
"outVLabel": "person",
"inV": "2:lop",
"inVLabel": "software",
"properties": {
"weight": 0.4,
"date": "20171210"
}
},
{
"id": "S1:marko>1>20130220>S1:josh",
"label": "knows",
"type": "edge",
"outV": "1:marko",
"outVLabel": "person",
"inV": "1:josh",
"inVLabel": "person",
"properties": {
"weight": 1.0,
"date": "20130220"
}
},
{
"id": "S1:peter>2>>S2:lop",
"label": "created",
"type": "edge",
"outV": "1:peter",
"outVLabel": "person",
"inV": "2:lop",
"inVLabel": "software",
"properties": {
"weight": 0.2,
"date": "20170324"
}
}
]
}
3.2.4.3 Use Cases
See 3.2.3.3
3.2.5 Same Neighbors
3.2.5.1 Function Introduction
Retrieve the common neighbors of two vertices.
Params
- vertex: ID of one vertex, required.
- other: ID of another vertex, required.
- direction: Direction in which the vertex expands outward (OUT, IN, BOTH). Optional, default is BOTH.
- label: Edge type. Optional, default represents all edge labels.
- max_degree: Maximum number of adjacent edges to traverse for each vertex during the query process. Optional, default is 10000.
- limit: Maximum number of common neighbors to be returned. Optional, default is 10000000.
3.2.5.2 Usage Method
Method & Url
GET http://localhost:8080/graphs/{graph}/traversers/sameneighbors?vertex=“1:marko”&other="1:josh"
Response Status
Response Body
{
"same_neighbors":[
"2:lop"
]
}
3.2.5.3 Use Cases
Find the common neighbors of two vertices:
- In a social network, find the common followers or users both users are following.
3.2.6 Jaccard Similarity (GET)
3.2.6.1 Function Introduction
Compute the Jaccard similarity between two vertices (the intersection of the neighbors of the two vertices divided by the union of the neighbors of the two vertices).
Params
- vertex: ID of one vertex, required.
- other: ID of another vertex, required.
- direction: Direction in which the vertex expands outward (OUT, IN, BOTH). Optional, default is BOTH.
- label: Edge type. Optional, default represents all edge labels.
- max_degree: Maximum number of adjacent edges to traverse for each vertex during the query process. Optional, default is 10000.
3.2.6.2 Usage Method
Method & Url
GET http://localhost:8080/graphs/{graph}/traversers/jaccardsimilarity?vertex="1:marko"&other="1:josh"
Response Status
Response Body
{
"jaccard_similarity": 0.2
}
3.2.6.3 Use Cases
Used to evaluate the similarity or closeness between two vertices.
3.2.7 Jaccard Similarity (POST)
3.2.7.1 Function Introduction
Compute the N vertices with the highest Jaccard similarity to a specified vertex.
The Jaccard similarity is calculated as the intersection of the neighbors of the two vertices divided by the union of the neighbors of the two vertices.
Params
- vertex: ID of a vertex, required.
- Steps from the starting point, required. The structure is as follows:
- direction: Direction of the edges (OUT, IN, BOTH). Optional, default is BOTH.
- labels: List of edge types.
- properties: Filter edges based on property values.
- max_degree: Maximum number of adjacent edges to traverse for each vertex during the query process. Default is 10000. (Note: Prior to version 0.12, the parameter name inside “step” was “degree”. Starting from version 0.12, it is unified as “max_degree” and still compatible with “degree” notation.)
- skip_degree: Used to set the minimum number of edges to skip super vertices during the query process. If the number of adjacent edges for a vertex is greater than skip_degree, the vertex is completely skipped. Optional, default is 0 (not enabled), which means no skipping. (Note: When this configuration is enabled, the traversal will attempt to access skip_degree edges of a vertex, not just max_degree edges. This incurs additional traversal overhead and may have a significant impact on query performance. Please enable it after understanding and confirming.)
- top: Return the top N vertices with the highest Jaccard similarity for a starting vertex. Optional, default is 100.
- capacity: Maximum number of vertices to be visited during the traversal process. Optional, default is 10000000.
3.2.7.2 Usage Method
Method & Url
POST http://localhost:8080/graphs/{graph}/traversers/jaccardsimilarity
Request Body
{
"vertex": "1:marko",
"step": {
"direction": "BOTH",
"labels": [],
"max_degree": 10000,
"skip_degree": 100000
},
"top": 3
}
Response Status
Response Body
{
"2:ripple": 0.3333333333333333,
"1:peter": 0.3333333333333333,
"1:josh": 0.2
}
3.2.7.3 Use Cases
Used to find the vertices in the graph that have the highest similarity to a specified vertex.
3.2.8 Shortest Path
3.2.8.1 Function Introduction
Find the shortest path between a starting vertex and a target vertex based on the direction, edge type (optional), and maximum depth.
Params
- source: ID of the starting vertex, required.
- target: ID of the target vertex, required.
- direction: Direction in which the starting vertex expands (OUT, IN, BOTH). Optional, default is BOTH.
- max_depth: Maximum number of steps, required.
- label: Edge type, optional. Default represents all edge labels.
- max_degree: Maximum number of adjacent edges to traverse for each vertex during the query process. Optional, default is 10000.
- skip_degree: Used to set the minimum number of edges to skip super vertices during the query process. If the number of adjacent edges for a vertex is greater than skip_degree, the vertex is completely skipped. Optional, default is 0 (not enabled), which means no skipping. (Note: When this configuration is enabled, the traversal will attempt to access skip_degree edges of a vertex, not just max_degree edges. This incurs additional traversal overhead and may have a significant impact on query performance. Please enable it after understanding and confirming.)
- capacity: Maximum number of vertices to be visited during the traversal process. Optional, default is 10000000.
3.2.8.2 Usage Method
Method & Url
GET http://localhost:8080/graphs/{graph}/traversers/shortestpath?source="1:marko"&target="2:ripple"&max_depth=3
Response Status
Response Body
{
"path":[
"1:marko",
"1:josh",
"2:ripple"
]
}
3.2.8.3 Use Cases
Used to find the shortest path between two vertices, for example:
- In a social network, finding the shortest path between two users, representing the closest friend relationship chain.
- In a device association network, finding the shortest association relationship between two devices.
3.2.9 All Shortest Paths
3.2.9.1 Function Introduction
Find all shortest paths between a starting vertex and a target vertex based on the direction, edge type (optional), and maximum depth.
Params
- source: ID of the starting vertex, required.
- target: ID of the target vertex, required.
- direction: Direction in which the starting vertex expands (OUT, IN, BOTH). Optional, default is BOTH.
- max_depth: Maximum number of steps, required.
- label: Edge type, optional. Default represents all edge labels.
- max_degree: Maximum number of adjacent edges to traverse for each vertex during the query process. Optional, default is 10000.
- skip_degree: Used to set the minimum number of edges to skip super vertices during the query process. If the number of adjacent edges for a vertex is greater than skip_degree, the vertex is completely skipped. Optional, default is 0 (not enabled), which means no skipping. (Note: When this configuration is enabled, the traversal will attempt to access skip_degree edges of a vertex, not just max_degree edges. This incurs additional traversal overhead and may have a significant impact on query performance. Please enable it after understanding and confirming.)
- capacity: Maximum number of vertices to be visited during the traversal process. Optional, default is 10000000.
3.2.9.2 Usage Method
Method & Url
GET http://localhost:8080/graphs/{graph}/traversers/allshortestpaths?source="A"&target="Z"&max_depth=10
Response Status
Response Body
{
"paths":[
{
"objects": [
"A",
"B",
"C",
"Z"
]
},
{
"objects": [
"A",
"M",
"N",
"Z"
]
}
]
}
3.2.9.3 Use Cases
Used to find all shortest paths between two vertices, for example:
- In a social network, finding all shortest paths between two users, representing all the closest friend relationship chains.
- In a device association network, finding all shortest association relationships between two devices.
3.2.10 Weighted Shortest Path
3.2.10.1 Function Introduction
Find a weighted shortest path between a starting vertex and a target vertex based on the direction, edge type (optional), maximum depth, and edge weight property.
Params
- source: ID of the starting vertex, required.
- target: ID of the target vertex, required.
- direction: Direction in which the starting vertex expands (OUT, IN, BOTH). Optional, default is BOTH.
- label: Edge type, optional. Default represents all edge labels.
- weight: Edge weight property, required. It must be a numeric property.
- max_degree: Maximum number of adjacent edges to traverse for each vertex during the query process. Optional, default is 10000.
- skip_degree: Used to set the minimum number of edges to skip super vertices during the query process. If the number of adjacent edges for a vertex is greater than skip_degree, the vertex is completely skipped. Optional, default is 0 (not enabled), which means no skipping. (Note: When this configuration is enabled, the traversal will attempt to access skip_degree edges of a vertex, not just max_degree edges. This incurs additional traversal overhead and may have a significant impact on query performance. Please enable it after understanding and confirming.)
- capacity: Maximum number of vertices to be visited during the traversal process. Optional, default is 10000000.
- with_vertex: true to include complete vertex information (all vertices in the path) in the result, false to only return vertex IDs. Optional, default is false.
3.2.10.2 Usage Method
Method & Url
GET http://localhost:8080/graphs/{graph}/traversers/weightedshortestpath?source="1:marko"&target="2:ripple"&weight="weight"&with_vertex=true
Response Status
Response Body
{
"path": {
"weight": 2.0,
"vertices": [
"1:marko",
"1:josh",
"2:ripple"
]
},
"vertices": [
{
"id": "1:marko",
"label": "person",
"type": "vertex",
"properties": {
"name": "marko",
"age": 29,
"city": "Beijing"
}
},
{
"id": "1:josh",
"label": "person",
"type": "vertex",
"properties": {
"name": "josh",
"age": 32,
"city": "Beijing"
}
},
{
"id": "2:ripple",
"label": "software",
"type": "vertex",
"properties": {
"name": "ripple",
"lang": "java",
"price": 199
}
}
]
}
3.2.10.3 Use Cases
Used to find the weighted shortest path between two vertices, for example:
- In a transportation network, finding the transportation method that requires the least cost from city A to city B.
3.2.11 Single Source Shortest Path
3.2.11.1 Function Introduction
Starting from a vertex, find the shortest paths from that vertex to other vertices in the graph (optional with weight).
Params
- source: ID of the starting vertex, required.
- direction: Direction in which the starting vertex expands (OUT, IN, BOTH). Optional, default is BOTH.
- label: Edge type, optional. Default represents all edge labels.
- weight: Edge weight property, optional. It must be a numeric property. If not provided or the edges don’t have this property, the weight is considered as 1.0.
- max_degree: Maximum number of adjacent edges to traverse for each vertex during the query process. Optional, default is 10000.
- skip_degree: Used to set the minimum number of edges to skip super vertices during the query process. If the number of adjacent edges for a vertex is greater than skip_degree, the vertex is completely skipped. Optional, default is 0 (not enabled), which means no skipping. (Note: When this configuration is enabled, the traversal will attempt to access skip_degree edges of a vertex, not just max_degree edges. This incurs additional traversal overhead and may have a significant impact on query performance. Please enable it after understanding and confirming.)
- capacity: Maximum number of vertices to be visited during the traversal process. Optional, default is 10000000.
- limit: Number of target vertices to be queried and the number of shortest paths to be returned. Optional, default is 10.
- with_vertex: true to include complete vertex information (all vertices in the path) in the result, false to only return vertex IDs. Optional, default is false.
3.2.11.2 Usage Method
Method & Url
GET http://localhost:8080/graphs/{graph}/traversers/singlesourceshortestpath?source="1:marko"&with_vertex=true
Response Status
Response Body
{
"paths": {
"2:ripple": {
"weight": 2.0,
"vertices": [
"1:marko",
"1:josh",
"2:ripple"
]
},
"1:josh": {
"weight": 1.0,
"vertices": [
"1:marko",
"1:josh"
]
},
"1:vadas": {
"weight": 1.0,
"vertices": [
"1:marko",
"1:vadas"
]
},
"1:peter": {
"weight": 2.0,
"vertices": [
"1:marko",
"2:lop",
"1:peter"
]
},
"2:lop": {
"weight": 1.0,
"vertices": [
"1:marko",
"2:lop"
]
}
},
"vertices": [
{
"id": "2:ripple",
"label": "software",
"type": "vertex",
"properties": {
"name": "ripple",
"lang": "java",
"price": 199
}
},
{
"id": "1:marko",
"label": "person",
"type": "vertex",
"properties": {
"name": "marko",
"age": 29,
"city": "Beijing"
}
},
{
"id": "1:josh",
"label": "person",
"type": "vertex",
"properties": {
"name": "josh",
"age": 32,
"city": "Beijing"
}
},
{
"id": "1:vadas",
"label": "person",
"type": "vertex",
"properties": {
"name": "vadas",
"age": 27,
"city": "Hongkong"
}
},
{
"id": "1:peter",
"label": "person",
"type": "vertex",
"properties": {
"name": "peter",
"age": 35,
"city": "Shanghai"
}
},
{
"id": "2:lop",
"label": "software",
"type": "vertex",
"properties": {
"name": "lop",
"lang": "java",
"price": 328
}
}
]
}
3.2.11.3 Use Cases
Used to find the weighted shortest path from one vertex to other vertices, for example:
- Finding the shortest travel time by bus from Beijing to all other cities in the country.
3.2.12 Multi Node Shortest Path
3.2.12.1 Function Introduction
Finds the shortest paths between pairs of specified vertices.
Params
- vertices: Defines the starting vertices, required. It can be specified in the following ways:
- ids: Provide a list of vertex IDs as starting vertices.
- label and properties: If no IDs are specified, use the combined conditions of label and properties to query the starting vertices.
- label: Vertex type.
- properties: Query the starting vertices based on property values.
Note: Property values in properties can be a list, indicating that the value of the key can be any value in the list.
- step: Represents the path from the starting vertices to the destination vertices, required. The structure of the step is as follows:
- direction: Represents the direction of the edges (OUT, IN, BOTH). Default is BOTH.
- labels: List of edge types.
- properties: Filters the edges based on property values.
- max_degree: Maximum number of adjacent edges to traverse for each vertex during the query process. Default is 10000. (Note: Before version 0.12, the step only supported “degree” as the parameter name. Starting from version 0.12, “max_degree” is used uniformly, and “degree” is still supported for backward compatibility.)
- skip_degree: Used to set the minimum number of edges to skip super vertices during the query process. If the number of adjacent edges for a vertex is greater than skip_degree, the vertex is completely skipped. Optional, default is 0 (not enabled), which means no skipping. (Note: When this configuration is enabled, the traversal will attempt to access skip_degree edges of a vertex, not just max_degree edges. This incurs additional traversal overhead and may have a significant impact on query performance. Please enable it after understanding and confirming.)
- max_depth: Number of steps, required.
- capacity: Maximum number of vertices to be visited during the traversal process. Optional, default is 10000000.
- with_vertex: true to include complete vertex information (all vertices in the path) in the result, false to only return vertex IDs. Optional, default is false.
3.2.12.2 Usage Method
Method & Url
POST http://localhost:8080/graphs/{graph}/traversers/multinodeshortestpath
Request Body
{
"vertices": {
"ids": ["382:marko", "382:josh", "382:vadas", "382:peter", "383:lop", "383:ripple"]
},
"step": {
"direction": "BOTH",
"properties": {
}
},
"max_depth": 10,
"capacity": 100000000,
"with_vertex": true
}
Response Status
Response Body
{
"paths": [
{
"objects": [
"382:peter",
"383:lop"
]
},
{
"objects": [
"382:peter",
"383:lop",
"382:marko"
]
},
{
"objects": [
"382:peter",
"383:lop",
"382:josh"
]
},
{
"objects": [
"382:peter",
"383:lop",
"382:marko",
"382:vadas"
]
},
{
"objects": [
"383:lop",
"382:marko"
]
},
{
"objects": [
"383:lop",
"382:josh"
]
},
{
"objects": [
"383:lop",
"382:marko",
"382:vadas"
]
},
{
"objects": [
"382:peter",
"383:lop",
"382:josh",
"383:ripple"
]
},
{
"objects": [
"382:marko",
"382:josh"
]
},
{
"objects": [
"383:lop",
"382:josh",
"383:ripple"
]
},
{
"objects": [
"382:marko",
"382:vadas"
]
},
{
"objects": [
"382:marko",
"382:josh",
"383:ripple"
]
},
{
"objects": [
"382:josh",
"383:ripple"
]
},
{
"objects": [
"382:josh",
"382:marko",
"382:vadas"
]
},
{
"objects": [
"382:vadas",
"382:marko",
"382:josh",
"383:ripple"
]
}
],
"vertices": [
{
"id": "382:peter",
"label": "person",
"type": "vertex",
"properties": {
"name": "peter",
"age": 29,
"city": "Shanghai"
}
},
{
"id": "383:lop",
"label": "software",
"type": "vertex",
"properties": {
"name": "lop",
"lang": "java",
"price": 328
}
},
{
"id": "382:marko",
"label": "person",
"type": "vertex",
"properties": {
"name": "marko",
"age": 29,
"city": "Beijing"
}
},
{
"id": "382:josh",
"label": "person",
"type": "vertex",
"properties": {
"name": "josh",
"age": 32,
"city": "Beijing"
}
},
{
"id": "382:vadas",
"label": "person",
"type": "vertex",
"properties": {
"name": "vadas",
"age": 27,
"city": "Hongkong"
}
},
{
"id": "383:ripple",
"label": "software",
"type": "vertex",
"properties": {
"name": "ripple",
"lang": "java",
"price": 199
}
}
]
}
3.2.12.3 Use Cases
Used to find the shortest paths between multiple vertices, for example:
- Finding the shortest paths between multiple companies and their legal representatives.
3.2.13 Paths (GET, Basic Version)
3.2.13.1 Function Introduction
Finds all paths based on conditions such as the starting vertex, destination vertex, direction, edge types (optional), and maximum depth.
Params
- source: ID of the starting vertex, required.
- target: ID of the destination vertex, required.
- direction: Direction in which the starting vertex expands (OUT, IN, BOTH). Optional, default is BOTH.
- label: Edge type. Optional, default represents all edge labels.
- max_depth: Number of steps, required.
- max_degree: Maximum number of adjacent edges to traverse for each vertex during the query process. Optional, default is 10000.
- capacity: Maximum number of vertices to be visited during the traversal process. Optional, default is 10000000.
- limit: Maximum number of paths to be returned. Optional, default is 10.
3.2.13.2 Usage Method
Method & Url
GET http://localhost:8080/graphs/{graph}/traversers/paths?source="1:marko"&target="1:josh"&max_depth=5
Response Status
Response Body
{
"paths":[
{
"objects":[
"1:marko",
"1:josh"
]
},
{
"objects":[
"1:marko",
"2:lop",
"1:josh"
]
}
]
}
3.2.13.3 Use Cases
Used to find all paths between two vertices, for example:
- In a social network, finding all possible relationship paths between two users.
- In a device association network, finding all associated paths between two devices.
3.2.14 Paths (POST, Advanced Version)
3.2.14.1 Function Introduction
Finds all paths based on conditions such as the starting vertex, destination vertex, steps (step), and maximum depth.
Params
- sources: Defines the starting vertices, required. The specification methods include:
- ids: Provide the starting vertices through a list of vertex IDs.
- label and properties: If no IDs are specified, use the label and properties as combined conditions to query the starting vertices.
- label: Vertex type.
- properties: Query the starting vertices based on the values of their properties.
Note: The property values in properties can be a list, indicating that any value corresponding to the key is acceptable.
- targets: Defines the destination vertices, required. The specification methods include:
- ids: Provide the destination vertices through a list of vertex IDs.
- label and properties: If no IDs are specified, use the label and properties as combined conditions to query the destination vertices.
- label: Vertex type.
- properties: Query the destination vertices based on the values of their properties.
Note: The property values in properties can be a list, indicating that any value corresponding to the key is acceptable.
- step: Represents the path from the starting vertex to the destination vertex, required. The structure of Step is as follows:
- direction: Represents the direction of edges (OUT, IN, BOTH). The default is BOTH.
- labels: List of edge types.
- properties: Filters edges based on property values.
- max_degree: Maximum number of adjacent edges to traverse for each vertex during the query process. Default is 10000. (Note: Prior to version 0.12, step only supported degree as a parameter name. Starting from version 0.12, max_degree is used uniformly and degree writing is backward compatible.)
- skip_degree: Used to set the minimum number of edges to be discarded for super vertices during the query process. When the number of adjacent edges for a vertex is greater than skip_degree, the vertex is completely discarded. Optional, if enabled, it must satisfy the constraint
skip_degree >= max_degree. Default is 0 (not enabled), which means no points are skipped. (Note: When this configuration is enabled, the traversal will attempt to visit skip_degree edges of a vertex, not just max_degree edges. This incurs additional traversal overhead and may have a significant impact on query performance. Please make sure to understand before enabling it.)
- max_depth: Number of steps, required.
- nearest: When nearest is true, it means the shortest path length from the starting vertex to the result vertex is depth, and there is no shorter path. When nearest is false, it means there is a path of length depth from the starting vertex to the result vertex (not necessarily the shortest path and can have cycles). Optional, default is true.
- capacity: Maximum number of vertices to be visited during the traversal process. Optional, default is 10000000.
- limit: Maximum number of paths to be returned. Optional, default is 10.
- with_vertex: When true, the results include complete vertex information (all vertices in the path). When false, only the vertex IDs are returned. Optional, default is false.
3.2.14.2 Usage Method
Method & Url
POST http://localhost:8080/graphs/{graph}/traversers/paths
Request Body
{
"sources": {
"ids": ["1:marko"]
},
"targets": {
"ids": ["1:peter"]
},
"step": {
"direction": "BOTH",
"properties": {
"weight": "P.gt(0.01)"
}
},
"max_depth": 10,
"capacity": 100000000,
"limit": 10000000,
"with_vertex": false
}
Response Status
Response Body
{
"paths": [
{
"objects": [
"1:marko",
"1:josh",
"2:lop",
"1:peter"
]
},
{
"objects": [
"1:marko",
"2:lop",
"1:peter"
]
}
]
}
3.2.14.3 Use Cases
Used to find all paths between two vertices, for example:
- In a social network, finding all possible relationship paths between two users.
- In a device association network, finding all associated paths between two devices.
3.2.15 Customized Paths
3.2.15.1 Function Introduction
Finds all paths that meet the specified conditions based on a batch of starting vertices, edge rules (including direction, edge types, and property filters), and maximum depth.
Params
- sources: Defines the starting vertices, required. The specification methods include:
- ids: Provide the starting vertices through a list of vertex IDs.
- label and properties: If no IDs are specified, use the label and properties as combined conditions to query the starting vertices.
- label: Vertex type.
- properties: Query the starting vertices based on the values of their properties.
Note: The property values in properties can be a list, indicating that any value corresponding to the key is acceptable.
- steps: Represents the path rules traversed from the starting vertices and is a list of Steps. Required. The structure of each Step is as follows:
- direction: Represents the direction of edges (OUT, IN, BOTH). The default is BOTH.
- labels: List of edge types.
- properties: Filters edges based on property values.
- weight_by: Calculates the weight of edges based on the specified property. It is effective when sort_by is not NONE and is mutually exclusive with default_weight.
- default_weight: The default weight to be used when there is no property to calculate the weight of edges. It is effective when sort_by is not NONE and is mutually exclusive with weight_by.
- max_degree: Maximum number of adjacent edges to traverse for each vertex during the query process. Default is 10000. (Note: Prior to version 0.12, step only supported degree as a parameter name. Starting from version 0.12, max_degree is used uniformly and degree writing is backward compatible.)
- sample: Used when sampling is needed for the edges that meet the conditions of a specific step. -1 means no sampling, and the default is to sample 100 edges.
- sort_by: Sorts the paths based on their weights. Optional, default is NONE:
- NONE: No sorting, default value.
- INCR: Sorts in ascending order based on path weights.
- DECR: Sorts in descending order based on path weights.
- capacity: Maximum number of vertices to be visited during the traversal process. Optional, default is 10000000.
- limit: Maximum number of paths to be returned. Optional, default is 10.
- with_vertex: When true, the results include complete vertex information (all vertices in the path). When false, only the vertex IDs are returned. Optional, default is false.
3.2.15.2 Usage Method
Method & Url
POST http://localhost:8080/graphs/{graph}/traversers/customizedpaths
Request Body
{
"sources":{
"ids":[
],
"label":"person",
"properties":{
"name":"marko"
}
},
"steps":[
{
"direction":"OUT",
"labels":[
"knows"
],
"weight_by":"weight",
"max_degree":-1
},
{
"direction":"OUT",
"labels":[
"created"
],
"default_weight":8,
"max_degree":-1,
"sample":1
}
],
"sort_by":"INCR",
"with_vertex":true,
"capacity":-1,
"limit":-1
}
Response Status
Response Body
{
"paths":[
{
"objects":[
"1:marko",
"1:josh",
"2:lop"
],
"weights":[
1,
8
]
}
],
"vertices":[
{
"id":"1:marko",
"label":"person",
"type":"vertex",
"properties":{
"city":[
{
"id":"1:marko>city",
"value":"Beijing"
}
],
"name":[
{
"id":"1:marko>name",
"value":"marko"
}
],
"age":[
{
"id":"1:marko>age",
"value":29
}
]
}
},
{
"id":"1:josh",
"label":"person",
"type":"vertex",
"properties":{
"city":[
{
"id":"1:josh>city",
"value":"Beijing"
}
],
"name":[
{
"id":"1:josh>name",
"value":"josh"
}
],
"age":[
{
"id":"1:josh>age",
"value":32
}
]
}
},
{
"id":"2:lop",
"label":"software",
"type":"vertex",
"properties":{
"price":[
{
"id":"2:lop>price",
"value":328
}
],
"name":[
{
"id":"2:lop>name",
"value":"lop"
}
],
"lang":[
{
"id":"2:lop>lang",
"value":"java"
}
]
}
}
]
}
3.2.15.3 Use Cases
Suitable for finding various complex sets of paths, for example:
- In a social network, finding the paths from users who have watched movies directed by Zhang Yimou to the influencers they follow (Zhang Yimou —> Movie —> User —> Influencer).
- In a risk control network, finding the paths from multiple high-risk users to the friends of their direct relatives (High-risk user —> Direct relative —> Friend).
3.2.16 Template Paths
3.2.16.1 Function Introduction
Finds all paths that meet the specified conditions based on a batch of starting vertices, edge rules (including direction, edge types, and property filters), and maximum depth.
Params
- sources: Defines the starting vertices, required. The specification methods include:
- ids: Provide the starting vertices through a list of vertex IDs.
- label and properties: If no IDs are specified, use the label and properties as combined conditions to query the starting vertices.
- label: Vertex type.
- properties: Query the starting vertices based on the values of their properties.
Note: The property values in properties can be a list, indicating that any value corresponding to the key is acceptable.
- targets: Defines the ending vertices, required. The specification methods include:
- ids: Provide the ending vertices through a list of vertex IDs.
- label and properties: If no IDs are specified, use the label and properties as combined conditions to query the ending vertices.
- label: Vertex type.
- properties: Query the ending vertices based on the values of their properties.
Note: The property values in properties can be a list, indicating that any value corresponding to the key is acceptable.
- steps: Represents the path rules traversed from the starting vertices and is a list of Steps. Required. The structure of each Step is as follows:
- direction: Represents the direction of edges (OUT, IN, BOTH). The default is BOTH.
- labels: List of edge types.
- properties: Filters edges based on property values.
- max_times: The number of times the current step can be repeated. When set to N, it means the starting vertices can pass through the current step 1-N times.
- max_degree: Maximum number of adjacent edges to traverse for each vertex during the query process. Default is 10000. (Note: Prior to version 0.12, step only supported degree as a parameter name. Starting from version 0.12, max_degree is used uniformly and degree writing is backward compatible.)
- skip_degree: Used to set the minimum number of edges to discard super vertices during the query process. When the number of adjacent edges of a vertex is greater than skip_degree, the vertex is completely discarded. Optional. If enabled, it must satisfy the
skip_degree >= max_degree constraint. Default is 0 (not enabled), which means no points are skipped. (Note: After enabling this configuration, traversing will attempt to access a vertex’s skip_degree edges, not just max_degree edges. This incurs additional traversal overhead and may have a significant impact on query performance. Please ensure understanding before enabling.)
- with_ring: Boolean value, true to include cycles; false to exclude cycles. Default is false.
- capacity: Maximum number of vertices to be visited during the traversal process. Optional, default is 10000000.
- limit: Maximum number of paths to be returned. Optional, default is 10.
- with_vertex: When true, the results include complete vertex information (all vertices in the path). When false, only the vertex IDs are returned. Optional, default is
false.
3.2.16.2 Usage Method
Method & Url
POST http://localhost:8080/graphs/{graph}/traversers/templatepaths
Request Body
{
"sources": {
"ids": [],
"label": "person",
"properties": {
"name": "vadas"
}
},
"targets": {
"ids": [],
"label": "software",
"properties": {
"name": "ripple"
}
},
"steps": [
{
"direction": "IN",
"labels": ["knows"],
"properties": {
},
"max_degree": 10000,
"skip_degree": 100000
},
{
"direction": "OUT",
"labels": ["created"],
"properties": {
},
"max_degree": 10000,
"skip_degree": 100000
},
{
"direction": "IN",
"labels": ["created"],
"properties": {
},
"max_degree": 10000,
"skip_degree": 100000
},
{
"direction": "OUT",
"labels": ["created"],
"properties": {
},
"max_degree": 10000,
"skip_degree": 100000
}
],
"capacity": 10000,
"limit": 10,
"with_vertex": true
}
Response Status
Response Body
{
"paths": [
{
"objects": [
"1:vadas",
"1:marko",
"2:lop",
"1:josh",
"2:ripple"
]
}
],
"vertices": [
{
"id": "2:ripple",
"label": "software",
"type": "vertex",
"properties": {
"name": "ripple",
"lang": "java",
"price": 199
}
},
{
"id": "1:marko",
"label": "person",
"type": "vertex",
"properties": {
"name": "marko",
"age": 29,
"city": "Beijing"
}
},
{
"id": "1:josh",
"label": "person",
"type": "vertex",
"properties": {
"name": "josh",
"age": 32,
"city": "Beijing"
}
},
{
"id": "1:vadas",
"label": "person",
"type": "vertex",
"properties": {
"name": "vadas",
"age": 27,
"city": "Hongkong"
}
},
{
"id": "2:lop",
"label": "software",
"type": "vertex",
"properties": {
"name": "lop",
"lang": "java",
"price": 328
}
}
]
}
3.2.16.3 Use Cases
Suitable for finding various complex template paths, such as personA -(Friend)-> personB -(Classmate)-> personC, where the “Friend” and “Classmate” edges can have a maximum depth of 3 and 4 layers, respectively.
3.2.17 Crosspoints
3.2.17.1 Function Introduction
Finds the intersection points based on the specified conditions, including starting vertices, destination vertices, direction, edge types (optional), and maximum depth.
Params
- source: ID of the starting vertex, required.
- target: ID of the destination vertex, required.
- direction: The direction from the starting vertex to the destination vertex. The reverse direction is used from the destination vertex to the starting vertex. When set to BOTH, the direction is not considered (OUT, IN, BOTH). Optional, default is BOTH.
- label: Edge type, optional. Default represents all edge labels.
- max_depth: Number of steps, required.
- max_degree: Maximum number of adjacent edges to traverse for each vertex during the query process. Optional, default is 10000.
- capacity: Maximum number of vertices to be visited during the traversal process. Optional, default is 10000000.
- limit: Maximum number of intersection points to be returned. Optional, default is 10.
3.2.17.2 Usage Method
Method & Url
GET http://localhost:8080/graphs/{graph}/traversers/crosspoints?source="2:lop"&target="2:ripple"&max_depth=5&direction=IN
Response Status
Response Body
{
"crosspoints":[
{
"crosspoint":"1:josh",
"objects":[
"2:lop",
"1:josh",
"2:ripple"
]
}
]
}
3.2.17.3 Use Cases
Used to find the intersection points and their paths between two vertices, such as:
- In a social network, finding the topics or influencers that two users have in common.
- In a family relationship, finding common ancestors.
3.2.18 Customized Crosspoints
3.2.18.1 Function Introduction
Finds the intersection of destination vertices that satisfy the specified conditions, including starting vertices, multiple edge rules (including direction, edge type, and property filters), and maximum depth.
Params
sources: Defines the starting vertices, required. The specified options include:
- ids: Provides a list of vertex IDs as starting vertices.
- label and properties: If no IDs are specified, uses the combined conditions of label and properties to query the starting vertices.
- label: Type of the vertex.
- properties: Queries the starting vertices based on property values.
Note: Property values in properties can be a list, indicating that the value of the key can be any item in the list.
path_patterns: Represents the path rules to be followed from the starting vertices. It is a list of rules. Required. Each rule is a PathPattern.
- Each PathPattern consists of a list of steps, where each step has the following structure:
- direction: Indicates the direction of the edge (OUT, IN, BOTH). Default is BOTH.
- labels: List of edge types.
- properties: Filters the edges based on property values.
- max_degree: Maximum number of adjacent edges to traverse for each vertex during the query process. Default is 10000.
- skip_degree: Sets the minimum number of edges to discard super vertices during the query process. If the number of adjacent edges for a vertex is greater than skip_degree, the vertex is completely discarded. Optional. If enabled, it must satisfy the constraint
skip_degree >= max_degree. Default is 0 (not enabled), which means no vertices are skipped. Note: When this configuration is enabled, the traversal process will attempt to visit skip_degree edges of a vertex, not just max_degree edges. This incurs additional traversal overhead and may significantly impact query performance. Please make sure you understand it before enabling.
capacity: Maximum number of vertices to be visited during the traversal process. Optional. Default is 10000000.
limit: Maximum number of paths to be returned. Optional. Default is 10.
with_path: When set to true, returns the paths where the intersection points are located. When set to false, does not return the paths. Optional. Default is false.
with_vertex: Optional. Default is false.
- When set to true, the result includes complete vertex information (all vertices in the paths):
- When with_path is true, it returns complete information of all vertices in the paths.
- When with_path is false, it returns complete information of all intersection points.
- When set to false, only the vertex IDs are returned.
3.2.18.2 Usage Method
Method & Url
POST http://localhost:8080/graphs/{graph}/traversers/customizedcrosspoints
Request Body
{
"sources":{
"ids":[
"2:lop",
"2:ripple"
]
},
"path_patterns":[
{
"steps":[
{
"direction":"IN",
"labels":[
"created"
],
"max_degree":-1
}
]
}
],
"with_path":true,
"with_vertex":true,
"capacity":-1,
"limit":-1
}
Response Status
Response Body
{
"crosspoints":[
"1:josh"
],
"paths":[
{
"objects":[
"2:ripple",
"1:josh"
]
},
{
"objects":[
"2:lop",
"1:josh"
]
}
],
"vertices":[
{
"id":"2:ripple",
"label":"software",
"type":"vertex",
"properties":{
"price":[
{
"id":"2:ripple>price",
"value":199
}
],
"name":[
{
"id":"2:ripple>name",
"value":"ripple"
}
],
"lang":[
{
"id":"2:ripple>lang",
"value":"java"
}
]
}
},
{
"id":"1:josh",
"label":"person",
"type":"vertex",
"properties":{
"city":[
{
"id":"1:josh>city",
"value":"Beijing"
}
],
"name":[
{
"id":"1:josh>name",
"value":"josh"
}
],
"age":[
{
"id":"1:josh>age",
"value":32
}
]
}
},
{
"id":"2:lop",
"label":"software",
"type":"vertex",
"properties":{
"price":[
{
"id":"2:lop>price",
"value":328
}
],
"name":[
{
"id":"2:lop>name",
"value":"lop"
}
],
"lang":[
{
"id":"2:lop>lang",
"value":"java"
}
]
}
}
]
}
3.2.18.3 Use Cases
Used to query a group of vertices that have intersections at the destination through multiple paths. For example:
- In a product knowledge graph, multiple models of smartphones, learning devices, and gaming devices belong to the top-level category of electronic devices through different lower-level category paths.
3.2.19 Rings
3.2.19.1 Function Introduction
Finds reachable cycles based on the specified conditions, including starting vertices, direction, edge types (optional), and maximum depth.
For example: 1 -> 25 -> 775 -> 14690 -> 25, where the cycle is 25 -> 775 -> 14690 -> 25.
Params
- source: Starting vertex ID, required.
- direction: Direction of edges emitted from the starting vertex (OUT, IN, BOTH). Optional. Default is BOTH.
- label: Edge type. Optional. Default represents all edge labels.
- max_depth: Number of steps. Required.
- source_in_ring: Whether the starting point is included in the cycle. Optional. Default is true.
- max_degree: Maximum number of adjacent edges to traverse for each vertex during the query process. Optional. Default is 10000.
- capacity: Maximum number of vertices to be visited during the traversal process. Optional. Default is 10000000.
- limit: Maximum number of reachable cycles to be returned. Optional. Default is 10.
3.2.19.2 Usage Method
Method & Url
GET http://localhost:8080/graphs/{graph}/traversers/rings?source="1:marko"&max_depth=2
Response Status
Response Body
{
"rings":[
{
"objects":[
"1:marko",
"1:josh",
"1:marko"
]
},
{
"objects":[
"1:marko",
"1:vadas",
"1:marko"
]
},
{
"objects":[
"1:marko",
"2:lop",
"1:marko"
]
}
]
}
3.2.19.3 Use Cases
Used to query cycles reachable from the starting vertex, for example:
- In a risk control project, querying individuals or devices involved in a circular guarantee that a user is connected to.
- In a device network, discovering devices that have circular references around a specific device.
3.2.20 Rays
3.2.20.1 Function Introduction
Finds paths that diverge from the starting vertex and reach boundary vertices based on the specified conditions, including starting vertices, direction, edge types (optional), and maximum depth.
For example: 1 -> 25 -> 775 -> 14690 -> 2289 -> 18379, where 18379 is the boundary vertex, meaning there are no edges emitted from 18379.
Params
- source: Starting vertex ID, required.
- direction: Direction of edges emitted from the starting vertex (OUT, IN, BOTH). Optional. Default is BOTH.
- label: Edge type. Optional. Default represents all edge labels.
- max_depth: Number of steps. Required.
- max_degree: Maximum number of adjacent edges to traverse for each vertex during the query process. Optional. Default is 10000.
- capacity: Maximum number of vertices to be visited during the traversal process. Optional. Default is 10000000.
- limit: Maximum number of non-cycle paths to be returned. Optional. Default is 10.
3.2.20.2 Usage Method
Method & Url
GET http://localhost:8080/graphs/{graph}/traversers/rays?source="1:marko"&max_depth=2&direction=OUT
Response Status
Response Body
{
"rays":[
{
"objects":[
"1:marko",
"1:vadas"
]
},
{
"objects":[
"1:marko",
"2:lop"
]
},
{
"objects":[
"1:marko",
"1:josh",
"2:ripple"
]
},
{
"objects":[
"1:marko",
"1:josh",
"2:lop"
]
}
]
}
3.2.20.3 Use Cases
Used to find paths from the starting vertex to boundary vertices based on a specific relationship, for example:
- In a family relationship, finding paths from a person to all descendants who do not have children.
- In a device network, discovering paths from a specific device to terminal devices.
3.2.21.1 Function Introduction
Queries a batch of “fusiform similar vertices” based on specified conditions. When two vertices share a certain relationship with many common vertices, they are considered “fusiform similar vertices.” For example, if “Reader A” has read 100 books, readers who have read 80 or more of these 100 books can be defined as “fusiform similar vertices” of “Reader A.”
Params
sources: Starting vertices, required. Specify using:
- ids: Provide a list of vertex IDs as starting vertices.
- label and properties: If ids are not specified, use the combined conditions of label and properties to query the starting vertices.
- label: Vertex type.
- properties: Query the starting vertices based on the values of their properties.
Note: Property values in properties can be a list, indicating that the value of the key can be any value in the list.
label: Edge type. Optional. Default represents all edge labels.
direction: Direction in which the starting vertex diverges (OUT, IN, BOTH). Optional. Default is BOTH.
min_neighbors: Minimum number of neighbors. If the number of neighbors is less than this threshold, the starting vertex is not considered a “fusiform similar vertex.” For example, if you want to find “fusiform similar vertices” of books read by “Reader A,” and min_neighbors is set to 100, it means that “Reader A” must have read at least 100 books to have “fusiform similar vertices.” Required.
alpha: Similarity, representing the proportion of common neighbors between the starting vertex and “fusiform similar vertices” to all neighbors of the starting vertex. Required.
min_similars: Minimum number of “fusiform similar vertices.” Only when the number of “fusiform similar vertices” of the starting vertex is greater than or equal to this value, the starting vertex and its “fusiform similar vertices” will be returned. Optional. Default is 1.
top: Returns the top highest similarity “fusiform similar vertices” of a starting vertex. Required. 0 means all.
group_property: Used together with min_groups. Returns the starting vertex and its “fusiform similar vertices” only if there are at least min_groups different values for a certain attribute of the starting vertex and its “fusiform similar vertices.” For example, when recommending “out-of-town” book buddies for “Reader A,” set group_property to the “city” attribute of readers and min_group to at least 2. Optional. If not specified, no filtering based on attributes is needed.
min_groups: Used together with group_property. Only meaningful when group_property is set.
max_degree: Maximum number of adjacent edges to traverse for each vertex during the query process. Optional. Default is 10000.
capacity: Maximum number of vertices to be visited during the traversal process. Optional. Default is 10000000.
limit: Maximum number of results to be returned (one starting vertex and its “fusiform similar vertices” count as one result). Optional. Default is 10.
with_intermediary: Whether to return the starting vertex and the intermediate vertices that are commonly related to the “fusiform
similar vertices.” Default is false.
- with_vertex: Optional. Default is false.
- true: Returns complete vertex information in the results.
- false: Only returns vertex IDs.
3.2.21.2 Usage Method
Method & Url
POST http://localhost:8080/graphspaces/DEFAULT/graphs/hugegraph/traversers/fusiformsimilarity
Request Body
{
"sources":{
"ids":[],
"label": "person",
"properties": {
"name":"p1"
}
},
"label":"read",
"direction":"OUT",
"min_neighbors":8,
"alpha":0.75,
"min_similars":1,
"top":0,
"group_property":"city",
"min_group":2,
"max_degree": 10000,
"capacity": -1,
"limit": -1,
"with_intermediary": false,
"with_vertex":true
}
Response Status
Response Body
{
"similars": {
"3:p1": [
{
"id": "3:p2",
"score": 0.8888888888888888,
"intermediaries": [
]
},
{
"id": "3:p3",
"score": 0.7777777777777778,
"intermediaries": [
]
}
]
},
"vertices": [
{
"id": "3:p1",
"label": "person",
"type": "vertex",
"properties": {
"name": "p1",
"city": "Beijing"
}
},
{
"id": "3:p2",
"label": "person",
"type": "vertex",
"properties": {
"name": "p2",
"city": "Shanghai"
}
},
{
"id": "3:p3",
"label": "person",
"type": "vertex",
"properties": {
"name": "p3",
"city": "Beijing"
}
}
]
}
3.2.21.3 Use Cases
Used to query vertices that have high similarity with a group of vertices. For example:
- Readers with similar book lists to a specific reader.
- Players who play similar games to a specific player.
3.2.22 Vertices
3.2.22.1 Batch Query Vertices by Vertex IDs
Params
- ids: List of vertex IDs to be queried.
Method & Url
GET http://localhost:8080/graphspaces/DEFAULT/graphs/hugegraph/traversers/vertices?ids="1:marko"&ids="2:lop"
Response Status
Response Body
{
"vertices":[
{
"id":"1:marko",
"label":"person",
"type":"vertex",
"properties":{
"city":[
{
"id":"1:marko>city",
"value":"Beijing"
}
],
"name":[
{
"id":"1:marko>name",
"value":"marko"
}
],
"age":[
{
"id":"1:marko>age",
"value":29
}
]
}
},
{
"id":"2:lop",
"label":"software",
"type":"vertex",
"properties":{
"price":[
{
"id":"2:lop>price",
"value":328
}
],
"name":[
{
"id":"2:lop>name",
"value":"lop"
}
],
"lang":[
{
"id":"2:lop>lang",
"value":"java"
}
]
}
}
]
}
Obtain vertex shard information by specifying the shard size split_size (can be used in conjunction with Scan in 3.2.21.3 to retrieve vertices).
Params
- split_size: Shard size, required.
Method & Url
GET http://localhost:8080/graphspaces/DEFAULT/graphs/hugegraph/traversers/vertices/shards?split_size=67108864
Response Status
Response Body
{
"shards":[
{
"start": "0",
"end": "2165893",
"length": 0
},
{
"start": "2165893",
"end": "4331786",
"length": 0
},
{
"start": "4331786",
"end": "6497679",
"length": 0
},
{
"start": "6497679",
"end": "8663572",
"length": 0
},
......
]
}
Retrieve vertices in batches based on the specified shard information (refer to 3.2.21.2 Shard for obtaining shard information).
Params
- start: Shard start position, required.
- end: Shard end position, required.
- page: Page position for pagination, optional. Default is null, no pagination. When page is “”, it represents the first page of pagination starting from the position indicated by start.
- page_limit: The upper limit of the number of vertices per page when retrieving vertices with pagination, optional. Default is 100000.
Method & Url
GET http://localhost:8080/graphspaces/DEFAULT/graphs/hugegraph/traversers/vertices/scan?start=0&end=4294967295
Response Status
Response Body
{
"vertices":[
{
"id":"2:ripple",
"label":"software",
"type":"vertex",
"properties":{
"price":[
{
"id":"2:ripple>price",
"value":199
}
],
"name":[
{
"id":"2:ripple>name",
"value":"ripple"
}
],
"lang":[
{
"id":"2:ripple>lang",
"value":"java"
}
]
}
},
{
"id":"1:vadas",
"label":"person",
"type":"vertex",
"properties":{
"city":[
{
"id":"1:vadas>city",
"value":"Hongkong"
}
],
"name":[
{
"id":"1:vadas>name",
"value":"vadas"
}
],
"age":[
{
"id":"1:vadas>age",
"value":27
}
]
}
},
{
"id":"1:peter",
"label":"person",
"type":"vertex",
"properties":{
"city":[
{
"id":"1:peter>city",
"value":"Shanghai"
}
],
"name":[
{
"id":"1:peter>name",
"value":"peter"
}
],
"age":[
{
"id":"1:peter>age",
"value":35
}
]
}
},
{
"id":"1:josh",
"label":"person",
"type":"vertex",
"properties":{
"city":[
{
"id":"1:josh>city",
"value":"Beijing"
}
],
"name":[
{
"id":"1:josh>name",
"value":"josh"
}
],
"age":[
{
"id":"1:josh>age",
"value":32
}
]
}
},
{
"id":"1:marko",
"label":"person",
"type":"vertex",
"properties":{
"city":[
{
"id":"1:marko>city",
"value":"Beijing"
}
],
"name":[
{
"id":"1:marko>name",
"value":"marko"
}
],
"age":[
{
"id":"1:marko>age",
"value":29
}
]
}
},
{
"id":"2:lop",
"label":"software",
"type":"vertex",
"properties":{
"price":[
{
"id":"2:lop>price",
"value":328
}
],
"name":[
{
"id":"2:lop>name",
"value":"lop"
}
],
"lang":[
{
"id":"2:lop>lang",
"value":"java"
}
]
}
}
]
}
3.2.22.4 Use Cases
- Querying vertices by ID list, which can be used for batch vertex queries. For example, after querying multiple paths in a path search, you can further query all vertex properties of a specific path.
- Retrieving shards and querying vertices by shard, which can be used to traverse all vertices.
3.2.23 Edges
3.2.23.1 Batch Retrieve Edges Based on Edge IDs
Params
- ids: List of edge IDs to be queried.
Method & Url
GET http://localhost:8080/graphspaces/DEFAULT/graphs/hugegraph/traversers/edges?ids="S1:josh>1>>S2:lop"&ids="S1:josh>1>>S2:ripple"
Response Status
Response Body
{
"edges": [
{
"id": "S1:josh>1>>S2:lop",
"label": "created",
"type": "edge",
"inVLabel": "software",
"outVLabel": "person",
"inV": "2:lop",
"outV": "1:josh",
"properties": {
"date": "20091111",
"weight": 0.4
}
},
{
"id": "S1:josh>1>>S2:ripple",
"label": "created",
"type": "edge",
"inVLabel": "software",
"outVLabel": "person",
"inV": "2:ripple",
"outV": "1:josh",
"properties": {
"date": "20171210",
"weight": 1
}
}
]
}
Retrieve shard information for edges by specifying the shard size (split_size). This can be used in conjunction with the Scan operation described in section 3.2.22.3 to retrieve edges.
Params
- split_size: Shard size, required field.
Method & Url
GET http://localhost:8080/graphspaces/DEFAULT/graphs/hugegraph/traversers/edges/shards?split_size=4294967295
Response Status
Response Body
{
"shards":[
{
"start": "0",
"end": "1073741823",
"length": 0
},
{
"start": "1073741823",
"end": "2147483646",
"length": 0
},
{
"start": "2147483646",
"end": "3221225469",
"length": 0
},
{
"start": "3221225469",
"end": "4294967292",
"length": 0
},
{
"start": "4294967292",
"end": "4294967295",
"length": 0
}
]
}
Batch retrieve edges by specifying shard information (refer to section 3.2.22.2 for shard retrieval).
Params
- start: Shard starting position, required field.
- end: Shard ending position, required field.
- page: Page position for pagination, optional field. Default is null, which means no pagination. When
page is empty, it indicates the first page of pagination starting from the position indicated by start. - page_limit: Upper limit of the number of edges per page for paginated retrieval, optional field. Default is 100000.
Method & Url
GET http://localhost:8080/graphspaces/DEFAULT/graphs/hugegraph/traversers/edges/scan?start=0&end=3221225469
Response Status
Response Body
{
"edges":[
{
"id":"S1:peter>2>>S2:lop",
"label":"created",
"type":"edge",
"inVLabel":"software",
"outVLabel":"person",
"inV":"2:lop",
"outV":"1:peter",
"properties":{
"weight":0.2,
"date":"20170324"
}
},
{
"id":"S1:josh>2>>S2:lop",
"label":"created",
"type":"edge",
"inVLabel":"software",
"outVLabel":"person",
"inV":"2:lop",
"outV":"1:josh",
"properties":{
"weight":0.4,
"date":"20091111"
}
},
{
"id":"S1:josh>2>>S2:ripple",
"label":"created",
"type":"edge",
"inVLabel":"software",
"outVLabel":"person",
"inV":"2:ripple",
"outV":"1:josh",
"properties":{
"weight":1,
"date":"20171210"
}
},
{
"id":"S1:marko>1>20130220>S1:josh",
"label":"knows",
"type":"edge",
"inVLabel":"person",
"outVLabel":"person",
"inV":"1:josh",
"outV":"1:marko",
"properties":{
"weight":1,
"date":"20130220"
}
},
{
"id":"S1:marko>1>20160110>S1:vadas",
"label":"knows",
"type":"edge",
"inVLabel":"person",
"outVLabel":"person",
"inV":"1:vadas",
"outV":"1:marko",
"properties":{
"weight":0.5,
"date":"20160110"
}
},
{
"id":"S1:marko>2>>S2:lop",
"label":"created",
"type":"edge",
"inVLabel":"software",
"outVLabel":"person",
"inV":"2:lop",
"outV":"1:marko",
"properties":{
"weight":0.4,
"date":"20171210"
}
}
]
}
3.2.23.4 Use Cases
- Querying edges based on ID list, suitable for batch retrieval of edges.
- Retrieving shard information and querying edges based on shards, useful for traversing all edges.
5.1.11 - Rank API
Rank REST API: Execute graph node ranking algorithms such as PageRank and Personalized PageRank for centrality analysis.
4.1 Rank API overview
Not only the Graph iteration (traverser) method, HugeGraph-Server also provide Rank API for recommendation purpose.
You can use it to recommend some vertexes much closer to a vertex.
4.2 Details of Rank API
4.2.1 Personal Rank API
A typical scenario for Personal Rank algorithm is in recommendation application. According to the out edges of a vertex,
recommend some other vertices that having the same or similar edges.
Here is a use case:
According to someone’s reading habit or reading history, we can recommend some books he may be interested or some book pal.
For Example:
- Suppose we have a vertex, Person type, and named tom.He like 5 books
a,b,c,d,e. If we want to recommend some book pal and books for tom, an easier idea is let’s check whoever also liked these books (common hobby based). - Now, we need someone else, like neo, he like three books
b,d,f. And Jay, he like 4 books c,d,e,g, and Lee, he also like 4 books a,d,e,f. - For we don’t need to recommend books tom already read, the recommend-list should only contain the books Tom’s book pal already read but tom haven’t read yet. Such as book “f” and “g”, and with priority f > g.
- Now, we recompute Tom’s personal rank value, we will get a sorted TopN book pal or book recommend-list. (Choose OTHER_LABEL,for Only Book purpose)
4.2.1.0 Data Preparation
The case above is simple. Here we also provide a public test dataset MovieLens for use case.
You should download the dataset. The load it into HugeGraph with HugeGraph-Loader. To make it simple, we ignore all properties data of user and move. only field id is enough. we also ignore the value of edge rating.
The metadata for input file and mapping file as follows:
////////////////////////////////////////////////////////////
// UserID::Gender::Age::Occupation::Zip-code
// MovieID::Title::Genres
// UserID::MovieID::Rating::Timestamp
////////////////////////////////////////////////////////////
// Define schema
schema.propertyKey("id").asInt().ifNotExist().create();
schema.propertyKey("rate").asInt().ifNotExist().create();
schema.vertexLabel("user")
.properties("id")
.primaryKeys("id")
.ifNotExist()
.create();
schema.vertexLabel("movie")
.properties("id")
.primaryKeys("id")
.ifNotExist()
.create();
schema.edgeLabel("rating")
.sourceLabel("user")
.targetLabel("movie")
.properties("rate")
.ifNotExist()
.create();
{
"vertices": [
{
"label": "user",
"input": {
"type": "file",
"path": "users.dat",
"format": "TEXT",
"delimiter": "::",
"header": ["UserID", "Gender", "Age", "Occupation", "Zip-code"]
},
"ignored": ["Gender", "Age", "Occupation", "Zip-code"],
"mapping": {
"UserID": "id"
}
},
{
"label": "movie",
"input": {
"type": "file",
"path": "movies.dat",
"format": "TEXT",
"delimiter": "::",
"header": ["MovieID", "Title", "Genres"]
},
"ignored": ["Title", "Genres"],
"mapping": {
"MovieID": "id"
}
}
],
"edges": [
{
"label": "rating",
"source": ["UserID"],
"target": ["MovieID"],
"input": {
"type": "file",
"path": "ratings.dat",
"format": "TEXT",
"delimiter": "::",
"header": ["UserID", "MovieID", "Rating", "Timestamp"]
},
"ignored": ["Timestamp"],
"mapping": {
"UserID": "id",
"MovieID": "id",
"Rating": "rate"
}
}
]
}
Note: modify the input.path to your local path.
4.2.1.1 Function Introduction
suitable for bipartite graph, will return all vertex or a list of its correlation which related to all source vertex.
Bipartite Graph is a special model in Graph Theory, as well as a special flow in network. The strongest feature is, it split all vertex in graph into two sets. The vertex in the set is not connected. However,the vertex in two sets may connect with each other.
Suppose we have one bipartite graph based on user and things.
A random walk based PersonalRank algorithm should be likes this:
- Choose a user u as start vertex, let’s set the initial weight to be 1.0 . Go from Vu with probability alpha to a neighbor vertex, and (1-alpha) to stay.
- If we decide to go outside, we would like to choose an edge, such as
rating, to find a common judge.- Then choose the neighbors of current vertex randomly with uniform distribution, and reset the weights with uniform distribution.
- Compensate the source vertex’s weight with (1 - alpha)
- Repeat step 2;
- Convergence after reaching a certain number of steps or precision, then we got a recommend-list.
Params
Required:
- source: the id of source vertex
- label: edge label go from the source vertex, should connect two different type of vertex
Optional:
- alpha: the probability of going out for one vertex in each iteration,similar to the alpha of PageRank,required, value range is (0, 1], default 0.85.
- max_degree: in query process, the max iteration number of adjacency edge for a vertex, default
10000 - max_depth: iteration number,range [2, 50], default
5 - with_label:result filter,default
BOTH_LABEL,optional list as follows:- SAME_LABEL:Only keep vertex which has the same type as source vertex
- OTHER_LABEL:Only keep vertex which has different type as source vertex (the another part in bipartite graph)
- BOTH_LABEL:Keep both type vertex
- limit: max return vertex number,default
100 - max_diff: accuracy for convergence, default
0.0001 (will implement soon) - sorted: whether sort the result by rank or not, true for descending sort, false for none, default
true
4.2.1.2 Usage
Method & Url
POST http://localhost:8080/graphspaces/DEFAULT/graphs/hugegraph/traversers/personalrank
Request Body
{
"source": "1:1",
"label": "rating",
"alpha": 0.6,
"max_depth": 15,
"with_label": "OTHER_LABEL",
"sorted": true,
"limit": 10
}
Response Status
Response Body
{
"2:2858": 0.0005014026017816927,
"2:1196": 0.0004336708357653617,
"2:1210": 0.0004128083140214213,
"2:593": 0.00038117341069881513,
"2:480": 0.00037005373269728036,
"2:1198": 0.000366641614652057,
"2:2396": 0.0003622362410538888,
"2:2571": 0.0003593312457300953,
"2:589": 0.00035922123055598566,
"2:110": 0.0003466135844390885
}
4.2.1.3 Suitable Scenario
In a bipartite graph build by two different type of vertex, recommend other most related vertex to one vertex. for example:
- Reading recommendation: find out the books should be recommended to someone first, It is also possible to recommend book pal with the highest common preferences at the same time (just like: WeChat “your friend also read xx " function)
- Social recommendation: find out other Poster who interested in same topics, or other News/Messages you may be interested with (Such as : “Hot News” function in Weibo)
- Commodity recommendation: according to someone’s shopping habit,find out a commodity list should recommend first, some online salesman may also be good (Such as : “You May Like” function in TaoBao)
4.2.2 Neighbor Rank API
4.2.2.0 Data Preparation
public class Loader {
public static void main(String[] args) {
HugeClient client = new HugeClient("http://127.0.0.1:8080", "hugegraph");
SchemaManager schema = client.schema();
schema.propertyKey("name").asText().ifNotExist().create();
schema.vertexLabel("person")
.properties("name")
.useCustomizeStringId()
.ifNotExist()
.create();
schema.vertexLabel("movie")
.properties("name")
.useCustomizeStringId()
.ifNotExist()
.create();
schema.edgeLabel("follow")
.sourceLabel("person")
.targetLabel("person")
.ifNotExist()
.create();
schema.edgeLabel("like")
.sourceLabel("person")
.targetLabel("movie")
.ifNotExist()
.create();
schema.edgeLabel("directedBy")
.sourceLabel("movie")
.targetLabel("person")
.ifNotExist()
.create();
GraphManager graph = client.graph();
Vertex O = graph.addVertex(T.label, "person", T.id, "O", "name", "O");
Vertex A = graph.addVertex(T.label, "person", T.id, "A", "name", "A");
Vertex B = graph.addVertex(T.label, "person", T.id, "B", "name", "B");
Vertex C = graph.addVertex(T.label, "person", T.id, "C", "name", "C");
Vertex D = graph.addVertex(T.label, "person", T.id, "D", "name", "D");
Vertex E = graph.addVertex(T.label, "movie", T.id, "E", "name", "E");
Vertex F = graph.addVertex(T.label, "movie", T.id, "F", "name", "F");
Vertex G = graph.addVertex(T.label, "movie", T.id, "G", "name", "G");
Vertex H = graph.addVertex(T.label, "movie", T.id, "H", "name", "H");
Vertex I = graph.addVertex(T.label, "movie", T.id, "I", "name", "I");
Vertex J = graph.addVertex(T.label, "movie", T.id, "J", "name", "J");
Vertex K = graph.addVertex(T.label, "person", T.id, "K", "name", "K");
Vertex L = graph.addVertex(T.label, "person", T.id, "L", "name", "L");
Vertex M = graph.addVertex(T.label, "person", T.id, "M", "name", "M");
O.addEdge("follow", A);
O.addEdge("follow", B);
O.addEdge("follow", C);
D.addEdge("follow", O);
A.addEdge("follow", B);
A.addEdge("like", E);
A.addEdge("like", F);
B.addEdge("like", G);
B.addEdge("like", H);
C.addEdge("like", I);
C.addEdge("like", J);
E.addEdge("directedBy", K);
F.addEdge("directedBy", B);
F.addEdge("directedBy", L);
G.addEdge("directedBy", M);
}
}
4.2.2.1 Function Introduction
In a general graph structure,find the first N vertices of each layer with the highest correlation with a given starting point and their relevance.
In graph words: to go out from the starting point, get the probability of going to each vertex of each layer.
Params
- source: id of source vertex,required
- alpha:the probability of going out for one vertex in each iteration,similar to the alpha of PageRank,required, value range is (0, 1]
- steps: a path rule for source vertex visited,it’s a list of Step,each Step map to a layout in result,required.The structure of each Step as follows:
- direction:the direction of edge(OUT, IN, BOTH), BOTH for default.
- labels:a list of edge types, will union all edge types
- max_degree:in query process, the max iteration number of adjacency edge for a vertex, default
10000
(Note: before v0.12 step only support degree as parameter name, from v0.12, use max_degree, compatible with degree) - top: retains only the top N results with the highest weight in each layer of the results, default 100, max 1000
- capacity: the maximum number of vertexes visited during the traversal, optional, default 10000000
4.2.2.2 Usage
Method & Url
POST http://localhost:8080/graphspaces/DEFAULT/graphs/hugegraph/traversers/neighborrank
Request Body
{
"source":"O",
"steps":[
{
"direction":"OUT",
"labels":[
"follow"
],
"max_degree":-1,
"top":100
},
{
"direction":"OUT",
"labels":[
"follow",
"like"
],
"max_degree":-1,
"top":100
},
{
"direction":"OUT",
"labels":[
"directedBy"
],
"max_degree":-1,
"top":100
}
],
"alpha":0.9,
"capacity":-1
}
Response Status
Response Body
{
"ranks": [
{
"O": 1
},
{
"B": 0.4305,
"A": 0.3,
"C": 0.3
},
{
"G": 0.17550000000000002,
"H": 0.17550000000000002,
"I": 0.135,
"J": 0.135,
"E": 0.09000000000000001,
"F": 0.09000000000000001
},
{
"M": 0.15795,
"K": 0.08100000000000002,
"L": 0.04050000000000001
}
]
}
4.2.2.3 Suitable Scenario
Find the vertices in different layers for a given start point that should be most recommended
- For example, in the four-layered structure of the audience, friends, movies, and directors, according to the movies that a certain audience’s friends like, recommend movies for that audience, or recommend directors for those movies based on who made them.
5.1.12 - Variable API
Variable REST API: Store and manage key-value pairs as global variables for graph-level configuration and state management.
5.1 Variables
Variables can be used to store data about the entire graph. The data is accessed and stored in the form of key-value pairs.
5.1.1 Creating or Updating a Key-Value Pair
Method & Url
PUT http://localhost:8080/graphspaces/DEFAULT/graphs/hugegraph/variables/name
Request Body
Response Status
Response Body
5.1.2 Listing all key-value pairs
Method & Url
GET http://localhost:8080/graphspaces/DEFAULT/graphs/hugegraph/variables
Response Status
Response Body
5.1.3 Listing a specific key-value pair
Method & Url
GET http://localhost:8080/graphspaces/DEFAULT/graphs/hugegraph/variables/name
Response Status
Response Body
5.1.4 Deleting a specific key-value pair
Method & Url
DELETE http://localhost:8080/graphspaces/DEFAULT/graphs/hugegraph/variables/name
Response Status
5.1.13 - Graphs API
Graphs REST API: Manage graph instance lifecycle including creating, querying, cloning, clearing, and deleting graph databases.
6.1 Graphs
Important Reminder: Since HugeGraph 1.7.0, dynamic graph creation must enable authentication mode. For non-authentication mode, please refer to Graph Configuration File to statically create graphs through configuration files.
6.1.1 List all graphs in the graphspace
Params
Path parameters
- graphspace: Graphspace name
Method & Url
GET http://localhost:8080/graphspaces/DEFAULT/graphs
Response Status
Response Body
{
"graphs": [
"hugegraph",
"hugegraph1"
]
}
6.1.2 Get details of the graph
Params
Path parameters
- graphspace: Graphspace name
- graph: Graph name
Method & Url
GET http://localhost:8080/graphspaces/DEFAULT/graphs/hugegraph
Response Status
Response Body
{
"name": "hugegraph",
"backend": "cassandra"
}
6.1.3 Clear all data of a graph, include: schema, vertex, edge and index, This operation requires administrator privileges
Params
Path parameters
- graphspace: Graphspace name
- graph: Graph name
Query parameters
Since emptying the graph is a dangerous operation, we have added parameters for confirmation to the API to avoid false calls by users:
- confirm_message: default by
I'm sure to delete all data
Method & Url
DELETE http://localhost:8080/graphspaces/DEFAULT/graphs/hugegraph/clear?confirm_message=I%27m+sure+to+delete+all+data
Response Status
6.1.4 Clone graph, this operation requires administrator privileges
Params
Path parameters
- graphspace: Graphspace name
- graph: Name of the new graph to create
Query parameters
- clone_graph_name: name of an existed graph. To clone from an existing graph, the user can choose to transfer the configuration file, which will replace the configuration in the existing graph
Method & Url
POST http://localhost:8080/graphspaces/DEFAULT/graphs/cloneGraph?clone_graph_name=hugegraph
Request Body [Optional]
Clone a non-auth mode graph (set Content-Type: application/json)
{
"gremlin.graph": "org.apache.hugegraph.HugeFactory",
"backend": "rocksdb",
"serializer": "binary",
"store": "cloneGraph",
"rocksdb.data_path": "./rks-data-xx",
"rocksdb.wal_path": "./rks-data-xx"
}
Note:
- The data/wal_path can’t be the same as the existing graph (use separate directories)
- Replace “gremlin.graph=org.apache.hugegraph.auth.HugeFactoryAuthProxy” to enable auth mode
Response Status
Response Body
{
"name": "cloneGraph",
"backend": "rocksdb"
}
6.1.5 Create graph, this operation requires administrator privileges
Params
Path parameters
- graphspace: Graphspace name
- graph: Graph name
Method & Url
POST http://localhost:8080/graphspaces/DEFAULT/graphs/hugegraph2
Request Body
Create a graph (set Content-Type: application/json)
gremlin.graph Configuration:
- Auth mode:
"gremlin.graph": "org.apache.hugegraph.auth.HugeFactoryAuthProxy" (Recommended) - Non-auth mode:
"gremlin.graph": "org.apache.hugegraph.HugeFactory"
Note!!
- In version 1.7.0, dynamic graph creation would cause a NPE. This issue has been fixed in PR#2912. The current master version and versions after 1.7.0 do not have this problem.
- For version 1.7.0 and earlier, if the backend is hstore, you must add “task.scheduler_type”: “distributed” in the request body. Also ensure HugeGraph-Server is properly configured with PD, see HStore Configuration.
RocksDB Example:
{
"gremlin.graph": "org.apache.hugegraph.auth.HugeFactoryAuthProxy",
"backend": "rocksdb",
"serializer": "binary",
"store": "hugegraph2",
"rocksdb.data_path": "./rks-data-xx",
"rocksdb.wal_path": "./rks-data-xx"
}
HStore Example (for version 1.7.0 and earlier):
{
"gremlin.graph": "org.apache.hugegraph.auth.HugeFactoryAuthProxy",
"backend": "hstore",
"serializer": "binary",
"store": "hugegraph2",
"task.scheduler_type": "distributed",
"pd.peers": "127.0.0.1:8686"
}
Note: The data/wal_path can’t be the same as the existing graph (use separate directories)
Response Status
Response Body
{
"name": "hugegraph2",
"backend": "rocksdb"
}
6.1.6 Delete graph and its data
Params
Path parameters
- graphspace: Graphspace name
- graph: Graph name
Query parameters
Since deleting a graph is a dangerous operation, we have added parameters for confirmation to the API to avoid false calls by users:
- confirm_message: default by
I'm sure to drop the graph
Method & Url
DELETE http://localhost:8080/graphspaces/DEFAULT/graphs/graphA?confirm_message=I%27m%20sure%20to%20drop%20the%20graph
Response Status
Note: For HugeGraph 1.5.0 and earlier versions, if you need to create or drop a graph, please still use the legacy text/plain (properties) style request body instead of JSON.
6.2 Conf
6.2.1 Get configuration for a graph, This operation requires administrator privileges
Params
Path parameters
- graphspace: Graphspace name
- graph: Graph name
Method & Url
GET http://localhost:8080/graphspaces/DEFAULT/graphs/hugegraph/conf
Response Status
Response Body
# gremlin entrence to create graph
gremlin.graph=org.apache.hugegraph.HugeFactory
# cache config
#schema.cache_capacity=1048576
#graph.cache_capacity=10485760
#graph.cache_expire=600
# schema illegal name template
#schema.illegal_name_regex=\s+|~.*
#vertex.default_label=vertex
backend=cassandra
serializer=cassandra
store=hugegraph
...=
6.3 Mode
Allowed graph mode values are: NONE, RESTORING, MERGING, LOADING
- None mode is regular mode
- Not allowed to create schema with specified id
- Not support creating vertex with id for AUTOMATIC id strategy
- LOADING mode used to load data via hugegraph-loader.
- When adding vertices / edges, it is not checked whether the required attributes are passed in
Restore has two different modes: Restoring and Merging
- Restoring mode is used to restore schema and graph data to a new graph.
- Support create schema with specified id
- Support create vertex with id for AUTOMATIC id strategy
- Merging mode is used to merge schema and graph data to an existing graph.
- Not allowed to create schema with specified id
- Support create vertex with id for AUTOMATIC id strategy
Under normal circumstances, the graph mode is None. When you need to restore the graph,
you need to temporarily modify the graph mode to Restoring or Merging as needed.
When you complete the restore, change the graph mode to None.
6.3.1 Get graph mode
Params
Path parameters
- graphspace: Graphspace name
- graph: Graph name
Method & Url
GET http://localhost:8080/graphspaces/DEFAULT/graphs/hugegraph/mode
Response Status
Response Body
Allowed graph mode values are: NONE, RESTORING, MERGING
6.3.2 Modify graph mode. This operation requires administrator privileges
Params
Path parameters
- graphspace: Graphspace name
- graph: Graph name
Method & Url
PUT http://localhost:8080/graphspaces/DEFAULT/graphs/hugegraph/mode
Request Body
Allowed graph mode values are: NONE, RESTORING, MERGING
Response Status
Response Body
6.3.3 Get graph’s read mode
Params
Path parameters
- graphspace: Graphspace name
- graph: Graph name
Method & Url
GET http://localhost:8080/graphspaces/DEFAULT/graphs/hugegraph/graph_read_mode
Response Status
Response Body
{
"graph_read_mode": "ALL"
}
6.3.4 Modify graph’s read mode. This operation requires administrator privileges
Params
Path parameters
- graphspace: Graphspace name
- graph: Graph name
Method & Url
PUT http://localhost:8080/graphspaces/DEFAULT/graphs/hugegraph/graph_read_mode
Request Body
Allowed read mode values are: ALL, OLTP_ONLY, OLAP_ONLY
Response Status
Response Body
{
"graph_read_mode": "OLTP_ONLY"
}
6.4 Snapshot
6.4.1 Create a snapshot
Params
Path parameters
- graphspace: Graphspace name
- graph: Graph name
Method & Url
PUT http://localhost:8080/graphspaces/DEFAULT/graphs/hugegraph/snapshot_create
Response Status
Response Body
{
"hugegraph": "snapshot_created"
}
6.4.2 Resume a snapshot
Params
Path parameters
- graphspace: Graphspace name
- graph: Graph name
Method & Url
PUT http://localhost:8080/graphspaces/DEFAULT/graphs/hugegraph/snapshot_resume
Response Status
Response Body
{
"hugegraph": "snapshot_resumed"
}
6.5 Compact
6.5.1 Manually compact graph, This operation requires administrator privileges
Params
Path parameters
- graphspace: Graphspace name
- graph: Graph name
Method & Url
PUT http://localhost:8080/graphspaces/DEFAULT/graphs/hugegraph/compact
Response Status
Response Body
{
"nodes": 1,
"cluster_id": "local",
"servers": {
"local": "OK"
}
}
5.1.14 - Task API
Task REST API: Query and manage asynchronous task execution status for long-running operations like index rebuilding and graph traversals.
7.1 Task
7.1.1 List all async tasks in graph
Params
- status: the status of asyncTasks
- limit: the max number of tasks to return
Method & Url
GET http://localhost:8080/graphspaces/DEFAULT/graphs/hugegraph/tasks?status=success
Response Status
Response Body
{
"tasks": [{
"task_name": "hugegraph.traversal().V()",
"task_progress": 0,
"task_create": 1532943976585,
"task_status": "success",
"task_update": 1532943976736,
"task_result": "0",
"task_retries": 0,
"id": 2,
"task_type": "gremlin",
"task_callable": "org.apache.hugegraph.api.job.GremlinAPI$GremlinJob",
"task_input": "{\"gremlin\":\"hugegraph.traversal().V()\",\"bindings\":{},\"language\":\"gremlin-groovy\",\"aliases\":{\"hugegraph\":\"graph\"}}"
}]
}
7.1.2 View the details of an async task
Method & Url
GET http://localhost:8080/graphspaces/DEFAULT/graphs/hugegraph/tasks/2
Response Status
Response Body
{
"task_name": "hugegraph.traversal().V()",
"task_progress": 0,
"task_create": 1532943976585,
"task_status": "success",
"task_update": 1532943976736,
"task_result": "0",
"task_retries": 0,
"id": 2,
"task_type": "gremlin",
"task_callable": "org.apache.hugegraph.api.job.GremlinAPI$GremlinJob",
"task_input": "{\"gremlin\":\"hugegraph.traversal().V()\",\"bindings\":{},\"language\":\"gremlin-groovy\",\"aliases\":{\"hugegraph\":\"graph\"}}"
}
Method & Url
DELETE http://localhost:8080/graphspaces/DEFAULT/graphs/hugegraph/tasks/2
Response Status
7.1.4 Cancel an async task, the task should be able to be canceled
If you already created an async task via Gremlin API as follows:
"for (int i = 0; i < 10; i++) {" +
"hugegraph.addVertex(T.label, 'man');" +
"hugegraph.tx().commit();" +
"try {" +
"sleep(1000);" +
"} catch (InterruptedException e) {" +
"break;" +
"}" +
"}"
Method & Url
PUT http://localhost:8080/graphspaces/DEFAULT/graphs/hugegraph/tasks/2?action=cancel
cancel it in 10s. if more than 10s, the task may already be finished, then can’t be cancelled.
Response Status
Response Body
At this point, the number of vertices whose label is man must be less than 10.
5.1.15 - Gremlin API
Gremlin REST API: Execute Gremlin graph traversal language scripts via HTTP interface.
8.1 Gremlin
⚠️ SEC Reminder: Safe Usage of Native Query Endpoints in Production Environments
The flexibility of Graph Query Languages (such as Gremlin/Cypher) inherently introduces certain potential security risks. To ensure core security, please avoid exposing any related native query endpoints directly to the public network.
In production scenarios where internal exposure is required, you must enable the Authentication System (Auth) combined with an IP Whitelist as a dual-security mechanism to strictly control user execution permissions. Additionally, it is advised to use an Audit Log to audit the specific statements executed and to adopt Containerized Deployment (Docker/K8s) to enhance system-level security isolation.
8.1.1 Sending a gremlin statement (GET) to HugeGraphServer for synchronous execution
Params
- gremlin: The gremlin statement to be sent to
HugeGraphServer for execution - bindings: Used to bind parameters. Key is a string, and the value is the bound value (can only be a string or number). This functionality is similar to MySQL’s Prepared Statement and is used to speed up statement execution.
- language: The language type of the sent statement. Default is
gremlin-groovy. - aliases: Adds aliases for existing variables in the graph space.
Querying vertices
Method & Url
GET http://127.0.0.1:8080/gremlin?gremlin=hugegraph.traversal().V('1:marko')
Response Status
Response Body
{
"requestId": "c6ef47a8-b634-4b07-9d38-6b3b69a3a556",
"status": {
"message": "",
"code": 200,
"attributes": {}
},
"result": {
"data": [{
"id": "1:marko",
"label": "person",
"type": "vertex",
"properties": {
"city": [{
"id": "1:marko>city",
"value": "Beijing"
}],
"name": [{
"id": "1:marko>name",
"value": "marko"
}],
"age": [{
"id": "1:marko>age",
"value": 29
}]
}
}],
"meta": {}
}
}
8.1.2 Sending a gremlin statement (POST) to HugeGraphServer for synchronous execution
Method & Url
POST http://localhost:8080/gremlin
Querying vertices
Request Body
{
"gremlin": "hugegraph.traversal().V('1:marko')",
"bindings": {},
"language": "gremlin-groovy",
"aliases": {}
}
Response Status
Response Body
{
"requestId": "c6ef47a8-b634-4b07-9d38-6b3b69a3a556",
"status": {
"message": "",
"code": 200,
"attributes": {}
},
"result": {
"data": [{
"id": "1:marko",
"label": "person",
"type": "vertex",
"properties": {
"city": [{
"id": "1:marko>city",
"value": "Beijing"
}],
"name": [{
"id": "1:marko>name",
"value": "marko"
}],
"age": [{
"id": "1:marko>age",
"value": 29
}]
}
}],
"meta": {}
}
}
Note:
Here we directly use the graph object (hugegraph), first retrieve its traversal iterator (traversal()), and then retrieve the vertices. Instead of writing graph.traversal().V() or g.V(), you can use aliases to operate on the graph and traversal iterator. In this case, hugegraph is a native variable, and __g_hugegraph is an additional variable added by HugeGraphServer. Each graph will have a corresponding traversal iterator object in this format (__g_${graph}).
The structure of the response body is different from the RESTful API structure of other vertices or edges. Users may need to parse it manually.
Querying edges
Request Body
{
"gremlin": "g.E('S1:marko>2>>S2:lop')",
"bindings": {},
"language": "gremlin-groovy",
"aliases": {
"graph": "hugegraph",
"g": "__g_hugegraph"
}
}
Response Status
Response Body
{
"requestId": "3f117cd4-eedc-4e08-a106-ee01d7bb8249",
"status": {
"message": "",
"code": 200,
"attributes": {}
},
"result": {
"data": [{
"id": "S1:marko>2>>S2:lop",
"label": "created",
"type": "edge",
"inVLabel": "software",
"outVLabel": "person",
"inV": "2:lop",
"outV": "1:marko",
"properties": {
"weight": 0.4,
"date": "20171210"
}
}],
"meta": {}
}
}
8.1.3 Sending a gremlin statement (POST) to HugeGraphServer for asynchronous execution
Method & Url
POST http://localhost:8080/graphspaces/DEFAULT/graphs/hugegraph/jobs/gremlin
Querying vertices
Request Body
{
"gremlin": "g.V('1:marko')",
"bindings": {},
"language": "gremlin-groovy",
"aliases": {}
}
Note:
Asynchronous execution of Gremlin statements does not currently support aliases. You can use graph to represent the graph you want to operate on, or directly use the name of the graph, such as hugegraph. Additionally, g represents the traversal, which is equivalent to graph.traversal() or hugegraph.traversal().
Response Status
Response Body
Note:
You can query the execution status of an asynchronous task by using GET http://localhost:8080/graphspaces/DEFAULT/graphs/hugegraph/tasks/1 (where “1” is the task_id). For more information, refer to the Asynchronous Task RESTful API.
Querying edges
Request Body
{
"gremlin": "g.E('S1:marko>2>>S2:lop')",
"bindings": {},
"language": "gremlin-groovy",
"aliases": {}
}
Response Status
Response Body
Note:
You can query the execution status of an asynchronous task by using GET http://localhost:8080/graphspaces/DEFAULT/graphs/hugegraph/tasks/2 (where “2” is the task_id). For more information, refer to the Asynchronous Task RESTful API.
5.1.16 - Cypher API
Cypher REST API: Execute OpenCypher declarative graph query language via HTTP interface.
9.1 Cypher
9.1.1 Sending a cypher statement (GET) to HugeGraphServer for synchronous execution
Method & Url
GET /graphspaces/{graphspace}/graphs/{graph}/cypher?cypher={cypher}
Params
Path parameters
- graphspace: Graphspace name
- graph: Graph name
Query parameters
Example
GET http://localhost:8080/graphspaces/DEFAULT/graphs/hugecypher1/cypher?cypher=match(n:person) return n.name as name order by n.name limit 1
Response Status
Response Body
{
"requestId": "766b9f48-2f10-40d9-951a-3027d0748ab7",
"status": {
"message": "",
"code": 200,
"attributes": {
}
},
"result": {
"data": [
{
"name": "hello"
}
],
"meta": {
}
}
}
9.1.2 Sending a cypher statement (POST) to HugeGraphServer for synchronous execution
Method & Url
POST /graphspaces/{graphspace}/graphs/{graph}/cypher
Params
Path parameters
- graphspace: Graphspace name
- graph: Graph name
Body
{cypher}
Note:
It is not in JSON format, but a plain text Cypher statement.
Example
POST http://localhost:8080/graphspaces/DEFAULT/graphs/hugecypher1/cypher
Request Body
match(n:person) return n.name as name order by n.name limit 1
Response Status
Response Body
{
"requestId": "f096bee0-e249-498f-b5a3-ea684fc84f57",
"status": {
"message": "",
"code": 200,
"attributes": {
}
},
"result": {
"data": [
{
"name": "hello"
}
],
"meta": {
}
}
}
5.1.17 - Authentication API
Authentication REST API: Manage users, roles, permissions, and access control to implement fine-grained graph data security.
Version Change Notice:
- 1.7.0+: Auth API paths use GraphSpace format, such as
/graphspaces/DEFAULT/auth/users, and group/target IDs match their names (e.g., admin) - 1.5.x and earlier: Auth API paths include graph name, and group/target IDs use format like
-69:grant. See HugeGraph 1.5.x RESTful API
10.1 User Authentication and Access Control
To enable authentication and related configurations, please refer to the Authentication Configuration documentation.
Overview of User Authentication and Access Control:
HugeGraph supports multi-user authentication and fine-grained access control. It adopts a 4-tier design based on “User-User Group-Operation-Resource” to flexibly control user roles and permissions. Resources describe data in the graph database, such as vertices that meet certain conditions. Each resource consists of three elements: type, label, and properties. There are a total of 18 types and combinations of any label and properties to form resources. The internal condition of a resource is an “AND” relationship, while the condition between multiple resources is an “OR” relationship. Users can belong to one or more user groups, and each user group can have permissions for any number of resources. The types of operations include read, write, delete, execute, etc. HugeGraph supports dynamically creating users, user groups, and resources, and supports dynamically assigning or revoking permissions. During the initialization of the database, a super administrator user is created, and subsequently, various role users can be created by the super administrator. If a newly created user is assigned sufficient permissions, they can create or manage more users.
Example:
user(name=boss) -belong-> group(name=all) -access(read)-> target(graph=graph1, resource={label: person, city: Beijing})
Description: User ‘boss’ has read permission for people in the ‘graph1’ graph from Beijing.
Interface Description:
The user authentication and access control interface includes 5 categories: UserAPI, GroupAPI, TargetAPI, BelongAPI, AccessAPI.
Note Before 1.5.0, the format of ids such as group/target was similar to -69:grant. After 1.7.0, the id and name were consistent. Such as admin HugeGraph 1.5 x RESTful API
10.2 User (User) API
The user interface includes APIs for creating users, deleting users, modifying users, and querying user-related information.
10.2.1 Create User
Params
- user_name: User name
- user_password: User password
- user_phone: User phone number
- user_email: User email
Both user_name and user_password are required.
Request Body
{
"user_name": "boss",
"user_password": "******",
"user_phone": "182****9088",
"user_email": "123@xx.com"
}
Method & Url
POST http://localhost:8080/graphspaces/DEFAULT/auth/users
Response Status
Response Body
In the response message, the password is encrypted as ciphertext.
{
"user_password": "******",
"user_email": "123@xx.com",
"user_update": "2020-11-17 14:31:07.833",
"user_name": "boss",
"user_creator": "admin",
"user_phone": "182****9088",
"id": "boss",
"user_create": "2020-11-17 14:31:07.833"
}
10.2.2 Delete User
Params
- id: User ID to be deleted
Method & Url
DELETE http://localhost:8080/graphspaces/DEFAULT/auth/users/test
Response Status
Response Body
10.2.3 Modify User
Params
- id: User ID to be modified
Method & Url
PUT http://localhost:8080/graphspaces/DEFAULT/auth/users/test
Request Body
Modify user_name, user_password, and user_phone.
{
"user_name": "test",
"user_password": "******",
"user_phone": "183****9266"
}
Response Status
Response Body
The returned result is the entire user object including the modified content.
{
"user_password": "******",
"user_update": "2020-11-12 10:29:30.455",
"user_name": "test",
"user_creator": "admin",
"user_phone": "183****9266",
"id": "test",
"user_create": "2020-11-12 10:27:13.601"
}
10.2.4 Query User List
Params
- limit: Upper limit of the number of results returned
Method & Url
GET http://localhost:8080/graphspaces/DEFAULT/auth/users
Response Status
Response Body
{
"users": [
{
"user_password": "******",
"user_update": "2020-11-11 11:41:12.254",
"user_name": "admin",
"user_creator": "system",
"id": "admin",
"user_create": "2020-11-11 11:41:12.254"
}
]
}
10.2.5 Query a User
Params
- id: User ID to be queried
Method & Url
GET http://localhost:8080/graphspaces/DEFAULT/auth/users/admin
Response Status
Response Body
{
"users": [
{
"user_password": "******",
"user_update": "2020-11-11 11:41:12.254",
"user_name": "admin",
"user_creator": "system",
"id": "admin",
"user_create": "2020-11-11 11:41:12.254"
}
]
}
10.2.6 Query Roles of a User
Method & Url
GET http://localhost:8080/graphspaces/DEFAULT/auth/users/boss/role
Response Status
Response Body
{
"roles": {
"hugegraph": {
"READ": [
{
"type": "ALL",
"label": "*",
"properties": null
}
]
}
}
}
10.3 Group (Group) API
Groups grant corresponding resource permissions, and users are assigned to different groups, thereby having different resource permissions.
The group interface includes APIs for creating groups, deleting groups, modifying groups, and querying group-related information.
10.3.1 Create Group
Params
- group_name: Group name
- group_description: Group description
Request Body
{
"group_name": "all",
"group_description": "group can do anything"
}
Method & Url
POST http://localhost:8080/graphspaces/DEFAULT/auth/groups
Response Status
Response Body
{
"group_creator": "admin",
"group_name": "all",
"group_create": "2020-11-11 15:46:08.791",
"group_update": "2020-11-11 15:46:08.791",
"id": "-69:all",
"group_description": "group can do anything"
}
10.3.2 Delete Group
Params
- id: Group ID to be deleted
Method & Url
DELETE http://localhost:8080/graphspaces/DEFAULT/auth/groups/-69:grant
Response Status
Response Body
10.3.3 Modify Group
Params
- id: Group ID to be modified
Method & Url
PUT http://localhost:8080/graphspaces/DEFAULT/auth/groups/-69:grant
Request Body
Modify group_description
{
"group_name": "grant",
"group_description": "grant"
}
Response Status
Response Body
The returned result is the entire group object including the modified content.
{
"group_creator": "admin",
"group_name": "grant",
"group_create": "2020-11-12 09:50:58.458",
"group_update": "2020-11-12 09:57:58.155",
"id": "-69:grant",
"group_description": "grant"
}
10.3.4 Query Group List
Params
- limit: Upper limit of the number of results returned
Method & Url
GET http://localhost:8080/graphspaces/DEFAULT/auth/groups
Response Status
Response Body
{
"groups": [
{
"group_creator": "admin",
"group_name": "all",
"group_create": "2020-11-11 15:46:08.791",
"group_update": "2020-11-11 15:46:08.791",
"id": "-69:all",
"group_description": "group can do anything"
}
]
}
10.3.5 Query a Specific Group
Params
- id: Group ID to be queried
Method & Url
GET http://localhost:8080/graphspaces/DEFAULT/auth/groups/-69:all
Response Status
Response Body
{
"group_creator": "admin",
"group_name": "all",
"group_create": "2020-11-11 15:46:08.791",
"group_update": "2020-11-11 15:46:08.791",
"id": "-69:all",
"group_description": "group can do anything"
}
10.4 Resource (Target) API
Resources describe data in the graph database, such as vertices that meet certain criteria. Each resource includes three elements: type, label, and properties. There are 18 types in total, and the combination of any label and any properties forms a resource. The internal conditions of a resource are based on the AND relationship, while the conditions between multiple resources are based on the OR relationship.
The resource API includes creating, deleting, modifying, and querying resources.
10.4.1 Create Resource
Params
- target_name: Name of the resource
- target_graph: Graph of the resource
- target_url: URL of the resource
- target_resources: Resource definitions (list)
target_resources can include multiple target_resource, stored in the form of a list.
Each target_resource contains:
- type: Optional value: VERTEX, EDGE, etc. Can be filled with ALL, indicating it can be a vertex or edge.
- label: Optional value: name of a vertex or edge type. Can be filled with *, indicating any type.
- properties: Map type, can contain multiple key-value pairs of properties. Must match all property values. Property values can support conditional ranges (e.g., age: P.gte(18)). If properties are null, it means any property is allowed. If both the property name and value are ‘*’, it also means any property is allowed.
For example, a specific resource: “target_resources”: [{“type”:“VERTEX”,“label”:“person”,“properties”:{“city”:“Beijing”,“age”:“P.gte(20)”}}]
The resource definition means: a vertex of type ‘person’ with the city property set to ‘Beijing’ and the age property greater than or equal to 20.
Request Body
{
"target_name": "all",
"target_graph": "hugegraph",
"target_url": "127.0.0.1:8080",
"target_resources": [
{
"type": "ALL"
}
]
}
Method & Url
POST http://localhost:8080/graphspaces/DEFAULT/auth/targets
Response Status
Response Body
{
"target_creator": "admin",
"target_name": "all",
"target_url": "127.0.0.1:8080",
"target_graph": "hugegraph",
"target_create": "2020-11-11 15:32:01.192",
"target_resources": [
{
"type": "ALL",
"label": "*",
"properties": null
}
],
"id": "-77:all",
"target_update": "2020-11-11 15:32:01.192"
}
10.4.2 Delete Resource
Params
- id: Resource Id to be deleted
Method & Url
DELETE http://localhost:8080/graphspaces/DEFAULT/auth/targets/-77:gremlin
Response Status
Response Body
10.4.3 Modify Resource
Params
- id: Resource Id to be modified
Method & Url
PUT http://localhost:8080/graphspaces/DEFAULT/auth/targets/-77:gremlin
Request Body
Modify the ’type’ in the resource definition.
{
"target_name": "gremlin",
"target_graph": "hugegraph",
"target_url": "127.0.0.1:8080",
"target_resources": [
{
"type": "NONE"
}
]
}
Response Status
Response Body
The response contains the entire target group object, including the modified content.
{
"target_creator": "admin",
"target_name": "gremlin",
"target_url": "127.0.0.1:8080",
"target_graph": "hugegraph",
"target_create": "2020-11-12 09:34:13.848",
"target_resources": [
{
"type": "NONE",
"label": "*",
"properties": null
}
],
"id": "-77:gremlin",
"target_update": "2020-11-12 09:37:12.780"
}
10.4.4 Query Resource List
Params
- limit: Upper limit of the number of returned results.
Method & Url
GET http://localhost:8080/graphspaces/DEFAULT/auth/targets
Response Status
Response Body
{
"targets": [
{
"target_creator": "admin",
"target_name": "all",
"target_url": "127.0.0.1:8080",
"target_graph": "hugegraph",
"target_create": "2020-11-11 15:32:01.192",
"target_resources": [
{
"type": "ALL",
"label": "*",
"properties": null
}
],
"id": "-77:all",
"target_update": "2020-11-11 15:32:01.192"
},
{
"target_creator": "admin",
"target_name": "grant",
"target_url": "127.0.0.1:8080",
"target_graph": "hugegraph",
"target_create": "2020-11-11 15:43:24.841",
"target_resources": [
{
"type": "GRANT",
"label": "*",
"properties": null
}
],
"id": "-77:grant",
"target_update": "2020-11-11 15:43:24.841"
}
]
}
10.4.5 Query a Specific Resource
Params
- id: Id of the resource to query
Method & Url
GET http://localhost:8080/graphspaces/DEFAULT/auth/targets/-77:grant
Response Status
Response Body
{
"target_creator": "admin",
"target_name": "grant",
"target_url": "127.0.0.1:8080",
"target_graph": "hugegraph",
"target_create": "2020-11-11 15:43:24.841",
"target_resources": [
{
"type": "GRANT",
"label": "*",
"properties": null
}
],
"id": "-77:grant",
"target_update": "2020-11-11 15:43:24.841"
}
10.5 Association of Roles (Belong) API
The association between users and user groups allows a user to be associated with one or more user groups. User groups have permissions for related resources, and the permissions for different user groups can be understood as different roles. In other words, users are associated with roles.
The API for associating roles includes creating, deleting, modifying, and querying the association of roles for users.
10.5.1 Create an Association of Roles for a User
Params
- user: User ID
- group: User group ID
- belong_description: Description
Request Body
{
"user": "boss",
"group": "-69:all"
}
Method & Url
POST http://localhost:8080/graphspaces/DEFAULT/auth/belongs
Response Status
Response Body
{
"belong_create": "2020-11-11 16:19:35.422",
"belong_creator": "admin",
"belong_update": "2020-11-11 16:19:35.422",
"id": "Sboss>-82>>S-69:all",
"user": "boss",
"group": "-69:all"
}
10.5.2 Delete an Association of Roles
Params
- id: ID of the association of roles to delete
Method & Url
DELETE http://localhost:8080/graphspaces/DEFAULT/auth/belongs/Sboss>-82>>S-69:grant
Response Status
Response Body
10.5.3 Modify an Association of Roles
An association of roles can only be modified for its description. The user and group properties cannot be modified. If you need to modify an association of roles, you need to delete the existing association and create a new one.
Params
- id: ID of the association of roles to modify
Method & Url
PUT http://localhost:8080/graphspaces/DEFAULT/auth/belongs/Sboss>-82>>S-69:grant
Request Body
Modify the belong_description field
{
"belong_description": "update test"
}
Response Status
Response Body
The response includes the modified content as well as the entire association of roles object
{
"belong_description": "update test",
"belong_create": "2020-11-12 10:40:21.720",
"belong_creator": "admin",
"belong_update": "2020-11-12 10:42:47.265",
"id": "Sboss>-82>>S-69:grant",
"user": "boss",
"group": "-69:grant"
}
10.5.4 Query List of Associations of Roles
Params
- limit: Upper limit on the number of results to return
Method & Url
GET http://localhost:8080/graphspaces/DEFAULT/auth/belongs
Response Status
Response Body
{
"belongs": [
{
"belong_create": "2020-11-11 16:19:35.422",
"belong_creator": "admin",
"belong_update": "2020-11-11 16:19:35.422",
"id": "Sboss>-82>>S-69:all",
"user": "boss",
"group": "-69:all"
}
]
}
10.5.5 View a Specific Association of Roles
Params
- id: The id of the association of roles to be queried
Method & Url
GET http://localhost:8080/graphspaces/DEFAULT/auth/belongs/Sboss>-82>>S-69:all
Response Status
Response Body
{
"belong_create": "2020-11-11 16:19:35.422",
"belong_creator": "admin",
"belong_update": "2020-11-11 16:19:35.422",
"id": "Sboss>-82>>S-69:all",
"user": "boss",
"group": "-69:all"
}
10.6 Authorization (Access) API
Grant permissions to user groups for resources, including operations such as READ, WRITE, DELETE, EXECUTE, etc.
The authorization API includes: creating, deleting, modifying, and querying permissions.
10.6.1 Create Authorization (Granting permissions to user groups for resources)
Params
- group: Group ID
- target: Resource ID
- access_permission: Permission grant
- access_description: Authorization description
Access permissions:
- READ: Read operations, including all queries such as querying the schema, retrieving vertices/edges, aggregating vertex and edge counts (VERTEX_AGGR/EDGE_AGGR), and reading the graph’s status (STATUS), variables (VAR), tasks (TASK), etc.
- WRITE: Write operations, including creating and updating operations, such as adding property keys to the schema or adding/updating properties of vertices.
- DELETE: Delete operations, including deleting metadata, vertices, or edges.
- EXECUTE: Execute operations, including executing Gremlin queries, executing tasks, and executing metadata functions.
Request Body
{
"group": "-69:all",
"target": "-77:all",
"access_permission": "READ"
}
Method & Url
POST http://localhost:8080/graphspaces/DEFAULT/auth/accesses
Response Status
Response Body
{
"access_permission": "READ",
"access_create": "2020-11-11 15:54:54.008",
"id": "S-69:all>-88>11>S-77:all",
"access_update": "2020-11-11 15:54:54.008",
"access_creator": "admin",
"group": "-69:all",
"target": "-77:all"
}
10.6.2 Delete Authorization
Params
- id: The ID of the authorization to be deleted
Method & Url
DELETE http://localhost:8080/graphspaces/DEFAULT/auth/accesses/S-69:all>-88>12>S-77:all
Response Status
Response Body
10.6.3 Modify Authorization
Authorization can only be modified for its description. User group, resource, and permission cannot be modified. If you need to modify the authorization relationship, delete the original authorization and create a new one.
Params
- id: The ID of the authorization to be modified
Method & Url
PUT http://localhost:8080/graphspaces/DEFAULT/auth/accesses/S-69:all>-88>12>S-77:all
Request Body
Modify access_description
{
"access_description": "test"
}
Response Status
Response Body
The response includes the modified content as well as the entire authorization object.
{
"access_description": "test",
"access_permission": "WRITE",
"access_create": "2020-11-12 10:12:03.074",
"id": "S-69:all>-88>12>S-77:all",
"access_update": "2020-11-12 10:16:18.637",
"access_creator": "admin",
"group": "-69:all",
"target": "-77:all"
}
10.6.4 Query Authorization List
Params
- limit: The maximum number of results to return
Method & Url
GET http://localhost:8080/graphspaces/DEFAULT/auth/accesses
Response Status
Response Body
{
"accesses": [
{
"access_permission": "READ",
"access_create": "2020-11-11 15:54:54.008",
"id": "S-69:all>-88>11>S-77:all",
"access_update": "2020-11-11 15:54:54.008",
"access_creator": "admin",
"group": "-69:all",
"target": "-77:all"
}
]
}
10.6.5 Query a Specific Authorization
Params
- id: The ID of the authorization to be queried
Method & Url
GET http://localhost:8080/graphspaces/DEFAULT/auth/accesses/S-69:all>-88>11>S-77:all
Response Status
Response Body
{
"access_permission": "READ",
"access_create": "2020-11-11 15:54:54.008",
"id": "S-69:all>-88>11>S-77:all",
"access_update": "2020-11-11 15:54:54.008",
"access_creator": "admin",
"group": "-69:all",
"target": "-77:all"
}
10.7 Graphspace Manager (Manager) API
Note: Before using the following APIs, you need to create a graphspace first. For example, create a graphspace named gs1 via the Graphspace API. The examples below assume that gs1 already exists.
- The graphspace manager API is used to grant/revoke manager roles for users at the graphspace level, and to query the roles of the current user or other users in a graphspace. Supported role types include
SPACE, SPACE_MEMBER, and ADMIN.
10.7.1 Check whether the current login user has a specific role
Params
- type: Role type to check, optional
Method & Url
GET http://localhost:8080/graphspaces/gs1/auth/managers/check?type=WRITE
Response Status
Response Body
The API returns the string true or false indicating whether the current user has the given role.
10.7.2 List graphspace managers
Params
- type: Role type, optional, used to filter by role
Method & Url
GET http://localhost:8080/graphspaces/gs1/auth/managers?type=SPACE
Response Status
Response Body
{
"managers": [
{
"user": "admin",
"type": "SPACE",
"create_time": "2024-01-10 09:30:00"
}
]
}
10.7.3 Grant/create a graphspace manager
- The following example grants user
boss the SPACE_MEMBER role in graphspace gs1.
Request Body
{
"user": "boss",
"type": "SPACE_MEMBER"
}
Method & Url
POST http://localhost:8080/graphspaces/gs1/auth/managers
Response Status
Response Body
{
"user": "boss",
"type": "SPACE_MEMBER",
"manager_creator": "admin",
"manager_create": "2024-01-10 09:45:12"
}
10.7.4 Revoke graphspace manager privileges
- The following example revokes the
SPACE_MEMBER role of user boss in graphspace gs1.
Params
- user: User ID to revoke
- type: Role type to revoke
Method & Url
DELETE http://localhost:8080/graphspaces/gs1/auth/managers?user=boss&type=SPACE_MEMBER
Response Status
Response Body
10.7.5 Query roles of a specific user in a graphspace
Params
Method & Url
GET http://localhost:8080/graphspaces/gs1/auth/managers/role?user=boss
Response Status
Response Body
{
"roles": {
"boss": [
"READ",
"SPACE_MEMBER"
]
}
}
5.1.18 - Metrics API
Metrics REST API: Retrieve runtime performance metrics, statistics, and health status data of the system.
HugeGraph provides a metrics interface for obtaining monitoring information, such as statistics on
each Gremlin execution time, cache size, etc. The metrics interface includes the following
categories: basic metrics, statistical metrics, system metrics, and backend storage metrics.
1. Basic Metrics
1.1 Get All Basic Metrics
Params
- type: If the passed value is
json, it is returned in json format, otherwise it is returned in
Promethaus format.
1.1.1 Method & Url
http://localhost:8080/metrics/?type=json
Response Status
Response Body
{
"gauges": {
"org.apache.hugegraph.backend.cache.Cache.edge-hugegraph.capacity": {
"value": 1000000
},
"org.apache.hugegraph.backend.cache.Cache.edge-hugegraph.expire": {
"value": 600000
},
"org.apache.hugegraph.backend.cache.Cache.edge-hugegraph.hits": {
"value": 0
},
"org.apache.hugegraph.backend.cache.Cache.edge-hugegraph.miss": {
"value": 0
},
"org.apache.hugegraph.backend.cache.Cache.edge-hugegraph.size": {
"value": 0
},
"org.apache.hugegraph.backend.cache.Cache.instances": {
"value": 7
},
"org.apache.hugegraph.backend.cache.Cache.schema-id-hugegraph.capacity": {
"value": 10000
},
"org.apache.hugegraph.backend.cache.Cache.schema-id-hugegraph.expire": {
"value": 0
},
"org.apache.hugegraph.backend.cache.Cache.schema-id-hugegraph.hits": {
"value": 0
},
"org.apache.hugegraph.backend.cache.Cache.schema-id-hugegraph.miss": {
"value": 0
},
"org.apache.hugegraph.backend.cache.Cache.schema-id-hugegraph.size": {
"value": 17
},
"org.apache.hugegraph.backend.cache.Cache.schema-name-hugegraph.capacity": {
"value": 10000
},
"org.apache.hugegraph.backend.cache.Cache.schema-name-hugegraph.expire": {
"value": 0
},
"org.apache.hugegraph.backend.cache.Cache.schema-name-hugegraph.hits": {
"value": 0
},
"org.apache.hugegraph.backend.cache.Cache.schema-name-hugegraph.miss": {
"value": 0
},
"org.apache.hugegraph.backend.cache.Cache.schema-name-hugegraph.size": {
"value": 17
},
"org.apache.hugegraph.backend.cache.Cache.token-hugegraph.capacity": {
"value": 10240
},
"org.apache.hugegraph.backend.cache.Cache.token-hugegraph.expire": {
"value": 600000
},
"org.apache.hugegraph.backend.cache.Cache.token-hugegraph.hits": {
"value": 0
},
"org.apache.hugegraph.backend.cache.Cache.token-hugegraph.miss": {
"value": 0
},
"org.apache.hugegraph.backend.cache.Cache.token-hugegraph.size": {
"value": 0
},
"org.apache.hugegraph.backend.cache.Cache.users-hugegraph.capacity": {
"value": 10240
},
"org.apache.hugegraph.backend.cache.Cache.users-hugegraph.expire": {
"value": 600000
},
"org.apache.hugegraph.backend.cache.Cache.users-hugegraph.hits": {
"value": 0
},
"org.apache.hugegraph.backend.cache.Cache.users-hugegraph.miss": {
"value": 0
},
"org.apache.hugegraph.backend.cache.Cache.users-hugegraph.size": {
"value": 0
},
"org.apache.hugegraph.backend.cache.Cache.users_pwd-hugegraph.capacity": {
"value": 10240
},
"org.apache.hugegraph.backend.cache.Cache.users_pwd-hugegraph.expire": {
"value": 600000
},
"org.apache.hugegraph.backend.cache.Cache.users_pwd-hugegraph.hits": {
"value": 0
},
"org.apache.hugegraph.backend.cache.Cache.users_pwd-hugegraph.miss": {
"value": 0
},
"org.apache.hugegraph.backend.cache.Cache.users_pwd-hugegraph.size": {
"value": 0
},
"org.apache.hugegraph.backend.cache.Cache.vertex-hugegraph.capacity": {
"value": 10000000
},
"org.apache.hugegraph.backend.cache.Cache.vertex-hugegraph.expire": {
"value": 600000
},
"org.apache.hugegraph.backend.cache.Cache.vertex-hugegraph.hits": {
"value": 0
},
"org.apache.hugegraph.backend.cache.Cache.vertex-hugegraph.miss": {
"value": 0
},
"org.apache.hugegraph.backend.cache.Cache.vertex-hugegraph.size": {
"value": 0
},
"org.apache.hugegraph.server.RestServer.max-write-threads": {
"value": 0
},
"org.apache.hugegraph.task.TaskManager.pending-tasks": {
"value": 0
},
"org.apache.hugegraph.task.TaskManager.workers": {
"value": 4
},
"org.apache.tinkerpop.gremlin.server.GremlinServer.gremlin-groovy.sessionless.class-cache.average-load-penalty": {
"value": 922769200
},
"org.apache.tinkerpop.gremlin.server.GremlinServer.gremlin-groovy.sessionless.class-cache.estimated-size": {
"value": 2
},
"org.apache.tinkerpop.gremlin.server.GremlinServer.gremlin-groovy.sessionless.class-cache.eviction-count": {
"value": 0
},
"org.apache.tinkerpop.gremlin.server.GremlinServer.gremlin-groovy.sessionless.class-cache.eviction-weight": {
"value": 0
},
"org.apache.tinkerpop.gremlin.server.GremlinServer.gremlin-groovy.sessionless.class-cache.hit-count": {
"value": 0
},
"org.apache.tinkerpop.gremlin.server.GremlinServer.gremlin-groovy.sessionless.class-cache.hit-rate": {
"value": 0
},
"org.apache.tinkerpop.gremlin.server.GremlinServer.gremlin-groovy.sessionless.class-cache.load-count": {
"value": 2
},
"org.apache.tinkerpop.gremlin.server.GremlinServer.gremlin-groovy.sessionless.class-cache.load-failure-count": {
"value": 0
},
"org.apache.tinkerpop.gremlin.server.GremlinServer.gremlin-groovy.sessionless.class-cache.load-failure-rate": {
"value": 0
},
"org.apache.tinkerpop.gremlin.server.GremlinServer.gremlin-groovy.sessionless.class-cache.load-success-count": {
"value": 2
},
"org.apache.tinkerpop.gremlin.server.GremlinServer.gremlin-groovy.sessionless.class-cache.long-run-compilation-count": {
"value": 0
},
"org.apache.tinkerpop.gremlin.server.GremlinServer.gremlin-groovy.sessionless.class-cache.miss-count": {
"value": 2
},
"org.apache.tinkerpop.gremlin.server.GremlinServer.gremlin-groovy.sessionless.class-cache.miss-rate": {
"value": 1
},
"org.apache.tinkerpop.gremlin.server.GremlinServer.gremlin-groovy.sessionless.class-cache.request-count": {
"value": 2
},
"org.apache.tinkerpop.gremlin.server.GremlinServer.gremlin-groovy.sessionless.class-cache.total-load-time": {
"value": 1845538400
},
"org.apache.tinkerpop.gremlin.server.GremlinServer.sessions": {
"value": 0
}
},
"counters": {
"favicon.ico/GET/FAILED_COUNTER": {
"count": 1
},
"favicon.ico/GET/TOTAL_COUNTER": {
"count": 1
},
"metrics/POST/FAILED_COUNTER": {
"count": 1
},
"metrics/POST/TOTAL_COUNTER": {
"count": 1
},
"metrics/backend/GET/SUCCESS_COUNTER": {
"count": 2
},
"metrics/backend/GET/TOTAL_COUNTER": {
"count": 2
},
"metrics/gauges/GET/SUCCESS_COUNTER": {
"count": 1
},
"metrics/gauges/GET/TOTAL_COUNTER": {
"count": 1
},
"metrics/system/GET/SUCCESS_COUNTER": {
"count": 2
},
"metrics/system/GET/TOTAL_COUNTER": {
"count": 2
},
"system/GET/FAILED_COUNTER": {
"count": 1
},
"system/GET/TOTAL_COUNTER": {
"count": 1
}
},
"histograms": {
"favicon.ico/GET/RESPONSE_TIME_HISTOGRAM": {
"count": 1,
"min": 1,
"mean": 1,
"max": 1,
"stddev": 0,
"p50": 1,
"p75": 1,
"p95": 1,
"p98": 1,
"p99": 1,
"p999": 1
},
"metrics/POST/RESPONSE_TIME_HISTOGRAM": {
"count": 1,
"min": 21,
"mean": 21,
"max": 21,
"stddev": 0,
"p50": 21,
"p75": 21,
"p95": 21,
"p98": 21,
"p99": 21,
"p999": 21
},
"metrics/backend/GET/RESPONSE_TIME_HISTOGRAM": {
"count": 2,
"min": 6,
"mean": 12.6852124529148,
"max": 20,
"stddev": 6.992918475157571,
"p50": 6,
"p75": 20,
"p95": 20,
"p98": 20,
"p99": 20,
"p999": 20
},
"metrics/gauges/GET/RESPONSE_TIME_HISTOGRAM": {
"count": 1,
"min": 7,
"mean": 7,
"max": 7,
"stddev": 0,
"p50": 7,
"p75": 7,
"p95": 7,
"p98": 7,
"p99": 7,
"p999": 7
},
"metrics/system/GET/RESPONSE_TIME_HISTOGRAM": {
"count": 2,
"min": 0,
"mean": 8.942674506664073,
"max": 40,
"stddev": 16.665399873223066,
"p50": 0,
"p75": 0,
"p95": 40,
"p98": 40,
"p99": 40,
"p999": 40
},
"system/GET/RESPONSE_TIME_HISTOGRAM": {
"count": 1,
"min": 2,
"mean": 2,
"max": 2,
"stddev": 0,
"p50": 2,
"p75": 2,
"p95": 2,
"p98": 2,
"p99": 2,
"p999": 2
}
},
"meters": {
"org.apache.hugegraph.api.API.commit-succeed": {
"count": 0,
"mean_rate": 0,
"m15_rate": 0,
"m5_rate": 0,
"m1_rate": 0,
"rate_unit": "events/second"
},
"org.apache.hugegraph.api.API.expected-error": {
"count": 0,
"mean_rate": 0,
"m15_rate": 0,
"m5_rate": 0,
"m1_rate": 0,
"rate_unit": "events/second"
},
"org.apache.hugegraph.api.API.illegal-arg": {
"count": 0,
"mean_rate": 0,
"m15_rate": 0,
"m5_rate": 0,
"m1_rate": 0,
"rate_unit": "events/second"
},
"org.apache.hugegraph.api.API.unknown-error": {
"count": 0,
"mean_rate": 0,
"m15_rate": 0,
"m5_rate": 0,
"m1_rate": 0,
"rate_unit": "events/second"
},
"org.apache.tinkerpop.gremlin.server.GremlinServer.errors": {
"count": 0,
"mean_rate": 0,
"m15_rate": 0,
"m5_rate": 0,
"m1_rate": 0,
"rate_unit": "events/second"
}
},
"timers": {
"org.apache.hugegraph.api.auth.AccessAPI.create": {
"count": 0,
"min": 0,
"mean": 0,
"max": 0,
"stddev": 0,
"p50": 0,
"p75": 0,
"p95": 0,
"p98": 0,
"p99": 0,
"p999": 0,
"duration_unit": "milliseconds",
"mean_rate": 0,
"m15_rate": 0,
"m5_rate": 0,
"m1_rate": 0,
"rate_unit": "calls/second"
},
"org.apache.hugegraph.api.auth.AccessAPI.delete": {
"count": 0,
"min": 0,
"mean": 0,
"max": 0,
"stddev": 0,
"p50": 0,
"p75": 0,
"p95": 0,
"p98": 0,
"p99": 0,
"p999": 0,
"duration_unit": "milliseconds",
"mean_rate": 0,
"m15_rate": 0,
"m5_rate": 0,
"m1_rate": 0,
"rate_unit": "calls/second"
},
"org.apache.hugegraph.api.auth.AccessAPI.get": {
"count": 0,
"min": 0,
"mean": 0,
"max": 0,
"stddev": 0,
"p50": 0,
"p75": 0,
"p95": 0,
"p98": 0,
"p99": 0,
"p999": 0,
"duration_unit": "milliseconds",
"mean_rate": 0,
"m15_rate": 0,
"m5_rate": 0,
"m1_rate": 0,
"rate_unit": "calls/second"
},
"org.apache.hugegraph.api.auth.AccessAPI.list": {
"count": 0,
"min": 0,
"mean": 0,
"max": 0,
"stddev": 0,
"p50": 0,
"p75": 0,
"p95": 0,
"p98": 0,
"p99": 0,
"p999": 0,
"duration_unit": "milliseconds",
"mean_rate": 0,
"m15_rate": 0,
"m5_rate": 0,
"m1_rate": 0,
"rate_unit": "calls/second"
},
...
}
}
1.1.2 Method & Url
http://localhost:8080/metrics/
Response Status
Response Body
# HELP hugegraph_info
# TYPE hugegraph_info untyped
hugegraph_info{version="0.69",
} 1.0
# HELP org_apache_hugegraph_backend_cache_Cache_edge_hugegraph_capacity
# TYPE org_apache_hugegraph_backend_cache_Cache_edge_hugegraph_capacity gauge
org_apache_hugegraph_backend_cache_Cache_edge_hugegraph_capacity 1000000
# HELP org_apache_hugegraph_backend_cache_Cache_edge_hugegraph_expire
# TYPE org_apache_hugegraph_backend_cache_Cache_edge_hugegraph_expire gauge
org_apache_hugegraph_backend_cache_Cache_edge_hugegraph_expire 600000
# HELP org_apache_hugegraph_backend_cache_Cache_edge_hugegraph_hits
# TYPE org_apache_hugegraph_backend_cache_Cache_edge_hugegraph_hits gauge
org_apache_hugegraph_backend_cache_Cache_edge_hugegraph_hits 0
# HELP org_apache_hugegraph_backend_cache_Cache_edge_hugegraph_miss
# TYPE org_apache_hugegraph_backend_cache_Cache_edge_hugegraph_miss gauge
org_apache_hugegraph_backend_cache_Cache_edge_hugegraph_miss 0
# HELP org_apache_hugegraph_backend_cache_Cache_edge_hugegraph_size
# TYPE org_apache_hugegraph_backend_cache_Cache_edge_hugegraph_size gauge
org_apache_hugegraph_backend_cache_Cache_edge_hugegraph_size 0
# HELP org_apache_hugegraph_backend_cache_Cache_instances
# TYPE org_apache_hugegraph_backend_cache_Cache_instances gauge
org_apache_hugegraph_backend_cache_Cache_instances 7
# HELP org_apache_hugegraph_backend_cache_Cache_schema_id_hugegraph_capacity
# TYPE org_apache_hugegraph_backend_cache_Cache_schema_id_hugegraph_capacity gauge
org_apache_hugegraph_backend_cache_Cache_schema_id_hugegraph_capacity 10000
# HELP org_apache_hugegraph_backend_cache_Cache_schema_id_hugegraph_expire
# TYPE org_apache_hugegraph_backend_cache_Cache_schema_id_hugegraph_expire gauge
org_apache_hugegraph_backend_cache_Cache_schema_id_hugegraph_expire 0
# HELP org_apache_hugegraph_backend_cache_Cache_schema_id_hugegraph_hits
# TYPE org_apache_hugegraph_backend_cache_Cache_schema_id_hugegraph_hits gauge
org_apache_hugegraph_backend_cache_Cache_schema_id_hugegraph_hits 0
# HELP org_apache_hugegraph_backend_cache_Cache_schema_id_hugegraph_miss
# TYPE org_apache_hugegraph_backend_cache_Cache_schema_id_hugegraph_miss gauge
org_apache_hugegraph_backend_cache_Cache_schema_id_hugegraph_miss 0
# HELP org_apache_hugegraph_backend_cache_Cache_schema_id_hugegraph_size
# TYPE org_apache_hugegraph_backend_cache_Cache_schema_id_hugegraph_size gauge
org_apache_hugegraph_backend_cache_Cache_schema_id_hugegraph_size 17
# HELP org_apache_hugegraph_backend_cache_Cache_schema_name_hugegraph_capacity
# TYPE org_apache_hugegraph_backend_cache_Cache_schema_name_hugegraph_capacity gauge
org_apache_hugegraph_backend_cache_Cache_schema_name_hugegraph_capacity 10000
# HELP org_apache_hugegraph_backend_cache_Cache_schema_name_hugegraph_expire
# TYPE org_apache_hugegraph_backend_cache_Cache_schema_name_hugegraph_expire gauge
org_apache_hugegraph_backend_cache_Cache_schema_name_hugegraph_expire 0
# HELP org_apache_hugegraph_backend_cache_Cache_schema_name_hugegraph_hits
# TYPE org_apache_hugegraph_backend_cache_Cache_schema_name_hugegraph_hits gauge
org_apache_hugegraph_backend_cache_Cache_schema_name_hugegraph_hits 0
# HELP org_apache_hugegraph_backend_cache_Cache_schema_name_hugegraph_miss
# TYPE org_apache_hugegraph_backend_cache_Cache_schema_name_hugegraph_miss gauge
org_apache_hugegraph_backend_cache_Cache_schema_name_hugegraph_miss 0
# HELP org_apache_hugegraph_backend_cache_Cache_schema_name_hugegraph_size
# TYPE org_apache_hugegraph_backend_cache_Cache_schema_name_hugegraph_size gauge
org_apache_hugegraph_backend_cache_Cache_schema_name_hugegraph_size 17
...
1.2 Get Gauges Metrics
Method & Url
http://localhost:8080/metrics/gauges
Response Status
Response Body
{
"org.apache.hugegraph.backend.cache.Cache.edge-hugegraph.capacity": {
"value": 1000000
},
"org.apache.hugegraph.backend.cache.Cache.edge-hugegraph.expire": {
"value": 600000
},
"org.apache.hugegraph.backend.cache.Cache.edge-hugegraph.hits": {
"value": 0
},
"org.apache.hugegraph.backend.cache.Cache.edge-hugegraph.miss": {
"value": 0
},
"org.apache.hugegraph.backend.cache.Cache.edge-hugegraph.size": {
"value": 0
},
"org.apache.hugegraph.backend.cache.Cache.instances": {
"value": 7
},
"org.apache.hugegraph.backend.cache.Cache.schema-id-hugegraph.capacity": {
"value": 10000
},
"org.apache.hugegraph.backend.cache.Cache.schema-id-hugegraph.expire": {
"value": 0
},
"org.apache.hugegraph.backend.cache.Cache.schema-id-hugegraph.hits": {
"value": 0
},
"org.apache.hugegraph.backend.cache.Cache.schema-id-hugegraph.miss": {
"value": 0
},
"org.apache.hugegraph.backend.cache.Cache.schema-id-hugegraph.size": {
"value": 17
},
"org.apache.hugegraph.backend.cache.Cache.schema-name-hugegraph.capacity": {
"value": 10000
},
"org.apache.hugegraph.backend.cache.Cache.schema-name-hugegraph.expire": {
"value": 0
},
"org.apache.hugegraph.backend.cache.Cache.schema-name-hugegraph.hits": {
"value": 0
},
"org.apache.hugegraph.backend.cache.Cache.schema-name-hugegraph.miss": {
"value": 0
},
"org.apache.hugegraph.backend.cache.Cache.schema-name-hugegraph.size": {
"value": 17
},
"org.apache.hugegraph.backend.cache.Cache.token-hugegraph.capacity": {
"value": 10240
},
"org.apache.hugegraph.backend.cache.Cache.token-hugegraph.expire": {
"value": 600000
},
"org.apache.hugegraph.backend.cache.Cache.token-hugegraph.hits": {
"value": 0
},
"org.apache.hugegraph.backend.cache.Cache.token-hugegraph.miss": {
"value": 0
},
"org.apache.hugegraph.backend.cache.Cache.token-hugegraph.size": {
"value": 0
},
"org.apache.hugegraph.backend.cache.Cache.users-hugegraph.capacity": {
"value": 10240
},
"org.apache.hugegraph.backend.cache.Cache.users-hugegraph.expire": {
"value": 600000
},
"org.apache.hugegraph.backend.cache.Cache.users-hugegraph.hits": {
"value": 0
},
"org.apache.hugegraph.backend.cache.Cache.users-hugegraph.miss": {
"value": 0
},
"org.apache.hugegraph.backend.cache.Cache.users-hugegraph.size": {
"value": 0
},
"org.apache.hugegraph.backend.cache.Cache.users_pwd-hugegraph.capacity": {
"value": 10240
},
"org.apache.hugegraph.backend.cache.Cache.users_pwd-hugegraph.expire": {
"value": 600000
},
"org.apache.hugegraph.backend.cache.Cache.users_pwd-hugegraph.hits": {
"value": 0
},
"org.apache.hugegraph.backend.cache.Cache.users_pwd-hugegraph.miss": {
"value": 0
},
"org.apache.hugegraph.backend.cache.Cache.users_pwd-hugegraph.size": {
"value": 0
},
"org.apache.hugegraph.backend.cache.Cache.vertex-hugegraph.capacity": {
"value": 10000000
},
"org.apache.hugegraph.backend.cache.Cache.vertex-hugegraph.expire": {
"value": 600000
},
"org.apache.hugegraph.backend.cache.Cache.vertex-hugegraph.hits": {
"value": 0
},
"org.apache.hugegraph.backend.cache.Cache.vertex-hugegraph.miss": {
"value": 0
},
"org.apache.hugegraph.backend.cache.Cache.vertex-hugegraph.size": {
"value": 0
},
"org.apache.hugegraph.server.RestServer.max-write-threads": {
"value": 0
},
"org.apache.hugegraph.task.TaskManager.pending-tasks": {
"value": 0
},
"org.apache.hugegraph.task.TaskManager.workers": {
"value": 4
},
"org.apache.tinkerpop.gremlin.server.GremlinServer.gremlin-groovy.sessionless.class-cache.average-load-penalty": {
"value": 9.227692E8
},
"org.apache.tinkerpop.gremlin.server.GremlinServer.gremlin-groovy.sessionless.class-cache.estimated-size": {
"value": 2
},
"org.apache.tinkerpop.gremlin.server.GremlinServer.gremlin-groovy.sessionless.class-cache.eviction-count": {
"value": 0
},
"org.apache.tinkerpop.gremlin.server.GremlinServer.gremlin-groovy.sessionless.class-cache.eviction-weight": {
"value": 0
},
"org.apache.tinkerpop.gremlin.server.GremlinServer.gremlin-groovy.sessionless.class-cache.hit-count": {
"value": 0
},
"org.apache.tinkerpop.gremlin.server.GremlinServer.gremlin-groovy.sessionless.class-cache.hit-rate": {
"value": 0.0
},
"org.apache.tinkerpop.gremlin.server.GremlinServer.gremlin-groovy.sessionless.class-cache.load-count": {
"value": 2
},
"org.apache.tinkerpop.gremlin.server.GremlinServer.gremlin-groovy.sessionless.class-cache.load-failure-count": {
"value": 0
},
"org.apache.tinkerpop.gremlin.server.GremlinServer.gremlin-groovy.sessionless.class-cache.load-failure-rate": {
"value": 0.0
},
"org.apache.tinkerpop.gremlin.server.GremlinServer.gremlin-groovy.sessionless.class-cache.load-success-count": {
"value": 2
},
"org.apache.tinkerpop.gremlin.server.GremlinServer.gremlin-groovy.sessionless.class-cache.long-run-compilation-count": {
"value": 0
},
"org.apache.tinkerpop.gremlin.server.GremlinServer.gremlin-groovy.sessionless.class-cache.miss-count": {
"value": 2
},
"org.apache.tinkerpop.gremlin.server.GremlinServer.gremlin-groovy.sessionless.class-cache.miss-rate": {
"value": 1.0
},
"org.apache.tinkerpop.gremlin.server.GremlinServer.gremlin-groovy.sessionless.class-cache.request-count": {
"value": 2
},
"org.apache.tinkerpop.gremlin.server.GremlinServer.gremlin-groovy.sessionless.class-cache.total-load-time": {
"value": 1845538400
},
"org.apache.tinkerpop.gremlin.server.GremlinServer.sessions": {
"value": 0
}
}
1.3 Get Counters Metrics
Method & Url
GET http://localhost:8080/metrics/counters
Response Status
Response Body
{
"favicon.ico/GET/FAILED_COUNTER": {
"count": 1
},
"favicon.ico/GET/TOTAL_COUNTER": {
"count": 1
},
"metrics//GET/SUCCESS_COUNTER": {
"count": 2
},
"metrics//GET/TOTAL_COUNTER": {
"count": 2
},
"metrics/POST/FAILED_COUNTER": {
"count": 1
},
"metrics/POST/TOTAL_COUNTER": {
"count": 1
},
"metrics/backend/GET/SUCCESS_COUNTER": {
"count": 2
},
"metrics/backend/GET/TOTAL_COUNTER": {
"count": 2
},
"metrics/gauges/GET/SUCCESS_COUNTER": {
"count": 1
},
"metrics/gauges/GET/TOTAL_COUNTER": {
"count": 1
},
"metrics/statistics/GET/SUCCESS_COUNTER": {
"count": 2
},
"metrics/statistics/GET/TOTAL_COUNTER": {
"count": 2
},
"metrics/system/GET/SUCCESS_COUNTER": {
"count": 2
},
"metrics/system/GET/TOTAL_COUNTER": {
"count": 2
},
"metrics/timers/GET/SUCCESS_COUNTER": {
"count": 1
},
"metrics/timers/GET/TOTAL_COUNTER": {
"count": 1
},
"system/GET/FAILED_COUNTER": {
"count": 1
},
"system/GET/TOTAL_COUNTER": {
"count": 1
}
}
1.4 Get Histograms Metrics
Method & Url
GET http://localhost:8080/metrics/gauges
Response Status
Response Body
{
"favicon.ico/GET/RESPONSE_TIME_HISTOGRAM": {
"count": 1,
"min": 1,
"mean": 1.0,
"max": 1,
"stddev": 0.0,
"p50": 1.0,
"p75": 1.0,
"p95": 1.0,
"p98": 1.0,
"p99": 1.0,
"p999": 1.0
},
"metrics//GET/RESPONSE_TIME_HISTOGRAM": {
"count": 2,
"min": 10,
"mean": 10.0,
"max": 10,
"stddev": 0.0,
"p50": 10.0,
"p75": 10.0,
"p95": 10.0,
"p98": 10.0,
"p99": 10.0,
"p999": 10.0
},
"metrics/POST/RESPONSE_TIME_HISTOGRAM": {
"count": 1,
"min": 21,
"mean": 21.0,
"max": 21,
"stddev": 0.0,
"p50": 21.0,
"p75": 21.0,
"p95": 21.0,
"p98": 21.0,
"p99": 21.0,
"p999": 21.0
},
"metrics/backend/GET/RESPONSE_TIME_HISTOGRAM": {
"count": 2,
"min": 6,
"mean": 12.6852124529148,
"max": 20,
"stddev": 6.992918475157571,
"p50": 6.0,
"p75": 20.0,
"p95": 20.0,
"p98": 20.0,
"p99": 20.0,
"p999": 20.0
},
"metrics/gauges/GET/RESPONSE_TIME_HISTOGRAM": {
"count": 1,
"min": 7,
"mean": 7.0,
"max": 7,
"stddev": 0.0,
"p50": 7.0,
"p75": 7.0,
"p95": 7.0,
"p98": 7.0,
"p99": 7.0,
"p999": 7.0
},
"metrics/statistics/GET/RESPONSE_TIME_HISTOGRAM": {
"count": 2,
"min": 1,
"mean": 1.4551211076264199,
"max": 2,
"stddev": 0.49798181193626,
"p50": 1.0,
"p75": 2.0,
"p95": 2.0,
"p98": 2.0,
"p99": 2.0,
"p999": 2.0
},
"metrics/system/GET/RESPONSE_TIME_HISTOGRAM": {
"count": 2,
"min": 0,
"mean": 8.942674506664073,
"max": 40,
"stddev": 16.665399873223066,
"p50": 0.0,
"p75": 0.0,
"p95": 40.0,
"p98": 40.0,
"p99": 40.0,
"p999": 40.0
},
"metrics/timers/GET/RESPONSE_TIME_HISTOGRAM": {
"count": 1,
"min": 3,
"mean": 3.0,
"max": 3,
"stddev": 0.0,
"p50": 3.0,
"p75": 3.0,
"p95": 3.0,
"p98": 3.0,
"p99": 3.0,
"p999": 3.0
},
"system/GET/RESPONSE_TIME_HISTOGRAM": {
"count": 1,
"min": 2,
"mean": 2.0,
"max": 2,
"stddev": 0.0,
"p50": 2.0,
"p75": 2.0,
"p95": 2.0,
"p98": 2.0,
"p99": 2.0,
"p999": 2.0
}
}
1.5 Get Meters Metrics
Method & Url
GET http://localhost:8080/metrics/meters
Response Status
Response Body
{
"org.apache.hugegraph.api.API.commit-succeed": {
"count": 0,
"mean_rate": 0.0,
"m15_rate": 0.0,
"m5_rate": 0.0,
"m1_rate": 0.0,
"rate_unit": "events/second"
},
"org.apache.hugegraph.api.API.expected-error": {
"count": 0,
"mean_rate": 0.0,
"m15_rate": 0.0,
"m5_rate": 0.0,
"m1_rate": 0.0,
"rate_unit": "events/second"
},
"org.apache.hugegraph.api.API.illegal-arg": {
"count": 0,
"mean_rate": 0.0,
"m15_rate": 0.0,
"m5_rate": 0.0,
"m1_rate": 0.0,
"rate_unit": "events/second"
},
"org.apache.hugegraph.api.API.unknown-error": {
"count": 0,
"mean_rate": 0.0,
"m15_rate": 0.0,
"m5_rate": 0.0,
"m1_rate": 0.0,
"rate_unit": "events/second"
},
"org.apache.tinkerpop.gremlin.server.GremlinServer.errors": {
"count": 0,
"mean_rate": 0.0,
"m15_rate": 0.0,
"m5_rate": 0.0,
"m1_rate": 0.0,
"rate_unit": "events/second"
}
}
1.6 Get Timers Metrics
Method & Url
GET http://localhost:8080/metrics/timers
Response Status
Response Body
{
"org.apache.hugegraph.api.auth.AccessAPI.create": {
"count": 0,
"min": 0.0,
"mean": 0.0,
"max": 0.0,
"stddev": 0.0,
"p50": 0.0,
"p75": 0.0,
"p95": 0.0,
"p98": 0.0,
"p99": 0.0,
"p999": 0.0,
"duration_unit": "milliseconds",
"mean_rate": 0.0,
"m15_rate": 0.0,
"m5_rate": 0.0,
"m1_rate": 0.0,
"rate_unit": "calls/second"
},
"org.apache.hugegraph.api.auth.AccessAPI.delete": {
"count": 0,
"min": 0.0,
"mean": 0.0,
"max": 0.0,
"stddev": 0.0,
"p50": 0.0,
"p75": 0.0,
"p95": 0.0,
"p98": 0.0,
"p99": 0.0,
"p999": 0.0,
"duration_unit": "milliseconds",
"mean_rate": 0.0,
"m15_rate": 0.0,
"m5_rate": 0.0,
"m1_rate": 0.0,
"rate_unit": "calls/second"
},
...
}
2.Statistical Metrics
Params
- type: If the passed value is JSON, it is returned in JSON format, otherwise it is returned in
Promethaus format.
2.1 Method & Url
GET http://localhost:8080/metrics/statistics
Response Status
# HELP hugegraph_info
# TYPE hugegraph_info untyped
hugegraph_info{version="0.69",
} 1.0
# HELP metrics_POST
# TYPE metrics_POST gauge
metrics_POST{name=FAILED_REQUEST,} 1
metrics_POST{name=MEAN_RESPONSE_TIME,} 21.0
metrics_POST{
name=MAX_RESPONSE_TIME,
} 21
metrics_POST{name=SUCCESS_REQUEST,
} 0
metrics_POST{
name=TOTAL_REQUEST,
} 1
# HELP metrics_backend_GET
# TYPE metrics_backend_GET gauge
metrics_backend_GET{name=FAILED_REQUEST,
} 0
metrics_backend_GET{
name=MEAN_RESPONSE_TIME,
} 12.6852124529148
metrics_backend_GET{
name=MAX_RESPONSE_TIME,
} 20
metrics_backend_GET{
name=SUCCESS_REQUEST,
} 2
metrics_backend_GET{name=TOTAL_REQUEST,} 2
# HELP system_GET
# TYPE system_GET gauge
system_GET{name=FAILED_REQUEST,} 1
system_GET{name=MEAN_RESPONSE_TIME,} 2.0
system_GET{name=MAX_RESPONSE_TIME,} 2
system_GET{
name=SUCCESS_REQUEST,
} 0
system_GET{name=TOTAL_REQUEST,
} 1
# HELP metrics_gauges_GET
# TYPE metrics_gauges_GET gauge
metrics_gauges_GET{name=FAILED_REQUEST,} 0
metrics_gauges_GET{name=MEAN_RESPONSE_TIME,
} 7.0
metrics_gauges_GET{
name=MAX_RESPONSE_TIME,
} 7
metrics_gauges_GET{
name=SUCCESS_REQUEST,
} 1
metrics_gauges_GET{
name=TOTAL_REQUEST,
} 1
# HELP favicon.ico_GET
# TYPE favicon.ico_GET gauge
favicon.ico_GET{name=FAILED_REQUEST,
} 1
favicon.ico_GET{
name=MEAN_RESPONSE_TIME,
} 1.0
favicon.ico_GET{name=MAX_RESPONSE_TIME,} 1
favicon.ico_GET{name=SUCCESS_REQUEST,} 0
favicon.ico_GET{
name=TOTAL_REQUEST,
} 1
# HELP metrics__GET
# TYPE metrics__GET gauge
metrics__GET{name=FAILED_REQUEST,} 0
metrics__GET{name=MEAN_RESPONSE_TIME,} 10.0
metrics__GET{name=MAX_RESPONSE_TIME,
} 10
metrics__GET{
name=SUCCESS_REQUEST,
} 2
metrics__GET{
name=TOTAL_REQUEST,
} 2
# HELP metrics_system_GET
# TYPE metrics_system_GET gauge
metrics_system_GET{name=FAILED_REQUEST,} 0
metrics_system_GET{name=MEAN_RESPONSE_TIME,
} 8.942674506664073
metrics_system_GET{
name=MAX_RESPONSE_TIME,
} 40
metrics_system_GET{name=SUCCESS_REQUEST,} 2
metrics_system_GET{name=TOTAL_REQUEST,
} 2
Response Body
2.2 Method & Url
GET http://localhost:8080/metrics/statistics?type=json
Response Status
Response Body
{
"metrics/POST": {
"FAILED_REQUEST": 1,
"MEAN_RESPONSE_TIME": 21,
"MAX_RESPONSE_TIME": 21,
"SUCCESS_REQUEST": 0,
"TOTAL_REQUEST": 1
},
"metrics/backend/GET": {
"FAILED_REQUEST": 0,
"MEAN_RESPONSE_TIME": 12.6852124529148,
"MAX_RESPONSE_TIME": 20,
"SUCCESS_REQUEST": 2,
"TOTAL_REQUEST": 2
},
"system/GET": {
"FAILED_REQUEST": 1,
"MEAN_RESPONSE_TIME": 2,
"MAX_RESPONSE_TIME": 2,
"SUCCESS_REQUEST": 0,
"TOTAL_REQUEST": 1
},
"metrics/gauges/GET": {
"FAILED_REQUEST": 0,
"MEAN_RESPONSE_TIME": 7,
"MAX_RESPONSE_TIME": 7,
"SUCCESS_REQUEST": 1,
"TOTAL_REQUEST": 1
},
"favicon.ico/GET": {
"FAILED_REQUEST": 1,
"MEAN_RESPONSE_TIME": 1,
"MAX_RESPONSE_TIME": 1,
"SUCCESS_REQUEST": 0,
"TOTAL_REQUEST": 1
},
"metrics//GET": {
"FAILED_REQUEST": 0,
"MEAN_RESPONSE_TIME": 10,
"MAX_RESPONSE_TIME": 10,
"SUCCESS_REQUEST": 2,
"TOTAL_REQUEST": 2
},
"metrics/system/GET": {
"FAILED_REQUEST": 0,
"MEAN_RESPONSE_TIME": 8.942674506664073,
"MAX_RESPONSE_TIME": 40,
"SUCCESS_REQUEST": 2,
"TOTAL_REQUEST": 2
}
}
3.System Metrics
System metrics mainly return the machine metrics, such as memory, threads, and other information.
Method & Url
GET http://localhost:8080/metrics/system
Response Status
Response Body
{
"basic": {
"mem": 1010,
"mem_total": 911,
"mem_used": 239,
"mem_free": 671,
"mem_unit": "MB",
"processors": 20,
"uptime": 137503,
"systemload_average": -1.0
},
"heap": {
"committed": 911,
"init": 254,
"used": 239,
"max": 3596
},
"nonheap": {
"committed": 98,
"init": 2,
"used": 95,
"max": 0
},
"thread": {
"peak": 82,
"daemon": 34,
"total_started": 108,
"count": 82
},
"class_loading": {
"count": 11495,
"loaded": 11495,
"unloaded": 0
},
"garbage_collector": {
"ps_scavenge_count": 16,
"ps_scavenge_time": 155,
"ps_marksweep_count": 3,
"ps_marksweep_time": 494,
"time_unit": "ms"
}
}
4.Backend Metrics
HugeGraph supports multiple backend storage, with backend metrics including memory, disk, and other
information.
Method & Url
GET http://localhost:8080/metrics/backend
Response Status
Response Body
{
"hugegraph": {
"backend": "rocksdb",
"nodes": 1,
"cluster_id": "local",
"servers": {
"local": {
"mem_unit": "MB",
"disk_unit": "GB",
"mem_used": 0.1,
"mem_used_readable": "103.53 KB",
"disk_usage": 0.03,
"disk_usage_readable": "29.03 KB",
"block_cache_usage": 0.00359344482421875,
"block_cache_pinned_usage": 0.00359344482421875,
"block_cache_capacity": 304.0,
"estimate_table_readers_mem": 0.019697189331054688,
"size_all_mem_tables": 0.07421875,
"cur_size_all_mem_tables": 0.07421875,
"estimate_live_data_size": 5.536526441574097E-5,
"total_sst_files_size": 5.536526441574097E-5,
"live_sst_files_size": 5.536526441574097E-5,
"estimate_pending_compaction_bytes": 0.0,
"estimate_num_keys": 0,
"num_entries_active_mem_table": 0,
"num_entries_imm_mem_tables": 0,
"num_deletes_active_mem_table": 0,
"num_deletes_imm_mem_tables": 0,
"num_running_flushes": 0,
"mem_table_flush_pending": 0,
"num_running_compactions": 0,
"compaction_pending": 0,
"num_immutable_mem_table": 0,
"num_snapshots": 0,
"oldest_snapshot_time": 0,
"num_live_versions": 38,
"current_super_version_number": 38
}
}
}
}
5.1.19 - Other API
Other REST API: Provide auxiliary functions such as system version query and API version information.
11.1 Other
Method & Url
GET http://localhost:8080/versions
Response Status
Response Body
{
"versions": {
"version": "v1",
"core": "0.4.5.1",
"gremlin": "3.2.5",
"api": "0.13.2.0"
}
}
5.2 - HugeGraph Java Client
The code in this document is written in java, but its style is very similar to gremlin(groovy). The user only needs to replace the variable declaration in the code with def or remove it directly,
You can convert java code into groovy; in addition, each line of statement can be without a semicolon at the end, groovy considers a line to be a statement.
The gremlin(groovy) written by the user in HugeGraph-Studio can refer to the java code in this document, and some examples will be given below.
1 HugeGraph-Client
HugeGraph-Client is the general entry for operating graph. Users must first create a HugeGraph-Client object and establish a connection (pseudo connection) with HugeGraph-Server before they can obtain the operation entry objects of schema, graph and gremlin.
Currently, HugeGraph-Client only allows connections to existing graphs on the server, and cannot create custom graphs. After version 1.7.0, client has supported setting graphSpace, the default value for graphSpace is DEFAULT. Its creation method is as follows:
// HugeGraphServer address: "http://localhost:8080"
// Graph Name: "hugegraph"
HugeClient hugeClient = HugeClient.builder("http://localhost:8080", "hugegraph")
//.builder("http://localhost:8080", "graphSpaceName", "hugegraph")
.configTimeout(20) // 20s timeout
.configUser("**", "**") // enable auth
.build();
If the above process of creating HugeClient fails, an exception will be thrown, and the user needs to use try-catch. If successful, continue to get schema, graph and gremlin manager.
When operating through gremlin in HugeGraph-Hubble(or HugeGraph-Studio), HugeClient is not required and can be ignored.
2 Schema
2.1 SchemaManager
SchemaManager is used to manage four kinds of schema in HugeGraph, namely PropertyKey (property type), VertexLabel (vertex type), EdgeLabel (edge type) and IndexLabel (index label). A SchemaManager object can be created for schema information definition.
The user can obtain the SchemaManager object using the following methods:
SchemaManager schema = hugeClient.schema()
Create a schema object via gremlin in HugeGraph-Hubble:
The definition process of the 4 kinds of schema is described below.
2.2 PropertyKey
2.2.1 Interface and parameter introduction
PropertyKey is used to standardize the property constraints of vertices and edges, and properties of properties are not currently supported.
The constraint information that PropertyKey allows to define includes: name, datatype, cardinality, and userdata, which are introduced one by one below.
- name: The name of the property, used to distinguish different PropertyKeys, PropertyKeys with the same name are not allowed.
| interface | param | must set |
|---|
| propertyKey(String name) | name | y |
- datatype: property value type, you must select an explicit setting from the following table that conforms to the specific business scenario:
| interface | Java Class |
|---|
| asText() | String |
| asInt() | Integer |
| asDate() | Date |
| asUuid() | UUID |
| asBoolean() | Boolean |
| asByte() | Byte |
| asBlob() | Byte[] |
| asDouble() | Double |
| asFloat() | Float |
| asLong() | Long |
- cardinality: Whether the property value is single-valued or multivalued, in the case of multivalued, it is divided into allowing-duplicate values and not-allowing-duplicate values. This item is single by default. If necessary, you can select a setting from the following table:
| interface | cardinality | description |
|---|
| valueSingle() | single | single value |
| valueList() | list | multi-values that allow duplicate value |
| valueSet() | set | multi-values that not allow duplicate value |
- userdata: Users can add some constraints or additional information by themselves, and then check whether the incoming properties satisfy the constraints, or extract additional information when necessary:
| interface | description |
|---|
| userdata(String key, Object value) | The same key, the latter will cover the former |
2.2.2 Create PropertyKey
schema.propertyKey("name").asText().valueSet().ifNotExist().create()
The syntax of creating the above PropertyKey object through gremlin in HugeGraph-Hubble is exactly the same. If the user does not define the schema variable, it should be written like this:
graph.schema().propertyKey("name").asText().valueSet().ifNotExist().create()
In the following examples, the syntax of gremlin and java is exactly the same, so we won’t repeat them.
- ifNotExist(): Add a judgment mechanism for create, if the current PropertyKey already exists, it will not be created, otherwise the property will be created. If no ifNotExist() is added, an exception will be thrown if a property-key with the same name already exists. The same as below, and will not be repeated there.
2.2.3 Delete PropertyKey
schema.propertyKey("name").remove()
2.2.4 Query PropertyKey
// Get PropertyKey
schema.getPropertyKey("name")
// Get attributes of PropertyKey
schema.getPropertyKey("name").cardinality()
schema.getPropertyKey("name").dataType()
schema.getPropertyKey("name").name()
schema.getPropertyKey("name").userdata()
2.3 VertexLabel
2.3.1 Interface and parameter introduction
VertexLabel is used to define the vertex type and describe the constraint information of the vertex.
The constraint information that VertexLabel allows to define include: name, idStrategy, properties, primaryKeys and nullableKeys, which are introduced one by one below.
- name: The name of the VertexLabel, used to distinguish different VertexLabels, VertexLabels with the same name are not allowed.
| interface | param | must set |
|---|
| vertexLabel(String name) | name | y |
- idStrategy: Each VertexLabel can choose its own ID strategy. There are currently three strategies to choose from, namely Automatic (automatically generated), Customize (user input) and PrimaryKey (primary attribute key). Among them, Automatic uses the Snowflake algorithm to generate ID, Customize requires the user to pass in the ID of string or number type, and PrimaryKey allows the user to select several properties of VertexLabel as the basis for differentiation. HugeGraph will be spliced and generated ID according to the value of the primary properties. idStrategy uses Automatic by default, but if the user does not explicitly set idStrategy and calls the primaryKeys(…) method to set the primary property, then idStrategy will automatically use PrimaryKey.
| interface | idStrategy | description |
|---|
| useAutomaticId | AUTOMATIC | generate id automatically by Snowflake algorithm |
| useCustomizeStringId | CUSTOMIZE_STRING | passed id by user, must be string type |
| useCustomizeNumberId | CUSTOMIZE_NUMBER | passed id by user, must be number type |
| usePrimaryKeyId | PRIMARY_KEY | choose some important prop as primary key to splice id |
- properties: define the properties of the vertex, the incoming parameter is the name of the PropertyKey.
| interface | description |
|---|
| properties(String… properties) | allow to pass multi properties |
- primaryKeys: When the user selects the ID strategy of PrimaryKey, several primary properties need to be selected from the properties of VertexLabel as the basis for differentiation;
| interface | description |
|---|
| primaryKeys(String… keys) | allow to choose multi prop as primaryKeys |
Note that the selection of the ID strategy and the setting of primaryKeys have some mutual constraints, which cannot be called at will. The constraints are shown in the following table:
| useAutomaticId | useCustomizeStringId | useCustomizeNumberId | usePrimaryKeyId |
|---|
| unset primaryKeys | AUTOMATIC | CUSTOMIZE_STRING | CUSTOMIZE_NUMBER | ERROR |
| set primaryKeys | ERROR | ERROR | ERROR | PRIMARY_KEY |
- nullableKeys: For properties set by the properties(…) method, all of them are non-nullable by default, that is, the property must be assigned a value when creating a vertex, which may impose too strict integrity requirements on user data. In order to avoid such strong constraints, the user can set some properties to be nullable through this method, so that the properties can be unassigned when adding vertices.
| interface | description |
|---|
| nullableKeys(String… properties) | allow to pass multi props |
Note: primaryKeys and nullableKeys cannot intersect, because a property cannot be both primary and nullable.
- enableLabelIndex: The user can specify whether to create an index for the label. If you don’t create it, you can’t globally search for the vertices and edges of the specified label. If you create it, you can search globally, like
g.V().hasLabel('person'), g.E().has('label', 'person') query, but the performance will be slower when inserting data, and it will take up more storage space. This defaults to true.
| interface | description |
|---|
| enableLabelIndex(boolean enable) | Whether to create a label index |
- userdata: Users can add some constraints or additional information by themselves, and then check whether the incoming properties meet the constraints, or extract additional information when necessary.
| interface | description |
|---|
| userdata(String key, Object value) | The same key, the latter will cover the former |
2.3.2 Create VertexLabel
// Use Automatic Id strategy
schema.vertexLabel("person").properties("name", "age").ifNotExist().create();
schema.vertexLabel("person").useAutomaticId().properties("name", "age").ifNotExist().create();
// Use Customize_String Id strategy
schema.vertexLabel("person").useCustomizeStringId().properties("name", "age").ifNotExist().create();
// Use Customize_Number Id strategy
schema.vertexLabel("person").useCustomizeNumberId().properties("name", "age").ifNotExist().create();
// Use PrimaryKey Id strategy
schema.vertexLabel("person").properties("name", "age").primaryKeys("name").ifNotExist().create();
schema.vertexLabel("person").usePrimaryKeyId().properties("name", "age").primaryKeys("name").ifNotExist().create();
2.3.3 Update VertexLabel
VertexLabel can append constraints, but only properties and nullableKeys, and the appended properties must also be added to the nullableKeys collection.
schema.vertexLabel("person").properties("price").nullableKeys("price").append();
2.3.4 Delete VertexLabel
schema.vertexLabel("person").remove();
2.3.5 Query VertexLabel
// Get VertexLabel
schema.getVertexLabel("name")
// Get attributes of VertexLabel
schema.getVertexLabel("person").idStrategy()
schema.getVertexLabel("person").primaryKeys()
schema.getVertexLabel("person").name()
schema.getVertexLabel("person").properties()
schema.getVertexLabel("person").nullableKeys()
schema.getVertexLabel("person").userdata()
2.4 EdgeLabel
2.4.1 Interface and parameter introduction
EdgeLabel is used to define the edge type and describe the constraint information of the edge.
The constraint information that EdgeLabel allows to define include: name, sourceLabel, targetLabel, frequency, properties, sortKeys and nullableKeys, which are introduced one by one below.
- name: The name of the EdgeLabel, used to distinguish different EdgeLabels, EdgeLabels with the same name are not allowed.
| interface | param | must set |
|---|
| edgeLabel(String name) | name | y |
sourceLabel: The name of the source vertex type of the edge link, only one is allowed;
targetLabel: The name of the target vertex type of the edge link, only one is allowed;
| interface | param | must set |
|---|
| sourceLabel(String label) | label | y |
| targetLabel(String label) | label | y |
- frequency: Indicating the number of times a relationship occurs between two specific vertices, which can be single (single) or multiple (frequency), the default is single.
| interface | frequency | description |
|---|
| singleTime() | single | a relationship can only occur once |
| multiTimes() | multiple | a relationship can occur many times |
- properties: Define the properties of the edge.
| interface | description |
|---|
| properties(String… properties) | allow to pass multi props |
- sortKeys: When the frequency of EdgeLabel is multiple, some properties are needed to distinguish the multiple relationships, so sortKeys (sorted keys) is introduced;
| interface | description |
|---|
| sortKeys(String… keys) | allow to choose multi prop as sortKeys |
- nullableKeys: Consistent with the concept of nullableKeys in vertices.
Note: sortKeys and nullableKeys also cannot intersect.
enableLabelIndex: It is consistent with the concept of enableLabelIndex in the vertex.
userdata: Users can add some constraints or additional information by themselves, and then check whether the incoming properties meet the constraints, or extract additional information when necessary.
| interface | description |
|---|
| userdata(String key, Object value) | The same key, the latter will cover the former |
2.4.2 Create EdgeLabel
schema.edgeLabel("knows").link("person", "person").properties("date").ifNotExist().create();
schema.edgeLabel("created").multiTimes().link("person", "software").properties("date").sortKeys("date").ifNotExist().create();
2.4.3 Update EdgeLabel
schema.edgeLabel("knows").properties("price").nullableKeys("price").append();
2.4.4 Delete EdgeLabel
schema.edgeLabel("knows").remove();
2.4.5 Query EdgeLabel
// Get EdgeLabel
schema.getEdgeLabel("knows")
// Get attributes of EdgeLabel
schema.getEdgeLabel("knows").frequency()
schema.getEdgeLabel("knows").sourceLabel()
schema.getEdgeLabel("knows").targetLabel()
schema.getEdgeLabel("knows").sortKeys()
schema.getEdgeLabel("knows").name()
schema.getEdgeLabel("knows").properties()
schema.getEdgeLabel("knows").nullableKeys()
schema.getEdgeLabel("knows").userdata()
2.5 IndexLabel
2.5.1 Interface and parameter introduction
IndexLabel is used to define the index type and describe the constraint information of the index, mainly for the convenience of query.
The constraint information that IndexLabel allows to define include: name, baseType, baseValue, indexFields, indexType, which are introduced one by one below.
- name: The name of the IndexLabel, used to distinguish different IndexLabels, IndexLabels with the same name are not allowed.
| interface | param | must set |
|---|
| indexLabel(String name) | name | y |
baseType: Indicates whether to index VertexLabel or EdgeLabel, used in conjunction with the baseValue below.
baseValue: Specifies the name of the VertexLabel or EdgeLabel to be indexed.
| interface | param | description |
|---|
| onV(String baseValue) | baseValue | build index for VertexLabel: ‘baseValue’ |
| onE(String baseValue) | baseValue | build index for EdgeLabel: ‘baseValue’ |
- indexFields: on which fields to index, it can be a joint index for multiple columns.
| interface | param | description |
|---|
| by(String… fields) | files | allow to build index for multi fields for secondary index |
- indexType: There are currently five types of indexes established, namely Secondary, Range, Search, Shard and Unique.
- Secondary Index supports exact matching secondary index, allow to build joint index, joint index supports index prefix search
- Single Property Secondary Index, support equality query, for example: the secondary index of the city property of the person vertex, you can use
g.V().has("city", "Beijing") to query all the vertices with “city attribute value is Beijing” - Joint Secondary Index, supports prefix query and equality query, such as: joint index of city and street properties of person vertex, you can use
g.V().has("city", "Beijing").has('street', 'Zhongguancun street ') to query all vertices of “city property value is Beijing and street property value is ZhongGuanCun”, or g.V().has("city", "Beijing") to query all vertices of “city property value is Beijing”.
The query of Secondary Index is based on the query condition of “yes” or “equal”, and does not support “partial matching”.
- Range Index supports for range queries of numeric types
- Must be a single number or date attribute, for example: the range index of the age property of the person vertex, you can use
g.V().has("age", P.gt(18)) to query the vertices with “age property value greater than 18” . In addition to P.gt(), also supports P.gte(), P.lte(), P.lt(), P.eq(), P.between() , P.inside() and P.outside() etc.
- Search Index supports full-text search
- It must be a single text property, such as: full-text index of the address property of the person vertex, you can use
g.V().has("address", Text.contains('building') to query all vertices whose “address property contains a ‘building’”
The query of the Search Index is based on the query condition of “is” or “contains”.
- Shard Index supports prefix matching + numeric range query
- The shard index of N properties supports range queries with equal prefixes. For example, the shard index of the city and age properties of the person vertex can use
g.V().has("city", "Beijing").has ("age", P.between(18, 30))Query “city property is Beijing and all vertices whose age is greater than or equal to 18 and less than 30”. - When all N properties are text properties in a Shard Index, it is equivalent to Secondary Index.
- When there is only one single number or date property in a Shard Index, it is equivalent to the Range Index.
Shard Index can have any number or date property, but at most one range search condition can be provided when querying, and the prefix properties of the Shard Search conditions must be “equals”.
- Unique Index supports properties uniqueness constraints, that is, the value of properties can be limited to not repeat, and joint indexing is allowed, but querying is not supported now
- The unique index of single or multiple properties cannot be used for query, only the value of the property can be limited, and an error will be reported when there is a duplicate value.
| interface | indexType | description |
|---|
| secondary() | Secondary | support prefix search |
| range() | Range | support range(numeric or date type) search |
| search() | Search | support full text search |
| shard() | Shard | support prefix + range(numeric or date type) search |
| unique() | Unique | support unique props value, not support search |
2.5.2 Create IndexLabel
schema.indexLabel("personByAge").onV("person").by("age").range().ifNotExist().create();
schema.indexLabel("createdByDate").onE("created").by("date").secondary().ifNotExist().create();
schema.indexLabel("personByLived").onE("person").by("lived").search().ifNotExist().create();
schema.indexLabel("personByCityAndAge").onV("person").by("city", "age").shard().ifNotExist().create();
schema.indexLabel("personById").onV("person").by("id").unique().ifNotExist().create();
2.5.3 Delete IndexLabel
schema.indexLabel("personByAge").remove()
2.5.4 Query IndexLabel
// Get IndexLabel
schema.getIndexLabel("personByAge")
// Get attributes of IndexLabel
schema.getIndexLabel("personByAge").baseType()
schema.getIndexLabel("personByAge").baseValue()
schema.getIndexLabel("personByAge").indexFields()
schema.getIndexLabel("personByAge").indexType()
schema.getIndexLabel("personByAge").name()
3 Graph
3.1 Vertex
Vertices are the most basic elements of a graph, and there can be many vertices in a graph. Here is an example of adding vertices:
Vertex marko = graph.addVertex(T.label, "person", "name", "marko", "age", 29);
Vertex lop = graph.addVertex(T.label, "software", "name", "lop", "lang", "java", "price", 328);
- The key to adding vertices is the vertex properties. The number of parameters of the vertex adding function must be an even number and satisfy the order of
key1 -> val1, key2 -> val2 ..., and the order between key-value pairs is free . - The parameter must contain a special key-value pair, namely
T.label -> "val", which is used to define the category of the vertex, so that the program can obtain the schema definition of the VertexLabel from the cache or backend, and then do subsequent constraint checks. The label in the example is defined as person. - If the vertex type’s ID policy is
AUTOMATIC, users are not allowed to pass in id key-value pairs. - If the ID policy of the vertex type is
CUSTOMIZE_STRING, the user needs to pass in the value of the id of the String type. The key-value pair is like: "T.id", "123456". - If the ID policy of the vertex type is
CUSTOMIZE_NUMBER, the user needs to pass in the value of the id of the Number type. The key-value pair is like: "T.id", 123456. - If the ID policy of the vertex type is
PRIMARY_KEY, the parameters must also contain the name and value of the properties corresponding to the primaryKeys, if not set an exception will be thrown. For example, the primaryKeys of person is name, in the example, the value of name is set to marko. - For properties that are not nullableKeys, a value must be assigned.
- The remaining parameters are the settings of other properties of the vertex, but they are not required.
- After calling the
addVertex method, the vertices are inserted into the backend storage system immediately.
3.2 Edge
After added vertices, edges are also needed to form a complete graph. Here is an example of adding edges:
Edge knows1 = marko.addEdge("knows", vadas, "city", "Beijing");
- The function
addEdge() of the (source) vertex is to add an edge(relationship) between itself and another vertex. The first parameter of the function is the label of the edge, and the second parameter is the target vertex. The position and order of these two parameters are fixed. The subsequent parameters are the order of key1 -> val1, key2 -> val2 ..., set the properties of the edge, and the key-value pair order is free. - The source and target vertices must conform to the definitions of source-label and target label in EdgeLabel, and cannot be added arbitrarily.
- For properties that are not nullableKeys, a value must be assigned.
Note: When frequency is multiple, the value of the property type corresponding to sortKeys must be set.
4 GraphSpace
The client supports multiple GraphSpaces in one physical deployment, and each GraphSpace can contain multiple graphs.
- Compatibility: When no GraphSpace is specified, the “DEFAULT” space is used by default.
4.1 Create GraphSpace
GraphSpaceManager spaceManager = hugeClient.graphSpace();
// Define GraphSpace configuration
GraphSpace graphSpace = new GraphSpace();
graphSpace.setName("myGraphSpace");
graphSpace.setDescription("Business data graph space");
graphSpace.setMaxGraphNumber(10); // Maximum number of graphs
graphSpace.setMaxRoleNumber(100); // Maximum number of roles
// Create GraphSpace
spaceManager.createGraphSpace(graphSpace);
4.2 GraphSpace Interface Summary
| Category | Interface | Description |
|---|
| Manager - Query | listGraphSpace() | Get the list of all GraphSpaces |
| getGraphSpace(String name) | Get the specified GraphSpace |
| Manager - Create/Update | createGraphSpace(GraphSpace) | Create a GraphSpace |
| updateGraphSpace(String, GraphSpace) | Update configuration |
| Manager - Delete | removeGraphSpace(String) | Delete the specified GraphSpace |
| GraphSpace - Properties | getName() / getDescription() | Get name / description |
| getGraphNumber() | Get the number of graphs |
| GraphSpace - Configuration | setDescription(String) | Set description |
| setMaxGraphNumber(int) | Set the maximum number of graphs |
5 Simple Example
Simple examples can reference HugeGraph-Client
5.3 - Gremlin-Console
Gremlin-Console is an interactive client developed by TinkerPop. Users can use this client to perform various operations on Graph. There are two main usage modes:
- Stand-alone offline mode
- Client/Server mode
Note: Gremlin-Console is only for users to quickly get started and experience, it is not recommended for use in production environments.
1 Stand-alone offline mode
Since the lib directory already contains the HugeCore jar package, and HugeGraph-Server has been registered in the Console as a plug-in, the users can write a groovy script directly to call the code of HugeGraph-Core, and then hand it over to the parsing engine in Gremlin-Console for execution. As a result, the users can operate the graph without starting the Server.
Here is an example, first modify the hugegraph.properties configuration to use the Memory backend (using other backends may encounter some initialization issues):
backend=memory
serializer=text
Then enter the following command:
> ./bin/gremlin-console.sh -- -i scripts/example.groovy
\,,,/
(o o)
-----oOOo-(3)-oOOo-----
plugin activated: HugeGraph
plugin activated: tinkerpop.server
plugin activated: tinkerpop.utilities
plugin activated: tinkerpop.tinkergraph
main dict load finished, time elapsed 644 ms
model load finished, time elapsed 35 ms.
>>>> query all vertices: size=6
>>>> query all edges: size=6
gremlin>
The -- here will be parsed by getopts as the last option, allowing the subsequent options to be passed to Gremlin-Console for processing. -i represents Execute the specified script and leave the console open on completion. For more options, you can refer to the source code of Gremlin-Console.
example.groovy is an example script under the scripts directory. This script inserts some data and queries the number of vertices and edges in the graph at the end.
You can continue to enter Gremlin statements to operate on the graph:
gremlin> g.V()
==>v[2:lop]
==>v[1:josh]
==>v[1:marko]
==>v[1:peter]
==>v[1:vadas]
==>v[2:ripple]
gremlin> g.E()
==>e[S1:josh>2>>S2:lop][1:josh-created->2:lop]
==>e[S1:josh>2>>S2:ripple][1:josh-created->2:ripple]
==>e[S1:marko>1>>S1:josh][1:marko-knows->1:josh]
==>e[S1:marko>1>>S1:vadas][1:marko-knows->1:vadas]
==>e[S1:marko>2>>S2:lop][1:marko-created->2:lop]
==>e[S1:peter>2>>S2:lop][1:peter-created->2:lop]
gremlin>
For more Gremlin statements, please refer to Tinkerpop Official Website
2 Client/Server mode
Because Gremlin-Console can only connect to HugeGraph-Server through WebSocket, HugeGraph-Server provides HTTP connections by default, so modify the configuration of gremlin-server first.
NOTE: After changing the connection method to WebSocket, HugeGraph-Client, HugeGraph-Loader, HugeGraph-Hubble and other supporting tools cannot be used.
# vim conf/gremlin-server.yaml
# ......
# If you want to start gremlin-server for gremlin-console (web-socket),
# please change `HttpChannelizer` to `WebSocketChannelizer` or comment this line.
channelizer: org.apache.tinkerpop.gremlin.server.channel.HttpChannelizer
# ......
Modify channelizer: org.apache.tinkerpop.gremlin.server.channel.HttpChannelizer to channelizer: org.apache.tinkerpop.gremlin.server.channel.WebSocketChannelizer or comment directly, and then follow the steps to start the Server.
Then enter Gremlin-Console:
> ./bin/gremlin-console.sh
\,,,/
(o o)
-----oOOo-(3)-oOOo-----
plugin activated: HugeGraph
plugin activated: tinkerpop.server
plugin activated: tinkerpop.utilities
plugin activated: tinkerpop.tinkergraph
To connect to the server, you need to specify the connection parameters in the configuration file, and there is a default remote.yaml file in the conf directory
# cat conf/remote.yaml
hosts: [localhost]
port: 8182
serializer: {
className: org.apache.tinkerpop.gremlin.driver.ser.GraphSONMessageSerializerV1d0,
config: {
serializeResultToString: false,
ioRegistries: [org.apache.hugegraph.io.HugeGraphIoRegistry]
}
}
gremlin> :remote connect tinkerpop.server conf/remote.yaml
==>Configured localhost/127.0.0.1:8182
After a successful connection, if the sample graph example.groovy is imported during the startup of HugeGraph-Server, you can directly perform queries in the console.
gremlin> :> hugegraph.traversal().V()
==>[id:2:lop,label:software,type:vertex,properties:[name:lop,lang:java,price:328]]
==>[id:1:josh,label:person,type:vertex,properties:[name:josh,age:32,city:Beijing]]
==>[id:1:marko,label:person,type:vertex,properties:[name:marko,age:29,city:Beijing]]
==>[id:1:peter,label:person,type:vertex,properties:[name:peter,age:35,city:Shanghai]]
==>[id:1:vadas,label:person,type:vertex,properties:[name:vadas,age:27,city:Hongkong]]
==>[id:2:ripple,label:software,type:vertex,properties:[name:ripple,lang:java,price:199]]
NOTE: In Client/Server mode, all operations related to the Server should be prefixed with :> . If not added, it indicates local console operations.
You can also put multiple statements in a single string variable and send them to the Server at once:
gremlin> script = """
......1> graph = hugegraph;
......2> g = graph.traversal();
......3> g.V().toList().size();
......4> """
==>
graph = hugegraph;
g = graph.traversal();
g.V().toList().size();
gremlin> :> @script
==>6
gremlin>
For more information on the use of Gremlin-Console, please refer to Tinkerpop Official Website
6 - GUIDES
6.1 - HugeGraph Architecture Overview
1 Overview
As a full-stack graph system covering Graph Database, Graph Computing, and Graph AI, HugeGraph is centered around a high-performance graph engine (HugeGraph Server) and supports both OLTP and OLAP graph computation types. For the OLTP layer, it implements the Apache TinkerPop3 framework and supports the Gremlin and Cypher query languages. It comes with a complete application toolchain and provides a pluggable backend storage driver framework.
Below is the overall architecture diagram of HugeGraph:
HugeGraph consists of three layers of functionality: the application layer, the graph engine layer, and the storage layer.
- Application Layer:
- Hubble: A one-stop visual analysis platform that covers the entire process from data modeling to rapid data import, online and offline analysis, and unified graph management, realizing wizard-style operations for the entire graph application process.
- Loader: A data import component that can transform data from multiple data sources into graph vertices and edges and batch import them into the graph database.
- Tools: Command-line tools for deploying, managing, and backing up/restoring data in HugeGraph.
- Computer: A distributed graph processing system (OLAP), which is an implementation of Pregel and can run on Kubernetes.
- Client: A HugeGraph client written in Java. Users can use the Client to write Java code to operate HugeGraph. Python, Go, C++ and other language support will be provided in the future as needed.
- Graph Engine Layer:
- REST Server: Provides a RESTful API for querying graph/schema information, supports the Gremlin and Cypher query languages, and offers APIs for service monitoring and operations.
- Graph Engine: Supports both OLTP and OLAP graph computation types, with OLTP implementing the Apache TinkerPop3 framework.
- Backend Interface: Implements the storage of graph data to the backend.
- Storage Layer:
- Storage Backend: Supports multiple built-in storage backends (RocksDB/MySQL/HBase/…) and allows users to extend custom backends without modifying the existing source code.
6.2 - HugeGraph Design Concepts
1. Property Graph
There are two common graph data representation models, namely the RDF (Resource Description Framework) model and the Property Graph (Property Graph) model.
Both RDF and Property Graph are the most basic and well-known graph representation modes, and both can represent entity-relationship modeling of various graphs.
RDF is a W3C standard, while Property Graph is an industry standard and is widely supported by graph database vendors. HugeGraph currently uses Property Graph.
The storage concept model corresponding to HugeGraph is also designed with reference to Property Graph. For specific examples, see the figure below:
( This figure is outdated for the old version design, please ignore it and update it later )
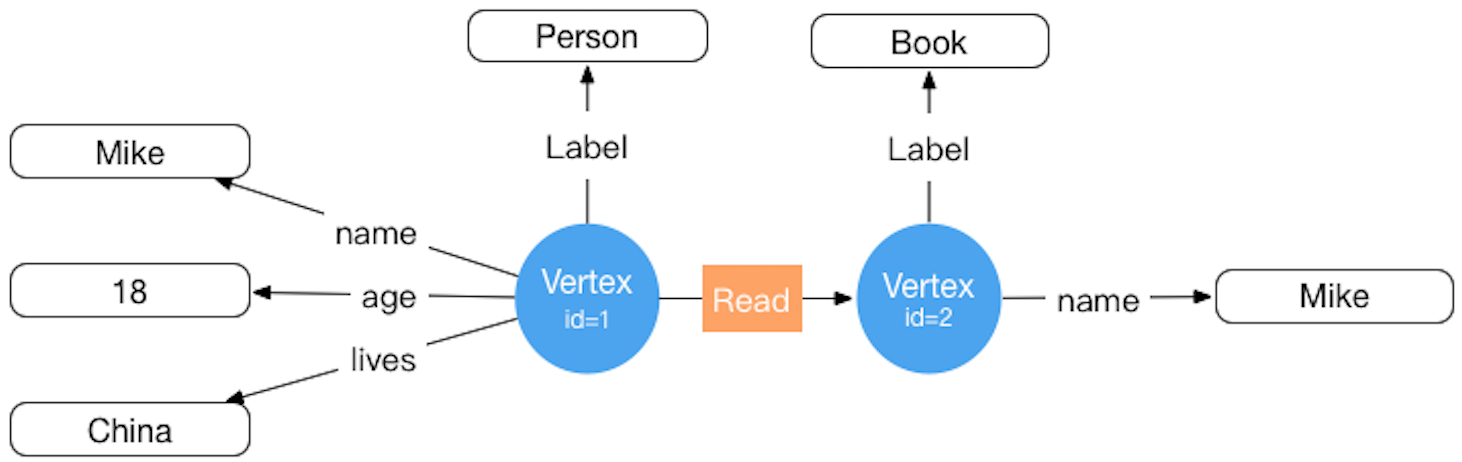
Inside HugeGraph, each vertex/edge is identified by a unique VertexId/EdgeId, and the attributes are stored inside the corresponding vertex/edge.
The relationship/mapping between vertices is stored through edges.
When the vertex attribute value is stored by edge pointer, if you want to update a vertex-specific attribute value, you can directly write it by overwriting.
The disadvantage is that the VertexId is redundantly stored; if you want to update the attribute of the relationship, you need to use the read-and-modify method ,
read all attributes first, modify some attributes, and then write to the storage system, the update efficiency is low. According to experience, there are more
requirements for modifying vertex attributes, but less for edge attributes. For example, calculations such as PageRank and Graph Cluster require frequent
modification of vertex attribute values.
2. Graph Partition Scheme
For distributed graph databases, there are two partition storage methods for graphs: Edge Cut and Vertex Cut, as shown in the following figure. When using the
Edge Cut method to store graphs, any vertex will only appear on one machine, while edges may be distributed on different machines. This storage method may lead
to multiple storage of edges. When using the Vertex Cut method to store graphs, any edge will only appear on one machine, and each same point may be distributed
to different machines. This storage method may result in multiple storage of vertices.
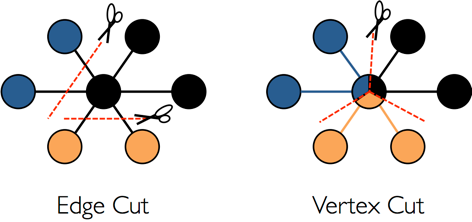
The EdgeCut partition scheme can support high-performance insert and update operations, while the VertexCut partition scheme is more suitable for static graph query
analysis, so EdgeCut is suitable for OLTP graph query, and VertexCut is more suitable for OLAP graph query. HugeGraph currently adopts the partition scheme of EdgeCut.
3. VertexId Strategy
Vertex of HugeGraph supports three ID strategies. Different VertexLabels in the same graph database can use different Id strategies. Currently, the Id strategies
supported by HugeGraph are:
- Automatic generation (AUTOMATIC): Use the Snowflake algorithm to automatically generate a globally unique Id, Long type;
- Primary Key (PRIMARY_KEY): Generate Id through VertexLabel+PrimaryKeyValues, String type;
- Custom (CUSTOMIZE_STRING|CUSTOMIZE_NUMBER): User-defined Id, which is divided into two types: String and Long, and you need to ensure the uniqueness of the Id yourself;
The default Id policy is AUTOMATIC, if the user calls the primaryKeys() method and sets the correct PrimaryKeys, the PRIMARY_KEY policy is automatically enabled.
After enabling the PRIMARY_KEY strategy, HugeGraph can implement data deduplication based on PrimaryKeys.
- AUTOMATIC ID Policy
schema.vertexLabel("person")
.useAutomaticId()
.properties("name", "age", "city")
.create();
graph.addVertex(T.label, "person","name", "marko", "age", 18, "city", "Beijing");
- PRIMARY_KEY ID policy
schema.vertexLabel("person")
.usePrimaryKeyId()
.properties("name", "age", "city")
.primaryKeys("name", "age")
.create();
graph.addVertex(T.label, "person","name", "marko", "age", 18, "city", "Beijing");
- CUSTOMIZE_STRING ID Policy
schema.vertexLabel("person")
.useCustomizeStringId()
.properties("name", "age", "city")
.create();
graph.addVertex(T.label, "person", T.id, "123456", "name", "marko","age", 18, "city", "Beijing");
- CUSTOMIZE_NUMBER ID Policy
schema.vertexLabel("person")
.useCustomizeNumberId()
.properties("name", "age", "city")
.create();
graph.addVertex(T.label, "person", T.id, 123456, "name", "marko","age", 18, "city", "Beijing");
If users need Vertex deduplication, there are three options:
- Adopt PRIMARY_KEY strategy, automatic overwriting, suitable for batch insertion of large amount of data, users cannot know whether overwriting has occurred
- Adopt AUTOMATIC strategy, read-and-modify, suitable for small data insertion, users can clearly know whether overwriting occurs
- Using the CUSTOMIZE_STRING or CUSTOMIZE_NUMBER strategy, the user guarantees the uniqueness
4. EdgeId policy
The EdgeId of HugeGraph is composed of srcVertexId + edgeLabel + sortKey + tgtVertexId. Among them sortKey is an important concept of HugeGraph.
There are two reasons for adding Edge sortKeyas the unique ID of Edge:
- If there are multiple edges of the same Label between two vertices, they can be sortKeydistinguished by
- For SuperNode nodes, it can be sortKeysorted and truncated by.
Since EdgeId is composed of srcVertexId + edgeLabel + sortKey + tgtVertexId, HugeGraph will automatically overwrite when the same Edge is inserted
multiple times to achieve deduplication. It should be noted that the properties of Edge will also be overwritten in the batch insert mode.
In addition, because HugeGraph’s EdgeId adopts an automatic deduplication strategy, HugeGraph considers that there is only one edge in the case of self-loop
(a vertex has an edge pointing to itself). The graph has two edges.
The edges of HugeGraph only support directed edges, and undirected edges can be realized by creating two edges, Out and In.
5. HugeGraph transaction overview
TinkerPop transaction overview
A TinkerPop transaction refers to a unit of work that performs operations on the database. A set of operations within a transaction either succeeds or all fail. For a detailed introduction, please refer to the official documentation of TinkerPop: http://tinkerpop.apache.org/docs/current/reference/#transactions:http://tinkerpop.apache.org/docs/current/reference/#transactions
TinkerPop transaction overview
- open open transaction
- commit commit transaction
- rollback rollback transaction
- close closes the transaction
TinkerPop transaction specification
- The transaction must be explicitly committed before it can take effect (the modification operation can only be seen by the query in this transaction if it is not committed)
- A transaction must be opened before it can be committed or rolled back
- If the transaction setting is automatically turned on, there is no need to explicitly turn it on (the default method), if it is set to be turned on manually, it must be turned on explicitly
- When the transaction is closed, you can set three modes: automatic commit, automatic rollback (default mode), manual (explicit shutdown is prohibited), etc.
- The transaction must be closed after committing or rolling back
- The transaction must be open after the query
- Transactions (non-threaded tx) must be thread-isolated, and multi-threaded operations on the same transaction do not affect each other
For more transaction specification use cases, see: Transaction Test
HugeGraph transaction implementation
- All operations in a transaction either succeed or fail
- A transaction can only read what has been committed by another transaction (Read committed)
- All uncommitted operations can be queried in this transaction, including:
- Adding a vertex can query the vertex
- Delete a vertex to filter out the vertex
- Deleting a vertex can filter out the related edges of the vertex
- Adding an edge can query the edge
- Delete edge can filter out the edge
- Adding/modifying (vertex, edge) attributes can take effect when querying
- Delete (vertex, edge) attributes can take effect at query time
- All uncommitted operations become invalid after the transaction is rolled back, including:
- Adding and deleting vertices and edges
- Addition/modification, deletion of attributes
Example: One transaction cannot read another transaction’s uncommitted content
static void testUncommittedTx(final HugeGraph graph) throws InterruptedException {
final CountDownLatch latchUncommit = new CountDownLatch(1);
final CountDownLatch latchRollback = new CountDownLatch(1);
Thread thread = new Thread(() -> {
// this is a new transaction in the new thread
graph.tx().open();
System.out.println("current transaction operations");
Vertex james = graph.addVertex(T.label, "author",
"id", 1, "name", "James Gosling",
"age", 62, "lived", "Canadian");
Vertex java = graph.addVertex(T.label, "language", "name", "java",
"versions", Arrays.asList(6, 7, 8));
james.addEdge("created", java);
// we can query the uncommitted records in the current transaction
System.out.println("current transaction assert");
assert graph.vertices().hasNext() == true;
assert graph.edges().hasNext() == true;
latchUncommit.countDown();
try {
latchRollback.await();
} catch (InterruptedException e) {
throw new RuntimeException(e);
}
System.out.println("current transaction rollback");
graph.tx().rollback();
});
thread.start();
// query none result in other transaction when not commit()
latchUncommit.await();
System.out.println("other transaction assert for uncommitted");
assert !graph.vertices().hasNext();
assert !graph.edges().hasNext();
latchRollback.countDown();
thread.join();
// query none result in other transaction after rollback()
System.out.println("other transaction assert for rollback");
assert !graph.vertices().hasNext();
assert !graph.edges().hasNext();
}
Principle of transaction realization
- The server internally realizes isolation by binding transactions to threads (ThreadLocal)
- The uncommitted content of this transaction overwrites the old data in chronological order for this transaction to query the latest version of data
- The bottom layer relies on the back-end database to ensure transaction atomicity (for example, the batch interface of Cassandra/RocksDB guarantees atomicity)
Notice
The RESTful API does not expose the transaction interface for the time being
TinkerPop API allows open transactions, which are automatically closed when the request is completed (Gremlin Server forces close)
6.3 - HugeGraph Plugin mechanism and plug-in extension process
Background
- HugeGraph is not only open source and open, but also simple and easy to use. General users can easily add plug-in extension functions without changing the source code.
- HugeGraph supports a variety of built-in storage backends, and also allows users to extend custom backends without changing the existing source code.
- HugeGraph supports full-text search. The full-text search function involves word segmentation in various languages. Currently, there are 8 built-in Chinese word
breakers, and it also allows users to expand custom word breakers without changing the existing source code.
Scalable dimension
Currently, the plug-in method provides extensions in the following dimensions:
- backend storage
- serializer
- Custom configuration items
- tokenizer
Plug-in implementation mechanism
- HugeGraph provides a plug-in interface HugeGraphPlugin, which supports plug-in through the Java SPI mechanism
- HugeGraph provides four extension registration functions: registerOptions(), registerBackend(), registerSerializer(),registerAnalyzer()
- The plug-in implementer implements the corresponding Options, Backend, Serializer or Analyzer interface
- The plug-in implementer implements register()the method of the HugeGraphPlugin interface, registers the specific
implementation class listed in the above point 3 in this method, and packs it into a jar package
- The plug-in user puts the jar package in the HugeGraph Server installation directory plugins, modifies the relevant
configuration items to the plug-in custom value, and restarts to take effect
Plug-in implementation process example
1 Create a new maven project
1.1 Name the project name: hugegraph-plugin-demo
1.2 Add hugegraph-core Jar package dependencies
The details of maven pom.xml are as follows:
<?xml version="1.0" encoding="UTF-8"?>
<project xmlns="http://maven.apache.org/POM/4.0.0"
xmlns:xsi="http://www.w3.org/2001/XMLSchema-instance"
xsi:schemaLocation="http://maven.apache.org/POM/4.0.0 http://maven.apache.org/xsd/maven-4.0.0.xsd">
<modelVersion>4.0.0</modelVersion>
<groupId>org.apache.hugegraph</groupId>
<artifactId>hugegraph-plugin-demo</artifactId>
<version>1.0.0</version>
<packaging>jar</packaging>
<name>hugegraph-plugin-demo</name>
<dependencies>
<dependency>
<groupId>org.apache.hugegraph</groupId>
<artifactId>hugegraph-core</artifactId>
<version>${project.version}</version>
</dependency>
</dependencies>
</project>
2 Realize extended functions
2.1 Extending a custom backend
2.1.1 Implement the interface BackendStoreProvider
- Realizable interfaces:
org.apache.hugegraph.backend.store.BackendStoreProvider - Or inherit an abstract class:
org.apache.hugegraph.backend.store.AbstractBackendStoreProvider
Take the RocksDB backend RocksDBStoreProvider as an example:
public class RocksDBStoreProvider extends AbstractBackendStoreProvider {
protected String database() {
return this.graph().toLowerCase();
}
@Override
protected BackendStore newSchemaStore(String store) {
return new RocksDBSchemaStore(this, this.database(), store);
}
@Override
protected BackendStore newGraphStore(String store) {
return new RocksDBGraphStore(this, this.database(), store);
}
@Override
public String type() {
return "rocksdb";
}
@Override
public String version() {
return "1.0";
}
}
2.1.2 Implement interface BackendStore
The BackendStore interface is defined as follows:
public interface BackendStore {
// Store name
public String store();
// Database name
public String database();
// Get the parent provider
public BackendStoreProvider provider();
// Open/close database
public void open(HugeConfig config);
public void close();
// Initialize/clear database
public void init();
public void clear();
// Add/delete data
public void mutate(BackendMutation mutation);
// Query data
public Iterator<BackendEntry> query(Query query);
// Transaction
public void beginTx();
public void commitTx();
public void rollbackTx();
// Get metadata by key
public <R> R metadata(HugeType type, String meta, Object[] args);
// Backend features
public BackendFeatures features();
// Generate an id for a specific type
public Id nextId(HugeType type);
}
2.1.3 Extending custom serializers
The serializer must inherit the abstract class: org.apache.hugegraph.backend.serializer.AbstractSerializer
( implements GraphSerializer, SchemaSerializer) The main interface is defined as follows:
public interface GraphSerializer {
public BackendEntry writeVertex(HugeVertex vertex);
public BackendEntry writeVertexProperty(HugeVertexProperty<?> prop);
public HugeVertex readVertex(HugeGraph graph, BackendEntry entry);
public BackendEntry writeEdge(HugeEdge edge);
public BackendEntry writeEdgeProperty(HugeEdgeProperty<?> prop);
public HugeEdge readEdge(HugeGraph graph, BackendEntry entry);
public BackendEntry writeIndex(HugeIndex index);
public HugeIndex readIndex(HugeGraph graph, ConditionQuery query, BackendEntry entry);
public BackendEntry writeId(HugeType type, Id id);
public Query writeQuery(Query query);
}
public interface SchemaSerializer {
public BackendEntry writeVertexLabel(VertexLabel vertexLabel);
public VertexLabel readVertexLabel(HugeGraph graph, BackendEntry entry);
public BackendEntry writeEdgeLabel(EdgeLabel edgeLabel);
public EdgeLabel readEdgeLabel(HugeGraph graph, BackendEntry entry);
public BackendEntry writePropertyKey(PropertyKey propertyKey);
public PropertyKey readPropertyKey(HugeGraph graph, BackendEntry entry);
public BackendEntry writeIndexLabel(IndexLabel indexLabel);
public IndexLabel readIndexLabel(HugeGraph graph, BackendEntry entry);
}
2.1.4 Extend custom configuration items
When adding a custom backend, it may be necessary to add new configuration items. The implementation process mainly includes:
- Add a configuration item container class and implement the interface
org.apache.hugegraph.config.OptionHolder - Provide a singleton method
public static OptionHolder instance(), and call the method when the object is initialized OptionHolder.registerOptions() - Add configuration item declaration, single-value configuration item type is
ConfigOption, multi-value configuration item type is ConfigListOption
Take the RocksDB configuration item definition as an example:
public class RocksDBOptions extends OptionHolder {
private RocksDBOptions() {
super();
}
private static volatile RocksDBOptions instance;
public static synchronized RocksDBOptions instance() {
if (instance == null) {
instance = new RocksDBOptions();
instance.registerOptions();
}
return instance;
}
public static final ConfigOption<String> DATA_PATH =
new ConfigOption<>(
"rocksdb.data_path",
"The path for storing data of RocksDB.",
disallowEmpty(),
"rocksdb-data"
);
public static final ConfigOption<String> WAL_PATH =
new ConfigOption<>(
"rocksdb.wal_path",
"The path for storing WAL of RocksDB.",
disallowEmpty(),
"rocksdb-data"
);
public static final ConfigListOption<String> DATA_DISKS =
new ConfigListOption<>(
"rocksdb.data_disks",
false,
"The optimized disks for storing data of RocksDB. " +
"The format of each element: `STORE/TABLE: /path/to/disk`." +
"Allowed keys are [graph/vertex, graph/edge_out, graph/edge_in, " +
"graph/secondary_index, graph/range_index]",
null,
String.class,
ImmutableList.of()
);
}
2.2 Extend custom tokenizer
The tokenizer needs to implement the interface org.apache.hugegraph.analyzer.Analyzer, take implementing a SpaceAnalyzer space tokenizer as an example.
package org.apache.hugegraph.plugin;
import java.util.Arrays;
import java.util.HashSet;
import java.util.Set;
import org.apache.hugegraph.analyzer.Analyzer;
public class SpaceAnalyzer implements Analyzer {
@Override
public Set<String> segment(String text) {
return new HashSet<>(Arrays.asList(text.split(" ")));
}
}
3. Implement the plug-in interface and register it
The plug-in registration entry is HugeGraphPlugin.register(), the custom plug-in must implement this interface method, and register the extension
items defined above inside it. The interface org.apache.hugegraph.plugin.HugeGraphPlugin is defined as follows:
public interface HugeGraphPlugin {
public String name();
public void register();
public String supportsMinVersion();
public String supportsMaxVersion();
}
And HugeGraphPlugin provides 4 static methods for registering extensions:
- registerOptions(String name, String classPath): register configuration items
- registerBackend(String name, String classPath): register backend (BackendStoreProvider)
- registerSerializer(String name, String classPath): register serializer
- registerAnalyzer(String name, String classPath): register tokenizer
The following is an example of registering the SpaceAnalyzer tokenizer:
package org.apache.hugegraph.plugin;
public class DemoPlugin implements HugeGraphPlugin {
@Override
public String name() {
return "demo";
}
@Override
public void register() {
HugeGraphPlugin.registerAnalyzer("demo", SpaceAnalyzer.class.getName());
}
}
4. Configure SPI entry
- Make sure the services directory exists: hugegraph-plugin-demo/resources/META-INF/services
- Create a text file in the services directory: org.apache.hugegraph.plugin.HugeGraphPlugin
- The content of the file is as follows: org.apache.hugegraph.plugin.DemoPlugin
5. Make Jar package
Through maven packaging, execute the command in the project directory mvn package, and a Jar package file will be generated in the
target directory. Copy the Jar package to the plugins directory when using it, and restart the service to take effect.
6.4 - HugeGraph Toolchain Local Testing Guide
This guide helps developers run HugeGraph toolchain tests locally.
1. Core Concepts
1.1 Core Dependency: HugeGraph Server
Integration and functional tests of the toolchain depend on HugeGraph Server, including Client, Loader, Hubble, Spark Connector, Tools, and other components.
1.2 Test Types
- Unit Tests: Test individual functions/methods, no external dependencies required
- API Tests (ApiTestSuite): Test API interfaces, requires running HugeGraph Server
- Functional Tests (FuncTestSuite): End-to-end tests, require complete system environment
2. Environment Setup
2.1 System Requirements
- Operating System: Linux / macOS (Windows use WSL2)
- JDK: >= 11, configure
JAVA_HOME - Maven: >= 3.5
- Python: >= 3.11 (only required for Hubble tests)
2.2 Clone Code
git clone https://github.com/${GITHUB_USER_NAME}/hugegraph-toolchain.git
cd hugegraph-toolchain
3. Deploy Test Environment
Deployment Options
- Script Deployment (Recommended): Precisely control Server version by specifying Commit ID, avoid interface incompatibility
- Docker Deployment: Quick start, but may have version lag causing test failures
For detailed installation instructions, refer to Community Documentation
3.1 Script Deployment (Recommended)
Parameter Description
$COMMIT_ID: Specify Server source code Git Commit ID$DB_DATABASE / $DB_PASS: MySQL database name and password for Loader JDBC tests
Deployment Steps
1. Install HugeGraph Server
# Set version
export COMMIT_ID="master" # Or specific commit hash, e.g. "8b90977"
# Execute installation (script located in /assembly/travis/ directory)
hugegraph-client/assembly/travis/install-hugegraph-from-source.sh $COMMIT_ID
- Default ports: http 8080, https 8443
- Ensure ports are not occupied
2. Install Optional Dependencies
# Hadoop (only required for Loader HDFS tests)
hugegraph-loader/assembly/travis/install-hadoop.sh
# MySQL (only required for Loader JDBC tests)
hugegraph-loader/assembly/travis/install-mysql.sh $DB_DATABASE $DB_PASS
3. Health Check
curl http://localhost:8080/graphs
# Returns {"graphs":["hugegraph"]} indicates success
3.2 Docker Deployment
Note: Docker images may have version lag, use script deployment if encountering compatibility issues
Quick Start
docker network create hugegraph-net
docker run -itd --name=server -p 8080:8080 --network hugegraph-net hugegraph/hugegraph:latest
docker-compose Configuration (Optional)
Complete configuration example including Server, MySQL, Hadoop services (requires Docker Compose V2):
version: '3.8'
services:
hugegraph-server:
image: hugegraph/hugegraph:latest # Can be replaced with a specific version, or build your own image
container_name: hugegraph-server
ports:
- "8080:8080" # HugeGraph Server HTTP port
environment:
# Configure HugeGraph Server parameters as needed, e.g., backend storage
- HUGEGRAPH_SERVER_OPTIONS="-Dstore.backend=rocksdb"
volumes:
# If you need to persist data or mount configuration files, add volumes here
# - ./hugegraph-data:/opt/hugegraph/data
healthcheck:
test: ["CMD-SHELL", "curl -f http://localhost:8080/graphs || exit 1"]
interval: 10s
timeout: 3s
retries: 5
networks:
- hugegraph-net
# If you need JDBC tests for hugegraph-loader, you can add the following service
# mysql:
# image: mysql:5.7
# container_name: mysql-db
# environment:
# MYSQL_ROOT_PASSWORD: ${DB_PASS:-your_mysql_root_password} # Read from environment variable, or use default
# MYSQL_DATABASE: ${DB_DATABASE:-hugegraph_test_db} # Read from environment variable, or use default
# ports:
# - "3306:3306"
# volumes:
# - ./mysql-data:/var/lib/mysql # Data persistence
# healthcheck:
# test: ["CMD", "mysqladmin", "ping", "-h", "localhost", "-p${DB_PASS:-your_mysql_root_password}"]
# interval: 5s
# timeout: 3s
# retries: 5
# networks:
# - hugegraph-net
# If you need Hadoop/HDFS tests for hugegraph-loader, you can add the following services
# namenode:
# image: johannestang/hadoop-namenode:2.0.0-hadoop2.8.5-java8
# container_name: namenode
# ports:
# - "0.0.0.0:9870:9870"
# - "0.0.0.0:8020:8020"
# environment:
# - CLUSTER_NAME=test-cluster
# - HDFS_NAMENODE_USER=root
# - HADOOP_CONF_DIR=/hadoop/etc/hadoop
# volumes:
# - ./config/core-site.xml:/hadoop/etc/hadoop/core-site.xml
# - ./config/hdfs-site.xml:/hadoop/etc/hadoop/hdfs-site.xml
# - namenode_data:/hadoop/dfs/name
# command: bash -c "if [ ! -d /hadoop/dfs/name/current ]; then hdfs namenode -format; fi && /entrypoint.sh"
# healthcheck:
# test: ["CMD", "hdfs", "dfsadmin", "-report"]
# interval: 5s
# timeout: 3s
# retries: 5
# networks:
# - hugegraph-net
# datanode:
# image: johannestang/hadoop-datanode:2.0.0-hadoop2.8.5-java8
# container_name: datanode
# depends_on:
# - namenode
# environment:
# - CLUSTER_NAME=test-cluster
# - HDFS_DATANODE_USER=root
# - HADOOP_CONF_DIR=/hadoop/etc/hadoop
# volumes:
# - ./config/core-site.xml:/hadoop/etc/hadoop/core-site.xml
# - ./config/hdfs-site.xml:/hadoop/etc/hadoop/hdfs-site.xml
# - datanode_data:/hadoop/dfs/data
# healthcheck:
# test: ["CMD", "hdfs", "dfsadmin", "-report"]
# interval: 5s
# timeout: 3s
# retries: 5
# networks:
# - hugegraph-net
networks:
hugegraph-net:
driver: bridge
volumes:
namenode_data:
datanode_data:
Hadoop Configuration Mounts
Create a ./config folder in the same directory as docker-compose.yml to mount Hadoop configuration files. You can skip this step if HDFS testing is not required.
📁 ./config/core-site.xml content:
<configuration>
<property>
<name>fs.defaultFS</name>
<value>hdfs://namenode:8020</value>
</property>
</configuration>
📁 ./config/hdfs-site.xml content:
<configuration>
<property>
<name>dfs.namenode.name.dir</name>
<value>/hadoop/hdfs/name</value>
</property>
<property>
<name>dfs.datanode.data.dir</name>
<value>/hadoop/hdfs/data</value>
</property>
<property>
<name>dfs.permissions.superusergroup</name>
<value>hadoop</value>
</property>
<property>
<name>dfs.support.append</name>
<value>true</value>
</property>
</configuration>
Docker Operations
# Start services
docker compose up -d
# Check status
docker compose ps
lsof -i:8080 # Server
lsof -i:8020 # Hadoop
lsof -i:3306 # MySQL
# Stop services
docker compose down
4. Run Tests
Test process for each tool:
4.1 hugegraph-client
Compile
mvn -e compile -pl hugegraph-client -Dmaven.javadoc.skip=true -ntp
Dependent Services
Start HugeGraph Server (refer to Section 3)
Server Authentication Configuration
Note: Docker images <= 1.5.0 don’t support authentication tests, need 1.6.0+
ApiTest requires authentication configuration. Skip this if using script installation. Manual configuration needed for Docker:
# 1. Modify authentication mode
cp conf/rest-server.properties conf/rest-server.properties.backup
sed -i '/^auth.authenticator=/c\auth.authenticator=org.apache.hugegraph.auth.StandardAuthenticator' conf/rest-server.properties
grep auth.authenticator conf/rest-server.properties
# 2. Set password
# Note: Test code uses "pa" as default password, must match for tests to work
bin/stop-hugegraph.sh
export PASSWORD="pa" # Set to test default password
echo -e "${PASSWORD}" | bin/init-store.sh
bin/start-hugegraph.sh
Run Tests
# Check environment
curl http://localhost:8080/graphs # Should return {"graphs":["hugegraph"]}
curl -u admin:pa http://localhost:8080/graphs # Authentication test (pa is test default password)
# Run tests
cd hugegraph-client
mvn test -Dtest=UnitTestSuite -ntp # Unit tests
mvn test -Dtest=ApiTestSuite -ntp # API tests (requires Server)
mvn test -Dtest=FuncTestSuite -ntp # Functional tests (requires Server)
Check Server log if tests fail: logs/hugegraph-server.log
4.2 hugegraph-loader
Compile
mvn install -pl hugegraph-client,hugegraph-loader -am -Dmaven.javadoc.skip=true -DskipTests -ntp
Dependent Services
- Required: HugeGraph Server
- Optional: Hadoop (HDFS tests), MySQL (JDBC tests)
Run Tests
cd hugegraph-loader
mvn test -P unit -ntp # Unit tests
mvn test -P file -ntp # File tests (requires Server)
mvn test -P hdfs -ntp # HDFS tests (requires Server + Hadoop)
mvn test -P jdbc -ntp # JDBC tests (requires Server + MySQL)
mvn test -P kafka -ntp # Kafka tests (requires Server)
4.3 hugegraph-hubble
Compile
mvn install -pl hugegraph-client,hugegraph-loader -am -Dmaven.javadoc.skip=true -DskipTests -ntp
cd hugegraph-hubble
mvn -e compile -Dmaven.javadoc.skip=true -ntp
Dependent Services
1. Start Server (refer to Section 3)
2. Python Environment
python -m venv venv
source venv/bin/activate # Windows: venv\Scripts\activate
python -m pip install -r hubble-dist/assembly/travis/requirements.txt
3. Build and Verify
mvn package -Dmaven.test.skip=true
# Optional: Start and verify
# Compatible with both historical (-incubating-) and TLP package naming
cd apache-hugegraph-hubble*/bin
./start-hubble.sh -d && sleep 10
curl http://localhost:8088/api/health
./stop-hubble.sh
Run Tests
# Unit tests
mvn test -P unit-test -pl hugegraph-hubble/hubble-be -ntp
# API tests (requires Server + Hubble running)
curl http://localhost:8080/graphs # Check Server
curl http://localhost:8088/api/health # Check Hubble
cd hugegraph-hubble/hubble-dist
./assembly/travis/run-api-test.sh
4.4 hugegraph-spark-connector
Compile
mvn install -pl hugegraph-client,hugegraph-spark-connector -am -Dmaven.javadoc.skip=true -DskipTests -ntp
Run Tests
cd hugegraph-spark-connector
mvn test -ntp # Requires Server running
Compile
mvn install -pl hugegraph-client,hugegraph-tools -am -Dmaven.javadoc.skip=true -DskipTests -ntp
Run Tests
cd hugegraph-tools
mvn test -Dtest=FuncTestSuite -ntp # Requires Server running
5. Common Issues
Service Connection Issues
Symptoms: Cannot connect to Server/MySQL/Hadoop
Troubleshooting:
- Confirm services are running (Server must be on port 8080)
- Check port usage:
lsof -i:8080 - Docker check:
docker compose ps and docker compose logs
Configuration Issues
Symptoms: File not found, parameter errors
Troubleshooting:
- Check environment variables:
echo $COMMIT_ID - Script permissions:
chmod +x hugegraph-*/assembly/travis/*.sh
HDFS Test Failures
Troubleshooting:
- Confirm NameNode/DataNode running normally
- Check Hadoop logs
- Verify HDFS connection:
hdfs dfsadmin -report
JDBC Test Failures
Troubleshooting:
- Confirm MySQL running normally
- Verify database connection:
mysql -u root -p$DB_PASS - Check MySQL logs
6. References
6.5 - Backup and Restore
Description
Backup and Restore are functions of backup map and restore map. The data backed up and restored includes metadata (schema) and graph data (vertex and edge).
Backup
Export the metadata and graph data of a graph in the HugeGraph system in JSON format.
Restore
Re-import the data in JSON format exported by Backup to a graph in the HugeGraph system.
Restore has two modes:
- In Restoring mode, the metadata and graph data exported by Backup are restored to the HugeGraph system intact. It can be used for graph backup and recovery, and the general target graph is a new graph (without metadata and graph data). for example:
- System upgrade, first back up the map, then upgrade the system, and finally restore the map to the new system
- Graph migration, from a HugeGraph system, use the Backup function to export the graph, and then use the Restore function to import the graph into another HugeGraph system
- In the Merging mode, the metadata and graph data exported by Backup are imported into another graph that already has metadata or graph data. During the process, the ID of the metadata may change, and the IDs of vertices and edges will also change accordingly.
- Can be used to merge graphs
Instructions
You can use hugegraph-tools to backup and restore the graph.
Backup
bin/hugegraph backup -t all -d data
This command backs up all the metadata and graph data of the hugegraph graph of http://127.0.0.1 to the data directory.
Backup works fine in all three graph modes
Restore
Restore has two modes: RESTORING and MERGING. Before backup, you must first set the graph mode according to your needs.
Step 1: View and set graph mode
bin/hugegraph graph-mode-get
This command is used to view the current graph mode, including: NONE, RESTORING, MERGING.
bin/hugegraph graph-mode-set -m RESTORING
This command is used to set the graph mode. Before Restore, it can be set to RESTORING or MERGING mode. In the example, it is set to RESTORING.
Step 2: Restore data
bin/hugegraph restore -t all -d data
This command re-imports all metadata and graph data in the data directory to the hugegraph graph at http://127.0.0.1.
Step 3: Restoring Graph Mode
bin/hugegraph graph-mode-set -m NONE
This command is used to restore the graph mode to NONE.
So far, a complete graph backup and graph recovery process is over.
help
For detailed usage of backup and restore commands, please refer to the hugegraph-tools documentation.
API description for Backup/Restore usage and implementation
Backup
Backup uses the corresponding list(GET) API export of metadata and graph data, and no new API is added.
Restore
Restore uses the corresponding create(POST) API imports for metadata and graph data, and does not add new APIs.
There are two different modes for Restore: Restoring and Merging. In addition, there is a regular mode of NONE (default), the differences are as follows:
- In None mode, the writing of metadata and graph data is normal, please refer to the function description. special:
- ID is not allowed when metadata (schema) is created
- Graph data (vertex) is not allowed to specify an ID when the id strategy is Automatic
- Restoring mode, restoring to a new graph, in particular:
- ID is allowed to be specified when metadata (schema) is created
- Graph data (vertex) allows specifying an ID when the id strategy is Automatic
- Merging mode, merging into a graph with existing metadata and graph data, in particular:
- ID is not allowed when metadata (schema) is created
- Graph data (vertex) allows specifying an ID when the id strategy is Automatic
Normally, the graph mode is None. When you need to restore the graph, you need to temporarily change the graph mode to Restoring mode or
Merging mode as needed, and when the Restore is completed, restore the graph mode to None.
The implemented RESTful API for setting graph mode is as follows:
View the schema of a graph. This operation requires administrator privileges
Method & Url
GET http://localhost:8080/graphs/{graph}/mode
Response Status
Response Body
Legal graph modes include: NONE, RESTORING, MERGING
Set the mode of a graph. ““This operation requires administrator privileges**
Method & Url
PUT http://localhost:8080/graphs/{graph}/mode
Request Body
Legal graph modes include: NONE, RESTORING, MERGING
Response Status
Response Body
6.6 - HugeGraph Docker Cluster Guide
Overview
HugeGraph can quickly run a full distributed deployment (PD + Store + Server) with Docker Compose. This works on Linux and Mac.
Prerequisites
- Docker Engine 20.10+ or Docker Desktop 4.x+
- Docker Compose v2
- For a 3-node cluster on Mac: allocate at least 12 GB memory (Settings → Resources → Memory). Adjust this on other platforms as needed.
Tested environments: Linux (native Docker) and macOS (Docker Desktop with ARM M4).
Compose Files
Three compose files are available in the docker/ directory of the HugeGraph main repository:
| File | Description |
|---|
docker-compose.yml | Quickstart for a single-host deployment using pre-built images |
docker-compose.dev.yml | Development mode for a single-host deployment built from source |
docker-compose-3pd-3store-3server.yml | Distributed cluster with 3 PD, 3 Store, and 3 Server processes |
Note: The following steps assume you have already cloned or pulled the HugeGraph main repository locally, or at least have its docker/ directory available.
Single-Node Quickstart
cd hugegraph/docker
# Keep the version aligned with the latest release, for example 1.x.0
HUGEGRAPH_VERSION=1.7.0 docker compose up -d
Verify:
curl http://localhost:8080/versions
3-Node Cluster Quickstart
cd hugegraph/docker
HUGEGRAPH_VERSION=1.7.0 docker compose -f docker-compose-3pd-3store-3server.yml up -d
Built-in startup ordering:
- PD nodes start first and must pass the
/v1/health check - Store nodes start only after all PD nodes are healthy
- Server nodes start last, after all PD and Store nodes are healthy
Verify that the cluster is healthy:
curl http://localhost:8620/v1/health # PD health
curl http://localhost:8520/v1/health # Store health
curl http://localhost:8080/versions # Server
curl http://localhost:8620/v1/stores # Registered stores
curl http://localhost:8620/v1/partitions # Partition assignment
Environment Variable Reference
PD Variables
| Variable | Required | Default | Maps To |
|---|
HG_PD_GRPC_HOST | Yes | — | grpc.host |
HG_PD_RAFT_ADDRESS | Yes | — | raft.address |
HG_PD_RAFT_PEERS_LIST | Yes | — | raft.peers-list |
HG_PD_INITIAL_STORE_LIST | Yes | — | pd.initial-store-list |
HG_PD_GRPC_PORT | No | 8686 | grpc.port |
HG_PD_REST_PORT | No | 8620 | server.port |
HG_PD_DATA_PATH | No | /hugegraph-pd/pd_data | pd.data-path |
HG_PD_INITIAL_STORE_COUNT | No | 1 | pd.initial-store-count |
Deprecated aliases: GRPC_HOST → HG_PD_GRPC_HOST, RAFT_ADDRESS → HG_PD_RAFT_ADDRESS, RAFT_PEERS → HG_PD_RAFT_PEERS_LIST
Store Variables
| Variable | Required | Default | Maps To |
|---|
HG_STORE_PD_ADDRESS | Yes | — | pdserver.address |
HG_STORE_GRPC_HOST | Yes | — | grpc.host |
HG_STORE_RAFT_ADDRESS | Yes | — | raft.address |
HG_STORE_GRPC_PORT | No | 8500 | grpc.port |
HG_STORE_REST_PORT | No | 8520 | server.port |
HG_STORE_DATA_PATH | No | /hugegraph-store/storage | app.data-path |
Deprecated aliases: PD_ADDRESS → HG_STORE_PD_ADDRESS, GRPC_HOST → HG_STORE_GRPC_HOST, RAFT_ADDRESS → HG_STORE_RAFT_ADDRESS
Server Variables
| Variable | Required | Default | Maps To |
|---|
HG_SERVER_BACKEND | Yes | — | backend in hugegraph.properties |
HG_SERVER_PD_PEERS | Yes | — | pd.peers |
STORE_REST | No | — | used by wait-partition.sh |
PASSWORD | No | — | enables auth mode |
Deprecated aliases: BACKEND → HG_SERVER_BACKEND, PD_PEERS → HG_SERVER_PD_PEERS
Port Reference
| Service | Host Port | Purpose |
|---|
| pd0 | 8620 | REST API |
| pd0 | 8686 | gRPC |
| pd1 | 8621 | REST API |
| pd1 | 8687 | gRPC |
| pd2 | 8622 | REST API |
| pd2 | 8688 | gRPC |
| store0 | 8500 | gRPC |
| store0 | 8520 | REST API |
| store1 | 8501 | gRPC |
| store1 | 8521 | REST API |
| store2 | 8502 | gRPC |
| store2 | 8522 | REST API |
| server0 | 8080 | Graph API |
| server1 | 8081 | Graph API |
| server2 | 8082 | Graph API |
Troubleshooting
Containers exit due to OOM (exit code 137): Increase Docker Desktop memory to at least 12 GB, or reduce the JVM heap settings for the process that is being killed.
Raft leader election timeout: Check that HG_PD_RAFT_PEERS_LIST is identical on all PD nodes. Verify connectivity with docker exec hg-pd0 ping pd1.
Partition assignment does not complete: Check curl http://localhost:8620/v1/stores and confirm that all 3 stores show "state":"Up" before partition assignment can finish.
Connection refused: Ensure HG_* environment variables use container hostnames (pd0, store0) instead of 127.0.0.1.
Viewing runtime logs: Use docker logs <container-name> (e.g. docker logs hg-pd0) to view logs directly without exec-ing into the container.
Container Supervision & Health Checks
Version note: This behavior is not present in the 1.7.0 images. Use HUGEGRAPH_VERSION=latest or wait for the next release tag.
Process Supervision Model
Previously, all three Docker entrypoints ended with tail -f /dev/null, which kept the container running even if the Java process crashed. Docker’s restart: unless-stopped policy never fired because the container never exited.
The entrypoints now supervise Java directly:
- PD and Store containers: the entrypoint passes
-d false to the startup script, which execs Java directly. The container process IS the Java process — when Java exits (crash or clean shutdown), the container exits immediately and Docker’s restart policy fires. - Server container: the entrypoint uses
tail --pid=$PID -f /dev/null to block until Java exits. A SIGTERM/SIGINT trap forwards docker stop signals to Java and waits for clean shutdown (exits 0). If Java crashes, the entrypoint exits 1 so the restart policy fires. dumb-init (PID 1 in all images) forwards signals from Docker to the entrypoint process.
Health Check Endpoints
All four Docker images now include a HEALTHCHECK instruction. docker ps shows real health status. During the 90-second start period, failed checks do not count. After that, three consecutive failures mark the container as unhealthy.
| Image | Health endpoint | Port | Parameters |
|---|
hugegraph/hugegraph (server) | GET /versions | 8080 | --interval=15s --timeout=10s --start-period=90s --retries=3 |
hugegraph/hugegraph-hstore | GET /versions | 8080 | same |
hugegraph/hugegraph-pd | GET /v1/health | 8620 | same |
hugegraph/hugegraph-store | GET /v1/health | 8520 | same |
Note: The -m true flag (cron-based monitor) in start-hugegraph.sh is for VM/bare-metal deployments only. It is not installed or used in Docker images. Docker users should rely on the built-in HEALTHCHECK and Docker’s restart policy instead.
6.7 - FAQ
How to choose the back-end storage? RocksDB or distributed storage?
HugeGraph supports multiple deployment modes. Choose based on your data scale and scenario:
- Standalone Mode: Server + RocksDB, suitable for development/testing and small to medium-scale data (< 4TB)
- Distributed Mode: HugeGraph-PD + HugeGraph-Store (HStore), supports horizontal scaling and high availability (< 1000TB data scale), suitable for production environments and large-scale graph data applications
Note: Cassandra, HBase, MySQL and other backends are only available in HugeGraph <= 1.5 versions and are no longer maintained by the official team
Prompt when starting the service: xxx (core dumped) xxx
Please check if the JDK version is Java 11, at least Java 8 is required
The service is started successfully, but there is a prompt similar to “Unable to connect to the backend or the connection is not open” when operating the graph
init-storeBefore starting the service for the first time, you need to use the initialization backend first , and subsequent versions will prompt more clearly and directly.
Do all backends need to be executed before use init-store, and can the serialization options be filled in at will?
Before running the init-store.sh command to create the databases that will host the graphs defined in the configuration file, the back-end must be properly configured and running. The only exception is when using memory as the back-end. Supported back-ends include cassandra, hbase, rocksdb, scylladb, etc. It’s important to note that serialization must maintain a strict one-to-one correspondence and cannot be assigned differntly than the recommended values.
Execution init-store error: Exception in thread "main" java.lang.UnsatisfiedLinkError: /tmp/librocksdbjni3226083071221514754.so: /usr/lib64/libstdc++.so.6: version `GLIBCXX_3.4.10' not found (required by /tmp/librocksdbjni3226083071221514754.so)
RocksDB requires gcc 4.3.0 (GLIBCXX_3.4.10) and above
The error NoHostAvailableException occurred while executing init-store.sh.
NoHostAvailableException means that the Cassandra service cannot be connected to. If you are sure that you want to use the Cassandra backend, please install and start this service first. As for the message itself, it may not be clear enough, and we will update the documentation to provide further explanation.
The bin directory contains start-hugegraph.sh, start-restserver.sh and start-gremlinserver.sh. These scripts seem to be related to startup. Which one should be used?
Since version 0.3.3, GremlinServer and RestServer have been merged into HugeGraphServer. To start, use start-hugegraph.sh. The latter two will be removed in future versions.
Two graphs are configured, the names are hugegraph and hugegraph1, and the command to start the service is start-hugegraph.sh. Is only the hugegraph graph opened?
start-hugegraph.sh will open all graphs under the graphs of gremlin-server.yaml. The two have no direct relationship in name
After the service starts successfully, garbled characters are returned when using curl to query all vertices
The batch vertices/edges returned by the server are compressed (gzip), and can be redirected to gunzip for decompression (curl http://example | gunzip), or can be sent with the postman of Firefox or the restlet plug-in of Chrome browser. request, the response data will be decompressed automatically.
When using the vertex Id to query the vertex through the RESTful API, it returns empty, but the vertex does exist
Check the type of the vertex ID. If it is a string type, the “id” part of the API URL needs to be enclosed in double quotes, while for numeric types, it is not necessary to enclose the ID in quotes.
Vertex Id has been double quoted as required, but querying the vertex via the RESTful API still returns empty
Check whether the vertex id contains +, space, /, ?, %, &, and = reserved characters of these URLs. If they exist, they need to be encoded. The following table gives the coded values:
special character | encoded value
------------------| -------------
+ | %2B
space | %20
/ | %2F
? | %3F
% | %25
# | %23
& | %26
= | %3D
Timeout when querying vertices or edges of a certain category (query by label)
Since the amount of data belonging to a certain label may be relatively large, please add a limit limit.
It is possible to operate the graph through the RESTful API, but when sending Gremlin statements, an error is reported: Request Failed(500)
It may be that the configuration of GremlinServer is wrong, check whether the host and port of gremlin-server.yaml match the gremlinserver.url of rest-server.properties, if they do not match, modify them, and then Restart the service.
When using Loader to import data, a Socket Timeout exception occurs, and then Loader is interrupted
Continuously importing data will put too much pressure on the Server, which will cause some requests to time out. The pressure on Server can be appropriately relieved by adjusting the parameters of Loader (such as: number of retries, retry interval, error tolerance, etc.), and reduce the frequency of this problem.
How to delete all vertices and edges. There is no such interface in the RESTful API. Calling g.V().drop() of gremlin will report an error Vertices in transaction have reached capacity xxx
At present, there is really no good way to delete all the data. If the user deploys the Server and the backend by himself, he can directly clear the database and restart the Server. You can use the paging API or scan API to get all the data first, and then delete them one by one.
The database has been cleared and init-store has been executed, but when trying to add a schema, the prompt “xxx has existed” appeared.
There is a cache in the HugeGraphServer, and it is necessary to restart the Server when the database is cleared, otherwise the residual cache will be inconsistent.
An error is reported during the process of inserting vertices or edges: Id max length is 128, but got xxx {yyy} or Big id max length is 32768, but got xxx
In order to ensure query performance, the current backend storage limits the length of the id column. The vertex id cannot exceed 128 bytes, the edge id cannot exceed 32768 bytes, and the index id cannot exceed 128 bytes.
Is there support for nested attributes, and if not, are there any alternatives?
Nested attributes are currently not supported. Alternative: Nested attributes can be taken out as individual vertices and connected with edges.
Can an EdgeLabel connect multiple pairs of VertexLabel, such as “investment” relationship, which can be “individual” investing in “enterprise”, or “enterprise” investing in “enterprise”?
An EdgeLabel does not support connecting multiple pairs of VertexLabels, users need to split the EdgeLabel into finer details, such as: “personal investment”, “enterprise investment”.
Prompt HTTP 415 Unsupported Media Type when sending a request through RestAPI
Content-Type: application/json needs to be specified in the request header
Other issues can be searched in the issue area of the corresponding project, such as Server-Issues / Loader Issues
6.8 - Security Report
Reporting New Security Problems with Apache HugeGraph
⚠️ SEC Reminder: Notice to Vulnerability Researchers Regarding Graph Query Languages
Given the inherent parsing and execution flexibility of graph query languages (like Gremlin/Cypher), HugeGraph strongly recommends relying on the "Auth (Authentication) + IP Whitelist + Audit Log" mechanism in production environments to adhere to the Principle of Least Privilege. Furthermore, since Server nodes are essentially stateless, it is explicitly advised to use Containerized Environments (Docker/K8s) for isolated deployments in all production environments.
Recently, the community has received numerous security reports concerning the flexibility of graph queries. Until the overall HugeGraph security architecture is fully refactored, known situations involving the execution of DSL queries with Auth disabled or skipped, or by using an anonymous or unauthorized identity will no longer be treated individually as new vulnerabilities.
However, if a vulnerability can still be exploited in an environment where the Auth system is enabled by accessing it with an anonymous or unauthorized identity, or if one successfully bypasses the IP whitelist / escapes the container causing severe unauthorized access or underlying system destruction, we still consider this a high-risk security vulnerability and highly encourage you to report it to us at any time!
Adhering to the specifications of ASF, the HugeGraph community maintains a highly proactive and open attitude towards addressing security issues in the remediation projects.
We strongly recommend that users first report such issues to our dedicated security email list, with detailed procedures specified in the ASF SEC code of conduct.
Please note that the security email group is reserved for reporting undisclosed security vulnerabilities and following up on the vulnerability resolution process.
Regular software Bug/Error reports should be directed to Github Issue/Discussion or the HugeGraph-Dev email group. Emails sent to the security list that are unrelated to security issues will be ignored.
The independent security email (group) address is: security@hugegraph.apache.org
The general process for handling security vulnerabilities is as follows:
- The reporter privately reports the vulnerability to the Apache HugeGraph SEC email group (including as much information as possible, such as reproducible versions, relevant descriptions, reproduction methods, and the scope of impact)
- The HugeGraph project security team collaborates privately with the reporter to discuss the vulnerability resolution (after preliminary confirmation, a
CVE number can be requested for registration) - The project creates a new version of the software package affected by the vulnerability to provide a fix
- At an appropriate time, a general description of the vulnerability and how to apply the fix will be publicly disclosed (in compliance with ASF standards, the announcement should not disclose sensitive information such as reproduction details)
- Official CVE release and related procedures follow the ASF-SEC page
Known Security Vulnerabilities (CVEs)
HugeGraph main project (Server/PD/Store)
7 - QUERY LANGUAGE
7.1 - HugeGraph Gremlin
Overview
HugeGraph supports Gremlin, a graph traversal query language of Apache TinkerPop3. While SQL is a query language for relational databases, Gremlin is a general-purpose query language for graph databases. Gremlin can be used to create entities (Vertex and Edge) of a graph, modify the properties of entities, delete entities, as well as perform graph queries.
Gremlin can be used to create entities (Vertex and Edge) of a graph, modify the properties of entities, and delete entities. More importantly, it can be used to perform graph querying and analysis operations.
TinkerPop Features
HugeGraph implements the TinkerPop framework, but not all TinkerPop features are implemented.
The table below lists the support status of various TinkerPop features in HugeGraph:
Graph Features
| Name | Description | Support |
|---|
| Computer | Determines if the {@code Graph} implementation supports {@link GraphComputer} based processing | false |
| Transactions | Determines if the {@code Graph} implementations supports transactions. | true |
| Persistence | Determines if the {@code Graph} implementation supports persisting it’s contents natively to disk.This feature does not refer to every graph’s ability to write to disk via the Gremlin IO packages(.e.g. GraphML), unless the graph natively persists to disk via those options somehow. For example,TinkerGraph does not support this feature as it is a pure in-sideEffects graph. | true |
| ThreadedTransactions | Determines if the {@code Graph} implementation supports threaded transactions which allow a transaction be executed across multiple threads via {@link Transaction#createThreadedTx()}. | false |
| ConcurrentAccess | Determines if the {@code Graph} implementation supports more than one connection to the same instance at the same time. For example, Neo4j embedded does not support this feature because concurrent access to the same database files by multiple instances is not possible. However, Neo4j HA could support this feature as each new {@code Graph} instance coordinates with the Neo4j cluster allowing multiple instances to operate on the same database. | false |
Vertex Features
| Name | Description | Support |
|---|
| UserSuppliedIds | Determines if an {@link Element} can have a user defined identifier. Implementation that do not support this feature will be expected to auto-generate unique identifiers. In other words, if the {@link Graph} allows {@code graph.addVertex(id,x)} to work and thus set the identifier of the newly added {@link Vertex} to the value of {@code x} then this feature should return true. In this case, {@code x} is assumed to be an identifier data type that the {@link Graph} will accept. | false |
| NumericIds | Determines if an {@link Element} has numeric identifiers as their internal representation. In other words,if the value returned from {@link Element#id()} is a numeric value then this method should be return {@code true}. Note that this feature is most generally used for determining the appropriate tests to execute in the Gremlin Test Suite. | false |
| StringIds | Determines if an {@link Element} has string identifiers as their internal representation. In other words, if the value returned from {@link Element#id()} is a string value then this method should be return {@code true}. Note that this feature is most generally used for determining the appropriate tests to execute in the Gremlin Test Suite. | false |
| UuidIds | Determines if an {@link Element} has UUID identifiers as their internal representation. In other words,if the value returned from {@link Element#id()} is a {@link UUID} value then this method should be return {@code true}.Note that this feature is most generally used for determining the appropriate tests to execute in the Gremlin Test Suite. | false |
| CustomIds | Determines if an {@link Element} has a specific custom object as their internal representation.In other words, if the value returned from {@link Element#id()} is a type defined by the graph implementations, such as OrientDB’s {@code Rid}, then this method should be return {@code true}.Note that this feature is most generally used for determining the appropriate tests to execute in the Gremlin Test Suite. | false |
| AnyIds | Determines if an {@link Element} any Java object is a suitable identifier. TinkerGraph is a good example of a {@link Graph} that can support this feature, as it can use any {@link Object} as a value for the identifier. Note that this feature is most generally used for determining the appropriate tests to execute in the Gremlin Test Suite. This setting should only return {@code true} if {@link #supportsUserSuppliedIds()} is {@code true}. | false |
| AddProperty | Determines if an {@link Element} allows properties to be added. This feature is set independently from supporting “data types” and refers to support of calls to {@link Element#property(String, Object)}. | true |
| RemoveProperty | Determines if an {@link Element} allows properties to be removed. | true |
| AddVertices | Determines if a {@link Vertex} can be added to the {@code Graph}. | true |
| MultiProperties | Determines if a {@link Vertex} can support multiple properties with the same key. | false |
| DuplicateMultiProperties | Determines if a {@link Vertex} can support non-unique values on the same key. For this value to be {@code true}, then {@link #supportsMetaProperties()} must also return true. By default this method, just returns what {@link #supportsMultiProperties()} returns. | false |
| MetaProperties | Determines if a {@link Vertex} can support properties on vertex properties. It is assumed that a graph will support all the same data types for meta-properties that are supported for regular properties. | false |
| RemoveVertices | Determines if a {@link Vertex} can be removed from the {@code Graph}. | true |
Edge Features
| Name | Description | Support |
|---|
| UserSuppliedIds | Determines if an {@link Element} can have a user defined identifier. Implementation that do not support this feature will be expected to auto-generate unique identifiers. In other words, if the {@link Graph} allows {@code graph.addVertex(id,x)} to work and thus set the identifier of the newly added {@link Vertex} to the value of {@code x} then this feature should return true. In this case, {@code x} is assumed to be an identifier data type that the {@link Graph} will accept. | false |
| NumericIds | Determines if an {@link Element} has numeric identifiers as their internal representation. In other words,if the value returned from {@link Element#id()} is a numeric value then this method should be return {@code true}. Note that this feature is most generally used for determining the appropriate tests to execute in the Gremlin Test Suite. | false |
| StringIds | Determines if an {@link Element} has string identifiers as their internal representation. In other words, if the value returned from {@link Element#id()} is a string value then this method should be return {@code true}. Note that this feature is most generally used for determining the appropriate tests to execute in the Gremlin Test Suite. | false |
| UuidIds | Determines if an {@link Element} has UUID identifiers as their internal representation. In other words,if the value returned from {@link Element#id()} is a {@link UUID} value then this method should be return {@code true}.Note that this feature is most generally used for determining the appropriate tests to execute in the Gremlin Test Suite. | false |
| CustomIds | Determines if an {@link Element} has a specific custom object as their internal representation.In other words, if the value returned from {@link Element#id()} is a type defined by the graph implementations, such as OrientDB’s {@code Rid}, then this method should be return {@code true}.Note that this feature is most generally used for determining the appropriate tests to execute in the Gremlin Test Suite. | false |
| AnyIds | Determines if an {@link Element} any Java object is a suitable identifier. TinkerGraph is a good example of a {@link Graph} that can support this feature, as it can use any {@link Object} as a value for the identifier. Note that this feature is most generally used for determining the appropriate tests to execute in the Gremlin Test Suite. This setting should only return {@code true} if {@link #supportsUserSuppliedIds()} is {@code true}. | false |
| AddProperty | Determines if an {@link Element} allows properties to be added. This feature is set independently from supporting “data types” and refers to support of calls to {@link Element#property(String, Object)}. | true |
| RemoveProperty | Determines if an {@link Element} allows properties to be removed. | true |
| AddEdges | Determines if an {@link Edge} can be added to a {@code Vertex}. | true |
| RemoveEdges | Determines if an {@link Edge} can be removed from a {@code Vertex}. | true |
Data Type Features
| Name | Description | Support |
|---|
| BooleanValues | | true |
| ByteValues | | true |
| DoubleValues | | true |
| FloatValues | | true |
| IntegerValues | | true |
| LongValues | | true |
| MapValues | Supports setting of a {@code Map} value. The assumption is that the {@code Map} can contain arbitrary serializable values that may or may not be defined as a feature itself | false |
| MixedListValues | Supports setting of a {@code List} value. The assumption is that the {@code List} can contain arbitrary serializable values that may or may not be defined as a feature itself. As this{@code List} is “mixed” it does not need to contain objects of the same type. | false |
| BooleanArrayValues | | false |
| ByteArrayValues | | true |
| DoubleArrayValues | | false |
| FloatArrayValues | | false |
| IntegerArrayValues | | false |
| LongArrayValues | | false |
| SerializableValues | | false |
| StringArrayValues | | false |
| StringValues | | true |
| UniformListValues | Supports setting of a {@code List} value. The assumption is that the {@code List} can contain arbitrary serializable values that may or may not be defined as a feature itself. As this{@code List} is “uniform” it must contain objects of the same type. | false |
Gremlin Steps
HugeGraph supports all steps of Gremlin. For complete reference information about Gremlin, please refer to the Gremlin official website.
| Step | Description | Documentation |
|---|
| addE | Add an edge between two vertices. | addE step |
| addV | add vertices to graph. | addV step |
| and | Make sure all traversals return values. | and step |
| as | Step modulator for assigning variables to the step’s output. | as step |
| by | Step Modulators used in conjunction with group and order. | by step |
| coalesce | Returns the first traversal that returns a result. | coalesce step |
| constant | Returns a constant value. Used in conjunction with coalesce. | constant step |
| count | Returns a count from the traversal. | count step |
| dedup | Returns values with duplicates removed. | dedup step |
| drop | Discards a value (vertex/edge). | drop step |
| fold | Acts as a barrier for computing aggregated values from results. | fold step |
| group | Groups values based on specified labels. | group step |
| has | Used to filter properties, vertices, and edges. Supports hasLabel, hasId, hasNot, and has variants. | has step |
| inject | Injects values into the stream. | inject step |
| is | Used to filter by a Boolean expression. | is step |
| limit | Used to limit the number of items in a traversal. | limit step |
| local | Locally wraps a part of a traversal, similar to a subquery. | local step |
| not | Used to generate the negation result of a filter. | not step |
| optional | Returns the result of a specified traversal if it generates any results, otherwise returns the calling element. | optional step |
| or | Ensures that at least one traversal returns a value. | or step |
| order | Returns results in the specified order. | order step |
| path | Returns the full path of the traversal. | path step |
| project | Projects properties as a map. | project step |
| properties | Returns properties with specified labels. | properties step |
| range | Filters based on a specified range of values. | range step |
| repeat | Repeats a step a specified number of times. Used for looping. | repeat step |
| sample | Used to sample results returned by the traversal. | sample step |
| select | Used to project the results returned by the traversal. | select step |
| store | This step is used fo.r non-blocking aggregation of results returned by traversal | store step |
| tree | Aggregate the paths in vertices into a tree. | tree step |
| unfold | Unfolds an iterator as a step. | unfold step |
| union | Merge the results returned by multiple traversals. | union step |
| V | These are the steps required for traversing between vertices and edges: V, E, out, in, both, outE, inE, bothE, outV, inV, bothV, and otherV. | order step |
| where | Used to filter the results returned by a traversal. Supports eq, neq, lt, lte, gt, gte, and between operators. | where step |
7.2 - HugeGraph Examples
1 Overview
This example uses the TitanDB Getting Started guide as a template to demonstrate how to use HugeGraph. By comparing HugeGraph and TitanDB, you can understand the differences between them.
1.1 Similarities and Differences between HugeGraph and TitanDB
Both HugeGraph and TitanDB are graph databases based on the Apache TinkerPop3 framework. They both support the Gremlin graph query language and share many similarities in terms of usage and interfaces. However, HugeGraph is a completely new design and development, characterized by its clear code structure, richer features, and more user-friendly interfaces.
Compared to TitanDB, HugeGraph’s main features are as follows:
- HugeGraph currently offers a comprehensive suite of tools, including HugeGraph-API, HugeGraph-Client, HugeGraph-Loader, HugeGraph-Studio, and HugeGraph-Spark. These components facilitate system integration, data loading, visual graph querying, Spark connectivity, and other functionalities.
- HugeGraph incorporates the concepts of Server and Client, allowing third-party systems to connect via multiple methods such as JAR references, clients, and APIs. In contrast, TitanDB only supports connections via JAR references.
- HugeGraph requires explicit schema definition, and all insertions and queries must pass strict schema validation. Implicit schema creation is not supported at the moment.
- HugeGraph makes full use of the characteristics of the underlying storage system to achieve efficient data access, whereas TitanDB ignores the differences of the backend with a unified Kv structure.
- HugeGraph’s update operations can be performed on-demand (e.g., updating a specific attribute), offering better performance. TitanDB uses a read-and-update approach for updates.
- Both VertexId and EdgeId in HugeGraph support concatenation, allowing for automatic deduplication and better query performance. In TitanDB, all IDs are auto-generated and require indexing for queries.
1.2 Character Relationship Graph
This example uses the Property Graph Model to describe the relationships between characters in Greek mythology, also known as the character relationship graph. The specific relationships are shown in the diagram below.
In the diagram, circular nodes represent entities (Vertices), arrows represent relationships (Edges), and the content in the boxes represents attributes.
There are two types of vertices in this graph: characters and locations, as shown in the table below:
| Name | Type | Attributes |
|---|
| character | vertex | name,age,type |
| location | vertex | name |
There are six types of relationships: father, mother, brother, battled, lives, and pet. The details of these relationships are as follows:
| Name | Type | Source Vertex Label | Target Vertex Label | Attributes |
|---|
| father | edge | character | character | - |
| mother | edge | character | character | - |
| brother | edge | character | character | - |
| pet | edge | character | character | - |
| lives | edge | character | location | reason |
In HugeGraph, each edge label can only act on one pair of source and target vertex labels. In other words, if a relationship called “father” is defined in the graph to connect character to character, then “father” cannot be used to connect to other vertex labels.
Therefore, in this example, the original TitanDB’s monster, god, human, and demigod are all represented using the same vertex label: character in HugeGraph, with an additional type attribute to indicate the type of character. The edge labels remain consistent with the original TitanDB. Of course, to satisfy the edge label constraints, adjustments can be made to the name of the edge label.
2 Graph Schema and Data Ingest Examples
HugeGraph requires explicit schema creation, which involves creating PropertyKeys, VertexLabels, and EdgeLabels in sequence. If indexing is needed, IndexLabels must also be created.
2.1 Graph Schema
schema = hugegraph.schema()
schema.propertyKey("name").asText().ifNotExist().create()
schema.propertyKey("age").asInt().ifNotExist().create()
schema.propertyKey("time").asInt().ifNotExist().create()
schema.propertyKey("reason").asText().ifNotExist().create()
schema.propertyKey("type").asText().ifNotExist().create()
schema.vertexLabel("character").properties("name", "age", "type").primaryKeys("name").nullableKeys("age").ifNotExist().create()
schema.vertexLabel("location").properties("name").primaryKeys("name").ifNotExist().create()
schema.edgeLabel("father").link("character", "character").ifNotExist().create()
schema.edgeLabel("mother").link("character", "character").ifNotExist().create()
schema.edgeLabel("battled").link("character", "character").properties("time").ifNotExist().create()
schema.edgeLabel("lives").link("character", "location").properties("reason").nullableKeys("reason").ifNotExist().create()
schema.edgeLabel("pet").link("character", "character").ifNotExist().create()
schema.edgeLabel("brother").link("character", "character").ifNotExist().create()
2.2 Graph Data
// add vertices
Vertex saturn = graph.addVertex(T.label, "character", "name", "saturn", "age", 10000, "type", "titan")
Vertex sky = graph.addVertex(T.label, "location", "name", "sky")
Vertex sea = graph.addVertex(T.label, "location", "name", "sea")
Vertex jupiter = graph.addVertex(T.label, "character", "name", "jupiter", "age", 5000, "type", "god")
Vertex neptune = graph.addVertex(T.label, "character", "name", "neptune", "age", 4500, "type", "god")
Vertex hercules = graph.addVertex(T.label, "character", "name", "hercules", "age", 30, "type", "demigod")
Vertex alcmene = graph.addVertex(T.label, "character", "name", "alcmene", "age", 45, "type", "human")
Vertex pluto = graph.addVertex(T.label, "character", "name", "pluto", "age", 4000, "type", "god")
Vertex nemean = graph.addVertex(T.label, "character", "name", "nemean", "type", "monster")
Vertex hydra = graph.addVertex(T.label, "character", "name", "hydra", "type", "monster")
Vertex cerberus = graph.addVertex(T.label, "character", "name", "cerberus", "type", "monster")
Vertex tartarus = graph.addVertex(T.label, "location", "name", "tartarus")
// add edges
jupiter.addEdge("father", saturn)
jupiter.addEdge("lives", sky, "reason", "loves fresh breezes")
jupiter.addEdge("brother", neptune)
jupiter.addEdge("brother", pluto)
neptune.addEdge("lives", sea, "reason", "loves waves")
neptune.addEdge("brother", jupiter)
neptune.addEdge("brother", pluto)
hercules.addEdge("father", jupiter)
hercules.addEdge("mother", alcmene)
hercules.addEdge("battled", nemean, "time", 1)
hercules.addEdge("battled", hydra, "time", 2)
hercules.addEdge("battled", cerberus, "time", 12)
pluto.addEdge("brother", jupiter)
pluto.addEdge("brother", neptune)
pluto.addEdge("lives", tartarus, "reason", "no fear of death")
pluto.addEdge("pet", cerberus)
cerberus.addEdge("lives", tartarus)
2.3 Indices
HugeGraph by default automatically generates IDs. However, if a user specifies the primaryKeys field list for a VertexLabel through primaryKeys, the ID strategy for that VertexLabel will automatically switch to the primaryKeys strategy. Once the primaryKeys strategy is enabled, HugeGraph generates VertexId by concatenating vertexLabel+primaryKeys, which allows for automatic deduplication. Additionally, there is no need to create extra indexes to use the properties in primaryKeys for fast querying. For example, both “character” and “location” have the primaryKeys("name") attribute, so without creating additional indexes, vertices can be queried using g.V().hasLabel('character') .has('name','hercules').
3 Graph Traversal Examples
3.1 Traversal Query
1. Find the grandfather of hercules
g.V().hasLabel('character').has('name','hercules').out('father').out('father')
It can also be done using the repeat method:
g.V().hasLabel('character').has('name','hercules').repeat(__.out('father')).times(2)
2. Find the name of Hercules’s father
g.V().hasLabel('character').has('name','hercules').out('father').value('name')
3. Find the characters with age > 100
g.V().hasLabel('character').has('age',gt(100))
4. Find who are pluto’s cohabitants
g.V().hasLabel('character').has('name','pluto').out('lives').in('lives').values('name')
5. Find pluto can’t be his own cohabitant
pluto = g.V().hasLabel('character').has('name', 'pluto')
g.V(pluto).out('lives').in('lives').where(is(neq(pluto)).values('name')
// use 'as'
g.V().hasLabel('character').has('name', 'pluto').as('x').out('lives').in('lives').where(neq('x')).values('name')
6. Pluto’s Brothers
pluto = g.V().hasLabel('character').has('name', 'pluto').next()
// where do pluto's brothers live?
g.V(pluto).out('brother').out('lives').values('name')
// which brother lives in which place?
g.V(pluto).out('brother').as('god').out('lives').as('place').select('god','place')
// what is the name of the brother and the name of the place?
g.V(pluto).out('brother').as('god').out('lives').as('place').select('god','place').by('name')
It is recommended to use HugeGraph-Hubble to execute the above code visually. Additionally, the code can be executed through various other methods such as HugeGraph-Client, HugeGraph-Api, GremlinConsole, and GremlinDriver.
3.2 Summary
HugeGraph currently supports Gremlin syntax, and users can implement various query requirements through Gremlin / REST-API.
8 - PERFORMANCE
8.1 - HugeGraph BenchMark Performance
Note:
The current performance metrics are based on an earlier version. The latest version has significant
improvements in both performance and functionality. We encourage you to refer to the most recent release featuring
autonomous distributed storage and enhanced computational push down capabilities. Alternatively,
you may wait for the community to update the data with these enhancements.
1 Test environment
| CPU | Memory | 网卡 | 磁盘 |
|---|
| 48 Intel(R) Xeon(R) CPU E5-2650 v4 @ 2.20GHz | 128G | 10000Mbps | 750GB SSD |
1.2.1 Test cases
Testing is done using the graphdb-benchmark, a benchmark suite for graph databases. This benchmark suite mainly consists of four types of tests:
- Massive Insertion, which involves batch insertion of vertices and edges, with a certain number of vertices or edges being submitted at once.
- Single Insertion, which involves the immediate insertion of each vertex or edge, one at a time.
- Query, which mainly includes the basic query operations of the graph database:
- Find Neighbors, which queries the neighbors of all vertices.
- Find Adjacent Nodes, which queries the adjacent vertices of all edges.
- Find the Shortest Path, which queries the shortest path from the first vertex to 100 random vertices.
- Clustering, which is a community detection algorithm based on the Louvain Method.
1.2.2 Test dataset
Tests are conducted using both synthetic and real data.
The size of the datasets used in this test is not mentioned.
| Name | Number of Vertices | Number of Edges | File Size |
|---|
| email-enron.txt | 36,691 | 367,661 | 4MB |
| com-youtube.ungraph.txt | 1,157,806 | 2,987,624 | 38.7MB |
| amazon0601.txt | 403,393 | 3,387,388 | 47.9MB |
| com-lj.ungraph.txt | 3997961 | 34681189 | 479MB |
1.3 Service configuration
HugeGraph version: 0.5.6, RestServer and Gremlin Server and backends are on the same server
- RocksDB version: rocksdbjni-5.8.6
Titan version: 0.5.4, using thrift+Cassandra mode
- Cassandra version: cassandra-3.10, commit-log and data use SSD together
Neo4j version: 2.0.1
The Titan version adapted by graphdb-benchmark is 0.5.4.
2 Test results
| Backend | email-enron(30w) | amazon0601(300w) | com-youtube.ungraph(300w) | com-lj.ungraph(3000w) |
|---|
| HugeGraph | 0.629 | 5.711 | 5.243 | 67.033 |
| Titan | 10.15 | 108.569 | 150.266 | 1217.944 |
| Neo4j | 3.884 | 18.938 | 24.890 | 281.537 |
Instructions
- The data scale is in the table header in terms of edges
- The data in the table is the time for batch insertion, in seconds
- For example, HugeGraph(RocksDB) spent 5.711 seconds to insert 3 million edges of the amazon0601 dataset.
Conclusion
- The performance of batch insertion: HugeGraph(RocksDB) > Neo4j > Titan(thrift+Cassandra)
2.2.1 Explanation of terms
- FN(Find Neighbor): Traverse all vertices, find the adjacent edges based on each vertex, and use the edges and vertices to find the other vertices adjacent to the original vertex.
- FA(Find Adjacent): Traverse all edges, get the source vertex and target vertex based on each edge.
| Backend | email-enron(3.6w) | amazon0601(40w) | com-youtube.ungraph(120w) | com-lj.ungraph(400w) |
|---|
| HugeGraph | 4.072 | 45.118 | 66.006 | 609.083 |
| Titan | 8.084 | 92.507 | 184.543 | 1099.371 |
| Neo4j | 2.424 | 10.537 | 11.609 | 106.919 |
Instructions
- The data in the table header “()” represents the data scale, in terms of vertices.
- The data in the table represents the time spent traversing vertices in seconds.
- For example, HugeGraph uses the RocksDB backend to traverse all vertices in amazon0601, and search for adjacent edges and another vertex, which takes a total of 45.118 seconds.
| Backend | email-enron(30w) | amazon0601(300w) | com-youtube.ungraph(300w) | com-lj.ungraph(3000w) |
|---|
| HugeGraph | 1.540 | 10.764 | 11.243 | 151.271 |
| Titan | 7.361 | 93.344 | 169.218 | 1085.235 |
| Neo4j | 1.673 | 4.775 | 4.284 | 40.507 |
Explanation
- The data size in the header “()” is based on the number of vertices.
- The data in the table is the time it takes to traverse the vertices in seconds.
- For example, HugeGraph with RocksDB backend traverses all vertices in the amazon0601 dataset, and it looks up adjacent edges and other vertices, taking a total of 45.118 seconds.
Conclusion
- Traversal performance: Neo4j > HugeGraph(RocksDB) > Titan(thrift+Cassandra)
Terminology Explanation
- FS (Find Shortest Path): finding the shortest path between two vertices
- K-neighbor: all vertices that can be reached by traversing K hops (including 1, 2, 3…(K-1) hops) from the starting vertex
- K-out: all vertices that can be reached by traversing exactly K out-edges from the starting vertex.
| Backend | email-enron(30w) | amazon0601(300w) | com-youtube.ungraph(300w) | com-lj.ungraph(3000w) |
|---|
| HugeGraph | 0.494 | 0.103 | 3.364 | 8.155 |
| Titan | 11.818 | 0.239 | 377.709 | 575.678 |
| Neo4j | 1.719 | 1.800 | 1.956 | 8.530 |
Explanation
- The data in the header “()” represents the data scale in terms of edges
- The data in the table is the time it takes to find the shortest path from the first vertex to 100 randomly selected vertices in seconds
- For example, HugeGraph using the RocksDB backend to find the shortest path from the first vertex to 100 randomly selected vertices in the amazon0601 graph took a total of 0.103s.
Conclusion
- In scenarios with small data size or few vertex relationships, HugeGraph outperforms Neo4j and Titan.
- As the data size increases and the degree of vertex association increases, the performance of HugeGraph and Neo4j tends to be similar, both far exceeding Titan.
| Vertex | Depth | Degree 1 | Degree 2 | Degree 3 | Degree 4 | Degree 5 | Degree 6 |
|---|
| v1 | Time | 0.031s | 0.033s | 0.048s | 0.500s | 11.27s | OOM |
| v111 | Time | 0.027s | 0.034s | 0.115s | 1.36s | OOM | – |
| v1111 | Time | 0.039s | 0.027s | 0.052s | 0.511s | 10.96s | OOM |
Explanation
- HugeGraph-Server’s JVM memory is set to 32GB and may experience OOM when the data is too large.
| Vertex | Depth | 1st Degree | 2nd Degree | 3rd Degree | 4th Degree | 5th Degree | 6th Degree |
|---|
| v1 | Time | 0.054s | 0.057s | 0.109s | 0.526s | 3.77s | OOM |
| Degree | 10 | 133 | 2453 | 50,830 | 1,128,688 | | |
| v111 | Time | 0.032s | 0.042s | 0.136s | 1.25s | 20.62s | OOM |
| Degree | 10 | 211 | 4944 | 113150 | 2,629,970 | | |
| v1111 | Time | 0.039s | 0.045s | 0.053s | 1.10s | 2.92s | OOM |
| Degree | 10 | 140 | 2555 | 50825 | 1,070,230 | | |
Explanation
- The JVM memory of HugeGraph-Server is set to 32GB, and OOM may occur when the data is too large.
Conclusion
- In the FS scenario, HugeGraph outperforms Neo4j and Titan in terms of performance.
- In the K-neighbor and K-out scenarios, HugeGraph can achieve results returned within seconds within 5 degrees.
| Database | Size 1000 | Size 5000 | Size 10000 | Size 20000 |
|---|
| HugeGraph(core) | 20.804 | 242.099 | 744.780 | 1700.547 |
| Titan | 45.790 | 820.633 | 2652.235 | 9568.623 |
| Neo4j | 5.913 | 50.267 | 142.354 | 460.880 |
Explanation
- The “scale” is based on the number of vertices.
- The data in the table is the time required to complete community discovery in seconds. For example, if HugeGraph uses the RocksDB backend and operates on a dataset of 10,000 vertices, and the community aggregation is no longer changing, it takes 744.780 seconds.
- The CW test is a comprehensive evaluation of CRUD operations.
- In this test, HugeGraph, like Titan, did not use the client and directly operated on the core.
Conclusion
- Performance of community detection algorithm: Neo4j > HugeGraph > Titan
8.2 - HugeGraph-API Performance
The HugeGraph API performance test mainly tests HugeGraph-Server’s ability to concurrently process RESTful API requests, including:
- Single insertion of vertices/edges
- Batch insertion of vertices/edges
- Vertex/Edge Queries
For the performance test of the RESTful API of each release version of HugeGraph, please refer to:
Updates coming soon, stay tuned!
8.2.1 - v0.5.6 Stand-alone(RocksDB)
Note:
The current performance metrics are based on an earlier version. The latest version has significant
improvements in both performance and functionality. We encourage you to refer to the most recent release featuring
autonomous distributed storage and enhanced computational push down capabilities. Alternatively,
you may wait for the community to update the data with these enhancements.
1 Test environment
Compressed machine information:
| CPU | Memory | 网卡 | 磁盘 |
|---|
| 48 Intel(R) Xeon(R) CPU E5-2650 v4 @ 2.20GHz | 128G | 10000Mbps | 750GB SSD,2.7T HDD |
- Information about the machine used to generate loads: configured the same as the machine that is being tested under load.
- Testing tool: Apache JMeter 2.5.1
Note: The load-generating machine and the machine under test are located in the same local network.
2 Test description
2.1 Definition of terms (the unit of time is ms)
- Samples: The total number of threads completed in the current scenario.
- Average: The average response time.
- Median: The statistical median of the response time.
- 90% Line: The response time below which 90% of all threads fall.
- Min: The minimum response time.
- Max: The maximum response time.
- Error: The error rate.
- Throughput: The number of requests processed per unit of time.
- KB/sec: Throughput measured in terms of data transferred per second.
2.2 Underlying storage
RocksDB is used for backend storage, HugeGraph and RocksDB are both started on the same machine, and the configuration files related to the server remain as default except for the modification of the host and port.
- The speed of inserting a single vertex and edge in HugeGraph is about 1w per second
- The batch insertion speed of vertices and edges is much faster than the single insertion speed
- The concurrency of querying vertices and edges by id can reach more than 13000, and the average delay of requests is less than 50ms
4 Test results and analysis
4.1 batch insertion
4.1.1 Upper limit stress testing
Test methods
The upper limit of stress testing is to continuously increase the concurrency and test whether the server can still provide services normally.
Stress Parameters
Duration: 5 minutes
Maximum insertion speed for vertices:

in conclusion:
- With a concurrency of 2200, the throughput for vertices is 2026.8. This means that the system can process data at a rate of 405360 per second (2026.8 * 200).
Maximum insertion speed for edges

Conclusion:
- With a concurrency of 900, the throughput for edges is 776.9. This means that the system can process data at a rate of 388450 per second (776.9 * 500).
4.2 Single insertion
4.2.1 Stress limit testing
Test Methods
Stress limit testing is a process of continuously increasing the concurrency level to test the upper limit of the server’s ability to provide normal service.
Stress parameters
- Duration: 5 minutes.
- Service exception indicator: Error rate greater than 0.00%.
Single vertex insertion

Conclusion:
- With a concurrency of 11500, the throughput is 10730. This means that the system can handle a single concurrent insertion of vertices at a concurrency level of 11500.
Single edge insertion

Conclusion:
- With a concurrency of 9000, the throughput is 8418. This means that the system can handle a single concurrent insertion of edges at a concurrency level of 9000.
4.3 Search by ID
4.3.1 Stress test upper limit
Testing method
Continuously increasing the concurrency level to test the upper limit of the server’s ability to provide service under normal conditions.
stress parameters
- Duration: 5 minutes
- Service abnormality indicator: error rate greater than 0.00%
Querying vertices by ID

Conclusion:
- Concurrency is 14,000, throughput is 12,663. The concurrency capacity for querying vertices by ID is 14,000, with an average delay of 44ms.
Querying edges by ID

Conclusion:
- Concurrency is 13,000, throughput is 12,225. The concurrency capacity for querying edges by ID is 13,000, with an average delay of 12ms.
8.2.2 - v0.5.6 Cluster(Cassandra)
Note:
The current performance metrics are based on an earlier version. The latest version has significant
improvements in both performance and functionality. We encourage you to refer to the most recent release featuring
autonomous distributed storage and enhanced computational push down capabilities. Alternatively,
you may wait for the community to update the data with these enhancements.
1 Test environment
Compressed machine information
| CPU | Memory | 网卡 | 磁盘 |
|---|
| 48 Intel(R) Xeon(R) CPU E5-2650 v4 @ 2.20GHz | 128G | 10000Mbps | 750GB SSD,2.7T HDD |
- Starting Pressure Machine Information: Configure the same as the compressed machine.
- Testing tool: Apache JMeter 2.5.1.
Note: The machine used to initiate the load and the machine being tested are located in the same data center (or server room)
2 Test Description
2.1 Definition of terms (the unit of time is ms)
- Samples – The total number of threads completed in this scenario.
- Average – The average response time.
- Median – The median response time in statistical terms.
- 90% Line – The response time below which 90% of all threads fall.
- Min – The minimum response time.
- Max – The maximum response time.
- Error – The error rate.
- Throughput – The number of transactions processed per unit of time.
- KB/sec – The throughput measured in terms of data transmitted per second.
2.2 Low-Level Storage
A 15-node Cassandra cluster is used for backend storage. HugeGraph and the Cassandra cluster are located on separate servers. Server-related configuration files are modified only for host and port settings, while the rest remain default.
- The speed of a single vertex and edge insertion in HugeGraph is 9000 and 4500 per second, respectively.
- The speed of bulk vertex and edge insertion is 50,000 and 150,000 per second, respectively, which is much higher than the single insertion speed.
- The concurrency for querying vertices and edges by ID can reach more than 12,000, and the average request delay is less than 70ms.
4 Test Results and Analysis
4.1 Batch Insertion
4.1.1 Pressure Upper Limit Test
Test Method
Continuously increase the concurrency level to test the upper limit of the server’s ability to provide services.
Pressure Parameters
Duration: 5 minutes.
Maximum Insertion Speed of Vertices:

Conclusion:
- At a concurrency level of 3500, the throughput of vertices is 261, and the amount of data processed per second is 52,200 (261 * 200).
Maximum Insertion Speed of Edges:

Conclusion:
- At a concurrency level of 1000, the throughput of edges is 323, and the amount of data processed per second is 161,500 (323 * 500).
4.2 Single Insertion
4.2.1 Pressure Upper Limit Test
Test Method
Continuously increase the concurrency level to test the upper limit of the server’s ability to provide services.
Pressure Parameters
- Duration: 5 minutes.
- Service exception mark: Error rate greater than 0.00%.
Single Insertion of Vertices:

Conclusion:
- At a concurrency level of 9000, the throughput is 8400, and the single-insertion concurrency capability for vertices is 9000.
Single Insertion of Edges:

Conclusion:
- At a concurrency level of 4500, the throughput is 4160, and the single-insertion concurrency capability for edges is 4500.
4.3 Query by ID
4.3.1 Pressure Upper Limit Test
Test Method
Continuously increase the concurrency and test the upper limit of the pressure that the server can still provide services normally.
Pressure Parameters
- Duration: 5 minutes
- Service exception flag: error rate greater than 0.00%
Query by ID for vertices

Conclusion:
- The concurrent capacity of the vertex search by ID is 14500, with a throughput of 13576 and an average delay of 11ms.
Edge search by ID

Conclusion:
- For edge ID-based queries, the server’s concurrent capacity is up to 12,000, with a throughput of 10,688 and an average latency of 63ms.
8.3 - HugeGraph-Loader Performance
Note:
The current performance metrics are based on an earlier version. The latest version has significant
improvements in both performance and functionality. We encourage you to refer to the most recent release featuring
autonomous distributed storage and enhanced computational push down capabilities. Alternatively,
you may wait for the community to update the data with these enhancements.
Use Cases
When the number of graph data to be batch inserted (including vertices and edges) is at the billion level or below,
or the total data size is less than TB, the HugeGraph-Loader tool can be used to continuously and quickly import
graph data.
The test uses the edge data of website.
- When the label index is turned off, 228k edges/s.
- When the label index is turned on, 153k edges/s.
- When label index is turned on by default, 63k edges/s.
8.4 -
1 测试环境
1.1 硬件信息
| CPU | Memory | 网卡 | 磁盘 |
|---|
| 48 Intel(R) Xeon(R) CPU E5-2650 v4 @ 2.20GHz | 128G | 10000Mbps | 750GB SSD |
1.2 软件信息
1.2.1 测试用例
测试使用graphdb-benchmark,一个图数据库测试集。该测试集主要包含4类测试:
Massive Insertion,批量插入顶点和边,一定数量的顶点或边一次性提交
Single Insertion,单条插入,每个顶点或者每条边立即提交
Query,主要是图数据库的基本查询操作:
- Find Neighbors,查询所有顶点的邻居
- Find Adjacent Nodes,查询所有边的邻接顶点
- Find Shortest Path,查询第一个顶点到100个随机顶点的最短路径
Clustering,基于Louvain Method的社区发现算法
1.2.2 测试数据集
测试使用人造数据和真实数据
本测试用到的数据集规模
| 名称 | vertex数目 | edge数目 | 文件大小 |
|---|
| email-enron.txt | 36,691 | 367,661 | 4MB |
| com-youtube.ungraph.txt | 1,157,806 | 2,987,624 | 38.7MB |
| amazon0601.txt | 403,393 | 3,387,388 | 47.9MB |
1.3 服务配置
- HugeGraph版本:0.4.4,RestServer和Gremlin Server和backends都在同一台服务器上
- Cassandra版本:cassandra-3.10,commit-log 和data共用SSD
- RocksDB版本:rocksdbjni-5.8.6
- Titan版本:0.5.4, 使用thrift+Cassandra模式
graphdb-benchmark适配的Titan版本为0.5.4
2 测试结果
2.1 Batch插入性能
| Backend | email-enron(30w) | amazon0601(300w) | com-youtube.ungraph(300w) |
|---|
| Titan | 9.516 | 88.123 | 111.586 |
| RocksDB | 2.345 | 14.076 | 16.636 |
| Cassandra | 11.930 | 108.709 | 101.959 |
| Memory | 3.077 | 15.204 | 13.841 |
说明
- 表头"()“中数据是数据规模,以边为单位
- 表中数据是批量插入的时间,单位是s
- 例如,HugeGraph使用RocksDB插入amazon0601数据集的300w条边,花费14.076s,速度约为21w edges/s
结论
- RocksDB和Memory后端插入性能优于Cassandra
- HugeGraph和Titan同样使用Cassandra作为后端的情况下,插入性能接近
2.2 遍历性能
2.2.1 术语说明
- FN(Find Neighbor), 遍历所有vertex, 根据vertex查邻接edge, 通过edge和vertex查other vertex
- FA(Find Adjacent), 遍历所有edge,根据edge获得source vertex和target vertex
2.2.2 FN性能
| Backend | email-enron(3.6w) | amazon0601(40w) | com-youtube.ungraph(120w) |
|---|
| Titan | 7.724 | 70.935 | 128.884 |
| RocksDB | 8.876 | 65.852 | 63.388 |
| Cassandra | 13.125 | 126.959 | 102.580 |
| Memory | 22.309 | 207.411 | 165.609 |
说明
- 表头”()“中数据是数据规模,以顶点为单位
- 表中数据是遍历顶点花费的时间,单位是s
- 例如,HugeGraph使用RocksDB后端遍历amazon0601的所有顶点,并查找邻接边和另一顶点,总共耗时65.852s
2.2.3 FA性能
| Backend | email-enron(30w) | amazon0601(300w) | com-youtube.ungraph(300w) |
|---|
| Titan | 7.119 | 63.353 | 115.633 |
| RocksDB | 6.032 | 64.526 | 52.721 |
| Cassandra | 9.410 | 102.766 | 94.197 |
| Memory | 12.340 | 195.444 | 140.89 |
说明
- 表头”()“中数据是数据规模,以边为单位
- 表中数据是遍历边花费的时间,单位是s
- 例如,HugeGraph使用RocksDB后端遍历amazon0601的所有边,并查询每条边的两个顶点,总共耗时64.526s
结论
- HugeGraph RocksDB > Titan thrift+Cassandra > HugeGraph Cassandra > HugeGraph Memory
2.3 HugeGraph-图常用分析方法性能
术语说明
- FS(Find Shortest Path), 寻找最短路径
- K-neighbor,从起始vertex出发,通过K跳边能够到达的所有顶点, 包括1, 2, 3…(K-1), K跳边可达vertex
- K-out, 从起始vertex出发,恰好经过K跳out边能够到达的顶点
FS性能
| Backend | email-enron(30w) | amazon0601(300w) | com-youtube.ungraph(300w) |
|---|
| Titan | 11.333 | 0.313 | 376.06 |
| RocksDB | 44.391 | 2.221 | 268.792 |
| Cassandra | 39.845 | 3.337 | 331.113 |
| Memory | 35.638 | 2.059 | 388.987 |
说明
- 表头”()“中数据是数据规模,以边为单位
- 表中数据是找到从第一个顶点出发到达随机选择的100个顶点的最短路径的时间,单位是s
- 例如,HugeGraph使用RocksDB查找第一个顶点到100个随机顶点的最短路径,总共耗时2.059s
结论
- 在数据规模小或者顶点关联关系少的场景下,Titan最短路径性能优于HugeGraph
- 随着数据规模增大且顶点的关联度增高,HugeGraph最短路径性能优于Titan
K-neighbor性能
| 顶点 | 深度 | 一度 | 二度 | 三度 | 四度 | 五度 | 六度 |
|---|
| v1 | 时间 | 0.031s | 0.033s | 0.048s | 0.500s | 11.27s | OOM |
| v111 | 时间 | 0.027s | 0.034s | 0.115 | 1.36s | OOM | – |
| v1111 | 时间 | 0.039s | 0.027s | 0.052s | 0.511s | 10.96s | OOM |
说明
- HugeGraph-Server的JVM内存设置为32GB,数据量过大时会出现OOM
K-out性能
| 顶点 | 深度 | 一度 | 二度 | 三度 | 四度 | 五度 | 六度 |
|---|
| v1 | 时间 | 0.054s | 0.057s | 0.109s | 0.526s | 3.77s | OOM |
| 度 | 10 | 133 | 2453 | 50,830 | 1,128,688 | | |
| v111 | 时间 | 0.032s | 0.042s | 0.136s | 1.25s | 20.62s | OOM |
| 度 | 10 | 211 | 4944 | 113150 | 2,629,970 | | |
| v1111 | 时间 | 0.039s | 0.045s | 0.053s | 1.10s | 2.92s | OOM |
| 度 | 10 | 140 | 2555 | 50825 | 1,070,230 | | |
说明
- HugeGraph-Server的JVM内存设置为32GB,数据量过大时会出现OOM
结论
- FS场景,HugeGraph性能优于Titan
- K-neighbor和K-out场景,HugeGraph能够实现在5度范围内秒级返回结果
2.4 图综合性能测试-CW
| 数据库 | 规模1000 | 规模5000 | 规模10000 | 规模20000 |
|---|
| Titan | 45.943 | 849.168 | 2737.117 | 9791.46 |
| Memory(core) | 41.077 | 1825.905 | * | * |
| Cassandra(core) | 39.783 | 862.744 | 2423.136 | 6564.191 |
| RocksDB(core) | 33.383 | 199.894 | 763.869 | 1677.813 |
说明
- “规模"以顶点为单位
- 表中数据是社区发现完成需要的时间,单位是s,例如HugeGraph使用RocksDB后端在规模10000的数据集,社区聚合不再变化,需要耗时763.869s
- “*“表示超过10000s未完成
- CW测试是CRUD的综合评估
- 后三者分别是HugeGraph的不同后端,该测试中HugeGraph跟Titan一样,没有通过client,直接对core操作
结论
- HugeGraph在使用Cassandra后端时,性能略优于Titan,随着数据规模的增大,优势越来越明显,数据规模20000时,比Titan快30%
- HugeGraph在使用RocksDB后端时,性能远高于Titan和HugeGraph的Cassandra后端,分别比两者快了6倍和4倍
9 - Contribution Guidelines
9.1 - How to Contribute to HugeGraph
Thanks for taking the time to contribute! As an open source project, HugeGraph is looking forward to be contributed from everyone, and we are also grateful to all the contributors.
The following is a contribution guide for HugeGraph:
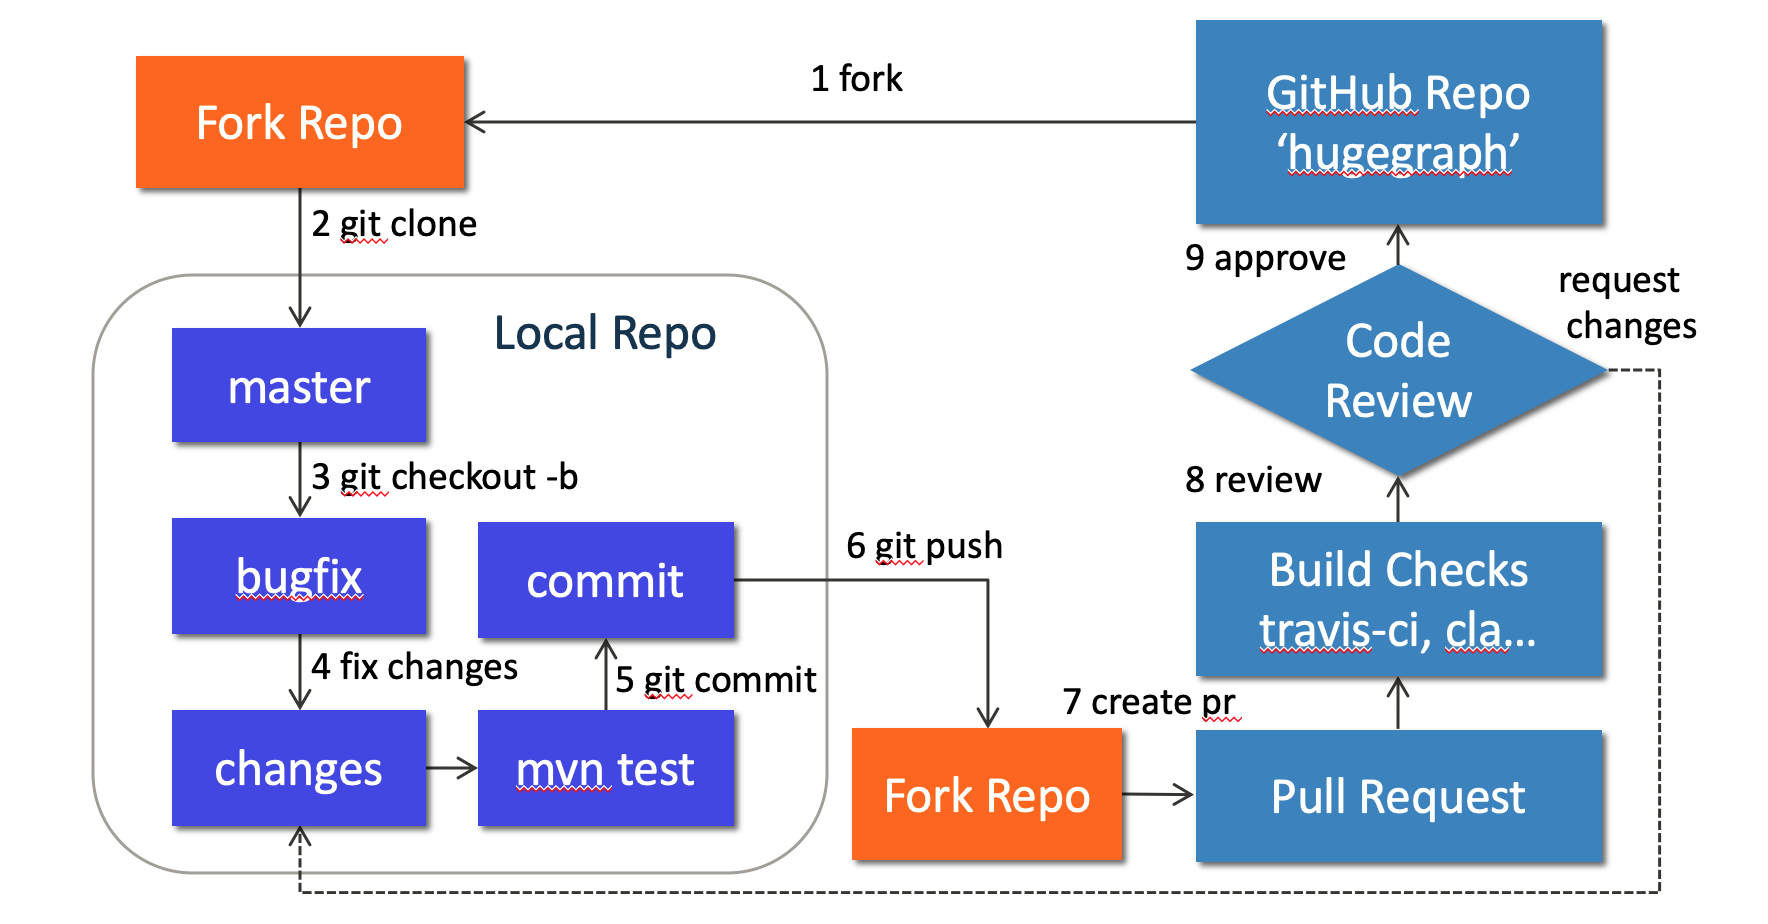
1. Preparation
Optional: You can use GitHub desktop to greatly simplify the commit and update process.
We can contribute by reporting issues, submitting code patches or any other feedback.
Before submitting the code, we need to do some preparation:
Sign up or login to GitHub: https://github.com
Fork HugeGraph repo from GitHub: https://github.com/apache/hugegraph/fork
Clone code from fork repo to local: https://github.com/${GITHUB_USER_NAME}/hugegraph
# clone code from remote to local repo
git clone https://github.com/${GITHUB_USER_NAME}/hugegraph
Configure local HugeGraph repo
cd hugegraph
# add upstream to synchronize the latest code
git remote add hugegraph https://github.com/apache/hugegraph
# set name and email to push code to github
git config user.name "{full-name}" # like "Jermy Li"
git config user.email "{email-address-of-github}" # like "jermy@apache.org"
2. Create an Issue on GitHub
If you encounter bugs or have any questions, please go to GitHub Issues to report them and feel free to create an issue.
3. Make changes of code locally
3.1 Create a new branch
Please don’t use master branch for development. We should create a new branch instead:
# checkout master branch
git checkout master
# pull the latest code from official hugegraph
git pull hugegraph
# create new branch: bugfix-branch
git checkout -b bugfix-branch
3.2 Change the code
Assume that we need to modify some files like “HugeGraph.java” and “HugeFactory.java”:
# modify code to fix a bug
vim hugegraph-core/src/main/java/org/apache/hugegraph/HugeGraph.java
vim hugegraph-core/src/main/java/org/apache/hugegraph/HugeFactory.java
# run test locally (optional)
mvn test -Pcore-test,memory
Note: In order to be consistent with the code style easily, if you use IDEA as your IDE, you can import our code style configuration file.
3.2.1 Check licenses
If we want to add new third-party dependencies to the HugeGraph project, we need to do the following things:
- Find the third-party dependent repository, put the dependent
license file into ./hugegraph-dist/release-docs/licenses/ path. - Declare the dependency in ./hugegraph-dist/release-docs/LICENSE
LICENSE information. - Find the NOTICE file in the repository and append it to ./hugegraph-dist/release-docs/NOTICE file (skip this step if there is no NOTICE file).
- Execute locally ./hugegraph-dist/scripts/dependency/regenerate_known_dependencies.sh to update the dependency list known-dependencies.txt (or manually update) .
Example: A new third-party dependency is introduced into the project -> ant-1.9.1.jar
The license information of ant-1.9.1.jar needs to be specified in the LICENSE file, and the notice information needs to be specified in the NOTICE file. The detailed LICENSE file corresponding to ant-1.9.1.jar needs to be copied to our licenses/ directory. Finally update the known-dependencies.txt file.
3.3 Commit changes to git repo
After the code has been completed, we submit them to the local git repo:
# add files to local git index
git add hugegraph-core/src/main/java/org/apache/hugegraph/HugeGraph.java
git add hugegraph-core/src/main/java/org/apache/hugegraph/HugeFactory.java
# commit to local git repo
git commit
Please edit the commit message after running git commit, we can explain what and how to fix a bug or implement a feature, the following is an example:
Fix bug: run deploy multiple times
fix #ISSUE_ID
Please remember to fill in the issue id, which was generated by GitHub after issue creation.
3.4 Push commit to GitHub fork repo
Push the local commit to GitHub fork repo:
# push the local commit to fork repo
git push origin bugfix-branch:bugfix-branch
Note that since GitHub requires submitting code through username + token (instead of using username + password directly), you need to create a GitHub token from https://github.com/settings/tokens:

4. Create a Pull Request
Go to the web page of GitHub fork repo, there would be a chance to create a Pull Request after pushing to a new branch, just click button “Compare & pull request” to do it. Then edit the description for proposed changes, which can just be copied from the commit message.
Note: please make sure the email address you used to submit the code is bound to the GitHub account. For how to bind the email address, please refer to https://github.com/settings/emails:

5. Code review
Maintainers will start the code review after all the automatic checks are passed:
- Check: Contributor License Agreement is signed
- Check: Travis CI builds is passed (automatically Test and Deploy)
The commit will be accepted and merged if there is no problem after review.
Please click on “Details” to find the problem if any check does not pass.
If there are checks not passed or changes requested, then continue to modify the code and push again.
6. More changes after review
If we have not passed the review, don’t be discouraged. Usually a commit needs to be reviewed several times before being accepted! Please follow the review comments and make further changes.
After the further changes, we submit them to the local repo:
# commit all updated files in a new commit,
# please feel free to enter any appropriate commit message, note that
# we will squash all commits in the pull request as one commit when
# merging into the master branch.
git commit -a
If there are conflicts that prevent the code from being merged, we need to rebase on master branch:
# synchronize the latest code
git checkout master
git pull hugegraph
# rebase on master
git checkout bugfix-branch
git rebase -i master
And push it to GitHub fork repo again:
# force push the local commit to fork repo
git push -f origin bugfix-branch:bugfix-branch
GitHub will automatically update the Pull Request after we push it, just wait for code review.
9.2 - Subscribe Mailing Lists
Subscribe the mailing list
Subscribe to the mailing list by following steps:
- Email dev-subscribe@hugegraph.apache.org through your email account, and then you will receive a confirmation email.
- Reply to the confirmation email to confirm your subscription. Then, you will receive another confirmation email.
- Now you are a subscriber of the mailing list. If you have more questions, just email the mailing list and someone will reply to you soon.
You can subscribe to the mailing list anytime you want. Additionally, you can check historical emails / all emails easily (even if you are not subscribing to the list).
Some notes:
- If you don’t receive the confirmation email, please send it after 24 hours later.
- Don’t email to dev until you subscribe to the mailing list successfully (otherwise the mail will be banned).
HugeGraph offers an email list for development and user discussions.
More information on mailing subscribe can be found at:
Unsubscribe Mailing Lists
If you do not need to know what’s going on with HugeGraph, you can unsubscribe from the mailing list.
Unsubscribe from the mailing list steps are as follows:
Email dev-unsubscribe@hugegraph.apache.org with your subscribed email address, subject and content are arbitrary.
Receive confirmation email and reply. After completing step 1, you will receive a confirmation email from dev-help@hugegraph.apache.org (if not received, please confirm whether the email is automatically classified as spam, promotion email, subscription email, etc.) . Then reply directly to the email, or click on the link in the email to reply quickly, the subject and content are arbitrary.
Receive a goodbye email. After completing the above steps, you will receive a goodbye email with the subject GOODBYE from dev@hugegraph.apache.org, and you have successfully unsubscribed to the Apache HugeGraph mailing list, and you will not receive emails from dev@hugegraph.apache.org.
9.3 - Validate Apache Release
Note: this doc will be updated continuously.
You need to use Java11 in runtime verification, we will drop Java8 support from version 1.5.0 (And currently doesn’t support Java17)
Graduation note: Apache HugeGraph graduated in January 2026. Official release voting is now completed within the HugeGraph community (PMC binding votes on dev@hugegraph.apache.org), and no longer requires Incubator general@incubator.apache.org approval.
Verification
When the internal temporary release and packaging work is completed, other community developers (
especially PMC) need to participate in verification based on ASF release policy and checklist references:
- ASF release policy
- Incubator checklist (historical reference)
To ensure the “correctness + completeness” of someone’s published version, here requires **everyone
** to participate as much as possible, and then explain which items you have checked in the
subsequent email reply.(The following are the core items)
1. prepare
If there is no svn or gpg or wget environment locally, it is recommended to install it first
(windows recommend using WSL2 environment, or at least git-bash), also make sure to install java
(prefer Java 11) and maven software
# 1. install svn
# ubuntu/debian
sudo apt install subversion -y
# MacOS
brew install subversion
# To verify that the installation was successful, execute the following command:
svn --version
# 2. install gpg
# ubuntu/debian
sudo apt-get install gnupg -y
# MacOS
brew install gnupg
# To verify that the installation was successful, execute the following command:
gpg --version
# 3. install wget (we will enhance it later, like use `curl`)
# ubuntu/debian
sudo apt-get install wget -y
# MacOS
brew install wget
# 4. Download the hugegraph-svn directory
# For version number, pay attention to fill in the verification version
svn co https://dist.apache.org/repos/dist/dev/hugegraph/1.x.x/
# (Note) If svn downloads a file very slowly,
# you can consider wget to download a single file, as follows (or consider using a proxy)
wget https://dist.apache.org/repos/dist/dev/hugegraph/1.x.x/apache-hugegraph-toolchain-incubating-1.x.x.tar.gz
2. check hash value
First you need to check the file integrity of the source + binary package, Verify by shasum to
ensure that it is consistent with the hash value published on apache/GitHub (Usually sha512), Here
is the same as the last step of 0x02 inspection.
execute the following command:
for i in *.tar.gz; do echo $i; shasum -a 512 --check $i.sha512; done
3. check gpg signature
This is to ensure that the published package is uploaded by a reliable person.
Assuming tom signs and uploads,
others should download A’s public key and then perform signature
confirmation.
Related commands:
# 1. Download project trusted public key to local (required for the first time) & import
curl https://downloads.apache.org/hugegraph/KEYS > KEYS
gpg --import KEYS
# After importing, you can see the following output, which means that x user public keys have been imported
gpg: /home/ubuntu/.gnupg/trustdb.gpg: trustdb created
gpg: key BA7E78F8A81A885E: public key "imbajin (apache mail) <jin@apache.org>" imported
gpg: key 818108E7924549CC: public key "vaughn <vaughn@apache.org>" imported
gpg: key 28DCAED849C4180E: public key "coderzc (CODE SIGNING KEY) <zhaocong@apache.org>" imported
...
gpg: Total number processed: x
gpg: imported: x
# 2. Trust release users (trust n username mentioned in voting mail, if more than one user,
# just repeat the steps in turn or use the script below)
gpg --edit-key $USER # input the username, enter the interactive mode
gpg> trust
...output options..
Your decision? 5 # select 5
Do you really want to set this key to ultimate trust? (y/N) y # slect y, then q quits trusting the next user
# (Optional) You could also use the command to trust one user in non-interactive mode:
echo -e "5\ny\n" | gpg --batch --command-fd 0 --edit-key $USER trust
# Or use the script to auto import all public gpg keys (be carefully):
for key in $(gpg --no-tty --list-keys --with-colons | awk -F: '/^pub/ {print $5}'); do
echo -e "5\ny\n" | gpg --batch --command-fd 0 --edit-key "$key" trust
done
# 3. Check the signature (make sure there is no Warning output, every source/binary file prompts Good Signature)
#Single file verification
gpg --verify xx.asc xxx-src.tar.gz
gpg --verify xx.asc xxx.tar.gz # Note: without the bin/binary suffix
# One-click shell traversal verification (recommended)
for i in *.tar.gz; do echo $i; gpg --verify $i.asc $i ; done
First confirm the overall integrity/consistency, and then confirm the specific content (key)
4. Check the archive contents
Check the contents of the archive downloaded from preparation work. Divided into two aspects: source code package + binary package, The source code package is stricter, it can be said that the core part (Because it is longer, For a complete list refer to
the official Wiki)
A. source package
After decompressing *hugegraph*src.tar.gz, Do the following checks:
- package/folder naming should match the release line (historical releases may still contain
incubating), and no empty files/folders LICENSE + NOTICE exist and the content is normal; DISCLAIMER is required for historical incubating artifacts- does not exist binaries (without LICENSE)
- The source code files all contain the standard
ASF License header (this could be done with
the Maven-MAT plugin) - Check whether the
pom.xml version number of each parent/child module is consistent (and meet
expectations) - Finally, make sure the source code works/compiles correctly
# prefer to use/switch to `java 11` for the following operations (compiling/running) (Note: `Computer` only supports `java >= 11`)
# java --version
# try to compile in the Unix env to check if it works well (-P is optional)
mvn clean package -P stage -DskipTests -Dcheckstyle.skip=true
B. binary package
After decompressing xxx-hugegraph.tar.gz, perform the following checks:
- package/folder naming should match the release line (historical releases may still contain
incubating) LICENSE and NOTICE file exists and the content is normal (DISCLAIMER applies to historical incubating artifacts)- start server
# hugegraph-server
bin/start-hugegraph.sh
# hugegraph-loader
bin/hugegraph-loader.sh -g hugegraph -f example/file/struct.json -s example/file/schema.groovy
# hugegraph-hubble
bin/start-hubble.sh
more reference official website: https://hugegraph.apache.org/docs/quickstart
Note: If a third-party dependency is introduced in the binary package, you need to update the
LICENSE and add the third-party dependent LICENSE; if the third-party dependent LICENSE is Apache
2.0, and the corresponding project contains NOTICE, you also need to update Our NOTICE file
5. Check the official website and GitHub and other pages
- Make sure that the official website at least meets apache website check,
and no circular links, etc.
- Update download link and release notes updated
- …
Mail Template
After the check & test, you should reply to the mail with the following content: (normal devs & PMC)
[] +1 approve
[] +0 no opinion
[] -1 disapprove with the reason
+1 (non-binding)
I checked:
1. Download link/tag in mail are valid
2. Checksum and GPG signatures are OK
3. LICENSE & NOTICE & DISCLAIMER are exist
4. Build successfully on XX OS & Version XX
5. No unexpected binary files
6. Date is right in the NOTICE file
7. Compile from source is fine under JavaXX
8. No empty file & directory found
9. Test running XXX service OK
10. ....
and the PMC members should reply with binding, it’s important for summary the valid votes:
+1 (binding)
I checked:
1. Download link/tag in mail are valid
2. Checksum and GPG signatures are OK
3. LICENSE & NOTICE & DISCLAIMER are exist
4. Build successfully on XX OS & Version XX
5. No unexpected binary files
6. Date is right in the NOTICE file
7. Compile from source is fine under JavaXX
8. No empty file & directory found
9. Test running XX process OK
10. ....
9.4 - Setup Server in IDEA (Dev)
NOTE: The following configuration is for reference purposes only, and has been tested on Linux and macOS platforms based on this version.
Background
The Quick Start section provides instructions on how to start and stop HugeGraph-Server using scripts. In this guide, we will explain how to run and debug HugeGraph-Server on the Linux platform using IntelliJ IDEA.
The core steps for local startup are the same as starting with scripts:
- Initialize the database backend by executing the
InitStore class to initialize the graph. - Start HugeGraph-Server by executing the
HugeGraphServer class to load the initialized graph information and start the server.
Before proceeding with the following process, make sure that you have cloned the source code of HugeGraph
and have configured the development environment, such as Java 11 & you could config your local environment
with this config-doc
git clone https://github.com/apache/hugegraph.git
Steps
1. Copy Configuration Files
To avoid the impact of configuration file changes on Git tracking, it is recommended to copy the required configuration files to a separate folder. Run the following command to copy the files:
cp -r hugegraph-dist/src/assembly/static/scripts hugegraph-dist/src/assembly/static/conf path-to-your-directory
Replace path-to-your-directory with the path to the directory where you want to copy the files.
After introducing ToplingDB, developers need to execute the preload-topling.sh script, which automatically extracts the required dynamic libraries and Web Server static resources into the library directory located alongside the bin directory (the static resources will also be copied to /dev/shm/rocksdb_resource ).
First, you need to configure the database backend in the configuration files. In this example, we will use RocksDB. Open path-to-your-directory/conf/graphs/hugegraph.properties and configure it as follows:
backend=rocksdb
serializer=binary
rocksdb.data_path=.
rocksdb.wal_path=.
Next, open the Run/Debug Configurations panel in IntelliJ IDEA and create a new Application configuration. Follow these steps for the configuration:
- Select
hugegraph-dist as the Use classpath of module. - Set the
Main class to org.apache.hugegraph.cmd.InitStore. - Set the program arguments to
conf/rest-server.properties. Note that the path here is relative to the working directory, so make sure to set the working directory to path-to-your-directory. - ToplingDB requires preloading dynamic libraries via the
LD_PRELOAD mechanism. Developers need to set two environment variables: LD_LIBRARY_PATH should point to the library directory extracted by preload-topling.sh, and LD_PRELOAD should be set to libjemalloc.so:librocksdbjni-linux64.so to ensure the necessary libraries are correctly loaded at runtime.- LD_LIBRARY_PATH=/path/to/your/library:$LD_LIBRARY_PATH
- LD_PRELOAD=libjemalloc.so:librocksdbjni-linux64.so
If user authentication (authenticator) is configured for HugeGraph-Server in the Java 11 environment, you need to refer to the script configuration in the binary package and add the following VM options:
--add-exports=java.base/jdk.internal.reflect=ALL-UNNAMED
Otherwise, an error will occur:
java.lang.reflect.InaccessibleObjectException: Unable to make public static synchronized void jdk.internal.reflect.Reflection.registerFieldsToFilter(java.lang.Class,java.lang.String[]) accessible: module java.base does not "exports jdk.internal.reflect" to unnamed module @xxx
Once the configuration is completed, run it. If the execution is successful, the following runtime logs will be displayed:
2023-06-05 00:43:37 [main] [INFO] o.a.h.u.ConfigUtil - Scanning option 'graphs' directory './conf/graphs'
2023-06-05 00:43:37 [main] [INFO] o.a.h.c.InitStore - Init graph with config file: ./conf/graphs/hugegraph.properties
......
2023-06-05 00:43:39 [main] [INFO] o.a.h.b.s.r.RocksDBStore - Write down the backend version: 1.11
2023-06-05 00:43:39 [main] [INFO] o.a.h.StandardHugeGraph - Graph 'hugegraph' has been initialized
2023-06-05 00:43:39 [main] [INFO] o.a.h.StandardHugeGraph - Close graph standardhugegraph[hugegraph]
2023-06-05 00:43:39 [db-open-1] [INFO] o.a.h.b.s.r.RocksDBStore - Opening RocksDB with data path: ./m
2023-06-05 00:43:39 [db-open-1] [INFO] o.a.h.b.s.r.RocksDBStore - Opening RocksDB with data path: ./s
2023-06-05 00:43:39 [db-open-1] [INFO] o.a.h.b.s.r.RocksDBStore - Opening RocksDB with data path: ./g
2023-06-05 00:43:39 [main] [INFO] o.a.h.HugeFactory - HugeFactory shutdown
2023-06-05 00:43:39 [hugegraph-shutdown] [INFO] o.a.h.HugeFactory - HugeGraph is shutting down
3. Running HugeGraphServer
Similarly, open the Run/Debug Configurations panel in IntelliJ IDEA and create a new Application configuration. Follow these steps for the configuration:
- Select
hugegraph-dist as the Use classpath of module. - Set the
Main class to org.apache.hugegraph.dist.HugeGraphServer. - Set the program arguments to
conf/gremlin-server.yaml conf/rest-server.properties. Similarly, note that the path here is relative to the working directory, so make sure to set the working directory to path-to-your-directory.
Similarly, if user authentication (authenticator) is configured for HugeGraph-Server in the Java 11 environment, you need to refer to the script configuration in the binary package and add the following VM options:
--add-exports=java.base/jdk.internal.reflect=ALL-UNNAMED --add-modules=jdk.unsupported --add-exports=java.base/sun.nio.ch=ALL-UNNAMED
Otherwise, an error will occur:
java.lang.reflect.InaccessibleObjectException: Unable to make public static synchronized void jdk.internal.reflect.Reflection.registerFieldsToFilter(java.lang.Class,java.lang.String[]) accessible: module java.base does not "exports jdk.internal.reflect" to unnamed module @xxx
Once the configuration is completed, run it. If you see the following logs, it means that HugeGraphServer has been successfully started:
......
2023-06-05 00:51:56 [gremlin-server-boss-1] [INFO] o.a.t.g.s.GremlinServer - Gremlin Server configured with worker thread pool of 1, gremlin pool of 8 and boss thread pool of 1.
2023-06-05 00:51:56 [gremlin-server-boss-1] [INFO] o.a.t.g.s.GremlinServer - Channel started at port 8182.
4. Debugging HugeGraphServer (optional)
After completing the above configuration, you can try debugging HugeGraphServer. Run HugeGraphServer in debug mode and set a breakpoint at the following location:
public String list(@Context GraphManager manager,
@PathParam("graph") String graph, @QueryParam("label") String label,
@QueryParam("properties") String properties, ......) {
// ignore log
Map<String, Object> props = parseProperties(properties);
Then use the RESTful API to request HugeGraphServer:
curl "http://localhost:8080/graphs/hugegraph/graph/vertices" | gunzip
At this point, you can view detailed variable information in the debugger.
5. Log4j2 Configuration
By default, when running InitStore and HugeGraphServer, the Log4j2 configuration file path read is hugegraph-dist/src/main/resources/log4j2.xml, not path-to-your-directory/conf/log4j2.xml. This configuration file is read when starting HugeGraph-Server using the script.
To avoid maintaining two separate configuration files, you can modify the Log4j2 configuration file path when running and debugging HugeGraph-Server in IntelliJ IDEA:
- Open the previously created
Application configuration. - Click on
Modify options - Add VM options. - Set the VM options to
-Dlog4j.configurationFile=conf/log4j2.xml.
Possible Issues
1. java: package sun.misc does not exist
The reason may be that cross-compilation is triggered when using Java 11 to compile, causing the symbol of sun.misc.Unsafe used in the project to not be found. There are two possible solutions:
- In IntelliJ IDEA, go to
Preferences/Settings and find the Java Compiler panel. Then, disable the --release option (recommended). - Set the Project SDK to 8 (Deprecated soon).
2. java: *.store.raft.rpc.RaftRequests does not exist (RPC Generated Files)
The reason is that the source code didn’t include the RPC-generated files. You could try 2 ways to fix it:
- [CMD]
mvn clean compile in the root directory (Recommend) - [UI] right click on the
hugegraph repo and select Maven->Generate Sources and Update Folders. This will rebuild the repo and correctly generate the required files.
This is because Log4j2 uses asynchronous loggers. You can refer to the official documentation for configuration details.
References
- HugeGraph-Server Quick Start: Instructions for setting up HugeGraph-Server.
- Local Debugging Guide for HugeGraph Server (Win/Unix)
- “package sun.misc does not exist” compilation error
- Cannot compile: java: package sun.misc does not exist
- The code-style config for HugeGraph in IDEA
9.5 - Apache HugeGraph Committer Guide
This document outlines the requirements and process for becoming an Apache Committer. The corresponding ASF official document can be found at: https://community.apache.org/newcommitter.html
Candidate Requirements
- Candidates must adhere to the Apache Code of Conduct.
- PMC members will assess candidates’ interactions with others and contributions through mailing lists, issues, pull requests, and official documentation.
- Considerations for evaluating candidates as potential Committers include:
- Ability to collaborate with community members
- Mentorship capabilities
- Community involvement
- Level of contribution
- Personal skills/abilities
Nomination Process
Discussion → Vote → Invitation → Announcement
Any PMC member of HugeGraph can initiate a voting discussion. After identifying valuable contributions from a community contributor and obtaining the candidate’s consent, a discussion can be initiated via private@hugegraph.apache.org.
The initiator of the discussion should clearly state the candidate’s contributions in the discussion email and provide URLs or other information for confirming the contributions, facilitating discussion and analysis.
Below is a template for HugeGraph emails: (For reference only)
Note: The term xxx will be used to refer to the candidate. Typically, xxx represents an easily readable name (e.g., Simon Jay).
ASF-INFRA recommends avoiding the use of less readable ID directly as a reference to the person in emails (e.g., avoid simon321 or wh0isSim0n 😄).
In addition, it is best to choose the “pure text” mode, otherwise the typesetting may be chaotic in the ASF Mailing-list UI
To: private@hugegraph.apache.org
Subject: [DISCUSS] XXX as a HugeGraph Committer Candidate
Hi all:
I am pleased to nominate xxx for the role of HugeGraph Committer based on his/her contributions over the past few months.
[ Candidate's Contribution Summary ]
Here are the relevant PRs (issues) he/she has participated in:
**Core Features:**
- Feature 1: [ Reference Links ]
- ...
**Fix/Chore/Release:**
**Doc:**
[ Candidate's Current Notable Contributions ]
His/Her contributions bring the following benefits to the community, helping us in the following ways:
[ Candidate's Contributions and Benefits to the Community ]
In view of the above contributions, I elect xxx as Committer of the HugeGraph project.
[ Reference Links ]
1. PR1
2. PR2
3. ...
Welcome everyone to share opinions~
Thanks!
For contribution links in discussion emails, you can use the statistical feature of GitHub Search by entering corresponding keywords as needed. You can also adjust parameters and add new repositories such as repo:apache/hugegraph-computer. Pay special attention to adjusting the time range (below is a template reference, please adjust the parameters accordingly):
- Number of PR submissions
is:pr author:xxx repo:apache/hugegraph repo:apache/hugegraph-doc created:>2023-06-01 updated:<2023-12-25
- Lines of code submissions/changes
- Number of PR submissions associated with issues
linked:issue involves:xxx repo:apache/hugegraph repo:apache/hugegraph-doc created:>2023-06-01 updated:<2023-12-25
- Number of PR reviews
type:pr reviewed-by:xxx repo:apache/hugegraph repo:apache/hugegraph-doc created:>2023-06-01 updated:<2023-12-25
- Number of merge commits
type:pr author:xxx repo:apache/hugegraph repo:apache/hugegraph-doc created:>2023-06-01 updated:<2023-12-25
- Effective lines merged
- Number of issue submissions
type:issue author:xxx repo:apache/hugegraph repo:apache/hugegraph-doc created:>2023-06-01 updated:<2023-12-25
- Number of issue fixes
- Based on the number of issue submissions, select those with a closed status.
- Number of issue participations
type:issue involves:xxx repo:apache/hugegraph repo:apache/hugegraph-doc created:>2023-06-01 updated:<2023-12-25
- Number of issue comments
type:issue commenter:xxx repo:apache/hugegraph repo:apache/hugegraph-doc created:>2023-06-01 updated:<2023-12-25
- Number of PR comments
type:pr commenter:xxx repo:apache/hugegraph repo:apache/hugegraph-doc created:>2023-06-01 updated:<2023-12-25
For participation in mailing lists, you can use https://lists.apache.org/list?dev@hugegraph.apache.org:lte=10M:xxx.
If there are no dissenting opinions within the specified time frame of the discussion email, the initiator of the discussion needs to initiate a voting email for the committer election at private@hugegraph.apache.org.
Below is the corresponding email template:
To: private@hugegraph.apache.org
Subject: [VOTE] xxx as a HugeGraph Committer
Hi all:
Through the discussion of last week:
[ Discussion Mailing List Link ]
We have discussed and listed what xxx participated in the HugeGraph community.
I believe making him/her a Committer will enhance the work for HugeGraph.
So, I am happy to call VOTE to accept xxx as a HugeGraph Committer.
Voting will continue for at least 72 hours or until the required number of votes is reached.
Please vote accordingly:
[ ] +1 approve
[ ] +0 no opinion
[ ] -1 disapprove with the reason
Thanks!
Then, PMC members reply to the email with +1 or -1 to express their opinions. Generally, at least 3 votes of +1 are needed to conclude the vote.
Announcement of Voting Results (RESULT)
After the voting email concludes, the initiator of the vote needs to remind the end of the voting in the email. Additionally, the initiator needs to announce the voting results via email to private@hugegraph.apache.org. The email template can be as follows:
To: private@hugegraph.apache.org
Subject: [RESULTS][VOTE] xxx as a HugeGraph Committer
Hi all: The vote for "xxx" as a HugeGraph Committer has PASSED and closed now.
The result is as follows: X PMC +1 Votes:
- A (PMC ID)
- B
- C...
Vote thread:
put vote thread link here
Then I'm going to invite xxx to join us soon. Thanks for everyone's support!
Send Invitation Email to Candidate (INVITE)
After the announcement of the voting results email is sent, the initiator of the vote should send an invitation email to the candidate. The invitation email is addressed to the candidate and cc’d to private@hugegraph.apache.org. The invited candidate must reply to the specified email address to accept or reject the invitation.
Below is a template for reference:
To: [ Candidate's Email ]
Cc: private@hugegraph.apache.org
Subject: Invitation to become HugeGraph committer: xxx
Hello xxx,
The HugeGraph Project Management Committee (PMC)
hereby offers you committer privileges to the project.
These privileges are offered on the understanding that you'll use them
reasonably and with common sense. We like to work on trust
rather than unnecessary constraints.
Being a committer enables you to more easily make
changes without needing to go through the patch
submission process.
Being a committer does not require you to
participate any more than you already do. It does
tend to make one even more committed. You will
probably find that you spend more time here.
Of course, you can decline and instead remain as a
contributor, participating as you do now.
A. This personal invitation is a chance for you to
accept or decline in private. Either way, please
let us know in reply to the private@hugegraph.apache.org
address only.
B. If you accept, the next step is to register an iCLA:
1. Details of the iCLA and the forms are found
through this link: https://www.apache.org/licenses/#clas
2. Instructions for its completion and return to
the Secretary of the ASF are found at
https://www.apache.org/licenses/#submitting
3. When you transmit the completed iCLA, request
to notify the Apache HugeGraph project and choose a
unique Apache ID. Look to see if your preferred
ID is already taken at
https://people.apache.org/committer-index.html
This will allow the Secretary to notify the PMC
when your iCLA has been recorded.
When recording of your iCLA is noted, you will
receive a follow-up message with the next steps for
establishing you as a committer.
With the expectation of your acceptance, welcome!
The Apache HugeGraph PMC
Candidate Accepts Invitation (ACCEPT)
The candidate should reply to the aforementioned email (select reply all) to indicate acceptance of the invitation. Below is a template for the email:
To: [ Sender's Email ]
Cc: private@hugegraph.apache.org
Subject: Re: Invitation to become HugeGraph committer: xxx
Hello Apache HugeGraph PMC,
I accept the invitation.
Thanks to the Apache HugeGraph Community for recognizing my work, I
will continue to actively participate in the work of the Apache
HugeGraph.
Next, I will follow the instructions to complete the next steps:
Signing and submitting iCLA and registering Apache ID.
xxx
Of course, the candidate may also choose to decline the invitation, in which case there is no template:)
Once the invitation is accepted, the candidate needs to complete the following tasks:
ICLA Signing Process
- Download the ICLA
- Open the PDF and fill in the required information. All fields must be filled in English. It is recommended to use a PDF tool to edit and sign.
- Full name: First name followed by last name
- Public name: Optional, defaults to the same as
Full name - Check the box only if you entered names with your family name first
- Postal Address: English address, starting from small to large, including detailed street address
- Country: Country of residence in English
- E-mail: Email address, preferably the same as the one used in the invitation email
- (optional) preferred Apache id(s): Choose an SVN ID that is not listed on the Apache committer page
- (optional) notify project: Apache HugeGraph
- Signature: Must be handwritten using a PDF tool
- Date: Format as xxxx-xx-xx
- After signing, rename
icla.pdf to name-pinyin-icla.pdf - Send the following email and attach
name-pinyin-icla.pdf as a reference.
To: secretary@apache.org
Subject: ICLA Information
Hello everyone:
I have accepted the Apache HugeGraph PMC invitation to
become a HugeGraph committer, the attachment is my ICLA information.
(Optional) My GitHub account is https://github.com/xxx. Thanks!
xxx
For more details, please refer to https://github.com/apache/hugegraph/issues/1732.
PMC members will await confirmation of the ICLA record from the Apache secretary team. Candidates and PMC members will receive the following email:
Dear xxx,
This message acknowledges receipt of your ICLA, which has been filed in the Apache Software Foundation records.
Your account (with id xxx) has been requested for you and you should receive email with next steps
within the next few days (this process can take up to a week).
Please refer to https://www.apache.org/foundation/how-it-works.html#developers
for more information about roles at Apache.
Setting Up Apache Account and Development Environment (CONFIG)
After the record is completed, the candidate will receive an email from root@apache.org with the subject Welcome to the Apache Software Foundation. At this point, the candidate needs to follow the steps in the email to set up the Apache account and development environment:
- Reset the password at https://id.apache.org/reset/enter.
- Configure personal information at https://whimsy.apache.org/roster/committer/xxx.
- Associate GitHub account at https://gitbox.apache.org/boxer.
- This step requires configuring GitHub Two-Factor Authentication (2FA).
- The nominating PMC member must add the new Committer to the official list of committers via the Roster page. (Important, otherwise repository permissions will not take effect).
- After this step, the candidate becomes a new Committer and gains write access to the GitHub HugeGraph repository.
- (Optional) The new Committer can apply for free use of JetBrains’ full range of products with their Apache account here.
Announcing via Email (ANNOUNCE)
After the candidate completes the above steps, they will officially become a Committer of HugeGraph. At this point, they need to send an announcement email to dev@hugegraph.apache.org. Below is a template for the email:
To: dev@hugegraph.apache.org
Subject: [ANNOUNCE] New Committer: xxx
Hi everyone, The PMC for Apache HugeGraph has invited xxx to
become a Committer and we are pleased to announce that he/she has accepted.
xxx is being active in the HugeGraph community & dedicated to ... modules,
and we are glad to see his/her more interactions with the community in the future.
(Optional) His/Her GitHub account is https://github.com/xxx
Welcome xxx, and please enjoy your community journey~
Thanks!
The Apache HugeGraph PMC
Since Apache HugeGraph graduated in January 2026, governance information is maintained in ASF committee/project data rather than Incubator clutch pages.
Please check:
If an update is required but does not appear automatically, coordinate with Apache Community Development or ASF Infra according to the official process.
References
- https://community.apache.org/newcommitter.html (ASF official documentation)
- https://infra.apache.org/new-committers-guide.html
- https://www.apache.org/dev/pmc.html#newcommitter
- https://linkis.apache.org/zh-CN/community/how-to-vote-a-committer-pmc
- https://www.apache.org/licenses/contributor-agreements.html#submitting
- https://www.apache.org/licenses/cla-faq.html#printer
- https://linkis.apache.org/zh-CN/community/how-to-sign-apache-icla
- https://github.com/apache/hugegraph/issues/1732 (HugeGraph ICLA related issue)
10 - CHANGELOGS
10.2 - HugeGraph 1.5.0 Release Notes
WIP: This doc is under construction, please wait for the final version (BETA)
Operating Environment / Version Description
- From
hugegraph version 1.5.0 and later, related components only support Java11.
PS: In the future, HugeGraph components will evolve through versions of Java 11 -> Java 17 -> Java 21.
hugegraph
This version introduces many new features and optimizations, particularly support for the new distributed backend HStore(Raft + RocksDB).
API Changes
- BREAKING CHANGE: Support “parent & child”
EdgeLabel type #2662
Feature Changes
- Integrate
pd-grpc, pd-common, and pd-client #2498 - Integrate
store-grpc, store-common, and store-client #2476 - Integrate
store-rocksdb submodule #2513 - Integrate
pd-core into HugeGraph #2478 - Integrate
pd-service into HugeGraph #2528 - Integrate
pd-dist into HugeGraph and add core tests, client tests, and REST tests for PD #2532 - Integrate
server-hstore into HugeGraph #2534 - Integrate
store-core submodule #2548 - Integrate
store-node submodule #2537 - Support new backend Hstore #2560
- Support Docker deployment for PD and Store #2573
- Add a tool method
encode #2647 - Add basic
MiniCluster module for distributed system testing #2615 - Support disabling RocksDB auto-compaction via configuration #2586
Bug Fixes
- Switch RocksDB backend to memory when executing Gremlin examples #2518
- Avoid overriding backend config in Gremlin example scripts #2519
- Update resource references #2522
- Randomly generate default values #2568
- Update build artifact path for Docker deployment #2590
- Ensure thread safety for range attributes in PD #2641
- Correct server Docker copy source path #2637
- Fix JRaft Timer Metrics bug in Hstore #2602
- Enable JRaft MaxBodySize configuration #2633
Option Changes
- Mark old raft configs as deprecated #2661
- Enlarge bytes write limit and remove
big parameter when encoding/decoding string ID length #2622
Other Changes
- Add Swagger-UI LICENSE files #2495
- Translate CJK comments and punctuations to English across multiple modules #2536, #2623, #2645
- Introduce
install-dist module in root #2552 - Enable up-to-date checks for UI (CI) #2609
- Minor improvements for POM properties #2574
- Migrate HugeGraph Commons #2628
- Tar source and binary packages for HugeGraph with PD-Store #2594
- Refactor: Enhance cache invalidation of the partition → leader shard in
ClientCache #2588 - Refactor: Remove redundant properties in
LogMeta and PartitionMeta #2598
API Changes
- Support “parent & child”
EdgeLabel type #624
Feature Changes
- Support English interface & add a script/doc for it in Hubble #631
Bug Fixes
- Serialize source and target label for non-father EdgeLabel #628
- Encode/decode Chinese error after building Hubble package #627
- Configure IPv4 to fix timeout of
yarn install in Hubble #636 - Remove debugging output to speed up the frontend construction in Hubble #638
Other Changes
- Bump
express from 4.18.2 to 4.19.2 in Hubble Frontend #598 - Make IDEA support IssueNavigationLink #600
- Update
yarn.lock for Hubble #605 - Introduce
editorconfig-maven-plugin for verifying code style defined in .editorconfig #614 - Upgrade distribution version to 1.5.0 #639
Documentation Changes
- Clarify the contributing guidelines #604
- Enhance the README file for Hubble #613
- Update README style referring to the server’s style #615
hugegraph-ai
API Changes
- Added local LLM API and version API. #41, #44
- Implemented new API and optimized code structure. #63
- Support for graphspace and refactored all APIs. #67
Feature Changes
- Added openai’s apibase configuration and asynchronous methods in RAG web demo. #41, #58
- Support for multi reranker and enhanced UI. #73
- Node embedding, node classify, and graph classify with models based on DGL. #83
- Graph learning algorithm implementation (10+). #102
- Support for any openai-style API (standard). #95
Bug Fixes
- Fixed fusiform_similarity test in traverser for server 1.3.0. #37
- Avoid generating config twice and corrected e_cache type. #56, #117
- Fixed null value detection on vid attributes. #115
- Handled profile regenerate error. #98
Option Changes
- Added auth for fastapi and gradio. #70
- Support for multiple property types and importing graph from the entire doc. #84
Other Changes
- Reformatted documentation and updated README. #36, #81
- Introduced a black for code format in GitHub actions. #47
- Updated dependencies and environment preparations. #45, #65
- Enhanced user-friendly README. #82
hugegraph-computer
Feature Changes
- Support Single Source Shortest Path Algorithm #285
- Support Output Filter #303
Bug Fixes
- Fix: base-ref/head-ref Missed in Dependency-Review on Schedule Push #304
Option Changes
- Refactor(core): StringEncoding #300
Other Changes
- Improve(algorithm): Random Walk Vertex Inactive #301
- Upgrade Version to 1.3.0 #305
- Doc(readme): Clarify the Contributing Guidelines #306
- Doc(readme): Add Hyperlink to Apache 2.0 #308
- Migrate Project to Computer Directory #310
- Update for Release 1.5 #317
- Fix Path When Exporting Source Package #319
Release Details
Please check the release details/contributor in each repository:
10.3 - HugeGraph 1.3.0 Release Notes
Operating Environment / Version Description
- consider using Java 11 in
hugegraph/toolchain/commons, also compatible with Java 8 now. hugegraph-computer required to use Java 11, not compatible with Java 8!- Using Java8 may loss some security ensured, we recommend using Java 11 in production env with AuthSystem enabled.
1.3.0 is the last major version compatible with Java 8, compatibility with Java 8 will end in
next release(1.5.0) when PD/Store merged into
master branch (Except for the java-client).
PS: In the future, we will gradually upgrade the java version from Java 11 -> Java 17 -> Java 21.
hugegraph
In this version, we have fixed some SEC-related issues. If used in an online service or exposed to
the public, please upgrade to the latest version and enable authorization authentication
API Changes
- feat(api): optimize adjacent-edges query (#2408)
Feature Changes
- feat: support docker use the auth when starting (#2403)
- feat: added the OpenTelemetry trace support (#2477)
Bug Fix
- fix(core): task restore interrupt problem on restart server (#2401)
- fix(server): reinitialize the progress to set up graph auth friendly (#2411)
- fix(chore): remove zgc in dockerfile for ARM env (#2421)
- fix(server): make CacheManager constructor private to satisfy the singleton pattern (#2432)
- fix(server): unify the license headers (#2438)
- fix: format and clean code in dist and example modules (#2441)
- fix: format and clean code in core module (#2440)
- fix: format and clean code in modules (#2439)
- fix(server): clean up the code (#2456)
- fix(server): remove extra blank lines (#2459)
- fix(server): add tip for gremlin api NPE with an empty query (#2467)
- fix(server): fix the metric name when promthus collects hugegraph metric, see issue (#2462)
- fix(server):
serverStarted error when execute gremlin example (#2473) - fix(auth): enhance the URL check (#2422)
Option Changes
- refact(server): enhance the storage path in RocksDB & clean code (#2491)
Other Changes
- chore: add a license link (#2398)
- doc: enhance NOTICE info to keep it clear (#2409)
- chore(server): update swagger info for default server profile (#2423)
- fix(server): unify license header for protobuf file (#2448)
- chore: improve license header checker confs and pre-check header when validating (#2445)
- chore: unify to call SchemaLabel.getLabelId() (#2458)
- chore: refine the hg-style.xml specification (#2457)
- chore: Add a newline formatting configuration and a comment for warning (#2464)
- chore(server): clear context after req done (#2470)
API Changes
Feature Changes
- fix(loader): update shade plugin for spark loader (#566)
- fix(hubble): yarn install timeout in arm64 (#583)
- fix(loader): support file name with prefix for hdfs source (#571)
- feat(hubble): warp the exception info in HugeClientUtil (#589)
Bug Fix
- fix: concurrency issue causing file overwrite due to identical filenames (#572)
Option Changes
- feat(client): support user defined OKHTTPClient configs (#590)
Other Changes
- doc: update copyright date(year) in NOTICE (#567)
- chore(deps): bump ip from 1.1.5 to 1.1.9 in /hugegraph-hubble/hubble-fe (#580)
- refactor(hubble): enhance maven front plugin (#568)
- chore(deps): bump es5-ext from 0.10.53 to 0.10.63 in /hugegraph-hubble/hubble-fe (#582)
- chore(hubble): Enhance code style in hubble (#592)
- chore: upgrade version to 1.3.0 (#596)
- chore(ci): update profile commit id for 1.3 (#597)
hugegraph-commons
Feature Changes
- feat: support user defined RestClientConfig/HTTPClient params (#140)
Bug Fix
Other Changes
- chore: disable clean flatten for deploy (#141)
hugegraph-ai
This is the first release version of hugegraph-ai, it contains a variety of features, including
an initialized Python client, knowledge graph construction capabilities through LLM, and the integration
of RAG based on HugeGraph.
It also adds significant functionalities on python-client such as variable APIs,
auth, metric, traverser, and task APIs, as well as interactive and visual demo creation with Gradio.
In addition to these features, the release addresses several bugs and issues, ensuring a more stable
and error-free user experience. Maintenance tasks such as dependency updates, project structure improvements,
and the addition of basic CI further enhance the project’s robustness and developer workflow.
This release encapsulates the collaborative efforts of the HugeGraph community, with contributions
from various members, ensuring the project’s continuous growth and improvement.
Feature Changes
- feat: initialize hugegraph python client (#5)
- feat(llm): knowledge graph construction by llm (#7)
- feat: initialize rag based on HugeGraph (#20)
- feat(client): add variables api and test (#24)
- feat: add llm wenxinyiyan & config util & spo_triple_extract (#27)
- feat: add auth&metric&traverser&task api and ut (#28)
- feat: refactor construct knowledge graph task (#29)
- feat: Introduce gradio for creating interactive and visual demo (#30)
Bug Fix
- fix: invalid GitHub label (#3)
- fix: import error (#13)
- fix: function getEdgeByPage(): the generated query url does not include the parameter page (#15)
- fix: issue template (#23)
- fix: base-ref/head-ref missed in dependency-check-ci on branch push (#25)
Other Changes
- chore: add asf.yaml and ISSUE_TEMPLATE (#1)
- Bump urllib3 from 2.0.3 to 2.0.7 in /hugegraph-python (#8)
- chore: create .gitignore file for py (#9)
- refact: improve project structure & add some basic CI (#17)
- chore: Update LICENSE and NOTICE (#31)
- chore: add release scripts (#33)
- chore: change file chmod 755 (#34)
Release Details
Please check the release details/contributor in each repository:
10.4 - HugeGraph 1.2.0 Release Notes
Java version statement
In the future, we will gradually upgrade the java version, Java 11 -> Java 17 -> Java 21.
- hugegraph, hugegraph-toolchain, hugegraph-commons consider use Java 11, also compatible with Java 8 now.
- hugegraph-computer required to use Java 11, not compatible with Java 8 now!
v1.2.0 may be the last major version compatible with Java 8, compatibility with Java 8 will totally end in v1.5 when PD/Store merged into master branch (Except for the java-client).
hugegraph
API Changes
- feat(api&core): in oltp apis, add statistics info and support full info about vertices and edges (#2262)
- feat(api): support embedded arthas agent in hugegraph-server (#2278,#2337)
- feat(api): support metric API Prometheus format & add statistic metric api (#2286)
- feat(api-core): support label & property filtering for both edge and vertex & support kout dfs mode (#2295)
- feat(api): support recording slow query log (#2327)
Feature Changes
- feat: support task auto manage by server role state machine (#2130)
- feat: support parallel compress snapshot (#2136)
- feat: use an enhanced CypherAPI to refactor it (#2143)
- feat(perf): support JMH benchmark in HG-test module (#2238)
- feat: optimising adjacency edge queries (#2242)
- Feat: IP white list (#2299)
- feat(cassandra): adapt cassandra from 3.11.12 to 4.0.10 (#2300)
- feat: support Cassandra with docker-compose in server (#2307)
- feat(core): support batch+parallel edges traverse (#2312)
- feat: adapt Dockerfile for new project structur (#2344)
- feat(server):swagger support auth for standardAuth mode by (#2360)
- feat(core): add IntMapByDynamicHash V1 implement (#2377)
Bug Fix
- fix: transfer add_peer/remove_peer command to leader (#2112)
- fix query dirty edges of a vertex with cache (#2166)
- fix exception of vertex-drop with index (#2181)
- fix: remove dup ‘From’ in filterExpiredResultFromFromBackend (#2207)
- fix: jdbc ssl mode parameter redundant (#2224)
- fix: error when start gremlin-console with sample script (#2231)
- fix(core): support order by id (#2233)
- fix: update ssl_mode value (#2235)
- fix: optimizing ClassNotFoundException error message for MYSQL (#2246)
- fix: asf invalid notification scheme ‘discussions_status’ (#2247)
- fix: asf invalid notification scheme ‘discussions_comment’ (#2250)
- fix: incorrect use of ‘NO_LIMIT’ variable (#2253)
- fix(core): close flat mapper iterator after usage (#2281)
- fix(dist): avoid var PRELOAD cover environmnet vars (#2302)
- fix: base-ref/head-ref missed in dependency-review on master (#2308)
- fix(core): handle schema Cache expandCapacity concurrent problem (#2332)
- fix: in wait-storage.sh, always wait for storage with default rocksdb (#2333)
- fix(api): refactor/downgrade record logic for slow log (#2347)
- fix(api): clean some code for release (#2348)
- fix: remove redirect-to-master from synchronous Gremlin API (#2356)
- fix HBase PrefixFilter bug (#2364)
- chore: fix curl failed to request https urls (#2378)
- fix(api): correct the vertex id in the edge-existence api (#2380)
- fix: github action build docker image failed during the release 1.2 process (#2386)
- fix: TinkerPop unit test lack some lables (#2387)
Option Changes
- feat(dist): support pre-load test graph data in docker container (#2241)
Other Changes
- refact: use standard UTF-8 charset & enhance CI configs (#2095)
- move validate release to hugegraph-doc (#2109)
- refact: use a slim way to build docker image on latest code & support zgc (#2118)
- chore: remove stage-repo in pom due to release done & update mail rule (#2128)
- doc: update issue template & README file (#2131)
- chore: cmn algorithm optimization (#2134)
- add github token for license check comment (#2139)
- chore: disable PR up-to-date in branch (#2150)
- refact(core): remove lock of globalMasterInfo to optimize perf (#2151)
- chore: async remove left index shouldn’t effect query (#2199)
- refact(rocksdb): clean & reformat some code (#2200)
- refact(core): optimized batch removal of remaining indices consumed by a single consumer (#2203)
- add com.janeluo.ikkanalyzer dependency to core model (#2206)
- refact(core): early stop unnecessary loops in edge cache (#2211)
- doc: update README & add QR code (#2218)
- chore: update .asf.yaml for mail rule (#2221)
- chore: improve the UI & content in README (#2227)
- chore: add pr template (#2234)
- doc: modify ASF and remove meaningless CLA (#2237)
- chore(dist): replace wget to curl to download swagger-ui (#2277)
- Update StandardStateMachineCallback.java (#2290)
- doc: update README about start server with example graph (#2315)
- README.md tiny improve (#2320)
- doc: README.md tiny improve (#2331)
- refact: adjust project structure for merge PD & Store[Breaking Change] (#2338)
- chore: disable raft test in normal PR due to timeout problem (#2349)
- chore(ci): add stage profile settings (#2361)
- refact(api): update common 1.2 & fix jersey client code problem (#2365)
- chore: move server info into GlobalMasterInfo (#2370)
- chore: reset hugegraph version to 1.2.0 (#2382)
hugegraph-computer
Feature Changes
- feat: implement fast-failover for MessageRecvManager and DataClientManager (#243)
- feat: implement parallel send data in load graph step (#248)
- feat(k8s): init operator project & add webhook (#259, #263)
- feat(core): support load vertex/edge snapshot (#269)
- feat(k8s): Add MinIO as internal(default) storage (#272)
- feat(algorithm): support random walk in computer (#274, #280)
- feat: use ‘foreground’ delete policy to cancel k8s job (#290)
Bug Fix
- fix: superstep not take effect (#237)
- fix(k8s): modify inconsistent apiGroups (#270)
- fix(algorithm): record loop is not copied (#276)
- refact(core): adaptor for common 1.2 & fix a string of possible CI problem (#286)
- fix: remove okhttp1 due to conflicts risk (#294)
- fix(core): io.grpc.grpc-core dependency conflic (#296)
Option Changes
- feat(core): isolate namespace for different input data source (#252)
- refact(core): support auth config for computer task (#265)
Other Changes
- remove apache stage repo & update notification rule (#232)
- chore: fix empty license file (#233)
- chore: enhance mailbox settings & enable require ci (#235)
- fix: typo errors in start-computer.sh (#238)
- [Feature-241] Add PULL_REQUEST_TEMPLATE (#242, #257)
- chore: change etcd url only for ci (#245)
- doc: update readme & add QR code (#249)
- doc(k8s): add building note for missing classes (#254)
- chore: reduce mail to dev list (#255)
- add: dependency-review (#266)
- chore: correct incorrect comment (#268)
- refactor(api): ListValue.getFirst() replaces ListValue.get(0) (#282)
- Improve: Passing workerId to WorkerStat & Skip wait worker close if master executes failed (#292)
- chore: add check dependencies (#293)
- chore(license): update license for 1.2.0 (#299)
API Changes
- feat(client): support edgeExistence api (#544)
- refact(client): update tests for new OLTP traverser APIs (#550)
Feature Changes
- feat(spark): support spark-sink connector for loader (#497)
- feat(loader): support kafka as datasource (#506)
- feat(client): support go client for hugegraph (#514)
- feat(loader): support docker for loader (#530)
- feat: update common version and remove jersey code (#538)
Bug Fix
- fix: convert numbers to strings (#465)
- fix: hugegraph-spark-loader shell string length limit (#469)
- fix: spark loader meet Exception: Class is not registered (#470)
- fix: spark loader Task not serializable (#471)
- fix: spark with loader has dependency conflicts (#480)
- fix: spark-loader example schema and struct mismatch (#504)
- fix(loader): error log (#499)
- fix: checkstyle && add suppressions.xml (#500)
- fix(loader): resolve error in loader script (#510)
- fix: base-ref/head-ref missed in dependency-check-ci on branch push (#516, #551)
- fix yarn network connection on linux/arm64 arch (#519)
- fix(hubble): drop-down box could not display all options (#535)
- fix(hubble): build with node and yarn (#543)
- fix(loader): loader options (#548)
- fix(hubble): parent override children dep version (#549)
- fix: exclude okhttp1 which has different groupID with okhttp3 (#555)
- fix: github action build docker image failed (#556, #557)
- fix: build error with npm not exist & tiny improve (#558)
Option Changes
- set default data when create graph (#447)
Other Changes
- chore: remove apache stage repo & update mail rule (#433, #474, #479)
- refact: clean extra store file in all modules (#434)
- chore: use fixed node.js version 16 to avoid ci problem (#437, #441)
- chore(hubble): use latest code in Dockerfile (#440)
- chore: remove maven plugin for docker build (#443)
- chore: improve spark parallel (#450)
- doc: fix build status badge link (#455)
- chore: keep hadoop-hdfs-client and hadoop-common version consistent (#457)
- doc: add basic contact info & QR code in README (#462, #475)
- chore: disable PR up-to-date in branch (#473)
- chore: auto add pr auto label by path (#466, #528)
- chore: unify the dependencies versions of the entire project (#478)
- chore(deps): bump async, semver, word-wrap, browserify-sign in hubble-fe (#484, #491, #494, #529)
- chore: add pr template (#498)
- doc(hubble): add docker-compose to start with server (#522)
- chore(ci): add stage profile settings (#536)
- chore(client): increase the api num as the latest server commit + 10 (#546)
- chore(spark): install hugegraph from source (#552)
- doc: adjust docker related desc in readme (#559)
- chore(license): update license for 1.2 (#560, #561)
hugegraph-commons
Feature Changes
- feat(common): replace jersey dependencies with OkHttp (Breaking Change) (#133)
Bug Fix
- fix(common): handle spring-boot2/jersey dependency conflicts (#131)
- fix: Assert.assertThrows() should check result of exceptionConsumer (#135)
- fix(common): json param convert (#137)
Other Changes
- refact(common): add more construction methods for convenient (#132)
- add: dependency-review (#134)
- refact(common): rename jsonutil to avoid conflicts with server (#136)
- doc: update README for release (#138)
- update licence (#139)
Release Details
Please check the release details in each repository:
10.5 - HugeGraph 1.0.0 Release Notes
OLTP API & Client Changes
API Changes
- feat(api): support hot set trace through /exception/trace API.
- feat(api): support query by Cypher language.
- feat(api): support swagger UI to viewing API.
Client Changes
- feat(client) support Cypher query API.
- refact(client): change ’limit’ type from long to int.
- feat(client): server bypass for hbase writing (Beta).
Core & Server
Feature Changes
- feat: support Java 11.
- feat(core): support adamic-adar & resource-allocation algorithms.
- feat(hbase): support hash rowkey & pre-init tables.
- feat(core): support query by Cypher language.
- feat(core): support automatic management and fail-over for cluster role.
- feat(core): support 16 OLAP algorithms, like: LPA, Louvain, PageRank, BetweennessCentrality, RingsDetect.
- feat: prepare for Apache release.
Bug Fix
- fix(core): can’t query edges by multi labels + properties.
- fix(core): occasionally NoSuchMethodError Relations().
- fix(core): limit max depth for cycle detection.
- fix(core): traversal contains Tree step has different result.
- fix edge batch update error.
- fix unexpected task status.
- fix(core): edge cache not clear when update or delete associated vertex.
- fix(mysql): run g.V() is error when it’s MySQL backend.
- fix: close exception and server-info EXPIRED_INTERVAL.
- fix: export ConditionP.
- fix: query by within + Text.contains.
- fix: schema label race condition of addIndexLabel/removeIndexLabel.
- fix: limit admin role can drop graph.
- fix: ProfileApi url check & add build package to ignore file.
- fix: can’t shut down when starting with exception.
- fix: Traversal.graph is empty in StepStrategy.apply() with count().is(0).
- fix: possible extra comma before where statement in MySQL backend.
- fix: JNA UnsatisfiedLinkError for Apple M1.
- fix: start RpcServer NPE & args count of ACTION_CLEARED error & example error.
- fix: rpc server not start.
- fix: User-controlled data in numeric cast & remove word dependency.
- fix: closing iterators on errors for Cassandra & Mysql.
Option Changes
- move
raft.endpoint option from graph scope to server scope.
Other Changes
- refact(core): enhance schema job module.
- refact(raft): improve raft module & test & install snapshot and add peer.
- refact(core): remove early cycle detection & limit max depth.
- cache: fix assert node.next==empty.
- fix apache license conflicts: jnr-posix and jboss-logging.
- chore: add logo in README & remove outdated log4j version.
- refact(core): improve CachedGraphTransaction perf.
- chore: update CI config & support ci robot & add codeQL SEC-check & graph option.
- refact: ignore security check api & fix some bugs & clean code.
- doc: enhance CONTRIBUTING.md & README.md.
- refact: add checkstyle plugin & clean/format the code.
- refact(core): improve decode string empty bytes & avoid array-construct columns in BackendEntry.
- refact(cassandra): translate ipv4 to ipv6 metrics & update cassandra dependency version.
- chore: use .asf.yaml for apache workflow & replace APPLICATION_JSON with TEXT_PLAIN.
- feat: add system schema store.
- refact(rocksdb): update rocksdb version to 6.22 & improve rocksdb code.
- refact: update mysql scope to test & clean protobuf style/configs.
- chore: upgrade Dockerfile server to 0.12.0 & add editorconfig & improve ci.
- chore: upgrade grpc version.
- feat: support updateIfPresent/updateIfAbsent operation.
- chore: modify abnormal logs & upgrade netty-all to 4.1.44.
- refact: upgrade dependencies & adopt new analyzer & clean code.
- chore: improve .gitignore & update ci configs & add RAT/flatten plugin.
- chore(license): add dependencies-check ci & 3rd-party dependency licenses.
- refact: Shutdown log when shutdown process & fix tx leak & enhance the file path.
- refact: rename package to apache & dependency in all modules (Breaking Change).
- chore: add license checker & update antrun plugin & fix building problem in windows.
- feat: support one-step script for apache release v1.0.0 release.
Computer (OLAP)
Algorithm Changes
- feat: implement page-rank algorithm.
- feat: implement wcc algorithm.
- feat: implement degree centrality.
- feat: implement triangle_count algorithm.
- feat: implement rings-detection algorithm.
- feat: implement LPA algorithm.
- feat: implement kcore algorithm.
- feat: implement closeness centrality algorithm.
- feat: implement betweenness centrality algorithm.
- feat: implement cluster coefficient algorithm.
- feat: init module computer-core & computer-algorithm & etcd dependency.
- feat: add Id as base type of vertex id.
- feat: init Vertex/Edge/Properties & JsonStructGraphOutput.
- feat: load data from hugegraph server.
- feat: init basic combiner, Bsp4Worker, Bsp4Master.
- feat: init sort & transport interface & basic FileInput/Output Stream.
- feat: init computation & ComputerOutput/Driver interface.
- feat: init Partitioner and HashPartitioner
- feat: init Master/WorkerService module.
- feat: init Heap/LoserTree sorting.
- feat: init rpc module.
- feat: init transport server, client, en/decode, flowControl, heartbeat.
- feat: init DataDirManager & PointerCombiner.
- feat: init aggregator module & add copy() and assign() methods to Value class.
- feat: add startAsync and finishAsync on client side, add onStarted and onFinished on server side.
- feat: init store/sort module.
- feat: link managers in worker sending end.
- feat: implement data receiver of worker.
- feat: implement StreamGraphInput and EntryInput.
- feat: add Sender and Receiver to process compute message.
- feat: add seqfile fromat.
- feat: add ComputeManager.
- feat: add computer-k8s and computer-k8s-operator.
- feat: add startup and make docker image code.
- feat: sort different type of message use different combiner.
- feat: add HDFS output format.
- feat: mount config-map and secret to container.
- feat: support java11.
- feat: support partition concurrent compute.
- refact: abstract computer-api from computer-core.
- refact: optimize data receiving.
- fix: release file descriptor after input and compute.
- doc: add operator deploy readme.
- feat: prepare for Apache release.
- feat(loader): support use SQL to construct graph.
- feat(loader): support Spark-Loader mode(include jdbc source).
- feat(loader): support Flink-CDC mode.
- fix(loader): fix NPE when loading ORC data.
- fix(loader): fix schema is not cached with Spark/Flink mode.
- fix(loader): fix json deserialize error.
- fix(loader): fix jackson conflicts & missing dependencies.
- feat(hubble): supplementary algorithms UI.
- feat(hubble): support highlighting and hints for Gremlin text.
- feat(hubble): add docker-file for hubble.
- feat(hubble): display packaging log output progress while building.
- fix(hubble): fix port-input placeholder UI.
- feat: prepare for Apache release.
Commons (common,rpc)
- feat: support assert-throws method returning Future.
- feat: add Cnm and Anm to CollectionUtil.
- feat: support custom content-type.
- feat: prepare for Apache release.
Release Details
Please check the release details in each repository:
11 -
Contributor Agreement
Individual Contributor exclusive License Agreement
(including the TRADITIONAL PATENT LICENSE OPTION)
Thank you for your interest in contributing to HugeGraph’s all projects (“We” or “Us”).
The purpose of this contributor agreement (“Agreement”) is to clarify and document the rights granted by contributors to Us. To make this document effective, please follow the comment of GitHub CLA-Assistant when submitting a new pull request.
How to use this Contributor Agreement
If You are an employee and have created the Contribution as part of your employment, You need to have Your employer approve this Agreement or sign the Entity version of this document. If You do not own the Copyright in the entire work of authorship, any other author of the Contribution should also sign this – in any event, please contact Us at hugegraph@googlegroups.com
1. Definitions
“You” means the individual Copyright owner who Submits a Contribution to Us.
“Contribution” means any original work of authorship, including any original modifications or additions to an existing work of authorship, Submitted by You to Us, in which You own the Copyright.
“Copyright” means all rights protecting works of authorship, including copyright, moral and neighboring rights, as appropriate, for the full term of their existence.
“Material” means the software or documentation made available by Us to third parties. When this Agreement covers more than one software project, the Material means the software or documentation to which the Contribution was Submitted. After You Submit the Contribution, it may be included in the Material.
“Submit” means any act by which a Contribution is transferred to Us by You by means of tangible or intangible media, including but not limited to electronic mailing lists, source code control systems, and issue tracking systems that are managed by, or on behalf of, Us, but excluding any transfer that is conspicuously marked or otherwise designated in writing by You as “Not a Contribution.”
“Documentation” means any non-software portion of a Contribution.
2. License grant
2.1 Copyright license to Us
Subject to the terms and conditions of this Agreement, You hereby grant to Us a worldwide, royalty-free, Exclusive, perpetual and irrevocable (except as stated in Section 8.2) license, with the right to transfer an unlimited number of non-exclusive licenses or to grant sublicenses to third parties, under the Copyright covering the Contribution to use the Contribution by all means, including, but not limited to:
- publish the Contribution,
- modify the Contribution,
- prepare derivative works based upon or containing the Contribution and/or to combine the Contribution with other Materials,
- reproduce the Contribution in original or modified form,
- distribute, to make the Contribution available to the public, display and publicly perform the Contribution in original or modified form.
2.2 Moral rights
Moral Rights remain unaffected to the extent they are recognized and not waivable by applicable law. Notwithstanding, You may add your name to the attribution mechanism customary used in the Materials you Contribute to, such as the header of the source code files of Your Contribution, and We will respect this attribution when using Your Contribution.
2.3 Copyright license back to You
Upon such grant of rights to Us, We immediately grant to You a worldwide, royalty-free, non-exclusive, perpetual and irrevocable license, with the right to transfer an unlimited number of non-exclusive licenses or to grant sublicenses to third parties, under the Copyright covering the Contribution to use the Contribution by all means, including, but not limited to:
- publish the Contribution,
- modify the Contribution,
- prepare derivative works based upon or containing the Contribution and/or to combine the Contribution with other Materials,
- reproduce the Contribution in original or modified form,
- distribute, to make the Contribution available to the public, display and publicly perform the Contribution in original or modified form.
This license back is limited to the Contribution and does not provide any rights to the Material.
3. Patents
3.1 Patent license
Subject to the terms and conditions of this Agreement You hereby grant to Us and to recipients of Materials distributed by Us a worldwide, royalty-free, non-exclusive, perpetual and irrevocable (except as stated in Section 3.2) patent license, with the right to transfer an unlimited number of non-exclusive licenses or to grant sublicenses to third parties, to make, have made, use, sell, offer for sale, import and otherwise transfer the Contribution and the Contribution in combination with any Material (and portions of such combination). This license applies to all patents owned or controlled by You, whether already acquired or hereafter acquired, that would be infringed by making, having made, using, selling, offering for sale, importing or otherwise transferring of Your Contribution(s) alone or by combination of Your Contribution(s) with any Material.
3.2 Revocation of patent license
You reserve the right to revoke the patent license stated in section 3.1 if We make any infringement claim that is targeted at your Contribution and not asserted for a Defensive Purpose. An assertion of claims of the Patents shall be considered for a “Defensive Purpose” if the claims are asserted against an entity that has filed, maintained, threatened, or voluntarily participated in a patent infringement lawsuit against Us or any of Our licensees.
4. License obligations by Us
We agree to (sub)license the Contribution or any Materials containing, based on or derived from your Contribution under the terms of any licenses the Free Software Foundation classifies as Free Software License and which are approved by the Open Source Initiative as Open Source licenses.
More specifically and in strict accordance with the above paragraph, we agree to (sub)license the Contribution or any Materials containing, based on or derived from the Contribution only in accordance with our licensing policy available at: http://www.apache.org/licenses/LICENSE-2.0.
In addition, We may use the following licenses for Documentation in the Contribution: GFDL-1.2 (including any right to adopt any future version of a license).
We agree to license patents owned or controlled by You only to the extent necessary to (sub)license Your Contribution(s) and the combination of Your Contribution(s) with the Material under the terms of any licenses the Free Software Foundation classifies as Free Software licenses and which are approved by the Open Source Initiative as Open Source licenses..
5. Disclaimer
THE CONTRIBUTION IS PROVIDED “AS IS”. MORE PARTICULARLY, ALL EXPRESS OR IMPLIED WARRANTIES INCLUDING, WITHOUT LIMITATION, ANY IMPLIED WARRANTY OF SATISFACTORY QUALITY, FITNESS FOR A PARTICULAR PURPOSE AND NON-INFRINGEMENT ARE EXPRESSLY DISCLAIMED BY YOU TO US AND BY US TO YOU. TO THE EXTENT THAT ANY SUCH WARRANTIES CANNOT BE DISCLAIMED, SUCH WARRANTY IS LIMITED IN DURATION AND EXTENT TO THE MINIMUM PERIOD AND EXTENT PERMITTED BY LAW.
6. Consequential damage waiver
TO THE MAXIMUM EXTENT PERMITTED BY APPLICABLE LAW, IN NO EVENT WILL YOU OR WE BE LIABLE FOR ANY LOSS OF PROFITS, LOSS OF ANTICIPATED SAVINGS, LOSS OF DATA, INDIRECT, SPECIAL, INCIDENTAL, CONSEQUENTIAL AND EXEMPLARY DAMAGES ARISING OUT OF THIS AGREEMENT REGARDLESS OF THE LEGAL OR EQUITABLE THEORY (CONTRACT, TORT OR OTHERWISE) UPON WHICH THE CLAIM IS BASED.
7. Approximation of disclaimer and damage waiver
IF THE DISCLAIMER AND DAMAGE WAIVER MENTIONED IN SECTION 5. AND SECTION 6. CANNOT BE GIVEN LEGAL EFFECT UNDER APPLICABLE LOCAL LAW, REVIEWING COURTS SHALL APPLY LOCAL LAW THAT MOST CLOSELY APPROXIMATES AN ABSOLUTE WAIVER OF ALL CIVIL OR CONTRACTUAL LIABILITY IN CONNECTION WITH THE CONTRIBUTION.
8. Term
8.1 This Agreement shall come into effect upon Your acceptance of the terms and conditions.
8.2 This Agreement shall apply for the term of the copyright and patents licensed here. However, You shall have the right to terminate the Agreement if We do not fulfill the obligations as set forth in Section 4. Such termination must be made in writing.
8.3 In the event of a termination of this Agreement Sections 5, 6, 7, 8 and 9 shall survive such termination and shall remain in full force thereafter. For the avoidance of doubt, Free and Open Source Software (sub)licenses that have already been granted for Contributions at the date of the termination shall remain in full force after the termination of this Agreement.
9 Miscellaneous
9.1 This Agreement and all disputes, claims, actions, suits or other proceedings arising out of this agreement or relating in any way to it shall be governed by the laws of China excluding its private international law provisions.
9.2 This Agreement sets out the entire agreement between You and Us for Your Contributions to Us and overrides all other agreements or understandings.
9.3 In case of Your death, this agreement shall continue with Your heirs. In case of more than one heir, all heirs must exercise their rights through a commonly authorized person.
9.4 If any provision of this Agreement is found void and unenforceable, such provision will be replaced to the extent possible with a provision that comes closest to the meaning of the original provision and that is enforceable. The terms and conditions set forth in this Agreement shall apply notwithstanding any failure of essential purpose of this Agreement or any limited remedy to the maximum extent possible under law.
9.5 You agree to notify Us of any facts or circumstances of which you become aware that would make this Agreement inaccurate in any respect.
12 -
HugeGraph Docs
Quickstart
Config
API
Guides
Query Language
ChangeLogs